Gussofen G1
Gussofen G1
Gussofen G1
- No tags were found...

You also want an ePaper? Increase the reach of your titles
YUMPU automatically turns print PDFs into web optimized ePapers that Google loves.
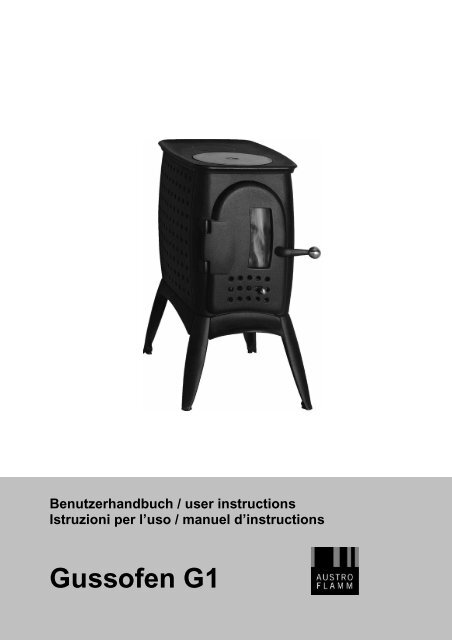
Benutzerhandbuch / manual / manuale / manuelBenutzerhandbuch / user instructionsIstruzioni per l’uso / manuel d’instructions<strong>Gussofen</strong> <strong>G1</strong>
Fig. 1Fig. 2deutsch english italiano françaisAUF – ZU open – closed aperto – chiuso ouvert - ferméLuftschieber air supply Regolazione aria Coulisseau d’entrée d’airdeutsch english italiano françaisInhalt Contents Indice sommaire1. Techn. Daten 1 1. Techn. data 4 1. Dati tecnici 7 1. Caractéristiques 102. Wichtige Informationen 1 2. Important information 4 2. Informazioni importanti 7 2. Infos importantes 103. So bedienen Sie Ihren 3. Correct operation 3. Per un uso corretto della 3. Bien utiliser votreKaminofen richtig 2 of your stove 5 vostra Kaminofen 8 poêle 114. Die wichtigsten 4. The most important 4. Prospetto dei ricambi 4. Principales piècesErsatzteile - Übersicht 3 spare parts - overview 6 principali 9 détachées 12Garantie 13 Guarantee 13 Garanzia 14 Garantie 14
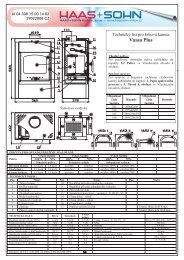
<strong>G1</strong> 1 deutsch1. TECHNISCHE DATENAls <strong>Gussofen</strong> der Bauart 1 ist ein Anschluß an einenbereits mit anderen Öfen und Herden für festeBrennstoffe belegten Schornstein möglich, soferndie Schornsteinbemessung gemäß DIN 4705, Teil 3,dem nicht widerspricht.TECHNISCHE DATENHöheBreiteTiefeGewichtRauchrohrabgang DurchmesserNennwärmeleistung lt. EN 13240Maximale Heizleistung677 mm400 mm595 mm85 kg120 mm6 kW8kW2. WICHTIGE INFORMATIONENKleinste HeizleistungRaumheizvermögen (abhängigvon der Hausisolierung)3 kW48 – 124 m³Abgaswerte für die Mehrfachbelegung des Schornsteinesnach DIN 4705, Teil 3 bzw. zur Bemessungdes Schornsteines nach DIN 4705, Teil 2Abgasmassenstrom geschlossen 6 g/sAbgastemperatur geschlossen 330 °CMindestförderdruck beiNennwärmeleistung (NWL)geschlossen 12 Pabei 0,8facherNWL10 PaDie Informationen in diesem Handbuch sindallgemeiner Natur. Nationale und europäischeNormen, örtliche und baurechtliche Vorschriftensowie feuerpolizeiliche Bestimmungen sindeinzuhalten.Allgemeine Sicherheitshinweisezum Betrieb Ihres Kaminofens• Lesen Sie vor der Inbetriebnahme des Ofens dasgesamte Handbuch gründlich durch und beachten Siedie Warnhinweise.• Für den Transport Ihres Heizgerätes dürfen nurzugelassene Transporthilfen mit ausreichenderTragfähigkeit verwendet werden.• Ihr Heizgerät ist nicht zur Verwendung als Leiteroder Standgerüst geeignet.• Durch den Abbrand von Brennmaterial wirdWärmeenergie frei, die zu einer starken Erhitzung derOberfläche des Heizgerätes, der Türen, der Tür- undBediengriffe, der Türgläser, der Rauchrohre undgegebenenfalls der Frontwand des Heizgerätes führt.Die Berührung dieser Teile ohne entsprechendeSchutzbekleidung oder Hilfsmittel wie z.B. Hitzeschutzhandschuheoder Betätigungsmittel (kalte Hand),ist zu unterlassen.• Machen Sie Ihre Kinder auf diese besondereGefahr aufmerksam und halten Sie sie während desHeizbetriebes vom Heizgerät fern.• Verbrennen Sie ausschließlich das im Kapitel„saubere Verbrennung“ angeführte, genehmigteHeizmaterial.• Das Verbrennen oder Einbringen von leichtbrennbaren oder explosiven Stoffen, wie leereSpraydosen und dgl. in den Brennraum, sowie derenLagerung in unmittelbarer Nähe Ihres Heizgerätes, istwegen Explosionsgefahr strengstens verboten.• Beim Nachheizen sollen keine weiten, oder leichtbrennbaren Kleidungsstücke getragen werden.• Das Abstellen von nicht hitzebeständigenGegenständen auf dem Heizgerät oder in dessenNähe ist verboten.• Legen Sie keine Wäschestücke zum Trocknenauf den Ofen. Auch Wäscheständer oder dgl. müssenin ausreichendem Abstand vom Heizgerät aufgestelltwerden – Brandgefahr.• Der <strong>Gussofen</strong> <strong>G1</strong> ist keine Dauerbrand-Feuerstelle.• Beim Betrieb Ihres Heizgerätes ist dasVerarbeiten von leicht brennbaren und explosivenStoffen im selben oder in anschließenden Räumenverboten.OfenaufstellungEinzuhaltende Sicherheitsabstände(Mindestabstände - siehe auch Typenschild)Fig. 21. Ohne Strahlungsschutzblech oder Konvektionsmantel::a > 800 mm b > 700 mm c > 400 mm2. Mit Strahlungsschutzblech oder Konvektionsmantel:a > 800 mm b > 300 mm c > 300 mm(a - nach vorne im Strahlungsbereich)(b - seitlich)(c - hinten)Bitte beachten Sie, dass der Aufstellungsraum mind.eine Türe / ein Fenster ins Freie aufweist oder miteinem derartigen Raum direkt verbunden sein muss.Andere Feuerstätten und Dunstabzugshauben dürfennicht im Raumluftverbund mit Feuerstätten betriebenwerden.Technische und optische Änderungen, Satz- und Druckfehler vorbehalten.
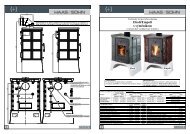
deutsch 2 <strong>G1</strong>BodentragfähigkeitPrüfen Sie vor dem Aufstellen, ob die Tragfähigkeitder Unterkonstruktion dem Gewicht Ihres<strong>Gussofen</strong>s standhält.VerbrennungsluftAls Betreiber müssen Sie für ausreichende Verbrennungsluftsorgen. Bei abgedichteten Fensternund Türen kann es sein, dass die Frischluftzufuhrnicht mehr gewährleistet ist, bzw. das Zugverhaltendes Ofens beeinträchtigt wird. Ggf. muss für einezusätzliche Frischluftzufuhr gesorgt werden. Bittebefragen Sie Ihren Fachhändler.RauchrohranschlußFür den Anschluß der Rauchrohre an denSchornstein gibt es zu Ihrer eigenen Sicherheitstrenge Richtlinien. Ihr Kaminofen-Fachhändlerkennt diese. Beauftragen Sie daher unbedingtIhren Fachhändler mit dem Rauchrohranschluß.3. SO BEDIENEN SIE IHREN GUSSOFEN RICHTIGZugelassene BrennstoffeTrockenes, gut abgelagertes, naturbelassenes Holz(Hartholz bevorzugt), Holzbriketts.Maximale BrennstoffmengeMaximal aufzugebende Brennstoffmenge: ca. 1,6kg Holz oder ca. 1,6 kg Holzbriketts.Größere Brennstoffmengen können zu Überhitzungund Beschädigungen am Ofen führen!Saubere VerbrennungDas Brennholz muß trocken (rel. Holzfeuchte < 15 %)und unbehandelt sein. Außerdem muß die richtigeBrennholzmenge verbrannt werden, um einesaubere, emissionsarme Verbrennung zu erreichen.Richtig Feuer machenBereiten Sie alles zum Anheizen vor –Weichholzspäne, Anzündhilfe (wie z.B. AustroflammAnzünder), Brennholz. Fig. 3 gibt Ihnen eineRichtlinie hinsichtlich der Menge an Heizmaterial.Öffnen Sie den Luftschieber maximal. (siehe Fig. 2„AUF“).Öffnen Sie die Ofentür.Legen Sie 2 – 3 Stk. Anzündhilfen auf den Feuerraumboden.Legen Sie darauf eine handvoll Weichholzspäne.Legen Sie auf diese Späne 1 – 2 ScheiteHolz.Luftschieber regulierenSobald die Holzscheite gut brennen, können Sie mitdem Luftschieber die Heizleistung regulieren(Schieber auf Maximalstellung „AUF“ = maximaleHeizleistung – siehe Fig. 2).Beim Nachlegen gehen Sie prinzipiell wie beimAnheizen vor: beide Luftschieber öffnen, Ofentürevorsichtig öffnen, Holz nachlegen, Türe schließen.Warten Sie, bis das nachgelegte Holz brennt. RegelnSie in der Folge die Heizleistung mit demSekundärluftschieber.Heizen in der ÜbergangszeitIn der Übergangszeit, d.h. bei höheren Außentemperaturen,kann es bei plötzlichem Temperaturanstiegzu Störungen des Schornsteinzuges kommen,so dass die Heizgase nicht vollständig abgezogenwerden. Die Feuerstätte ist dann mit geringerenBrennstoffmengen zu befüllen und bei weitergeöffneter Stellung des Primärluftschiebers/-reglersso zu betrieben, dass der vorhandene Brennstoffschneller (mit Flammenentwicklung) abbrennt unddadurch der Schornsteinzug stabilisiert wird.SymbolabbildungenFig 3: AnzündenZünden Sie nun die Anzündhilfen an. Schließen Siedie Feuerraumtür.
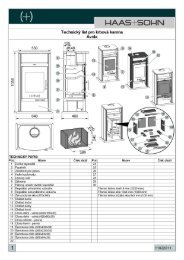
Pallas 3 deutschHinweis bei SchornsteinbrandWird falscher oder zu feuchter Brennstoff verwendet,kann es aufgrund von Ablagerungen im Schornsteinzu einem Schornsteinbrand kommen. VerschließenSie sofort alle Luftöffnungen am Kamin und informierenSie die Feuerwehr. Nach dem Ausbrennendes Schornsteins diesen vom Fachmann auf Rissebzw. Dichtheit überprüfen lassen.4. DIE WICHTIGSTEN ERSATZTEILE - ÜBERSICHTDichtungenBezeichnungNr.-Skizze Artikelnr.Dichtung flach 8 x 2 x 400 mm, 21 710096Dichtung flach 8 x 2 x 81 mm 23 710096Dichtung rund d =10 x 1050 mm 20 710319KeramottBezeichnungNr.-Skizze Artikelnr.<strong>G1</strong> Keramott Boden 3 716213<strong>G1</strong> Keramott Holzfänger 9 716249<strong>G1</strong> Keramott Seite links vorne 8 716215<strong>G1</strong> Keramott Seite links hinten 7 716211<strong>G1</strong> Keramott Rückwand 4 716214<strong>G1</strong> Keramott Seite rechts vorne 6 716247<strong>G1</strong> Keramott Seite rechts hinten 5 716248<strong>G1</strong> FR-Umlenkplatte 1 716054<strong>G1</strong> Vermiculitplatte oben 2 716210Numerierung Keramott = Einbaureihenfolge!SonstigesBezeichnungNr.-Skizze Artikelnr.<strong>G1</strong> Türglas 22 716063Ofenlack -- 650002Austroflamm Anzünder Dose à 100 Stk. -- 640162Glasreiniger 0,5l -- 640070ZubehörBei Ihrem Fachhändler erhalten Sie Bodenplatten aus Glas oder Stahl, Kaminbestecke und Pflegemittel.WICHTIG: Lassen Sie defekte Teile ausschließlich von Ihrem Fachhändler austauschen. Damit istgewährleistet, daß Ihr <strong>Gussofen</strong> sicher und funktionstüchtig ist und bleibt.Die Feuerstätte darf nicht verändert werden.PflegeZur Glasreinigung verwenden Sie bitte ein Spezialprodukt wie Thermohit Glasreiniger. LackierteOberflächen dürfen nur mit einem Tuch (ev. feucht) gereinigt werden. Für Edelstahloberflächen gibt esebenfalls Spezialreiniger.ReinigungDer Ofen, Rauchgaswege und Rauchrohre sollten jährlich – evtl. auch öfter, z.B. nach der Reinigung desSchornsteines – nach Ablagerungen untersucht und ggf. gereinigt werden. Der Schornstein mussebenfalls regelmäßig durch den Schornsteinfeger gereinigt werden. Über die notwendigen Intervalle gibtIhr zuständiger Schornsteinfegermeister Auskunft. Der Ofen sollte jährlich durch einen Fachmannüberprüft werden.
<strong>G1</strong> 4 english1. TECHNICAL DATAAs a stove of construction type 1, it is possible toconnect it to the flue pipe of an existing other stoveor another hearth for solid fuels, as long as thechimney complies with DIN 4705, Part 3.TECHNICAL DATAHeightWidthDepthWeightFlue pipe outlet diameterNominal thermal output (EN 13240)Maximum thermal capacitySmallest heating capacity677 mm400 mm595 mm85 kg120 mm6 kW8 kW3 kWRoom heating capacity (depending onbuilding insulation)48 – 124m³Exhaust values for multiple use of the chimney inaccordance with DIN 4705, Part 3 and for thecalculation of the chimney measurements inaccordance with DIN 4705, Part 2Fluegas mass flow closed 6 g/sFluegas temperature closed 330 °CMinimum feed pressureNominal thermal outputclosedat 0.8 timesn. ther. outp.12 Pa10 Pa2. IMPORTANT INFORMATIONThe installation and operation information given hereis of general nature. National and Europeanstandards, local and building regulations as well asfire prevention laws must be observed during theoperation of the stove.General safety instructions forthe operation of your stove• Thoroughly read the entire manual beforestarting up your stove and observe the cautionnotices.• Your heating unit may not be moved withoutapproved means of transport with sufficient loadbearingcapacity.• Your heating unit is not suitable to be used as astand or as a ladder.• The burning of fuel releases thermal energy thatleads to a substantial heating up of the surface of theheating unit, the doors and operating handlesmounted on the door, door glass, flue pipe and insome cases the front wall of the heating unit. Do nottouch any of these surfaces without respectiveprotective clothing or without the help of accessoriessuch as heat-resistant gloves or a cold hand.• Make your children aware of this particulardanger and keep them at a distance from the heatingunit whenever it is in operation.• Only burn approved fuels and materials listed inthe chapter “Clean Burning”.• The burning or placing of flammable or explosivematerials, such as empty spray cans and such likeinto the firebox as well as the storage of suchmaterials in the immediate vicinity of your heating unitis strictly forbidden due the danger of explosion.• Do not wear loose or flammable clothing whenadding fuel to the fire.• Placing non-heat-resistant objects on theheating unit or in the vicinity of the heating unit isforbidden.• Do not lay laundry onto the stove for drying.Laundry hung up to dry must be kept at a safedistance from the stove because of the danger of fire.• The woodstove <strong>G1</strong> is not suitable for long termheating.• During the operation of your heating unit it isforbidden to use flammable or explosive materials inthe same or an adjacent room to the one in whichyour heating unit is located.Setting up your stoveRequired safety distances (Minimumdistances – see name plate - in Fig. 2)with protection shield or convection claddinga > 800 mm b > 700 mm c > 400 mmwithout protection shield or convection cladding:a > 800 mm b > 300 mm c > 300 mm(a – toward the front in the radiated area)(b – to the side)(c – to the back)Make sure that the room in which the stove is set uphas at least one door or window into the outside or isdirectly adjacent to such a room. Other fireplaces andextractor hoods must not be operated in the sameroom as the stove.Subject to technical and optical modifications. Formatting and printing errors excepted.
english 5 <strong>G1</strong>Floor load capacityMake sure that the load capacity of the supportingconstruction is sufficient to carry the weight of theentire unit, before the heating unit is installed.Combustion airBeing the user of the stove you must take care of asufficient combustion air supply. Sealed-up windowsand doors may not allow a sufficient combustion airsupply or disturb the draught behaviour of your stove.Please ensure the additional supply of freshcombustion air if necessary. For details pleaseconsult your specialist retailer..Stove pipe connectionFor your own safety stringent laws apply forconnecting the stove pipes to the chimney. Yourprofessional dealer or distributor knows these laws.Please have your certified retailer carry out theconnection of your stove.3. CORRECT OPERATION OF YOUR STOVEFigure 3: Igniting the FireApproved fuelsDry, well cured and natural wood (hardwoodpreferred), wood briquettes.Light the ignition aid. Close the firebox door.Maximum amount of fuelMaximum amount of fuel to be added: appr. 1,6 kgwood or appr. 1,6 kg wood briquettes. Largeramounts of fuel can lead to overheating and thusdamage the stove.Clean burningThe wood must be dry (relative wood moisture< 15%) and untreated. The right amount of woodmust be burned in order to ensure a clean fire thatreleases only small amounts of emissions.Making a firePrepare everything you need for starting the firesoftwood chips, igniter materials (such as Austroflammlighter), wood. Figure 1 provides a good overview ofthe quantity of the materials you will need.Open the air all the way. See figure 2.Open the stove door.Put ignition aid on the floor of the firebox.Lay soft wood chips onto the paper.Lay one or two logs of wood on the wood chips.Close the AirAs soon as the wood logs are burning well, youcan regulate the heating capacity with the airslider. (slider set to the maximum (“AUF”) settingproduces maximum heat – see figure 2.)When adding wood to the fire, follow the sameprocedure as when igniting the fire: Opensecondary air, carefully open firebox door, laywood on the fire, close the firebox door.Wait until the added wood catches fire and isburning. Subsequently regulate the fire with thesecondary air supply.symbol figures
<strong>G1</strong> 6 englishHeating in between seasonsHeating the stove in between seasons, when theoutside temperatures are higher, the flue gases maynot be able to escape completely and this may lead todisturbances in the chimney draught, especially if thetemperatures are rising suddenly. The stove has tobe charged with less wood and the primary air has tobe increased so that the wood can burn down faster(with visible flames) and thus the chimney flue canstabilize.Chimney fireA Chimney fire may occur, due to sooting anddeposits in the chimney, if wrong or humid fuel isused. Close all air inlets on the fireplace/chimneyimmediately and call the fire brigade. Please have anexpert inspect your chimney for cracks and airtightnessafter the burning out of the chimney.4. THE MOST IMPORTANT SPARES—OVERVIEWGasketsDescription Nr. drawing Part numberFlat gasket 8 x 2 x 400 mm 21 710096Flat gasket 8 x 2 x 81 mm 23 710096Round gasket d= 10 x 1100 mm 20 710319KeramottDescription Nr. drawing Part number<strong>G1</strong> keramott base 3 716213<strong>G1</strong> keramott wood retainer 9 716249<strong>G1</strong> keramott lateral front left 8 716215<strong>G1</strong> keramott lateral rear left 7 716211<strong>G1</strong> keramott rear 4 716214<strong>G1</strong> keramott lateral front right 6 716247<strong>G1</strong> keramott lateral rear right 5 716248<strong>G1</strong> baffle plate 1 716054<strong>G1</strong> vermiculite baffle plate 2 716210Keramott numbering = order of installationOther partsDescription Nr. drawing Part number<strong>G1</strong> door glass 22 716063Stove lacquer -- 650002Igniter -- 640162Glass cleaner ½ litre -- 640070AccessoriesYou can obtain floor plates made of glass or steel, hearth accessories or care products from your certifieddealer.IMPORTANT: Have defective parts replaced by your certified dealer only. This will guarantee that yourstove functions properly and safely.The fireplace must not be amended.MaintenanceTo clean the glass, please use a specialized product such as Thermohit glass cleaner. Lacqueredsurfaces are to be cleaned only with a cloth (may be damp). Special cleaning agents should also be usedfor stainless steel surfaces.CleaningThe stove, flue outlets and smoke pipes should be cleaned and inspected for deposits every year – ifnecessary more often, e.g. after the cleaning of the chimney. The chimney also has to be cleanedregularly by the chimneysweeper. Your chimneysweeper will inform you of the necessary inspectionintervals. An expert should inspect the stove annually.
<strong>G1</strong> 7 italiano1. DATI TECNICIQuesta stufa-caminetto (Kaminofen del tipo Bauart1) è adatta per essere collegata ad una cannafumaria già utilizzata per altre stufe o fonti di caloreche impiegano combustibili solidi, se le dimensionidella canna fumaria lo consentono (norma DIN4705, Parte 3).DATI TECNICIAltezzaLarghezzaProfonditàPesoDiametro uscita fumiRendimento nominale (EN 13240)Rendimento massimoRendimento minimo677 mm400 mm595 mm85 kg120 mm6 kW8 kW3kWVolume riscaldabile (m 3 ) (dipende dalle condizionidi isolamento dell'abitazione)48 – 124m 3Valori delle emissioni per allacciamento multiploalla canna fumaria (secondo norma DIN 4705,Parte 3) e per il calcolo delle dimensioni dellacanna fumaria (secondo DIN 4705, Parte 2)Flusso fumi chiuso 6 g/sTemperatura fumi chiuso 330 °CDepressione minimacon rendimentochiusocon r.nom. di0,8 volte12 Pa10 Pa2. INFORMAZIONI IMPORTANTIQuesto manuale contiene informazioni generali.Devone essere rispettate sia le norme nazionale eeuropee, le disposizioni locali e le leggi sul ediliziaed anche le disposizioni dei vigili del fuoco.Avvertenze generali e precauzioninell'impiego della Kaminofen• Prima di mettere in funzione la stufa viraccomandiamo di leggere attentamente l'interomanuale che vi fornisce importanti informazioni eavvertimenti.• Per il trasporto della stufa utilizzate mezzi idonei,la cui portata sia sufficiente a sostenerne il peso.• Non utilizzate la stufa come se fosse una scala oun'impalcatura per salirvi sopra.• In seguito alla combustione si libera energiatermica, che provoca un forte riscaldamento dellasuperficie della stufa e del tubo uscita fumi. Fateattenzione quindi ed evitate di toccare componenticome l'antina, la maniglia, le leve di regolazione delleprese d'aria, il vetro ceramico, il tubo di uscita fumi edeventualmente la parte frontale della stufa senza unaprotezione adeguata, ad esempio un guanto o altriutensili (gancio smuovicenere, ”manofredda”).• Istruite i vostri bambini su questi inconvenienti eteneteli lontani dalla stufa quando è accesa.• Utilizzate solo combustibili idonei indicati nelcapitolo „Combustibili adatti“.• Nella camera di combustione non devonoessere infilate e bruciate sostanze facilmenteinfiammabili od esplosive, come bombolette sprayvuote e simili. E’ severamente vietato lasciare talioggetti nelle immediate vicinanze della stufa (pericolodi esplosione).• Mentre si ricarica legna nella stufa accesa èsconsigliato portare capi di abbigliamento chepossano prendere fuoco facilmente.• Non appoggiate oggetti non resistenti al caloresulla stufa o nelle sue immediate vicinanze.• Non mettete ad asciugare biancheria sopra lastufa. Stendibiancheria o simili devono esserecollocati ad una distanza adeguata dalla stufa(pericolo di incendio).• La stufa non e una stufa da tenere in funzioneininterrotamente.• Quando la stufa è in funzione è sconsigliato l’utilizzo di sostanze facilmente infiammabili oesplosive nella stessa stanza o in stanze adiacenti.Installazione della stufaDistanze di sicurezza (distanzeminime) Fig. 21. senza lamiera prottetiva o mantello convettivoa > 800 mm b > 700 mm c > 400 mm2. con lamiera prottetiva o mantello convettivoa > 800 mm b > 300 mm c > 300 mm(a - anteriormente nell’area di irradiazione)(b - lateralmente)(c - posteriormente)Il luogo in cui installate la stufa deve disporre dialmeno una porta / finestra che dia all’esterno oppuredeve essere collegato direttamente ad un ambientecon accesso all’esterno. Non devono essere messi infunzione nella stessa stanza, altre stufe, caminetti oestrattori fumi.Salvo modifiche di carattere tecnico ed estetico o errori di fotocomposizione e stampa.
italiano 8 <strong>G1</strong>Portata del pavimentoPrima di installare la stufa, accertatevi che la strutturasottostante al punto in cui volete sistemarla sia ingrado di sopportarne il peso.Fornimento d'arai frescaIl gestore del focolare deve garantire la fornitura di unsufficiente volume d'aria fresca. In ambienti con portee finestre chiuse ermeticamente la fornitura d'ariafresca non sempre e'garantita. Questo puoinfluenzare il tiraggio del focolare. Eventualmentedeve essere previsto un aflusso d'ariasupplementare. Rivolgetevi al vostro rivenditore perulteriori informazioni.Collegamento del tubo di uscitafumiPer garantire la vostra sicurezza, il collegamento deitubi di uscita fumi alla canna fumaria è regolato daapposite norme. Per l’installazione e il collegamentorivolgetevi quindi al vostro rivenditore, che è aconoscenza di tali disposizioni.3. PER UN USO CORRETTO DELLA VOSTRAKAMINOFENCombustibili adattiLegna naturale e non trattata, secca esufficientemente depositata (preferibilmente legnoresistente/duro), tronchetti di legno pressato emattonelle di lignite.Quantità massime di combustibiliLa massima quantità di combustibile consigliata:ca. 1,6 kg di legna oppure ca. 1,6 kg di tronchetti dilegno pressato per volta. Non introducete quantitàeccessive di combustibile per evitare unsurriscaldamento ed un conseguentedanneggiamento della stufa.Combustione ed ecologiaPer ottenere una combustione corretta con un minimodi emissioni la legna deve essere secca (< 15 % diumidità relativa) e non trattata e non si devonosuperare le quantità di combustibile consigliate. E'assolutamente vietato bruciare rifiuti (sopratutto inplastica).Per una corretta accensionePreparate tutto l'occorrente per accendere la stufa:trucioli di legno morbido , accendifuoco (ad es.Thermohit), carta (non patinata), e legna..Aprite al massimo la presa d’aria, spostando lalevetta come indicato nella fig. 2 “AUF / aperto”.Aprite ora l'antina.Disponete dapprima della carta (non patinata) sulfondo della camera di combustione, sopra di essauna manciata di trucioli di legno dolce e poi 1 o 2ceppi di legna.lIl. 3 : AccensioneDopo aver dato fuoco alla carta, chiudete l'antina.Chiusura presa d’l'ariaQuando anche i ceppi avranno incominciato aprendere ben fuoco, potete regolare il rendimentodella stufa con la levetta dell'aria secondaria(portandola nella posizione massima otterrete ilmassimo del rendimento).Questa operazione va ripetuta per ogni strato di legnache vorrete aggiungere: aprite la presa d'aria, poil'antina (facendo attenzione), aggiungete la legna erichiudete l'antina. Attendete fino a quando anche lanuova legna abbia preso ben fuoco, regolando infineil rendimento con la levetta dell'aria secondaria.Spiegazione dei simboli
Pallas 9 italianoIl riscaldamento durante le mezzestagioniSe accendete la stufa durante le mezze stagioni,quando le temperature sono più elevate, possonosussistere condizioni di tiraggio sfavorevolli in modotale da non evacuare il fumo interamente,specialmente se le temperature si alzano in modorepentino. Consigliamo quindi di caricare meno legnae di tenere la presa d'aria aperta del tutto perpermettere una combustione più rapida, con unafiamma più alta. In tal modo il tiraggio della cannafumaria si stabilisce.4. PROSPETTO DEI RICAMBI PRINCIPALIGuarnizioniDenominazione N. su dis. N. art.Guarnizione piatta 8 x 2 x 400 mm 21 710096Guarnizione piatta 8 x 2 x 81 mm 23 710096Guarnizione tonda d=10 x 1050 mm 20 710319Autocombustione della cannafumariaFuliggine e depositi causati da legna inadeguata otroppo umida possono provocare l'autocombustionedella canna fumaria. Chiudete immediatamente tuttele prese d'aria presenti su stufa e camino e chiamate ivigili del fuoco. Fate poi ispezionare la vostra cannafumaria da personale specializzato che ne verifichi lecrepe e la tenuta.KeramottDenominazione N. su dis. N. art.<strong>G1</strong> keramott di fondo 3 716213<strong>G1</strong> keramott fermalegna 9 716249<strong>G1</strong> keramott laterale sinistra anteriore 8 716215<strong>G1</strong> keramott laterale sinistra posteriore 7 716211<strong>G1</strong> keramott posteriore 4 716214<strong>G1</strong> keramott laterale destra anteriore 6 716247<strong>G1</strong> keramott laterale destra posteriore 5 716248<strong>G1</strong> tagliafiamme 1 716054<strong>G1</strong> vermiculite 2 716210Numerazione dei refrattari = ordine da seguire per ilmontaggio!Altre partiDenominazione N. su dis. N. art.Vetroceramico antina <strong>G1</strong> 22 716063Vernice -- 650002Accendifuoco -- 640162Detergente vetroceramico 0,5 l -- 640070AccessoriPresso il vostro rivenditore potete acquistare basi di protezione in vetro o acciaio, vari utensili per la stufaed prodotti per la cura e pulizia.IMPORTANTE: per la sostituzione di parti difettose rivolgetevi esclusivamene al vostro rivenditore diKaminofen, in questo modo avrete la garanzia che la vostra stufa continuerà a funzionare in modocorretto e sicuro.Il focolalere non deve essere modificato.PuliziaPer la pulizia del vetro ceramico dell'antina utilizzate gli appositi prodotti in vendita presso i rivenditori distufe (ad es. Thermohit). Le superfici laccate della stufa vanno pulite solamente con un panno(eventualmente umido). Anche le superfici in acciaio inox vanno trattate con appositi detergenti.Stufa, uscite fumi e tubi dovrebbero essere sottoposti ad un ispezione ed una pulizia annuale- senecessario questo puo avenire anche piu spesso , per esempio in seguito alla manutenzione della cannafumaria, che dev'essere anch'essa eseguita periodicamente dal servizio spazzacamino. Sarà proprio ilvostro spazzacamino ad indicarvi i regolari intervalli per la manutenzione. Personale specializzatodovrebbe ispezionare la stufa annualmente.
<strong>G1</strong> 10 français1. CARACTÉRISTIQUES TECHNIQUESLe poêle de type 1 peut être raccordé à unecheminée déjà occupée par d’autres poêles oucuisinières à combustibles solides, à conditiontoutefois que les dimensions de la cheminée selonla norme DIN 4705 Partie 3 l’autorisent.CARACTÉRISTIQUES TECHNIQUESHauteurLargeurProfondeurPoidsDiamètre à la base du carneauPuissance calorifique selon EN 13240Puissance calorifique maximalePuissance calorifique minimaleVolume chauffé (selonl’isolation du bâtiment)677 mm400 mm595 mm85 kg120 mm6 kW8 kW3 kW48 – 124m³Caractéristiques des gaz de combustion en vue del’installation de plusieurs appareils sur unecheminée selon DIN 4705 Partie 3 ou dudimensionnement de la cheminée selon DIN 4705Partie 2Débit de gaz de fermé 6 g/scombustionTempérature des gaz fermé 330 °Cde combustionPression d’extractionminimale à la puissancenominalefermé 12 Paà 0,8 fois lapuissancenominale10 Pa2. INFORMATIONS IMPORTANTESLes informationes dans ce manuel, sont présentésd’une façon générale. Les normes nationales eteuropéennes, les directives de constructionrégionales ainsi que les accords concernant lasécurité incendie sont à respecter.Remarques générales concernantla sécurité• Lisez attentivement l’ensemble du manuel avantde mettre le poêle en service et respectez lesavertissements relatifs à la sécurité.• Le transport de l’appareil doit toujours êtreeffectué au moyen d’un appareillage de capacitésuffisante.• Le poêle ne doit pas être utilisé commemarchepied ou estrade.• La combustion libère de l’énergie thermique quientraîne un fort échauffement de la surface del’appareil, des portes, des poignées, des vitres desportes, du carneau et parfois de la face avant del’appareil. Ne touchez ces éléments qu’avec uneprotection adéquate, par exemple des gants isolantsou un instrument d’actionnement.• Expliquez bien le risque de brûlures à vosenfants et tenez-les loin de l’appareil lorsque celui-cifonctionne.• Utilisez toujours le combustible autorisé selon lechapitre « Combustion non polluante ».• La combustion ou l’introduction de matières trèsinflammables ou explosives dans le foyer, parexemple de bombes aérosols vides, est strictementinterdite en raison du risque d’explosion, de mêmeque la conservation de tels produits à proximité del’appareil.• Ne rechargez pas le poêle alors que vous portezdes vêtements amples ou en matières inflammables.• Il est interdit de déposer des objets ne résistantpas à la chaleur sur l’appareil ou à proximité.• Ne faites pas sécher de linge sur le poêle.• Les étendages et égouttoirs à linge ou autresdoivent être placés suffisamment loin de l’appareilpour éviter tout risque d’incendie.• Lorsque le poêle est en marche, ne travaillezjamais avec des matières facilement inflammables oucombustibles dans le local où il se trouve ni dans unepièce adjacente.• Le poêle <strong>G1</strong> est un chauffage d'appoint.Installation du poêleDistances de sécurité à respecter(distances minimum – voir également plaqued’identification) (Fig. 2)Sans plaque de protection ou sans manteau deconvectiona > 800 mm b > 700 mm c > 400 mmAvec plaque de protection ou avec manteau deconvection:a > 800 mm b > 300 mm c > 300 mm(a - à l'avant dans espace de rayonnement)(b - sur les côtés)(c - à l'arrière)Attention : le local dans lequel vous installez lepoêle doit être pourvu au minimum d’une porte oud’une fenêtre donnant à l’extérieur, oucommuniquer avec une autre pièce donnant àl’extérieur.Sous réserve de modifications techniques et optiques, ainsi que d'erreurs de composition et d'impression.
français 11 <strong>G1</strong>Capacité portante du solAvant d’installer l’appareil, vérifiez si le sol pourraen supporter le poids.Air de combustionEn tant qu’utilisateur, vous devez faire en sortequ’il y ait suffisamment d’air de combustion. Sitoutes les fenêtres et portes sont ferméeshermétiquement , il se peut que l’entrée d’air fraisne se fasse plus correctement voire même que letirage du poêle en soit affecté. Dans ce cas, unearrivée d’air frais supplémentaire est nécessaire.Merci de vous adresser alors à votre revendeur.Raccordement du carneauPour votre sécurité, des consignes strictes doiventêtre respectées pour le raccordement descarneaux à la cheminée. Votre installateurprofessionnel connaît bien ces règles. Il faut doncimpérativement confier à ce professionnel leraccordement du carneau.3. POUR BIEN UTILISER VOTRE POÊLECombustibles autorisésBois naturel sec et bien conservé, briquettes de bois.Allumez les aides pour l'allumage.Fermez la porte du foyer.Quantité maximale decombustibleAu maximum ca. 1,6 kg de bois ou ca. 1,6 kg debriquettes de bois. N’utilisez pas plus de combustible,sous peine de provoquer une surchauffe quiendommagera le poêle.Combustion non polluanteLe bois doit être sec (humidité relative < 15 %) et nontraité. Il doit être utilisé en quantité adéquate pourobtenir une combustion propre et dégageant peud’émissions.Pour bien faire du feuPréparez tout ce dont vous avez besoin pour allumer lepoêle : copeaux de bois tendre, allume-feu, papier nonenduit, bois de chauffage. La Figure 3 indique la bonnequantité de matériaux à disposer dans le foyer.Ouvrez au maximum les arrivées d’entrée d’air, endéplaçant les deux coulisseaux (voir la Figure 2).Ouvrez la porte du poêle.Déposez les aides pour l'allumage (non enduit) sur lefond du foyer.Déposez par-dessus une poignée de copeauxpuis 1 ou 2 bûches.Fermeture du coulisseau d’entrée d’airDès que les bûches brûlent bien, réglez la puissance dechauffage avec le coulisseau d’entrée d’air (positionmaximale du coulisseau = puissance maximale).Pour recharger le poêle, suivez la même séquence quepour l’allumage : ouvrez les coulisseaux d’entréed’entrée d’air secondaire, ouvrez prudemment la pote dupoêle, ajoutez du bois et refermez la porte.Attendez que le bois ajouté s’enflamme. Réglez lapuissance de chauffage avec le coulisseau d’entrée d’airsecondaire.Représentation des symbolesFig. 3 : Allumage
<strong>G1</strong> 12 françaisChauffer à la mi-saisonA la mi-saison, c’est-à-dire quand les températuresextérieures sont plus élevées, il arrive que le tirage duconduit de cheminée soit mauvais à cause de l’élévationsoudaine des températures : les gaz ne sont pascomplètement tirés vers le haut.Il faut alors remplir la cheminée avec des quantités debois moindres et ouvrir le régulateur d’air primaire à fondafin que le combustible brûle plus vite (formation deflammes), ce qui stabilisera le tirage du conduit.4. PRINCIPALES PIÈCES DÉTACHÉESJointsDésignation N° sur schéma Réf. articleJoint plat 8 x 2 x 400 mm 21 710096Joint plat 8 x 2 x 81 mm 23 710096Joint rond d= 10 x 1050 mm 20 710319Information en cas d’incendiedans le conduitEn cas d’utilisation d’un mauvais combustible ou d’uncombustible trop humide, il en résulterait des dépôtsdans le conduit qui pourraient alors provoquer unincendie.Fermez aussitôt toutes les arrivées d’air de la cheminéeet prévenez les pompiers.Après l’incendie, faîtes vérifier votre conduit par unspécialiste car il peut avoir subi des dommages (félures,détérioration de l’étanchéité).Céramique réfractaireDésignation N° sur schéma Réf. article<strong>G1</strong> keramott de base 3 716213<strong>G1</strong> keramott pare-bûche 9 716249<strong>G1</strong> keramott côte avant gauche 8 716215<strong>G1</strong> keramott côte arrière gauche 7 716211<strong>G1</strong> keramott paroi arrière 4 716214<strong>G1</strong> keramott côte avant droite 6 716247<strong>G1</strong> keramott côte arrière droite 5 716248<strong>G1</strong> plaque tirage 1 716054<strong>G1</strong> plaque tirage vermiculite 2 716210Numérotation des céramiques réfractaires =instructions de montage !AutresDésignation N° sur schéma Réf. articlePorte verre <strong>G1</strong> 22 716063Vernis pour poêle -- 650002Allume-feu bois -- 640162Nettoyant pour vitres 0,5 l -- 640070AccessoiresVous trouverez chez votre revendeur spécialisé des plaques de fond en verre ou en métal, desinstruments de cheminée et des produits d’entretien.IMPORTANT : Les pièces défectueuses doivent toujours être remplacées par votre revendeurspécialisé, afin que le poêle reste sûr et en bon état de marche.L'appareil ne doit pas être modifié.EntretienPour le nettoyage de la vitre, utilisez un produit pour vitre comme "Thermohit". Les parties laquéesdoivent être nettoyés uniquement avec un chiffon (éventuellement humide). Utilisez pour les superficiesen inox, des produits spéciaux prévus pour ce revêtement.NettoyageLe poêle, le dispositif d’évacuation des fumées et les tuyaux doivent être contrôlés et en cas de dépôts,être nettoyés au moins une fois par an, si ce n’est plus, par exemple lors du ramonage du conduit decheminée. Le conduit doit également être nettoyé régulièrement par un ramoneur. C’est celui-ci qui vousindiquera dans quelles intervalles un ramonage est nécessaire. Le poêle doit être vérifier une fois par anpar un spécialiste.
GARANTIE / GUARANTEE / GARANZIA / GARANTIEGarantieFür Ihren AUSTROFLAMM-Kaminofen garantierenwir für die einwandfreie Funktion des Korpus 6Jahre, aller weiteren Bauteile aus Stahl und Guß 2Jahre ab dem Erstverkaufsdatum. Stahl- undGußteile, die während der Garantiezeit Materialund/ oder Verarbeitungsmängel aufweisen,werden gegen Neuteile ersetzt.Wir gewähren keine Garantie auf Verschleißteile(z. B.: Keramott, Dichtungen, Bodenrost),Oberflächenbeschichtungen, Lack, Glas undKeramiken.Voraussetzungen für unsere Garantieleistung sind:1. Ihr AUSTROFLAMM-Kaminofen wurde gemäßdem Benutzerhandbuch betrieben und voneinem Fachmann installiert.2. Der Garantieanspruch wird mit der vollständigausgefüllten Garantiekarte und der Rechnungbei einem AUSTROFLAMM-Fachhändlergeltend gemacht.WICHTIG: Unsere Garantieleistung umfaßt diekostenlose Lieferung der Neuteile. Arbeits- undWegzeiten werden dadurch nicht umfaßt. Eineungerechtfertigte Garantieinanspruchnahme wirddem Betreiber rückbelastet.GuaranteeWe guarantee full functionality of the stove carcassfor 6 years and all stove components made of steelor cast iron for a full two years from the date ofpurchase. Steel and cast-iron components whichshow defect in materials or workmanship duringthe guarantee period shall be replaced with newcomponents.We do not guarantee wearable components (suchas Keramott, gaskets, floor grid), surface coatings,lacquer, glass and ceramics.Conditions of the Guarantee:1. Your AUSTROFLAMM stove was installed bya certified professional and is operated inaccordance with the operator’s manual.2. Claims to the guarantee shall be subject to acompletely filled-out Guarantee Card andsubmittal of the original invoice issued by acertified AUSTROFLAMM sales agent.IMPORTANT: Our guarantee includes freeshipping of new components. Work and traveltimes are not included. Unwarranted claims shallbe re-invoiced to the operator.---------------------------------------------------------------------------------------------------------------------------------------Im Garantiefall herausschneiden und Ihrem AUSTROFLAMM-Fachhändler vorlegen!In the event of claims to the guarantee, separate here and present this proof of purchase to your certified AUSTROFLAMM dealer.GARANTIE / GUARANTEE / GARANZIA / GARANTIEHändlerstempel / Dealer’s Stamp / Timbro concessionario /tampon du concessionnaireKaufdatum / date of purchase / Data d’acquisto / dated’achatModellname / Name of Model / modello / nom du produitG 1angeschlossen von / Installed by / installato da / raccordée parSerien No. / serial no. / No. di serie / no. de série(siehe Typenschild / See manufacturer’s plate /Vedi targhetta / voir plaque signalétique)
GARANTIE / GUARANTEE / GARANZIA / GARANTIEgaranziaGarantiamo piena funzionalità del corpo stufa peruna durata di 6 anni. I componenti in acciaio oghisa sono garantiti due anni dalla data diacquisto. Le parti in acciaio e ghisa che dovesseropresentare difetti di materiale e/o lavorazionedurante il periodo di garanzia verranno sostituitecon parti nuove.Sono escluse dalla garanzia le parti soggette adusura (ad es. elementi in keramott, guarnizioni,griglie della camera di combustione), nonché irivestimenti delle superfici, vernici, vetroceramicoed elementi in ceramica.Per avere diritto alle prestazioni di garanzia:1. La vostra Kaminofen AUSTROFLAMM deveessere installata da personale specializzato efatta funzionare osservando le istruzioni delmanuale.2. Occorre presentare la cartolina di garanziacorrettamente compilata e lo scontrino / lafattura / la ricevuta fiscale ad uno deirivenditori AUSTROFLAMM.IMPORTANTE: la nostra Garanzia copre lafornitura gratuita delle parti nuove e non includené la durata dell'intervento né la trasferta. I costicollegati ad una richiesta ingiustificata diprestazione di garanzia saranno addebitatiall'utente.GarantieNous garantissons le fonctionnement irréprochabledu corps de l'appareil de votre poêleAUSTROFLAMM pendant 6 ans, toutes les autrespièces en acier et en fonte étant garanties 2 ans.Les pièces en acier et en fonte présentant undéfaut de matériau et/ou de fabrication pendant ladurée de la garantie seront remplacées par despièces neuves.Nous déclinons toute garantie pour les piècesd’usure (par ex. céramique réfractaire, joints, grillede fond), les joints de surfaces, le vernis, les vitreset les céramiques.Conditions d’application de la garantie :1. Votre poêle AUSTROFLAMM doit avoir étéinstallé par un spécialiste et utiliséconformément au mode d’emploi.2. La demande de garantie doit être présentée àun revendeur spécialisé AUSTROFLAMM enmême temps que la carte de garantiecomplétée et que la facture.IMPORTANT : Notre service sous garantiecouvre le remplacement gratuit par des piècesneuves. Les temps de travail et de déplacementne sont pas inclus. En cas de demande abusived’application de la garantie, nous présenterons àl’utilisateur une facture correspondante.Austroflamm GmbH, Austroflamm Platz 1, 4631 Krenglbach, Austria, Stand 07/07-------------------------------------------------------------------------------------------------------------------------------------In caso di richiesta di garanzia, ritagliare la cartolina e presentarla al rivenditore AUSTROFLAMM!Découpez selon les pointillés et présentez ce coupon à votre revendeur AUSTROFLAMM.GARANTIE / GUARANTEE / GARANZIA / GARANTIEKunde / Customer / cliente / clientMarkeStampFrancobolloaffranchiran/ to / per / pour