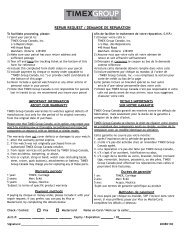
THANK YOU FOR PURCHASING YOUR TIMEX WATCH. www.timex ...
THANK YOU FOR PURCHASING YOUR TIMEX WATCH. www.timex ...
THANK YOU FOR PURCHASING YOUR TIMEX WATCH. www.timex ...
- No tags were found...

You also want an ePaper? Increase the reach of your titles
YUMPU automatically turns print PDFs into web optimized ePapers that Google loves.
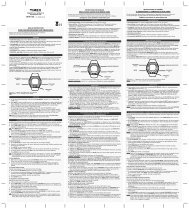
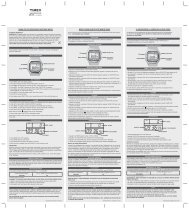
<strong>www</strong>.<strong>timex</strong>.comW-3 759-095003<strong>THANK</strong> <strong>YOU</strong> <strong>FOR</strong> <strong>PURCHASING</strong> <strong>YOU</strong>R <strong>TIMEX</strong> <strong>WATCH</strong>.EXTENDED WARRANTYAvailable in U.S. only. Extend your warranty for an additional 4 years from date of purchasefor $5. You can pay with AMEX, Discover, Visa or MasterCard by calling 1 800-448-4639 duringnormal business hours. Payment must be made within 30 days of purchase. Name, address,telephone number, purchase date, and 5-digit model number required. You can also mail acheck for $5 to: Timex Extended Warranty, P.O. Box 1676, Dept. EF, Little Rock, AR 72203.Please read instructions carefully to understand how to operate your Timex watch.Your model may not have all of the features described in this booklet.FEATURES• Two time zones • Alarm • 24-hour countdown timer • 99-lap chronograph • Hourly chimeINDIGLOMODEBASIC OPERATIONSSTART/SPLITORALARM ONSETORSTOP/RESETPress MODE to cycle through CHRONO, ALARM, TIMER and TIME ZONE modes. Press INDIGLOto illuminate watch face. When setting functions, press and hold SET to advance digits rapidly.In any mode, press MODE to view time display. Press any button to stop alarm or timer beeps.TIME AND DATEA. Press and hold SET. SECONDS digits will flash.B. Press START/SPLIT to set SECONDS to 0.C. Press MODE to select HOURS.D. Press START/SPLIT to advance. Go through 12 hours for AM or PME. Press MODE to select MINUTES, then START/SPLIT to advance.F. Repeat to set MONTH, DATE, DAY, 12- or 24-hour TIME display.G. Press SET when done.Press START/SPLIT to view TIME ZONE 2.CHRONOGRAPHINDIGLOMODEA. Press MODE to select CHRONOB. Press SET to select Lap or Split displayC. Press START/SPLIT to start.D. Press START/SPLIT to record lap time.E. Press MODE to display lap or split time (automatic after 10 seconds).F. Press STOP/RESET to pause.G. Press START/SPLIT to resumeH. Press STOP/RESET to stop.I. Press STOP/RESET to reset.When CHRONO is running LAP or SPLIT appears in time display.Lap PauseSTART/SPLITALARM AND CHIMEA. Press MODE to select ALARMB. Press SET to select Time Zone 1 or 2C. Press START/SPLIT to change.D. Press MODE to select HOURS. Digits will flash.E. Press START/SPLIT to advance. Go through 12 hours for AM or PMF. Press MODE to select TENS of MINUTES.G. Press START/SPLIT to advance. Repeat for MINUTES, Time Zone 1 or 2.H. Press SET when done.I. In ALARM Mode, press START/SPLIT repeatedly to turn ALARM and CHIME modes on or off.When alarm time is indicated in appropriate time zone, watch will beep for 20 seconds, or untila watch button is pushed. Alarm will repeat every 24 hours until deactivated.COUNTDOWN TIMERA. Press MODE to select TIMERB. Press SET to select TENS of HOURS. Digits will flash.C. Press START/SPLIT to advance.D. Press MODE to select HOURS.E. Repeat to set TENS of MINUTES, MINUTES, TENS of SECONDS, and SECONDSF. Press SET when done.G. Press START/SPLIT to start timer.H. Press STOP/RESET to pause, START/SPLIT to resume.I. Press STOP/RESET again to reset.Watch will beep when countdown ends.TIME ZONESplit PauseSTOP/RESETA. Press MODE to select TIME ZONE 2.B. Press and hold SET to set time. HOURS digits will flash.C. Press START/SPLIT to advance. Go through 12 hours for AM or PM.D. Press MODE to select MONTH, DATE, 12- or 24-hour TIME display. Press START/SPLIT toadvance.E. Press SET when doneF. Press START/SPLIT to view TIME ZONE 2.INDIGLO® NIGHT-LIGHT WITH NIGHT-MODE®A. Press INDIGLO to illuminate watch face. Patented (U.S. pat. 4,527,096 and 4,775,964) electroluminescenttechnology used in the INDIGLO® night-light illuminates entire watch faceat night and in low light conditions.B. Press and hold INDIGLO for three seconds (beep will sound) to activate or de-activateNIGHT-MODE®C. While in NIGHT-MODE®, press any button to illuminate watch face for 3 secondsSETMERCI D’AVOIR ACHETÉ CETTE MONTRE <strong>TIMEX</strong>.Lire les instructions avec attention pour bien comprendre le fonctionnement de cette montreTimex. Il est possible que ce modèle ne présente pas toutes les fonctions décrites dansle dépliant.FONCTIONS• Deux fuseaux horaires • Alarme • Minuterie 24 heures • Chronomètre 99 tempsintermédiaires • Carillon horaireINDIGLOMODEOPÉRATIONS DE BASESTART/SPLITOUALARM ONSETOUSTOP/RESETAppuyer sur MODE pour afficher successivement les modes CHRONO, ALARM, TIMER (minuterie)et TIME ZONE (fuseau horaire). Appuyer sur INDIGLO pour illuminer la face de la montre.Lors du réglage de fonctions, tenir SET enfoncé pour faire avancer les chiffres rapidement. Danstout mode, appuyer sur MODE pour afficher l’heure. Appuyer sur tout bouton pour arrêter lesbips de l’alarme ou de la minuterie.HEURE ET DATEA. Tenir SET enfoncé. Les chiffres des SECONDES clignotent.B. Appuyer sur START/SPLIT pour mettre les SECONDES à 0.C. Appuyer sur MODE pour sélectionner les HEURES.D. Appuyer sur START/SPLIT pour avancer. Faire défiler 12 heures pouralterner entre matin (AM) et après-midi (PM).E. Appuyer sur MODE pour sélectionner les MINUTES, puis surSTART/SPLIT pour avancer.F. Répéter pour régler les MOIS, la DATE, le JOUR et l’affichage de l’HEURE sur 12 ou 24heures.G. Appuyer sur SET pour valider.Appuyer sur START/SPLIT pour afficher le FUSEAU HORAIRE 2.CHRONOMÈTREINDIGLOMODESTART/SPLITA. Appuyer sur MODE pour sélectionner CHRONO.B. Appuyer sur SET pour sélectionner l’affichage des temps au tour (Lap) ou intermédiaires (Split).C. Appuyer sur START/SPLIT pour démarrer.D. Appuyer sur START/SPLIT pour enregistrer le temps intermédiaire.E. Appuyer sur MODE pour afficher le temps au tour ou intermédiaire (automatique au boutde 10 secondes).F. Appuyer sur STOP/RESET pour marquer une pause.G. Appuyer sur START/SPLIT pour redémarrer.H. Appuyer sur STOP/RESET pour arrêter.I. Appuyer sur STOP/RESET pour remettre à zéro.Lorsque le CHRONO est en marche, LAP ou SPLIT s’affiche.Pause tour(Lap)ALARME ET CARILLONA. Appuyer sur MODE pour sélectionner ALARM.B. Appuyer sur SET pour sélectionner le fuseau horaire 1 ou 2.C. Appuyer sur START/SPLIT pour changer.D. Appuyer sur MODE pour sélectionner les HEURES. Les chiffres clignotent.E. Appuyer sur START/SPLIT pour avancer. Faire défiler 12 heures pour alterner entre matin(AM) et après-midi (PM).F. Appuyer sur MODE pour sélectionner les DIZAINES de MINUTES.G. Appuyer sur START/SPLIT pour avancer. Répéter pour les MINUTES, les fuseaux horaires 1 ou 2.H. Appuyer sur SET pour valider.I. En mode ALARM, appuyer plusieurs fois sur START/SPLIT pour activer ou désactiver lesmodes ALARM et CHIME (carillon).Lorsque l’heure de l’alarme est indiquée dans le fuseau horaire approprié, la montre sonnependant 20 secondes ou jusqu’à ce qu’un des boutons soit enfoncé. L’alarme se répète toutesles 24 heures jusqu’à ce qu’elle soit désactivée.MINUTERIEPause tpsinterm. (Split)STOP/RESETA. Appuyer sur MODE pour sélectionner TIMER.B. Appuyer sur SET pour sélectionner les DIZAINES d’HEURES. Les chiffres clignotent.C. Appuyer sur START/SPLIT pour avancer.D. Appuyer sur MODE pour sélectionner les HEURES.E. Répéter pour régler les DIZAINES de MINUTES, les MINUTES, les DIZAINES de SECONDES etles SECONDES.F. Appuyer sur SET pour valider.G. Appuyer sur START/SPLIT pour démarrer le compte à rebours.H. Appuyer sur STOP/RESET pour marquer une pause, sur START/SPLIT pour redémarrer.I. Appuyer de nouveau sur STOP/RESET pour remettre à zéro.La montre émet un bip à la fin du compte à rebours.FUSEAU HORAIREA. Appuyer sur MODE pour sélectionner TIME ZONE 2.B. Tenir SET enfoncé pour régler l’heure. Les chiffres des HEURES clignotent.C. Appuyer sur START/SPLIT pour avancer. Faire défiler 12 heures pour alterner entre AM(matin) et PM (après-midi).D. Appuyer sur MODE pour sélectionner le MOIS, la DATE et l’affichage de l’HEURE sur 12 ou24 heures. Appuyer sur START/SPLIT pour avancer.E. Appuyer sur SET pour valider.F. Appuyer sur START/SPLIT pour afficher le FUSEAU HORAIRE 2.VEILLEUSE INDIGLO® À FONCTION NIGHT-MODE®A. Appuyer INDIGLO pour illuminer la face de la montre. La technologie électroluminescentebrevetée (brevets américains n° 4,527,096 et 4,775,964) utilisée dans la veilleuse INDIGLO®permet d’illuminer toute la face de la montre la nuit et dans des conditions de faibleéclairage.B. Tenir INDIGLO enfoncé pendant trois secondes (jusqu’au bip sonore) pour activer oudésactiver la fonction NIGHT-MODE®.C. Dans NIGHT-MODE®, appuyer sur tout bouton pour illuminer la montre pendant 3 secondes.SETLE AGRADECEMOS LA COMPRA DE SU RELOJ <strong>TIMEX</strong>.Le rogamos lea atentamente las instrucciones para poner en funcionamiento su reloj Timex.Es posible que su modelo no tenga todas las características descritas en este folleto.FEATURES• Dos zonas horarias • Alarma • Temporizador de cuenta regresiva de 24 horas • Cronógrafode 99 vueltas • Señal acústica cada horaINDIGLOMODEOPERACIONES BÁSICASSTART/SPLITOALARM ONSETOSTOP/RESETPulse MODE para recorrer los modos CRONÓGRAFO, ALARMA, TEMPORIZADOR y ZONAHORARIA. Pulse INDIGLO para iluminar la cara del reloj. Cuando ajuste las funciones, pulse ymantenga pulsado SET para hacer avanzar rápidamente los dígitos. En cualquier modo, pulseMODE para visualizar la hora. Pulse cualquier botón para parar los pitidos de la alarma o deltemporizador.HORA Y FECHAA. Pulse y mantenga pulsado SET. Los dígitos de los SEGUNDOS parpadearán.B. Pulse START/SPLIT para ajustar los SEGUNDOS a 0.C. Pulse MODE para seleccionar HORAS.D. Pulse START/SPLIT para avanzar. Avance 12 horas para AM o PM.E. Pulse MODE para seleccionar MINUTOS y después pulseSTART/SPLIT para avanzar.F. Repita el procedimiento para ajustar el MES, la FECHA, el DÍA y la visualización HORARIA de12 ó 24 horas.G. Pulse SET cuando haya acabado.Pulse START/SPLIT para ver la ZONA HORARIA 2.CHRONÓGRAFOINDIGLOMODESTART/SPLITA. Pulse MODE para seleccionar CRONÓGRAFO.B. Pulse SET para seleccionar la visualización de Vuelta o Tiempo parcial.C. Pulse START/SPLIT para empezar.D. Pulse START/SPLIT para registrar el tiempo de la vuelta.E. Pulse MODE para visualizar el tiempo de la vuelta o el tiempo parcial (automático despuésde 10 segundos).F. Pulse STOP/RESET para pausar el cronógrafo.G. Pulse START/SPLIT para reanudar la marcha del cronógrafo.H. Pulse STOP/RESET para parar el cronógrafo.I. Pulse STOP/RESET para poner a cero el cronógrafo.Cuando el CRONÓGRAFO está en marcha, LAP (VUELTA) o SPLIT (TIEMPO PARCIAL) aparece enla visualización de tiempo.Pausa devueltaALARMA Y SEÑAL ACÚSTICAA. Pulse MODE para seleccionar ALARMA.B. Pulse SET para seleccionar la zona horaria 1 ó 2.C. Pulse START/SPLIT para cambiar.D. Pulse MODE para seleccionar HORAS. Los dígitos parpadearán.E. Pulse START/SPLIT para avanzar. Avance 12 horas para AM o PM.F. Pulse MODE para seleccionar DECENAS de MINUTOS.G. Pulse START/SPLIT para avanzar. Repita el procedimiento para los MINUTOS, Zona Horaria1 ó 2.H. Pulse SET cuando haya acabado.I. En el modo ALARMA, pulse repetidamente START/SPLIT para activar o desactivar losmodos ALARMA y SEÑAL ACÚSTICA.Cuando la hora de la alarma esté indicada en la zona horaria apropiada, el reloj emitirá pitidosdurante 20 segundos o hasta que se pulse un botón del reloj. La alarma se repetirá cada 24horas hasta que sea desactivada.TEMPORIZADOR DE CUENTA REGRESIVAPausa detiempo parcialSTOP/RESETA. Pulse MODE para seleccionar TIMER (TEMPORIZADOR).B. Pulse SET para seleccionar DECENAS de HORAS. Los dígitos parpadearán.C. Pulse START/SPLIT para avanzar.D. Pulse MODE para seleccionar HORAS.E. Repita el procedimiento para ajustar las DECENAS de MINUTOS, los MINUTOS, las DECENASde SEGUNDOS y los SEGUNDOS.F. Pulse SET cuando haya acabado.G. Pulse START/SPLIT para poner en marcha el temporizador.H. Pulse STOP/RESET para pausar el temporizador y START/SPLIT para reanudar la marchadel temporizador.I. Pulse STOP/RESET para poner a cero el temporizador.El reloj emitirá un pitido cuando la cuenta regresiva termine.ZONA HORARIAA. Pulse MODE para seleccionar la ZONA HORARIA 2.B. Pulse y mantenga pulsado SET para ajustar la hora. Los dígitos de las HORAS parpadearán.C. Pulse START/SPLIT para avanzar. Avance 12 horas para AM o PM.D. Pulse MODE para seleccionar MES, FECHA y visualización HORARIA de 12 ó 24 horas. PulseSTART/SPLIT para avanzar.E. Pulse SET cuando haya acabado.F. Pulse START/SPLIT para ver la ZONA HORARIA 2.LUZ NOCTURNA INDIGLO®A. Pulse INDIGLO para iluminar la cara del reloj. La tecnología electroluminiscente patentada(patente 4,527,096 y 4,775,964 en EE.UU.) y utilizada por la luz nocturna INDIGLO® iluminatoda la cara del reloj por la noche y en condiciones de poca luz.B. Pulse y mantenga pulsado INDIGLO durante tres segundos (sonará un pitido) para activaro desactivar el modo nocturno NIGHT-MODE®.C. Mientras está en el modo NIGHT-MODE®, pulse cualquier botón para iluminar la cara delreloj durante 3 segundos.SET
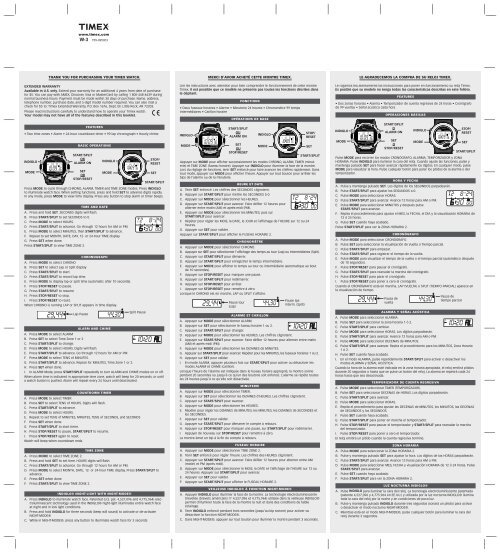
If your watch is water-resistant, meter marking or (Water-Resistance Depth*pounds per square inch absoluteWATER RESISTANCE) is indicated.p.s.i.a.* Water Pressure Below Surface30m/98ft 6050m/164ft 86100m/328ft 160200m/656ft 284WARNING: TO MAINTAIN WATER-RESISTANCE, DO NOT PRESS ANY BUTTONS OR PULLOUT THE CROWN UNDER WATER UNLESS <strong>YOU</strong>R <strong>WATCH</strong> IS INDICATED AS 200 METERWATER-RESISTANT.1. Watch is water-resistant only as long as crystal, crown and case remain intact.2. Watch is not a diver watch and should not be used for diving.3. Rinse watch with fresh water after exposure to salt water.FAST WRAP® STRAPSi la montre est étanche, la profondeur maximale ou le symbole (Profondeur d’étanchéité*livres par pouce carré (abs.)ÉTANCHÉITÉ) est indiqué.Pression de l’eau sous la surface en p.s.i.a.*30 m/98 ft 6050 m/164 ft 86100 m/328 ft 160200 m/656 ft 284MISE EN GARDE : POUR PRÉSERVER L’ÉTANCHÉITÉ, NE PAS ENFONCER LES BOUTONSNI TIRER LES COURONNES SOUS L’EAU, SAUF SUR LES MODÈLES ÉTANCHES JUSQU’À200 MÈTRES.1. La montre est étanche aussi longtemps que le verre, les couronnes et le boîtier sont intacts.2. La montre n’est pas conçue pour la plongée. Ne pas l’utiliser dans ces conditions.3. Rincer à l’eau douce après tout contact avec l’eau de mer.BRACELET FAST WRAP®RESISTENCIA AL AGUA) o mediante un mar-Si su reloj es resistente al agua, se indicará mediante el símbolo (cador de profundidad.Profundidad de resistencia al aguaPresión del agua por debajode la superficie en p.s.i.a.*30m/98pies 6050m/164pies 86100m/328pies 160200m/656pies 284*libras por pulgada cuadrada absolutaADVERTENCIA: PARA MANTENER LA RESISTENCIA AL AGUA, NO APRIETE NINGÚN BOTÓN NITIRE DE LA CORONA DEBAJO DEL AGUA A MENOS QUE SU RELOJ ESTÉ INDICADO PARAUNA RESISTENCIA AL AGUA DE 200 METROS.1. El reloj es resistente al agua solamente cuando el cristal, los botones y la caja estánintactos.2. El reloj no es apropiado para hacer submarinismo y no debería utilizarse para ello.3. Enjuague el reloj con agua dulce después de haber estado expuesto al agua salada.CORREA RÁPIDA FAST WRAP®BRACELET ADJUSTMENTFOLDOVER CLASP BRACELETFind spring bar that connects bracelet to clasp. Using a pointed tool (Fig. 2), push spring bar inand gently twist bracelet to disengage. Determine wrist size, then insert spring bar in correctbottom hole (Fig. 3). Push down on spring bar, align with top hole and release to lock in place(Fig. 4).AJUSTEMENT DU BRACELETBRACELET À FERMOIR DÉPLIANTTrouver la barrette à ressort qui attache le bracelet au fermoir. À l’aide d’un outil pointu (Fig. 2),enfoncer la barrette et pivoter délicatement le bracelet pour le dégager. Déterminer la taille dupoignet puis introduire la barrette à ressort dans l’orifice inférieur correspondant (Fig. 3). Enfoncerla barrette, l’aligner sur l’orifice supérieur puis la relâcher pour la mettre en place (Fig. 4).AJUSTE DE LA PULSERAPULSERA CON BROCHE PLEGABLELocalice la barra de resorte que conecta la pulsera al broche. Utilizando una herramienta puntiaguda(Fig. 2), empuje hacia dentro la barra de resorte y gire suavemente la pulsera paradesacoplarla. Determine el tamaño de la muñeca y después introduzca la barra de resorte enel agujero inferior correcto (Fig. 3). Empuje hacia abajo la barra de resorte, alinéela con el agujerosuperior y suéltela para que quede sujeta en su sitio (Fig. 4).Fig. 2 Fig. 3 Fig. 4BATTERYTimex strongly recommends that a retailer or jeweler replace battery. If applicable, pushreset button when replacing battery. Battery type is indicated on caseback. Battery life estimatesare based on certain assumptions regarding usage; battery life may vary depending onactual usage.DO NOT DISPOSE OF BATTERY IN FIRE. DO NOT RECHARGE. KEEP LOOSE BATTERIESAWAY FROM CHILDREN.Fig. 2 Fig. 3 Fig. 4PILETimex recommande fortement de faire changer la pile par un détaillant ou un bijoutier.Le cas échéant, appuyer sur le bouton de remise à zéro lors du changement de la pile. Le typede pile est indiqué sur le dos du boîtier. L’estimation de la durée de service de la pile est baséesur certaines hypothèses quant à l’usage ; la durée réelle peut varier selon l’utilisation de lamontre.NE PAS JETER LA PILE AU FEU. NE PAS RECHARGER LA PILE. GARDER LES PILES HORS DELA PORTÉE DES ENFANTS.Fig. 2 Fig. 3 Fig. 4PILATimex recomienda encarecidamente que un minorista o un joyero cambien la pila. Siprocede, pulse el botón de restablecimiento cuando cambie la pila. El tipo de pila se indica enla parte de atrás de la caja. Las estimaciones de duración de la pila se basan en ciertas suposicionesrelacionadas con el uso; la duración de la pila puede variar dependiendo del uso real.NO TIRE LA PILA AL FUEGO. NO LA RECARGUE. MANTENGA LAS PILAS SUELTAS FUERADEL ALCANCE DE LOS NIÑOS.<strong>TIMEX</strong> INTERNATIONAL WARRANTY(U.S. – LIMITED WARRANTY – PLEASE SEE FRONT OF INSTRUCTION BOOKLET<strong>FOR</strong> TERMS OF EXTENDED WARRANTY OFFER)Your <strong>TIMEX</strong> watch is warranted against manufacturing defects by Timex Corporation for a period of ONE YEARfrom the original purchase date. Timex and its worldwide affiliates will honor this International Warranty.Please note that Timex may, at its option, repair your watch by installing new or thoroughly reconditioned andinspected components or replace it with an identical or similar model. IMPORTANT — PLEASE NOTE THAT THISWARRANTY DOES NOT COVER DEFECTS OR DAMAGES TO <strong>YOU</strong>R <strong>WATCH</strong>:1) after the warranty period expires;2) if the watch was not originally purchased from an authorized Timex retailer;3) from repair services not performed by Timex;4) from accidents, tampering or abuse; and5) lens or crystal, strap or band, watch case, attachments or battery. Timex may charge you for replacing anyof these parts.THIS WARRANTY AND THE REMEDIES CONTAINED HEREIN ARE EXCLUSIVE AND IN LIEU OF ALL OTHER WAR-RANTIES, EXPRESS OR IMPLIED, INCLUDING ANY IMPLIED WARRANTY OF MERCHANTABILITY OR FITNESS <strong>FOR</strong> PAR-TICULAR PURPOSE. <strong>TIMEX</strong> IS NOT LIABLE <strong>FOR</strong> ANY SPECIAL, INCIDENTAL OR CONSEQUENTIAL DAMAGES. Somecountries and states do not allow limitations on implied warranties and do not allow exclusions or limitations ondamages, so these limitations may not apply to you. This warranty gives you specific legal rights and you may alsohave other rights which vary from country to country and state to state.To obtain warranty service, please return your watch to Timex, one of its affiliates or the Timex retailer where thewatch was purchased, together with a completed original Watch Repair Coupon or, in the U.S. and Canada only,the completed original Watch Repair Coupon or a written statement identifying your name, address, telephonenumber and date and place of purchase. Please include the following with your watch to cover postage and handling(this is not a repair charge): a US$ 7.00 check or money order in the U.S.; a CAN$6.00 cheque or money orderin Canada; and a UK£2.50 cheque or money order in the U.K. In other countries, Timex will charge you for postageand handling. NEVER INCLUDE A SPECIAL <strong>WATCH</strong>BAND OR ANY OTHER ARTICLE OF PERSONAL VALUE IN <strong>YOU</strong>RSHIPMENT.For the U.S., please call 1-800-448-4639 for additional warranty information. For Canada, call 1-800-263-0981. ForBrazil, call 0800-168787. For Mexico, call 01-800-01-060-00. For Central America, the Caribbean, Bermuda and theBahamas, call (501) 370-5775 (U.S.). For Asia, call 852-2815-0091. For the U.K., call 44 208 687 9620. For Portugal,call 351 212 946 017. For France, call 33 3 81 63 42 00. For Germany, call +43 662 88 92130. For the Middle Eastand Africa, call 971-4-310850. For other areas, please contact your local Timex retailer or Timex distributor forwarranty information. In Canada, the U.S. and in certain other locations, participating Timex retailers can provideyou with a postage-paid, pre-addressed Watch Repair Mailer for your convenience in obtaining factory service.GARANTIE INTERNATIONALE <strong>TIMEX</strong>(É.-U. – GARANTIE LIMITÉE – VEUILLEZ CONSULTER LA COUVERTURE DU LIVRET D’INSTRUCTIONS POUR LESMODALITÉS DE L’OFFRE DE GARANTIE PROLONGÉE)Votre montre <strong>TIMEX</strong> est garantie contre les défauts de fabrication pour une période d’UN AN, à compter de la dated’achat. Timex ainsi que ses affiliés honoreront cette garantie internationale.Timex se réserve le droit de réparer votre montre en y installant des composants neufs ou révisés, ou bien dela remplacer avec un modèle identique ou similaire. IMPORTANT : CETTE GARANTIE NE COUVRE PAS VOTREMONTRE :1) après l’expiration de la période de garantie,2) si elle n’a pas été achetée chez un revendeur Timex agréé,3) si la réparation n’a pas été faite par Timex,4) s’il s’agit d’un accident, falsification ou abus,5) s’il s’agit du verre, du bracelet, du boîtier ou des piles; Timex peut effectuer les réparations mais celles-ciseront payantes.CETTE GARANTIE AINSI QUE LES RECOURS INDIQUÉS DANS LES PRÉSENTES SONT EXCLUSIFS ET REMPLACENTTOUTE AUTRE GARANTIE, IMPLICITE OU EXPLICITE, Y COMPRIS MAIS NON EXCLUSIVEMENT TOUTE GARANTIEIMPLICITE DE COMMERCIALISATION OU D’APTITUDE À UN USAGE PARTICULIER. <strong>TIMEX</strong> N’EST RESPONSABLE D’AU-CUN DOMMAGE PARTICULIER, ACCESSOIRE OU INDIRECT. Certains pays et juridictions interdisent les limitations desgaranties implicites et les exclusions ou restrictions sur les dommages ; les présentes restrictions peuvent donc nepas vous être applicables. Cette garantie vous confère des droits légaux précis. Il se peut que vous bénéficiezd’autres droits, lesquels varieront selon le pays et la juridiction.Pour obtenir le service garanti, retourner la montre à Timex, une de ses filiales ou le détaillant Timex qui vous avendu la montre. Inclure le Coupon de réparation original rempli ou, pour les É.-U. ou le Canada seulement, cemême coupon rempli ou une feuille comprenant votre nom, adresse, numéro de téléphone ainsi que la date et lelieu de l’achat. Afin de couvrir les frais de retour de la montre (ce ne sont pas des frais de réparation), prière d’inclureun chèque ou un mandat-poste de 7,00 $US (É.-U.), de 6,00 $ (Canada) ou de 2,50 £ (Royaume-Uni). Pour lesautres pays, Timex vous demandera de couvrir les frais de poste et de manutention. NE JAMAIS INCLURE DANSVOTRE ENVOI UN BRACELET SPÉCIAL OU TOUT ARTICLE AYANT UNE VALEUR SENTIMENTALE.Pour les Etats-Unis, vous pouvez appeler le 1 800 448 4639 pour plus de renseignements. Pour le Canada, appelezle 1 800 263 0981. Pour le Brésil, le 0800 168787. Pour le Mexique, le 01 800 01 060-00. Pour l’Amérique Centrale,les Caraïbes, les Bermudes et les Bahamas, appelez le 501 370 5775 (É.-U.). Pour l’Asie, appelez le 852 2815 0091.Pour le Royaume-Uni, appelez le 44 208 687 9620. Pour le Portugal, appelez le 351 212 946 017. Pour la France,appelez le 33 3 81 63 42 00. Pour l'Allemagne, appelez le +43 662 88 92130. Pour le Moyen-Orient et l'Afrique,appelez le 971-4-310850. Pour les autres régions, veuillez contacter votre revendeur ou le distributeur Timex localpour toute information concernant la garantie. Aux Etats-Unis, au Canada et dans d’autres pays, vous pouvez disposerd’un emballage pré-payé, pré-adressé.GARANTIA INTERNACIONAL <strong>TIMEX</strong>(GARANTIA LIMITADA USA - LEA POR FAVOR EL FOLLETO DE INSTRUCCIONES PARA LOS DETALLESDE LA OFERTA DE EXTENSIÓN DE LA GARANTÍA).Su reloj <strong>TIMEX</strong> está garantizado contra cualquier defecto de fabricación por <strong>TIMEX</strong> Corporation durante un períodode UN AÑO a partir de la fecha de compra. <strong>TIMEX</strong> y sus compañías subsidiarias en todo el mundo aceptarán estaGarantía Internacional.<strong>TIMEX</strong> notifica que, a nuestra discreción, su reloj será reparado con piezas nuevas o reacondicionado totalmente concomponentes debidamente revisados o será cambiado por otro reloj idéntico o similar. IMPORTANTE: ESTA GARAN-TIA NO CUBRE LOS SIGUIENTES DEFECTOS O FALTAS DE SU RELOJ:1. Si el período de garantía ha vencido.2. Si su reloj no ha sido comprado en una agencia o tienda oficial <strong>TIMEX</strong>.3. Si su reloj ha sido manipulado fuera del Servicio Técnico Oficial <strong>TIMEX</strong>.4. Si su reloj evidencia pruebas de golpes, accidentes o abusos.5. Si el cristal, correa, caja, pila o accesorios aparecen dañados o gastados. En estos casos <strong>TIMEX</strong> efectuará lareparación y facturará su costo.ESTA GARANTÍA Y LOS DERECHOS Y ACCIONES CONTENIDOS EN EL PRESENTE SON EXCLUSIVOS Y SUSTITUYEN ATODAS LAS DEMÁS GARANTÍAS, EXPRESAS O IMPLÍCITAS, INCLUYENDO CUALESQUIERA GARANTÍAS IMPLÍCITAS DECOMERCIABILIDAD O ADECUACIDAD PARA UN PROPÓSITO PARTICULAR. <strong>TIMEX</strong> NO ES RESPONSABLE DE CUALQUIERDAÑO ESPECIAL, INCIDENTAL O EVENTUALES. Algunos países y estados no permiten limitaciones sobre garantíasimplícitas y no permiten exclusiones o limitaciones sobre daños, por lo tanto estas limitaciones pueden no corresponderlea usted. Esta garantía le ofrece derechos legales específicos y usted también puede tener otros derechosque varían de país en país y de estado a estado.Para obtener servicio cubierto por la garantía, por favor envíe su reloj a Timex, una de sus filiales o a la tienda dondecompró el reloj, conjuntamente con un Cupón de Reparación de Reloj original completado, o en los EE.UU. y Canadásolamente, el Cupón de Reparación de reloj original completado o una declaración escrita indicando su nombre,dirección, número de teléfono y fecha y lugar de la compra. Sírvase incluir lo siguiente con su reloj para cubrir elfranqueo y gastos administrativos (esto no es un cargo de reparación): un cheque o giro postal de US$7 en losEE.UU., un cheque o giro postal de US$6.00 en Canadá; y un cheque o giro postal de UK£2.50 en el Reino Unido yen otros países. Timex le cobrará por franqueo y gastos administrativos. NUNCA INCLUYA UNA CORREA DE RELOJESPECIAL O CUALQUIER OTRO ARTÍCULO DE VALOR PERSONAL EN EL ENVÍO.Para los EE.UU. llame por favor al 1-800-448-4639 para información adicional de su garantía. Para Canadá llame al1-800-263-0981. Para Brasil llame al 0800-168787. Para México 01-800-01-060-00. Para América Central, Caribe,Bermudas y Bahamas llame al (501) 370-5775 (US). Para Asia llame al 852-2815-0091. Para el Reino Unido, llame al 44208 687 9620. Para Portugal, llame al 351 212 946 017. Para Francia, llame al 33 3 81 63 42 00. Para Alemania, llameal +43 662 88 92130. Para el Medio Oriente y Africa, llame al 971-4-310850. Para otras regiones, si desea informaciónsobre la garantía, por favor comuníquese con el representante de Timex o el distribuidor de Timex de su zona.En Canadá, los EE.UU. y otros países, las tiendas autorizadas <strong>TIMEX</strong> le podrán informar y facilitar pagos postales osobres para envíos especiales de reparación de relojes <strong>TIMEX</strong> y ayudarle a conseguir dicho servicio de fábrica.