Kit Thermoflash DIGI 2 HF + - Jean-Paul GUY
Kit Thermoflash DIGI 2 HF + - Jean-Paul GUY
Kit Thermoflash DIGI 2 HF + - Jean-Paul GUY
- No tags were found...

You also want an ePaper? Increase the reach of your titles
YUMPU automatically turns print PDFs into web optimized ePapers that Google loves.
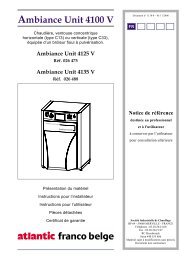
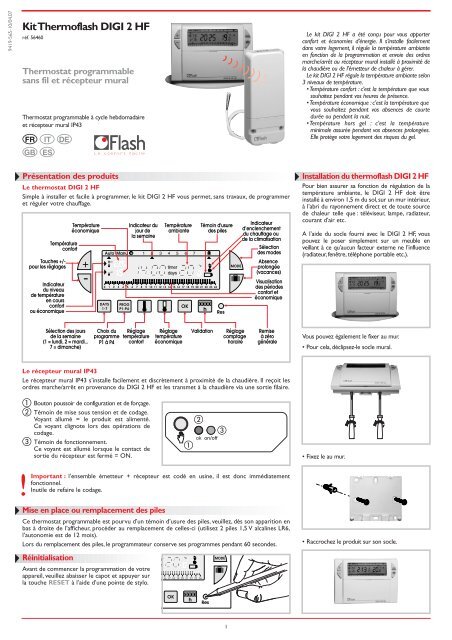
9419-565-10/04.07<strong>Kit</strong> <strong>Thermoflash</strong> <strong>DIGI</strong> 2 <strong>HF</strong>réf. 56460Thermostat programmablesans fil et récepteur muralThermostat programmable à cycle hebdomadaireet récepteur mural IP43 FR ITGB ESDEPrésentation des produitsLe thermostat <strong>DIGI</strong> 2 <strong>HF</strong>Simple à installer et facile à programmer, le kit <strong>DIGI</strong> 2 <strong>HF</strong> vous permet, sans travaux, de programmeret réguler votre chauffage.TempératureconfortTouches +/-pour les réglagesIndicateurdu niveaude températureen coursconfortou économiqueTempératureéconomique+-DAYS1-7Auto Manu 1 2 3 4 5 6 7¡c¡cPROGP1-P4Indicateur dujour dela semaineTempératureambiantetimerdaysOKTémoin d'usuredes piles0 1 2 3 4 5 6 7 8 9 10 11 12 13 14 15 16 17 18 19 20 21 22 23 240000hResMODEIndicateurd’enclenchementdu chauffage oude la climatisationSélectiondes modesAbsenceprolongée(vacances)Visualisationdes périodesconfort etéconomiqueLe kit <strong>DIGI</strong> 2 <strong>HF</strong> a été conçu pour vous apporterconfort et économies d’énergie. Il s’installe facilementdans votre logement, il régule la température ambianteen fonction de la programmation et envoie des ordresmarche/arrêt au récepteur mural installé à proximité dela chaudière ou de l’émetteur de chaleur à gérer.Le kit <strong>DIGI</strong> 2 <strong>HF</strong> régule la température ambiante selon3 niveaux de température.• Température confort : c’est la température que voussouhaitez pendant vos heures de présence.• Température économique : c’est la température quevous souhaitez pendant vos absences de courtedurée ou pendant la nuit.• Température hors gel : c’est la températureminimale assurée pendant vos absences prolongées.Elle protège votre logement des risques du gel.Installation du thermoflash <strong>DIGI</strong> 2 <strong>HF</strong>Pour bien assurer sa fonction de régulation de latempérature ambiante, le <strong>DIGI</strong> 2 <strong>HF</strong> doit êtreinstallé à environ 1,5 m du sol,sur un mur intérieur,à l’abri du rayonnement direct et de toute sourcede chaleur telle que : téléviseur, lampe, radiateur,courant d’air etc.A l’aide du socle fourni avec le <strong>DIGI</strong> 2 <strong>HF</strong>, vouspouvez le poser simplement sur un meuble enveillant à ce qu’aucun facteur externe ne l’influence(radiateur, fenêtre, téléphone portable etc.).Sélection des joursde la semaine(1 = lundi, 2 = mardi...7 = dimanche)Choix duprogrammeP1 à P4RéglagetempératureconfortRéglagetempératureéconomiqueValidationRéglagecomptagehoraireRemiseà zérogénéraleVous pouvez également le fixer au mur.• Pour cela, déclipsez-le socle mural.Le récepteur mural IP43Le récepteur mural IP43 s’installe facilement et discrètement à proximité de la chaudière. Il reçoit lesordres marche/arrêt en provenance du <strong>DIGI</strong> 2 <strong>HF</strong> et les transmet à la chaudière via une sortie filaire. Bouton poussoir de configuration et de forçage. Témoin de mise sous tension et de codage.Voyant allumé = le produit est alimenté.Ce voyant clignote lors des opérations decodage. Témoin de fonctionnement.Ce voyant est allumé lorsque le contact desortie du récepteur est fermé = ON.• Fixez le au mur.!Important : l’ensemble émetteur + récepteur est codé en usine, il est donc immédiatementfonctionnel.Inutile de refaire le codage.Mise en place ou remplacement des pilesCe thermostat programmable est pourvu d’un témoin d’usure des piles, veuillez, dès son apparition enbas à droite de l’afficheur, procéder au remplacement de celles-ci (utilisez 2 piles 1,5 V alcalines LR6,l’autonomie est de 12 mois).Lors du remplacement des piles, le programmateur conserve ses programmes pendant 60 secondes.RéinitialisationAvant de commencer la programmation de votreappareil, veuillez abaisser le capot et appuyer surla touche RESET à l’aide d’une pointe de stylo.• Raccrochez le produit sur son socle.0000h1
Mise à l’heure et au jour actuelC’est la première mise en service.• Vous venez d’appuyer sur la touche RESET.• Les inscriptions I2:00 et lepointeur ▲ sous le jour 1(lundi) clignotent.+-☛☛Auto Manu 1 2 3 4 5 6 7 Mettez à l’heure avec les touches +/- (un appuiprolongé sur la touche accélère le défilement del’heure). Réglez le jour actuel par appuis successifs sur latouche DAYS 1-7,un pointeur ▲ apparaît sousle jour correspondant (1 = lundi, 2 = mardi,3 = mercredi etc.).Validez avec la touche OK.Vous souhaitez modifier l’heure ou le jour :appuyez sur la touche MODE jusqu’à l’apparitiondu pointeur ▲ sous le sigle horloge et procédercomme ci-dessus aux points , et .Réglage des températuresLes températures confort et économique sontpréréglées : Confort = 20°C, Economique = 16°C.☛☛☛+-DAYS1-7uPROGP1-P4 Modification de la température confort Appuyez sur la touche . Modifiez la température avec les touches +/-.Validez avec la touche OK.Modification de la température économique Appuyez sur la touche . Modifiez la température avec les touches +/-.Validez avec la touche OK.La programmation☛PROGP1-P41 2 3 4 5Pour programmer votre semaine vous diposez de 4programmes :P1,P2,P3,qui sont préenregistrés etnon modifiables. P4 est libre et vous permet decréer un programme personnalisé et différent pourchaque jour de la semaine.P1 = Température confort de 6h à 23h.Température économique de 23h à 6h.0 1 2 3 4 5 6 7 8 9 10 11 12 13 14 15 16 17 18 19 20 21 22 23 24!P1 est affecté aux 7 jours de la semainepar défaut. S’il correspond à votre rythmede vie restez en mode automatique, sinoncontinuez.P2 = Température confort de 6h à 8h30 etde 16h30 à 23h.Température économique de 8h30 à16h30 et de 23h à 6h.0 1 2 3 4 5 6 7 8 9 10 11 12 13 14 15 16 17 18 19 20 21 22 23 24OKAuto Manu 1 2 3 4 5 6 7c ¡ccDAYS1-7¡cPROGP1-P4☛☛☛OK0000h0000hResResMODEMODE☛P3 = Température confort de 6h à 8h30,de11h30 à 13h30 et de 16h30 à 23h.Température économique de 8h30 à11h30, de 13h30 à 16h30 et de 23h à6h.0 1 2 3 4 5 6 7 8 9 10 11 12 13 14 15 16 17 18 19 20 21 22 23 24P4 = Programme libre vous permettant decréer des périodes en températureconfort et des périodes en températureéconomique. Ce programme P4 peutêtre différent pour chaque jour de lasemaine.Sélection d’un programme existant P1, P2,P3, pour un jour de la semaine (en modeprogrammation, toutes les modificationsse valident automatiquement).exemple : P2 pour mercredi+-Auto Manu 1 2 3 4 5 6 7¡c¡c☛☛0 1 2 3 4 5 6 7 8 9 10 11 12 13 14 15 16 17 18 19 20 21 22 23 24DAYS1-7PROGP1-P4 Appuyez sur la touche PROG P1-P4 pourpasser en mode programmation.Le N° du programme affecté au jour clignotesur la partie droite de l’afficheur. Appuyez sur la touche DAYS 1-7 jusqu’àl’apparition du pointeur ▲ sous le jour que voussouhaitez programmer dans notre exemplemercredi. Appuyez sur la touche PROG P1-P4 jusqu’àl’apparition dans la partie droite de l’écran dunuméro de programme P2 clignotant.Validez avec la touche OK, le jour suivant vousest automatiquement proposé.Création d’un programme P4Un profil de 24h, composé de 48 thermomètres enbas de l’afficheur,vous permet de visualiser aisémentla composition de votre programme.Un thermomètre à moitié vide correspond à30 minutes en température économique.Un thermomètre plein correspond à 30 minutesen température confort.exemple : création de 3 périodes en températureconfort pour le vendredi :de 6h à 8h,de 12h à 14het de 18h à 22h.+-2DAYS1-7☛PROGP1-P4 Depuis le mode Auto, appuyez sur la touchePROG P1-P4. Appuyez sur la touche DAYS 1-7 jusqu’à l’apparitiondu pointeur ▲ sous le jour que vous souhaitezprogrammer,dans notre exemple vendredi. Appuyez sur la touche PROG P1-P4 jusqu’àl’apparition dans la partie droite de l’écran dunuméro de programme P4 clignotant. Votreafficheur indique 0:00 et le premier thermomètreclignote sur le profil de 24h.OK☛Auto Manu 1 2 3 4 5 6 7¡c¡c☛☛ ☛☛OK0000h0 1 2 3 4 5 6 7 8 9 10 11 12 13 14 15 16 17 18 19 20 21 22 23 240 1 0000hResResMODEMODE☛☛ Appuyez sur la touche plusieurs fois pourobtenir l’horaire 6:00 : chaque appui bref vousfait progresser de 30 minutes et un appui prolongéaccélère la progression.• Appuyez sur la touche plusieurs fois pourobtenir l’horaire 8:00.• Appuyez sur la touche plusieurs fois pourobtenir l’horaire I2:00.• Appuyez sur la touche plusieurs fois pourobtenir l’horaire I4:00.• Appuyez sur la touche plusieurs fois pourobtenir l’horaire I8:00.• Appuyez sur la touche plusieurs fois pourobtenir l’horaire 22:00.Nota : si vous avez fait une erreur (ex : 11h30 aulieu de 12h00) utilisez les touches +/- pour avancerou reculer et corriger à l’aide des touches.Validez avec la touche OK, le jour suivant vousest automatiquement proposé. Appuyez sur MODE pour revenir en modeAuto.Lecture des programmesVous pouvez vérifier votre programmation :+-DAYS1-7Auto Manu 1 2 3 4 5 6 7¡c¡c☛☛0 1 2 3 4 5 6 7 8 9 10 11 12 13 14 15 16 17 18 19 20 21 22 23 24PROGP1-P4 Depuis le mode Auto, appuyez sur la touchePROG P1-P4.Avec la touche DAYS 1-7 sélectionnez le jour de1 à 7 et vérifiez votre programme sur le profil de24h en bas de l’afficheur (exemple ci-dessous).Appuyez sur MODE pour revenir en modeAuto.Le mode automatique (Auto)Le passage en mode automatique se faiten appuyant sur la touche MODEjusqu’à l’apparition du pointeur ▲ sousAuto.Auto ManuEn mode automatique, l’horloge°cthermostat s’adapte à votre rythmede vie en réalisant le ou les programme(s) quevous avez choisi(s).Le mode manuel (Manu)Le mode manuel transforme votre appareil en unsimple thermostat.Il vous permet de maintenir une températureconstante dans votre logement (réglable de 5°C à30°C). Appuyez sur la touche MODE pour positionnerle pointeur ▲ sous Manu. Appuyez sur + ou - pour régler la températuresouhaitée (exemple 22,5°C).Pour quitter le mode Manu, appuyez sur MODEet repositionnez le pointeur ▲ sous Auto.OK0000hResMODE0 1 2 3 4 5 6 7 8 9 10 11 12 13 14 15 16 17 18 19 20 21 22 23 24+-Auto AutoManuManuDAYS1-7¡c ¡cPROGP1-P4OK¡c0000hResMODE☛☛MODE☛☛2
Modification temporaire de latempératureEn mode automatique,cette fonction très pratiquevous permet de modifier temporairement latempérature ambiante.Auto Manu• Pour augmenter la températureappuyez sur la +¡c¡ctouche + (plusieurs appuissi nécessaire). -0 1 2 3 4 5• Pour abaisser la températureappuyez sur la touche - (plusieurs appuis sinécessaire).L’indicateur du niveau de température en cours(confort ou économique) se met à clignoter.Cette modification prendra fin lors du prochainchangement de température programmée.Pour revenir au programme initial, appuyez surMODE et replacez le pointeur ▲ sous Auto.L’arrêt du clignotement de l’indicateur du niveaude température en cours (confort ou économique)marque la fin de la modification temporaire.☛☛Le mode absence prolongéevacancesCe mode met votre logement à l’abri des risquesdu gel en maintenant une température minimumréglable dans votre logement durant vos absences.Vous pouvez programmer la durée de votreabsence pour prévoir la remontée en températurede votre logement à votre retour.2 possibilités de maintien hors-gel :Forçage hors-gel permanent• Appuyez sur , le jour 0I clignote.• Appuyez une fois sur la touche -, l’affichage FORCclignote.• Validez avec la touche OK.• Réglez le niveau de température souhaité pendantvotre absence avec les touches +/-.• Validez avec la touche OK.Pour annuler et revenir en mode Auto, appuyezsur la touche MODE.Maintien hors-gel pour un nombre de jours• Appuyez sur , le jour 0I clignote.• Avec les touches +/-, réglez la durée de votreabsence en jour (de 1 à 99 jours). La journéeen cours compte pour 1.• Validez avec la touche OK.• Réglez le niveau de température souhaité pendantvotre absence avec les touches +/-.• Validez avec la touche OK. Le thermostatrepassera en mode Auto à la fin de la périoderéglée.Pour annuler et revenir en mode Auto, appuyezsur la touche MODE.Signal d’entretien de votre0000installation hCe mode vous permet soit :• de penser à faire effectuer un entretien périodique(changement de filtre sur un climatiseur, lenettoyage d’un appareil).• de comparer vos consommations de chauffage oud’air conditionné d’une année sur l’autre (en comparantle nombre d’heures d’enclenchement).Comptage du nombre d’heures d’enclenchement+-Auto Manu 1 2 3 4 5 6 70 1 2 3 4 5 6 7 8 9 10 11 12 13 14 15 16 17 18 19 20 21 22 23 24DAYS1-7PROGP1-P4timer0000hOK ☛MODE0000 Appuyez sur la touche h l’afficheur vousindique, depuis la mise en place des piles, lenombre d’heures d’enclenchement de votrebrûleur,climatiseur,ventilo-convecteur,etc.selonle type d’appareil commandé (un appui sur + ou- remet le compteur à zéro). Appuyez sur MODE pour revenir en mode Auto.Res☛Programmation de la périodicité d’entretiende votre installation0000 Appuyez sur la touche h . Réglez avec les touches +/- le nombre d’heuresde fonctionnement à partir duquel vous souhaitezêtre averti. Validez avec la touche OK ;le décomptage commence.Vousserez averti par l’apparition du sigletimer de la fin du décomptage.Réglages éventuelsVous pouvez procéder à différentsréglages au dos de l’appareil(lorsqu’il est débroché).1- Sélection du type d’installation■ ChauffageAir conditionné■2- Sélection du mode de régulation■ Tout ou rienChronoproportionnel■Le mode chronoproportionnel est plus particulièrementconseillé pour des installations de plancherschauffants (forte inertie).3- Fonction anti-blocage de la pompe de circulation(enclenchement de la pompedurant 1 minute toutes les 24 heures)■ Arrêt fonction Marche fonctionanti-blocage ■ anti-blocageConfigurationPour associer un émetteur au récepteur :• Appuyez pendant plus de 3 secondes sur lebouton poussoir du récepteur.• Le voyant OK clignote, relâchez la touche.Vous êtes en mode configuration.• Appuyez pendant 3 secondes sur le boutonRESET du <strong>Thermoflash</strong> <strong>DIGI</strong> 2 <strong>HF</strong>.• Le voyant OK du récepteur s'arrête declignoter au bout de 5 secondes environ.Le lien émetteur/récepteur est établi.Mise à zéroPour effacer tous les liens émetteur/récepteur :• Appuyez pendant plus de 10 secondes sur lebouton poussoir du récepteur.• Le voyant OK clignote lentement puis plusrapidement.• Ré-appuyez pendant 3 secondes sur le boutonpoussoir du récepteur.• Le voyant OK arrête de clignoter, tous lesliens sont effacés.Le récepteur retourne en mode Auto.ForçageLa commande manuelle est disponible sur ceproduit.• Appuyez brièvement sur le bouton poussoir du récepteur (appui < 3 s.).Chaque appui bref inverse l’état de la sortie.Remarque : la commande radio reste prioritaire.Que faire si ?• Le chauffage ne se met pas en marche:- le récepteur n’est pas alimenté : (voyant OK éteint).Vérifiez le fusible et le disjoncteur.• Le récepteur est hors de portée del’émetteur :- rapprochez-vous suffisamment du récepteur.• Le récepteur ne reconnaît pas le code del’émetteur :- reconfigurez le récepteur.• L'application ne se met pas en marcheou ne s’arrête pas :- le récepteur ou l'émetteur est dans une zoneperturbée par des émissions d'ondes (radio amateur,télévision, borne réseau GSM etc.) : déplacezle récepteur ou l'émetteur hors de la zoneperturbée.Si le problème persiste contactez votre électricien.Caractéristiques techniquesEmetteurPlage de réglage de la T° confort : +5°C à +30°CPlage de réglage de la T° réduite : +5°C à +30°CPlage de réglage de la T° vacances : +5°C à +30°CPlage d’affichage de la T° ambiante : 0°C à +40°CDifférentiel statique :< 0.3°CAlimentation : 2 piles alcalines 1,5 V LR6(pour alimenter l’ensemble du produit,transmission radio comprise)Portée typique :75 m. en champ libre3 étages dans l’habitat typiqueFréquence d’émission :433.92 MHzRapport cyclique d’émission : 10%IP : 30Température de fonctionnement : 0°C à +40°CTempérature de stockage : -20°C à +70°CHygrométrie : 95% à 40°CDegré de pollution :normalDimensions :115 x 82 x 34 mmNormes : EN 301-489-3RécepteurAlimentation : 230 V +10 % à -15 %Charge minimale :12 V 100 mASortie : 1 contact inverseur libre de potentielPouvoir de coupure :AC1 :16 A 250 VInductif : 3 A (cos ϕ = 0,6)Fréquence radio :433.92 MHzIndice de protection :IP43Classe d’isolation :IITenue aux chocs :IK04T° de fonctionnement : -10°C à +60°CT° de stockage : -20°C à +70°CCapacité souple :20,5 à 1,5 mmCapacité rigide :20,5 à 2,5 mmDimensions :130 x 60 x 27 mmHygrométrie : 90% max. à 20°CClasse de réception : 2Normes : EN 60669-2-1Normes : EN 300220-3,EN 301-489-1 et EN 301-489-3.Utilisable partout en Europe3
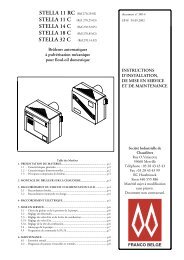
Installation du récepteur!Avant toute intervention, coupez le courant.Le schéma de câblage ne représente pas lesprotections. L’installation doit être réaliséepar un professionnel dans le respect desnormes en vigueur.Pour faciliter son installation, le kit <strong>Thermoflash</strong><strong>DIGI</strong> 2 <strong>HF</strong> est livré avec un câble souple 4 fils de1,5 mm 2 , longueur 1,20 m (non raccordé).Pour le raccordement du récepteur <strong>HF</strong>, nous vousconseillons d’utiliser ce câble, en respectant lecode couleur suivant :brun= phasebleu = neutregrisliaison vers la chaudièrenoir85 mmLNLNLN5 4 3 2 1L N5 4 3 2 15 4 3 2 1LNLNPour convecteurs sans régulation fil pilote.!Dans le cas d’un branchement avec 2 typesd’appareils (chauffage et climatisation), veillez àéteindre l’un des appareils pour éviter que lesdeux ne fonctionnent simultanément durant lamême saison.33 rue Saint-NicolasB.P. 50152 - 67704 SAVERNE CedexTél. 03 88 01 88 01 - Fax 03 88 01 88 90www.flash.fr4
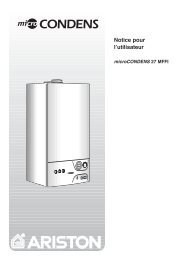
9419-565-10/04.07<strong>Kit</strong> <strong>Thermoflash</strong> <strong>DIGI</strong> 2 <strong>HF</strong>rif. 56460Cronotermostato senza fili conricevitore muraleCronotermostato senza fili, ciclo settimanalecon ricevitore murale IP43 FR ITGBES DEPresentazione dei prodottiCronotermostato <strong>DIGI</strong> 2 <strong>HF</strong>Semplice da installare, facile da programmare, il kit <strong>DIGI</strong> 2 <strong>HF</strong> vi permette di programmare e regolareil vostro riscaldamento.TemperaturacomfortTasti +/–per la regolazioneIndicatoredel livellodi temperaturain corsocomforto economiaTemperaturaeconomica+-DAYS1-7Auto Manu 1 2 3 4 5 6 7¡c¡cPROGP1-P4Indicatore delgiorno dellasettimanaTemperaturaambientetimerdaysOK¡c0000hSpia usurapile0 1 2 3 4 5 6 7 8 9 10 11 12 13 14 15 16 17 18 19 20 21 22 23 24ResIndicatore dell’innestodel riscaldamentoo del sistemadi aria condizionamentoSelezionedei modiMODEAssenzaprolungata(vacanze)Visualizzazionedei periodicomfort eeconomiaIl kit <strong>DIGI</strong> 2 <strong>HF</strong> è stato concepito per apportarecomfort ed economizzare energia. Si installafacilmente nella vostra casa, regola la temperaturaambiente in funzione della programmazione effettuataed invia comandi marcia/arresto al ricevitore muraleinstallato vicino alla caldaia.Il kit <strong>DIGI</strong> 2 <strong>HF</strong> regola la temperatura ambientesecondo 3 livelli di temperatura.• Comfort: è la temperatura raccomandata quandosiete in casa.• Ridotto: è la temperatura più gradevole quando sieteassenti per breve tempo o durante la notte.• Antigelo: è la temperatura minima assicurata durantele assenze prolungata. Protegge l’abitazione dai rischidel gelo.Installazione del <strong>DIGI</strong> 2 <strong>HF</strong>Per assicurare un buon funzionamento ;il <strong>DIGI</strong> 2 <strong>HF</strong> deve essere installato a circa 1.5 m dalsuolo su un muro interno e riparato da ogni tipo diirraggiamento diretto e da ogni sorgente di calorecome ad esempio il televisore, lampade, radiatori,correnti d’aria etc.Il <strong>DIGI</strong> 2 <strong>HF</strong> può essere collocato su un qualsiasimobile attraverso una sua base di appoggio,verificando che nessun fattore esterno possainfluenzarlo (radiatore, finestra etc.).Selezione dei giornidella settimana(1 = lunedì, 2 = martedì...7 = domenica)Scelta delprogrammada P1 a P4RegolazionetemperaturacomfortRegolazionetemperaturaeconomiaConvalidaRegolazionecontatoreorarioRas: rimessaa zerogeneraleVoi potete comunque installarlo a muro.• Per fare questo, staccate la base di appoggio.Il ricevitore murale IP43Il ricevitore murale IP43 si installa facilmente in prossimità della caldaia.Esso riceve i comandi marcia/arresto provenienti dal <strong>DIGI</strong> 2 <strong>HF</strong> e li trasmette alla caldaia via filo. Pulsante di configurazione e di forzatura. Spia di messa in tensione e di codifica.LED acceso = il prodotto è alimentato.Questo LED lampeggia durante le operazionidi codifica. Spia di funzionamento. Questo LED è accesoquando il contatto di uscita del ricevitore èchiuso = ON.!• Fissatela al muro.Importante: l'insieme emettitore + ricettore viene codificato dal produttore ed é dunque immediatamentefunzionante.Inutile effettuare nuovamente la codifica.Installazione o sostituzione delle pileIl <strong>DIGI</strong> 2 <strong>HF</strong> è dotato di una spia che controlla la carica delle pile. Non appena la spia appare in bassoa destra del display, procedere alla sostituzione delle pile (usare 2 pile 1,5 V alcaline LR6, l’autonomia èdi circa 12 mesi).Durante la sostituzione delle pile <strong>DIGI</strong> 2 <strong>HF</strong> conserva i suoi programmi per 60 secondi.ReinizializzazionePrima di iniziare la programmazione del vostroapparecchio abbassate il coperchio e premete sultasto RESET con la punta di una biro.• Dopo di che appoggiate il <strong>DIGI</strong> 2 <strong>HF</strong> sulla base.0000h5
Programmazione dell’ora e delgiornoE’ la prima messa in servizio.• Voi avete premuto sul tastoRESET.• Le ore I2:00 e l’indice ▲ sotto ilgiorno 1 (lunedì) lampeggiano.☛☛+-Auto Manu 1 2 3 4 5 6 7 Programmate l’ora con i tasti +/- (una pressioneprolungata sul tasto accelera lo scorrimentodell’ora). Regolare il giorno con pressioni successive sultasto DAYS 1-7, un indice ▲ appare sotto ilgiorno corrispondente (1 = lunedì,2 = martedì,3 = mercoledì, ecc.). Convalidate con il tasto OK. Se volete modificare l’ora o il giorno: premeresul tasto MODE fino alla comparsa dell’indice ▲sotto la sigla orologio e procedere come indicatosopra,ai punti , e .Regolazione delle temperatureLe temperature comfort e economia sonopreregolate: Comfort = 20°C, Economia = 16°C.☛☛☛+-DAYS1-7PROGP1-P4Modifica della temperatura comfort Premere sul tasto . Modificare la temperatura con i tasti +/-. Convalidate con il tasto OK.Modifica della temperatura économique Premere sul tasto . Modificare la temperatura con i tasti +/-. Convalidate con il tasto OK.La programmazioneu☛PROGP1-P41 2 3 4 5Per programmare la vostra settimana avete adisposizione 4 programmi: P1, P2, P3, che sonopreregolati e non modificabili.P4 che è libero e chepermette di creare un programma personalizzato edifferente per ogni giorno della settimana.P1 = Temperatura comfort dalle ore 6h alle 23h.Temperatura economia dalle ore 23h alle 6h.P2 = Temperatura comfort dalle ore 6h alle8h30 e dalle ore 16h30 alle 23h.Temperatura economia dalle ore 8h30alle 16h30 e dalle ore 23h alle 6h.0 1 2 3 4 5 6 7 8 9 10 11 12 13 14 15 16 17 18 19 20 21 22 23 24OKAuto Manu 1 2 3 4 5 6 7c ¡ccDAYS1-7¡cPROGP1-P4☛☛☛OK0000h0000hResResMODEMODE0 1 2 3 4 5 6 7 8 9 10 11 12 13 14 15 16 17 18 19 20 21 22 23 24!P1 è destinata ai 7 giorni della settimana inmodo standard. Se P1 corrisponde al vostroritmo di vita rimanete in modo automatico,in caso contrario continuate.☛P3 = Temperatura comfort dalle ore 6h alle8h30, dalle ore 11h30 alle 13h30 edalle ore 16h30 alle 23h.Temperatura economia dalle ore 8h30alle 11h30, dalle ore 13h30 alle 16h30e dalle ore 23h alle 6h.0 1 2 3 4 5 6 7 8 9 10 11 12 13 14 15 16 17 18 19 20 21 22 23 24P4 = Programma libero che vi permette dicreare 3 periodi in temperatura comforte 3 periodi in temperatura economia perogni giorno della settimana.Selezione di un programma esistente P1,P2 o P3 per un giorno della settimana (inmodo programmazione tutte le modifichesi convalidano automaticamente).esempio: P2 per mercoledi+-Auto Manu 1 2 3 4 5 6 7¡c¡c☛☛0 1 2 3 4 5 6 7 8 9 10 11 12 13 14 15 16 17 18 19 20 21 22 23 24DAYS1-7PROGP1-P4 Premere sul tasto PROG P1-P4 per passarein modo programmazione.Il numero del programma assegnato al giornolampeggia sulla destra del display. Premere sul tasto DAYS 1-7 fino alla comparsadell’indice ▲sotto il giorno che voleteprogrammare. Nel nostro caso : mercoledì. Premere sul tasto PROG P1-P4 fino alla comparsaa destra del display del numero diprogramma P2 che lampeggia. Convalidate con il tasto OK,il giorno seguenteè proposto automaticamente.Creazione di un programma P4Un profilo di 24 ore composto da 48 termometriin basso sul display vi permettono di visualizzarefacilmente la composizione del vostro programma.Un termometro mezzo vuoto corrisponde a30 minuti a temperatura economia.Un termometro pieno corrisponde a 30 minutien temperatura comfort.esempio: creazione di 3 periodi in temperaturacomfort per il venerdì: dalle 6h alle 8h, dalle 12halle 14h e dalle 18h alle 22h.+-2DAYS1-7☛PROGP1-P4 Partendo dal modo Auto, premere sul tastoPROG P1-P4. Premere sul tasto DAYS 1-7 fino alla comparsadell’indice ▲ sotto il giorno che volete programmare,nel nostro esempio: venerdì. Premere sul tasto PROG P1-P4 fino allacomparsa a destra del display del numero diprogramma P4 che lampeggia. Il display indica0:00 ed il primo termometro lampeggia sulprofilo di 24 ore.OK☛Auto Manu 1 2 3 4 5 6 7¡c¡c☛☛ ☛☛OK0000h0 1 2 3 4 5 6 7 8 9 10 11 12 13 14 15 16 17 18 19 20 21 22 23 240 1 0000hResResMODEMODE☛☛ Premere sul tasto più volte fino ad arrivarealle 6:00: ogni breve pressione rappresenta unincremento di 30 minuti,la pressione prolungataaccelera la progressione.• Premere sul tasto più volte fino ad arrivarealle 8:00.• Premere sul tasto più volte fino ad arrivarealle I2:00.• Premere sul tasto più volte fino ad arrivarealle I4:00.• Premere sul tasto più volte fino ad arrivarealle I8:00.• Premere sul tasto più volte fino ad arrivarealle 22:00.Nota : se avete fatto un errore (esempio: 11h30invece di 12h00) usate il tasto +/- per avanzare oretrocedere e correggete con i tasto . Convalidate con il tasto OK, ed il giornoseguente è proposto automaticamente. Premere su MODE per ritornare al modoAuto.Lettura dei programmiE’ possibile verificare la programmazione:+-DAYS1-7Auto Manu 1 2 3 4 5 6 7¡c¡c☛☛0 1 2 3 4 5 6 7 8 9 10 11 12 13 14 15 16 17 18 19 20 21 22 23 24PROGP1-P4 Partendo dal modo Auto, premere sul tastoPROG P1-P4. Con il tasto DAYS 1-7 selezionare il giorno da 1a 7 e verificate la programmazione sul profilo di 24ore sulla parte bassa del display (vedere esempioqui sotto). Premere su MODE per ritornare al modoAuto.Il modo automatico (Auto)Il passaggio in modo automatico sieffettua premendo sul tasto MODEfino alla comparsa dell’indice ▲ sottoAuto.In modo automatico il <strong>DIGI</strong> 2 <strong>HF</strong> si°cadatta al vostro ritmo di vita con ilprogramma o con i programmi da voi scelti.Il modo manuale (Manu)Il modo manuale trasforma il vostro apparecchioin un semplice termostato mantenendo unatemperatura costante dell’ambiente (regolabileda 5 a 30° C). Premere sul tasto MODE per posizionare l’indice▲ sotto Manu. Premere su + o - per regolare la temperaturavoluta (esempio 22.5° C).Per uscire dal modo Manu, premere su MODE eriposizionare l’indice ▲ sotto Auto.OK0000hResMODE0 1 2 3 4 5 6 7 8 9 10 11 12 13 14 15 16 17 18 19 20 21 22 23 24+-Auto AutoManuManuDAYS1-7¡c ¡cPROGP1-P4OK¡c0000hAuto ManuResMODE☛☛MODE☛☛6
0 1 2 3 4 5 6 7 8 9 10 11 12 13 14 15 16 17 18 19 20 21 22 23 24Modifica temporanea dellatemperaturaIn modo automatico, questa funzione molto pratica,vi permette di modificare temporaneamente latemperatura ambiente.• Per aumentare la temperaturapremere sul tasto +¡cAuto Manu(più volte se necessario). +¡c• Per abbassare la temperaturapremere sul tasto - -0 1 2 3 4 5(più volte se necessario).L’indicatore del livello di temperatura in corso(comfort o economia), si mette a lampeggiare.La modifica terminerà al prossimo cambio ditemperatura programmato.Per ritornare al programma iniziale premere suMODE e rimettere l’indice ▲ sotto Auto.L’arresto del lampeggiamento del livello di temperatura(comfort o economico) indica la fine dellamodifica temporanea.Il modo assenza prolungataVacanzeQuesto modo mette la vostra abitazione al riparoda ogni rischio di gelo, pur mantenendo unatemperatura minima regolabile durante la vostraassenza. Potete programmare la durata dellavostra assenza per prevedere l’aumento dellatemperatura al vostro ritorno.2 possibilità di fuori gelo:Forzatura fuori gelo permanente• Premere sul tasto , il giorno 0I si mette alampeggiare.• Premere una sola volta sul tasto -, la visualizzazioneFORCsi mette a lampeggiare.• Convalidate con il tasto OK.• Regolare il livello di temperatura desideratodurante la vostra assenza mediante i tasti +/-.• Convalidate con il tasto OK.Per annullare e ritornare in modo Auto, premeresul tasto MODE.Impostazione fuori gelo per un determinatonumero di giorni• Premere sul tasto , il giorno 0I si mette alampeggiare.• Con i tasti +/-, regolate la durata della vostraassenza in giorni (da 1 a 99). Il giorno in corsoconta per 1.• Convalidate con il tasto OK.• Regolare il livello di temperatura desideratodurante la vostra assenza mediante i tasti +/-.• Convalidate con il tasto OK.Per annullare e ritornare in modo Auto, premeresul tasto MODE.Segnale di pausa della vostra0000installazione hQuesto modo vi permette sia:• di pensare di fare effettuare un periode di pausa(cambio del filtro su un sistema ad aria condizionatao pulizia di un apparecchio).• di paragonare il consumo del riscaldamento odell’aria condizionata da un anno all’altro (confrontandoil numero di ore di funzionamento).Comptaggio del numero di ore di funzionamento+-DAYS1-7Auto Manu 1 2 3 4 5 6 7PROGP1-P4☛☛timer0000hOK ☛ResMODE☛0000 Premere sul tasto h il display indica,fin dallainstallazione delle pile, il numero di ore difunzionamento del vostro bruciatore, sistemadi climatizzazione, convettore ecc., a secondadel tipo di apparecchio ordinato (una pressionesu + o - rimette il contatore a zero). Premere su MODE per ritornare al modo Auto.Programmazione del periodo di pausa dellavostra installazione0000 Premere sul tasto h . Regolare con i tasti +/- le ore di funzionamentotrascorse le quali volete che l’apparecchio viavverta. Convalidate con il tasto OK ; Il conto allarovescia ha inizio.L’apparizione del segno timervi avvertirà della fine del conteggio.Regolazioni eventualiPotete procedere a differentiregolazioni sul retro dell’apparecchio(sempre che sia).1- Selezione del tipo d’installazione■ Riscaldamento Aria condizionamento■2- Selezione del modo di regolazione■ On/OffCronoproporzionale■Il modo cronoproporzionale è più particolarmenteindicato per installazioni di riscaldamento a pavimento(forte inerzia).3- Funzione antibloccaggio della pompa dicircolazione (innesto della pompa per1 minuto ogni 24 ore).■ Arresto funzione Funzionamento funzioneantibloccaggio ■ antibloccaggioConfigurazionePer associare un emettitore con il ricevitore:• Premere per più di 3 secondi il pulsante delricevitore.• La spia OK lampeggia, rilasciare il pulsante.Questo è il modo configurazione.• Premere per 3 secondi il pulsante RESET del<strong>Thermoflash</strong> <strong>DIGI</strong> 2 <strong>HF</strong>.• La spia OK del ricevitore non lampeggia piùdopo circa 5 secondi.Il collegamento emettitore/ricevitore è creato.ReinizializzazionePer cancellare tutti i collegamenti emettitore/ricevitore:• Premere per oltre 10 secondi il pulsante delricevitore.• La spia OK si mette a lampeggiare lentamente,poi sempre più rapidamente.• Premere di nuovo per 3 secondi il pulsantememo del ricevitore.• La spia OK smette di lampeggiare, vengonocancellati tutti i collegamenti.Il ricevitore torna in modo Auto.ForzaturaSu questo apparecchio è disponibile un comandomanuale:• Premere brevemente il pulsante memo del ricevitore (pressione < 3 secondi).Ogni volta che si preme brevemente il pulsante,viene invertito lo stato dell’uscita.Osservazione: il comando radio continua adavere la precedenza.Che cosa fare se… ?• Il riscaldamento non si avvia:- il ricevitore non è alimentato: (spia OK spenta). Verificare il fusibile e l’interruttoreautomatico.• Il ricevitore è fuori dalla portatadell’emettitore:- avvicinarsi sufficientemente al ricevitore.• Il ricevitore non riconosce il codicedell’emettitore:- reinizializzare il ricevitore.• Il prodotto non si accende o non sispegne:- il ricevitore o l'emettitore si trovano in un'areaperturbata da altre onde (radio-amatori, televisione,antenne GSM ecc.): spostate il ricevitore ol'emettitore in un'altra zona non perturbata.Se il problema persiste, contattare il proprioelettricista.Caratteristiche tecnicheEmettitoreIntervallo di regolazione della T° comfort:da +5°C a +30°CIntervallo di regolazione della T° ridotta:da +5°C a +30°CIntervallo di regolazione della T° vacanze:da +5°C a +30°CIntervallo di regolazione della T° ambiente:da 0°C a +40°CDifferenziale statico:< 0.3°CAlimentazione: 2 batterie alcaline tipo 1.5V LR6(per alimentare il prodotto completo,trasmissione radio compresa)Distanza di emissione: 75 metri con campo libero3 piani in abitazione standardFrequenza di emissione:433.92 MHzFunzionamento ciclo di emissione: 10%IP : 30Temperatura di funzionamento: 0°C a +40°CTemperatura di stoccaggio: -20°C a +70°CIgrometria: 95% a 40°CLivello di inquinamento:normaleDimensioni:115 x 82 x 34 mmNorme: EN 301-489-3RicevitoreAlimentazione: 230 V +10 % a -15 %Carica minima:12 V 100 mAUscita: 1 contatto invertitore libero da potenzialeCapacità d’interruzione:AC1 :16 A 250 VInduttiva: 3 A (cos ϕ = 0,6)Frequenza radio:433.92 MHzIndice di protezione:IP43Classe d’isolamento:IIResistenza all’urto:IK04Temperatura di funzionamento: -10°C a +60°CTemperatura di stoccaggio: -20°C a +70°CCapacità flessibile:20,5 a 1,5 mmCapacità rigida:0,5 a 2,5 mm2Dimensioni:130 x 60 x 27 mmIgrometria: 90% max. a 20°CClasse di ricezione 2Norme: EN 60669-2-1Norme: EN 300220-3,EN 301-489-1 e EN 301-489-3.Usato in tutta Europa7
Installazione del ricevitore!Prima di qualsiasi intervento, togliere correnteall’impianto. Lo schema dei collegamenti nonraffigura le protezioni. L’installazione deveessere effettuata da un esperto nel rispettodelle norme in vigore.Per facilitarne l’installazione, il kit <strong>Thermoflash</strong><strong>DIGI</strong> 2 <strong>HF</strong> viene fornito con un cavo flessibiledotato di 4 fili da 1,5 mm 2 , lunghezza 1,20 m (noncollegato).Per collegare il ricevitore <strong>HF</strong>, vi consigliamo di utilizzarequesto cavo, rispettando i seguenti codicicromatici:marrone = faseblu = neutragrigio collegamento con la caldaianero 85 mmLNLNLN5 4 3 2 1L N5 4 3 2 15 4 3 2 1LNLN!Nel caso di un collegamento con 2 tipid’apparecchi (caldaia e climatizzazione), spegnereuno degli apparecchi afine di evitare che i duefunzionano simultaneamente duranted la stessastaggione.33 rue Saint-NicolasB.P. 50152 - 67704 SAVERNE CedexTél. 03 88 01 88 01 - Fax 03 88 01 88 90www.flash.fr8
9419-565-10/04.07<strong>Kit</strong> <strong>Thermoflash</strong> <strong>DIGI</strong> 2 <strong>HF</strong>Art. Nr. 56460Digitale Uhrenthermostatdrahtlos und aufputz EmpfängerDigitale Uhrenthermostat Wochenzyklusund IP43 aufputz Empfänger FR IT DEGB ESProduktbeschreibungDer Uhrenthermostat <strong>DIGI</strong> 2 <strong>HF</strong>Einfach zu installieren, leicht zu programmieren, der <strong>DIGI</strong> 2 <strong>HF</strong> <strong>Kit</strong> ermöglicht Ihnen ohne BauarbeitenIhre Heizung zu programmieren und regulieren.Taste "+/–" fürdie EinstellungAnzeige desTemperaturwertesfür denKomfortundAbsenkbetriebUmgebungstemperaturKomforttemperaturAbsenktemperatur+-DAYS1-7Auto Manu 1 2 3 4 5 6 7¡c¡cPROGP1-P4AnzeigedesWochentagstimerdaysOKAnzeige fürden Ladezustandder Batterie0 1 2 3 4 5 6 7 8 9 10 11 12 13 14 15 16 17 18 19 20 21 22 23 24¡c0000hResMODEAnzeige für dieEinschaltung derHeizung oder derKlimaanlageWahl derBetriebsartLängereAbwesenheit(Urlaub)Anzeige derBetriebsartenKomfort- undAbsenkbetriebDer <strong>DIGI</strong> 2 <strong>HF</strong> <strong>Kit</strong> ist entwickelt worden, um für SieKomfort und Energieeinsparen zu bieten.Die Installation des <strong>DIGI</strong> 2 <strong>HF</strong> <strong>Kit</strong> in Ihre Wohnung istleicht durchzuführen. Er reguliert, gemäss derProgrammierung, die Raumtemperatur und sendetEin/Aus Befehle dem Empfänger der in der Nähe desHeizkessels installiert ist.• Die Komforttemperatur: das ist die Temperatur,die Sie haben möchten, wenn Sie anwesend sind.• Die Absenktemperatur: das ist die Temperatur, dieSie während Ihrer kurzzeitigen Abwesenheit oderwährend der Nacht haben möchten.• Die Frostschutztemperatur: das ist dieMindesttemperatur für die Zeit einer längerenAbwesenheit. Mit dieser Einstellung ist Ihre Wohnunggegen Frost geschützt.Einrichtung des <strong>Thermoflash</strong> <strong>DIGI</strong> 2 <strong>HF</strong>Um die Regelung der Raumtemperatur zu sichern,sollte der <strong>DIGI</strong> 2 <strong>HF</strong> in ca. 1,5 m Höhe an einerStelle der Innenwand angebracht werden, die vondirekter Sonneneinstrahlungen und anderenthermischen Einflüssen (bspw. Lampe, Fernseher,usw.) geschützt ist.Sie können den <strong>DIGI</strong> 2 <strong>HF</strong> einfach auf einMöbelstück stellen, mit Hilfe des mitgeliefertenSockels. Sie sollten dabei achten dass, keinAußenfaktor den <strong>DIGI</strong> 2 <strong>HF</strong> beeinflussen kann(Heizkörper, Fenster).Wahl desWochentags(1 = Montag,2 = Dienstag ...7 = Sonntag)Wahl desProgrammsP1 bis P4Einstellungdes Wertes derKomforttemperaturEinstellungdes Wertes derAbsenktemperaturBestätigungEinstellungdesStundenzählersRESETSie können den <strong>DIGI</strong> 2 <strong>HF</strong> auch an die Wandbefestigen.• Den Sockel entfernenIP43 EmpfängerDer IP43 Wandempfänger ist leicht und diskret in der Nähe des Heizkessels zu montieren.Er erhält die Ein/Aus Befehle vom <strong>DIGI</strong> 2 <strong>HF</strong> und leitet sie mittels ein Schaltausgang an denHeizkessel weiter. Taste für Verknüpfung und Zwangbetrieb. Betrieb- und Kodierungs-Kontrolleuchte.Wenn die Leuchte an ist, steht das produktunter Strohn.LED blinkt = Kodierungsvorgang läuft. Funktions-Kontrolleuchte.LED leuchtet = Ausgangskontakt geschlossen =ON.!Wichtig: das Sende-/Empfangsgerät wird werkseitig mit dem Code versehen und ist daher sofortBetriebsbereit.Eine Codierung ist nicht erforderlich.Einsetzen und Austausch der BatterienDiese Uhrenthermostat besitzt eine Anzeige für den Ladezustand der Batterie. Sobald diese Anzeigeunten rechts im Display erscheint, sollten Sie die Batterien auswechseln. Es sind jeweils 2 alkalischeBatterien 1,5 V LR 6 zu verwenden. Der Betrieb wird damit für ca. 12 Monate gewährleistet.Beim Austausch der Batterien bleiben die Programme für 60 Sekunden im Gerät gespeichert.ResetBevor Sie mit der Programmierung Ihres Gerätesbeginnen, klappen Sie bitte die Haube herab unddrücken Sie mit Hilfe der Spitze einesKugelschreibers o.ä. die Taste RESET.0000h• An die Wand befestigen.• Das Produkt auf den Sockel wieder montieren.9
Einstellung des Tages und derUhrzeitEs handelt sich um die erste Inbetriebnahme.• Drücken Sie die TasteRESET.• Die Anzeige I2:00 und derZeiger ▲ unterhalb des Tages1 (Montag) blinken.+-☛☛Auto Manu 1 2 3 4 5 6 7 Stellen Sie nun mit den Tasten +/- die Uhrzeitein. Beim anhaltenden Drücken dieser Tastenläuft die Zeitanzeige schneller durch. Mit Hilfe der Taste DAYS 1-7, stellen Sie jetztden Tag ein. Unter dem jeweiligen Tag erscheintdann der Zeiger ▲ (1 = Montag, 2 = Dienstag,3 = Mittwoch usw.). Bestätigen Sie die Einstellung mit der Taste OK. Falls Sie die Einstellung des Tages oder derUhrzeit verändern möchten, drücken Sie dieTaste MODE bis der Zeiger ▲ unter dem Symbolder Uhr steht. Anschließend gehen Sie ebenso wiein den obigen Punkten , und vor.Einstellung der TemperaturenDie Werte der Komfort- und derAbsenktemperatur sind voreingestellt:Komforttemperatur = 20°C,Absenktemperatur = 16 C☛☛☛+-DAYS1-7uPROGP1-P4Änderung der Komforttemperatur Änderung der Taste . Mit Hilfe der Taste +/- den Wert der Temperaturändern. Bestätigen Sie die Einstellung mit der Taste OK.Modification de la température économique Änderung der Taste . Mit Hilfe der Taste +/- den Wert der Temperaturändern. +/-. Bestätigen Sie die Einstellung mit der Taste OK.Programmierung☛PROGP1-P41 2 3 4 5Für die Programmierung sind 4 Programmeauswählbar: P1, P2, P3, sind voreingestellt undkönnen nicht verändert werden. P4 kann freiprogrammiert werden und erlaubt Ihnen damit, Ihrpersönliches Programm für jeden einzelnenWochentag zu erstellen.P1 = Komforttemperatur von 6 Uhr bis 23 Uhr.Absenktemperatur von 23 Uhr à 6h.P1 ist standardmässig den 7 Wochentagenzugeordnet. Sollte dieses Programm IhremLebensrhythmus entsprechen, so bleibenSie in dem automatischen Betriebsmodus,sonst setzen Sie fort.OKAuto Manu 1 2 3 4 5 6 7c ¡ccDAYS1-7¡cPROGP1-P4☛☛☛OK0000h0000hResResMODEMODE0 1 2 3 4 5 6 7 8 9 10 11 12 13 14 15 16 17 18 19 20 21 22 23 24!☛P2 = Komforttemperatur von 6 Uhr bis 8.30Uhr und von 16.30 Uhr bis 23 Uhr.Absenktemperatur von 8.30 Uhr bis16.30 Uhr und von 23Uhr bis 6 Uhr.0 1 2 3 4 5 6 7 8 9 10 11 12 13 14 15 16 17 18 19 20 21 22 23 24P3 = Komforttemperatur von 6 Uhr bis 8.30Uhr und von 16.30 Uhr bis 23 Uhr.Absenktemperatur von 8.30 Uhr bis11.30 Uhr, von 13.30 Uhr bis 16.30Uhr und von 23Uhr bis 6 Uhr.0 1 2 3 4 5 6 7 8 9 10 11 12 13 14 15 16 17 18 19 20 21 22 23 24P4 = Über dieses freie Programm könnenSie für jeden einzelnen Wochentag biszu 3 Zeiträume mit Komforttemperaturund 3 Zeiträume mit Absenktemperaturprogrammieren.Wahl eines der voreingestellten ProgrammeP1, P2 und P3 für einen Wochentag (in demBetriebsmodus Programmierung werdenalle Änderungen automatisch bestätigt).Beispiel: P2 für Mittwoch+-Auto Manu 1 2 3 4 5 6 7¡c¡c☛☛0 1 2 3 4 5 6 7 8 9 10 11 12 13 14 15 16 17 18 19 20 21 22 23 24DAYS1-7PROGP1-P4 Drücken Sie die Taste PROG P1-P4 um in dieBetriebsart Programmierung zu gelangen.Die Nummer des Programms, die demWochentag zugeordnet ist,blinkt im rechten Teildes Displays. Drücken Sie die Taste DAYS 1-7 bis der Zeiger▲ unter dem Wochentag steht, den Sie programmierenmöchten (in unserem Beispiel :Mittwoch). Drücken Sie die Taste PROG P1-P4 zudrücken, bis im rechten Teil des Displays diegewünschte Programmnummer P2 blinkt. Bestätigen Sie die Einstellung mit der Taste OK,anschliessend wird Ihnen automatisch der folgendeTag angeboten.Zusammenstellung eines Programms P4+-2DAYS1-7☛PROGP1-P4Im unteren Teil des Displays wird ein aus 48Thermometern bestehendes 24 Std.Profil angezeigt,an dem Sie die Zusammensetzung Ihres Programmsganz deutlich ablesen können.Ein halbleeres Thermometer entspricht30 Minuten bei Absenktemperatur.Ein volles Thermometer entspricht 30 Minutenbei Komforttemperatur.OK☛Auto Manu 1 2 3 4 5 6 7¡c¡c☛☛ ☛☛OK0000h0 1 2 3 4 5 6 7 8 9 10 11 12 13 14 15 16 17 18 19 20 21 22 23 240 1 0000hResResMODEMODE☛Beispiel: für die Programmierung von 3 Perioden beiKomforttemperatur für Freitag: 6 Uhr bis 8 Uhr, 12Uhr bis 14 Uhr und 18 Uhr bis 22 Uhr. Ausgehend von der Betriebsart Auto,drückenSie die Taste PROG P1-P4. Drücken Sie die Taste DAYS 1-7 bis sich derZeiger ▲ unter dem Tage befindet, den Sie programmierenmöchten,das ist in unserem Falle derFreitag. Drücken Sie die Taste PROG P1-P4 bis imrechten Teil des Displays die ProgrammnummerP4 blinkt. Ihr Display zeigt 0:00 an und das ersteThermometer im Profil der 24 Std blinkt. Jetzt drücken Sie mehrmals die Taste bisdie Zeit 6:00 angezeigt wird. Bei jedem kurzenDruck rücken Sie um 30 Minuten vor.Durch einanhaltendes Drücken der Taste wird dasDurchlaufen der Uhrzeit beschleunigt.• Drücken Sie mehrmals die Taste bis die Zeit8:00 Uhr angezeigt wird.• Drücken Sie mehrmals die Taste bis die ZeitI2:00 Uhr angezeigt wird.• Drücken Sie mehrmals die Taste bis die ZeitI4:00Uhr angezeigt wird.• Drücken Sie mehrmals die Taste bis die ZeitI8:00 Uhr angezeigt wird.• Drücken Sie mehrmals die Taste bis die Zeit22:00 Uhr angezeigt wird.Anmerkung: sollten Sie einen Fehler gemachthaben (z.B. 11.30 Uhr statt 12.00 Uhr), so benutzenSie die Tasten +/- um sich vor- oder rückwärts zubewegen und dann mit Hilfe der Tastendie entsprechenden Korrekturen vorzunehmen. Bestätigen Sie die Einstellung mit der Taste OK,anschliessend wird Ihnen automatisch der folgendeTag angeboten. Drücken Sie die Taste MODE um in die AutoBetriebsmodus zurückzukehren.Ablesen der ProgrammeSie können Ihre Programmierung folgenderweiseüberprüfen:+-DAYS1-7Auto Manu 1 2 3 4 5 6 7¡c¡c☛☛0 1 2 3 4 5 6 7 8 9 10 11 12 13 14 15 16 17 18 19 20 21 22 23 24PROGP1-P4Ausgehend von der Betriebsart Auto,drückenSie die Taste PROG P1-P4. Jetzt drücken Sie die Taste DAYS 1-7 um den Tagauszuwählen. Anschliessend können Sie dieProgrammierung an dem Profil der 24 Std überprüfen,das im unteren Teil des Displays angezeigtwird,z.B. Zum Schluss drücken Sie die Taste MODE um inden Auto Betriebsmodus zurückzukehren.Automatischer(Auto)BetriebsmodusUm den automatischen Betriebsmoduseinzuschalten, ist die Taste MODE zudrücken, bis der Zeiger ▲ unter Autosteht.Auto ManuIn dem automatischen Betriebsmodus°cpasst sich dieser UhrenthermostatIhrem Lebensrhythmus an, indem das von Ihnengewählte Programm ausgeführt wird.OK0000hResMODE0 1 2 3 4 5 6 7 8 9 10 11 12 13 14 15 16 17 18 19 20 21 22 23 24☛☛MODE10
☛☛Handgesteuerter Betriebsmodus(Manu)In dem handgesteuerten Betriebsmodus wird IhrGerät zu einem einfachen Thermostaten.Sie können auf diese Weise in Ihrer Wohnung einekonstante Temperatur aufrecht erhalten (die Sie von5 °C bis 30 °C einstellen können).+-Auto AutoManuManuDAYS1-7¡c ¡cPROGP1-P4 Drücken Sie die Taste MODE um den Zeiger ▲unter Manu zu setzen. Drücken Sie die Tasten +oder -um die gewünschteTemperatur einzustellen (z.B.22,5 °C).Um die Manu zu verlassen, drücken Sie erneut dieTaste MODE um den Zeiger ▲ unter Auto zusetzen.Vorübergehende Änderung derTemperaturIn dem automatischen Betriebsmodus, können Sieüber diese sehr praktische Funktion dieUmgebungstemperatur zeitweilig ändern.• Um die Temperatur zuAuto Manuerhöhen, drücken Sie¡c(gegebenenfalls mehrfach) +¡cdie Taste +.-• Um die Temperatur zu0 1 2 3 4 5senken, drücken Sie(gegebenenfalls mehrfach) die Taste -.Die Anzeige des aktuellen Sollwertes derTemperatur (Absenk- oder Komforttemperatur)beginnt zu blinken. Diese Änderung wird mit demnächsten programmierten Temperaturwechselaufgehoben.Um zum ursprünglichen Programm zurückzukehren,ist die Taste MODE zu drücken, bis der Zeiger ▲unter Auto steht.Das Ende der zeitweiligen Änderung derTemperatur wird dadurch gekennzeichnet, dass dieAnzeige des aktuellen Sollwertes der Temperatur(Absenk- oder Komforttemperatur) aufhört zublinken.Urlaubsbetriebsmodus(bei längerer Abwesenheit)In diesem Betriebsmodus wird Ihre Wohnung währendeiner längeren Abwesenheit gegen Frost geschützt,indem hier eine einstellbare Mindesttemperaturaufrechterhalten wird. Sie können die Dauer IhrerAbwesenheit programmieren, um für ihre Rückkehreinen Temperaturanstieg in Ihrer Wohnung vorzusehen.2 Möglichkeiten für die FrostschutzschaltungPermanenter Frostschutz (Zwangsbetrieb)• Drücken Sie die Taste Wochentag 0I blinkt.• Drücken Sie einmal die Taste -, Anzeige FORC(Zwangsbetrieb) blinkt.• Bestätigen Sie die Einstellung mit der Taste OK.• Jetzt den während Ihrer Abwesenheit gewünschtenTemperaturlevel mit Hilfe der Tasten +/- eingeben.• Bestätigen Sie die Einstellung mit der Taste OK.Um in Auto Betriebsmodus zurückzukehren undum abzubrechen,drücken Sie die Taste MODE.Frostschutzbetrieb über mehrere Tage• Drücken Sie die Taste Wochentag 0I blinkt• Stellen Sie mit den tasten +/-, die Anzahl derTage ihrer Abwesenheit ein (1 bis 99 Tage). Derlaufende Tage gilt dabei als 1.• Bestätigen Sie die Einstellung mit der Taste OK.• Jetzt den während Ihrer Abwesenheit gewünschtenTemperaturlevel mit Hilfe der Tasten +/- eingeben.• Bestätigen Sie die Einstellung mit der Taste OK.Um in Auto Betriebsmodus zurückzukehren undum abzubrechen,drücken Sie die Taste MODE.OK☛☛¡c0000hResMODE☛Hinweis für die Wartung Ihrer0000Anlage hDiese Betriebsmodus bietet diese Möglichkeiten:• Sie an die Durchführung einer periodischenWartung zu erinnern (Filterwechsel an derKlimaanlage, Reinigung eines Gerätes usw.).• Ihren Verbrauch für die Heizung bzw.Klimatisierung von einem Jahr zum anderen zuvergleichen (durch das Zählen der tatsächlichenBetriebsstunden).Zählen der Betriebsstunden+-Auto Manu 1 2 3 4 5 6 70 1 2 3 4 5 6 7 8 9 10 11 12 13 14 15 16 17 18 19 20 21 22 23 24DAYS1-7PROGP1-P4timer0000 Nachdem Sie die Taste h gedrückt haben,wirdIhnen auf dem Display die Anzahl derBetriebsstunden seit dem Einsetzen der Batterienangezeigt, d.h. die Anzahl der Stunden, in denenIhr Brenner,Ihre Klimaanlage,Ihr Heizlüfter oderein anderes Gerät, das Sie angeschlossen haben,eingeschaltet war. (der Taste + oder - wird derZähler auf Null gesetzt). Drücken Sie die Taste MODE um in die AutoBetriebsweise zurückzukehren.Programmierung des Wartungsintervalls fürihre Anlage0000 Drücken Sie die Taste h . Stellen Sie mit den Tasten +/- die Anzahl derBetriebsstunden ein,nach denen Sie hingewiesenwerden möchten. Bestätigen Sie die Einstellung mit der Taste OK;Das Rückwärtszählen beginnt. Am Ende desZählvorgangs werden sie durch die Anzeige desZeichens timer hingewiesen.0000hOK ☛Mögliche EinstellungenAn der Rückseite Ihres nicht aufgesetztenVorteils können Sieunterschiedliche Einstellungenvornehmen:1- Anlagestypsauswahl■ HeizungKlimaanlage■2- Regelungstypsauswahl■ Ein/AusZeitproportional■MODEDer Zeitproportionale Modus ist fürFussbodenheizungen empfohlen.3- Blockierschutzfunktion für dieUmwälzpumpe (Einschalten der Pumpefür 1 Minute nach jeweils 24 Stunden)■ Blockierschutz BlockierschutzAus■ EinRes☛VerknüpfungUm ein Sender mit einem Empfänger zu verknüpfen:• Taste des Empfängers 3 Sekunden drücken.• Die Kontrolleuchte OK blinkt, Taste loschen. Sie sind jetzt im Konfigurationsmodus.• Die Taste RESET des <strong>Thermoflash</strong> <strong>DIGI</strong> 2 <strong>HF</strong>, 3Sekunden lang, drückten.• Kontrolleuchte OK hört auf zu blinken nachungefähr 5 Sekunden.Die Verknüpfung zwischen Sender und Empfängerist jetzt erstellt.ZurücksetzenLöschen sämtlicher Sender-/Empfänger Verknüpfungen:• Taste des Empfängers mindestens 10Sekunden lang drücken.• Kontrolleuchte OK blinkt erst langsam,dann schnell.• Erneut 3 Sekunden lang die Taste desEmpfängers drücken.• Kontrolleuchte OK hört auf zu blinken,sämtliche Verknüpfungen sind gelöscht.Der Empfänger kehrt in den automatischenBetriebsmodus zurück.ZwangsbetriebDas Gerät kann im Handbetrieb gesteuert werden:• Drücken Sie kurz die Taste des Empfängers(Duck < 3 Sek.).Jeder kurze Druck kehrt den Ausgangszustand um.Hinweis: die Funksteuerung behält immer denVorrang auf der Handbedienung.Was tun wenn?• Die Heizung schaltet sich nicht ein:- der Empfänger steht nicht unter Spannung(Kontrolleuchte OK leuchtet nicht).Sicherung und Leistungsschutzschalter überprüfen.• Der Empfänger befindet sich nicht inSenderreichweite:- gehen Sie nahe genug an den Empfängerheran.• Der Empfänger erkennt nicht den Kodevom Sender:- den Empfänger neu kodifizieren.• Die Anwendung schaltet sich nicht einoder schaltet sich nicht aus:- der Sender oder der Empfänger durchStörsignale gestört (CB-Funk,Fernsehbildschirm, Handy-Signalverstärkerusw.):versuchen Sie die Quelle der Störsignale ingrösserer Entfernung aufzustellen.Sollte das Problem anhalten, wenden Sie sich anIhren Elektriker.11
Anschlüss des Empfängers!Das Anschlußbild zeigt die Schutzelementenicht. Die Einrichtung sollte fachgemäss undnormgerecht durchgeführt werden.Um die Installation zu erleichtern wird derBausatz <strong>Thermoflash</strong> <strong>DIGI</strong> 2 <strong>HF</strong> mit einem flexiblenKabel, 4-adrig, Querschnittsfläche 1,5 mm 2 ,Länge 1,20 m geliefert (nicht angeschlossen).Wir empfehlen Ihnen, den <strong>HF</strong>-Empfänger mit Hilfedieses Kabels unter Beachtung des nachstehendenFarbencodes anzuschließen:braun = Phaseblau = nulleitergrauAnbindung an HeizkesselschwartzTechnische DatenSenderEinstellbereich für die Normaltemperatur:+5°C bis +30°CEinstellbereich für die Absenktemperatur:+5°C bis +30°CEinstellbereich für die Frostschutztemperatur:+5°C bis +30°CAnzeigebereich für die Raumtemperatur:0°C bis +40°CStatische Schaltdifferenz:< 0.3°CStromversorgung:2 Batterien typ LR6(Produkt inklusive Funkübertragung)Durchschnittliche Reichweite: 75 m. zwischenSender und Empfänger im FreifeldÜbertragung über 3 Stockwerke im WohnbereichSendefrequenz:433.92 MHzDuty cycle: 10%IP : 30Betriebstemperatur:0°C bis +40°CLagertemperatur:-20°C bis +70°CLuftfeuchtigkeit: 95% bis 40°CVerschmutzungstufe:normalAbmessungen:115 x 82 x 34 mmNormen: EN 301-489-3EmfängerVersorgungsspannung: 230 V +10 % bis -15 %Mindestlast:12 V 100 mAAusgang: 1 Wechselkontakt, spannungsfreiSchaltleistung:AC1:16 A 250 VInduktiv: 3 A (cos ϕ = 0,6)Funkfrequenz:433.92 MHzSchutzgrad:IP43Schutzklasse:IIStossfestigkeitIK04Betriebstemperatur: -10°C bis +60°CLagerungstemperatur: -20°C bis +70°CFlexibel:20,5 bis 1,5 mmMassiv:0,5 bis 2,5 mm2Abmessungen:130 x 60 x 27 mmLuftfeuchtigkeit: 90% max. bei 20°CReceiver class: 2Normen: EN 60669-2-1Normen: EN 300220-3,EN 301-489-1 und EN 301-489-3.!LNL N5 4 3 2 1Falls Sie den <strong>Thermoflash</strong> <strong>DIGI</strong> 2 <strong>HF</strong> fürHeizung und Kühlung Steuerung verwenden,müssen Sie achten, dass beide Systeme(Heizung und Kühlung) nicht während derselbe jahreszeit funktionnieren.LN85 mm5 4 3 2 1LNLNN5 4 3 2 1LÜberall in Europa einsetzbar33 rue Saint-NicolasB.P. 50152 - 67704 SAVERNE CedexTél. 03 88 01 88 01 - Fax 03 88 01 88 90www.flash.fr12
9419-565-10/04.07<strong>Kit</strong> <strong>Thermoflash</strong> <strong>DIGI</strong> 2 <strong>HF</strong>ref. 56460Wireless clock thermostat andwall-mounting receiverWireless clock thermostat, weekly cycle andIP43 wall-mounting receiver FR IT DEGB ES Product presentationThe thermostat <strong>DIGI</strong> 2 <strong>HF</strong>Easy to install, easy to program, the kit <strong>DIGI</strong> 2 <strong>HF</strong> will allow you to control your heating system inaccordance with your way of life.Comforttemperature+/– buttons foradjusting settingsIndicator forcurrenttemperature levelcomfortor reducedReducedtemperature+-DAYS1-7Auto Manu 1 2 3 4 5 6 7¡c¡cPROGP1-P4Pointerindicating dayof the weekAmbienttemperaturetimerdays0 1 2 3 4 5 6 7 8 9 10 11 12 13 14 15 16 17 18 19 20 21 22 23 24OK¡cWarning lightto indicatebattery wear0000hResMODEHeating orair conditioningstart-up indicatorModeselectionProlongedabsence(holidays)Viewing ofcomfort andeconomicalperiodsThe <strong>Thermoflash</strong> <strong>DIGI</strong> 2 <strong>HF</strong> kit has been designedto offer you comfort and energy savings. It will beeasily installed in your home and will control theambient temperature according to the program. It willcontrol through radio waves the RF receiver which maybe fitted close to the boiler or the heating system.The <strong>Thermoflash</strong> <strong>DIGI</strong> 2 <strong>HF</strong> kit will control theambient temperature according to 3 temperature levels.• Comfort temperature: this is the temperature foryour hours of presence.• Reduced temperature: this is the temperature foryour brief absences or during the night.• Frost protection temperature: this is the minimumtemperature for long absences. It protects yourdwelling from the risk of frost.Installation of thermoflash <strong>DIGI</strong> 2 <strong>HF</strong>To control accurately the ambient temperature,the <strong>DIGI</strong> 2 <strong>HF</strong> must be installed 1,5 m. above thefloor, on an internal wall shaded from directsunlight and from all thermal influences such as:television, lamps, heater, etc.The <strong>DIGI</strong> 2 <strong>HF</strong> is delivered with a base.With thisaccessory, you can simply put it on a furniture. It isimportant to check that no external influence willperturb it (heater, window etc.).Days of theweek selection(1=Monday, 2=Tuesday....7=Sunday)P1 to P4programmeselectionComforttemperaturesettingReducedtemperaturesettingValidationHourcountersettingRESETYou can also install it on an internal wall.• Therefore, take out its wall mounting base.The IP43 wall-mounting receiverThe IP43 wall-mounting receiver can be easily installed close to the boiler.The thermostat <strong>DIGI</strong> 2 <strong>HF</strong> willcontrol the ambient temperature in the dwelling and will transmit ON and OFF signals to the receiver. Pushbutton for configuration and prioritysetting. Indicator of Power on and coding light.LED on = product is powered on.This LED flickers during coding operations. Operation indicator light.The LED is on when receiver’s outputcontact is closed = ON.• Fix it to the wall.!Important: the transmitter and receiver assembly is factory coded and is therefore immediatelyoperational.There is no need to recode.Inserting or re-inserting the batteriesThis clock thermostat is equipped with a warning light to indicate when the batteries need replacing.As soon as this indicator lights up at the bottom right-hand side of the display panel, replace the batteries(use two 1.5V LR6 alkaline batteries, life is approximately 12 months).The device remains programmed for 60 seconds while batteries are being replaced.ResetBefore beginning the programming of the device,please slide cover down and press RESET withthe tip of a pen.• Then replace the product on its base.0000h13
Setting current time and dayYou are putting the device into operation for thefirst time.• You have just pressed theRESET button.• I2:00 appears and the pointer▲ flashes under day 1 (monday).+-☛☛ Set the time using the +/- buttons (the numbersrun off more quickly when the button ispressed continuously). Set the current day by pressing several timeson the DAYS 1-7, a pointer ▲ appears underthe corresponding day (1=monday, 2=tuesday,3=wednesday, etc.)Validate with the OK button. If you wish to change the time or the day, pressthe MODE button until the pointer ▲ under theclock sign and continue as above for points , and .Temperature settingComfort and reduced temperatures are pre-set:Comfort = 20°C, Reduced = 16°C.☛☛☛+-DAYS1-7uModification of comfort temperature Press the button. Modify the temperature with the +/- buttons.Validate with the OK button.Modification of reduced temperature Press the button. Modify the temperature with the +/- buttons.Validate with the OK button.ProgrammingAuto Manu 1 2 3 4 5 6 7PROGP1-P4PROGP1-P4☛1 2 3 4 5You can programme your week according to 4 programmesettings: P1, P2 and P3 are pre-recordedand cannot be modified. P4 is blank and allows youto create a personalized programme varyingaccording to the day of the week.P1 = Comfort temperature from 6 a.m. till 11 p.m.Reduced temperature from 11 p.m. till 6 a.m.0 1 2 3 4 5 6 7 8 9 10 11 12 13 14 15 16 17 18 19 20 21 22 23 24!The default allocation of P1 is to 7 days ofthe week. If this corresponds to your lifestyle, stay in automatic mode, otherwise,continue.P2 = Comfort temperature from 6 a.m. till 8.30a.m. and from 4.30 p.m. till 11 p.m.Reduced temperature from 8.30 a.m. till4.30 p.m. and from 11 p.m. till 6 a.m.0 1 2 3 4 5 6 7 8 9 10 11 12 13 14 15 16 17 18 19 20 21 22 23 24OKAuto Manu 1 2 3 4 5 6 7c ¡ccDAYS1-7¡cPROGP1-P4☛☛☛OK0000h0000hResResMODEMODE☛P3 = Comfort temperature from 6 a.m. till 8.30a.m., from 11.30 a.m. till 1.30 p.m. and from4.30 p.m. till 11 p.m.Reduced temperature from 8.30 a.m. till11.30 a.m. from 1.30 a.m. till 4.30 p.m. andfrom 11 p.m. till 6 a.m.0 1 2 3 4 5 6 7 8 9 10 11 12 13 14 15 16 17 18 19 20 21 22 23 24P4 = Blank programme allowing you tocreate 3 comfort temperature periodsand 3 reduced periods for each day ofthe week.Selection of an existing P1, P2 or P3programme for a day of the week (inprogramming mode all modifications areautomatically validated).example : P2 for wednesday+-Auto Manu 1 2 3 4 5 6 7¡c¡c☛☛0 1 2 3 4 5 6 7 8 9 10 11 12 13 14 15 16 17 18 19 20 21 22 23 24DAYS1-7PROGP1-P4 Press the PROG P1-P4 button to go intoprogramming mode.The N° of the programme assigned to the dayflashes on the right-hand side of the display panel. Press the DAYS 1-7 button until the pointer ▲appears under the day you wish to programme(wednesday in our example). Press the PROG P1-P4 button until the P2programme number flashes in the right side ofthe screen.Validate with the OK button, the following dayis automatically proposed.Creating a P4 programmeA 24-hour profile composed of 48 thermometersat the bottom of the display panel allows yourprogramme composition to be easily viewed;A half-empty thermometer corresponds to30 minutes at reduced temperature.A full thermometer corresponds to 30 minutesat reduced temperature.example: programming 3 temperature periods forfriday: 6 a.m. till 8 a.m., noon till 2 a.m. and 6a.m. till 22 a.m..+-2DAYS1-7☛PROGP1-P4 From the Auto,mode press the PROG P1-P4button. Press the DAYS 1-7 button until a pointer ▲appears under the day you wish to programme(friday in our example). Press the PROG P1-P4 button until the P4programme number flashes in the right side ofthe screen.Your display panel indicates time as0:00 and the first thermometer flashes on the24-hour profile.OK☛Auto Manu 1 2 3 4 5 6 7¡c¡c☛☛ ☛☛OK0000h0 1 2 3 4 5 6 7 8 9 10 11 12 13 14 15 16 17 18 19 20 21 22 23 240 1 0000hResResMODEMODE☛☛ Press the button several times to obtain6:00 :The time displayed advances by 30 minutesfor each short press. Continuous pressing acceleratesthe time run-off.• Press the button several times to obtain8:00.• Press the button several times to obtainI2:00.• Press the button several times to obtainI4:00.• Press the button several times to obtainI8:00.• Press the button several times to obtain22:00.N.B. : if you make a mistake (e.g. 11.30 instead of12.00) use the +/- buttons to advance or return andcorrect with the thermometer buttons.Validate with the OK button, the following dayautomatically appears. Press the MODE button to return to Auto mode.Programme readingYou can check your programming:+-DAYS1-7Auto Manu 1 2 3 4 5 6 7¡c¡c☛☛0 1 2 3 4 5 6 7 8 9 10 11 12 13 14 15 16 17 18 19 20 21 22 23 24PROGP1-P4 From Auto mode, press the PROG P1-P4button.With the DAYS 1-7 button select the day from 1to 7 and check your programming on the 24-hourprofile at the bottom of the display panel (seeexample above). Press the MODE button to return in Auto mode.Automatic mode (Auto)You pass into automatic mode bypressing the MODE button until thepointer ▲ appears under Auto.In automatic mode the clock thermostatadapts to your life style by runningthe programs you have selected.Manual mode (Manu)Manual mode transforms your device into a simplethermostat.It allows you to maintain a constant temperature inyour dwelling (set to a temperature of between 5°Cand 30°C). Press the MODE button to position the pointer▲ under Manu. Press the + or - buttons to adjust to the desiredtemperature (for instance 22.5°C).To quit the Manu mode, press the MODE buttonand re-position ▲ under Auto.OK0000hResMODE0 1 2 3 4 5 6 7 8 9 10 11 12 13 14 15 16 17 18 19 20 21 22 23 24+-Auto AutoManuManuDAYS1-7¡c ¡cPROGP1-P4OK¡c0000hAuto Manu°cResMODE☛☛MODE☛☛14
TemporarymodificationtemperatureIn automatic mode this very useful function allowsyou to modify ambient temperature temporarily.• To increase the temperature, press the + button(several times, if necessary).Auto Manu• To decrease the temperature¡cpress the - button (several +¡ctimes, if necessary).0 1 2 3 4 5The current temperature levelindicator (comfort or reduced) will begin flashing.This modification ends with the next change inprogrammed temperature.To return to the initial programme press MODEand re-position the pointer ▲ under Auto.The current temperature level indicator (comfortor reduced) will stop flashing when the temporarymodification comes to an end.Prolonged absence mode(holidays)This mode protects your dwelling from freezing bymaintaining a minimum adjustable temperature inyour dwelling during your absences.You can programme the length of your absence sothat the temperature rises for your return.2 different settings are available formaintaining temperature above frost level:Permanent frost protection• Press the button, the day 0I flickers.• Press once the - button, the FORC display flickers.• Validate with the OK button.• Using +/- buttons, set the temperature leveldesired during your absence.• Validate with the OK button.To cancel and return to Auto mode,press MODEbutton.Setting frost protection temperature for acertain number of days• Press the button, the day 0I flickers.• Using +/- buttons, set the length of your absencein days (from 1 to 99 days). The currentday count as one.• Validate with the OK button.• Using +/- buttons, set the temperature leveldesired during your absence.• Validate with the OK button.To cancel and return to Auto mode,press MODEbutton.Installation maintenance signal0000h☛☛This mode allows you either:• to take steps for regular maintenance (changeof air conditioning filter, device cleaning).• to compare your heating or air conditioningconsumption from one year to the next (bycomparing the number of running hours).Counting running hours+-Auto Manu 1 2 3 4 5 6 70000 Press the h button.The display panel willndicate the number of hours your burner, airconditioning,ventilator-convector,etc.(dependingof the type of device controlled) has been runningfrom the moment the batteries were inserted (bypressing once on + or - you return the counterto zero.). Press the MODE button to return in Auto mode.-0 1 2 3 4 5 6 7 8 9 10 11 12 13 14 15 16 17 18 19 20 21 22 23 24DAYS1-7PROGP1-P4timer0000hOK ☛ResMODE☛Programming the regular servicing of yourinstallation.0000 Press the h button. Set the number of running hours after which thewarning signal should flash using the +/- buttons. Validate with the OK button; the countdownbegins.The message timer will appear at the endof the count-down warning you that servicing isrequired.Possible settingsVarious settings can be made onthe back of the device (when it isnot mounted).1- Selection of installation’s type■ HeatingCooling■2- Selection of adjustment mode■ On/OffProportionnal■The proportionnal mode is to be set when usingfloorheating (high inertia).3- Anti-locking function for the circulationpump (activation of the pump for 1 minuteevery 24 hours)■ Anti-lockingAnti-lockingfunction off ■ function onConfigurationIn order to associate the transmitter with thereceiver:• Press the receiver’s pushbutton for morethan 3 seconds.• The indicator OK light will start flickering,release the pushbutton.The system is in configuration mode.• Press the RESET button during 3 seconds ofthe transmitter <strong>Thermoflash</strong> <strong>DIGI</strong> 2 <strong>HF</strong>.• The indicator OK button will stop flickering,at the end of 5 secondes.The transmitter/receiver link is now established.ResetFor clearing all transmission/reception links:• Press the receiver’s pushbutton for morethan 10 seconds.• The indicator OK light flickers slowly, thenmore quickly.• Press again the receiver’s pushbutton morethan 3 seconds.• The indicator OK light stops flickering, alllinks have been cleared.The receiver returns to the Auto mode.Priority settingManual control is provided for this product.• Press shortly receiver’s pushbutton (
Receiver installation!Before working on the installation, isolate allelectrical supplies. All electrical wiring mustbe carried out by a qualified person.For easier installation, the <strong>Thermoflash</strong> <strong>DIGI</strong> 2 <strong>HF</strong>kit is suppplied with a flexible 4-wire 1,5 mm 2cable of 1.20m length (not connected).We recommend using this cable for connecting the<strong>HF</strong> receiver according to the following colourcodes:brown = phaseblue = neutralgrayconnection to the boilerblack85 mmLNLNLN5 4 3 2 1L N5 4 3 2 15 4 3 2 1LNLN!When two appliances (heating and cooling) areconnected, always keep one of them switchedoff to prevent their simultaneous operationduring the same season.33 rue Saint-NicolasB.P. 50152 - 67704 SAVERNE CedexTél. 03 88 01 88 01 - Fax 03 88 01 88 90www.flash.fr16
9419-565-10/04.07<strong>Kit</strong> <strong>Thermoflash</strong> <strong>DIGI</strong> 2 <strong>HF</strong>ref. 56460Termostato programable yreceptor muralTermostato programable sin hilos, ciclo semanaly receptor mural IP43 FR IT DEGB ES Presentación de los productosEl termostato <strong>DIGI</strong> 2 <strong>HF</strong>Simple de instalar, fácil de programar, el <strong>Kit</strong> <strong>DIGI</strong> 2 <strong>HF</strong> sin problemas para programar y regular sucalefacción.TemperaturaconfortTeclas +/–para lasregulacionesIndicadordel nivelde temperaturaactualconforto económicaTemperaturaeconómica+-DAYS1-7Auto Manu 1 2 3 4 5 6 7¡c¡cPROGP1-P4Indicadordel díade la semanaTemperaturaambientetimerdaysOKTestigo de desgastede las pilas0 1 2 3 4 5 6 7 8 9 10 11 12 13 14 15 16 17 18 19 20 21 22 23 240000hResMODEIndicador depuesta en marchade la calefacción ode la climatizaciónSelecciónde los modosAusenciaprolongada(vacaciones)Visualizaciónde los periodosconfort yeconómicoEl <strong>Kit</strong> <strong>DIGI</strong> 2 <strong>HF</strong> ha sido creado para aportarconfort y ahorro de energía. De fácil instalación en suvivienda, regula la temperatura ambiente en funciónde la programación y envía órdenes de marcha/paroal receptor mural instalado cerca de la caldera.El <strong>Kit</strong> <strong>DIGI</strong> 2 <strong>HF</strong> regula la temperatura ambientesegún 3 niveles de temperatura.• Temperatura confort: temperatura deseadadurante su estancia.• Temperatura económica: temperatura deseadadurante las ausencias diarias, o por la noche.• Temperatura descarche: temperatura mínimaasegurada durante sus ausencias prolongadas.Protege su hogar de las heladas.Instalación del termostato <strong>DIGI</strong> 2 <strong>HF</strong>Para asegurar el correcto funcionamiento deregulación de la temperatura ambiente el <strong>DIGI</strong> 2 <strong>HF</strong>debe instalarse a un altura de 1,5 m del suelo,en unapared interior y alejado de cualquier fuente de calordirecto como: televisión, lámparas, radiadores,corrientes de aire etc.Con ayuda del zócalo que acompaña al <strong>DIGI</strong> 2 <strong>HF</strong>,puede colocarlo simplemente sobre cualquiermueble, lejos de la influencia de cualquier factorexterno (radiador, ventana).Selección de los díasde la semana(1 = lunes, 2 = martes, ...,7 = domingo)Elección delprogramade P1 a P4RegulacióntemperaturaconfortRegulacióntemperaturaeconómicaValidaciónRegulacióncómputohorarioPuestaa cerogeneralPuede fijarlo a la pared.• Para ello quitar el zócalo trasero.El receptor mural IP 43El receptor mural IP 43, se instala fácilmente cerca de la caldera. El <strong>DIGI</strong> 2 <strong>HF</strong> manda las órdenes demarcha/paro al IP 43 y este las trasmite a la caldera. Pulsador para configuración y forzamiento. Indicador de puesta en tensión y de codificación.Led encendido = el aparato recibe tensión.Este led parpadea durante las operaciones decodificación. Indicador de funcionamiento.Este led está encendido cuando el contacto desalida del receptor está cerrado = ON.• Fijarlo a la pared.!Importante: el equipo emisor + receptor sale codificado de fábrica, apto listo para su funcionamiento.Superfluo de recodificar.Colocación o cambio de las pilasEl Cronotermostato dispone de un testigo de desgaste de las pilas. Cuando éste se enciende en la partederecha del visualizador, hay que cambiar las pilas (utilice 2 pilas de 1,5 V, alcalinas LR6 - su autonomíaes de unos 12 meses).Cuando se cambian las pilas, el cronotermostato mantiene sus programas durante 60 segundos.ReinicializaciónAntes de iniciar la programación de su aparato,baje la tapa y pulse la tecla RESET con la puntade un bolígrafo.• Volver a colocar el <strong>DIGI</strong> 2 <strong>HF</strong> sobre su zócalo.0000h17
Puesta en hora y fechaEs la primera puesta en servicio.• Acaba de pulsar la tecla RESET.• Las inscripciones I2:00 y elapuntador s bajo el día 1(lunes) se encienden intermitentemente.+-☛☛ Ponga la hora con las teclas +/- (si pulsa la teclade forma prolongada, se acelera el paso de lahora). Ajuste la fecha actual pulsando sucesivamentela tecla DAYS 1-7,aparece un apuntador ▲ bajoel día correspondiente (1 = lunes, 2 = martes,3 = miércoles, etc.).Valide con la tecla OK. Si desea modificar la hora o el día,pulse la teclaMODE hasta que aparezca el apuntador ▲ bajo lasigla reloj,y proceda como en los puntos , y .Regulación de las temperaturasLas temperaturas confort y económica están preajustadas:Confort = 20°C, Económica = 16°C.☛☛☛+-DAYS1-7uAuto Manu 1 2 3 4 5 6 7PROGP1-P4Modificación de la temperatura confort Pulse la tecla . Modifique la temperatura con las teclas +/-.Valide con la tecla OK.Modificación de la temperatura económica Pulse la tecla . Modifique la temperatura con las teclas +/-.Valide con la tecla OK.ProgramaciónPROGP1-P4☛1 2 3 4 5Para programar su semana, dispone de 4 programasP1, P2, P3, que están prerregistrados y no sonmodificables. P4 que es libre, y le permite crear unprograma personalizado y diferente para cada día dela semana.P1 = Temperatura confort de 6h a 23h.Temperatura económica de 23h a 6h.OKAuto Manu 1 2 3 4 5 6 7c ¡ccDAYS1-7¡cPROGP1-P4☛☛☛OK0000h0000hResResMODEMODE☛P3 = Temperature confort de 6h a 8h30,de11h30 a 13h30 y de 16h30 a 23h.Temperatura económica de 8h30 a11h30, de 13h30 a 16h30 y de 23h a6h.0 1 2 3 4 5 6 7 8 9 10 11 12 13 14 15 16 17 18 19 20 21 22 23 24P4 = Programa libre que le permite creartres periodos en temperatura confort yotros tres en temperatura económicapara cada día de la semana.Selección de un programa existente P1, P2o P3 para un día de la semana (en modoprogramación, todas las modificaciones sevalidan automáticamente).Ejemplo: P2 para miércoles+-Auto Manu 1 2 3 4 5 6 7¡c¡c☛☛0 1 2 3 4 5 6 7 8 9 10 11 12 13 14 15 16 17 18 19 20 21 22 23 24DAYS1-7PROGP1-P4 Pulse la tecla PROG P1-P4 para pasar al modoprogramación.El N° del programa asignado al día parpadea enla parte derecha del visualizador. Pulse la tecla DAYS 1-7 hasta que aparezca elapuntador ▲ bajo el día que desea programar;miércoles en nuestro ejemplo. Pulse la tecla PROG P1-P4 hasta que aparezcaintermitentemente el número de programa P2en la parte derecha de la pantalla.Valide con la tecla OK, el día siguiente le espropuesto automáticamente.Creación de un programa P4Un perfil de 24 h compuesto por 48 termómetrosen la parte inferior del visualizador le permitevisualizar fácilmente la composición de su programa.Un termómetro vacío hasta la mitadcorresponde a 30 minutos en temperaturaeconómica.Un termómetro lleno corresponde a 30 minutosen temperatura confort.Ejemplo: creación de 3 periodos en temperaturaconfort para el viernes: de 6h a 8h, de 12h a 14h yde 18h a 22h.+-2DAYS1-7☛OK☛Auto Manu 1 2 3 4 5 6 7¡c¡c☛☛ ☛☛PROGP1-P4OK0000h0 1 2 3 4 5 6 7 8 9 10 11 12 13 14 15 16 17 18 19 20 21 22 23 240 1 0000hResResMODEMODE Pulse la tecla varias veces para obtener elhorario 6:00:cada pulsación breve hace avanzar30 minutos,y una pulsación prolongada acelerala progresión.• Pulse la tecla varias veces para obtener elhorario 8:00.• Pulse la tecla varias veces para obtener elhorario I2:00.• Pulse la tecla varias veces para obtener elhorario I4:00.• Pulse la tecla varias veces para obtener elhorario I8:00.• Pulse la tecla varias veces para obtener elhorario 22:00.Nota : si ha cometido un error (por ej.: 11h30 envez de 12h00, utilice las teclas +/- para avanzar oretroceder, y modifique con las teclas .Valide con la tecla OK, el día siguiente le espropuesto automáticamente. Pulse la tecla MODE para pasar a modo Auto.Lectura de los programasPuede verificar su programación:+-Auto Manu 1 2 3 4 5 6 7¡c¡c☛☛DAYS1-70 1 2 3 4 5 6 7 8 9 10 11 12 13 14 15 16 17 18 19 20 21 22 23 24PROGP1-P4 Desde el modo Auto,pulse la tecla PROG P1-P4. Con la tecla DAYS 1-7 seleccione el día de 1 a 7,y verifique su programa en el perfil de 24 h en laparte inferior del visualizador (ejemplo siguiente). Pulse la tecla MODE para pasar a modo Auto.Modo automático (Auto)El paso a modo automático se efectúapulsando la tecla MODE hasta que aparezcael apuntador ▲ bajo Auto.En modo automático, elCronotermostato se adapta a suritmo de vida, ejecutando el o losprogramas que haya elegido.Modo manual (Manu)El modo manual transforma su aparato en un simpletermostato.Le permite mantener una temperatura constanteen su vivienda (regulable de 5°C a 30°C).OK0000hResMODE0 1 2 3 4 5 6 7 8 9 10 11 12 13 14 15 16 17 18 19 20 21 22 23 24+-Auto AutoManuManu¡c ¡c¡cAuto Manu°c☛☛MODE☛☛☛DAYS1-7PROGP1-P4OK0000hResMODE☛0 1 2 3 4 5 6 7 8 9 10 11 12 13 14 15 16 17 18 19 20 21 22 23 24!P1 está asignado a los 7 días de la semanade forma estándar. Si corresponde a suritmo de vida, manténgase en modoautomático; de lo contrario, continúe.P2 = Temperatura confort de 6h à 8h30 y de16h30 a 23h.Temperatura económica de 8h30 a16h30 y de 23h a 6h. Desde el modo Auto,pulse la tecla PROG P1-P4. Pulse la tecla DAYS 1-7 hasta que aparezca elapuntador ▲ debajo del día que desea programar;el viernes en nuestro ejemplo. Pulse la tecla PROG P1-P4 hasta que aparezcaintermitentemente el número de programa P4en la parte derecha de la pantalla.Su visualizadorindica 0:00 y el primer termómetro parpadeasobre el perfil de 24 h. Pulse la tecla MODE para situar el apuntador ▲bajo Manu. Pulse + o - para ajustar la temperatura deseada(ejemplo 22,5°C).Para abandonar el modo Manu, pulse la teclaMODE y vuelva a situar el apuntador ▲ bajo Auto.0 1 2 3 4 5 6 7 8 9 10 11 12 13 14 15 16 17 18 19 20 21 22 23 2418
Modificación temporal de latemperaturaEn modo automático, esta práctica función le permitemodificar temporalmente la temperaturaambiente.Auto Manu• Para aumentar la temperaturaambiente, pulse la +¡c¡ctecla + (varias veces sifuera necesario). -0 1 2 3 4 5• Para reducir la temperatura,pulsela tecla - varias veces si fuera necesario).El indicador del nivel de temperatura actual(confort o económica) comienza a parpadear.Esta modificación finalizará en el siguiente cambiode temperatura programada.Para volver al programa inicial, pulse MODE ysitúe el apuntador ▲ bajo Auto.La parada del parpadeo del indicador de temperaturaactual (confort o económica) marca el fin dela modificación temporal.☛☛Modo ausencia prolongadavacacionesEste modo evita el riesgo de helada de su vivienda,manteniendo una temperatura mínima regulabledurante sus ausencias.Puede programar el tiempo que vaya a estarausente, para prever el aumento de temperaturade su vivienda a su regreso.2 posibilidades para mantener el sistemaantihelada:Forzamiento de la antihelada permanente• Pulse la tecla , el día 0I parpadea.• Pulse una vez la tecla -,la indicación FORC parpadea.• Valide con la tecla OK.• Regule el nivel de temperatura que desea durantesu ausencia con las tecla +/-.• Valide con la tecla OK.Para anular y volver al Auto, pulse la teclaMODE.Forzamiento de la antihelada para unnúmero de días.• Pulse la tecla , el día 0I parpadea.• Con las teclas +/-, ajuste la duración de suausencia en días. La jornada actual como 1.• Valide con la tecla OK.• Regule el nivel de temperatura que deseadurante su ausencia con las teclas +/-.• Valide con la tecla OK.Para anular y volver al Auto, pulse la teclaMODE.Señal de mantenimiento de su0000instalación hEste modo le permite:• recordar que debe hacer efectuar un mantenimientoperiódico (cambio de filtro en un climatizador,o limpieza de un aparato).• comparar sus consumos de calefacción o de aireacondicionado de un año a otro (comparando elnúmero de horas de funcionamiento).Cómputo del número de horas de funcionamiento+-Auto Manu 1 2 3 4 5 6 70 1 2 3 4 5 6 7 8 9 10 11 12 13 14 15 16 17 18 19 20 21 22 23 24DAYS1-7PROGP1-P4timer0000hOK ☛MODE0000 Pulse la tecla h desde el momento en quecoloca las pilas,el visualizador le indica el númerode horas de funcionamiento de su: quemador,climatizador, etc., según el tipo de aparato pedigree(pulsando + o - el contador se pone a cero). Pulse la tecla MODE para pasar a modo Auto.Res☛Programación de la periodicidad de mantenimientode su instalación0000 Pulse la tecla h . Regule con las teclas +/- lel número de horasde funcionamiento a partir del cual desea seravisado. Valide con la tecla OK ;comienza la cuenta atrás.Una vez que ésta finalice,será avisado por la apariciónde la sigla timer.Regulaciones eventualesPuede efectuar los diferentesregulaciones en la parte traseradel aparato (cuando está desenchufado).1- Selección del tipo de regulación■ CalefacciónAire acondicionado■2- Selección del modo regulación■ On/Off Cronoproporcional■Se recomienda muy especialmente el modocronoproporcional para instalaciones de calefacciónpor el suelo (inercia baja o mediana).3- Función antibloqueo de la bomba de circulación(accionamiento de la bombadurante 1 minuto cada 24 horas)■ Parrada función Marcha funciónantibloqueo ■ antibloqueoConfiguraciónPara sintonizar un emisor con el receptor:• Mantener pulsado durante más de 3 segundosel pulsado del receptor.• El testigo OK parpadea, relajar el pulsado.El receptor está en modo configuración.• Mantener pulsado durante 3 segundos la teclaRESET del <strong>Thermoflash</strong> <strong>DIGI</strong> 2 <strong>HF</strong>.• El testigo OK del receptor deja de parpadeardespues de 5 segundos.La sintonización emisor/receptor queda establecida.BorradoPara borrar todas las sincronizacionesemisor/receptor:• Mantener pulsado durante mas de 10 segundosel pulsador del receptor.• El testigo OK parpadea primero lentamentey luego mas rapidamente.• Pulsar de nuevo durante 3 segundos el pulsador del receptor.• El testigo OK deja de parpadear, todos lassincronizaciones han sido borrados.El receptor retorna al modo Auto.ForzamientoEste producto puede ser controlado manualmente.• Pulsar rapidamente el pulsador del receptor(menos de 3 segundos).Cada presión invierte el estado de la salida.Nota: el radiocontrol es siempre prioritario.¿Qué hacer si ?• La calefacción no se pone en marcha:- el receptor no recibe alimentación:(testigo OK apagado). Revisar el fusible y el interruptor.• El receptor está fuera del alcance el emisor:- acercarse más al receptor.• El receptor no reconoce el código delemisor:- volver a instalar el receptor.• La aplicación no se pone en marcha o nose deja:- el receptor está perturbado por una emisión deondas (radioaficionado, pantalla de televisión, reemisorde teléfono móvil...): intentar desplazar lafuente de emisión de las ondas perturbadoras.Si el problema continúa, llamar al electricista.Caracterìsticas técnicasEmisorRango regulación T° confort: +5°C a +30°CRango regulación de T° Reducida: +5°C a +30°CRango regulación T° Fuera de helada:+5°C a +30°CGama de visualización de la T° ambiente:0°C a +40°CDiferencia estática:
Instalación del receptor!Antes de calquier manipulación, para lainstalación, cortar la corriente!El esquema de conexión no representa lasprotecciones. La instalación debe ser realizadapor un profesional en el respecto de las normasen vigor.Para facilitar su instalación el kit <strong>Thermoflash</strong><strong>DIGI</strong> 2 <strong>HF</strong> se suministra con un cable flexible de4 conductores de 1,5 mm 2 de 1,20 m de largo(no conectado).Para la conexión del receptor <strong>HF</strong>, se recomiendael uso de este cable, respetando los coloressiguientes:marrón = faseazul = neutrogrisconexión con la calderanegro85 mmLNLNLN5 4 3 2 1L N5 4 3 2 15 4 3 2 1LNLN!En caso de conexión con 2 instalaciones diferentes(calefacción y climatización), piense enapagar uno de los dos aparatos para evitar quelos dos funciones simultáneamente en la mismaestación.33 rue Saint-NicolasB.P. 50152 - 67704 SAVERNE CedexTél. 03 88 01 88 01 - Fax 03 88 01 88 90www.flash.fr20