
Create successful ePaper yourself
Turn your PDF publications into a flip-book with our unique Google optimized e-Paper software.
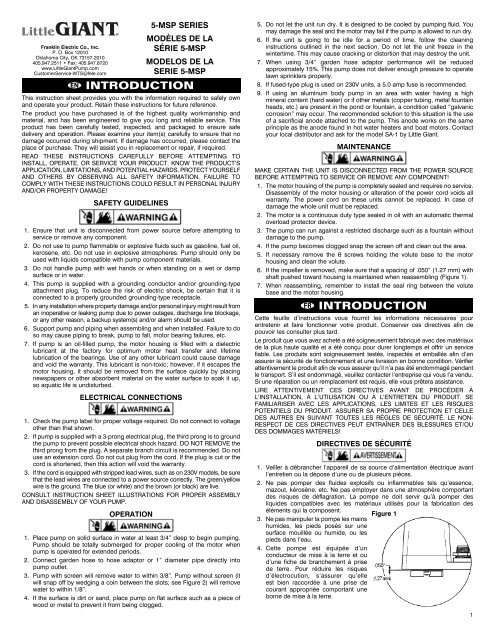
Franklin Electric Co., Inc.P. O. Box 12010Oklahoma City, OK 73157-2010405.947.2511 • Fax: 405.947.8720www.LittleGiantPump.<strong>com</strong>CustomerService-WTS@fele.<strong>com</strong>EN5-<strong>MSP</strong> SERIESMODÈLES DE LASÉRIE 5-<strong>MSP</strong>MODELOS DE LASERIE 5-<strong>MSP</strong>INTRODUCTIONThis instruction sheet provides you with the information required to safely ownand operate your product. Retain these instructions for future reference.The product you have purchased is of the highest quality workmanship andmaterial, and has been engineered to give you long and reliable service. Thisproduct has been carefully tested, inspected, and packaged to ensure safedelivery and operation. Please examine your item(s) carefully to ensure that nodamage occurred during shipment. If damage has occurred, please contact theplace of purchase. They will assist you in replacement or repair, if required.READ THESE INSTRUCTIONS CAREFULLY BEFORE ATTEMPTING TOINSTALL, OPERATE, OR SERVICE YOUR PRODUCT. KNOW THE PRODUCT’SAPPLICATION, LIMITATIONS, AND POTENTIAL HAZARDS. PROTECT YOURSELFAND OTHERS BY OBSERVING ALL SAFETY INFORMATION. FAILURE TOCOMPLY WITH THESE INSTRUCTIONS COULD RESULT IN PERSONAL INJURYAND/OR PROPERTY DAMAGE!SAFETY GUIDELINES1. Ensure that unit is disconnected from power source before attempting toservice or remove any <strong>com</strong>ponent.2. Do not use to pump flammable or explosive fluids such as gasoline, fuel oil,kerosene, etc. Do not use in explosive atmospheres. Pump should only beused with liquids <strong>com</strong>patible with pump <strong>com</strong>ponent materials.3. Do not handle pump with wet hands or when standing on a wet or dampsurface or in water.4. This pump is supplied with a grounding conductor and/or grounding-typeattachment plug. To reduce the risk of electric shock, be certain that it isconnected to a properly grounded grounding-type receptacle.5. In any installation where property damage and/or personal injury might result froman inoperative or leaking pump due to power outages, discharge line blockage,or any other reason, a backup system(s) and/or alarm should be used.6. Support pump and piping when assembling and when installed. Failure to doso may cause piping to break, pump to fall, motor bearing failures, etc.7. If pump is an oil-filled pump, the motor housing is filled with a dielectriclubricant at the factory for optimum motor heat transfer and lifetimelubrication of the bearings. Use of any other lubricant could cause damageand void the warranty. This lubricant is non-toxic; however, if it escapes themotor housing, it should be removed from the surface quickly by placingnewspapers or other absorbent material on the water surface to soak it up,so aquatic life is undisturbed.ELECTRICAL CONNECTIONS1. Check the pump label for proper voltage required. Do not connect to voltageother than that shown.2. If pump is supplied with a 3-prong electrical plug, the third prong is to groundthe pump to prevent possible electrical shock hazard. DO NOT REMOVE thethird prong from the plug. A separate branch circuit is re<strong>com</strong>mended. Do notuse an extension cord. Do not cut plug from the cord. If the plug is cut or thecord is shortened, then this action will void the warranty.3. If the cord is equipped with stripped lead wires, such as on 230V models, be surethat the lead wires are connected to a power source correctly. The green/yellowwire is the ground. The blue (or white) and the brown (or black) are live.CONSULT INSTRUCTION SHEET ILLUSTRATIONS FOR PROPER ASSEMBLYAND DISASSEMBLY OF YOUR PUMP.OPERATION1. Place pump on solid surface in water at least 3/4” deep to begin pumping.Pump should be totally submerged for proper cooling of the motor whenpump is operated for extended periods.2. Connect garden hose to hose adaptor or 1” diameter pipe directly intopump outlet.3. Pump with screen will remove water to within 3/8”. Pump without screen (itwill snap off by wedging a coin between the slots; see Figure 2) will removewater to within 1/8”.4. If the surface is dirt or sand, place pump on flat surface such as a piece ofwood or metal to prevent it from being clogged.5. Do not let the unit run dry. It is designed to be cooled by pumping fluid. Youmay damage the seal and the motor may fail if the pump is allowed to run dry.6. If the unit is going to be idle for a period of time, follow the cleaninginstructions outlined in the next section. Do not let the unit freeze in thewintertime. This may cause cracking or distortion that may destroy the unit.7. When using 3/4” garden hose adaptor performance will be reducedapproximately 15%. This pump does not deliver enough pressure to operatelawn sprinklers properly.8. If fused-type plug is used on 230V units, a 5.0 amp fuse is re<strong>com</strong>mended.9. If using an aluminum body pump in an area with water having a highmineral content (hard water) or if other metals (copper tubing, metal fountainheads, etc.) are present in the pond or fountain, a condition called “galvaniccorrosion” may occur. The re<strong>com</strong>mended solution to this situation is the useof a sacrificial anode attached to the pump. This anode works on the sameprinciple as the anode found in hot water heaters and boat motors. Contactyour local distributor and ask for the model SA-1 by Little Giant.MAINTENANCEMAKE CERTAIN THE UNIT IS DISCONNECTED FROM THE POWER SOURCEBEFORE ATTEMPTING TO SERVICE OR REMOVE ANY COMPONENT!1. The motor housing of the pump is <strong>com</strong>pletely sealed and requires no service.Disassembly of the motor housing or alteration of the power cord voids allwarranty. The power cord on these units cannot be replaced. In case ofdamage the whole unit must be replaced.2. The motor is a continuous duty type sealed in oil with an automatic thermaloverload protector device.3. The pump can run against a restricted discharge such as a fountain withoutdamage to the pump.4. If the pump be<strong>com</strong>es clogged snap the screen off and clean out the area.5. If necessary remove the 6 screws holding the volute base to the motorhousing and clean the volute.6. If the impeller is removed, make sure that a spacing of .050” (1.27 mm) withshaft pushed toward housing is maintained when reassembling (Figure 1).7. When reassembling, remember to install the seal ring between the volutebase and the motor housing.FRINTRODUCTIONCette feuille d’instructions vous fournit les informations nécessaires pourentretenir et faire fonctionner votre produit. Conserver ces directives afin depouvoir les consulter plus tard.Le produit que vous avez acheté a été soigneusement fabriqué avec des matériauxde la plus haute qualité et a été conçu pour durer longtemps et offrir un servicefiable. Les produits sont soigneusement testés, inspectés et emballés afin d’enassurer la sécurité de fonctionnement et une livraison en bonne condition. Vérifierattentivement le produit afin de vous assurer qu’il n’a pas été endommagé pendantle transport. S’il est endommagé, veuillez contacter l’entreprise qui vous l’a vendu.Si une réparation ou un remplacement est requis, elle vous prêtera assistance.LIRE ATTENTIVEMENT CES DIRECTIVES AVANT DE PROCÉDER ÀL’INSTALLATION, À L’UTILISATION OU À L’ENTRETIEN DU PRODUIT. SEFAMILIARISER AVEC LES APPLICATIONS, LES LIMITES ET LES RISQUESPOTENTIELS DU PRODUIT. ASSURER SA PROPRE PROTECTION ET CELLEDES AUTRES EN SUIVANT TOUTES LES RÈGLES DE SÉCURITÉ. LE NON-RESPECT DE CES DIRECTIVES PEUT ENTRAÎNER DES BLESSURES ET/OUDES DOMMAGES MATÉRIELS!DIRECTIVES DE SÉCURITÉ1. Veiller à débrancher l’appareil de sa source d’alimentation électrique avantl’entretien ou la dépose d’une ou de plusieurs piéces.2. Ne pas pomper des fluides explosifs ou inflammables tels qu’essence,mazout, kérosène, etc. Ne pas employer dans une atmosphère <strong>com</strong>portantdes risques de déflagration. La pompe ne doit servir qu’à pomper desliquides <strong>com</strong>patibles avec les matériaux utilisés pour la fabrication deséléments qui la <strong>com</strong>posent.Figure 13. Ne pas manipuler la pompe les mainshumides, les pieds posés sur unesurface mouillée ou humide, ou lespieds dans l’eau.4. Cette pompe est équipée d’unconducteur de mise à la terre et oud’une fiche de branchement à prisede terre. Pour réduire les risquesd’électrocution, s’assurer qu’elleest bien raccordée à une prise decourant appropriée <strong>com</strong>portant uneborne de mise à la terre.1