
You also want an ePaper? Increase the reach of your titles
YUMPU automatically turns print PDFs into web optimized ePapers that Google loves.
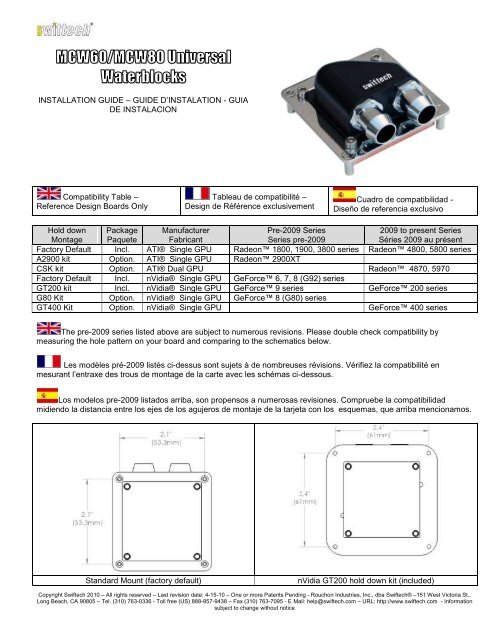
MCW60/MCW80 UniversalWaterblocksINSTALLATION GUIDE – GUIDE D’INSTALATION - GUIADE INSTALACIONCompatibility Table –Reference Design Boards OnlyTableau de compatibilité –Design de Référence exclusivementCuadro de compatibilidad -Diseño de referencia exclusivoHold downMontagePackagePaqueteManufacturerFabricantPre-2009 SeriesSeries pre-20092009 to present SeriesSéries 2009 au présentFactory Default Incl. ATI® Single GPU Radeon 1800, 1900, 3800 series Radeon 4800, 5800 seriesA2900 kit Option. ATI® Single GPU Radeon 2900XTCSK kit Option. ATI® Dual GPU Radeon 4870, 5970Factory Default Incl. nVidia® Single GPU GeForce 6, 7, 8 (G92) seriesGT200 kit Incl. nVidia® Single GPU GeForce 9 series GeForce 200 seriesG80 Kit Option. nVidia® Single GPU GeForce 8 (G80) seriesGT400 Kit Option. nVidia® Single GPU GeForce 400 seriesThe pre-2009 series listed above are subject to numerous revisions. Please double check compatibility bymeasuring the hole pattern on your board and comparing to the schematics below.Les modèles pré-2009 listés ci-dessus sont sujets à de nombreuses révisions. Vérifiez la compatibilité enmesurant l’entraxe des trous de montage de la carte avec les schémas ci-dessous.Los modelos pre-2009 listados arriba, son propensos a numerosas revisiones. Compruebe la compatibilidadmidiendo la distancia entre los ejes de los agujeros de montaje de la tarjeta con los esquemas, que arriba mencionamos.Standard Mount (factory default)nVidia GT200 hold down kit (included)Copyright <strong>Swiftech</strong> 2010 – All rights reserved – Last revision date: 4-15-10 – One or more Patents Pending - Rouchon Industries, Inc., dba <strong>Swiftech</strong>® –151 West Victoria St.,Long Beach, CA 90805 – Tel. (310) 763-0336 - Toll free (US) 888-857-9438 – Fax (310) 763-7095 - E Mail: help@swiftech.com – URL: http://www.swiftech.com - Informationsubject to change without notice
nVidia G80 hold down kitATI dual GPU CSK screws kitINSTALLATIONINSTALACION1. PREPARING THE GRAPHICS CARDFirst, remove the stock cooling solution; then clean off the GPU core, memory modules, and voltage regulators with alcohol, or preferably with anelectronic degreaser such as ArctiClean. Finally, apply the provided Arctic Céramique thermal paste to the GPU core as shown above.1. PREPAREZ LA CARTE GRAPHIQUETout d’abord, démontez le ventirad d’origine ; ensuite, nettoyez soigneusement les modules de mémoire et régulateurs de voltage. Finalementappliquez la graisse thermique Arctic Céramique fournie comme indiqué ci-dessus.1. PREPARE LA TARJETA GRÁFICADesmontar el disipador de origen y limpiar cuidadosamente los módulos de memoria, los reguladores de voltaje y el chip input/output. Pueden utilizarpara esto alcohol, sin embargo se recomienda un desengrasante electrónico modelo ArctiClean. A continuación, aplican la grasa térmica ArcticCerámica sobre el GPU como lo muestra la imagen.
2. FASTENING THE WATERBLOCK TO THE CARD – STANDARD MOUNTPlace the waterblock on the GPU and while holding it to the card, flip the card over and lay it on your work bench. Align the back plate with the mountingholes, and insert the 4 screws. Fasten the screws gradually and in a cross pattern until each leg of the bracket mates with the PCB.** IMPORTANT ** : these are fine screws and cross-threading them is easy. Do not force the screw if you feel abnormal resistance. Simply back it offcompletely, make sure that the screw is straight, and only then resume fastening.2. INSTALLATION DU BLOC SUR LA CARTE GRAPHIQUE – MONTAGE STANDARDPlacez le MCW80 sur le GPU et tout en le tenant contre la carte, retournez l’ensemble et déposez-le sur votre table de travail. Alignez la plaque arrièreavec les trous de montage, et insérez les vis. Serrez les vis en croix progressivement jusqu’à ce que les pattes viennent en contact avec la carte.** IMPORTANT ** : ces petites vis au pas très fin sont fragiles, et il est facile de les endommager. Ne forcez pas au serrage ! si vous sentez unerésistance anormale, simplement dévissez complètement, et réengagez la vis en vous assurant qu’elle est bien droite.2. INSTALACIÓN DEL BLOQUE SOBRE LA TARJETA GRÁFICA - MONTAJE NORMALColocar el MCW80 sobre el GPU, teniéndolo al mismo tiempo contra la tarjeta, voltee el conjunto y deposítalo sobre su mesa de trabajo. Alinee laplaca posterior con los agujeros de montaje, e inserta los tornillos. Apriete los tornillos en cruz progresivamente hasta que las patas hagan contacto conla tarjeta.** IMPORTANTE **: Estos pequeños tornillos, de rosca fina, son frágiles, por ello es fácil dañarlos. ¡No fuerzan a la sujeción! si sienten una resistenciaanormal, simplemente desatornillan completamente, y contratan con nuevo el tornillo, cerciorándose que se inserte bien.Copyright <strong>Swiftech</strong> 2010 – All rights reserved – Last revision date: 4-15-10 – One or more Patents Pending - Rouchon Industries, Inc., dba <strong>Swiftech</strong>® –151 West Victoria St.,Long Beach, CA 90805 – Tel. (310) 763-0336 - Toll free (US) 888-857-9438 – Fax (310) 763-7095 - E Mail: help@swiftech.com – URL: http://www.swiftech.com - Informationsubject to change without notice
GT200 Mounting kit installation - Installation du kit GT200 Instalación del kit GT200Remove all 4 screws and separatebracket from blockDémontez les 4 vis, et séparez laplaque du blocDesmontar los 4 tornillos y separar laplaca del bloque.Insert the 4 provided screws, andfasten them to the GT200 bracket with thethreaded standoffsInsérez les 4 vis fournies and la plaquede montage GT200, et serrez-les sur la plaqueavec les standoffs en plastique.Insertar los 4 tornillos proporcionadosen la placa de montaje GT200 y sujetarlossobre la placa junto con los standoffs plásticos.Mate the GT200 to the waterblock andfasten it with the existing Allen screws.Ajustez la plaque de montage sur lebloc, et serrez la avec les vis de montage Allenexistantes.Ajustar la placa de montaje sobre elbloque y apretarla con los tornillos de montajeexistentes.FASTENING THE WATERBLOCK TO THE CARD – GT200 MOUNTPlace the waterblock on the GPU and while holding it to the card, flip the card over and lay it on your work bench. Fasten all 4 thumbnuts gradually andin a cross pattern.INSTALLATION DU BLOC SUR LA CARTE GRAPHIQUE – MONTAGE GT200Placez le MCW80 sur le GPU et tout en le tenant contre la carte, retournez l’ensemble et déposez-le sur votre table de travail. Serrez les écrouscannèles en croix et progressivement.INSTALACIÓN DEL BLOQUE SOBRE LA TARJETA GRÁFICA - MONTAJE GT200Colocar el MCW80 sobre el GPU, manteniéndolo al mismo tiempo contra la tarjeta, voltear el conjunto y deposítalo sobre la mesa de trabajo. Apretarprogresivamente las tuercas en cruz.
You can now install the provided hose barbs (1/2” tube ID, G1/4 thread). Using a 5/8” socket, make sure to firmly fasten the barbs and plugs until they completely bottom out or leaks willensue. ALWAYS TEST YOUR BLOCK FOR LEAKS PRIOR TO POWERING UP YOUR SYSTEM!Vous pouvez à présent installer les embouts fournis (Tube de 12mm, pas de vis G1/4). Utilisez une clef à tube de 16mm en vous assurant de serrer les embouts et les bouchons bien àfond, sous peine de fuites. TOUJOURS TESTER VOTRE BLOC DE REFROIDISSEMENT LIQUIDE POUR DES FUITES EVENTUELLES AVANT DE LEMETTRE EN SERVICE DANS VOTRE SYSTEME!Pueden ahora instalar las conteras proporcionadas (Tubo de 12mm, tornillos de G1/4). Utilice una llave de tubo de 16mm. Asegúresede apretar las conteras y los tapones bien a fondo, so pena de fugas. ¡CONTRA LAS FUGAS, DEBEN COMPROBAR EL BLOQUE DEREFRIGERACION LÍQUIDA FUERA, ANTES DE PONERLO EN SERVICIO EN EL SISTEMA!DISCLAIMER: While all efforts have been made to provide the most comprehensive tutorial possible, <strong>Swiftech</strong>® assumes no liability expressed or implied for any damage(s) occurring toyour components as a result of using <strong>Swiftech</strong>® cooling products, either due to mistake or omission on our part in the above instructions, or due to failure or defect in the <strong>Swiftech</strong>® cooling products. Inaddition, <strong>Swiftech</strong> assumes no liability, expressed or implied, for the use of this product, and more specifically for any, and all damages caused by the use of this product to any other device in apersonal computer, whether due to product failure, leak, and electrical short, and or electro-magnetic emissions. WARRANTY: Our products are guaranteed for 12 months from the date of delivery to thefinal user against defects in materials or workmanship. During this period, they will be repaired or have parts replaced provided that: (I) the product is returned to the agent from which it was purchased;(II) the product has been purchased by the end user and not used for hire purposes; (III) the product has not been misused, handled carelessly, or other than in accordance with any instructions providedwith respect to its use. This guarantee does not confer rights other than those expressly set out above and does not cover any claims for consequential loss or damage. This guarantee is offered as anextra benefit and does not affect your statutory rights as a consumer.IMPORTANT ! Malgré tous nos efforts pour vous offrir un guide technique le plus explicite possible, des erreurs ou omissions sont possibles. La Société <strong>Swiftech</strong>® ne pourra pas être tenuepour responsable pour tous dommages survenus aux composants suite à l’utilisation des produits de refroidissement <strong>Swiftech</strong>®, dommages dus à des erreurs ou oublis de notre part dans les instructionsci-dessus mais également dus à un mauvais fonctionnement ou un défaut des produits <strong>Swiftech</strong>®. Les images utilisées ci-après ne sont pas nécessairement contractuelles. GARANTIE : Nos produitsbénéficient d’une garantie de 12 mois à partir de la date d’achat, garantie couvrant les défauts de matériaux ou de fabrication. Pendant cette période, les produits seront réparés ou remplacés si lesconditions suivantes sont respectées : (I) le produit doit être retourné au revendeur où il a été acheté; (II) le produit a été acheté et utilisé par l’utilisateur final, il n’a pas été loué ; (III) le produit n’a pasété mal utilisé, manipulé sans attention ou sans respect des règles d’utilisation mentionnées. Cette garantie ne confère pas d’autres droits que ceux clairement cités plus haut et ne couvre aucunedemande de dommages et intérêts. Cette garantie est offerte comme un extra et n’affecte pas vos droits statutaires de consommateur.¡¡IMPORTANTE! A pesar de todos los esfuerzos para ofrecerles una guía técnica lo más explícita posible, errores u omisiones pueden surgir. La sociedad <strong>Swiftech</strong>® no será responsable de losdaños o averías de los componentes como resultando de la utilización de los productos de disipación térmica <strong>Swiftech</strong>®, provocados por errores u omisiones en las instrucciones o debidos a unfuncionamiento incorrecto o a un defecto de los productos <strong>Swiftech</strong>®. Las imágenes utilizadas no son contractuales. GARANTÍA: Nuestros productos se benefician de una garantía de 12 meses a partirde la fecha de compra, garantía que cubre los defectos de material o de fabricación. Durante este periodo, los productos serán reparados o sustituidos si son conformes a las condiciones siguientes: (I)el producto debe ser enviado al distribuidor donde ha sido adquirido; (II) el producto ha sido comprado y utilizado por el usuario final, no ha sido alquilado; (III) el producto ha sido utilizadocorrectamente, manipulado con cuidado, respetando las reglas de utilización indicadas aquí arriba. Esta garantía no otorga más derechos que los arriba mencionados, y no cubre ninguna petición dedaños y perjuicios. Esta garantía se ofrece como un extra y no afecta los derechos estatutarios del consumidor.Copyright <strong>Swiftech</strong> 2010 – All rights reserved – Last revision date: 4-15-10 – One or more Patents Pending - Rouchon Industries, Inc., dba <strong>Swiftech</strong>® –151 West Victoria St.,Long Beach, CA 90805 – Tel. (310) 763-0336 - Toll free (US) 888-857-9438 – Fax (310) 763-7095 - E Mail: help@swiftech.com – URL: http://www.swiftech.com - Informationsubject to change without notice