Combi TTL Flash
Combi TTL Flash
Combi TTL Flash

You also want an ePaper? Increase the reach of your titles
YUMPU automatically turns print PDFs into web optimized ePapers that Google loves.
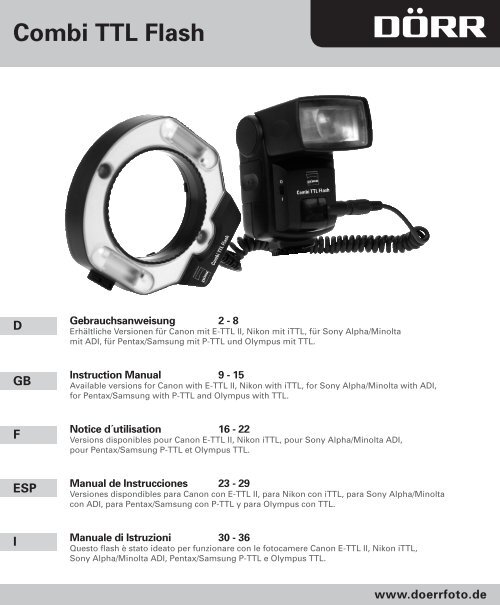
<strong>Combi</strong> <strong>TTL</strong> <strong>Flash</strong>DGebrauchsanweisung 2 - 8Erhältliche Versionen für Canon mit E-<strong>TTL</strong> II, Nikon mit i<strong>TTL</strong>, für Sony Alpha/Minoltamit ADI, für Pentax/Samsung mit P-<strong>TTL</strong> und Olympus mit <strong>TTL</strong>.GBInstruction Manual 9 - 15Available versions for Canon with E-<strong>TTL</strong> II, Nikon with i<strong>TTL</strong>, for Sony Alpha/Minolta with ADI,for Pentax/Samsung with P-<strong>TTL</strong> and Olympus with <strong>TTL</strong>.FNotice d´utilisation 16 - 22Versions disponibles pour Canon E-<strong>TTL</strong> II, Nikon i<strong>TTL</strong>, pour Sony Alpha/Minolta ADI,pour Pentax/Samsung P-<strong>TTL</strong> et Olympus <strong>TTL</strong>.ESPManual de Instrucciones 23 - 29Versiones dispondibles para Canon con E-<strong>TTL</strong> II, para Nikon con i<strong>TTL</strong>, para Sony Alpha/Minoltacon ADI, para Pentax/Samsung con P-<strong>TTL</strong> y para Olympus con <strong>TTL</strong>.IManuale di Istruzioni 30 - 36Questo flash è stato ideato per funzionare con le fotocamere Canon E-<strong>TTL</strong> II, Nikon i<strong>TTL</strong>,Sony Alpha/Minolta ADI, Pentax/Samsung P-<strong>TTL</strong> e Olympus <strong>TTL</strong>.www.doerrfoto.de
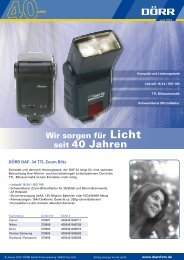
DInhaltsverzeichnis1 Vorwort ...................................................................... 22 Bauteile und Bezeichnungen ................................... 22.1 Hauptblitz .................................................................. 22.2 Makroblitz .................................................................. 32.3 Wichtige Hinweise .................................................... 32.4 Batteriehinweise ....................................................... 33 Verwendung des Hauptblitz ..................................... 43.1 Einlegen der Batterien .............................................. 43.2 Ansetzen und Abnehmen des Blitzgeräts ............... 43.3 Umschalter Hauptblitz --> Makroblitz ..................... 43.4 <strong>TTL</strong> Blitzen mit Programmautomatik ...................... 43.5 <strong>TTL</strong> Blitzen mit Zeitautomatik .................................. 53.6 <strong>TTL</strong> Blitzen mit Blendenautomatik .......................... 53.7 <strong>TTL</strong> Blitzen mit manueller Belichtungssteuerung .. 53.8 Manuelles Blitzen ...................................................... 53.9 Farbtemperatur und Weißabgleich ......................... 53.10 Abschaltautomatik ............................................ 53.11 Hilfslicht ............................................................. 53.12 Belichtungskontrollanzeige OK ........................ 63.13 Zoom-Blitzreflektor ........................................... 63.14 Indirektes Blitzen ............................................... 63.15 Rotaugen-Effekt ................................................. 63.16 Blitzsynchronzeit ............................................... 63.17 Aufhellblitz bei Tageslicht ................................ 63.18 Langzeitsynchronisation .................................. 74 Verwendung des Makroblitz ............................. 74.1 Befestigung des Makroblitz .............................. 74.2 Fotografieren mit dem DÖRR Makroblitz ........ 74.3 Einstellblitz ......................................................... 74.4 AF Hilfslicht ........................................................ 85 Technische Daten .............................................. 85.1 Hauptblitz ........................................................... 85.2 Makroblitz .......................................................... 81 VorwortVielen Dank für den Kauf des DÖRR <strong>Combi</strong> <strong>TTL</strong> <strong>Flash</strong> und für Ihr Vertrauen in die Firma DÖRR. Beim DÖRR <strong>Combi</strong> <strong>TTL</strong> <strong>Flash</strong> handelt essich um 2 Geräte in einem: ein aufsteckbares Blitzgerät, das zum Makroblitz erweitert werden kann. Dieses Blitzgerät wurde speziell fürDigitalkameras mit <strong>TTL</strong> Blitzautomatik entwickelt. Um alle Funktionen Ihres neuen Blitzgerätes nutzen zu können, empfehlen wir Ihnen,vor der ersten Inbetriebnahme des DÖRR <strong>Combi</strong> <strong>TTL</strong> <strong>Flash</strong> diese Bedienungsanleitung genau zu lesen. Bitte beachten Sie dazu auchdie Hinweise zu Blitzaufnahmen in der Bedienungsanleitung Ihrer Kamera.2 Bauteile und Bezeichnungen2.1 Hauptblitz6045300Typ Sony / AlphaTyp OlympusREADY<strong>TTL</strong> OKREADY<strong>TTL</strong> OKTyp Canon / Nikon / Olympus /Panasonic / Sony Alpha / MinoltaTyp PentaxReflektorUmschalter Haupt/MakroAutofokus HilfslichtBlitzfußBefestigungsringAnschlussbuchseBereitschaftsanzeige READYTest-HandauslöserHauptschalterBlitz OK AnzeigeBatteriefachdeckelSchwenkwinkel2
2.2 MakroblitzAutofokus- HilfslichtMakro Blitzröhre rechtsBefestigungs- KlemmtasteAutofokus- HilfslichtMakro Blitzröhre linksBefestigungs- KlemmtasteAnschlusssteckerEin/Aus- Schalter separat für Makroblitz links & rechtsHaupt- Anschlussringe 58 und 72 mm2.3 Wichtige HinweiseBevor Sie dieses Blitzgerät benutzen sollten, Sie folgende Sicherheitshinweise unbedingt beachten:• Im Falle eines Defektes sollten Sie nicht versuchen, das Blitzgerät auseinander zu nehmen oder selbst zu reparieren, da imBlitzgerät ein Kondensator für hohe Spannungen eingebaut ist. Bringen Sie das Blitzgerät zu einem Fotofachhändler oder schickenSie es an unsere Serviceabteilung ein. Sollte das Blitzgerät einmal so beschädigt sein, dass Gehäuseteile gebrochen sind, so dürfenSie das Innere des Gerätes nicht berühren.• Das Blitzlicht ist ein technisches Präzisionsgerät welches durch Schläge, Stöße und sonstige unsanfte und unsachgemäßeBehandlung Schaden nehmen kann.• Dieses Blitzgerät ist nicht wetterfest. Daher sollten Sie es vor Regen und hoher Luftfeuchtigkeit gut schützen, da sonst irreparableSchäden am Blitzgerät entstehen können.• Bitte schützen Sie das Blitzgerät vor extremen Temperaturen. Lassen Sie es nie im Auto bei starker Sonneneinstrahlung liegen.Vermeiden Sie starke Temperaturschwankungen.• Reinigen Sie das Blitzgerät nicht mit Benzin oder anderen scharfen Reinigungsmitteln.2.4 Batteriehinweise• Bevor Sie die Batterien in das Gerät einlegen, achten Sie auf Sauberkeit der Kontakte im Blitzgerät als auch bei den Batterien.• Verwenden Sie immer 4 Batterien des gleichen Typs mit gleicher Kapazität vom gleichen Hersteller.• Mischen Sie nie Batterien mit aufladbaren Akkus.• Wenn Sie das Blitzgerät über einen längeren Zeitraum nicht benutzen, so entnehmen Sie bitte die Batterien.• Bitte erneuern Sie die Batterien, wenn das Blitzgerät mehr als 30 Sekunden bis zum Aufleuchten der Bereitschaftsanzeige benötigt.• Batterien entwickeln Ihre volle Kapazität erst bei einer Temperatur von ca. 20°C. Um die volle Leistung auch bei kalter Witterung zunutzen, sollten Sie Ihre Ausrüstung z.B. im Fotorucksack DÖRR ICEBREAKER transportieren. Das Thermofach mit integriertemWärmepad hält die Leistung Ihrer Batterien und Akkus auch bei niedrigen Außentemperaturen im maximalen Bereich.• Batterien nie ins offene Feuer werfen – Explosionsgefahr!• Verbrauchte Batterien nicht in den Hausmüll werfen sondern im Fotofachhandel bzw. entsprechenden Annahmestationen abgeben,um eine umweltgerechte Entsorgung zu gewährleisten.3
3 Verwendung des Hauptblitz´3.1 Einlegen der Batterien• Öffnen Sie den Batteriefachdeckel, indem Sie ihn in Pfeilrichtung schieben und aufklappen.Der Hauptschalter sollte dabei auf OFF (Aus) stehen.• Legen Sie 4 Mignon Batterien (Typ AA) bzw. NiMH Akkus des gleichen Typs in das Batteriefach ein.Die richtige Polung entnehmen Sie bitte den Symbolen im Batteriefach.• Schließen Sie den Batteriefachdeckel, indem Sie ihn zudrücken und gegen die Pfeilrichtung schieben.• Schieben Sie den Hauptschalter auf ON (Ein). Bei korrekt eingelegten Batterien leuchtet die Blitzbereitschaftsanzeige READY nacheinigen Sekunden. Sie können jetzt einen Testblitz auslösen. Drücken Sie dazu den Test-Handauslöser.3.2 Ansetzen und Abnehmen des BlitzgerätsBevor Sie das Blitzgerät auf Ihre Kamera setzen, sollten Sie darauf achten, dass Blitzgerät und Kamera ausgeschaltet sind und derFeststellring des Blitzgeräts nach oben gedreht ist. Der eingebaute Kamerablitz muss geschlossen sein.Modelle Canon, Nikon und Pentax:Schieben Sie das Blitzgerät vorsichtig in den Blitzschuh Ihrer Kamera. Um eine hohe Festigkeit und guten Kontaktzwischen Blitz und Kamera zu garantieren, sollten Sie anschließend den Feststellring im Uhrzeigersinn festdrehen.Wenn Sie das Blitzgerät wieder von der Kamera entfernen möchten, so gehen Sie in umgekehrter Reihenfolge vor.Modell Olympus:Schieben Sie das Blitzgerät vorsichtig in den Blitzschuh Ihrer Kamera. Um eine hohe Festigkeit und gutenKontakt zwischen Blitz und Kamera zu garantieren, sollten Sie anschließend die Taste LOCK drücken. Wenn Siedas Blitzgerät wieder von der Kamera entfernen möchten, so drücken Sie gleichzeitig die beiden Pfeiltasten nebender Lock Taste. Nun ist das Blitzgerät entriegelt und lässt sich wieder leicht von der Kamera entfernen.Modell Sony/Minolta:Schieben Sie das Blitzgerät in den Blitzschuh der Kamera bis es einrastet. Um das Blitzgerät wieder von derKamera zu lösen drücken Sie die PUSH Taste. Nun ist das Blitzgerät entriegelt und lässt sich wieder leicht vonder Kamera entfernen.3.3 Umschalter Hauptblitz --> MakroblitzI – Schieben Sie den Umschalter nach unten auf das Symbol „I“, so ist der Hauptblitz aktiviert.O - Schieben Sie den Umschalter nach oben auf das Symbol „O“, so ist der Makroblitz aktiviert.3.4 <strong>TTL</strong> Blitzen mit ProgrammautomatikNachdem Sie das Blitzgerät mit Ihrer Kamera verbunden haben, schalten Sie zuerst Ihre Kamera an und stellen Sie den Belichtungsmodusauf Programmautomatik (P) und anschließend das Blitzgerät auf ON (Ein). Der DÖRR <strong>Combi</strong> <strong>TTL</strong> <strong>Flash</strong> ist automatisch im<strong>TTL</strong> Modus. Wenn die Blitzbereitschaftsanzeige READY leuchtet, brauchen Sie nur noch den Auslöser Ihrer Kamera zu betätigen. Diemeisten SLR Kameras besitzen zusätzlich im Kamerasucher eine Blitzbereitschaftsanzeige (lesen Sie dazu die BedienungsanleitungIhrer Kamera). Im <strong>TTL</strong> Automatikbetrieb wird nun die Lichtmenge von Kamera und Blitzgerät so gesteuert, dass sich immer eine exakteBelichtung Ihres Motivs ergibt. Das Blitzlicht wird dabei vom Motiv reflektiert und durch das Objektiv (Through The Lens) gemessen.Bei Erreichen der für das Motiv korrekten Lichtmenge wird ein Stoppsignal an das Blitzgerät gegeben, welches mittels eingebauterElektronik den Lichtausstoß unterbricht. Zusätzlich werden dabei die optimale Blende und Belichtungszeit an Ihrer Kamera eingestellt.Die <strong>TTL</strong> Blitzautomatik hat neben der hohen Belichtungsgenauigkeit und der einfachen Handhabung noch weitere Vorteile:• Sämtliche Einstell- und Belichtungskorrekturen entfallen• Auszugsverlängerungen (z.B. mit Zwischenringen) werden automatisch berücksichtigt• Filterfaktoren (z.B. bei Pol- und Graufiltern) werden automatisch berücksichtigt• Automatische Berücksichtigung der variablen Lichtstärke bei Zoomobjektiven• Die verwendete Filmempfindlichkeit/ISO Zahl wird automatisch übernommen und berücksichtigt• Automatische Berücksichtigung bei indirektem Blitzen und beim Einsatz von Bouncern und Softboxen• Es wird nur das zur Belichtung notwendige Licht erfasst4
3.5 <strong>TTL</strong> Blitzen mit ZeitautomatikMöchten Sie zugunsten eines von Ihnen gewünschten Schärfenbereichs mit Zeitautomatik fotografieren, so ist auch das mit <strong>TTL</strong>Blitzautomatik möglich. Stellen Sie den Belichtungsmodus Ihrer Kamera auf Zeitautomatik und wählen Sie die gewünschte Blendemanuell. Beachten Sie aber bitte, dass mit kleiner werdender Blendenöffnung (größere Blendenzahl) die Blitzreichweite abnimmt.Die entsprechende Blitzsynchronzeit wird von Ihrer Kamera automatisch gesteuert und sorgt zusammen mit der automatischen <strong>TTL</strong>Blitzautomatik für richtig belichtete Bildergebnisse.3.6 <strong>TTL</strong> Blitzen mit BlendenautomatikStellen Sie zunächst Ihre Kamera auf Blendenautomatik ein. Nun können Sie die Belichtungszeit Ihrer Wahl eingeben. Dabei darfallerdings die kürzeste Blitzsynchronzeit Ihrer Kamera nicht unterschritten werden. Die meisten modernen SLR Kameras verhinderndas automatisch. Die <strong>TTL</strong> Blitzautomatik sorgt zusammen mit der automatischen Blendensteuerung der Kamera für korrekteBildergebnisse.3.7 <strong>TTL</strong> Blitzen mit manueller BelichtungssteuerungStellen Sie Ihre Kamera auf manuelle Belichtungssteuerung ein. Nun können Sie die Belichtungszeit und die Blende Ihrer Wahleingeben. Dabei darf allerdings die kürzeste Blitzsynchronzeit Ihrer Kamera nicht unterschritten werden. Die meisten modernen SLRKameras verhindern das automatisch. Die <strong>TTL</strong> Blitzautomatik sorgt für korrekte Bildergebnisse.3.8 Manuelles BlitzenAnstelle der <strong>TTL</strong>-Blitzautomatik können Sie den Blitz auch im manuellen Blitzmodus (M) bedienen und dieerforderliche Lichtmenge selbst dosieren. Die LED-Anzeige auf der Rückseite des Blitzgehäuses zeigt dengewählten Modus an. Drücken Sie den MODE-Knopf und wählen Sie die gewünschte Blitzleistung:M1/1 - M1/4 - M1/16. Wenn Sie zur <strong>TTL</strong>-Blitzautomatik zurückkehren möchten, drücken Sie den MODE-Knopf solange, bis <strong>TTL</strong> auf der LCD-Anzeige zu sehen ist.3.9 Farbtemperatur und WeißabgleichDie Farbtemperatur des DÖRR <strong>Combi</strong> <strong>TTL</strong> <strong>Flash</strong> liegt bei ca. 5.500 K. Der automatische Weißabgleich von Digitalkameras stellt sichautomatisch auf diese Farbtemperatur ein. Aufgrund von Mischlicht kann es aber zu Farbstichen kommen. Deshalb empfehlen wirIhnen die manuelle Einstellung des Weißabgleichs an Ihrer Digitalkamera. Stellen Sie den Weißabgleich je nach Kameramodell auf5.500 K oder Blitzlicht-Symbol.3.10 Blitzabschalt- AutomatikUm die Batterien zu schonen ist der DÖRR <strong>Combi</strong> <strong>TTL</strong> <strong>Flash</strong> mit einer Abschaltautomatik ausgestattet. Sie wird nach ca. 3 Minutenaktiviert, wenn das Gerät nicht benutzt wird. Soll das Blitzgerät wieder benutzt werden, so schieben Sie den Hauptschalter auf Off/Aus und dann wieder auf ON/Ein. Das Blitzgerät ist damit wieder in Bereitschaft. Wenn Sie das Gerät längere Zeit nicht verwenden,schalten Sie den Hauptschalter auf OFF/Aus.3.11 HilfslichtDer DÖRR <strong>Combi</strong> <strong>TTL</strong> <strong>Flash</strong> besitzt ein AF Hilfslicht. Digitale und analoge SLR Kameras benötigen für die korrekteEntfernungseinstellung einen bestimmten Mindestkontrast. Bei schlechten Lichtverhältnissen kann es sein, dass der vorhandeneMotivkontrast nicht mehr für eine automatische Scharfeinstellung ausreicht. In diesem Fall sendet Ihr DÖRR <strong>Combi</strong> <strong>TTL</strong> <strong>Flash</strong>bei leichtem Druck auf den Kameraauslöser ein Kontrastmuster aus. Der Autofokus Ihrer Kamera kann dann mit Hilfe des AFRotlichtmessstrahls nun wieder Motivstrukturen erkennen und die Entfernung selbst in dunkelsten Umgebungen schnell und exakteinstellen. Die Reichweite des AF Hilfslichts beträgt ca. 1 bis 5m.Hinweis: Je nach Kameramodell kann es sein, dass das in die Kamera eingebaute AF Hilfslicht erste Priorität besitzt. In diesem Fallwird das AF Hilfslicht Ihres DÖRR <strong>Combi</strong> <strong>TTL</strong> <strong>Flash</strong> nicht aktiviert.5
3.12 Belichtungskontrollanzeige OKDer DÖRR <strong>Combi</strong> <strong>TTL</strong> <strong>Flash</strong> ist mit einer Belichtungskontrollanzeige versehen. Sie zeigt Ihnen an, ob der angegebene Blitz für einekorrekte Beleuchtung Ihres Motivs ausreichend war, oder ob Sie die Aufnahme ggf. mit kürzerer Aufnahmedistanz wiederholen sollten.War die Lichtmenge ausreichend, so leuchtet für ca. 2 Sekunden die OK Anzeige. Die Belichtungskontrollanzeige wird nur im <strong>TTL</strong>Modus in Verbindung mit der Kamera aktiviert.3.13 Zoom-BlitzeflektorBei der Verwendung verschiedener Objektivbrennweiten erhalten Sie auch verschiedene Bildwinkel.So haben Sie z. B. bei einem 28mm Weitwinkelobjektiv einen wesentlich größeren Bildwinkel als miteinem 85mm Teleobjektiv. Um den Ausleuchtwinkel des Blitzgerätes dem Bildwinkel des Objektivsanzupassen, besitzt der DÖRR <strong>Combi</strong> <strong>TTL</strong> <strong>Flash</strong> einen Zoom-Reflektor, der sich durch Ziehen amReflektorkopf variieren lässt. Zur Information über die eingestellte Reflektor- Brennweite befindet sichauf der Oberseite des Reflektorkopfes eine Anzeige. Folgende Einstellungen sind möglich:28, 35, 50 und 85mm. Berücksichtigen Sie bitte, dass sich je nach Brennweite und Filmempfindlichkeitauch die Blitzreichweite ändert.3.14 Indirektes BlitzenDer DÖRR <strong>Combi</strong> <strong>TTL</strong> <strong>Flash</strong> ist mit einem Schwenkreflektor ausgestattet. Dieser ermöglicht Ihnen die Veränderungder Blitzrichtung um bis zu 90° in vertikaler Richtung. Sie vermeiden das frontale Anblitzen von Motiven, indem Sieden Blitzreflektor in Richtung einer reflektierenden Fläche richten. Die Fläche sollte neutral- weiß sein(weiße Zimmerdecke), da das Licht in dem Farbton der angeblitzten Fläche zurückreflektiert wird. Das führt beifarbigen Reflektionsflächen zu Farbstichen. Durch das indirekte Blitzen haben Sie folgende Vorteile:• Vermeidung von Schlagschatten• Vermeidung roter Augen• weiche, diffuse und gleichmäßigere Ausleuchtung• Vermeidung störender Lichtreflexe auf spiegelnden Oberflächen (z.B. Brillen, Fensterscheiben)Den eingestellten Blitzwinkel können Sie am hinteren Teil des Blitzreflektor-Kopfes ablesen. Bitte berücksichtigen Sie, dass derLichtweg beim indirekten Blitzen nicht mehr der Motiventfernung entspricht, sondern der Strecke Blitz --> reflektierende Fläche -->Motiv. Im <strong>TTL</strong>-Blitzmodus übernehmen Blitzgerät und Kamera automatisch die entsprechende Dosierung der Blitzleistung.3.15 Rotaugen-EffektDie auf manchen Bildern zu sehenden roten Augen werden durch Blitzlicht verursacht, welches von der durchbluteten Netzhautim Auge reflektiert wird. Der Effekt tritt besonders auf, wenn sich der Blitz nah der Objektivachse befindet. Begünstigt wird derRotaugen- Effekt noch von schwachem Umgebungslicht, da sich dann die Pupillen weiten. Eine sichere Vermeidung stellt dasindirekte Blitzen dar. Aber auch bei direktem Blitzen kommt die Bauweise des DÖRR <strong>Combi</strong> <strong>TTL</strong> <strong>Flash</strong> der Verringerung des Rotaugen-Effektes entgegen, da sich der Blitzreflektor möglichst weit weg von der optischen Achse der Kamera befindet. Denn je größer derBlitzeinfallwinkel ist, desto weniger tritt der Rotaugen-Effekt auf. Einige Kameratypen von Pentax/Samsung, Nikon und Olympus bietenzusätzlich einen Vorblitz zur Reduzierung roter Augen an. Diese Vorblitzfunktion wird von dem DÖRR <strong>Combi</strong> <strong>TTL</strong> <strong>Flash</strong> unterstützt. Fürausführliche Informationen lesen Sie bitte die Bedienungsanleitung Ihrer Kamera.3.16 BlitzsynchronzeitAls Blitzsynchronzeit werden die Belichtungszeiten bezeichnet, mit denen Aufnahmen mit Blitz überhaupt möglich sind. Problematischsind dabei nur die kürzeren Belichtungszeiten. Deshalb besitzt jede Kamera eine kürzeste Blitzsynchronzeit, die je nach Kameramodellunterschiedlich ist und aus der Bedienungsanleitung Ihrer Kamera entnommen werden kann. Die kürzeste Blitzsynchronzeit darf aufkeinen Fall unterschritten werden, da es sonst zu fehlerhaften Belichtungen kommt.Bei der Verwendung des DÖRR <strong>Combi</strong> <strong>TTL</strong> <strong>Flash</strong> wird in der Betriebsart <strong>TTL</strong> automatisch die richtige Blitzsynchronzeit eingestellt.Die Version Pentax bietet zusätzlich das Blitzen auf den 2. Verschluss-vorhang an. Schieben Sie dazu den entsprechenden Schalternach rechts. Die mittlere Schalterstellung ist für „normales“ Blitzen auf den ersten Vorhang.3.17 Aufhellblitz bei TageslichtAn sonnigen Tagen reicht die Helligkeit zwar für eine richtige Belichtung ohne Blitz aus, jedoch entstehen, je nach Stand der Sonne,mehr oder weniger hässliche Schatten in Gesichtern oder anderen Motiven. Auch Gegenlichtaufnahmen haben oft ein unterbelichtetesHauptmotiv zur Folge. Deshalb ist das Fotografieren mit Blitz auch bei ausreichendem Tageslicht empfehlenswert. Die oben genanntenProbleme werden damit beseitigt und Ihre Bilder wirken farbkräftiger, kontrastreicher und brillanter.6
3.18 LangzeitsynchronisationUm bei schlechtem Umgebungslicht ein ausgewogenes Verhältnis von Motiv- und Hintergrundhelligkeit zu bekommen, empfiehlt sichdie Verwendung einer längeren Belichtungszeit. Dadurch wird das Hauptmotiv im Vordergrund durch den Blitz beleuchtet, währendder Hintergrund (der beim „normalen Blitzen“ in der Dunkelheit versinken würde) durch eine längere Belichtungszeit derMotivhelligkeit angepasst wird. Damit können Sie tolle Effekte erzielen. Besonders gut wirken z. B. Portraits vor der abendlichenKulisse eines Rummelplatzes, Weihnachtsmarktes oder einer neonbeleuchteten Einkaufspassage.Um eine längere BelichtungszeitIhrer Wahl einstellen zu können, müssen Sie Ihre Kamera auf Blendenautomatik stellen. Bei einigen Kameramodellen lässt sich dieLangzeitsynchronisation auch mit Programm- und Zeitautomatik durchführen. Einige Kameramodelle sind auch mit entsprechendenMotivprogrammen ausgestattet (z.B. Nachtportait), bei denen diese Einstellungen automatisch vorgenommen werden.Um den Hintergrund nicht zu verwackeln, empfiehlt sich die Verwendung eines DÖRR Stativs.4 Verwendung des Makroblitzes4.1 Befestigung des MakroblitzesAm Hauptblitz: Stecken Sie den Stecker des Makroblitz in die Anschlussbuchse des Hauptblitzes.Schalten Sie den Umschalter auf das Symbol „O“.An der Kamera: Schrauben Sie den Anschlussring „1“ in das Filtergewinde Ihres Kameraobjektivs.Verwenden Sie dazu ggf. zusätzlich einen der mitgelieferten Adapterringe. Verbinden Sie dann den Makroblitz mit dem Anschlussring,indem Sie beide Befestigungs-Klemmtasten „2“ zusammendrücken und den Anschlussring in den Ringblitz einfügen. Sobald Sie dieBefestigungs-Klemmtasten wieder loslassen, ist der Anschlussring fest mit dem Makroblitz verbunden.4.2 EinstellblitzMit der Funktion Einstellblitz können Sie vor einer Aufnahme prüfen, ob Ihr Objekt richtig ausgeleuchtet ist oder ob Schattenentstehen. Drücken Sie hierzu den MODE-Knopf für 2 Sekunden. Der Makroblitz löst nun eine Reihe von Blitzen aus, die Ihnenhelfen wird, das gewünschte Blitzergebnis für Ihre Makroaufnahme zu bestimmen.4.3 Fotografieren mit dem DÖRR Makroblitz• Schalten Sie Ihre Digitalkamera ein.• Schalten Sie den Hauptblitz des <strong>Combi</strong> <strong>Flash</strong> ein indem Sie den Hauptschalter auf ON (Ein) schieben.• Die Blitzbereitschaftsanzeige „READY“ brennt bei blitzbereitem Gerät.• Schalten Sie den Umschalter auf das Symbol „O“.• Schalten Sie eine oder beide Blitzseiten des Makroblitz’ ein.- Blitzen Sie nur mit einer Blitzseite, um das Motiv einseitig zu beleuchten. Das Motiv wirkt dadurch plastischer und es werden –je nach Motiv – mehr oder weniger Schatten erzeugt.- Blitzen Sie mit beiden Blitzseiten, um eine schattenfreie und gleichmäßige Ausleuchtung im Makrobereich zu erreichen.- Je nach Motiv kann es von Vorteil sein, die Makro-Blitzreflektoren nach oben und unten zu drehen. Drücken Sie dazu die beidenKlemmtasten und drehen Sie den Makroblitz um 90°.• Auch der Makroblitz ist mit einer <strong>TTL</strong> Belichtungsautomatik ausgestattet. Auch im Makrobereich können Sie mit Programm-, ZeitoderBlendenautomatik arbeiten. Für Aufnahmen im Nah- und Makrobereich empfehlen wir Ihnen jedoch nur im manuellenBelichtungsmodus (M) zu arbeiten.• Stellen Sie die gewünschte Belichtungszeit an Ihrer Kamera ein. Diese darf nicht kürzer als die kürzeste Blitzsynchronzeit sein (sieheBedienungsanleitung Ihrer Kamera).• Wählen Sie die gewünschte Blende an Ihrer Kamera. Zugunsten eines möglichst großen Schärfenbereichs sollten Sie sich für einekleinere Blendenöffnung entscheiden (= große Blendenzahl, z.B. 11, 16 oder 22).Tipp: Mit der Abblendtaste an Ihrer Kamera können Sie bereits vor der Aufnahme den Schärfenbereich -je nach eingestellter Blende - Ihres Motivs kontrollieren.Der Makroblitz hat folgende Leitzahl:• Eine Seite eingeschaltet: Leitzahl 6• Beide Seiten eingeschaltet: Leitzahl 8,4So können Sie die erforderliche Blende berechnen: Leitzahl : Entfernung = erforderliche BlendeBeispiel: Leitzahl 8,4 : Entfernung 0,4m = erforderliche Blende: 22• Bei Über- oder Unterbelichtung wiederholen Sie die Aufnahme bitte mit geänderter Blendeneinstellung• Blitzbereitschaftsanzeige und Blitz OK Anzeige vorherige Erläuterungen7
4.4 AF HilfslichtAuch der Makroblitz des DÖRR <strong>Combi</strong> <strong>TTL</strong> <strong>Flash</strong> besitzt ein AF Hilfslicht. Digitale und manuelle SLR Kameras benötigen für die korrekteEntfernungseinstellung einen bestimmten Mindestkontrast. Bei schlechten Lichtverhältnissen kann es sein, dass der vorhandeneMotivkontrast nicht mehr für eine automatische Scharfeinstellung ausreicht. In diesem Fall sendet Ihr DÖRR <strong>Combi</strong> <strong>TTL</strong> <strong>Flash</strong> beileichtem Druck auf den Kameraauslöser ein Hilfslicht aus. Der Autofokus Ihrer Kamera kann dann mit Hilfe des AF Messstrahls wiederMotivstrukturen erkennen und die Entfernung selbst in dunkelsten Umgebungen schnell und exakt einstellbar.Das AF Hilfslicht im Makroblitz ist nur für den Nahbereich geeignet.5 Technische Daten5.1 Hauptblitz(Änderungen der technischen Daten bleiben vorbehalten)Blitzreichweite mit ISO 100:BrennweiteBlende 28 mm 35 mm 50 mm 85 mmF 1,4 0,7 - 11,4 m 1 - 17,1 m 1,3 - 21,4 m 1,5 - 24,3 mF 2 0,7 - 8 m 1 - 12 m 1,3 - 15 m 1,5 - 17 mF 2,8 0,7 - 5,7 m 1 - 8,6 m 1,3 - 10,7 m 1,5 - 12,1 mF 4 0,7 - 4 m 1 - 6 m 1,3 - 7,5 m 1,5 - 8,5 mF 5,6 0,7 - 2,9 m 1 - 4,3 m 1,3 - 5,4 m 1,5 - 6,1 mF 8 0,7 - 2 m 1 - 3 m 1,3 - 3,8 m 1,5 - 4,3 mF 11 0,7 - 1,5 m 1 - 2,2 m 1,3 - 2,7 m 1,5 - 3,1 mF 16 0,7 - 1 m 1 - 1,5 m 1,3 - 1,9 m 1,5 - 2,1 mF 22 0,7 m 1 m 1,3 m 1,5 mMax. Leitzahl bei ISO 100: 34Zoomreflektor:28, 35, 50 und 85mm, manuell einstellbarSchwenkwinkel: 0°/ 30°/ 45°/ 60°/ 90°Blitzsteuerung:<strong>TTL</strong>-Blitzautomatik oder manuell in 3 StufenAF-Rotlichtstrahl:Reichweite ca. 1 - 5mBelichtungskontrollanzeige grüne LED auf GeräterückseiteBlitzbereitschaftsanzeige rote LED auf GeräterückseiteBlitzen auf den 2. Vorhang: nur Modell Pentax/SamsungBlitz-Leuchtdauer:ca. 1/500s - 1/30.000sBlitzfolgezeit:ca. 0.5-7sBlitzanzahl: ca.150 - 2.000Farbtemperatur:ca. 5.500 K (entspricht Tageslichtfilmen)Handauslöser:an GeräterückseiteStromversorgung:4x1,5V AA-Mignon-Batterien (Alkaline) oder NiMH-Akkus gleichen TypsGewicht:ca. 250g (ohne Batterien)Abmessungen:ca. 85x73x120mm5.2 Makroblitz(Änderungen der technischen Daten bleiben vorbehalten)Max. Leitzahl bei ISO 100:Farbtemperatur ca. 5.500KBlitzreflektorAF-Hilfslicht:GewichtAbmessungen6 (eine Seite eingeschaltet), 8,4 (beide Seiten eingeschaltet)2 unabhängig voneinander zuschaltbare Blitzhälften2 x im Makroblitz integriertca. 190 g120 x 120 x 30mm (ohne Kabel)8
GBTable of Contents1 Preface ............................................................................... 92 Nomenclature ................................................................... 92.1 Main <strong>Flash</strong> ......................................................................... 92.2 Macro <strong>Flash</strong> ....................................................................... 102.3 Caution ............................................................................... 102.4 Battery Information ........................................................... 103 Usage of Main <strong>Flash</strong> ......................................................... 113.1 Loading of the Batteries .................................................... 113.2 Mounting and Removing the <strong>Flash</strong> from the Camera .... 113.3 Selector Switch Main <strong>Flash</strong> --> Macro <strong>Flash</strong> ................... 113.4 <strong>TTL</strong> <strong>Flash</strong> Mode with Automatic Program Mode ............ 113.5 <strong>TTL</strong> <strong>Flash</strong> Control-Exposure Priority ................................ 123.6 <strong>TTL</strong> <strong>Flash</strong> Control-Aperture Priority ................................. 123.7 <strong>TTL</strong> <strong>Flash</strong> with Manual <strong>Flash</strong> Control .............................. 123.8 Manual <strong>Flash</strong> Mode ........................................................... 123.9 Color Temperature & Auto White Balance ...................... 123.10 Auto Power OFF ..................................................... 123.11 Autofocus Illumination .......................................... 123.12 Exposure Control Display ...................................... 123.13 Zoom <strong>Flash</strong> Head ................................................... 133.14 Indirect <strong>Flash</strong> .......................................................... 133.15 Red-Eye Effect ........................................................ 133.16 <strong>Flash</strong> Synchronization ........................................... 133.17 Fill-in <strong>Flash</strong> in Daylight .......................................... 133.18 Slow Synchronization ............................................ 134 Usage of the Macro <strong>Flash</strong> Unit ............................. 144.1 Connecting Macro <strong>Flash</strong> Unit ............................... 144.2 Modeling <strong>Flash</strong> ....................................................... 144.3 Taking Pictures with the DÖRR Macro <strong>Flash</strong> ....... 144.4 Autofocus Illumination .......................................... 145 Specifications ......................................................... 155.1 Main <strong>Flash</strong> .............................................................. 155.2 Macro <strong>Flash</strong> ............................................................ 151 PrefaceThank you for purchasing the DÖRR <strong>Combi</strong> <strong>TTL</strong> <strong>Flash</strong>. The flash is designed to fulfill 2 purposes --> it works as a normal accessoryflash and as a --> macro flash with digital cameras featuring <strong>TTL</strong> flash control. In order to enjoy this flash unit to its maximum and takeutmost advantage of its features, we recommend to read these instructions carefully before using the DÖRR <strong>Combi</strong> <strong>TTL</strong> <strong>Flash</strong>. Pleasealso refer to the instruction manual of your camera with regards to flash photography.2 Nomenclature2.1 Main <strong>Flash</strong>6045300Type Sony / AlphaType OlympusREADY<strong>TTL</strong> OKREADY<strong>TTL</strong> OKType Canon / Nikon / Olympus /Panasonic / Sony Alpha / MinoltaType Pentax<strong>Flash</strong> HeadMain/Macro Selector SwitchAutofocus LightHot ShoeLocking RingConnection Socket<strong>Flash</strong> READY Button<strong>Flash</strong> Test ButtonOn/Off Switch<strong>Flash</strong> OK DisplayBattery Compartment CoverBounce Angle9
2.2 Macro <strong>Flash</strong>Autofocus IlluminationMacro <strong>Flash</strong> Tube right sideFixing ClampAutofocus IlluminationMacro <strong>Flash</strong> Tube left sideFixing ClampConnection SocketOn/Off Switch for both Left & Right Macro <strong>Flash</strong> TubeMain Connection Rings 58 and 72 mm2.3 Caution!Before using this flash unit, it is important to carefully read and follow these security instructions:• Should this flash prove to be defective do not attempt to open the housing or to repair the flash yourself. This flash contains ahigh voltage condenser. Take the flash unit to your local photo specialty shop or contact your local DÖRR service agent.In case the flash housing is broken, do not touch the interior parts of the flash.• This flash unit is a technical instrument of high precision which should be protected against shocks, dropping or other improperhandling.• The flash unit is not water resistant. Rain and humidity may cause damages which are irreparable.• Protect the flash unit from extreme temperatures as may occur in cars or in direct sun reflection. Avoid extreme temperaturechanges.• Never use aggressive cleansing agents such as benzine to clean this flash.2.4 Battery Information• Before inserting the batteries be sure that there is no dust in the battery compartment nor on the contacts.• Always use 4 fresh batteries of the same type and brand (AA).• Do not combine AA alkaline batteries with rechargeable batteries.• Replace the batteries by fresh ones if the flash ready display doesn’t light up within 30 seconds.• Batteries develop their full capacity at a temperature of approximately 20°C/70°F. In order to achieve full performance at lowertemperatures, protect the flash unit against cold, for instance by carrying your equipment e.g. in a DÖRR ICEBREAKER backpackwhich comes with an integrated thermal compartment with heat pack. Your batteries will perform at a maximum even at extremelylow temperatures.• Never throw batteries into open fire or attempt to recharge batteries other than those made for this purpose (NiMH) due to dangerof explosion!• Protect your environment by proper waste disposal of batteries after use.10
3 Usage of Main <strong>Flash</strong>3.1 Loading of the Batteries• Open the battery compartment cover by sliding it in direction of the arrow. The flash must be switched Off.• Insert four AA batteries (Mignon type) or rechargeable NiMH of the same performance making sure to respectthe correct plus/minus order as shown inside the compartment.• Close the battery cover.• Switch the flash on (ON/OFF switch). If batteries have been properly inserted, the “Ready” light will glow after a few seconds.Now the first test flash can be made. Simply press the flash test button.3.2 Mounting and Removing the <strong>Flash</strong> from the CameraBefore mounting the flash onto your cmaera, be sure that the flash and the camera are switched off and that the locking ring of theflash is turned upwards. The camera’s incorporated flash must be closed.Models for Canon, Nikon and Pentax:Slide the flash unit carefully onto the camera’s flash shoe. In order to guarantee a tight fitting and good contactbetween flash and camera, the locking ring should be turned clockwise. When removing the flash from the camera,reverse the steps.Models for Olympus:Slide the flash unit carefully onto the camera’s flash shoe. In order to guarantee a tight fitting and good contactbetween flash and camera, push the LOCK button. When removing the flash from the camera, press the twoarrow buttons next to the lock button simultaneously. The flash is loose now and can now be removed.Models Sony/Minolta:Slide the flash unit carefully onto the camera’s flash shoe until it clicks closed. In order to remove the flash,press the PUSH button. The flash is loose now and can be removed from the camera easily.3.3 Selector Switch for Main <strong>Flash</strong>I – Slide the selector switch down to symbol „I“ to activate the main flash.O - Slide the selector switch up to symbol „O“ to activate the macro flash.3.4 <strong>TTL</strong> <strong>Flash</strong> Mode with Automatic Program ModeAfter the flash is properly mounted on your camera, switch the camera on, select the automatic program exposure mode (P), thenswitch the flash unit to ON. The DÖRR <strong>Combi</strong> <strong>TTL</strong> <strong>Flash</strong> works automatically in <strong>TTL</strong> flash mode. When the flash READY light glowsyou need only press the shutter release button to start taking pictures. Most cameras boast of a flash ready indicator in the viewfinder(see camera instruction). The <strong>TTL</strong> auto flash mode automatically controls the required light of camera and flash for correct exposureof your object. The flash light is reflected from the object and measured through the lens (<strong>TTL</strong>). When the correct exposure has beenmeasured, a stop signal is transmitted to the flash. The flash electronics circuitry then interrupts the light transmission and ignites theflash. Simultaneously the best aperture and exposure time will be set at your camera. The <strong>TTL</strong> auto flash mode offers a highly preciseexposure and is easy to handle. And in addition the following advantages are given:• Camera settings and corrections are not required• Lens extensions (e.g. with extension tubes) are automatically recognized• Filter factors (e.g. for polarizing or neutral density filters) will be considered• Automatic calculation of the variable aperture of zoom lenses• The film speed in use /ISO no. will be considered and calculated correctly• The usage of soft boxes and bouncers in case of indirect flash will be calculated correctly• Only the required light for correct exposure is measured11
3.5 <strong>TTL</strong> <strong>Flash</strong> Control-Exposure PriorityThe auto exposure program of your camera can be combined with the <strong>TTL</strong> auto flash function. Set your camera to shutter speedpriority mode. Now the desired aperture can be set manually. Please keep in mind that the flash range will decrease with smallapertures (such as F11 or smaller). Your camera will automatically choose the correct flash synchronization. With the assistance of the<strong>TTL</strong> auto flash mode best results may be expected.3.6 <strong>TTL</strong> <strong>Flash</strong> Control- Aperture PrioritySet your camera to aperture priority mode. Now the desired shutter speed can be set manually. Be aware that a shorter exposuretime than the camera’s x-synchronization can not be selected (most modern cameras will refuse such setting automatically).The <strong>TTL</strong> auto flash mode and the aperture priority mode will insure correct lighting of your object.3.7 <strong>TTL</strong> <strong>Flash</strong> with Manual <strong>Flash</strong> ControlFirst set your camera to manual flash control mode. Now select aperture and exposure time at your choice.Do not choose a exposure time shorter than the camera’s x-synchronization. Most modern cameras will refuse such settingsautomatically. The <strong>TTL</strong> auto flash mode ensures correct lighting of your object.3.8 Manual <strong>Flash</strong> ModeInstead of using a <strong>TTL</strong> flash control, you can also adjust the flash power output manually using the manualmode (M). The LED on the rear side of the main flash indicates the selected mode. The following power ratioscan be selected by pressing the mode button: M1/1 - M1/4 -M1/16. If you wish to return to <strong>TTL</strong> mode, press themode button again until the LCD indicates <strong>TTL</strong>.3.9 Color Temperature & Auto White BalanceThe DÖRR <strong>Combi</strong> <strong>TTL</strong> <strong>Flash</strong> achieves a color temperature of app. 5.500 K. The camera’s white balance will be automatically set to thiscolor temperature. Mixed light can create tints. We therefore recommend to set your camera’s white balance manually to 5.500 K or toflash light symbol, depending on the camera model.3.10 Automatic Power SavingTo conserve the batteries, the flash features an automatic power saving mode. This mode automatically activates approx. 3 minutesafter the flash has not been in use. To re-activate the flash, turn the power switch to OFF and then to ON or push down slightly thecamera´s shutter. The flash is now in stand-by mode again. Should you plan not to use the flash for a longer time period, set the powerswitch to OFF.3.11 Autofocus IlluminationThe DÖRR <strong>Combi</strong> <strong>TTL</strong> <strong>Flash</strong> boasts of an assisting autofocus illumination. Digital and analogue autofocus SLR camera require acertain minimum contrast for proper distance setting. In case of inferior light conditions, the contrast of the object may be too smallfor autofocus. In this case DÖRR <strong>Combi</strong> <strong>TTL</strong> <strong>Flash</strong> can emit a contrast pattern which is activated by pressing slightly on the camera’sshutter release button. The camera’s autofocus with its autofocus red light beam can now recognize structures of your object andcalculates the distance even in darkest environments fast and precisely. The autofocus illumination ranges app. 1 to 5m.Note: Depending on the camera model, the camera’s incorporated light beam may have priority. In this case the autofocusillumination of the DÖRR <strong>Combi</strong> <strong>TTL</strong> <strong>Flash</strong> cannot be activated.3.12 Exposure Control DisplayThe incorporated exposure control of the DÖRR <strong>Combi</strong> <strong>TTL</strong> <strong>Flash</strong>displays OK (glowing for 2 seconds) for correct exposure. If there is no OK, the shot must be repeated with a smaller distance to theobject. The exposure control is only activiated in <strong>TTL</strong> mode and if the flash is connected to a camera.12
3.13 Zoom <strong>Flash</strong> HeadUsing different focal lengths, the angles of view of your lens will change. A 28mm wide angle lense.g. provides a far larger angle of view then a 85mm telephoto lens. The zoom flash head of the DÖRR<strong>Combi</strong> <strong>TTL</strong> <strong>Flash</strong> compensates the different requirements of illumination. The zoom flash head can betorn off the top to vary the angle of view. The scale ontop of the flash head indicated the adjusted focallength. The following settings are available: 28, 35, 50 and 85mm. Please bear in mind that the filmspeed in use influences the flash range.3.14 Indirect <strong>Flash</strong>The bounce flash head of the DÖRR <strong>Combi</strong> <strong>TTL</strong> <strong>Flash</strong> can change direction of the flash up to 90° vertically. Soyou can avoid direct flashes on your object and flash instead to a reflecting nearby surface. The surface ideallyshould be neutrally white like a ceiling. Colored surfaces may cause tints, since the color is being reflected back.Indirect flash has the following advantages:• Harsh shadows can be avoided• Red eyes can be avoided• Soft, diffuse and even illumination• Avoids disturbing light reflections on shining surfaces like eye glasses or windowsThe adjusted angle of the flash is shown on the bounce angle indicator. Please bear in mind that the distance of the light now is longerthan the distance to your object. It calculcates: distance of flash --> reflecting surface --> object. In <strong>TTL</strong> flash mode, your camera willautomatically adjust the light output.3.15 Red-Eye EffectRed eyes which you see in some pictures are caused by the reflection of the flash light in the eye’s retina. This effect mostly happenswhen the flash is directed almost parallel to the optical axis and is intensified by low light situations whereby the pupil of the eye iswiden. The best way to eliminate red eyes is indirect flash. But even with usage of direct flash the design of the DÖRR <strong>Combi</strong> <strong>TTL</strong><strong>Flash</strong> helps in reducing the red-eye effect as the flash head is located as far as possible from the optical axis of the camera. Thelarger the incident angle of the flash light, the less red-eye effect will appear. Some camera models from Pentax/Samsung, Nikon andOlympus offer an additional pre-flash which reduces the red-eye effect. These pre-flash functions are supported by the DÖRR <strong>Combi</strong><strong>TTL</strong> <strong>Flash</strong>. For more detailed information refer to the instruction manual of your camera.3.16 <strong>Flash</strong> SynchronizationSynchronization time refers to the shutter speeds which will allow flash photography. Special attention must be paid in the case ofshort shutter speeds. Each camera model features a „shortest“ synchronization - the so-called x-synchronization. Please review theinstruction manual of your camera. Do not use shutter speeds shorter than the camera‘s x-synchronization for flash photography inorder to avoid incorrect exposures. Using the DÖRR <strong>Combi</strong> <strong>TTL</strong> <strong>Flash</strong> in <strong>TTL</strong> mode the x-synchronization of your camera will be setauto- matically. The version Pentax additionally offers flashing with the second shutter curtain. Move the respective switch to the right.Switch in the middle position is for „normal“ flash with the first shutter curtain.3.17 Fill-in <strong>Flash</strong> in DaylightOn sunny days the brightness is sufficient for exposures without flash, however the position of the sun can project shadows onto yourobject. Even backlit shots often have under exposed central figures. Therefore flash photography is recommended even with sufficientdaylight. The above mentioned problems therefore will be corrected and the pictures more colorful, with richer contrasts and morebrilliance.3.18 Slow SynchronizationWhen the ambient illumination of your object is poor, it can be difficult to balance brightness for both subject and background. Forthese situations a longer shutter speed is recommended. The main subject is therefore illuminated by the flash, whereas thebackground lighting (which would appear darker with standard flash settings) is adjusted by the longer exposure time. Slowsynchronization is a versatile instrument for special effects, e.g. portraits taken at night with illuminated surroundings such as foundat fairgrounds, outdoor events or shopping malls. In order to obtain a longer shutter speed of your choice, the camera must be set inauto aperture mode. Some camera models will allow the slow sync photography also in the auto program or auto exposure mode.We recommend consulting your camera‘s instruction manual. In order to avoid blurred backgrounds, it is recommended to use one ofthe various DÖRR tripods.13
4 Usage of the Macro <strong>Flash</strong> Unit4.1 Connecting Macro <strong>Flash</strong> UnitAt the Main <strong>Flash</strong>: Insert the macro unit plug into the socket of the main flash. Switch the selector toposition „O“.At the Camera: Screw the connecting ring „1“ onto the filter thread of your lens. If necessary, useone of the supplied step down rings. Connect the macro flash unit with the connection ring by pressingthe fixing clamps „2“, then insert the connection ring into the macro flash unit. Once you release the fixing clamps, the stepping ringis firmly attached to the macro flash unit.4.2 Modeling <strong>Flash</strong>A modeling flash function is available to help you to check for shadows and light balance on your object before taking the picture. Touse this function, simply press the “MODE” button for 2 seconds. The macro flash will fire a series of flashes to help you to determinethe result of macro shot.4.3 Taking Pictures with the DÖRR Macro <strong>Flash</strong>• Switch your digital camera on.• Switch the main flash of the <strong>Combi</strong> <strong>Flash</strong> ON.• Wait for the flash „READY“ indication.• Switch the selector switch to position „O“.• Switch on one or two of the macro flash tubes.- If you use one side of the macro flash only, the object will be illuminated partially. The object turns out more vividly, depending onthe object you will create more or less shadow.- If you use both macro flash tubes, you will receive a shadow-free and even illumination of your macro object.- Depending on the object, it may be of advantage to turn the macro flash tubes up or down. For this purpose press the two fixingclamps and turn the macro flash unit by 90°.• The macro flash unit also boasts of a <strong>TTL</strong> flash control. You can use program automatic mode or aperture or exposure prioritymode. For real macro photography, however, we recommend to use the manual flash mode (M) only.• Set the desired exposure at your camera. It should not be shorter then your camera’s x-synchronization (see camera instructions).You can increase the focus area by choosing a small aperture (e.g. 11, 16 or 22).Note: Your camera’s stop down button allows checking the focus area before shooting, depending on the selected aperture.The Macro <strong>Flash</strong> Unit boasts of the following guide numbers:• one side operation: guide no. 6• both sides in operation: guide no. 8,4How to calculate the required aperture: Guide no. / distance to object = required apertureExample: guide no. 8,4 / distance 0,4m = required aperture 22• In case of over or under exposure please repeat the shot with a different aperture setting.• <strong>Flash</strong> READY indicator and flash OK signal see previvous chapters.4.4 Autofocus IlluminationThe DÖRR <strong>Combi</strong> <strong>TTL</strong> <strong>Flash</strong> boasts of an assisting autofocus illumination. Digital and analogue autofocus SLR cameras require acertain minimum contrast for proper distance setting. In case of inferior light conditions, the contrast of the object may be too smallfor autofocus. In this case DÖRR <strong>Combi</strong> <strong>TTL</strong> <strong>Flash</strong> can emit a contrast pattern which is activated by pressing slightly on the camera’sshutter release button. The camera’s autofocus with its autofocus red light beam can now recognize structures of your objectand calculates the distance even in darkest environments fast and precisely. The autofocus illumination of the macro flash unit isappropriate for macro shots only.14
5 Specifications5.1 DÖRR <strong>Combi</strong> <strong>TTL</strong> <strong>Flash</strong> Main <strong>Flash</strong>(subject to change without notice)<strong>Flash</strong> Range at ISO 100:Focal LengthAperture 28 mm 35 mm 50 mm 85 mmF 1,4 0,7 - 11,4 m 1 - 17,1 m 1,3 - 21,4 m 1,5 - 24,3 mF 2 0,7 - 8 m 1 - 12 m 1,3 - 15 m 1,5 - 17 mF 2,8 0,7 - 5,7 m 1 - 8,6 m 1,3 - 10,7 m 1,5 - 12,1 mF 4 0,7 - 4 m 1 - 6 m 1,3 - 7,5 m 1,5 - 8,5 mF 5,6 0,7 - 2,9 m 1 - 4,3 m 1,3 - 5,4 m 1,5 - 6,1 mF 8 0,7 - 2 m 1 - 3 m 1,3 - 3,8 m 1,5 - 4,3 mF 11 0,7 - 1,5 m 1 - 2,2 m 1,3 - 2,7 m 1,5 - 3,1 mF 16 0,7 - 1 m 1 - 1,5 m 1,3 - 1,9 m 1,5 - 2,1 mF 22 0,7 m 1 m 1,3 m 1,5 mMax. Guide No at ISO 100: 34Zoom <strong>Flash</strong> Head:28, 35, 50 and 85mm, manually adjustableAngles of View: 0°/ 30°/ 45°/ 60°/ 90°<strong>Flash</strong> Control:AF IR Illumination Range:Exposure Control Display:<strong>Flash</strong> Ready Indicator:<strong>Flash</strong> on second Curtain:<strong>Flash</strong> Duration:<strong>Flash</strong> Recycling Time:<strong>TTL</strong> <strong>Flash</strong> or manually in 3 ratio stepsapp. 1 to 5mgreen LED at rear side of main flashred LED at rear side of main flashmodel for Pentax/Samsung onlyapp. 1/500s to 1/30.000secapp. 0.5 to 7secNumber of <strong>Flash</strong>es: app. 50 - 2.000Color Temperature:<strong>Flash</strong> Test Button:Power Source:Weight:Measurements:app. 5.500 K (corresponds with daylight)at the rear side of main flash4x1,5V AA batteries Mignon type (alkaline) or NIMH rechargeable batteries of the same sizeapp. 250g (w/o batteries)app. 85x73x120m5.2 Specifications DÖRR <strong>Combi</strong> <strong>TTL</strong> <strong>Flash</strong> Macro Unit(subject to change without notice)Max. Guide no. at ISO 100:6 (one side of ring flash activiated) 8,4 (both sides of ring flash activated)Color temperature: app. 5.500K<strong>Flash</strong> Head:Autofocus Illumination:Weight:Measurements:2 independantly working flash tubes2 x integrated in macro unitapp. 190 g120 x 120 x 30mm (w/o cable)15
FTable des Matières1 Préambule ................................................................162 Désignation des composants ................................ 162.1 <strong>Flash</strong> principal ........................................................ 162.2 <strong>Flash</strong> macro ............................................................ 172.3 Recommandations importantes ............................ 172.4 Informations piles .................................................. 173 Utilisation du flash principal ................................. 183.1 Mise en place des piles .......................................... 183.2 Montage et démontage du flash ........................... 183.3 Sélecteur <strong>Flash</strong> principal --> <strong>Flash</strong> macro ............ 183.4 <strong>Flash</strong> <strong>TTL</strong> avec programmation automatique ...... 183.5 <strong>Flash</strong> <strong>TTL</strong> avec minuteur automatique ................. 193.6 <strong>Flash</strong> <strong>TTL</strong> avec sélection automatique delongueur de focale ................................................. 193.7 <strong>Flash</strong> <strong>TTL</strong> en mode manuel d´exposition ............. 193.8 <strong>Flash</strong> manuel .......................................................... 193.9 Température de coleurs et contraste blanc .......... 193.10 Mise hors tension automatique ............................. 193.11 Source de lumière additionnelle infrarouge IR ..... 193.12 Affichage contrôle d´exposition „OK“ ................... 193.13 Réflecteur zoom du flash ........................................ 203.14 <strong>Flash</strong> indirect ........................................................... 203.15 Effet yeux rouges .................................................... 203.16 Synchronisation du flash ........................................ 203.17 Utilisation du flash à la lumière du jour ................ 203.18 Durée de synchronisation en pose longue ........... 204 Utilisation du flash macro ...................................... 214.1 Fixation du flash macro .......................................... 214.2 <strong>Flash</strong> de réglage ...................................................... 214.3 Prise de vue avec le flash macro DÖRR ................ 214.4 Source de lumière additionnelle IR ....................... 215 Caractéristiques techniques ................................... 225.1 <strong>Flash</strong> principal ......................................................... 225.2 <strong>Flash</strong> macro ............................................................. 221 PréambuleNous vous remercions d’avoir choisi le flash DÖRR <strong>Combi</strong> <strong>TTL</strong> et de la confiance que vous accordez à la société DÖRR. Le flash DÖRR<strong>Combi</strong> <strong>TTL</strong> propose 2 appareils en 1- un flash principal orientable pouvant être complété d’un flash macro. Ce flash a été spécialementdéveloppé pour des appareils numériques avec flash <strong>TTL</strong> automatique. Afin d’apprécier pleinement cet appareil et de profiter aumieux de ses fonctions, nous vous recommandons de lire soigneusement les instructions avant d’utiliser le <strong>Flash</strong> DÖRR <strong>Combi</strong> <strong>TTL</strong>.Veuillez également consulter les préconisations concernant l’utilisation d’un flash dans la notice d’utilisation de votre appareil photo.2 Désignation des composants2.1 <strong>Flash</strong> principal6045300Type Sony / AlphaType OlympusREADY<strong>TTL</strong> OKREADY<strong>TTL</strong> OKType Canon / Nikon / Olympus /Panasonic / Sony Alpha / MinoltaType PentaxRéflecteurSélecteur flash principal ou macroLumière additionelle IREmbase du flashBague de serragePort de connexionVoyant flash „READY“Déclencheur testInterrupteur généralVoyant flash „OK“ en serviceBoîtier batteriePosition angulaire16
2.2 <strong>Flash</strong> macroLumière additionnelle IRRampe flash macro droiteClip de fixationLumière additionnelle IRRampe flash macro gaucheClip de fixationConnecteurInterrupteur marche/arrêt séparé flash macro droite et gaucheBague de fixation principale 58 et 72mm2.3 Recommandations importantesAvant d’utiliser ce flash, il est important de lire et d’appliquer les instructions de sécurité:• Si ce flash devait s’avérer défectueux, n’essayez en aucun cas d’ouvrir le boîtier ou de réparer le flash vous-même. Ce flash contientun condensateur à haute tension. Adressez-vous à votre magasin spécialiste photo ou prenez contact avec votre revendeur. En casde casse du boîtier du flash, évitez de toucher les parties intérieures de l’appareil.• Le flash est un appareil de technique de haute précision qui doit être protégé contre les chocs et toute autre manipulationinappropriée.• Cet appareil ne résiste pas à l’eau. La pluie et l’humidité peuvent l’endommager de façon irréparable.• Veillez à protéger le flash des températures extrêmes telles que l’exposition prolongée dans les voitures ou la réflexion directedu soleil. Eviter les changements de températures trop brutales.• Ne jamais utiliser d’agents nettoyants agressifs de type essence pour nettoyer le flash.2.4 Informations piles• Avant d’insérer les piles, s’assurer qu’il n’y a aucune poussière dans le compartiment à piles, ni sur les contacts.• Utiliser toujours 4 piles neuves du même type et de la même marque.• Ne pas utiliser des piles alcalines avec des piles rechargeables.• Retirer les piles si vous n’avez pas l’intention d’utiliser le flash pendant une longue période.• Changer les piles lorsque le flash met plus de 30 secondes pour être opérationnel.• Les piles fournissent une capacité optimale à une température moyenne de 20°C. Afin d’obtenir la pleine capacité à de bassestempératures, nous vous suggérons d’utiliser un équipement adéquat tel que le sac à dos DÖRR ICEBREAKER idéal pour letransport dans ces conditions. Le compartiment réfrigéré par des accumulateurs de chaleur intégrés permet de conserver la pleinecapacité de vos piles ainsi que des batteries rechargeables à leur niveau maximum même par température extérieure basse.• Ne jamais jeter les piles au feu – Risque d’explosion!• Afin de respecter l’environnement, ne jetez pas les piles usagées dans les ordures ménagères, déposezles dans un magasinspécialiste photo ou dans un point de collecte approprié.17
3.5 <strong>Flash</strong> <strong>TTL</strong> avec minuteur automatiqueLe système de flash <strong>TTL</strong> vous permet des prises de vues en mode minuteur automatique avec la longueur de focale de votre choix.Régler la durée d’exposition sur le minuteur automatique et sélectionner votre focale, rappelez-vous qu’une faible ouverture de focale(valeur la plus grande) diminue la portée de votre flash. La synchronisation du flash est automatiquement gérée par votre appareilphoto et vous garanti l’éclairage optimal de vos prises de vues.3.6 <strong>Flash</strong> <strong>TTL</strong> avec sélection automatique de longueur de focaleSélectionner la fonction „focale automatique“ de votre appareil photo. Régler la durée d’exposition à votre convenance, veiller àrespecter le temps de synchronisation de votre flash. La plupart des boîtiers SLR calent le temps de synchronisation automatiquement.Le système de flash <strong>TTL</strong> associé au mode de focale automatique de votre appareil optimise vos prises de vues.3.7 <strong>Flash</strong> <strong>TTL</strong> en mode manuel d’expositionSélectionner la fonction manuelle d’exposition de votre appareil photo. Régler la durée d’exposition et la focale à votre convenance,veiller à respecter le temps de synchronisation de votre flash. La plupart des boîtiers SLR calent le temps de synchronisationautomatiquement. Le système de flash <strong>TTL</strong> de votre appareil optimise vos prises de vues.3.8 <strong>Flash</strong> manuelIl vous est possible d’utiliser le mode flash manuel (M) et d’adapter vous-même la mise en lumière nécessaireau sujet au lieu d’utiliser le système de flash automatique <strong>TTL</strong>. L’affichage LED à l’arrière du boîtier de flashindique le mode sélectionné. Appuyez sur le bouton MODE et choisissez la puissance de flash souhaitée:M1/1 - M1/4 - M1/16. Pour revenir au mode de flash automatique <strong>TTL</strong>, appuyez sur le bouton MODE jusqu’àl’affichage de <strong>TTL</strong> sur l’écran digital.3.9 Température de couleurs et contraste blancLa température de couleurs du flash DÖRR <strong>Combi</strong> <strong>TTL</strong> est d’environ 5.500 K. Le contraste blanc de l’appareil photo digital se règleautomatiquement à cette température de lumière. Des conditions de lumières contrastées peuvent cependant générer des éclats decouleur. Aussi, nous vous recommandons le réglage manuel du contraste blanc sur votre appareil photo digital. Suivant le modèled’appareil photo, positionner le contraste blanc sur 5.500 K ou sur le symbole „<strong>Flash</strong>“.3.10 Mise hors tension automatiqueAfin d’économiser de l’énergie, le DORR <strong>Combi</strong> <strong>TTL</strong> est équipé d’une fonction OFF Automatique. Il est activé après 3 minutes de nonutilisation. Si vous souhaitez de nouveau Utiliser le flash, déplacer le commutateur «MARCHE/ARRET» d’abord Sur la position « OFF»puis sur la position «ON». Le flash est maintenant opérationnel.Si les appareils ne sont pas utilisés pendant une longue période,Pousser le bouton « OFF »3.11 Source de lumière additionnelle infrarouge IRLe flash DÖRR <strong>Combi</strong> <strong>TTL</strong> est équipé d’une source de lumière infrarouge additionnelle. Les boîtiers analogiques et digitaux SLRnécessitent un minimum de contraste pour une mesure correcte des distances. Dans un environnement à faible luminosité, il se peutque le contraste de l’objet ne soit pas suffisant pour la mise au point automatique. Dans ce cas, la lumière infrarouge du flash DÖRR<strong>TTL</strong> est activée par simple pression sur le bouton. La lumière IR aide l’auto focus de votre appareil photo à identifier précisémentet rapidement les structures et contrastes du motif, même dans l’environnement le plus sombre. La portée de la source de lumièreadditionnelle IR de l’auto focus est de 1 à 5 mètres.Remarque: Si votre appareil photo est équipé d’une source de lumière additionnelle infrarouge, celle-ci aura priorité sur celle du flash.La fonction IR de votre flash DÖRR <strong>Combi</strong> <strong>TTL</strong> ne sera pas activée.3.12 Affichage contrôle d’exposition „OK“Le flash DÖRR <strong>Combi</strong> <strong>TTL</strong> est équipé d’un affichage automatique d’exposition qui vous confirmera si l’éclairage de votre motif étaitsuffisant ou si la prise de vue devrait être réitérée à une distance moindre. Si la quantité de lumière est suffisante, le voyant «OK»s’affichera pendant environ 2 secondes. L’affichage automatique d’exposition est activé en mode <strong>TTL</strong> de votre appareil photo.19
3.13 Réflecteur zoom du flashLes objectifs de différentes longueurs de focales permettent différents angles de vue. Par exemple, unobjectif grand angle de 28 millimètres fournira un plus grand angle de vue qu’un téléobjectif de85 millimètres. Le flash DÖRR <strong>Combi</strong> <strong>TTL</strong> offre un réflecteur zoom réglable qui permet d’adapterl’incidence de lumière à l’angle de vue de votre objectif en prolongeant la tête de flash pour correspondreà la longueur de focale de votre objectif. Pour votre information, les longueurs de focales sont affichéessur le côté supérieur du réflecteur du flash. Les longueurs de focales possibles sont 28, 35, 50 ou85 millimètres. Rappelez-vous que la portée du flash est affectée par la longueur de focale et la sensibilité du film.3.14 <strong>Flash</strong> indirectLe <strong>Flash</strong> DÖRR <strong>Combi</strong> <strong>TTL</strong> est équipé d’une tête orientable permettant un positionnement du flash verticalementjusqu’à 90°. En détournant la tête du flash sur une surface réfléchissante, vous éviterez le scintillement frontal devotre motif, il est préconisé que cette surface soit d’un blanc neutre (plafond blanc), car celle-ci réfléchira lalumière émise dans la même température. Des surfaces réfléchissantes contrastées ou colorées peuvent générerdes éclats de couleur. Le flash indirect offre les avantages suivants :• Les ombres parasites peuvent être gommées• Evite l’effet yeux rouges• Luminosité douce, diffuse et égale• Evite les reflets gênants sur des surfaces réfléchissantes telles que lunettes ou fenêtres.La valeur de l’angle peut être lue sur le diagramme au dos de la tête du flash. Veuillez tenir compte que la distance en lumière indirecteest différente de la distance entre l’appareil photo et l’objet. La distance correcte est mesurée en partant du flash via une surfaceréfléchissante, puis à l’objet. En mode <strong>TTL</strong>, le flash et l’appareil photo gèrent automatiquement la quantité de lumière adéquate.3.15 Effet yeux rougesL’effet yeux rouges visible sur certaines photos est provoqué par la réflexion de la lumière dans la rétine de l’oeil. Cet effet seproduit la plupart du temps lorsque le flash est orienté parallèlement à l’axe de l’objectif, cet effet est intensifié par des situations deluminosité faible entraînant la dilatation de la pupille de l’œil. La meilleure façon d’éliminer cet effet est le flash indirect.Cependant même en flash direct, la conception du flash DÖRR <strong>Combi</strong> <strong>TTL</strong> aide à réduire l’effet yeux rouges, la tête du flash étantplacée le plus loin possible de l’axe de l’objectif de l’appareil photo. Plus l’angle d’incidence de la lumière est grand, moins l’effet yeuxrouges apparaîtra. Certains modèles d’appareil photo de marques Pentax, Nikon, Olympus offrent un pré-flash additionnel qui réduitl’effet yeux rouges. Ces fonctions de pré-flash sont complétées par le flash DÖRR <strong>Combi</strong> <strong>TTL</strong>. Pour de plus amples informations, vousréférer à la notice d‘utilisation de votre appareil photo.3.16 Synchronisation du flashOn désigne par temps de synchronisation la durée d’exposition qui permet l’usage du flash. Une attention particulière doit êtreapportée en cas de vitesses d’obturation courtes. Chaque appareil photo comporte une synchronisation dite « la plus courte »,consulter la notice d’utilisation de votre appareil photo à ce sujet. Ne pas utiliser une vitesse d’obturation inférieure au temps desynchronisation flash de l’appareil photo afin d’éviter des expositions incorrectes. En utilisant le flash DÖRR <strong>Combi</strong> <strong>TTL</strong> en mode<strong>TTL</strong>, la synchronisation de votre flash sera réglée automatiquement. La version Pentax offre en plus le „flashage“ avec le secondobturateur. Déplacer le commutateur correspondant vers la droite. La position centrée du commutateur est destinée au flashage« normal » avec le premier obturateur.3.17 Utilisation du flash à la lumière du jourLes jours ensoleillés, la luminosité est suffisante pour des expositions sans flash, toutefois la position du soleil peut projeter desombres parasites sur votre motif. Les figures centrales à contre-jour de certains sujets sont souvent sous- exposées. La prise de vueavec flash est par conséquent recommandée même avec une lumière du jour suffisante. Les défauts mentionnés ci-dessus seront donccorrigés et les images plus colorées avec des contrastes plus riches et plus brillants.3.18 Durée de synchronisation en pose longueQuand l’éclairage ambiant autour de votre motif est défavorable, il peut être difficile d’équilibrer la lumière entre le sujet et le fond.Dans ce cas, une plus longue vitesse d’obturation est recommandée. Le sujet principal est donc illuminé par le flash, alors quel’éclairage du fond (lequel apparaîtrait plus foncé dans des conditions de flash normal) est adapté à la luminosité du sujet par unedurée d’exposition plus longue.20
La synchronisation longue est un outil de grande souplesse pour obtenir des effets spéciaux, tels que des portraits pris la nuit dans unenvironnement vespéral tel que des champs de foire, des marchés de Noël ou des galeries marchandes éclairées par des néons.Afin d’obtenir une plus longue exposition à votre convenance, régler votre appareil photo en mode d’exposition automatique.Suivant les modèles d’appareil photo, la synchronisation en pose longue est gérée par le programme automatique d’exposition ou leprogramme automatique de mise au point dédié au portrait de nuit. Pour éviter de «bouger le fond», nous vousrecommandons d’utiliser un trépied de la gamme DÖRR.4 Utilisation du flash macro4.1 Fixation du flash macroAu niveau du flash principal: raccorder la connexion du flash macro dans le port de connexion du flashprincipal. Positionner le commutateur sur le symbole „O“Au niveau de l’appareil photo: visser la bague de connexion“1“ sur votre objectif. Si nécessaire, utiliserles adaptateurs fournis. Positionner le flash macro en pressant les clips de fixation „2“ et insérer le flashdans la rainure de la bague de connexion, relâcher les clips et vérifier la bonne liaison du flash avec l’objectif.4.2 <strong>Flash</strong> de réglageLa fonction flash de réglage vous permet, avant d’effectuer une prise de vue, de vérifier la mise en lumière du sujet ou si des ombressont générées. Pour cela, appuyez pendant 2 secondes sur le bouton MODE. Le flash macro déclenche alors une séquence de flashsqui vous aideront à définir la puissance de flash la plus appropriée pour votre prise de vue macro.4.3 Prise de vue avec le flash macro DÖRR• Mettez votre appareil photo digital en marche.• Placer l’interrupteur général du flash principal en position „ON“ (marche)• Le voyant „READY“ du flash s’allume• Positionner le sélecteur sur le symbole „O“• Vous pouvez activer une ou les deux rampes du flash macro. Pour faire ressortir les volumes du motif par un subtil jeux d’ombres,n’activez qu’une seule rampe du flash macro pour un éclairage asymétrique. Pour un éclairage uniforme et dénué d’ombres de lazone de macro photographie, il est conseillé d’utiliser simultanément les deux rampes du flash. En fonction de la nature du motif,une rotation de 90° du flash macro peut être souhaitée, dans ce cas, presser les clips de fixation et faites pivoter le flash macro de90° autour de son axe.• Le flash macro dispose également du mode <strong>TTL</strong>, ainsi vous pouvez utiliser toutes les fonctions de programme automatique –minuteur – sélecteur de focale. Nous vous conseillons cependant de ne travailler qu’en mode manuel d’exposition „M“ en macrophotographie.• Régler la durée d’exposition souhaitée sur votre boîtier, veiller à ce que la durée d’exposition choisie ne soit pas inférieure au tempsde synchronisation du flash (consulter la notice d’utilisation de votre appareil photo).• Sélectionner la longueur de focale souhaitée. Pour favoriser la qualité du piqué de votre prise de vue, nous vous conseillons dechoisir une faible ouverture (=valeur de focale élevée par ex. 11,16 ou 22).Les nombres guide du flash macro sont les suivants:• une rampe activée: Nombre guide 6• deux rampes activées: Nombre guide 8,4Vous pouvez ainsi calculer le nombre guide approprié. Nombre guide / Distance = valeur obturateur appropriéExemple: Nombre guide 8,4 / Distance 0,4 m = valeur obturateur approprié 22• En cas de sur- ou de sous-exposition, il est conseillé de réitérer la prise de vue avec une valeur d’obturateur modifiée.• Les voyants du flash “OK“ et „READY“ s’affichent comme décrit précédemment.4.4 Source de lumière additionnelle IRLe flash DÖRR <strong>Combi</strong> <strong>TTL</strong> est équipé d’une source de lumière infrarouge additionnelle. Les boîtiers analogiques et digitaux SLRnécessitent un minimum de contraste pour une mesure correcte des distances. Dans un environnement à faible luminosité, il sepeut que le contraste de l’objet ne soit pas suffisant pour la mise au point automatique. Dans ce cas, la lumière infrarouge du flashDÖRR <strong>Combi</strong> <strong>TTL</strong> est activée par simple pression sur le bouton. La lumière IR aide l’auto focus de votre appareil photo à identifierprécisément et rapidement les structures et contrastes du motif, même dans l’environnement le plus sombre. La portée de la sourcede lumière additionnelle IR du flash macro n’est adaptée qu’aux prises de vues en macro photographie.21
5 Caractéristiques techniques5.1 <strong>Flash</strong> principal(Sous réserve de modifications)Portée du flash à ISO 100:FocaleDiaphragme 28 mm 35 mm 50 mm 85 mmF 1,4 0,7 - 11,4 m 1 - 17,1 m 1,3 - 21,4 m 1,5 - 24,3 mF 2 0,7 - 8 m 1 - 12 m 1,3 - 15 m 1,5 - 17 mF 2,8 0,7 - 5,7 m 1 - 8,6 m 1,3 - 10,7 m 1,5 - 12,1 mF 4 0,7 - 4 m 1 - 6 m 1,3 - 7,5 m 1,5 - 8,5 mF 5,6 0,7 - 2,9 m 1 - 4,3 m 1,3 - 5,4 m 1,5 - 6,1 mF 8 0,7 - 2 m 1 - 3 m 1,3 - 3,8 m 1,5 - 4,3 mF 11 0,7 - 1,5 m 1 - 2,2 m 1,3 - 2,7 m 1,5 - 3,1 mF 16 0,7 - 1 m 1 - 1,5 m 1,3 - 1,9 m 1,5 - 2,1 mF 22 0,7 m 1 m 1,3 m 1,5 mGuide No. ISO 100: 34Zoom <strong>Flash</strong>:28, 35, 50 et 85mm, réglable manuellementAngle de vue: 0°/ 30°/ 45°/ 60°/ 90°Control du flash:IR infrarouge:Contrôle d’exposition:Disposition du flash:<strong>Flash</strong> sur 2° rideau:Durée du flash:Durée de recharge:<strong>TTL</strong> automatique ou manuel en 3 pasPortée env. 1 à 5mLED verte au dos du flashLED rouge au dos du flashuniquement pour modèles Pentax/Samsungenv. 1/500s to 1/30.000secenv. 0.5 to 7secNombre de flashs: env. 150 - 2.000Température des couleurs:Bouton test:Alimentation:Poids:Dimensions:env. 5.500 K (correspond à la lumière du jour)au dos du flash4x1,5V AA-Mignon-piles alcalines ou NiMH-piles recharcheableenv. 250g (hors piles)env. 85x73x120m5.2 Caractéristiques techniques du <strong>Flash</strong> macro(Sous réserve de modifications)Nombre guide ISO 100:6 (1 élément activée) / 8,4 (deux éléments activés)Température des couleurs: env. 5.500KRéflecteur du flash:IR infrarouge:Poids:Dimensions:2 éléments du flash macro D+G sélectionnable2 sources intégrées au flash macroenv. 190 g120 x 120 x 30mm (sans câble)22
ESPEl Indice1 Prefacio ........................................................................................ 232 Componentes .............................................................................. 232.1 <strong>Flash</strong> principal ............................................................................. 232.2 Macro ........................................................................................... 242.3 Advertencias importantes .......................................................... 242.4 Advertencias referentes a las baterías ...................................... 243 Utilización del flash principal .................................................... 253.1 Insertar las baterías .................................................................... 253.2 Montaje y desmontaje del flash ................................................ 253.3 Conmutador de flash principal-->flash en modo macro ......... 253.4 Control de flash <strong>TTL</strong> con modo de programa automático ...... 253.5 Control de flash <strong>TTL</strong> con prioridad de exposición ................... 263.6 Control de flash <strong>TTL</strong> con prioridad de apertura ....................... 263.7 Control de flash <strong>TTL</strong> con control de flash manual ................... 263.8 Modo de <strong>Flash</strong> Manual .............................................................. 263.9 Temperatura de color y equilibrio de blanco automático ....... 263.10 Desconexión automática ................................... 263.11 Iluminación de enfoque automático ................. 263.12 Indicación de control de exposición OK ........... 263.13 Reflector de flash zoom ..................................... 273.14 <strong>Flash</strong> indirecto .................................................... 273.15 Efecto de reducción de ojos rojos ..................... 273.16 Tiempo de sincronización de flash ................... 273.17 <strong>Flash</strong> iluminador en luz natural ......................... 273.18 Syncronización lenta .......................................... 284 Utilización del flash en modo macro ................ 284.1 Instalación del flash en modo macro ............... 284.2 <strong>Flash</strong> de prueba .................................................. 284.3 Como hacer fotografías con el flash macro ..... 284.4 Iluminación de enfoque automático ................. 295 Datos técnicos .................................................... 295.1 <strong>Flash</strong> principal .................................................... 295.2 Macro .................................................................. 291 PrefacioQueremos darle las gracias por su compra del DÖRR <strong>Combi</strong> <strong>TTL</strong> <strong>Flash</strong> y también por su confianza en la marca DÖRR. El DÖRR <strong>Combi</strong><strong>TTL</strong> <strong>Flash</strong> se puede utilizar en cámaras digitales con control de flash <strong>TTL</strong> y ha sido diseñado con dos propósitos: se puede utilizarcomo --> un flash accesorio normal, y también como -->un flash en modo macro. Antes de usar el <strong>Combi</strong> <strong>TTL</strong> <strong>Flash</strong> de DÖRRrecomendamos leer atentamente este Manual de Instrucciones para poder utilizar todas las funciones de la unidad de flash de modoóptimo. Por favor tenga también en cuenta las notas referentes a fotografía con flash del manual de instrucciones de su cámara.2 Componentes2.1 <strong>Flash</strong> principal6045300Tipo Sony / AlphaTipo OlympusREADY<strong>TTL</strong> OKREADY<strong>TTL</strong> OKTipo Canon / Nikon / Olympus /Panasonic / Sony Alpha / MinoltaTipo PentaxReflectorSelector de modo de flashPrincipal/macroIluminación de enfoque automáticoZócalo de flashAnillo de fijación zócalo de conexiónLámpara piloto READYDisparador manual de flashInterruptor principalLámpara de flash OKTapa de la cámara para pilasAngulo de giro23
2.2 MacroIluminación de enfoque automáticoTubo flash en modo macro derechoBorne du uniónIluminación de enfoque automáticoTubo flash en modo macro derechoBorne du uniónClavija de conexiónConectador/desconectador separado para tubo de flash enmodo macro derecho e izquierdoAnillos de conexión principales 58 y 72 mm2.3 Advertencias importantesAntes de utilizar este flash, es importante leer atentamente las siguientes advertencias de seguridad:• En caso de presentar defectos no trate de desmontar el flash o repararlo Vd. mismo ya que el flash contiene un condensador de altovoltaje. Haga reparar el flash en una tienda especializada en fotografía o contacte con su agente local de servicio DÖRR. Si el flashse encuentra en un estado tan deteriorado que las partes de la caja están rotas, Vd. no debe tocar en absoluto las partes delinterior del aparato.• El flash es un instrumento técnico de precisión que se puede dañar por medio de golpes, choques y otros manejos no suaves einadecuados.• Este flash no es impermeable. Protéjalo contra la lluvia y la humedad ya que en caso contrario pueden ocurrir daños irreparables.• Proteja el flash contra temperaturas extremas como las que se pueden producir en el interior de un coche o sometiéndolodirectamente a la radiación solar. Evite los cambios de temperatura bruscos.• Nunca se debe limpiar el flash con gasolina u otros productos de limpieza agresivos.2.4 Advertencias referentes a las baterías• Antes de colocar las baterías en el aparato, asegúrese de que los contactos del compartimento de la baterías y de las bateríasestán limpios.• Utilice siempre 4 baterías del mismo tipo, capacidad y fabricante.• Nunca mezcle baterías alcalinas AA con baterías recargables.• Si no utiliza el flash por tiempos prolongados, saque las baterías del mismo.• Es necesario reemplazar las baterías cuando el flash tarda más de 30 segundos hasta que se ilumina la lámpara piloto.• Las baterías alcanzan su capacidad total a temperaturas de unos 20°C. Para lograr las máximas prestaciones de las baterías a bajastemperaturas recomendamos proteger la unidad de flash contra el frío, por ejemplo transportando su equipo de fotografía en lamochila de foto DÖRR ICEBREAKER que viene con un compartimento térmico integrado con almohada de calor. Sus bateríasfuncionaran a la máxima capacidad incluso a tempe-raturas extremadamente bajas.• Nunca tire las baterías al fuego ni intente recargar otras baterías que las que están hechas para este fin (NiMH) por peligrode explosión.• Por favor, no tire las baterías usadas a la basura dado que son altamente contaminantes para el medio ambiente. Deposítelas en losrecipientes adecuados para ello que encontrará en muchos establecimientos de su localidad. Si es necesario pregunte a suayuntamiento dónde encontrarlos.24
3 Utilización del flash principal3.1 Insertar las baterías• Abra la tapa del compartimento para baterías empujándola en dirección de la flecha. El interruptor principaldel flash debe encontrarse en la posición OFF (apagado).• Inserte 4 baterías miniaturas (tipo AA) o baterías recargables NiMH del mismo tipo en el compartimento parabaterías, respetando la polaridad +/- tal como se muestra en el interior del compartimento para baterías.• Cierre la tapa del compartimento para baterías presionando y deslizándola en sentido contrario al de la flecha.• Ponga el conmutador principal del flash en la posición ON (conectado). Si las baterías ha sido insertadas correctamente, la lámparapiloto READY se ilumina después de algunos segundos. Ahora Vd. puede comprobar que el flash funciona pulsando el disparadormanual del flash.3.2 Montaje y desmontaje del flashAntes de montar el flash sobre la cámara, hay que asegurar que el flash y la cámara están desconectados y el anillo de fijación delflash se encuentra girado hacia arriba. El flash integrado de la cámara debe estar cerrado.Modelos Canon, Nikon y Pentax:Empuje el flash cuidadosamente en el zócalo de flash de su cámara. Para garantizar una alta resistencia y unbuen contacto entre el flash y la cámara, debe girar el anillo de fijación en el sentido de las agujas del reloj.Cuando quiera quitar el flash de la cámara, hay que proceder en sentido inverso.Modelo Olympus:Empuje el flash cuidadosamente en el zócalo de flash de su cámara. A continuación para garantizar la fijación yun buen contacto entre el flash y la cámara, es necesario pulsar la tecla LOCK. Cuando quiera quitar el flash de lacámara, hay que pulsar simultáneamente las dos teclas de flecha situadas al lado de la tecla LOCK. Ahora el flashse encuentra desbloqueado y puede ser retirado fácilmente de la cámara.Modelo Sony/Minolta:Empuje el flash cuidadosamente en el zócalo de flash de la cámara hasta haga el clic de cierre. Para desmontarel flash de nuevo de la cámara, pulse la tecla PUSH. Ahora el flash se encuentra desbloqueado y puede serretirado fácilmente de la cámara.3.3 Conmutador de flash principal --> flash en modo macroI- Deslizando el conmutador hacia abajo sobre el símbolo „I“ se activa el flash principal.O- Deslizando el conmutador hacia arriba sobre el símbolo „O“ se activa el flash en modo macro.3.4 Control de flash <strong>TTL</strong> con modo de programa automáticoDespués de haber montado el flash en la cámara, conecte primero la cámara y ponga el modo de exposición en programa automático(P) y a continuación el flash sobre ON (conectado). El DÖRR <strong>Combi</strong> <strong>TTL</strong> <strong>Flash</strong> trabaja automáticamente en el modo <strong>TTL</strong>. Cuando elpiloto READY del flash se ilumina, Vd. solo tiene que presionar el botón de disparo de la cámara para tomar fotografías. La mayoríade las cámaras SLR tienen adicionalmente en el visor de la cámara una lámpara piloto de flash (lea el manual de instrucciones de sucámara). En el modo de programa automático <strong>TTL</strong> la capacidad de luz de la cámara y del flash es controlada de forma que se alcanceuna exposición exacta del motivo. La luz de flash es reflejda por el motivo y medida por medio del objetivo (Through The Lens). Alalcanzar la cantidad de luz correcta para el motivo, el flash recibe una señal de parada que interrumpe la expulsión de luz por mediode la electrónica integrada. Adicionalmente en la cámara se ajusta el diafragma y también el tiempo de exposición más óptimo. Elmodo <strong>TTL</strong> de flash automático no solamente permite una exposición muy precisa y un manejo sencillo sino también las siguientesventajas:• No es necesario efectuar ajustes y correcciones de exposición en la cámara.• Las extensiones de objetivo (p.ej. con anillos intermedios) son reconocidas de forma automática.• Los factores de filtro (p.ej. en caso de filtros polarizadores y filtros con densidad neutral) son considerados automáticamente.• Cálculo automático de la apertura variable de los objetivos zoom.• La sensibilidad de la película/ número ISO se ajusta automáticamente.• La utilización de bouncers (piezas enchufables para el flash) y softboxes (cubas de luz) se calcula correctamente en caso de flashindirecto.• Únicamente se mide la luz necesaria para una exposición correcta.25
3.5 Control de flash <strong>TTL</strong> con prioridad de exposiciónSe puede combinar el programa de exposición automática de la cámara con la función de flash automática <strong>TTL</strong>. Ajuste su cámaraal modo de prioridad velocidad de obturador. Ahora la apertura deseada se puede ajustar de forma manual. Hay que tener encuenta, sin embargo, que el alcance del flash disminuye con aperturas pequeñas (p.ej. F11 o más pequeña). La cámara seleccionaautomáticamente la sincronización de flash correcta. Con la ayuda del modo <strong>TTL</strong> de flash automático se pueden alcanzar resultadosóptimos.3.6 Control de flash <strong>TTL</strong> con prioridad de aperturaPrimeramente ponga su cámara en el modo de prioridad de apertura. Ahora se puede ajustar la velocidad del obturadormanualmente. Hay que tener en cuenta que no es posible seleccionar un tiempo de exposición por debajo de la sincronización x de lacámara (la mayoría de las cámeras modernas no permiten tales ajustes). El modo <strong>TTL</strong> de flash automático y la prioridad de aperturagarantizan una iluminiación del objeto correcta.3.7 Control de flash <strong>TTL</strong> con control de flash manualAjuste su cámara en el modo de control de flash manual. Ajora Vd. puede seleccionar la apertura y el tiempo de exposición deseados.No es posible ajustar un tiempo de exposición que es más corto que la sincronización x de la cámara. La mayoría de las cámeras SLRmodernas evitan esto de forma automática. El modo <strong>TTL</strong> de flash automático asegura una iluminación del objeto correcta.3.8 Modo de <strong>Flash</strong> ManualEn lugar de utilizar un control de flash <strong>TTL</strong>, también pude ajustar la potencia del flash manualmente utilizandoel modo manual (M). El indicador LED de la parte posterior del flash principal indica el modo seleccionado.Puede seleccionar los siguientes tipos de potencia pulsando el botón de modo: M1/1 - M1/4 -M1/16. Si deseavolver al modo <strong>TTL</strong>, pulse de nuevo el botón de modo hasta que en el visor aparezca <strong>TTL</strong>.3.9 Temperatura de color y equilibrio de blanco automáticoLa temperatura de color del DÖRR <strong>Combi</strong> <strong>TTL</strong> <strong>Flash</strong> alcanza 5.500 K. El equilibrio de blanco automático de las cámaras digitalesse ajusta automáticamente en esta temperatura de color. A causa de luz mixta pueden occurir matizes de color. Por tal motivorecomendamos el ajuste manual del equilibrio de blanco automático en su cámara digital. Ajuste el equilibrio de blanco automáticosegún el modelo de cámara correspondiente en 5.500 K o en el símbolo de flash.3.10 Desconexión automáticaCon el fin de ahorrar energía este flash esta equipado con una función de apagado automático. Se activa automáticamente a los tresminutos de inactividad. Si desea utilizar nuevamente su flash debe mover el interruptor de ON/OFF primero en posición OFF yluego en posición ON. Nuevamente esta listo para usarse. Si no va a utilizar el flash apáguelo OFF.3.11 Iluminación de enfoque automáticoEl DÖRR <strong>Combi</strong> <strong>TTL</strong> <strong>Flash</strong> está equipado con una iluminación de enfoque automático. Las cámaras SLR digitales y análogicas precisanun contraste mínimo para el ajuste de la distancia correcta. En caso de situaciones con luz insuficiente, puede ser que el contraste yano sea suficiente para el enfoque automático. En este caso el DÖRR <strong>Combi</strong> <strong>TTL</strong> <strong>Flash</strong> puede emitir un patrón de contraste al presionarligeramente sobre el disparador. Ahora el enfoque automático de la cámara con su rayo de luz rubí de enfoque automático puedeidentificar otra vez estructuras de motivo y ajustar entonces la distancia rápida y exactamente incluso en ambientes muy oscuros. Elrango de iluminación de enfoque automático va desde 1 hasta 5 m.Nota: Dependiendo del modelo de la cámara puede ser que el rayo de luz integrada en la cámara tenga prioridad. En este caso lailuminación de enfoque automático del DÖRR <strong>Combi</strong> <strong>TTL</strong> <strong>Flash</strong> no se puede activar.3.12 Indicación de control de exposición OKEl DÖRR <strong>Combi</strong> <strong>TTL</strong> <strong>Flash</strong> tiene una indicación de control de exposición. Esta indicación muestra si el flash fue suficiente para unailuminación correcta del objeto o si debería repetir la fotografía a una distancia más corta. Si la capacidad de luz fue suficiente, laindicación OK se ilumina durante aproximadamente 2 segundos.26
La indicación de control de exposición se activa solamente en el modo <strong>TTL</strong> y con el flash montado en la cámara.3.13 Reflector de flash zoomAl utilizar diferentes distancias focales, los ángulos de imagen del objetivo se cambian. Un objetivogranangular con 28 mm asegura un ángulo de imagen más grande, por ejemplo, que un teleobjetivode 85 mm. Para adaptar el ángulo de iluminación del flash al ángulo de imagen del objetivo, el DÖRR<strong>Combi</strong> <strong>TTL</strong> <strong>Flash</strong> tiene un reflector zoom variable tirando de la cabeza del reflector. En la parte superiorde la cabeza del reflector se encuentra una indicación para dar informaciones sobre la distancia focaldel reflector. Los ajustes posibles son 28, 35, 50 y 85 mm. Hay que tener en cuenta que el alcance delflash cambia dependiendo de la distancia focal y de la sensibilidad de la película.3.14 <strong>Flash</strong> indirectoEl DÖRR <strong>Combi</strong> <strong>TTL</strong> <strong>Flash</strong> está equipado con un reflector giratorio. Este reflector permite el cambio de direccióndel flash hasta 90° en dirección vertical. Vd. puede evitar el flash directo sobre el objeto posicionando el reflectorflash en dirección a otra superficie reflectante. Esta superficie debería ser blanca neutral como el techo de unahabitación. Las superficies coloradas pueden causar tintes porque desde ellas se refleja el color. Utilizar el flashen forma indirecta garantiza las ventajas siguientes:• Se evitan las sombras cortas• Se evitan los ojos rojos• Se obtiene una iluminación blanda, difusa y más uniforme• Se evitan los reflejos de luz molestas en superficies reflejantes (por ejemplo gafas, ventanas, etc.)El ángulo de flash ajustado se muestra en la parte trasera de la cabeza del reflector del flash. Tenga en cuenta que en el flash indirectola distancia de la luz ahora es mayor que la distancia a la que se encuentra el objeto. Ahora se calcula: distancia de flash --> superficiereflejante --> objeto. En el modo flash <strong>TTL</strong> el flash y la cámara ajustan automáticamente la capacidad de luz emitida.3.15 Efecto de reducción de ojos rojosLos ojos rojos visibles en ciertas imágenes son la causa del flash reflejado de la retina vascularizada en el ojo. El efecto ocurreprincipalmente cuando el flash se dirige casi paralelo al eje óptico de la cámara y se intensifica en condiciones de poca luz en lasque las pupilas se encuentran dilatadas. La mejor manera de evitar este problema es utilizando el flash de forma indirecta. Pero aúnutilizando el DÖRR <strong>Combi</strong> <strong>TTL</strong> <strong>Flash</strong> en modo directo, su diseño ayuda a reducir el efecto de ojos rojos porque la cabeza del flash estálo más alejado posible del eje óptico de la cámara. Cuanto mayor sea el ángulo de incidencia de la luz del flash menor será el efectode ojos rojos. Algunas cámaras de Pentax/Samung, Nikon y Olympus ofrecen adicionalmente un flash preliminar para la reducciónde los ojos rojos. El DÖRR <strong>Combi</strong> <strong>TTL</strong> <strong>Flash</strong> soporta este flash preliminar. Lea el manual de instrucciones de su cámara para obtenerinformación detallada sobre esta función.3.16 Tiempo de sincronización de flashEl tiempo de sincronización se refiere a las velocidades de obturador que permiten hacer fotografías con flash. Hay que prestarespecial atención a las velocidades de obturador más cortas. Cada cámara tiene un tiempo de sincronización de flash más cortodiferente dependiendo del modelo que se llama sincronización-x. En el manual de instrucciones de su cámara Vd. encontrará másinformaciones sobre este tema. Es importante no utilizar velocidades de obturador por debajo de la sincronización-x en caso defotografías con flash para evitar exposiciones erróneas. Utilizando el DÖRR <strong>Combi</strong> <strong>TTL</strong> <strong>Flash</strong> en el modo <strong>TTL</strong> la sincronización-x de lacámara se ajusta automáticamente. La versión de Pentax ofrece la posibilidad de utilizar el flash con la segunda cortina del obturador.Para ello hay que desplazar el interruptor correspondiente hacia la derecha. La posición del interruptor media se reserva para el flash„normal“ con la primera cortina.3.17 <strong>Flash</strong> iluminador en luz naturalEn días con bastante sol la luminosidad es suficiente para una exposición sin flash pero es posible que se produzcan sombras feasen las caras de personas o en otros objetos según sea la posición del sol. Las fotografías a contraluz frecuentemente resultan con elmotivo central subexpuesto. Por este motivo se recomienda utilizar el flash también durante el día con suficiente de luz natural. Deesta forma se eliminan los problemas mencionados arriba y las imágenes parecen más intensas en color, tienen más contraste y sonmás brillantes.27
3.18 Syncronización lentaCuando la iluminación ambiental es insuficiente es difícil equilibrar el brillo del objeto y el del fondo de la fotografía. En estos casos serecomienda utilizar una velocidad de obturador más larga para obtener una relación equilibrada. De esta manera se ilumina el objetoprincipal en el primer plano mediante el flash mientras que el fondo (que aparecería oscuro utilizando los ajustes de flash normales)se adapta a la luminosidad del objeto utilizando un tiempo de exposición más largo. La sincronización lenta es un instrumentouniversal de aplicación para efectos especiales, p.ej. fotos de retratos tomados durante la noche con contornos iluminados como porejemplo las ferias, los mercados navideños o las galerías comerciales iluminadas con luces de neón.Vd. debe ajustar la cámara en el modo de prioridad de apertura para alcanzar la velocidad de obturador más larga que desee. Algunosmodelos de cámara también permiten la sincronización lenta en el modo de programa automático o de prioridad de exposiciónSerecomienda utilizar un trípode de DÖRR para evitar un fondo difuso.4 Utilización del flash en modo macro4.1 Instalación del flash en modo macroEn el flash principal: Inserte la clavija de conexión de la unidad macro en el zócalo de conexión del flashprincipal. Ponga el selector de modo de flash sobre el símbolo „O“.En la cámara: Enrosque el anillo de conexión „1“ en la rosca de filtro del objetivo de la cámara. Si esnecesario utilice uno de los anillos de ajuste adicionales suministrados. Conecte la unidad de flash paramodo macro con el anillo de conexión presionando sobre ambos bornes de unión „2“ e inserte el anillo de conexión en el anillo delflash. Al soltar los bornes de unión de nuevo, el anillo de conexión tiene una unión firme con la unidad de flash para modo macro.4.2 <strong>Flash</strong> de pruebaPuede utilizar la función de flash de prueba para comprobar el equilibrio de sombras y luz en su objeto antes de tomar la foto. Parautilizar esta función sólo tiene que pulsar el botón «MODE» durante 2 segundos. El flash de macro disparará una serie de ráfagas quele ayudarán a determinar el resultado de una foto macro.4.3 Como hacer fotografías con el flash macro DÖRR• Conecte su cámara digital.• Conecte el flash principal del <strong>Combi</strong> <strong>Flash</strong> desplazando el interruptor principal en la posición ON (conectado).• La lámpara piloto „ready“ se ilumina cuando el flash está listo.• Ponga el selector de modo de flash en el símbolo de „O“ (macro).• Conecte uno o ambos tubos de flash (derecho e izquierdo) de la unidad para modo macro.- Al utilizar un solo un tubo del flash, el objeto se ilumina parcialmente. El objeto aparece más vivo y se generan más o menossombras según el mismo.- Al utilizar ambos tubos del flash se alcanza una iluminación uniforme sin sombras.- Dependiendo del motivo puede dar buenos resultados girar los reflectores en modo macro hacia arriba y hacia abajo. Para estopulse ambos bornes y gire el flash en modo macro 90°.• La unidad de flash para modo macro también tiene un control de flash <strong>TTL</strong>. En el modo macro es posible también hacer fotografíascon modo de programa automático, prioridad de exposición o prioridad de apertura. Para fotografías en el modo macro purorecomendamos, sin embargo, utilizar solamente el modo de exposición manual (M).• Ajuste el tiempo de exposición deseado en su cámara. Este tiempo no debe ser más corto que el tiempo de sincronización-x(ver el manual de instrucciones de su cámara).• Seleccione la apertura deseada en su cámara. Es posible incrementar el campo de enfoque seleccionando una apertura máspequeña (= número de diafragma del objetivo grande, p.ej. 11, 16 o 22).Nota: Es posible controlar el área de enfoque antes de la toma con el disparador – según la apertura seleccionada.La unidad de flash para modo macro tiene las siguientes números de guía:• operación con un lado: número de guía 6• operación con ambos lados: número de guía 8,4Es posible calcular la apertura necesaria mediante la fórmula siguiente: apertura necesaria = número de guía / distanciaEjemplo: número de guía 8,4 / distancia 0,4 m (21), apertura necesaria (22)28
• En caso de sobreexposición o subexposición es necesario repetir la toma con un ajuste de apertura diferente.• Los capítulos anteriores contienen informaciones relativas a la lámpara piloto de flash READY y la lámpara de flash OK.4.4 Iluminación de enfoque automáticoLa unidad de flash para modo macro del DÖRR <strong>Combi</strong> <strong>TTL</strong> <strong>Flash</strong> está equipada también con una iluminación asistente para enfoqueautomático. Las cámaras SLR digitales y análogicas precisan un contraste mínimo para el ajuste de la distancia correcta. En caso desituaciones con luz insuficiente, puede ser que el contraste del objeto no sea suficiente para el enfoque automático. En este caso elDÖRR <strong>Combi</strong> <strong>TTL</strong> <strong>Flash</strong> puede emitir un patrón de contraste al presionar ligeramente sobre el disparador. Ahora el enfoque automáticode la cámara con su rayo de luz rubí de enfoque automático puede identificar otra vez estructuras del objeto y ajustar la distanciarápida y exactamente, incluso en ambientes muy oscuros. La iluminación de enfoque automático de la unidad de flash para modomacro se puede utilizar solamente para fotografías en el modo macro.5 Datos técnicos5.1 <strong>Flash</strong> principal(sujetos a modificaciones si aviso previo)Alcance del flash con ISO 100:Distancia focalAperture 28 mm 35 mm 50 mm 85 mmF 1,4 0,7 - 11,4 m 1 - 17,1 m 1,3 - 21,4 m 1,5 - 24,3 mF 2 0,7 - 8 m 1 - 12 m 1,3 - 15 m 1,5 - 17 mF 2,8 0,7 - 5,7 m 1 - 8,6 m 1,3 - 10,7 m 1,5 - 12,1 mF 4 0,7 - 4 m 1 - 6 m 1,3 - 7,5 m 1,5 - 8,5 mF 5,6 0,7 - 2,9 m 1 - 4,3 m 1,3 - 5,4 m 1,5 - 6,1 mF 8 0,7 - 2 m 1 - 3 m 1,3 - 3,8 m 1,5 - 4,3 mF 11 0,7 - 1,5 m 1 - 2,2 m 1,3 - 2,7 m 1,5 - 3,1 mF 16 0,7 - 1 m 1 - 1,5 m 1,3 - 1,9 m 1,5 - 2,1 mF 22 0,7 m 1 m 1,3 m 1,5 mNúmero guía máximo con ISO 100: 34Reflector Zoom:28, 35, 50 y 85 mm, ajustable de forma manualÁngulo de giro: 0°/ 30°/ 45°/ 60°/ 90°Control de <strong>Flash</strong>:<strong>TTL</strong> o manual en 3 pasosRayo de luz rubí de enfoque automático: Alcance aproximadamente 1 - 5 mLámpara de control de exposición: LED verde en el lado trasero del aparatoLampara piloto de flash READY:LED rojo en el lado trasero<strong>Flash</strong> con la segunda cortina:sólo modelo Pentax/SamsungDuración de iluminación de flash: aprox. 1/500 s - 1/30.000 sTiempo de seguimiento de flash: aprox. 0,5-7 sNúmero de destellos: aprox.150 - 2.000Temperatura de color:aprox. 5.500 K (corresponde a películas para luz de día)Disparador manual:en el lado trasero del aparatoAlimentation:4x1,5 V AA baterías miniaturas (alcalino) o NiMH acumuladores del mismo tipoPeso:aprox. 250 g (sin baterías)Dimensiones:aprox. 85x73x120 mm5.2 Macro(sujetos a modificaciones si aviso previo)Número guía máximo con ISO 100:Temperatura de color: aprox. 5.500KReflector flash:Iluminación de enfoque automático:Peso:Dimensiones:6 (un lado conectado) / 8,4 (ambos lados conectados)2 tubos de flash conectables independientemente2 x integrado en el flash en modo macroaprox. 190 g120 x 120 x 30mm (sin cable)29
IL`Indice1 Presentazione ......................................................... 302 Nomenclatura ......................................................... 302.1 <strong>Flash</strong> principale ...................................................... 302.2 Macroflash .............................................................. 312.3 Precauzioni .............................................................. 312.4 Precauzioni con le batterie .................................... 313 Utilizzo del flash principale .................................... 323.1 Inserimento delle batterie ...................................... 323.2 Montaggio e smontaggio del flash ....................... 323.3 Pulsante flash principale-->macroflash ................ 323.4 <strong>TTL</strong> flash mode automatico ................................... 323.5 <strong>Flash</strong> <strong>TTL</strong> con esposizione automatica ................. 323.6 <strong>Flash</strong> <strong>TTL</strong> con apertura automatica ...................... 333.7 <strong>Flash</strong> manuale ........................................................ 333.8 Modalità manuale del <strong>Flash</strong> .................................. 333.9 Temperatura del colore e taratura del bianco ...... 333.10 Spegnimento automatico ........................... 333.11 Illuminazione autofocus infrarossi ............. 333.12 Controllo display dell´esposizione OK ....... 333.13 Parabola flash power zoom ........................ 343.14 <strong>Flash</strong> indiretto .............................................. 343.15 Riduzione occhi rossi .................................. 343.16 <strong>Flash</strong> sincronizzato ...................................... 343.17 <strong>Flash</strong> riempimento ...................................... 343.18 Sincronizzazione lenta ................................. 344 Utilizzo del macroflash ................................ 354.1 Montaggio del macroflash .......................... 354.2 Modeling <strong>Flash</strong> ............................................ 354.3 Fotografare col DÖRR macroflash ............. 354.4 Illuminazione AF .......................................... 355 Dati tecnici .................................................... 365.1 <strong>Flash</strong> principale ............................................ 365.2 Macroflash ................................................... 361 PresentazioneVi ringraziamo di aver acquistato il flash DORR <strong>Combi</strong> <strong>TTL</strong> e della vs. fiducia nella dittà DORR. In quanto al flash DORR <strong>Combi</strong> <strong>TTL</strong> sitratta di due apparechii in un solo -->un flash inseribile che potrebbe utilizzato come macroflash. Questo flash è stato ideato per le fotocameredigitali con flash <strong>TTL</strong> automatico. Per poter utilizzare al meglio le funzioni di questo flash, vi consigliamo di leggere attentamentele istruzioni di uso del flash DORR <strong>Combi</strong> <strong>TTL</strong> prima alla prima messa in funzione. Vogliate anche tener in mente le istruzioni inquanto alle fotografie col flash date nel manuale della vs. fotocamera.2 Nomenclatura2.1 <strong>Flash</strong> principale6045300Tipo Sony / AlphaTipo OlympusREADY<strong>TTL</strong> OKREADY<strong>TTL</strong> OKTipo Canon / Nikon / Olympus /Panasonic / Sony Alpha / MinoltaTipo PentaxRiflettorePulsante principale/macroIlluminazione AFSlitta flashGhiera di montaggioConnettoreSpia flash READYPulsante test flashPulsante on/offSpia flash OKCoperchio scom-parto batterieAngolo di rotazione30
2.2 MacroflashIlluminazione AFTubo macroflash a destraPulsante di bloccaggioIlluminazione AFTubo macroflash a sinistraPulsante di bloccaggioConnettoreLeva on/off separata per i due macroflash a sinistra e a destraGhiere di collegamento da 58 e 72 mm2.3 PrecauzioniPrima di usare il flash, leggete attentamente le istruzioni di sicurezza:• Se il flash fosse difettuoso, non provare di aprire o riparare il flash perché il flash utilizza un circuito ad alto voltaggio. Vogliatecontattare il vs. rivenditore DORR o mandarlo all’indirizzo del ns. servizio. Se il corpo del flash è rotto non toccare il suo interno.• Questo flash è un’strumento tecnico ad alta precisione e offre protezione contro gli urti ecc.• Questo flash non è resistente all’acqua. La pioggia e l’umidità possono danneggiarlo.• Non usare liquidi aggressivi per pulire il flash, come la benzina.• Non esponere il flash alle temperature estreme come si possono trovare in macchina quando vi è un raggio di sole diretto. Evitarebruschi cambiamenti di temperatura.2.4 Precauzioni con le batterie• Assicurare che non sia polvere nel vano batteria o sui contatti, prima di inserire le batterie• Usare sempre 4 batterie fresche dello stesso tipo e marca• Non utilizzare delle batterie alcaline e delle batterie ricaricabili allo stesso tempo• Rimuovere delle batterie se non avete intenzione di utilizzare il flash durante un periodo più lungo• Cambiare le batterie se il flash ha bisogno di più di 30 sec. fino al display pronto flash si accende• Le batterie hanno una migliore prestazione a temperatura di circa 20°C. Per garantire una buona prestazione anche con letemperature inferiori vi consigliamo di proteggere il flash tenendolo al caldo, per esempio di trasportare i pezzi nello zaino fotoDORR ICEBREAKER. Il suo scomparto termico garantisce ottima prestazione delle vs. batterie o batterie ricaricabili alle temperatureinferiori.• Non gettare mai le batterie in una sorgente di calore, potrebbero esplodere• Proteggere la natura assicurando che le batterie vengano eliminate nella maniera corretta.31
3 Utilizzo del flash3.1 Inserimento delle batterie• Aprire il coperchio del vano portabatterie facendolo scivolare nella direzione della freccia. Il flash deve esserespento (OFF).• Inserire le 4 batterie Mignon (tipo AA) oppure batterie NiMH ricaricabili dello stesso tipo assicurando che sianoa contatto con il segno +/- come illustrato nel vano portabatterie.• Chiudere il coperchio delle batterie.• Posizionare la leva (ON/OFF) del flash su ON. Se le batterie sono state inserite nella maniera corretta si accenderà la spia READYdopo qualche secondo. Premere il pulsante “test” del flash per fare un lampo di prova.3.2 Montaggio e smontaggio del flashPrima di montare il flash sulla vs. fotocamera, assicuratevi che il flash e la fotocamera siano sulla posizione OFF e chela ghiera di montaggio del flash sia girata nella posizione più alta. Il flash incorporato nella fotocamera deve essere spento.Modelli Canon, Nikon e Pentax:inserite il flash nella slitta della vs. fotocamera. Per garantire una presa sicura ed un buon contatto fra flash efotocamera stringere la ghiera nel senso orario. Per rimuovere il flash della vs. fotocamera, procedere viceversa.Modello Olympus:inserite il flash nella slitta della vs. fotocamera. Per garantire una presa sicura ed un buon contatto fra flash efotocamera, premere il pulsante di bloccaggio (LOCK). Per rimuovere il flash dalla fotocamera premere le duefrecce acconto al pulsante LOCK. Il flash è sbloccato e può essere facilmente smontato della fotocamera.Modelli Sony/Minolta:inserite il flash nella slitta della vs. fotocamera. Per rimuovere il flash dalla fotocamera premere il pulsantedi sbloccaggio (PUSH). Il flash è sbloccato e può essere facilmente smontato della fotocamera.3.3 Pulsante flash principale --> macroflashI- quando mettete il pulsante al simbolo „I“, il flash principale è attivato.O- quando mettete il pulsante al simbolo „O“, il macroflash è attivato.3.4 Montaggio e smontaggio del flashQuando il flash è montato sulla Vs. fotocamera, accendere la fotocamera poi selezionare il programma automatico (P) e accendereil flash (ON). Il flash DORR <strong>Combi</strong> <strong>TTL</strong> è auto-maticamente nel modo <strong>TTL</strong>. Quando la spia del flash (READY) si accende potretepremere il pulsante dell’otturatore della vs. fotocamera per incominciare fotografare. La maggior parte delle fotocamere hanno unaspia del flash (READY) nel mirino della fotocamera (vogliate leggere il manuale di istruzione della vs. fotocamera). Il sistema <strong>TTL</strong>automaticamente controlla che il lampo del flash sia sufficiente per l’esposizione del soggetto. La luce riflessa dal flash sul soggettoviene misurata dall’obiettivo (Through The Lens). Appena la luce viene ritenuta sufficiente per una corretta esposizione, un segnale diarresto è dato che a mezzo dell’elettronica installata interrompe l’espulsione della luce. Simultaneamente la migliore apertura e tempodi esposizione verrà settata sulla vs. fotocamera. La funzione <strong>TTL</strong> offre una alta precisione di esposizione ed è facile da utilizzare. Inoltre questa funzione vi da i seguenti vantaggi:• Non è necessario programmare la fotocamera• I tubi di estensione sono riconosciuti automaticamente• Il fattore filtri sono calcolati automaticamente• L’intensità luminosa è riconosciuta automaticamente con gli obiettivi zoom• La sensibilità della pellicola è riconosciuta automaticamente• Il flash indiretto e l’applicazione dei „bouncer e softboxes“ sono riconosciuti automaticamente• Solo la luce necessaria per una corretta esposizione è misurata3.5 <strong>Flash</strong> <strong>TTL</strong> con esposizione automaticaE’ possibile combinare il vs. programma di esposizione automatica con il sistema <strong>TTL</strong> del flash. Posizionare il sistema d’esposizioneautomatica sulla vs. fotocamera. Ora l’apertura desiderata può essere posizionata manualmente. Tenere in mente che il campo delflash diminuirà con un’apertura più piccola. La vs. fotocamera automaticamente sceglierà la corretta sincronia flash. Con l’assistenzadel <strong>TTL</strong> ottenerete dei risultati migliori.32
3.6 <strong>Flash</strong> <strong>TTL</strong> con apertura automaticaPosizionare la vs. fotocamera all’apertura automatica, ora i tempi di esposizione possono essere selezionati. Non scegliere tempi diesposizione inferiori alla sincronizzazione della vs. fotocamera (la maggior parte delle fotocamere non vi permettano di scegliere tempidi esposizione inferiore). Il sistema <strong>TTL</strong> del flash e l’apertura automatica vi garantiscono una corretta esposizione.3.7 <strong>Flash</strong> manualePosizionare la vs. fotocamera al controllo d’esposizione manuale, ora i tempi di esposizione e l’apertura possono essere selezionati.Non scegliere tempi di esposizione inferiori alla sincronizzazione della vs. fotocamera (la maggior parte delle fotocamere non vipermettano di scegliere tempi di esposizione inferiore). Il sistema <strong>TTL</strong> del flash vi garantisce corretti risultati della foto.3.8 Modalità manuale del <strong>Flash</strong>In alternativa al controllo <strong>TTL</strong>, la potenza del flash può essere regolata manualmente, utilizzando la modalitàmanuale (M). Il LED sul retro del flash indica la potenza selezionata. E’ possibile scegliere tra le seguenti potenze:M1/1 –M1/4 - M1/16. Per tornare in modo <strong>TTL</strong> premete il pulsante della modalità fino a che sul pannello LCD nonappare la scritta <strong>TTL</strong>.3.9 Temperatura del colore e taratura del biancoLa temperatura del colore del flash DORR <strong>Combi</strong> <strong>TTL</strong> è di circa 5.500 K. La taratura del bianco automatica delle fotocamere digitali siadatta automaticamente a questa temperatura del colore. A causa di luce miscelata, dominanti di colore possono accadere.Quindi vi consigliamo di mettere la taratura del bianco della vs. fotocamera digitale a mano. Secondo il modello della vs. fotocamera,mettete la taratura del bianco a 5.000 K o al simbolo del flash.3.10 Spegnimento automaticoIl flash DÖRR <strong>Combi</strong> <strong>TTL</strong> ha anche la funzione di spegnimento automatico. Questa funzione vi aiuta a risparmiare energia, vieneattivato automaticamente se il flash non viene utilizzato per circa 3 minuti. Se desiderate usare il flash, semplicemente spostate la leva(ON/OFF) dalla posizione ON alla posizione OFF e poi di nuovo sulla posizione ON. Se non intendete usare il flash per un lungo periododi tempo posizionate la leva (ON/OFF) sulla posizione OFF.3.11 Illuminazione autofocus infrarossiIl flash DORR <strong>Combi</strong> <strong>TTL</strong> ha la funzione illuminazione autofocus infrarossi. Le fotocamere digitali e analogici richiedono una minimaquantità di contrasto per una messa a fuoco corretta. Può accadere che sotto condizioni di scarsa luce il contrasto del soggetto no siasufficiente per l’autofocus. In questi casi illuminazione autofocus infrarossi del flash DORR <strong>Combi</strong> <strong>TTL</strong> è attivato tramite il pulsantedell’otturatore. L’illuminazione aiuto l’autofocus della vs. fotocamera a riconoscere i contrasti anche nelle stanze buie. Questailluminazione ha una gamma da 1 a 5m.Nota: Secondo modello della fotocamera può essere che l’illuminazione AF installata nella fotocamera viene data prima priorità. Inquesto caso l’illuminazione AF del flash DORR <strong>Combi</strong> <strong>TTL</strong> non è attivata.3.12 Controllo display dell’esposizione OKIl flash DORR <strong>Combi</strong> <strong>TTL</strong> dispone della funzione di controllo dell’esposizione. Il display conferma dopo che la fotografia viene scattatache l’illuminazione usata fosse sufficiente o se c’è bisogno di fare la foto di nuovo a una distanza più breve. Se la luce era sufficiente,una luce verde di Okay apparirà dopo circa due secondi. Il controllo display dell’esposizione è solamente attivato nel modo <strong>TTL</strong> con lafotocamera.33
3.13 Parabola flash power zoomSe usate un obiettivo con diverse lunghezze focali, anche l’angolo di campo cambierà. Per esempio ungrand-angolare da 28mm vi darà un angolo di campo più grande rispetto ad un teleobiettivo da 85mm.Il flash DORR <strong>Combi</strong> <strong>TTL</strong> dispone di una funzione che lo consente di adattare l’angolatura diilluminazione del flash in corrispondenza all’angolatura dell’obiettivo con una lunghezza focale da28,35, 50 e 85mm. Vogliate tener in mente che a seconda delle lunghezze focali e della sensibilità dipellicola, il campo del flash cambierà lo stesso.3.14 <strong>Flash</strong> indirettoIl flash DORR <strong>Combi</strong> <strong>TTL</strong> ha la funzione flash indiretto dandovi la possibilità di cambiare la direzione del lamodel flash fino a 90° in direzione verticale. Cosi potrete evitare di sparare il lampo direttamente su i soggetti, madirigere il lampo verso una superficie. La superficie dovrebbe essere bianca (soffitto di camera) perché la lucenel colore della superficie fotografata col flash è riflessa. L’utilizzo del flash indiretto vi da i seguenti vantaggi:• E’ possibile evitare le ombre nei vs. soggetti• Riduzione occhi rossi• Potrete ottenere una illuminazione uguale, morbida e diffusa• I riflessi dalle superfici lucide possono essere minimizzateL’angolo di riflessione può essere letto dal grafico che si trova sul retro del flash. Tenere in considerazione che per scattare le fotografiecon il flash indiretto dovrete calcolare la distanza del flash alla superficie riflettente più la distanza dalla superficie riflettente alsoggetto. La funzione <strong>TTL</strong> controlla queste distanze automaticamente.3.15 Riduzione occhi rossiGli occhi rossi sono causati dai riflessi del flash sulla retina dell’occhio. Questo avviene principalmente quando il lampo del flash èdiretto quasi parallelo con l’asse ottico e la condizione di luce è scarsa, causando la pupilla dell’occhio ad allargarsi. Il miglior modoper eliminare l’effetto occhi rossi è utilizzare un flash indiretto. Il design del flash DORR <strong>Combi</strong> <strong>TTL</strong> aiuta ad evitare questo effetto inquanto il flash è ad una certa distanza dall’asso ottico della fotocamera. Quanto più ampio l’angolo del lampo flash tanto meno lapossibilità di ottenere l’effetto occhi rossi. Alcune fotocamere come la Pentax/Samsung, Nikon e Olympus hanno anche un pre-lampoper ridurre occhi rossi. Questa funzione è supportata dal flash DORR <strong>Combi</strong> <strong>TTL</strong>. Vogliate anche leggere il manuale d’istruzione dellavs. fotocamera.3.16 <strong>Flash</strong> sincronizzatoI tempi di sincronizzazione siriferiscono ai tempi di otturazione che permettano di fotografare con il flash. Un’attenzione particolare è richiesta quando si usatempi di otturazione più brevi. Ogni fotocamera ha una sua sincronizzazione più breve diversa secondo modello di fotocamera. Lasincronizzazione più breve deve essere rispettata per forza, altrimento c’è un’otturazione diffettuosa. Con il flash DORR <strong>Combi</strong> <strong>TTL</strong>il flash sincronizzato corretto è messo automaticamente nel modo <strong>TTL</strong>. Il modello Pentax anche offre la possiblità di fotografare colflash sulla seconda tendina. Posizionare il pulsante relativo a destra. La posizione media del pulsante serve per fotografare col flash„normale“ sulla prima tendina.3.17 <strong>Flash</strong> riempimentoCon una giornata di sole vi è abbastanza luce per una corretta esposizione, a volte però a secondo della posizione del sole si puòcreare delle ombre in contrasto con il soggetto. Per evitare questo inconveniente e per migliorare la qualità delle vs. fotografie inriguardo a colore, contrasto e brillantezza, l’utilizzo del flash è a consigliare.3.18 Sincronizzazione lentaQuando la luce è scarsa ed il vs. soggetto è poco illuminato può essere difficile bilanciare la luminosità dello sfondo e del soggetto.Per questa situazione vi consigliamo di utilizzare un tempo di otturazione più lunga. In questa maniera il soggetto viene illuminato dalflash mentre lo sfondo viene compensato dalla otturazione prolungata. La sincronizzazione lenta è uno strumento versatile ideale perla fotografia notturna di soggetti con uno sfondo illuminato. Per potere ottenere una otturazione più lunga, posizionare la fotocamerasulla apertura automatica, cosi potrete selezionare dei tempi di otturazione più lunghi. Alcune fotocamere permettono di sceglierela sincronizzazione più lenta anche con la programmazione automatica o esposizione automatica. L’utilizzo di un treppiedi DORR vigarantisce che le vs. fotografie siano sempre messa a fuoco.34
4 Utilizzo del macroflash4.1 Montaggio del macroflashSul flash principale:mettere la spina del macroflash nel connettore del flash principale. Posizionare il pulsante a „O“.Sulla fotocamera:avvitare la ghiera di collegamento „1“ nel filetto filtro del vs. obiettivo della vs. fotocamera. Utilizzareeventualmente le ghiere adattatore fornite. Per collegare il macroflash con la ghiera premere i due pulsanti di bloccaggio „2“ e metterela ghiera nel flash. Dopo aver lasciato i pulsanti di bloccaggio, la ghiera è collegata col macroflash.4.2 Modeling <strong>Flash</strong>E’ disponibile la funzione modeling flash per aiutarvi a controllare le ombre e verificare il bilanciamento della luce sul soggetto primadi scattare la fotografia. Per utilizzare questa funzione premete il pulsante “MODE” per due secondi. Il micro flash emetterà una seriedi flash che vi aiuteranno a visualizzare il risultato dell’illuminazione.4.3 Fotografare col DÖRR macroflash• Mettere la fotocamera digitale in funzione.• Mettere il flash principale del <strong>Combi</strong> <strong>Flash</strong> in funzione posizionando il pulsante a ON.• La spia del flash „READY“ è accesa quando il flash è pronto.• Posizionare il pulsante a „O“.• Mettere uno o due lati del macroflash in funzione.- applicare il flash di un lato per illuminare il soggetto di un lato solo. Cosi, il soggetto ha un effetto più plastico- applicare il flash ai due lati per ottenere un’illuminazione uniforme e senza ombra nella macrogamma.- Secondo motivi vi consigliamo di girare i riflettori del macroflash di sopra e di sotto. Premere i due pulsanti di bloccaggio e girareil macroflash di 90°.• Anche il macroflash ha un’esposizione <strong>TTL</strong> automatica. Potete utilizzare il programma, esposizione e diframma automaticianche nella macrogamma. In quanto ai primi piani e quelle fote fatte nella macrogamma, vi consigliamo di utilizzare solo il modod’esposizione (M) manuale.• Scegliete il tempo d’esposizione alla vs. fotocamera. Non deve essere più breve che il tempo di sincronizzazione più breve (vederemanuale di istruzione della vs. fotocamera).• Scegliete il diaframma richiesto alla vs. fotocamera. Per ottenere un perfetto nitidezza, vi consigliamo di scegliere un’apertura deldiaframma più piccolo (= numero di diaframma grande, per esempio 11,16 o 22).Consiglio: tramite il pulsante di luminosità su vs. fotocamera, potete controllare secondo diaframma messo la nitidezza del vs.soggetto già prima di fare la foto.Il macroflash ha il numero guida seguente:• un lato messo in funzione: numero guida 6• due lati messi in funzione: numero guida 8,4Così potete calcolare il diaframma richiesto: Numero guida: distanza = diaframmo richiestoEsempio: numero guida 8,4: distanza 0,4m = diaframmo richiesto: 22• Nel caso di una sovra- o sottoesposizione vogliate fare la foto di nuovo con un altro diaframma• In quanto alla spia del flash READY e spina del flash OK (vedere spiegazioni di cui sopra4.4 Illuminazione AFAnche il macroflash DORR <strong>Combi</strong> <strong>TTL</strong> ha la funzione illuminazione AF. Le fotocamere digitali e manuali richiedono una minimaquantità di contrasto per una messa a fuoco corretta. Può accadere che sotto condizioni di scarsa luce il contrasto del soggetto no siasufficiente per l’autofocus. In questi casi il flash DORR <strong>TTL</strong> è attivato tramite il pulsante dell’otturatore. L’AF della vs. fotocamera puòriconoscere le strutture del soggetto a mezzo di un raggio di misurazioni AF e quindi la distanza può essere messa in una manierarapida e esata anche sotto condizioni di scarsa luce. L’illuminazione AF nel macroflash si raccomanda solo per le breve distanze.35
5 Dati tecnici5.1 <strong>Flash</strong> principale(Salvo modifiche dei dati tecnici)Portata del flash con ISO 100:Distanza focaleDiaframma 28 mm 35 mm 50 mm 85 mmF 1,4 0,7 - 11,4 m 1 - 17,1 m 1,3 - 21,4 m 1,5 - 24,3 mF 2 0,7 - 8 m 1 - 12 m 1,3 - 15 m 1,5 - 17 mF 2,8 0,7 - 5,7 m 1 - 8,6 m 1,3 - 10,7 m 1,5 - 12,1 mF 4 0,7 - 4 m 1 - 6 m 1,3 - 7,5 m 1,5 - 8,5 mF 5,6 0,7 - 2,9 m 1 - 4,3 m 1,3 - 5,4 m 1,5 - 6,1 mF 8 0,7 - 2 m 1 - 3 m 1,3 - 3,8 m 1,5 - 4,3 mF 11 0,7 - 1,5 m 1 - 2,2 m 1,3 - 2,7 m 1,5 - 3,1 mF 16 0,7 - 1 m 1 - 1,5 m 1,3 - 1,9 m 1,5 - 2,1 mF 22 0,7 m 1 m 1,3 m 1,5 mN°guida massimo con ISO 100: 34Riflettore zoom:28, 35, 50 e 85mm, regolabile a manoAngolo di rotazione: 0°/ 30°/ 45°/ 60°/ 90°Controllo flash:<strong>TTL</strong> automatic e manual in 3 posizioniRaggio luminoso rosso AF:portata 1 - 5mSpia controllo dell’esposizione:LED verde sul retro del flashSpia flash READY:LED rosso sul retro del flash<strong>Flash</strong> sulla seconda tendina:solo i modelli Pentax/SamsungTempo illuminazione flash:circa 1/500s - 1/30.000sTempo di ricarica del flash:circa 0.5-7sN° flash: circa150 - 2.000Temperatura del colore:circa 5.500 K (corrisp. alle pellicole a luce diurna)Scatto manuale:sul retro del flashAlimentazione elettrica:4x1,5V batterie AA Mignon (Alkaline) o batterie NiMH ricaricabili dello stesso tipoPeso:circa 250g (senza batterie)Misure:circa 85x73x120mm5.2 Macroflash(Salvo modifiche dei dati tecnici.)N°guida massima con 100:6 (un lato messo in funzione) / 8,4 (due lati messi in funzione)Temperatura del colore: circa 5.500KRiflettore del flash:2 parti di flash collegabile independentementeIlluminazione AF:2 volte integrata nel macroflashPeso:circa 190 gMisura:120 x 120 x 30mm (senza cavo)36
Notizen / Notes37
Notizen / Notes38
DInformation für AnwenderSammlung und Entsorgung von defekten Geräten und gebrauchten Batterien in EU-LändernWenn Sie die Symbole (rechts) auf Produkten, Verpackung oder Lieferpapieren sehen, bedeutet dies, dass essich um elektrische oder elektronische Geräte, Komponenten oder Batterien handelt, die nicht mit dem normalenHausmüll vermischt werden dürfen. Laut Gesetz müssen gebrauchte Geräte und Batterien separat gesammeltund einer geeigneten Entsorgung, Reparatur oder dem Recycling zugeführt werden. Abhängig vomStatus der Umsetzung der Richtlinien in den Mitgliedsländern, können private Haushalte ihren Elektro- undElektronikmüll und Batterien kostenlos bei ausgewiesenen Sammelstellen abgeben.GBInformation for UsersCollection of old Equipment and Used Batteries in EU CountriesThe symbols (shown on the right) on the products, packaging and/or accompanying documents mean thatused electrical and electronic equipments and batteries should not be mixed with general household waste.Used electrical/electronic equipments and batteries must be treated separately and in accordance with legislationthat requires proper treatment, recovery and recycling of these products. Following the implementationby member states, private households within the EU states may return their used electrical/ electronic equipmentsand batteries to designated collection facilities free of charge.FInformation pour l’utilisateurCollecte et élimination d’appareils en fin de vie et/ou défectueux ainsi que les batteries usagées dans lespays de la Communauté EuropéenneLes symboles apposés (à droite) sur les produits, emballages ou sur les documents de livraison vous informentqu’il s’agit d’appareils électriques ou électroniques, de composants ou de batteries et qu’il est interditde les jeter avec les déchets ménagers. La loi exige que les appareils usagés et les batteries soient collectésséparément et apportés pour élimination, réparation ou recyclage à des endroits appropriés. Conformémentau statut de l’application de la directive des pays de la Communauté Européenne, les particuliers peuvent déposergratuitement tous leurs déchets électriques, électroniques et batteries dans les lieux de collecte définis.ESPInformación para los usuariosRecogida de unidades antiguas y baterías usadas en países de la UELos símbolos (en la parte derecha) de los productos, envoltorios y /o documentos adjuntos significan que lasunidades eléctricas y electrónicas y las baterías usadas no deben mezclarse con otros residuos generales delhogar, sino que deben ser tratadas por separado y de acuerdo con la legislación que exige un tratamiento, recuperacióny reciclaje adecuado de estos productos. Según lo implementado por los estados miembros, cadausuario de los países de la UE puede llevar sus unidades eléctricas/electrónicas y baterías usadas ainstalaciones de recogida homologadas sin cargo alguno.IInformazione per gli utentiRaccolta e smaltimento di prodotti vecchi e batterie usate nei paesi EUI simboli (visibili sulla destra) del prodotto, sulla confezione e/o sui documenti indicano che i componentielettrici e le batterie non dovrebbero essere mischiati con altri rifiuti. Materiale elettrico usato e batteriedevono essere smaltite e/o riciclate separatamente, presso i punti di raccolta, in conformità con le vigentileggi locali.Das aufgedruckte CE Kennzeichen entspricht den geltenden EU Normen.Die entsprechende EG-Konformitätserklärung können Sie unter folgendem Link downloaden:http://www.doerrfoto.de/info/EG-KonformitätserklärungenThe CE marking complies with the European directives.You can download the relative EU declaration of conformity with following link:http://www.doerrfoto.de/info/EG-KonformitätserklärungenCd39
<strong>Combi</strong> <strong>TTL</strong> <strong>Flash</strong>DÖRR GmbHPostfach 128 • 89202 Neu-Ulm/GermanyFon +49 731 97037-0 • Fax +49 731 97037-37info@doerrfoto.de • www.doerrfoto.dewww.doerrfoto.de