Safety and operating instructions - Crowder Hydraulic Tools
Safety and operating instructions - Crowder Hydraulic Tools
Safety and operating instructions - Crowder Hydraulic Tools

Create successful ePaper yourself
Turn your PDF publications into a flip-book with our unique Google optimized e-Paper software.
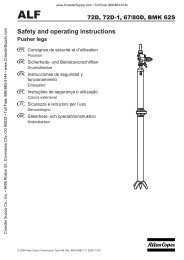
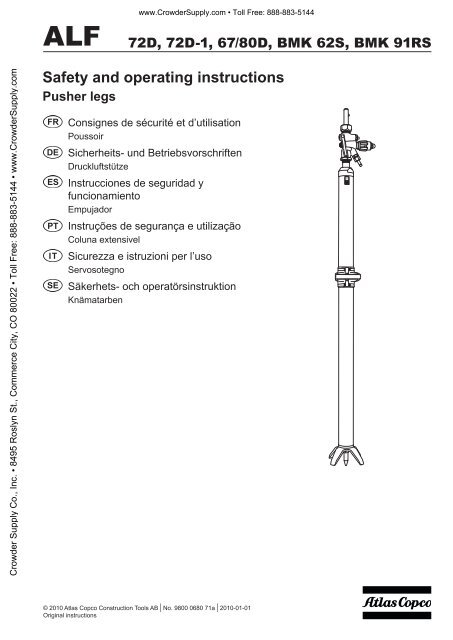
ALFwww.<strong>Crowder</strong>Supply.com • Toll Free: 888-883-514472D, 72D-1, 67/80D, BMK 62S, BMK 91RS<strong>Crowder</strong> Supply Co., Inc. • 8495 Roslyn St., Commerce City, CO 80022 • Toll Free: 888-883-5144 • www.<strong>Crowder</strong>Supply.com<strong>Safety</strong> <strong>and</strong> <strong>operating</strong> <strong>instructions</strong>Pusher legsConsignes de sécurité et d’utilisationPoussoirSicherheits- und BetriebsvorschriftenDruckluftstützeInstrucciones de seguridad yfuncionamientoEmpujadorInstruções de segurança e utilizaçãoColuna extensivelSicurezza e istruzioni per l’usoServosotegnoSäkerhets- och operatörsinstruktionKnämatarben© 2010 Atlas Copco Construction <strong>Tools</strong> AB | No. 9800 0680 71a | 2010-01-01Original <strong>instructions</strong>
<strong>Crowder</strong> Supply Co., Inc. • 8495 Roslyn St., Commerce City, CO 80022 • Toll Free: 888-883-5144 • www.<strong>Crowder</strong>Supply.comwww.<strong>Crowder</strong>Supply.com • Toll Free: 888-883-5144
www.<strong>Crowder</strong>Supply.com • Toll Free: 888-883-5144ALF 72D, ALF 72D-1, ALF 67/80D, BMK 62S, BMK 91 RS<strong>Safety</strong> <strong>and</strong> <strong>operating</strong> <strong>instructions</strong><strong>Crowder</strong> Supply Co., Inc. • 8495 Roslyn St., Commerce City, CO 80022 • Toll Free: 888-883-5144 • www.<strong>Crowder</strong>Supply.comSAFETY INSTRUCTIONSTo reduce risk of serious injury or death to yourself orothers, read these safety <strong>instructions</strong> before <strong>operating</strong>the machine.Post these safety <strong>instructions</strong> at work locations,provide copies to employees, <strong>and</strong> make sure thateveryone reads the safety <strong>instructions</strong> before<strong>operating</strong> or servicing the machine.Follow all safety <strong>instructions</strong> given in this manual.Allthe safety <strong>instructions</strong> conform to the applicable laws<strong>and</strong> directives in the European Union.You should also respect any additional national/regional directives.In countries outside the European Union, the validlocal statutes <strong>and</strong> regulations shall apply.Any additional regional laws <strong>and</strong> regulations must beobserved.<strong>Safety</strong> symbols usedThe indications Danger, Warning <strong>and</strong> Caution havethe following meanings:DangerWarningCautionIndicates an imminentlyhazardous situation which,if not avoided, will result indeath or serious injury.Indicates a potentiallyhazardous situation which,if not avoided, could resultin death or serious injury.Indicates a situationwhich, if not avoided, mayresult in personal injury ordamage to the product orother property.Transportation hazardCautionThe rock drill <strong>and</strong> the pusher leg are heavy. To avoidpersonal injuries during transportation to the workingarea►►Use a carriage or ask for assistance from acolleague during transport.Machine <strong>and</strong> tool <strong>operating</strong>hazardsWarningSudden or unexpected movement of the machinemay occur during <strong>operating</strong>, which may causeinjuries. Furthermore, losing your balance or slippingmay cause injury. To reduce risks:►►Make sure that you always keep a stable positionwith your feet as far apart as your shoulder width,<strong>and</strong> keeping a balanced body weight.►►St<strong>and</strong> firmly <strong>and</strong> always hold on to the machinewith both h<strong>and</strong>s.►►Do not start the machine when it is lying on theground.►►Make sure that the h<strong>and</strong>le is clean <strong>and</strong> free fromgrease <strong>and</strong> oil.WarningUnintentional start of the machine may cause injury.►►Keep your h<strong>and</strong>s away from the start <strong>and</strong> stopdevice until you are about to start work.WarningThe working tool is exposed to heavy strains whenthe machine is used <strong>and</strong> after a certain amount of usethe tool may break due to fatigue. If the tool breaks,there may be sudden or strong movements. Suchsudden or strong movements may cause seriousinjury.►►Make sure that you always keep a stable positionwith your feet as far apart as your shoulder width,<strong>and</strong> keeping a balanced body weight.►►Check regularly for wear to the working tool, <strong>and</strong>check whether there are any signs of damage orvisible cracks.WarningAn incorrect dimension of the working tool’s shankcan result in the working tool being lost or is slippingout during operation. A working tool that is lost or slipsout can cause personal injury.►►Before inserting the working tool, make sure thatthe shank’s dimensions are correct for use in themachine.►►Working tools without a collar may not be used.WarningIf the tool retainer on the machine is not in the lockedposition, the tool can be ejected with great force,which can cause serious injury.►►Once the working tool has been mounted <strong>and</strong>locked, the locking function must be checked bypulling the working tool sharply outwards.►►Make sure that the working tool is fully inserted<strong>and</strong> that the tool retainer is in the locked positionbefore the machine is started.►►Never point the working tool at yourself or anyoneelse.© 2010 Atlas Copco Construction <strong>Tools</strong> AB | No. 9800 0680 71a | 2010-01-01Orginal <strong>instructions</strong>5
<strong>Safety</strong> <strong>and</strong> <strong>operating</strong> <strong>instructions</strong>www.<strong>Crowder</strong>Supply.com • Toll Free: 888-883-5144ALF 72D, ALF 72D-1, ALF 67/80D, BMK 62S, BMK 91 RS<strong>Crowder</strong> Supply Co., Inc. • 8495 Roslyn St., Commerce City, CO 80022 • Toll Free: 888-883-5144 • www.<strong>Crowder</strong>Supply.comWarningChanging the working tool while the machine isrunning may cause serious injury.►►Before changing the tool always stop the machine.►►Never grab or touch a rotating drill steel.WarningA compressed air hose that comes loose can lasharound <strong>and</strong> cause personal injury or death.To reduce risks:►►Check that the compressed air hose <strong>and</strong> theconnections are not damaged.►►Check that all compressed air connections areproperly attached.►►Never attempt to disconnect a compressed airhose that is pressurized. First switch off thecompressed air at the compressor <strong>and</strong> then bleedthe machine by activating the start <strong>and</strong> stopdevice.WarningIf the drill steel gets caught during operation, thewhole machine will start to rotate if you lose your gripon it. This unexpected rotation of the entire machinemay cause serious injury.►►St<strong>and</strong> firmly <strong>and</strong> always hold onto the machinewith both h<strong>and</strong>s.►►Make sure that the h<strong>and</strong>le is clean <strong>and</strong> freefrom grease <strong>and</strong> oil.►►Never drill in an old hole.WarningThere is a risk of items getting dragged into or caughtby a rotating drill steel. This may cause serious injury.►►Never grab or touch a rotating drill steel.►►Avoid wearing clothing that may get caught.If you have long hair, cover it with a hair net.Explosion <strong>and</strong> fire hazardDangerIf the machine comes in contact with an explosive, anexplosion may occur. Explosions may cause seriousinjury or death.To reduce the risk of explosion:►►Never use the equipment to drill near anyexplosives, including dynamite or other explosivesin the rock.►►Make sure that there are no explosives in the rock.►►Never drill in an old hole.WarningDrilling <strong>and</strong> working with certain materials can causesparks, which may ignite explosive gases <strong>and</strong> causeexplosions. Explosions may cause serious injury ordeath.To reduce such risk of explosion:►►Never operate the machine in any explosiveenvironment.►►Do not use the machine near flammable materials,fumes or dust.►►Make sure that there are no undetected sources ofgas.Electrical/Concealed objecthazardsDangerThe machine is not electrically insulated. If themachine comes into contact with electricity, seriousinjuries or death may result.►►To reduce the risk of such injury or death, neveroperate the machine near any electric wire or othersource of electricity.►►Make sure that there are no concealed wires orother sources of electricity.WarningDuring drilling, concealed wires <strong>and</strong> pipes constitute adanger that can result in serious injury.►►Before you start drilling, check the composition ofthe material you are to work on.►►Watch out for concealed cables <strong>and</strong> pipes e.g.electricity, telephone, water, gas <strong>and</strong> sewage linesetc.►►If the tool seems to have hit a concealed object,switch off the machine immediately.►►Make sure that there is no danger beforecontinuing.6© 2010 Atlas Copco Construction <strong>Tools</strong> AB | No. 9800 0680 71a | 2010- 01-01Orginal <strong>instructions</strong>
www.<strong>Crowder</strong>Supply.com • Toll Free: 888-883-5144ALF 72D, ALF 72D-1, ALF 67/80D, BMK 62S, BMK 91 RS<strong>Safety</strong> <strong>and</strong> <strong>operating</strong> <strong>instructions</strong><strong>Crowder</strong> Supply Co., Inc. • 8495 Roslyn St., Commerce City, CO 80022 • Toll Free: 888-883-5144 • www.<strong>Crowder</strong>Supply.comProjectile hazardWarningDuring drilling, splinters or other particles from theworked material may become projectiles <strong>and</strong> causepersonal injury by striking the operator or otherpersons.►►Use approved personal protective equipment,including impact resistant safety glasses with sideprotection, to reduce the risk of being injured by aprojectile.CautionDuring blow-cleaning particles <strong>and</strong> dirty flushing watercan emerge from the drill hole <strong>and</strong> cause personalinjury.►►Move to the side <strong>and</strong> cover your eyes beforestarting to blow-clean the drill hole.►►Always wear impact resistant eye protection withside protection.►►Make sure that no co-workers are in range whenblow-cleaning.Noise hazardWarningHigh sound levels may cause permanent hearingloss.►►Use hearing protection in accordance withoccupational health <strong>and</strong> safety regulations.Silica/Dust hazardWarningExposure to crystalline silica (sometimes called‘silica dust’) as a result of drilling, or other activitiesinvolving rock, concrete, asphalt or other materialsmay cause silicosis (a serious lung disease), silicosisrelatedillnesses, cancer, or death. Silica is a majorcomponent of rock, s<strong>and</strong> <strong>and</strong> mineral ores.To reduce silica exposure:►►Use proper engineering controls to reduce theamount of silica in the air <strong>and</strong> the build-up of duston equipment <strong>and</strong> surfaces. Examples of suchcontrols include: exhaust ventilation <strong>and</strong> dustcollection systems, water sprays, <strong>and</strong> wet drilling.Make sure that controls are properly installed <strong>and</strong>maintained.►►Wear, maintain, <strong>and</strong> correctly use approvedparticulate respirators when engineering controlsalone are not adequate to reduce exposure belowpermissible levels.►►Participate in air monitoring, medical exams, <strong>and</strong>training programs offered by your employer <strong>and</strong>when required by law.►►Wear washable or disposable protective clothes atthe worksite; shower <strong>and</strong> change into clean clothesbefore leaving the worksite to reduceexposure of silica to yourself, other persons, cars,homes, <strong>and</strong> other areas.►►Do not eat, drink, or use tobacco products in areaswhere there is dust containing crystalline silica.►►Wash your h<strong>and</strong>s <strong>and</strong> face before eating, drinking,or using tobacco products outside of the exposurearea.►►Work with your employer to reduce silica exposureat your worksite.WarningSome dust, fumes or other airborne material createdduring use of the machine may contain chemicalsknown to the State of California to cause cancer<strong>and</strong> birth defects or other reproductive harm. Someexamples of such chemicals are:►►Crystalline silica <strong>and</strong> cement <strong>and</strong> other masonryproducts.►►Arsenic <strong>and</strong> chromium from chemically-treatedrubber.►►Lead from lead based paints.To reduce your exposure to these chemicals, work ina well ventilated area, <strong>and</strong> work with approved safetyequipment, such as dust masks that are speciallydesigned to filter out microscopic particles.Vibration hazardWarningNormal <strong>and</strong> proper use of the machine exposes theoperator to vibration. Regular <strong>and</strong> frequent exposureto vibration may cause, contribute to, or aggravateinjury or disorders to the operator’s fingers, h<strong>and</strong>s,wrists, arms, shoulders <strong>and</strong>/or other body parts,including debilitating <strong>and</strong>/or permanent injuries ordisorders that may develop gradually over periodsof weeks, months, or years. Such injury or disordermay include damage to the blood circulatory system,damage to the nervous system, damage to joints, <strong>and</strong>possibly damage to other body structures.If numbness, tingling, pain, clumsiness, weakenedgrip, whitening of the skin, or other symptoms occurat any time, when <strong>operating</strong> the machine or whennot <strong>operating</strong> the machine, do not resume <strong>operating</strong>the machine <strong>and</strong> seek medical attention. Continueduse of the machine after the occurrence of anysuch symptom may increase the risk of symptomsbecoming more severe <strong>and</strong>/or permanent.© 2010 Atlas Copco Construction <strong>Tools</strong> AB | No. 9800 0680 71a | 2010-01-01Orginal <strong>instructions</strong>7
www.<strong>Crowder</strong>Supply.com • Toll Free: 888-883-5144ALF 72D, ALF 72D-1, ALF 67/80D, BMK 62S, BMK 91 RS<strong>Safety</strong> <strong>and</strong> <strong>operating</strong> <strong>instructions</strong>Protective equipment<strong>Crowder</strong> Supply Co., Inc. • 8495 Roslyn St., Commerce City, CO 80022 • Toll Free: 888-883-5144 • www.<strong>Crowder</strong>Supply.comAlways use approved protective equipment.Operators <strong>and</strong> all other persons in the working areamust wear protective equipment, including at aminimum:►►Protective helmet►►Hearing protection►►Impact resistant eye protection with side protection►►Respiratory protection when appropriate►►Protective gloves►►Protective bootsService <strong>and</strong> maintenanceRegular maintenance is a prerequisite for keepingthe machine safe <strong>and</strong> effective. Carefully follow the<strong>operating</strong> <strong>instructions</strong>.Before undertaking any maintenance or changingthe working tool on pneumatic machines, alwaysswitch off the air supply <strong>and</strong> bleed the machineby depressing the start <strong>and</strong> stop device. Thendisconnect the air hose from the machine.►►Use only authorised parts. Any damage ormalfunction caused by the use of unauthorisedparts is not covered by Warranty or ProductLiability.►►Change damaged parts immediately.►►Replace damaged <strong>and</strong> worn components in goodtime.►►For major service to the machine, contact yournearest authorised workshop.►►When cleaning mechanical parts with solvent,make sure to comply with current health <strong>and</strong>safety regulations <strong>and</strong> that there is satisfactoryventilation.Working tools►►Keep the tools clean <strong>and</strong> in good condition.Regulary check the working tools, make sure thatthey are sharp <strong>and</strong> not worn out.Note! The machine can be destroyed if you useincorrect working tools.© 2010 Atlas Copco Construction <strong>Tools</strong> AB | No. 9800 0680 71a | 2010-01-01Orginal <strong>instructions</strong>9
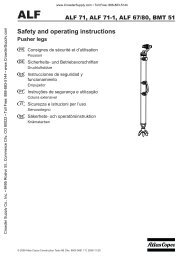
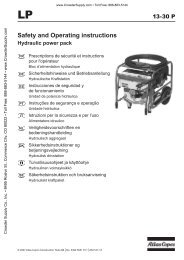
www.<strong>Crowder</strong>Supply.com • Toll Free: 888-883-5144<strong>Safety</strong> <strong>and</strong> <strong>operating</strong> <strong>instructions</strong>ALF 72D, ALF 72D-1, ALF 67/80D, BMK 62S, BMK 91 RS<strong>Crowder</strong> Supply Co., Inc. • 8495 Roslyn St., Commerce City, CO 80022 • Toll Free: 888-883-5144 • www.<strong>Crowder</strong>Supply.comOPERATINGINSTRUCTIONSDesign <strong>and</strong> functionAtlas Copco pusher legs of type ALF 72D, ALF72D-1, BMK 62S, ALF 67/80D <strong>and</strong> BMK 91RSare used with light rock drills of type BBD <strong>and</strong> RH.ALF 72D, ALF 72D-1 <strong>and</strong> ALF 67/80D are usedtogether with BBD 94W <strong>and</strong> are double-acting withan automatic return. BMK 62S is used togetherwith RH 656W <strong>and</strong> needs to be retracted manually.ALF 72D, ALF 72D-1, BMK 62S <strong>and</strong> ALF 67/80Dare equipped with a one-stage cylinder. ALF67/80D is equipped with a two-stage cylinder.BMK 91RS is used together with BBD 94W <strong>and</strong>is equipped with a one-stage cylinder with anautomatic return. Cylinders are made of aluminiumexcept for BMK 62S <strong>and</strong> BMK 91RS which aremade of steel. The pusher legs are connectedto the rock drill by a special attachment device.Recommended air pressure is 6 bar.The pusher leg support is for helping the operatorto lift <strong>and</strong> feed the rock drill during drillingoperations.Signs <strong>and</strong> decals on themachineSigns <strong>and</strong> decals that are important for your safety<strong>and</strong> the care of the machine are included with eachmachine. New decals can be ordered using thespare parts list.ACBA. Machine typeB. Maximum permitted compressed air pressureC. Serial numberD. The warning symbol together with the booksymbol means that the user must read the safety<strong>and</strong> <strong>operating</strong> <strong>instructions</strong> before the machine isused for the first time.E.The CE symbol means that the machine isEC-approved. See the EC declaration which isdelivered with the machine for more information.If the CE symbol is missing, it means that themachine is not EC-approved.DEThe sign shows important information:The warning symbol together with the booksymbol means that you must read the <strong>Safety</strong> <strong>and</strong><strong>operating</strong> <strong>instructions</strong> before using the machine.10© 2010 Atlas Copco Construction <strong>Tools</strong> AB | No. 9800 0680 71a | 2010- 01-01Orginal <strong>instructions</strong>
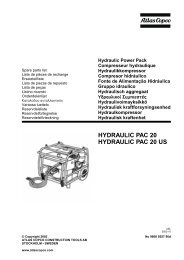
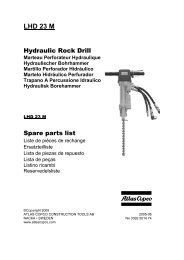
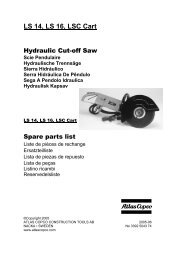
www.<strong>Crowder</strong>Supply.com • Toll Free: 888-883-5144ALF 72D, ALF 72D-1, ALF 67/80D, BMK 62S, BMK 91 RS<strong>Safety</strong> <strong>and</strong> <strong>operating</strong> <strong>instructions</strong><strong>Crowder</strong> Supply Co., Inc. • 8495 Roslyn St., Commerce City, CO 80022 • Toll Free: 888-883-5144 • www.<strong>Crowder</strong>Supply.comWorking principle of a pusherlegFunctionThe feeding movement of the pusher leg ispowered by compressed air, which is directedto the lower side of the piston <strong>and</strong> pushes thepiston out of the cylinder. For automatic return(not BMK 62S) of the piston rod into the cylinder,compressed air is directed to the upper side of thepiston.ALF 72DALF 72D-1BMK 62S1. Feed control knob2. Valve pin3. Hose nipple (12,5 mm)4. Feed cylinder5. Piston rod6. H<strong>and</strong>le7. Spike with support8. Warning labelPreparations before starting1. Check the drilling equipmentCheck that all of the drilling equipment is in goodworking order.Make sure that the air inlet port is free fromobstruction.Ensure that the fittings are tight <strong>and</strong> leak-proof.WarningAlways check for damaged or loose hoses <strong>and</strong>fittings before operation. Whipping hoses cancause serious injury.2. Blow through the air hoseEvery day, before to using the drill, blow throughthe air hose to clear it of accumulated dirt <strong>and</strong>moisture.3. Fill the lubricator with oilNote! Check that the chuck <strong>and</strong> drill-steel shankare always covered with a film of oil.Note! Always use a recommended lubricant.LubricantAir tool oilRecommendationUse a mineral-based air tool oilAmbienttemperature ºCViscosity grade(ISO 3448)-30 to 0 ISO VG 32-68-10 to +20 ISO VG 68-100+10 to +50 ISO VG 100-150© 2010 Atlas Copco Construction <strong>Tools</strong> AB | No. 9800 0680 71a | 2010-01-01Orginal <strong>instructions</strong>11
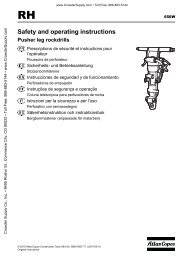
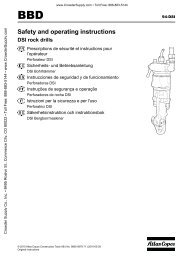
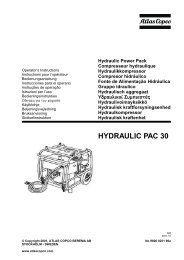
<strong>Safety</strong> <strong>and</strong> <strong>operating</strong> <strong>instructions</strong>www.<strong>Crowder</strong>Supply.com • Toll Free: 888-883-5144ALF 72D, ALF 72D-1, ALF 67/80D, BMK 62S, BMK 91 RS<strong>Crowder</strong> Supply Co., Inc. • 8495 Roslyn St., Commerce City, CO 80022 • Toll Free: 888-883-5144 • www.<strong>Crowder</strong>Supply.com4. Calibrate the correct air <strong>and</strong> waterpressureUse the Atlas Copco no. 9090 0550 80 pressuregauge to check the water <strong>and</strong> air pressure whenthe rock drill is running.Air pressureEnsure that the compressor can deliver therequired air volume at 4–6 bar at the tool.►►High pressure causes rough operation <strong>and</strong>damage.►►Low pressure results in a slow drilling speed.Water pressureThe pressure gauge is equipped with a needlewhich is pressed into the hose to measure thepressure inside.Note! Make sure that the water pressure is atleast 1 bar lower than the air pressureotherwise the water can enter the impactmechanism. For example if the air pressureis 6 bar, the water pressure must be below5 bar to prevent water entering the impactmechanism.Attachment deviceAn attachment device is needed to couple thepusher leg to the rock drill.BBD 94 W Rock drillAttachment is fitted to the intermediate part of therock drill.RH 656 W rock drillAttachment is fitted to the rock drill by clamping iton the side bolts.12© 2010 Atlas Copco Construction <strong>Tools</strong> AB | No. 9800 0680 71a | 2010- 01-01Orginal <strong>instructions</strong>
www.<strong>Crowder</strong>Supply.com • Toll Free: 888-883-5144ALF 72D, ALF 72D-1, ALF 67/80D, BMK 62S, BMK 91 RS<strong>Safety</strong> <strong>and</strong> <strong>operating</strong> <strong>instructions</strong><strong>Crowder</strong> Supply Co., Inc. • 8495 Roslyn St., Commerce City, CO 80022 • Toll Free: 888-883-5144 • www.<strong>Crowder</strong>Supply.comAttaching the pusher leg tothe rock drillThe pusher leg must be fixed to the rock drill by meansof the bayonet coupling.ControlsControls for ALF 72D, ALF 72D-1, ALF67/80D <strong>and</strong> BMK 91RSPusher Leg Feed control knob (1)Adjust the feed force by means of the feed controlknob as follows:Turn the knob counter-clockwise (B) to increasethe feed force.Turn the knob clockwise (A) to decrease the feedforce.When the feed control knob is in the closedposition, the pusher leg is vented.Valve pin (2)When the valve pin is pushed in, the feed forceceases abruptly, thus overriding the setting onthe feed control knob. The facility is used, e.g. toadjust the height of the rock drill, when rigging upthe pusher leg, or when there is a tendency to jam.When the valve pin is depressed, the piston rod inthe pusher leg is retracted automatically.Controls for BMK 62SPusher Leg Feed control knob (1)Adjust the feed force by means of the feed controlknob as follows:Turn the knob counter-clockwise (B) to increasethe feed force.Turn the knob clockwise (A) to decrease the feedforce.When the feed control knob is in the closedposition, the pusher leg is vented.Valve pin (2)When the valve pin is pushed in, the feed forceceases abruptly, thus overriding the setting onthe feed control knob. The facility is used, e.g. toadjust the height of the rock drill, when rigging upthe pusher leg, or when there is a tendency to jam.© 2010 Atlas Copco Construction <strong>Tools</strong> AB | No. 9800 0680 71a | 2010-01-01Orginal <strong>instructions</strong>13
<strong>Safety</strong> <strong>and</strong> <strong>operating</strong> <strong>instructions</strong>www.<strong>Crowder</strong>Supply.com • Toll Free: 888-883-5144ALF 72D, ALF 72D-1, ALF 67/80D, BMK 62S, BMK 91 RS<strong>Crowder</strong> Supply Co., Inc. • 8495 Roslyn St., Commerce City, CO 80022 • Toll Free: 888-883-5144 • www.<strong>Crowder</strong>Supply.comDrillingStarting the rock drillA1. Open the main valve for compressed air.2. Adjust the feed control knob (C) to give asuitable feed force for collaring the hole.3. Align the rock drill so that the drill steeltouches the desired collaring point.4. Move the throttle lever (A) forward a little,this will start water flushing, percussion <strong>and</strong>rotation.5. Collar the hole with reduced feed force.6. Move the throttle lever (A) fully forward oncethe drill steel has gained a secure footing inthe rock.7. Adjust the feed force by means of the controlknob (C) so that the maximum penetrationrate is obtained.Stopping the rock drill1. Pull the throttle lever (A) backwards, this willstop percussion, rotation <strong>and</strong> flushing water.2. Turn the feed control knob (C) to the closedposition.CBRe-positioning the pusher leg1. Switch off the rock drill percussion <strong>and</strong>flushing with the throttle lever (A).2. Depress the valve pin (B), whereupon thepiston rod is pulled back into the pusher legcylinder automatically (manually for BMK62S).3. Re-position the pusher leg.4. Release the valve pin (B), whereupon thepiston rod moves outward again.5. Move the throttle lever (A) forward into theworking position.6. Note that the feed control knob (C) does notneed to be touched during this procedure.When you have finished drillingLay down the rock drill on a stone, wooden plankor similar object, so as to prevent drill cuttings <strong>and</strong>other foreign matter from entering the chuck.Turn off the water pressure before the air pressure.Run the rock drill for a few seconds to clean outwater <strong>and</strong> moisture after the water has been shutoff.MaintenanceRegular maintenance is a prerequisite for machinesafety. Replace damaged <strong>and</strong> worn componentsin good time. For a major service to the machine,contact your nearest authorized workshop.Check the machine <strong>and</strong> tools for wear <strong>and</strong> damageat regular intervals. Do not use very worn ordamaged tools.When cleaning mechanical parts with a solvent,make sure that you comply with current health<strong>and</strong> safety regulations <strong>and</strong> ensure that there issufficient ventilation.Daily maintenance, regular checking of wearingparts <strong>and</strong> carrying out repairs in good timeprevents breakdowns <strong>and</strong> increases the service lifeof the machine.Always oil the rock drill <strong>and</strong> pusher leg well,before you put them into storage.Store in a clean <strong>and</strong> dry place.Make sure that no foreign matter enters themachine.Always hose down <strong>and</strong> wipe clean the rock drill<strong>and</strong> pusher leg after use.14© 2010 Atlas Copco Construction <strong>Tools</strong> AB | No. 9800 0680 71a | 2010- 01-01Orginal <strong>instructions</strong>
www.<strong>Crowder</strong>Supply.com • Toll Free: 888-883-5144ALF 72D, ALF 72D-1, ALF 67/80D, BMK 62S, BMK 91 RS<strong>Safety</strong> <strong>and</strong> <strong>operating</strong> <strong>instructions</strong><strong>Crowder</strong> Supply Co., Inc. • 8495 Roslyn St., Commerce City, CO 80022 • Toll Free: 888-883-5144 • www.<strong>Crowder</strong>Supply.comDifferences between original parts <strong>and</strong>pattern partsWhen buying a part, the first thing to do is to verifythat the part is an Atlas Copco part. Most parts canbe identified.Rock drill parts are normally marked with a part number<strong>and</strong> the Atlas Copco identity mark which is a circle witha rock drill inside it. In a few cases the part is markedeither with the circle only or the part number only.Rubber <strong>and</strong> plastic parts are not normally marked.Competitors that copy our parts often markmajor, expensive parts. Some parts have onlythe part number, but some of them also havean identity mark in the form of the initials of themanufacturer's name. Part numbers on the patternparts are mostly stamped by h<strong>and</strong> which results inirregularities. The part numbers stamped by AtlasCopco are regular <strong>and</strong> the individual figures arethe same size. In addition the depth of the figures<strong>and</strong> the spacing between the figures in each groupare the same.Once a shift (after 8 hours of operation)1. Check the rock drill’s connection to thepusher leg.2. Check the hoses, couplings <strong>and</strong> controls forleakage <strong>and</strong> damage.3. Check that the rock drill <strong>and</strong> pusher legare receiving enough lubrication. Fill thelubricator as necessary.4. Drain the water separator.Once a week (after 40 hours of operation)►►Carry out a basic check of all functions of thedrilling equipment.Scrapping <strong>and</strong> wastedisposalUsed <strong>and</strong> worn-out machines must be disposedof in such a way that as much of the material aspossible can be recycled <strong>and</strong> the impact on theenvironment is kept to a minimum.© 2010 Atlas Copco Construction <strong>Tools</strong> AB | No. 9800 0680 71a | 2010-01-01Orginal <strong>instructions</strong>15
<strong>Safety</strong> <strong>and</strong> <strong>operating</strong> <strong>instructions</strong>www.<strong>Crowder</strong>Supply.com • Toll Free: 888-883-5144ALF 72D, ALF 72D-1, ALF 67/80D, BMK 62S, BMK 91 RSTroubleshooting<strong>Crowder</strong> Supply Co., Inc. • 8495 Roslyn St., Commerce City, CO 80022 • Toll Free: 888-883-5144 • www.<strong>Crowder</strong>Supply.comBasic troubleshooting guideProblem Cause SolutionInsufficient feedforceLow air pressureValve 3121 0726 80 has stuckor packings 0663 2124 00 areworn (only ALF models).Piston rod packing worn ordeformed.Increase air pressure to 6 bar.Dismantle the valve <strong>and</strong> clean it if necessary. Replacepackings if worn or deformed.Replace the packing1For wear limits <strong>and</strong> tightening torques, see the light rock drills service information, Atlas Copco document no. 9853 1086 01.2Gauge for chuck bushing 22mm (7/8”) hexagon shank Atlas Copco no. 3091 0038 00.3Use Atlas Copco no. 9090 0550 80 pressure gauge to test the water <strong>and</strong> air pressure.16© 2010 Atlas Copco Construction <strong>Tools</strong> AB | No. 9800 0680 71a | 2010- 01-01Orginal <strong>instructions</strong>
www.<strong>Crowder</strong>Supply.com • Toll Free: 888-883-5144ALF 72D, ALF 72D-1, ALF 67/80D, BMK 62S, BMK 91 RS<strong>Safety</strong> <strong>and</strong> <strong>operating</strong> <strong>instructions</strong>Accessories<strong>Crowder</strong> Supply Co., Inc. • 8495 Roslyn St., Commerce City, CO 80022 • Toll Free: 888-883-5144 • www.<strong>Crowder</strong>Supply.comAccessoryOrdering no.Lubricator for BBC, BBD, RH:BLG 30, for mineral oil 8202 5102 05CLG 30, for both mineral <strong>and</strong> synthetic oil 8202 5102 39Water separator for BBC, BBD, RHVAM 5A, for airflow up to 120 l/s (254 cfm) 8092 0110 82Air line accessories for 25 mm (1'')Rubber hose, 30 m 9030 2041 00Claw coupling 9000 0313 00Two-piece hose clamp 9000 0197 00Pressure gauge for compressed air <strong>and</strong> water pressureGauge 9090 0550 80Extra needle set 9090 0678 90Compressed air hose 25 mm (1’’) for rock drill <strong>and</strong> feed, fitted withcouplings for:BBD 94W together with ALF 72D, ALF 72D-1, ALF 67/80D <strong>and</strong> BMK 91RS 9030 2068 00Compressed air hose 20 mm (3/4’’) for rock drill <strong>and</strong> feed, fitted withcouplings for:RH 656W together with BMK 62S 9030 2067 00© 2010 Atlas Copco Construction <strong>Tools</strong> AB | No. 9800 0680 71a | 2010-01-01Orginal <strong>instructions</strong>17
<strong>Safety</strong> <strong>and</strong> <strong>operating</strong> <strong>instructions</strong>www.<strong>Crowder</strong>Supply.com • Toll Free: 888-883-5144ALF 72D, ALF 72D-1, ALF 67/80D, BMK 62S, BMK 91 RSTechnical Data<strong>Crowder</strong> Supply Co., Inc. • 8495 Roslyn St., Commerce City, CO 80022 • Toll Free: 888-883-5144 • www.<strong>Crowder</strong>Supply.comType Ordering No. Suitable forRock drillSingletelescopeALF 72D 8321 020180ALF 72D-1 8321 020181BMK 62S 8321 010202BMK 91RS 8321 010427DoubletelescopeALF 67/80D 8321 020169FeedingLength(mm)LengthRetracted(mm)LengthExtracted(mm)Weight(kg)PistonBore(mm)BBD 94W 1300 1970 3270 19 70BBD 94W 1200 1830 3030 16 70RH 656W 1300 1815 3115 17 53BBD 94W 1300 1730 3030 24 67BBD 94W 1855 1595 3450 19 67/80EC Declaration of Conformity (EC Directive 2006/42/EC)We, Atlas Copco Construction <strong>Tools</strong> AB, hereby declare that the machines listed below conform to theprovisionsof EC Directive 2006/42/EC (Machinery Directive).Pusher legsPmax (bar)ALF 72D 7ALF 72D-1 7BMK 62S 7BMK 91RS 7ALF 67/80D 7Technical Documentation authorised representative:Erik SigfridssonAtlas Copco Construction <strong>Tools</strong> ABDragonvägen 2KalmarGeneral Manager:Erik SigfridssonManufacturer:Atlas Copco Construction <strong>Tools</strong> AB105 23 StockholmSwedenPlace <strong>and</strong> date: Kalmar, 2010-01-0118© 2010 Atlas Copco Construction <strong>Tools</strong> AB | No. 9800 0680 71a | 2010- 01-01Orginal <strong>instructions</strong>
www.<strong>Crowder</strong>Supply.com • Toll Free: 888-883-5144ALF 72D, ALF 72D-1, ALF 67/80D, BMK 62S, BMK 91 RS<strong>Safety</strong> <strong>and</strong> <strong>operating</strong> <strong>instructions</strong><strong>Crowder</strong> Supply Co., Inc. • 8495 Roslyn St., Commerce City, CO 80022 • Toll Free: 888-883-5144 • www.<strong>Crowder</strong>Supply.com© 2010 Atlas Copco Construction <strong>Tools</strong> AB | No. 9800 0680 71a | 2010-01-01Orginal <strong>instructions</strong>19
Sommairewww.<strong>Crowder</strong>Supply.com • Toll Free: 888-883-5144ALF-72D ALF-72D-1 ALF-67-80D BMK-62S BMK 91RSFRANÇAIS<strong>Crowder</strong> Supply Co., Inc. • 8495 Roslyn St., Commerce City, CO 80022 • Toll Free: 888-883-5144 • www.<strong>Crowder</strong>Supply.comSommairePRESCRIPTIONS DE SÉCURITÉ. . . . . . . . . . . . . . . . . . . . . . . . . . . . . . . . . . . . . . . . . . . . . . . 21Symboles de sécurité utilisés . . . . . . . . . . . . . . . . . . . . . . . . . . . . . . . . . . . . . . . . . . . . . . .21Danger lié au transport . . . . . . . . . . . . . . . . . . . . . . . . . . . . . . . . . . . . . . . . . . . . . . . . . . . .21Dangers liés à l'utilisation d'outils et de machines. . . . . . . . . . . . . . . . . . . . . . . . . . . . . .21Danger d'incendies et d'explosions . . . . . . . . . . . . . . . . . . . . . . . . . . . . . . . . . . . . . . . . . .22Dangers liés aux objets cachés et électriques . . . . . . . . . . . . . . . . . . . . . . . . . . . . . . . . .23Danger lié aux projections . . . . . . . . . . . . . . . . . . . . . . . . . . . . . . . . . . . . . . . . . . . . . . . . .23Danger lié au bruit . . . . . . . . . . . . . . . . . . . . . . . . . . . . . . . . . . . . . . . . . . . . . . . . . . . . . . . .23Danger lié aux poussières et cristaux de silice . . . . . . . . . . . . . . . . . . . . . . . . . . . . . . . . .23Danger lié aux vibrations . . . . . . . . . . . . . . . . . . . . . . . . . . . . . . . . . . . . . . . . . . . . . . . . . . .24Danger lié aux modifications sur la machine . . . . . . . . . . . . . . . . . . . . . . . . . . . . . . . . . .24Prescriptions de sécurité supplémentaires . . . . . . . . . . . . . . . . . . . . . . . . . . . . . . . . . . . .25Équipement de protection individuelle . . . . . . . . . . . . . . . . . . . . . . . . . . . . . . . . . . . . . . .25Entretien et maintenance . . . . . . . . . . . . . . . . . . . . . . . . . . . . . . . . . . . . . . . . . . . . . . . . . .25Outils de travail . . . . . . . . . . . . . . . . . . . . . . . . . . . . . . . . . . . . . . . . . . . . . . . . . . . . . . . . . .25INSTRUCTIONS POUR L'OPÉRATEUR. . . . . . . . . . . . . . . . . . . . . . . . . . . . . . . . . . . . . . . . . . 26Conception et fonctionnement . . . . . . . . . . . . . . . . . . . . . . . . . . . . . . . . . . . . . . . . . . . . . .26Signalisation et autocollants apposés sur l'appareil . . . . . . . . . . . . . . . . . . . . . . . . . . . .26Principe de fonctionnement du poussoir . . . . . . . . . . . . . . . . . . . . . . . . . . . . . . . . . . . . .27Fonction . . . . . . . . . . . . . . . . . . . . . . . . . . . . . . . . . . . . . . . . . . . . . . . . . . . . . . . . . . . . . . 27Opérations à effectuer avant de démarrer . . . . . . . . . . . . . . . . . . . . . . . . . . . . . . . . . . . . .27Système de fixation . . . . . . . . . . . . . . . . . . . . . . . . . . . . . . . . . . . . . . . . . . . . . . . . . . . . . . .28Marteau perforateur BBD 94 W . . . . . . . . . . . . . . . . . . . . . . . . . . . . . . . . . . . . . . . . . . . . 28Marteau perforateur RH 656 W . . . . . . . . . . . . . . . . . . . . . . . . . . . . . . . . . . . . . . . . . . . . 28Montage du poussoir surle marteau perforateur . . . . . . . . . . . . . . . . . . . . . . . . . . . . . . . . . . . . . . . . . . . . . . . . . . . . .29Comm<strong>and</strong>es . . . . . . . . . . . . . . . . . . . . . . . . . . . . . . . . . . . . . . . . . . . . . . . . . . . . . . . . . . . . .29Comm<strong>and</strong>es des modèles ALF 72D, ALF72D-1, ALF 67/80D et BMK 91RS . . . . . . . . . . . . . . . . . . . . . . . . . . . . . . . . . . . . . . . . . . 29Comm<strong>and</strong>es du BMK 62S . . . . . . . . . . . . . . . . . . . . . . . . . . . . . . . . . . . . . . . . . . . . . . . . 29Forage . . . . . . . . . . . . . . . . . . . . . . . . . . . . . . . . . . . . . . . . . . . . . . . . . . . . . . . . . . . . . . . . . .30Démarrage du marteau perforateur . . . . . . . . . . . . . . . . . . . . . . . . . . . . . . . . . . . . . . . . . 30Arrêt du marteau perforateur . . . . . . . . . . . . . . . . . . . . . . . . . . . . . . . . . . . . . . . . . . . . . . 30Re-positionnement du poussoir . . . . . . . . . . . . . . . . . . . . . . . . . . . . . . . . . . . . . . . . . . . . 30Une fois le forage terminé . . . . . . . . . . . . . . . . . . . . . . . . . . . . . . . . . . . . . . . . . . . . . . . . 30Maintenance . . . . . . . . . . . . . . . . . . . . . . . . . . . . . . . . . . . . . . . . . . . . . . . . . . . . . . . . . . . . .30Différences entre les pièces d'origine et les pièces copiées . . . . . . . . . . . . . . . . . . . . . . 31A chaque changement d'équipe (après8 heures d'utilisation) . . . . . . . . . . . . . . . . . . . . . . . . . . . . . . . . . . . . . . . . . . . . . . . . . . . . 31Une fois par semaine (après 40 heures d'utilisation) . . . . . . . . . . . . . . . . . . . . . . . . . . . . 31Mise à la ferraille et élimination des déchets . . . . . . . . . . . . . . . . . . . . . . . . . . . . . . . . . .31Dépannage . . . . . . . . . . . . . . . . . . . . . . . . . . . . . . . . . . . . . . . . . . . . . . . . . . . . . . . . . . . . . .32Guide de dépannage de base . . . . . . . . . . . . . . . . . . . . . . . . . . . . . . . . . . . . . . . . . . . . . 32Accessoires . . . . . . . . . . . . . . . . . . . . . . . . . . . . . . . . . . . . . . . . . . . . . . . . . . . . . . . . . . . . .33Caractéristiques techniques . . . . . . . . . . . . . . . . . . . . . . . . . . . . . . . . . . . . . . . . . . . . . . . .34Déclaration CE de conformité (Directive 2006/42/CE) . . . . . . . . . . . . . . . . . . . . . . . . . . .3420© 2010 Atlas Copco Construction <strong>Tools</strong> AB | No. 9800 0680 71a | 2010-01-01Instructions d’origine
<strong>Crowder</strong> Supply Co., Inc. • 8495 Roslyn St., Commerce City, CO 80022 • Toll Free: 888-883-5144 • www.<strong>Crowder</strong>Supply.comALF 72D, ALF 72D-1, ALF 67/80D, BMK 62S, BMK 91RS Prescriptions de sécurité et <strong>instructions</strong>pour l'opérateurPRESCRIPTIONS DESÉCURITÉIl convient de lire attentivement les présentesprescriptions de sécurité avant toute utilisation dela machine, afin de minimiser le risque de blessuresgraves ou de dommages pouvant entraîner la mort.Affichez les consignes de sécurité sur les lieux detravail ; faites des copies pour les salariés et assurezvousque chaque personne concernée a bien lu lesprescriptions de sécurité avant toute utilisation oumaintenance sur la machine.Prière de respecter les <strong>instructions</strong> de sécuritécontenues dans le présent manuel.Toutes les <strong>instructions</strong> de sécurité sont conformesaux règlements et directives applicables dans l’UnionEuropéenne.Veuillez toujours observer les directives additionnellesnationales/régionales, le cas échéant.Dans les pays en dehors de l’Union Européenne, lesstatuts et réglementations en vigueur au niveau localseront appliqués.Toute loi ou réglementation additionnelle devra êtreobservée.Symboles de sécurité utilisésLes indications Danger, Attention et Prudence ontles significations suivantes :DangerAttentionPrudenceIndique une situationdangereuse imminentequi, si elle n'est pas évitée,provoquera la mort ou desblessures graves.Indique une situationdangereuse qui, si ellen'est pas évitée,pourraitprovoquer la mort ou desblessures graves.Indique une situation qui,si elle n'est pas évitée,risque de provoquer desblessures corporelles oudes dommages au produitou à d'autres biens.Danger lié au transportPrudenceLa foreuse à roche et le verrin d'appui sont lourds.Pour éviter des blessures corporelles pendant letransport sur la zone de travail,►►utilisez un chariot de transport ou dem<strong>and</strong>ez l'aided'un collègue.www.<strong>Crowder</strong>Supply.com • Toll Free: 888-883-5144Dangers liés à l'utilisationd'outils et de machinesAttentionDurant son utilisation, la machine risque d'effectuerun mouvement brusque ou imprévu, pouvantprovoquer des blessures. En outre, les pertesd'équilibre ou les glissades peuvent provoquer desblessures. Pour réduire les risques :►►Assurez-vous de toujours adopter une positionstable, les pieds dans le prolongement de vosépaules et votre poids bien réparti sur les deuxjambes.►►Restez bien droit et tenez toujours la machine àdeux mains.►►Ne mettez pas la machine en marche lorsqu'elleest posée sur le sol.►►Assurez-vous que la poignée est toujours bienpropre, sans graisse ni huile.AttentionLe démarrage accidentel de la machine peutprovoquer des blessures.►►Gardez les mains bien éloignées du dispositif demarche/arrêt jusqu'au moment de commencer àtravailler.AttentionL'outil de travail est soumis à de fortes contrainteslorsque la machine est utilisée et peut casser aprèsune certaine durée d'utilisation à cause de la fatigue.Une rupture éventuelle de l'outil risque d'induiredes mouvements brusques ou violents. De telsmouvements peuvent être la source de blessuresgraves.►►Assurez-vous de toujours adopter une positionstable, les pieds dans le prolongement de vosépaules et votre poids bien réparti sur les deuxjambes.►►Examinez régulièrement l'usure de l'outil de travailet contrôlez la présence éventuelle de signes dedétérioration ou de fissures visibles.AttentionUne dimension incorrecte de la tige de l'outil de travailpeut entraîner la perte ou le glissement de ce dernierpendant le fonctionnement. Un outil de travail perdu ouqui glisse peut provoquer des dommages corporels.►►Avant d'insérer l'outil de travail, assurez-vous queles dimensions de la tige sont correctes pour sonutilisation dans la machine.►►Evitez d'utiliser des outils de travail sans collier.© 2010 Atlas Copco Construction <strong>Tools</strong> AB | No. 9800 0680 71a | 2010-01-01Instructions d’origine21
Prescriptions de sécurité et <strong>instructions</strong>pour l'opérateurwww.<strong>Crowder</strong>Supply.com • Toll Free: 888-883-5144ALF 72D, ALF 72D-1, ALF 67/80D, BMK 62S, BMK 91RS<strong>Crowder</strong> Supply Co., Inc. • 8495 Roslyn St., Commerce City, CO 80022 • Toll Free: 888-883-5144 • www.<strong>Crowder</strong>Supply.comAttentionSi l'outil n'est pas verrouillé sur la machine, ilrisque d'être éjecté avec force et de provoquer desblessures graves.►►Une fois que l'outil de travail a été installé etverrouillé, la fonction de verrouillage doit êtrevérifiée en tirant énergiquement l'outil de travailvers l'extérieur.►►Assurez-vous que l'outil est entièrement inséré etque le porte-outil est en position verrouillée avantde démarrer la machine.►►Ne jamais pointer l'outil de travail vers soi-même nivers autrui.AttentionLe fait de changer l'outil de travail alors que lamachine est en fonctionnement peut provoquer desblessures graves.►►Avant tout changement d'outil, commencez pararrêter la machine.►►Evitez à tout prix d'attraper ou de toucher un fleureten rotation.AttentionUn flexible d'air comprimé qui se détache risque defouetter l'air dans tous les sens et de provoquer desdommages corporels ou la mort.Pour réduire les risques :►►Vérifiez que le flexible d'air comprimé et lesraccords ne sont pas endommagés.►►Vérifiez que les raccords d'air comprimé sontcorrectement fixés.►►Ne jamais essayer de débrancher un flexibled'air comprimé sous pression. Commencez parcouper l'alimentation en air comprimé au niveau ducompresseur, puis purgez la machine en activantle dispositif de marche/arrêt.AttentionSi le fleuret se bloque durant le fonctionnement, lamachine se mettra à tourner sur elle-même si vousne la tenez pas bien. Cette rotation inattendue dela machine entière peut provoquer des blessuresgraves.►►Restez bien droit et maintenez toujours la machineavec les deux mains.►►Assurez-vous que la poignée est toujours bienpropre sans graisse ni huile.►►Ne jamais forer dans un ancien trou.AttentionDes objets risquent d'être entraînés ou attrapés par lefleuret en rotation. D'où éventuellement des blessuresgraves.►►Evitez à tout prix d'attraper ou de toucher un fleureten rotation.►►Ainsi que de porter des vêtements susceptibles dese prendre dans la pièce en rotation.Si vous avez les cheveux longs, couvrez-les d'unfilet à cheveux.Danger d'incendies etd'explosionsDangerEn cas de contact de la machine avec un explosif,une explosion risque de se produire. Les explosionspeuvent provoquer des blessures graves ou la mort.Pour réduire le risque d'explosion :►►N'utilisez jamais l'équipement pour forer àproximité d'explosifs : dynamite ou autres explosifspour la roche inclus.►►Assurez-vous qu'aucun explosif n'est présent dansla roche.►►Ne jamais forer dans un ancien trou.AttentionLe fait de forer et de travailler avec certains matériauxpeut provoquer des étincelles, susceptibles à leur tourd'enflammer des gaz inflammables et de provoquerdes explosions. Les explosions peuvent provoquerdes blessures graves ou la mort.Pour réduire de tels risques d'explosion :►►Ne jamais utiliser la machine dans unenvironnement explosif quelconque.►►N'utilisez pas cette machine près de poussières,d'émanations ou de matériaux inflammables.►►Assurez-vous qu'il n'y a aucune source de gaz nonidentifiée.22© 2010 Atlas Copco Construction <strong>Tools</strong> AB | No. 9800 0680 71a | 2010-01-01Instructions d’origine
www.<strong>Crowder</strong>Supply.com • Toll Free: 888-883-5144ALF 72D, ALF 72D-1, ALF 67/80D, BMK 62S, BMK 91RS Prescriptions de sécurité et <strong>instructions</strong>pour l'opérateur<strong>Crowder</strong> Supply Co., Inc. • 8495 Roslyn St., Commerce City, CO 80022 • Toll Free: 888-883-5144 • www.<strong>Crowder</strong>Supply.comDangers liés aux objetscachés et électriquesDangerLa machine n'est pas isolée électriquement. Toutcontact de la machine avec de l'électricité risque deprovoquer des blessures graves ou la mort.►►Pour réduire de tels risques de blessures ou demort, n'utilisez jamais la machine à proximité d'uncâble électrique ou d'autres sources d'électricité.►►Assurez-vous de l'absence de câbles cachés oud'autres sources d'électricité.AttentionEn cours de forage, les tuyaux et câbles cachésconstituent une source potentielle de blessuresgraves.►►Avant de commencer à forer, vérifiez lacomposition du matériau sur lequel vous alleztravailler.►►Faites attention aux câbles et aux tuyauxdissimulés, comme ceux de l'électricité, dutéléphone, de l'eau, du gaz et les canalisationsd'égout, etc.►►Si vous pensez avoir touché un objet occulté avecl'outil, arrêtez immédiatement la machine.►►Assurez-vous de toute absence de danger avantde continuer.Danger lié aux projectionsAttentionEn cours de forage, des éclats ou d'autres particulesdu matériau travaillé peuvent se tranformer enprojectiles et provoquer des blessures en frappantl'opérateur ou d'autres personnes.►►Utilisez des équipements de protectionpersonnelle, lunettes de sécurité résistant auxchocs équipées de protections latérales intégrées,pour réduire le risque de blessures liées auxprojectiles.PrudenceDurant le rinçage, des particules et les eaux derinçage peuvent être projetées hors du trou de forageet provoquer des blessures corporelles.►►Écartez-vous sur le côté et couvrez vos yeux avantde commencer à nettoyer par soufflage le troupercé.►►Portez toujours des lunettes pour les yeuxrésistantes aux chocs et équipées de protectionslatérales.►►Assurez-vous qu'aucun de vos collègues de travailn'est à proximité lors du rinçage.Danger lié au bruitAttentionLes niveaux acoustiques très élevés peuventprovoquer une perte auditive permanente.►►Utilisez un dispositif de protection anti-bruitrespectant les normes de sécurité et de santé autravail.Danger lié aux poussières etcristaux de siliceAttentionL'exposition à la silice cristalline (parfois appelée «poussière de silice ») résultant du forage ou d'uneautre activité impliquant la roche, le béton, l'asphalteou d'autres matériaux peut provoquer la silicose (unemaladie grave des poumons), des maladies liées àla silicose, le cancer ou la mort. La silice est l'un desprincipaux composants de la roche, du sable et desminéraux.Pour réduire l'exposition à la silice :►►Appliquez des mesures d'ingénierie adaptéespour réduire la quantité de silice dans l'air etl'accumulation de poussières sur les équipementset les surfaces. Exemples de mesures applicables: systèmes de ventilation aspirante et de captagedes poussières, pulvérisation d'eau et foragehumide. Assurez-vous que ces systèmes sontcorrectement installés et entretenus.►►Portez, conservez et utilisez correctement lesrespirateurs contre les matières en suspensionqu<strong>and</strong> les mesures d'ingénierie, seules, ne sontpas adéquates pour réduire l'exposition à desniveaux tolérables.►►Participez à la surveillance de l'air, aux examensmédicaux et aux programmes de formation offertspar votre employeur ou imposés par la loi.►►Portez des vêtements de protection lavables oujetables sur votre lieu de travail, douchez-vous etmettez des vêtements propres avant de quittervotre lieu de travail afin d'éviter de vous exposer àla silice, ainsi que d'exposer autrui, votre voiture,votre domicile et d'autres zones.►►Ne mangez pas, ne buvez pas et ne fumezpas dans les zones exposées aux poussièrescontenant de la silice cristalline.►►Lavez-vous les mains et le visage avant demanger, boire ou fumer hors de la zone exposée.►►Aidez votre employeur à réduire l'exposition à lasilice sur votre lieu de travail.© 2010 Atlas Copco Construction <strong>Tools</strong> AB | No. 9800 0680 71a | 2010-01-01Instructions d’origine23
Prescriptions de sécurité et <strong>instructions</strong>pour l'opérateurwww.<strong>Crowder</strong>Supply.com • Toll Free: 888-883-5144ALF 72D, ALF 72D-1, ALF 67/80D, BMK 62S, BMK 91RS<strong>Crowder</strong> Supply Co., Inc. • 8495 Roslyn St., Commerce City, CO 80022 • Toll Free: 888-883-5144 • www.<strong>Crowder</strong>Supply.comAttentionCertaines poussières, émanations ou autres matièresen suspension dans l'air pendant l'utilisation de lamachine peuvent contenir des produits chimiques,reconnus par l'état de Californie comme pouvantprovoquer des cancers, des anomalies congénitalesou d'autres dommages pour la reproduction. Voiciquelques-uns de ces produits chimiques :►►Silice cristalline, ciment et autres produits demaçonnerie.►►Arsenic et chrome provenant de caoutchouc traitéchimiquement.►►Plomb provenant de peintures à base de plomb.Pour réduire votre exposition à ces produits, travaillezdans une zone bien ventilée et avec des équipementsde sécurité homologués, tels que les masques deprotection contre la poussière spécialement conçuspour filtrer les particules microscopiques.Danger lié aux vibrationsAttentionL'utilisation normale et adéquate de la machineexpose l'opérateur à des vibrations. L'expositionrégulière et fréquente aux vibrations peut causer,contribuer à, ou aggraver les blessures ou lestroubles au niveau des doigts, des mains, despoignets, des bras, des épaules et/ou d'autres partiesdu corps de l'opérateur, y compris les blessures oules troubles débilitants et/ou permanents qui peuventse développer graduellement sur des semaines, desmois, ou des années. De telles blessures ou troublespeuvent inclure des dommages au niveau du systèmede circulation sanguine, du système nerveux, desarticulations et éventuellement au niveau d'autresparties du corps.En cas d'apparition, à un moment quelconque,d'engourdissement, de fourmillement, de douleur,de maladresse, d'affaiblissement du poignet, deblanchissement de la peau ou d'autres symptômes,lors de l'utilisation ou non de la machine, cessez touteutilisation de celle-ci et consultez un médecin. Le faitde continuer à utiliser la machine après l'apparitionde tels symptômes risque de les agraver et/ou de lesrendres permanents.Les mesures suivantes peuvent contribuer à réduirel'exposition de l'opérateur aux vibrations :►►Laissez l'outil faire le travail. Utilisez une poignéede main réduite permettant un contrôle appropriéet une utilisation en toute sécurité.►►Lorsque le mécanisme de percussion est activé,le seul point de contact entre votre corps et lamachine se situe au niveau de vos mains sur lespoignées. Évitez tout autre contact, notammentd'appuyer une partie quelconque du corps contrela machine ou de vous pencher sur cette dernièrepour essayer d'en augmenter la capacité d'avance.Il est également important de ne pas maintenir lamanette actionnée lorsque l'outil est retiré de lasurface de travail.►►Assurez-vous que l'outil inséré est correctemententretenu, pas usé et de la taille appropriée.Les outils de travail mal entretenus, usés oude dimension inadaptée allongent la duréed'exécution d'une tâche (et celle de l'exposition auxvibrations) et peuvent induire ou contribuer à desniveaux plus élevés d'exposition aux vibrations.►►Arrêtez immédiatement de travailler si la machinecommence soudainement à vibrer fortement. Avantde recommencer à travailler, identifiez la cause del'augmentation des vibrations et remédiez-y.►►Respectez la pression d'air recomm<strong>and</strong>ée lorsquevous utilisez la machine. Une pression d'air plusélevée ou plus faible peut entraîner des niveaux devibrations plus élevés.►►Evitez de saisir, de tenir ou de toucher l'outil detravail lors de l’utilisation de la machine.►►Participez à la surveillance médicale, aux examensmédicaux et aux programmes de formation offertspar votre employeur ou imposés par la loi.Reportez-vous au document intitulé « Énoncédéclaratif sur les vibrations et le bruit » correspondantà la machine, et qui se trouvefound à la fin deces Prescriptions de sécurité et <strong>instructions</strong> pourl'opérateur.Danger lié aux modificationssur la machineAttentionToute modification sur la machine non approuvée parAtlas Copco peut provoquer des blessures graves, àvous ou aux autres.►►La machine ne doit pas être modifiée sans lapermission d'Atlas Copco.►►Utilisez uniquement des pièces détachées etdes accessoires d’origine approuvés par AtlasCopco.24© 2010 Atlas Copco Construction <strong>Tools</strong> AB | No. 9800 0680 71a | 2010-01-01Instructions d’origine
www.<strong>Crowder</strong>Supply.com • Toll Free: 888-883-5144ALF 72D, ALF 72D-1, ALF 67/80D, BMK 62S, BMK 91RS Prescriptions de sécurité et <strong>instructions</strong>pour l'opérateur<strong>Crowder</strong> Supply Co., Inc. • 8495 Roslyn St., Commerce City, CO 80022 • Toll Free: 888-883-5144 • www.<strong>Crowder</strong>Supply.comPrescriptions de sécuritésupplémentaires►►Ne pas utiliser les machines et les accessoiresà d'autres fins que celles pour lesquelles ils sontprévus.►►Seules des personnes qualifiées ou forméespeuvent utiliser ou procéder à l'entretien de lamachine.►►Apprenez à éteindre la machine en cas d'urgence.►►Ne dépassez pas la pression d'air maximaleautorisée pour la machine.►►Relâchez immédiatement le dispositif de marche/arrêt en cas de coupure de courant quelconque.►►Vérifiez toujours l'équipement avant de l'utiliser.Evitez d'utiliser l'équipement s'il vous sembleendommagé.►►Utilisez toujours votre jugement et votre bon sens.►►Soyez vigilant et concentrez-vous sur ce que vousfaites.►►N'utilisez pas la machine lorsque vous êtes fatiguéou sous l'influence de médicaments, de l'alcool oude toute autre substance qui risque d'affecter votrevue, vos réactions ou votre jugement.►►Participez aux cours de formation et de sécurité.►►Ne maltraitez jamais l'équipement.►►Conservez la machine et les outils bien verrouillés,dans un endroit sûr, hors de la portée des enfants.►►Assurez-vous que tous les équipements auxiliairesou connexes sont correctement entretenus.►►Des signes et des étiquettes portant desinformations importantes relatives à la sécuritédes personnes et à l'entretien de la machine sontfournis avec celle-ci. Assurez-vous que ces signesrestent toujours lisibles. De nouveaux signes etétiquettes peuvent être comm<strong>and</strong>és en utilisant laliste des pièces détachées.►►Assurez-vous qu'aucune personne non autoriséene pénètre dans la zone de travail.►►Maintenez le lieu de travail propre et exempt decorps étrangers.►►Ne jamais pointer un flexible d'air comprimé verssoi-même ou vers autrui. Afin d'éviter tout risquede blessure, ne jamais utiliser d'air comprimé pournettoyer la poussière, les salissures, etc., sur vosvêtements.Équipement de protectionindividuelleUtilisez toujours un équipement de protectionindividuelle homologué. Les opérateurs et toute autrepersonne présente dans la zone de travail doiventporter un équipement de protection individuelleincluant au minimum :►►Casque de protection►►Protections auditives►►Protecteurs des yeux résistants aux chocs avecprotection latérale►►Appareil de protection respiratoire, le cas échéant►►Gants de protection►►Chaussures de sécuritéEntretien et maintenanceLa maintenance régulière est un prérequis pourgarantir la sécurité et l'efficacité de la machine.Suivez attentivement les <strong>instructions</strong> pour l'opérateur.Avant d'entreprendre toute maintenance ouchangement de l'outil de travail d'une machinepneumatique, coupez toujours l'arrivée d'air etpurgez la machine en appuyant sur le dispositif demarche/arrêt. Débranchez ensuite le flexible d'air dela machine.►►N'utilisez que des pièces de rechange autorisées.Tout dommage ou mauvais fonctionnement dûà l’utilisation de pièces non autorisées n’est pascouvert par la garantie ou la responsabilité du faitdes produits.►►Changez immédiatement les pièces abîmées.►►Ne tardez pas à remplacer les composants abîméset usés.►►Pour un entretien plus complet de la machine,contactez l'atelier homologué le plus proche.►►Lors du nettoyage des pièces mécaniques avec unsolvant, assurez-vous que vous respectez bien lesnormes de sécurité et de santé et que la ventilationest suffisante.Outils de travail►►Maintenez les outils propres et en bon état.Contrôlez régulièrement les outils de travail,assurez-vous qu'ils sont affûtés et ne présententpas d'usure.Remarque ! L'utilisation d'outils de travail inadaptéspeut provoquer la destruction de lamachine.© 2010 Atlas Copco Construction <strong>Tools</strong> AB | No. 9800 0680 71a | 2010-01-01Instructions d’origine25
Prescriptions de sécurité et <strong>instructions</strong>pour l'opérateurwww.<strong>Crowder</strong>Supply.com • Toll Free: 888-883-5144ALF 72D, ALF 72D-1, ALF 67/80D, BMK 62S, BMK 91RS<strong>Crowder</strong> Supply Co., Inc. • 8495 Roslyn St., Commerce City, CO 80022 • Toll Free: 888-883-5144 • www.<strong>Crowder</strong>Supply.comINSTRUCTIONS POURL'OPÉRATEURConception et fonctionnementLes poussoirs Atlas Copco de type ALF 72D, ALF72D-1, BMK 62S et ALF 67/80D sont utilisés avecles marteaux perforateurs légers de type BBD et RH.les modèles ALF 72D, ALF 72D-1 et ALF 67/80Dsont utilisés avec le BBD 94W et sont des modèlesà double action avec retour automatique. Le modèleBMK 62S s'utilise avec le marteau RH 656W et doitêtre rétracté manuellement. Les modèles ALF 72D,ALF 72D-1, BMK 62S et ALF 67/80D sont équipésd'un cylindre à un étage. Le modèle ALF 67/80D estéquipé d'un cylindre à deux étages. Les cylindressont en aluminium sauf sur le modèle BMK 62S,où il est en acier. Les poussoirs sont connectés aumarteau-perforateur par système spécial. La pressiond'air recomm<strong>and</strong>ée est de 6 bar.Le support poussoir est là pour aider l'opérateur àsoulever et avancer le marteau perforateur pendantle forage.ABCA. Type de machineB. Pression d'air comprimé maximale autoriséeC. Numéro de sérieD. Le symbole « Attention » accompagnédusymbole du livre signifie que l'utilisateur doitlireles « Prescriptions de sécurité et<strong>instructions</strong> pourl'opérateur » avant lapremière utilisation de lamachine.E. Le symbole CE indique la conformité delamachine avec les directives applicables. Pourplusd'informations, consultez la déclarationCE deconformité fournie avec la machine.L'absencedu symbole CE indique que lamachine n'est pasconforme aux directivesapplicables.DESignalisation et autocollantsapposés sur l'appareilLes appareils sont livrés avec la signalisation et lesautocollants importants pour votre sécurité et pourleur bon fonctionnement. Vous pouvez comm<strong>and</strong>erdes autocollants supplémentaires à l'aide de la listedes pièces de rechange.La signalisation donne des informationsimportantes :Un symbole d'avertissement associé à un symbolereprésentant un livre indique que vous devez lireles « Prescriptions de sécurité et <strong>instructions</strong> pourl'opérateur » avant d'utiliser la machine.26© 2010 Atlas Copco Construction <strong>Tools</strong> AB | No. 9800 0680 71a | 2010-01-01Instructions d’origine
<strong>Crowder</strong> Supply Co., Inc. • 8495 Roslyn St., Commerce City, CO 80022 • Toll Free: 888-883-5144 • www.<strong>Crowder</strong>Supply.comALF 72D, ALF 72D-1, ALF 67/80D, BMK 62S, BMK 91RS Prescriptions de sécurité et <strong>instructions</strong>pour l'opérateurPrincipe de fonctionnementdu poussoirFonctionLe mouvement d'avance du poussoir est alimentépar une source d'air comprimé, qui est dirigé vers lecôté inférieur du piston et qui pousse celui-ci versl'extérieur du cylindre. Pour le retour automatique(sauf sur le modèle BMK 62S) de la tige du pistondans le cylindre, l'air comprimé est dirigé vers le hautdu piston.ALF 72DALF 72D-1www.<strong>Crowder</strong>Supply.com • Toll Free: 888-883-5144BMK 62S1. Bouton de comm<strong>and</strong>e2. Goupille de la soupape3. Raccord de flexible (12,5 mm)4. Cylindre d'avance5. Tige du piston6. Poignée7. Crampon avec support8. Étiquette d'avertissementOpérations à effectuer avantde démarrer1. Vérifiez l'équipement de forage►►Vérifiez que l'intégralité de l'équipement de forageest en bon état de marche.►►Assurez-vous que l'arrivée d'air n'est pas obstruée.►►Assurez-vous que tous les raccords sont bienserrés et étanches.AttentionVérifiez toujours l'état des flexibles et des raccordsavant toute utilisation. Des flexibles qui claquentsoudainement peuvent provoquer des blessuresgraves.2. Purgez le flexible pneumatique►►Chaque jour,avant d'utiliser le marteau perforateur,purgez le flexible pneumatique afin d'éliminerl'humidité et les saletés accumulées.3. Remplissez le lubrificateur d'huileRemarque ! Vérifiez que le porte-douille etl'emmanchement du fleuret sonttoujours recouverts d'un film d'huile.© 2010 Atlas Copco Construction <strong>Tools</strong> AB | No. 9800 0680 71a | 2010-01-01Instructions d’origine27
Prescriptions de sécurité et <strong>instructions</strong>pour l'opérateurwww.<strong>Crowder</strong>Supply.com • Toll Free: 888-883-5144ALF 72D, ALF 72D-1, ALF 67/80D, BMK 62S, BMK 91RS<strong>Crowder</strong> Supply Co., Inc. • 8495 Roslyn St., Commerce City, CO 80022 • Toll Free: 888-883-5144 • www.<strong>Crowder</strong>Supply.comRemarque ! Utilisez toujours le lubrifiantrecomm<strong>and</strong>é.LubrifiantHuile pouroutilpneumatiqueRecomm<strong>and</strong>ationUtilisez une huile minérale pouroutil pneumatiqueTempératureambiante ºCDegré de viscosité(ISO 3448)-30 à 0 ISO VG 32-68-10 à +20 ISO VG 68-100+10 à +50 ISO VG 100-1504. Calibrer la pression correcte d'air et d'eauUtilisez la jauge de pression Atlas Copco no.9090 0550 80 pour vérifier la pression d'eau et d'airpendant le fonctionnement du marteau perforateur.Pression d'airAssurez-vous que le compresseur fournit à l'outil unepression d'air de 4 à bar.►►Une pression trop élevée peut entraîner undysfonctionnement et endommager l'appareil.►►Une pression trop basse se traduit par une pertede vitesse lors du forage.Pression d'eauLa jauge de pression est équipée d'une aiguille qu'ilconvient d'introduire dans le flexible pour mesurer lapression interne.Remarque! Vérifiez que la pression d'eau estinférieure d'au moins 1 bar à la pressiond'air, de façon à éviter que l'eau nepénètre dans le mécanisme d'impact.Par exemple, si la pression d'air estde 6 bars, la pression de l'eau doitêtre inférieure à 5 bars pour éviter quel'eau ne pénètre dans le mécanismed'impact.Système de fixationLe système de fixation permet de monter le poussoirsur le marteau perforateur.Marteau perforateur BBD 94 WCe système de fixation est fixé à une partieintermédiaire du marteau-perforateurMarteau perforateur RH 656 WLe système de fixation est fixé au marteauperforateurpar serrage sur les deux écrous de tirant.28© 2010 Atlas Copco Construction <strong>Tools</strong> AB | No. 9800 0680 71a | 2010-01-01Instructions d’origine
www.<strong>Crowder</strong>Supply.com • Toll Free: 888-883-5144ALF 72D, ALF 72D-1, ALF 67/80D, BMK 62S, BMK 91RS Prescriptions de sécurité et <strong>instructions</strong>pour l'opérateur<strong>Crowder</strong> Supply Co., Inc. • 8495 Roslyn St., Commerce City, CO 80022 • Toll Free: 888-883-5144 • www.<strong>Crowder</strong>Supply.comMontage du poussoir surle marteau perforateurLe poussoir doit être fixé sur le marteau perforateur à l'aidedu raccord à baïonnette.Comm<strong>and</strong>esComm<strong>and</strong>es des modèles ALF 72D, ALF72D-1, ALF 67/80D et BMK 91RSBouton de comm<strong>and</strong>e d'avance du poussoir (1)Réglez la force d'avance à l'aide du bouton decomm<strong>and</strong>e d'avance de la manière suivante :Tourner le bouton dans le sens inverse des aiguillesd'une montre (B) pour augmenter la force d'avance.Tourner le bouton dans le sens des aiguilles d'unemontre (A) pour réduire la force d'avance.Qu<strong>and</strong> le bouton de comm<strong>and</strong>e d'avance est enposition fermée, le poussoir est ventilé.Goupille de la soupape (2)Qu<strong>and</strong> la goupille de la soupape est enfoncée, laforce d'avance cesse brusquement, annulant lesréglages du bouton de comm<strong>and</strong>e d'avance. Cemécanisme est utilisé, par exemple, pour régler lataille de la perforatrice lors du montage du poussoirou lorsque l'ensemble à tendance à bloquer.Lorsqu'on appuie sur la goupille de la soupape,la tige du piston dans le poussoir se rétracteautomatiquement.Comm<strong>and</strong>es du BMK 62SBouton de comm<strong>and</strong>e d'avance du poussoir (1)Réglez la force d'avance à l'aide du bouton decomm<strong>and</strong>e d'avance de la manière suivante :Tourner le bouton dans le sens inverse des aiguillesd'une montre (B) pour augmenter la force d'avance.Tourner le bouton dans le sens des aiguilles d'unemontre (A) pour réduire la force d'avance.Qu<strong>and</strong> le bouton de comm<strong>and</strong>e d'avance est enposition fermée, le poussoir est ventilé.Goupille de la soupape (2)Qu<strong>and</strong> la goupille de la soupape est enfoncée, laforce d'avance cesse brusquement, annulant lesréglages du bouton de comm<strong>and</strong>e d'avance. Cemécanisme est utilisé, par exemple, pour régler lataille de la perforatrice lors du montage du poussoirou lorsque l'ensemble à tendance à bloquer.© 2010 Atlas Copco Construction <strong>Tools</strong> AB | No. 9800 0680 71a | 2010-01-01Instructions d’origine29
Prescriptions de sécurité et <strong>instructions</strong>pour l'opérateurwww.<strong>Crowder</strong>Supply.com • Toll Free: 888-883-5144ALF 72D, ALF 72D-1, ALF 67/80D, BMK 62S, BMK 91RS<strong>Crowder</strong> Supply Co., Inc. • 8495 Roslyn St., Commerce City, CO 80022 • Toll Free: 888-883-5144 • www.<strong>Crowder</strong>Supply.comForageDémarrage du marteau perforateurA1. Ouvrez le tiroir de distribution du compresseur.2. Réglez le bouton de comm<strong>and</strong>e d'avance (C)pour appliquer une force d'avance suffisantepour amorcer le trou.3. Alignez le marteau perforateur de façon àce que le fleuret touche le point d'amorcesouhaité.4. Poussez légèrement le levier de comm<strong>and</strong>e (A)vers l'avant pour activer le dispositif d'injectiond'eau, de percussion et de rotation.5. Amorcez le trou avec une force d'avanceréduite.6. Poussez le levier de comm<strong>and</strong>e (A) à fond versl'avant une fois que le fleuret a trouvé une basesûre dans la roche.7. Réglez la force d'avance à l'aide du bouton decomm<strong>and</strong>e (C) de façon à obtenir un taux depénétration maximum.Arrêt du marteau perforateur1. Tirez le levier de comm<strong>and</strong>e (A) vers l'arrièrepour arrêter la percussion, la rotation et ledispositif d'injection d'eau.2. Tournez le bouton de comm<strong>and</strong>e (C) de façon àle mettre sur la position fermée.CBRe-positionnement du poussoir1. Arrêtez la percussion du marteau-perforateuret le dispositif d'injection d'eau à l'aide du levierde comm<strong>and</strong>e (A)2. Appuyez sur l'axe du clapet (B), ce qui a poureffet de rétracter automatiquement la tige dupiston dans le cylindre du poussoir (systèmemanuel sur le BMK 62S)3. Re-positionnez le poussoir4. Relâchez l'axe du clapet (B), ce qui a pour effetde libérer la tige du piston.5. Placez le levier sélecteur (A) vers l'avant enposition de travail.6. Remarque : le bouton de comm<strong>and</strong>e d'avance(C) ne doit pas être manipulé pendant cetteopération.Une fois le forage terminéPosez le marteau perforateur sur une pierre, uneplanche de bois ou un objet similaire, pour éviterd'abîmer l'outil et éviter que des corps étrangers nepénètrent dans le porte-douille.Coupez la pression d'eau avant de couper l'aircomprimé. Faites fonctionner le marteau-perforateurpendant quelques secondes pour évacuer l'eau etl'humidité, une fois l'eau coupée.MaintenanceUne maintenance régulière est une conditionpréalable à la sûreté de la machine. Ne tardez pas àremplacer les composants abîmés et fatigués. Pourtoute intervention importante sur l'appareil, contactezl'atelier homologué le plus proche.Vérifiez régulièrement que l'appareil et les outilsne présentent aucune marque d'usure ou signe dedégradation. N'utilisez pas d'outils usés ou abîmés.Lorsque vous nettoyez des pièces mécaniques àl'aide d'un solvant, assurez-vous que vous respectezbien les normes de sécurité et de santé en vigueur etque la pièce est correctement ventilée.Une maintenance quotidienne, la vérification régulièredes pièces d'usure et la réalisation des réparations àtemps évitent les pannes et augmentent la durée devie de la machine►►Graissez systématiquement le marteau perforateuret le poussoir, avant de les stocker.►►Entreposez-le dans un endroit propre et sec.►►Assurez-vous qu'aucun corps étranger ne pénètredans l'appareil.►►Après utilisation, lavez systématiquement lemarteau perforateur et le poussoir au jet, puisséchez-les correctement.30© 2010 Atlas Copco Construction <strong>Tools</strong> AB | No. 9800 0680 71a | 2010-01-01Instructions d’origine
www.<strong>Crowder</strong>Supply.com • Toll Free: 888-883-5144ALF 72D, ALF 72D-1, ALF 67/80D, BMK 62S, BMK 91RS Prescriptions de sécurité et <strong>instructions</strong>pour l'opérateur<strong>Crowder</strong> Supply Co., Inc. • 8495 Roslyn St., Commerce City, CO 80022 • Toll Free: 888-883-5144 • www.<strong>Crowder</strong>Supply.comDifférences entre les pièces d'origine et lespièces copiéesLorsque vous achetez une pièce, la première choseà faire est de vérifier qu'il s'agit bien d'une pièce de lamarque Atlas Copco. La plupart des pièces peuventêtre identifiées.Les pièces pour marteau perforateur sont normalementmarquées d'un numéro de pièce et de la marqued'identification d'Atlas Copco : un marteau perforateurentouré d'un cercle. Plus rarement, la pièce est uniquementmarquée du cercle ou du numéro de pièce.Les pièces en plastique ou en caoutchouc ne sontnormalement pas marquées.Les concurrents qui copient nos pièces marquentsouvent des pièces plus onéreuses. Certaines piècesindiquent uniquement un numéro de série, maiscertaines présentent aussi une marque d'identificationsous la forme des initiales du nom du fabricant. Lesnuméros de pièces sur les pièces génériques sontgénéralement marqués à la main, montrant desirrégularités. Les numéros de pièces marquées parAtlas Copco sont réguliers et les chiffres sont tous dela même taille. De plus, la profondeur de ces chiffres,tout comme l'espace qui les sépare, sont les mêmes.A chaque changement d'équipe (après8 heures d'utilisation)1. Vérifiez le raccordement du marteauperforateurau poussoir.2. Vérifiez l'état des flexibles, des raccordset des comm<strong>and</strong>es afin de vous assurerqu'ils ne présentent ni traces de fuite ou dedétérioration.3. Vérifiez que le marteau-perforateur etle poussoir sont correctement lubrifiés.Remplissez le lubrificateur si nécessaire.4. Purgez l'extracteur d'eau.Une fois par semaine (après 40 heuresd'utilisation)►►Procédez à un contrôle de base de toutes lesfonctions de l'équipement de forage.Mise à la ferraille etélimination des déchetsLes machines usées et en fin de vie doivent êtreéliminées de manière à que la majorité des matériauxsoient recyclés afin de limiter au maximum l'impactsur l'environnement.© 2010 Atlas Copco Construction <strong>Tools</strong> AB | No. 9800 0680 71a | 2010-01-01Instructions d’origine31
Prescriptions de sécurité et <strong>instructions</strong>pour l'opérateurDépannagewww.<strong>Crowder</strong>Supply.com • Toll Free: 888-883-5144ALF 72D, ALF 72D-1, ALF 67/80D, BMK 62S, BMK 91RS<strong>Crowder</strong> Supply Co., Inc. • 8495 Roslyn St., Commerce City, CO 80022 • Toll Free: 888-883-5144 • www.<strong>Crowder</strong>Supply.comGuide de dépannage de baseProblème Cause SolutionPuissanced'alimentationinsuffisantePression d'air insuffisanteLe clapet 3121 0726 80est collé ou les garnituresd'étanchéité 0663 2124 00 sontusées (sur les modèles ALFuniquement).Garniture de la tige de pistonusée ou déforméeAugmentez la pression d'air à 6 bar.Démontez le clapet et nettoyez le si nécessaire.Remplacez les garnitures d'étanchéités si elles sont uséesou abîmées.Remplacez la garniture d'étanchéité1En ce qui concerne les limites d'usure et les couples de serrage, reportez-vous aux informations de maintenance des marteauxperforateurs légers, document Atlas Copco N° 9853 1086 01.2Calibre pour emmanchement hexagonal de la douille de rotation de 22 mm (7/8”) Nº 3091 0038 00 d'Atlas Copco.3Utilisez la jauge de pression Nº 9090 0550 80 d'Atlas Copco pour tester la pression d'air et la pression d'eau.32© 2010 Atlas Copco Construction <strong>Tools</strong> AB | No. 9800 0680 71a | 2010-01-01Instructions d’origine
ALF 72D, ALF 72D-1, ALF 67/80D, BMK 62S, BMK 91RS Prescriptions de sécurité et <strong>instructions</strong>pour l'opérateurAccessoireswww.<strong>Crowder</strong>Supply.com • Toll Free: 888-883-5144<strong>Crowder</strong> Supply Co., Inc. • 8495 Roslyn St., Commerce City, CO 80022 • Toll Free: 888-883-5144 • www.<strong>Crowder</strong>Supply.comAccessoireLubrificateur pour BBC, BBD, RH:Nº de comm<strong>and</strong>eBLG 30, pour huile minérale 8202 5102 05CLG 30, pour huile minérale et huile synthétique 8202 5102 39Extracteur d'eau pour BBC, BBD, RHVAM 5A, pour l'écoulement d'air jusqu'à 120 l/s (254 cfm) 8092 0110 82Accessoires de ligne pour 25 mm (1")Flexible caoutchouc, 30 m 9030 2041 00Raccord à griffes 9000 0313 00Colliers de serrage en deux parties 9000 0197 00Jauge de pression pour les pressions d'air et d'eauManomètre 9090 0550 80Jeu d'aiguilles supplémentaire 9090 0678 90Flexible d'air comprimé 25 mm (1'') pour marteau perforateur et avance, équipé deraccords pour :BBD 94W avec ALF 72D, ALF 72D-1, ALF 67/80D et BMK 91RS 9030 2068 00Flexible d'air comprimé 20 mm (3/4'') pour le marteau perforateur et l'avance,équipé de raccords pour :RH 656W avec BMK 62S 9030 2067 00© 2010 Atlas Copco Construction <strong>Tools</strong> AB | No. 9800 0680 71a | 2010-01-01Instructions d’origine33
Prescriptions de sécurité et <strong>instructions</strong>pour l'opérateurCaractéristiques techniqueswww.<strong>Crowder</strong>Supply.com • Toll Free: 888-883-5144ALF 72D, ALF 72D-1, ALF 67/80D, BMK 62S, BMK 91RS<strong>Crowder</strong> Supply Co., Inc. • 8495 Roslyn St., Commerce City, CO 80022 • Toll Free: 888-883-5144 • www.<strong>Crowder</strong>Supply.comTypeNº decomm<strong>and</strong>eLunetteuniqueALF 72D 8321 020180ALF 72D-1 8321 020181BMK 62S 8321 010202BMK 91RS 8321 010427LunettedoubleALF 67/80D 8321 020169ConvientpourmarteauperforateurPortéelongueur(mm)LongueurRétracté(mm)Longueurdéployé(mm)Poids(kg)Pistonalésage(mm)BBD 94W 1300 1970 3270 19 70BBD 94W 1200 1830 3030 16 70RH 656W 1300 1815 3115 17 53BBD 94W 1300 1730 3030 24 67BBD 94W 1855 1595 3450 19 67/80Déclaration CE de conformité (Directive 2006/42/CE)Nous, Atlas Copco Construction <strong>Tools</strong> AB, déclarons par la présente que les machines énumérées ci-dessoussontconformes aux dispositions de la directive européenne 2006/42/CE (directive « Machines »).Bouchardeuses pneumatiques portativesPmax (bar)ALF 72D 7ALF 72D-1 7BMK 62S 7BMK 91RS 7ALF 67/80D 7Représentant agréé de la documentation technique:Erik SigfridssonAtlas Copco Construction <strong>Tools</strong> ABDragonvägen 2KalmarDirecteur général:Erik SigfridssonFabricant:Atlas Copco Construction <strong>Tools</strong> AB105 23 StockholmSwedenLieu et date: Kalmar, 2010-01-0134© 2010 Atlas Copco Construction <strong>Tools</strong> AB | No. 9800 0680 71a | 2010-01-01Instructions d’origine
www.<strong>Crowder</strong>Supply.com • Toll Free: 888-883-5144ALF 72D, ALF 72D-1, ALF 67/80D, BMK 62S, BMK 91RS Prescriptions de sécurité et <strong>instructions</strong>pour l'opérateur<strong>Crowder</strong> Supply Co., Inc. • 8495 Roslyn St., Commerce City, CO 80022 • Toll Free: 888-883-5144 • www.<strong>Crowder</strong>Supply.com© 2010 Atlas Copco Construction <strong>Tools</strong> AB | No. 9800 0680 71a | 2010-01-01Instructions d’origine35
Inhaltwww.<strong>Crowder</strong>Supply.com • Toll Free: 888-883-5144ALF-72D ALF-72D-1 ALF-67-80D BMK-62S BMK 91RSDEUTSCH<strong>Crowder</strong> Supply Co., Inc. • 8495 Roslyn St., Commerce City, CO 80022 • Toll Free: 888-883-5144 • www.<strong>Crowder</strong>Supply.comInhaltSICHERHEITSHINWEISEN. . . . . . . . . . . . . . . . . . . . . . . . . . . . . . . . . . . . . . . . . . . . . . . . . . . . 37Verwendete Sicherheitssymbole . . . . . . . . . . . . . . . . . . . . . . . . . . . . . . . . . . . . . . . . . . . .37Gefahren durch Transport . . . . . . . . . . . . . . . . . . . . . . . . . . . . . . . . . . . . . . . . . . . . . . . . . .37Gefahren durch den Betrieb der Maschine und des Werkzeugs . . . . . . . . . . . . . . . . . . .37Explosions- und Feuergefahr . . . . . . . . . . . . . . . . . . . . . . . . . . . . . . . . . . . . . . . . . . . . . . .38Gefahren durch verborgenen elektrische Leitungen/Objekte . . . . . . . . . . . . . . . . . . . . .38Gefahr durch fliegende Splitter . . . . . . . . . . . . . . . . . . . . . . . . . . . . . . . . . . . . . . . . . . . . . .39Gefahren durch Lärm . . . . . . . . . . . . . . . . . . . . . . . . . . . . . . . . . . . . . . . . . . . . . . . . . . . . . .39Gefahren durchQuarz/Steinstaub . . . . . . . . . . . . . . . . . . . . . . . . . . . . . . . . . . . . . . . . . . . . . . . . . . . . . . . . .39Gefahren durch Vibration . . . . . . . . . . . . . . . . . . . . . . . . . . . . . . . . . . . . . . . . . . . . . . . . . .40Gefahren durch Änderungen an der Maschine . . . . . . . . . . . . . . . . . . . . . . . . . . . . . . . . .40Ergänzende Sicherheitshinweisen . . . . . . . . . . . . . . . . . . . . . . . . . . . . . . . . . . . . . . . . . . .41Schutzausrüstung . . . . . . . . . . . . . . . . . . . . . . . . . . . . . . . . . . . . . . . . . . . . . . . . . . . . . . . .41Service und Wartung . . . . . . . . . . . . . . . . . . . . . . . . . . . . . . . . . . . . . . . . . . . . . . . . . . . . . .41Werkzeuge . . . . . . . . . . . . . . . . . . . . . . . . . . . . . . . . . . . . . . . . . . . . . . . . . . . . . . . . . . . . . .41BETRIEBSANLEITUNG . . . . . . . . . . . . . . . . . . . . . . . . . . . . . . . . . . . . . . . . . . . . . . . . . . . . . . 42Konstruktion und Funktion . . . . . . . . . . . . . . . . . . . . . . . . . . . . . . . . . . . . . . . . . . . . . . . . .42Schilder und Aufkleber an der Maschine . . . . . . . . . . . . . . . . . . . . . . . . . . . . . . . . . . . . . .42Arbeitsprinzip einer Druckluftstütze . . . . . . . . . . . . . . . . . . . . . . . . . . . . . . . . . . . . . . . . .43Funktion . . . . . . . . . . . . . . . . . . . . . . . . . . . . . . . . . . . . . . . . . . . . . . . . . . . . . . . . . . . . . . 43Vorbereitungen vor der Inbetriebnahme . . . . . . . . . . . . . . . . . . . . . . . . . . . . . . . . . . . . . .43Anschlussvorrichtung . . . . . . . . . . . . . . . . . . . . . . . . . . . . . . . . . . . . . . . . . . . . . . . . . . . . .44Bohrhammer BBD 94 W. . . . . . . . . . . . . . . . . . . . . . . . . . . . . . . . . . . . . . . . . . . . . . . . . . 44Bohrhammer RH 656 W. . . . . . . . . . . . . . . . . . . . . . . . . . . . . . . . . . . . . . . . . . . . . . . . . . 44Anbringen der Druckluftstütze am Bohrhammer . . . . . . . . . . . . . . . . . . . . . . . . . . . . . . .45Bedienelemente . . . . . . . . . . . . . . . . . . . . . . . . . . . . . . . . . . . . . . . . . . . . . . . . . . . . . . . . . .45Bedienelemente für ALF 72D, ALF 72D-1, ALF 67/80D und BMK 91RS . . . . . . . . . . . . . 45Bedienelemente für BMK 62S . . . . . . . . . . . . . . . . . . . . . . . . . . . . . . . . . . . . . . . . . . . . . 45Bohren . . . . . . . . . . . . . . . . . . . . . . . . . . . . . . . . . . . . . . . . . . . . . . . . . . . . . . . . . . . . . . . . . .46Starten des Bohrhammers . . . . . . . . . . . . . . . . . . . . . . . . . . . . . . . . . . . . . . . . . . . . . . . . 46Anhalten des Bohrhammers. . . . . . . . . . . . . . . . . . . . . . . . . . . . . . . . . . . . . . . . . . . . . . . 46Neupositionieren der Vorschubstütze. . . . . . . . . . . . . . . . . . . . . . . . . . . . . . . . . . . . . . . . 46Nach Beendigung des Bohrens . . . . . . . . . . . . . . . . . . . . . . . . . . . . . . . . . . . . . . . . . . . . 46Wartung . . . . . . . . . . . . . . . . . . . . . . . . . . . . . . . . . . . . . . . . . . . . . . . . . . . . . . . . . . . . . . . . .46Unterschiede zwischen Originalersatzteilen und baugleichen Ersatzteilen . . . . . . . . . . . 47Einmal pro Schicht (alle 8 Betriebsstunden) . . . . . . . . . . . . . . . . . . . . . . . . . . . . . . . . . . 47Einmal pro Woche (alle 40 Betriebsstunden) . . . . . . . . . . . . . . . . . . . . . . . . . . . . . . . . . . 47Verschrottung und Entsorgung von Abfall . . . . . . . . . . . . . . . . . . . . . . . . . . . . . . . . . . . .47Fehlersuche . . . . . . . . . . . . . . . . . . . . . . . . . . . . . . . . . . . . . . . . . . . . . . . . . . . . . . . . . . . . .48Grundlegende Hinweise zur Fehlersuche . . . . . . . . . . . . . . . . . . . . . . . . . . . . . . . . . . . . 48Zubehör . . . . . . . . . . . . . . . . . . . . . . . . . . . . . . . . . . . . . . . . . . . . . . . . . . . . . . . . . . . . . . . . .49Technische Daten . . . . . . . . . . . . . . . . . . . . . . . . . . . . . . . . . . . . . . . . . . . . . . . . . . . . . . . . .50EG-Konformitätserklärung (EG-Richtlinie 2006/42/EG) . . . . . . . . . . . . . . . . . . . . . . . . . .5036© 2010 Atlas Copco Construction <strong>Tools</strong> AB | No. 9800 0680 71a | 2010-01-01Originalbetriebsanleitung
Sicherheitshinweise und Betriebsanleitungwww.<strong>Crowder</strong>Supply.com • Toll Free: 888-883-5144ALF 72D, ALF 72D-1, ALF 67/80D, BMK 62S, BMK 91RS<strong>Crowder</strong> Supply Co., Inc. • 8495 Roslyn St., Commerce City, CO 80022 • Toll Free: 888-883-5144 • www.<strong>Crowder</strong>Supply.comWarnungWenn der Werkzeughalter nicht arretiert ist, kann dasWerkzeug mit Gewalt ausgeworfen werden. Dies kannzu ernsthaften Verletzungen führen.►►Prüfen Sie nach dem Einsetzen und Arretieren desWerkzeugs die Verriegelungsfunktion, indem Siekräftig und ruckartig daran ziehen.►►Stellen Sie sicher, dass das Werkzeug vollständigeingesetzt ist und der Werkzeughalter verriegelt ist,bevor Sie die Maschine einschalten.►►Richten Sie das Werkzeug nie auf eine <strong>and</strong>erePerson oder den eigenen Körper!WarnungDas Wechseln des Werkzeugs bei laufender Maschinekann zu ernsthaften Verletzungen führen.►►Schalten Sie die Maschine vor dem Wechseln desWerkzeugs immer aus.►►Versuchen Sie niemals, einen rotierenden Bohrstahlzu berühren oder anzufassen.WarnungEin Druckluftschlauch, der sich gelöst hat, kannausschlagen und lebensgefährliche Verletzungenverursachen.Zur Verhütung von Unfällen ist folgendes zu beachten:►►Stellen Sie sicher, dass Druckluftschlauch undAnschlüsse unbeschädigt sind.►►Stellen Sie sicher, dass sämtlicheDruckluftanschlüsse korrekt befestigt sind.►►Ein unter Druck stehender Druckluftschlauch darfunter keinen Umständen abgebaut oder demontiertwerden. Schalten Sie zuerst die Druckluft amKompressor aus und lassen Sie die Maschine durchBetätigen des Start- und Stoppschalters auslaufen.WarnungWenn sich der Bohrstahl während des Betriebsverklemmt und Sie die Maschine nicht fest genug halten,fängt die ganze Maschine an, sich zu drehen. Dieseunerwartete Rotation der gesamten Maschine kannernsthafte Verletzungen verursachen.►►Stehen Sie sicher und halten Sie die Maschine immermit beiden Händen fest.►►Stellen Sie sicher, dass der Griff sauber und freivon Fett oder Öl ist.►►Bohren Sie niemals in einem alten Bohrloch.WarnungEs ist möglich, dass Gegenstände in den rotierendenBohrstahl eingerollt oder eingezogen werden. Dies kannzu ernsthaften Verletzungen führen.►►Versuchen Sie niemals, einen rotierenden Bohrstahlzu greifen oder zu berühren.►►Tragen Sie keine Kleidung, die erfasst werden kann.Wenn Sie lange Haare haben, tragen Sie einHaarnetz.Explosions- und FeuergefahrGefahrWenn die Maschine mit einem Explosivstoff inKontakt kommt, kann es zu einer Explosion kommen.Explosionen können zu ernsthaften Verletzungen oderzum Tod führen.Zur Vermeidung von Explosionen ist Folgendes zubeachten:►►Verwenden Sie die Ausrüstung niemals in der Nähevon Explosivstoffen, einschließlich Dynamit oder<strong>and</strong>eren Explosivstoffen im Gestein.►►Stellen Sie sicher, dass sich keine Explosivstoffe imGestein befinden.►►Bohren Sie niemals in einem alten Bohrloch.WarnungBeim Bohren bestimmter Materialien können Funkenentstehen, die explosive Gase entzünden undExplosionen verursachen können. Explosionen könnenzu ernsthaften Verletzungen oder zum Tod führen.Um Explosionen zu vermeiden, ist folgendes zubeachten:►►Betreiben Sie die Maschine niemals in einerexplosiven Umgebung.►►Verwenden Sie die Maschine nicht in der Nähe vonentzündlichen Materialien, Dämpfen oder Staub.►►Stellen Sie sicher, dass keine verborgenenGasquellen vorh<strong>and</strong>en sind.Gefahren durch verborgenenelektrische Leitungen/ObjekteGefahrDie Maschine ist nicht elektrisch isoliert. Wenn dieMaschine mit Elektrizität in Kontakt kommt, kann dies zuernsthaften Verletzungen oder zum Tod führen.►►Um Unfallrisiken, die mit Lebensgefahr verbundensind, zu verhüten, betreiben Sie die Maschine niemalsin der Nähe von elektrischen Leitungen oder <strong>and</strong>erenelektrischen Quellen.►►Stellen Sie sicher, dass keine verborgenenelektrischen Quellen vorh<strong>and</strong>en sind.38© 2010 Atlas Copco Construction <strong>Tools</strong> AB | No. 9800 0680 71a | 2010-01-01Originalbetriebsanleitung
www.<strong>Crowder</strong>Supply.com • Toll Free: 888-883-5144ALF 72D, ALF 72D-1, ALF 67/80D, BMK 62S, BMK 91RSSicherheitshinweise und Betriebsanleitung<strong>Crowder</strong> Supply Co., Inc. • 8495 Roslyn St., Commerce City, CO 80022 • Toll Free: 888-883-5144 • www.<strong>Crowder</strong>Supply.comWarnungBeim Bohren stellen verborgene Leitungen und Rohreeine Gefahr dar, die zu ernsthaften Verletzungen führenkann.►►Prüfen Sie vor dem Bohren die Zusammensetzungdes zu bearbeitenden Materials.►►Achten Sie auf verborgene Kabel und Leitungen,z. B. Elektro-, Telefon-, Wasser-, Gas- undAbwasserleitungen.►►Wenn Sie meinen, dass das Werkzeug einverborgenes Objekt getroffen hat, schalten Sie dieMaschine sofort aus.►►Stellen Sie sicher, dass keine Gefahr besteht, bevorSie fortfahren.Gefahr durch fliegendeSplitterWarnungBeim Bohren können Splitter oder <strong>and</strong>ere Partikel desbearbeiteten Materials zu Geschosse werden undernsthafte Verletzungen verursachen, wenn Sie denMaschinenbenutzer oder <strong>and</strong>ere Personen treffen.►►Verwenden Sie geeignete Schutzausrüstung,einschließlich bruchsicherer Schutzbrille mit seitlicherAbschirmung der Augen, um Verletzungen durch einGeschoss zu verhüten.AchtungBeim Ausblasen können Partikel und verschmutzesSpülwasser aus dem Bohrloch austreten und zuVerletzungen führen.►►Treten Sie zur Seite und schützen Sie Ihre Augen,wenn Sie ein Bohrloch ausblasen.►►Tragen Sie immer eine Schutzbrille mit seitlicherAbschirmung der Augen.►►Stellen Sie sicher, dass sich beim Ausblasen keineMitarbeiter in der Nähe aufhalten.Gefahren durch LärmWarnungHohe Schallpegel können zu bleibendem Gehörverlustführen.►►Tragen Sie einen Gehörschutz entsprechendder betrieblichen Gesundheits- undSicherheitsbestimmungen.Gefahren durchQuarz/SteinstaubWarnungBeim Bohren oder <strong>and</strong>eren Arbeiten, die mit Gestein,Beton, Asphalt oder ähnlichen Materialien zu tunhaben, kann Steinstaub (auch „Quarzmehl“ genannt)entstehen, der zu Silikose (auch „Staublunge“ genannt,ernsthafte Lungenerkrankung) oder zu ähnlichenKrankheiten, zu Krebs oder zum Tod führen kann.Quarz ist ein Hauptbest<strong>and</strong>teil von Gesteinen, S<strong>and</strong> undMineralerzen.Zur Verringerung der Gefährdung durch Steinstaub istFolgendes zu beachten:►►Verwenden Sie geeignete technische Hilfsmittelzur Verringerung der Steinstaubkonzentration inder Luft und auf der Oberfläche der Ausrüstung. Zusolchen Hilfsmitteln gehören z. B.: Absaugungen undStaubsammelsysteme, Sprühwasseranlagen undNassbohren. Stellen Sie sicher, dass die Hilfsmittelkorrekt installiert und gewartet sind.►►Tragen Sie stets geeignete und korrekt angewendeteAtemschutzmasken, falls die genannten technischenHilfsmittel allein nicht ausreichen, um dieStaubbelastung unter den zulässigen Wert zu senken.►►Nehmen Sie an Schulungen zur Luftreinhaltung undmedizinischen Untersuchungen teil, wenn diese vonIhrem Arbeitgeber angeboten werden oder gesetzlichvorgeschrieben sind.►►Tragen Sie am Arbeitsplatz abwaschbare oderEinwegschutzkleidung; Duschen Sie oderwechseln Sie die Kleidung vor dem Verlassen desArbeitsplatzes, um die Steinstaubbelastung für sichund <strong>and</strong>ere in Autos, Wohnbereichen und sonstigenBereichen so gering wie möglich zu halten so geringwie möglich zu halten.►►Essen, trinken oder rauchen Sie nicht in Bereichen, indenen eine Quarzstaubbelastung vorh<strong>and</strong>en ist.►►Waschen Sie Ihre Hände und Ihr Gesicht außerhalbdes Belastungsbereichs, bevor Sie essen, trinkenoder rauchen.►►Arbeiten Sie mit Ihrem Arbeitgeber zusammen, umdie Quarzstaubbelastung an Ihrem Arbeitsplatz sogering wie möglich zu halten.© 2010 Atlas Copco Construction <strong>Tools</strong> AB | No. 9800 0680 71a | 2010-01-01Originalbetriebsanleitung39
Sicherheitshinweise und Betriebsanleitungwww.<strong>Crowder</strong>Supply.com • Toll Free: 888-883-5144ALF 72D, ALF 72D-1, ALF 67/80D, BMK 62S, BMK 91RS<strong>Crowder</strong> Supply Co., Inc. • 8495 Roslyn St., Commerce City, CO 80022 • Toll Free: 888-883-5144 • www.<strong>Crowder</strong>Supply.comWarnungEinige Staubsorten, Rauch oder <strong>and</strong>ere Partikel in derLuft, die durch den Betrieb der Maschine freigesetztwerden, können chemische Elemente enthalten, diekrebserregend sind oder Erbkrankheiten auslösen. Dazugehören z. B.:►►Quarzstaub, Zement und <strong>and</strong>ere Baustoffe.►►Arsen und Chrom aus chemisch beh<strong>and</strong>eltemGummi.►►Blei aus bleihaltigen Farben.Um die Belastung durch diese Chemikalien gering zuhalten, arbeiten Sie in einem gut belüfteten Raum mitgeeigneter Sicherheitsausrüstung, z. B. Staubmasken,die speziell für die Filterung mikroskopischer Partikelvorgesehen sind.Gefahren durch VibrationWarnungDer Anwender ist auch bei normaler und richtigerAnwendung der Maschine Vibrationen ausgesetzt.Häufige und regelmäßige Vibrationsbelastungenkönnen zu Verletzungen der Finger, Hände,H<strong>and</strong>gelenke, Arme, Schultern und/oder oder <strong>and</strong>ereKörperteile führen oder bestehende Schädigungenverschlimmern. Es können chronische Beschwerdenoder Schwächungen entstehen, die sich nur allmählichüber Zeiträume von Wochen, Monaten oder Jahrenentwickeln. Dazu können Schädigungen oderStörungen des Blutkreislaufs, des Nervensystems, desBewegungsapparats oder <strong>and</strong>erer Körperstrukturengehören.Falls während oder nach der Benutzung der MaschineTaubheit, Kribbeln, Schmerzen, eingeschränkteFeinmotorik oder Greiffunktion, weiße Haut oder<strong>and</strong>ere Symptome auftreten, nehmen Sie die Arbeitnicht wieder auf und begeben Sie sich in medizinischeBetreuung. Wenn Sie nach dem Auftreten der genanntenBeschwerden die Arbeit an der Maschine fortsetzen,kann das zu einer Verschlimmerung der Beschwerdenoder zu chronischen Erkrankungen führen.Die folgenden Hinweise können dazu beitragen, dieVibrationsbelastung für den Anwender gering zu halten:►►Lassen Sie das Werkzeug die Arbeit verrichten.Wenden Sie zum Festhalten der Maschine nur sovielKraft auf, wie für deren einw<strong>and</strong>freie Steuerbarkeitund sicheren Betrieb mindestens erforderlich ist.►►Bei laufendem Schlagmechanismus dürfen Sie keinen<strong>and</strong>eren Körperkontakt mit der Maschine haben alsdie Hände am Griff. Vermeiden Sie jeden <strong>and</strong>erenKontakt, z. B. Anlehnen irgendeines Körperteils an dieMaschine, um die Vorschubkraft zu erhöhen. Wichtigist auch, beim Zurückziehen des Werkzeugs aus derBearbeitungsfläche den Auslöser nicht gedrückt zuhalten.►►Stellen Sie sicher, dass das Werkzeug gut gewartetund nicht abgenutzt ist und die richtige Größe hat.Werkzeuge, die nicht gut gewartet oder abgenutztsind oder die die falsche Größe haben, bewirkenlängere Bearbeitungszeiten und damit auch längereund höhere Vibrationsbelastungen.►►Stellen Sie sofort die Arbeit ein, wenn die Maschineplötzlich stark zu vibrieren anfängt. Ermittelnund beseitigen Sie die Ursache der verstärktenVibrationen, bevor Sie die Arbeit fortsetzen.►►Halten Sie den für den Betrieb der Maschineempfohlenen Luftdruck ein. Höherer oder niedrigererLuftdruck als der empfohlene kann zu stärkerenVibrationen führen.►►Fassen Sie während des Betriebs der Maschineniemals das Werkzeug an oder halten Sie es fest.►►Nehmen Sie an medizinischen Untersuchungen undKontrollen teil, wenn diese von Ihrem Arbeitgeberangeboten werden oder gesetzlich vorgeschriebensind.Lesen Sie die für diese Maschine geltende „Erklärungzu Geräuschemission und Vibration“, die sich am Endedieser Sicherheitsvhinweisen und Betriebsanleitungbefindet.Gefahren durch Änderungenan der MaschineWarnungÄnderungen an der Maschine, die nicht von Atlas Copcogenehmigt sind, können zu ernsthaften Verletzungenführen.►►Die Maschine darf nicht ohne die Genehmigungvon Atlas Copco geändert werden.►►Verwenden Sie nur Originalteile undOriginalzubehör von Atlas Copco!40© 2010 Atlas Copco Construction <strong>Tools</strong> AB | No. 9800 0680 71a | 2010-01-01Originalbetriebsanleitung
www.<strong>Crowder</strong>Supply.com • Toll Free: 888-883-5144ALF 72D, ALF 72D-1, ALF 67/80D, BMK 62S, BMK 91RSSicherheitshinweise und Betriebsanleitung<strong>Crowder</strong> Supply Co., Inc. • 8495 Roslyn St., Commerce City, CO 80022 • Toll Free: 888-883-5144 • www.<strong>Crowder</strong>Supply.comErgänzendeSicherheitshinweisen►►Maschinen und Zubehör dürfen nurbestimmungsgemäß verwendet werden.►►Die Maschine darf nur von qualifiziertem undgeschultem Personal bedient oder gewartet werden.►►Machen Sie sich damit vertraut, wie die Maschine imNotfall ausgeschaltet wird.►►Der für die Maschine zulässige maximale Luftdruckdarf nicht überschritten werden.►►Lassen Sie bei jeglicher Unterbrechung derEnergieversorgung sofort den Start- undStoppschalter los.►►Prüfen Sie die Ausrüstung vor jeder Anwendung.Bei Schadensverdacht darf die Ausrüstung nichtverwendet werden.►►Wenden Sie immer Ihren gesunden Menschenverst<strong>and</strong>an.►►Achten Sie während des Betriebs auf ungewöhnlicheVorgänge.►►Nehmen Sie die Maschine niemals in Betrieb, wennSie müde sind oder unter dem Einfluss von Drogen,Alkohol oder <strong>and</strong>eren Mitteln stehen, die Ihre Sicht,Reaktionsfähigkeit oder Urteilskraft einschränken.►►Nehmen Sie an Sicherheitstrainings und Schulungenteil.►►Gehen Sie mit der Ausrüstung sorgsam um.►►Lagern Sie die Maschine und die Werkzeuge in einersicheren, abgeschlossenen Umgebung und für Kinderunzugänglich.►►Ausrüstung und Anschlusszubehör sind angemessenzu warten.►►Schilder und Aufkleber mit wichtigen Informationen zuSicherheit und Wartung werden mit jeder Maschineausgeliefert. Stellen Sie sicher, dass die Schilderimmer gut lesbar angebracht werden. Neue Schilderund Aufkleber können anh<strong>and</strong> der Ersatzteillistenachbestellt werden.►►Stellen Sie sicher, dass Unbefugte den Arbeitsbereichnicht betreten können.►►Halten Sie den Arbeitsplatz sauber und frei vonFremdkörpern.►►Richten Sie einen Druckluftschlauch nie auf eine<strong>and</strong>ere Person oder den eigenen Körper! DieDruckluft darf nicht zum Sauberblasen der Kleidungverwendet werden.SchutzausrüstungVerwenden Sie stets geeignete Schutzausrüstung! VonMitarbeitern und <strong>and</strong>eren Personen im Arbeitsbereich istmindestens folgende Schutzausrüstung zu tragen:►►Schutzhelm►►Gehörschutz►►Schutzbrille (mit seitlicher Abschirmung der Augen)►►Atemmaske (bei Bedarf)►►Schutzh<strong>and</strong>schuhe►►SicherheitsschuheService und WartungEine regelmäßige Wartung ist die Grundvoraussetzungfür Sicherheit und Leistungsfähigkeit der Maschine.Halten Sie sich bitte genau an die Betriebsanleitung.Schalten Sie bei pneumatischen Maschinen vor jederWartung oder jedem Werkzeugwechsel immer dieDruckluftversorgung aus und lassen Sie die Maschinedurch Betätigen des Start- und Stoppschaltersauslaufen. Trennen Sie anschließend denDruckluftschlauch von der Maschine.►►Verwenden Sie nur Originalersatzteile. Schäden oderFehlfunktionen, die durch den Einsatz unzulässigerBauteile entstehen, werden nicht durch Garantie oderProdukthaftung abgedeckt.►►Wechseln Sie beschädigte Bauteile sofort aus.►►Ersetzen Sie beschädigte oder abgenutzteKomponenten rechtzeitig.►►Für eine Hauptinspektion der Maschine wenden Siesich an Ihre nächste Vertragswerkstatt.►►Stellen Sie beim Reinigen mechanischer Teilemit Lösungsmittel sicher, dass die geltendenGesundheits- und Sicherheitshinweisen eingehaltenwerden und für ausreichende Lüftung gesorgt ist.Werkzeuge►►Halten Sie die Werkzeuge sauber und in gutemZust<strong>and</strong>. Überprüfen Sie die Werkzeuge regelmäßigund stellen Sie sicher, dass sie scharf und nichtabgenutzt sind.Hinweis! Die Maschine kann durch die Verwendungfalscher Werkzeuge zerstört werden.© 2010 Atlas Copco Construction <strong>Tools</strong> AB | No. 9800 0680 71a | 2010-01-01Originalbetriebsanleitung41
www.<strong>Crowder</strong>Supply.com • Toll Free: 888-883-5144Sicherheitshinweise und BetriebsanleitungALF 72D, ALF 72D-1, ALF 67/80D, BMK 62S, BMK 91RS<strong>Crowder</strong> Supply Co., Inc. • 8495 Roslyn St., Commerce City, CO 80022 • Toll Free: 888-883-5144 • www.<strong>Crowder</strong>Supply.comBETRIEBSANLEITUNGKonstruktion und FunktionDruckluftstützen von Atlas Copco vom Typ ALF 72D,ALF 72D-1, BMK 62S und ALF 67/80D werden fürleichte Bohrhämmer vom Typ BBD und RH verwendet.ALF 72D, ALF 72D-1 und ALF 67/80D werdenzusammen mit dem BBD 94W verwendet und sindmit einem automatischen Rücklauf zwei-fachwirkend.Die BMK 62S wird zusammen mit dem RH 656Wverwendet und muss manuell zurück-gezogen werden.ALF 72D, ALF 72D-1, BMK 62S und ALF 67/80Dsind mit einem Einstufenzylinder ausgerüstet. DieALF 67/80D ist mit einem Zwei-stufenzylinder ausgerüstet.Die Zylinder sind aus Aluminium, mit Ausnahmedes Zylinders der BMK 62S – dieser ist aus Stahl.Die Druckluftstützen werden über eine spezielleAnschlussvorrichtung mit dem Bohrhammer verbunden.Der empfohlene Luftdruck beträgt 6 Bar.Die Druckluftstütze des Bohrhammers erleichtertdem Bediener das Anheben und den Vorschub desBohrhammers.ACBA. MaschinentypB. Max. zulässiger DruckluftdruckC. SeriennummerD. Das Warnsymbol und das Buchsymbol weisendarauf hin, dass Sie vor dem ersten Einsatzder Maschine die Sicherheitshinweise und dieBetriebsanleitung lesen müssen.E. Das CE-Zeichen zeigt an, dass die Maschine EGgeprüftist. Weitere Informationen daz ufinden Sie inder beigefügten EG-Konformitätserklärung. Fehlt dasCE-Zeichen, bedeutet dies, dass die Maschine nichtEG-geprüft ist.DESchilder und Aufkleber <strong>and</strong>er MaschineSchilder und Aufkleber werden mit jeder Maschineausgeliefert. Neue Aufkleber können anh<strong>and</strong> derErsatzteilliste nachbestellt werden.Das Typschild zeigt wichtige Informationen an:Das Warnsymbol und das Buchsymbol weisen daraufhin, dass Sie vor dem Einsatz der Maschine dieSicherheitshinweise und die Betriebsanleitung lesenmüssen.42© 2010 Atlas Copco Construction <strong>Tools</strong> AB | No. 9800 0680 71a | 2010-01-01Originalbetriebsanleitung
www.<strong>Crowder</strong>Supply.com • Toll Free: 888-883-5144ALF 72D, ALF 72D-1, ALF 67/80D, BMK 62S, BMK 91RSSicherheitshinweise und Betriebsanleitung<strong>Crowder</strong> Supply Co., Inc. • 8495 Roslyn St., Commerce City, CO 80022 • Toll Free: 888-883-5144 • www.<strong>Crowder</strong>Supply.comArbeitsprinzip einerDruckluftstützeFunktionDie Vorschubbewegung der Druckluftstütze erfolgtdurch Druckluft, die gegen die Unterseite des Kolbensgeleitet wird und den Kolben aus dem Zylinder drückt.Für den automatischen Rücklauf (nicht bei der BMK62S) der Kolbenstange in den Zylinder wird Druckluftauf die Oberseite des Kolben geleitet.ALF 72DALF 72D-1BMK 62S1. Vorschubeinstellring2. Ventilstift3. Schlauchnippel (12,5 mm)4. Vorschubzylinder5. Kolbenstange6. Griff7. Spitze mit Stütze8. WarnschildVorbereitungen vor derInbetriebnahme1. Prüfen der BohrausrüstungStellen Sie sicher, dass die gesamte Bohrausrüstungin einw<strong>and</strong>freiem Zust<strong>and</strong> ist.Stellen Sie sicher, dass die Luftzufuhr frei vonFremdkörpern ist.Stellen Sie sicher, dass die Anschlüsse dicht sind.WarnungStellen Sie vor jedem Einsatz sicher, dass Schläucheund Anschlüsse nicht lose oder beschädigt sind. Einherumpeitschender Luftschlauch kann ernsthafteVerletzungen verursachen.2. Ausblasen des LuftschlauchsDer Luftschlauch muss täglich vor dem Einsatz desBohrhammers ausgeblasen werden, um von angesammeltenVerunreinigungen und Feuchtigkeit befreitzu werden.3. Schmiervorrichtung mit Öl füllenHinweis! Stellen Sie sicher, dass das Bohrfutter unddas Bohrstahl-Einsteckende immer mit einemÖlfilm bedeckt sind.© 2010 Atlas Copco Construction <strong>Tools</strong> AB | No. 9800 0680 71a | 2010-01-01Originalbetriebsanleitung43
Sicherheitshinweise und Betriebsanleitungwww.<strong>Crowder</strong>Supply.com • Toll Free: 888-883-5144ALF 72D, ALF 72D-1, ALF 67/80D, BMK 62S, BMK 91RS<strong>Crowder</strong> Supply Co., Inc. • 8495 Roslyn St., Commerce City, CO 80022 • Toll Free: 888-883-5144 • www.<strong>Crowder</strong>Supply.comHinweis! Verwenden Sie immer das empfohleneSchmiermittel.SchmiermittelDruckluftwerkzeugölEmpfohlenVerwenden Sie ein mineralischesDruckluftwerkzeugölUmgebungstemperaturºCViskosität (ISO3448)-30 bis 0 ISO VG 32-68-10 bis +20 ISO VG 68-100+10 bis +50 ISO VG 100-1504. Einstellen des korrekten Luft- undWasserdrucksVerwenden Sie zum Messen des Luft- und Wasserdruckswährend des Betriebs des Bohrhammers dasManometer Atlas Copco-Nr. 9090 0550 80.LuftdruckStellen Sie sicher, dass der Kompressor das erforderlicheLuftvolumen bei einem Luftdruck von 4-6 Baram Werkzeug erzeugen kann.►►Zu hoher Druck verursacht einen harten Lauf undBeschädigungen der Maschine.►►Zu niedriger Druck führt zu einer geringenBohrgeschwindigkeit.WasserdruckDas Manometer verfügt über eine Nadel, die in denSchlauch gedrückt wird, um den Druck im Innern zuMessen.Hinweis! Stellen Sie sicher, dass der Wasserdruckmindestens 1 Bar unter dem Luftdruckliegt. Andernfalls kann Wasser in denSchlagmechanismus eindringen. Wennder Luftdruck z. B. 6 Bar beträgt, darf derWasserdruck höchstens 5 Bar betragen,damit kein Wasser in den Schlagmechanismuseindringt.AnschlussvorrichtungZum Anbringen der Druckluftstütze am Bohrhammerwird eine Anschlussvorrichtung benötigt.Bohrhammer BBD 94 WDie Anschlussvorrichtung wird am Mittelteil des Bohrhammersangebracht.Bohrhammer RH 656 WDie Anschlussvorrichtung wird durch Anklemmen <strong>and</strong>ie Seitenschrauben am Bohrhammer angebracht.44© 2010 Atlas Copco Construction <strong>Tools</strong> AB | No. 9800 0680 71a | 2010-01-01Originalbetriebsanleitung
www.<strong>Crowder</strong>Supply.com • Toll Free: 888-883-5144ALF 72D, ALF 72D-1, ALF 67/80D, BMK 62S, BMK 91RSSicherheitshinweise und Betriebsanleitung<strong>Crowder</strong> Supply Co., Inc. • 8495 Roslyn St., Commerce City, CO 80022 • Toll Free: 888-883-5144 • www.<strong>Crowder</strong>Supply.comAnbringen der Druckluftstützeam BohrhammerDie Druckluftstütze muss über den Bajonettverschlussmit dem Bohrhammer verbunden werden.BedienelementeBedienelemente für ALF 72D, ALF 72D-1,ALF 67/80D und BMK 91RSVorschubeinstellring an der Druckluftstütze (1)Stellen Sie die Vorschubkraft mithilfe des Vorschubeinstellringswie folgt ein:Drehen Sie den Einstellring entgegen dem Uhrzeigersinn(B), um die Vorschubkraft zu erhöhen.Drehen Sie den Einstellring im Uhrzeigersinn (A), umdie Vorschubkraft zu verringern.In der geschlossenen Stellung ist die Druckluftstützeentlüftet.Ventilstift (2)Durch Drücken des Ventilstifts stoppt der Vorschubsofort, unabhängig von der Einstellung am Vorschubeinstellring.Diese Funktion dient z. B. dazu, die Lagedes Bohrhammers beim Ansetzen oder bei Klemmneigungzu korrigieren.Beim Drücken des Ventilstifts, wird die Kolbenstangein der Druckluftstütze automatisch zurückgezogen.Bedienelemente für BMK 62SVorschubeinstellring an der Druckluftstütze (1)Stellen Sie die Vorschubkraft mithilfe des Vorschubeinstellringswie folgt ein:Drehen Sie den Einstellring entgegen dem Uhrzeigersinn(B), um die Vorschubkraft zu erhöhen.Drehen Sie den Einstellring im Uhrzeigersinn (A), umdie Vorschubkraft zu verringern.In der geschlossenen Stellung ist die Druckluftstützeentlüftet.Ventilstift (2)Durch Drücken des Ventilstifts stoppt der Vorschubsofort, unabhängig von der Einstellung am Vorschubeinstellring.Diese Funktion dient z. B. dazu, die Lagedes Bohrhammers beim Ansetzen oder bei Klemmneigungzu korrigieren.© 2010 Atlas Copco Construction <strong>Tools</strong> AB | No. 9800 0680 71a | 2010-01-01Originalbetriebsanleitung45
Sicherheitshinweise und Betriebsanleitungwww.<strong>Crowder</strong>Supply.com • Toll Free: 888-883-5144ALF 72D, ALF 72D-1, ALF 67/80D, BMK 62S, BMK 91RS<strong>Crowder</strong> Supply Co., Inc. • 8495 Roslyn St., Commerce City, CO 80022 • Toll Free: 888-883-5144 • www.<strong>Crowder</strong>Supply.comBohrenStarten des BohrhammersA1. Öffnen Sie das Hauptventil für die Druckluft.2. Stellen Sie die Vorschubeinstellring (C) aufeine für den Bohrungsansatz geeignete Vorschubkraftein.3. Halten Sie den Bohrhammer so, dass der Bohrstahlden gewünschten Ansatzpunkt berührt.4. Schieben Sie den Drosselhebel (A) etwas nachvorn, und Wasserspülung, Schlagmechanismusund Rotation setzen ein.5. Beginnen Sie die Bohrung mit verringerterVorschubkraft.6. Schieben Sie den Drosselhebel (A) ganz nachvorn, wenn der Bohrstahl ausreichend Führungim Gestein erlangt hat.7. Stellen Sie die Vorschubkraft mithilfe des Vorschubeinstellrings(C) so ein, dass eine maximaleEindringgeschwindigkeit erreicht wird.Anhalten des Bohrhammers1. Schieben Sie den Drosselhebel (A) zurück,und Schlagmechanismus, Rotation und Wasserspülunghalten an.2. Bringen Sie den Vorschubeinstellring (C) in diegeschlossene Stellung.CBNeupositionieren der Vorschubstütze1. Schalten Sie Schlagmechanismus und Spülungüber den Drosselhebel (A) aus.2. Drücken Sie den Ventilstift (B), wodurch dieKolbenstange automatisch (bzw. manuell beider BMK 62S) in den Zylinder der Druckluftstützezurückgezogen wird.3. Richten Sie die Druckluftstütze neu aus.4. Lassen Sie den Ventilstift (B) los, wodurch dieKolbenstange wieder ausfährt.5. Schieben Sie den Drosselhebel (A) wiedernach vorn in Arbeitsstellung.6. Der Vorschubeinstellring (C) muss für diesenVorgang nicht verwendet werden.Nach Beendigung des BohrensLegen Sie den Bohrhammer auf einen Stein, einHolzbrett oder ein ähnliches Objekt, um zu verhindern,dass Gesteinsbrösel oder <strong>and</strong>ere Fremdkörperin das Bohrfutter eindringen.Stellen Sie zuerst die Wasserzufuhr und dann dieDruckluft ab. Lassen Sie den Bohrhammer nach demAbstellen der Wasserzufuhr ein paar Minuten weiterlaufen,um restliches Wasser und Feuchtigkeit auszublasen.WartungEine regelmäßige Wartung ist Grundvoraussetzung fürdie Sicherheit der Maschine. Ersetzen Sie beschädigteoder verschlissene Komponenten recht-zeitig. Für eineHauptdurchsicht der Maschine wenden Sie sich anIhre nächste Vertragswerkstatt.Prüfen Sie die Maschine und die Werkzeuge regelmäßigauf Abnutzung und Beschädigungen. VerwendenSie niemals stark verschlissene oder beschädigteWerkzeuge.Stellen Sie beim Reinigen mechanischer Teile mit Lösungsmittelnsicher, dass die geltenden GesundheitsundSicherheitsvorschriften eingehalten werden undfür ausreichende Lüftung gesorgt ist.Eine tägliche Wartung, die regelmäßige Prüfung vonVerschleißteilen und rechtzeitig ausgeführte Reparaturenbeugen einem plötzlichen Totalausfall vor underhöhen die Lebensdauer der Maschine.Ölen Sie den Bohrhammer und die Vorschubstützevor dem Einlagern immer gut ein.Lagern Sie den Bohrhammer an einem sauberenund trockenen Ort.Stellen Sie sicher, dass keine Fremdkörper in dieMaschine gelangen.Reinigen Sie den Bohrhammer und dieDruckluftstütze nach der Benutzung immer mit einemWasserstrahl und wischen Sie ihn trocken.46© 2010 Atlas Copco Construction <strong>Tools</strong> AB | No. 9800 0680 71a | 2010-01-01Originalbetriebsanleitung
www.<strong>Crowder</strong>Supply.com • Toll Free: 888-883-5144ALF 72D, ALF 72D-1, ALF 67/80D, BMK 62S, BMK 91RSSicherheitshinweise und Betriebsanleitung<strong>Crowder</strong> Supply Co., Inc. • 8495 Roslyn St., Commerce City, CO 80022 • Toll Free: 888-883-5144 • www.<strong>Crowder</strong>Supply.comUnterschiede zwischen Originalersatzteilenund baugleichen ErsatzteilenStellen Sie beim Kauf von Ersatzteilen zunächst fest,ob es sich um ein Originalersatzteil von Atlas Copcoh<strong>and</strong>elt. Ersatzteile können meistens identifiziertwerden.Bohrhammerbauteile von Atlas Copco sind normalerweisemit einer Artikelnummer und dem Atlas Copco-Logo, einKreis mit einem Bohrhammer, gekennzeichnet. In seltenenFällen sind Bauteile nur mit dem Logo oder der Artikelnummergekennzeichnet.Bauteile aus Gummi oder Kunststoff sind in der Regelnicht gekennzeichnet.Bei kopierten Konkurrenzprodukten sind oft nur diegrößeren, teuren Ersatzteile gekennzeichnet. EinigeTeile haben nur eine Artikelnummer, <strong>and</strong>ere habenauch ein Herstellerlogo, z. B. Initialen. In diesen Fällensind die Artikelnummern oft von H<strong>and</strong> geprägt undsehen unregelmäßig aus. Von Atlas Copco geprägteArtikelnummern sind regelmäßig und alle Zeichenhaben die gleiche Größe. Ebenso fallen Prägetiefeund Zwischenabstände der Zeichen gleichmäßig aus.Einmal pro Schicht (alle 8 Betriebsstunden)1. Prüfen Sie die Verbindung von Bohrhammerund Druckluftstütze.2. Prüfen Sie Schläuche, Kupplungen undSteuerelemente auf Undichtigkeiten undBeschädigungen.3. Stellen Sie sicher, dass der Bohrhammer unddie Druckluftstütze ausreichend geschmiertsind. Füllen Sie die Schmiervorrichtung beiBedarf auf.4. Leeren Sie den Wasserabscheider.Einmal pro Woche (alle 40Betriebsstunden)►►Führen Sie eine Grundprüfung aller Funktionen derBohrausrüstung durch.Verschrottung undEntsorgung von AbfallVerschlissene Maschinen müssen so entsorgt werden,dass so viel Material wie möglich wiederverwendetwerden kann und die Umwelt so wenig wiemöglich belastet wird.© 2010 Atlas Copco Construction <strong>Tools</strong> AB | No. 9800 0680 71a | 2010-01-01Originalbetriebsanleitung47
Sicherheitshinweise und Betriebsanleitungwww.<strong>Crowder</strong>Supply.com • Toll Free: 888-883-5144ALF 72D, ALF 72D-1, ALF 67/80D, BMK 62S, BMK 91RSFehlersuche<strong>Crowder</strong> Supply Co., Inc. • 8495 Roslyn St., Commerce City, CO 80022 • Toll Free: 888-883-5144 • www.<strong>Crowder</strong>Supply.comGrundlegende Hinweise zur FehlersucheProblem Ursache LösungVorschubkraft zugeringZu niedriger LuftdruckDas Ventil 3121 0726 80 istverklemmt oder die Dichtungen0663 2124 00 sind verschlissen(gilt nur für die ALF-Modelle).Kolbenstangendichtungverschlissen oder deformiert.Erhöhen Sie den Luftdruck auf 6 Bar.Zerlegen Sie das Ventil und reinigen Sie es bei Bedarf.Ersetzen Sie verschlissene oder deformierte Dichtungen.Ersetzen Sie die Dichtung1Verschleißgrenzen und Anzugsdrehmomente finden Sie in der Service-Information für leichte Bohrhämmer, Atlas Copco-Dokumentnr.9853 1086 01.2Lehre für Bohrfutterbuchse 22 mm (7/8 Zoll), Sechskant-Einsteckende, Atlas Copco-Nr. 3091 0038 00.3Verwenden Sie zum Messen des Luft- und Wasserdrucks das Manometer Atlas Copco-Nr. 9090 0550 80.48© 2010 Atlas Copco Construction <strong>Tools</strong> AB | No. 9800 0680 71a | 2010-01-01Originalbetriebsanleitung
www.<strong>Crowder</strong>Supply.com • Toll Free: 888-883-5144ALF 72D, ALF 72D-1, ALF 67/80D, BMK 62S, BMK 91RSSicherheitshinweise und BetriebsanleitungZubehör<strong>Crowder</strong> Supply Co., Inc. • 8495 Roslyn St., Commerce City, CO 80022 • Toll Free: 888-883-5144 • www.<strong>Crowder</strong>Supply.comZubehörBestellnr.Schmiervorrichtung für BBC, BBD, RH:BLG 30, für Mineralöl 8202 5102 05CLG 30, für Mineralöl und synthetisches Öl 8202 5102 39Wasserabscheider für BBC, BBD, RH:VAM 5A, für Luftstrom von bis zu 120 l/s (254 cfm) 8092 0110 82Druckluft-Zubehör für 25 mm (1 Zoll)Gummischlauch, 30 m 9030 2041 00Klauenkupplung 9000 0313 00Zweiteilige Schlauchklemme 9000 0197 00Manometer für Luft- und WasserdruckManometer 9090 0550 80Satz Ersatznadeln 9090 0678 90Druckluftschlauch 25 mm (1 Zoll) für Bohrhammer und Vorschubmit Kupplungen für:BBD 94W zusammen mit ALF 72D, ALF 72D-1, ALF 67/80D und BMK 91RS 9030 2068 00Druckluftschlauch 20 mm (3/4 Zoll) für Bohrhammer und Vorschubmit Kupplungen für:RH 656W zusammen mit BMK 62S 9030 2067 00© 2010 Atlas Copco Construction <strong>Tools</strong> AB | No. 9800 0680 71a | 2010-01-01Originalbetriebsanleitung49
Sicherheitshinweise und Betriebsanleitungwww.<strong>Crowder</strong>Supply.com • Toll Free: 888-883-5144ALF 72D, ALF 72D-1, ALF 67/80D, BMK 62S, BMK 91RSTechnische Daten<strong>Crowder</strong> Supply Co., Inc. • 8495 Roslyn St., Commerce City, CO 80022 • Toll Free: 888-883-5144 • www.<strong>Crowder</strong>Supply.comTyp Bestellnr. Passend fürBohrhammerEinzelteleskopVorschubLänge(mm)Längezurückgezogen(mm)Längeextrahiert(mm)Gewicht(kg)KolbenBohrung(mm)ALF 72D 8321 0201 80 BBD 94W 1300 1970 3270 19 70ALF 72D-1 8321 0201 81 BBD 94W 1200 1830 3030 16 70BMK 62S 8321 0102 02 RH 656W 1300 1815 3115 17 53BMK 91RS 8321 0104 27 BBD 94W 1300 1730 3030 24 67DoppelteleskopALF 67/80D 8321 0201 69 BBD 94W 1855 1595 3450 19 67/80EG-Konformitätserklärung (EG-Richtlinie 2006/42/EG)Wir, die Atlas Copco Construction <strong>Tools</strong> AB, erklären hiermit, dass die nachfolgend aufgelisteten MaschinendieBestimmungen der EG-Richtlinien 2006/42/EG (Maschinenrichtlinie).H<strong>and</strong>gehaltener pneumatischer AbklopferPmax (bar)ALF 72D 7ALF 72D-1 7BMK 62S 7BMK 91RS 7ALF 67/80D 7Bevollmächtigter für die technische Dokumentation:Erik SigfridssonAtlas Copco Construction <strong>Tools</strong> ABDragonvägen 2KalmarGeschäftsführer:Erik SigfridssonHersteller:Atlas Copco Construction <strong>Tools</strong> AB105 23 StockholmSwedenOrt und Datum: Kalmar, 2010-01-0150© 2010 Atlas Copco Construction <strong>Tools</strong> AB | No. 9800 0680 71a | 2010-01-01Originalbetriebsanleitung
www.<strong>Crowder</strong>Supply.com • Toll Free: 888-883-5144ALF 72D, ALF 72D-1, ALF 67/80D, BMK 62S, BMK 91RSSicherheitshinweise und Betriebsanleitung<strong>Crowder</strong> Supply Co., Inc. • 8495 Roslyn St., Commerce City, CO 80022 • Toll Free: 888-883-5144 • www.<strong>Crowder</strong>Supply.com© 2010 Atlas Copco Construction <strong>Tools</strong> AB | No. 9800 0680 71a | 2010-01-01Originalbetriebsanleitung51
Contenidowww.<strong>Crowder</strong>Supply.com • Toll Free: 888-883-5144ALF-72D ALF-72D-1 ALF-67-80D BMK-62S BMK-91RSESPAÑOL<strong>Crowder</strong> Supply Co., Inc. • 8495 Roslyn St., Commerce City, CO 80022 • Toll Free: 888-883-5144 • www.<strong>Crowder</strong>Supply.comContenidoINSTRUCCIONES DE SEGURIDAD . . . . . . . . . . . . . . . . . . . . . . . . . . . . . . . . . . . . . . . . . . . . . 53Símbolos de seguridad utilizados . . . . . . . . . . . . . . . . . . . . . . . . . . . . . . . . . . . . . . . . . . .53Riesgo durante el transporte . . . . . . . . . . . . . . . . . . . . . . . . . . . . . . . . . . . . . . . . . . . . . . .53Peligros de utilización de la máquina y las herramientas . . . . . . . . . . . . . . . . . . . . . . . .53Peligros de explosión e incendio . . . . . . . . . . . . . . . . . . . . . . . . . . . . . . . . . . . . . . . . . . . .54Peligros relacionados con objetos eléctricos/ocultos . . . . . . . . . . . . . . . . . . . . . . . . . . .55Peligros relacionados con proyectiles . . . . . . . . . . . . . . . . . . . . . . . . . . . . . . . . . . . . . . . .55Riesgos relacionados con el ruido . . . . . . . . . . . . . . . . . . . . . . . . . . . . . . . . . . . . . . . . . . .55Riesgos relacionados con el sílice o el polvo . . . . . . . . . . . . . . . . . . . . . . . . . . . . . . . . . .55Riesgos relativos a las vibraciones . . . . . . . . . . . . . . . . . . . . . . . . . . . . . . . . . . . . . . . . . .56Riesgos de modificación de la máquina . . . . . . . . . . . . . . . . . . . . . . . . . . . . . . . . . . . . . .56Instrucciones de seguridad adicionales . . . . . . . . . . . . . . . . . . . . . . . . . . . . . . . . . . . . . .57Equipo de protección . . . . . . . . . . . . . . . . . . . . . . . . . . . . . . . . . . . . . . . . . . . . . . . . . . . . . .57Servicio y mantenimiento . . . . . . . . . . . . . . . . . . . . . . . . . . . . . . . . . . . . . . . . . . . . . . . . . .57Herramientas de trabajo . . . . . . . . . . . . . . . . . . . . . . . . . . . . . . . . . . . . . . . . . . . . . . . . . . .57INSTRUCCIONES DE FUNCIONAMIENTO . . . . . . . . . . . . . . . . . . . . . . . . . . . . . . . . . . . . . . . 58Diseño y funcionamiento . . . . . . . . . . . . . . . . . . . . . . . . . . . . . . . . . . . . . . . . . . . . . . . . . . .58Símbolos y letreros de la máquina . . . . . . . . . . . . . . . . . . . . . . . . . . . . . . . . . . . . . . . . . . .58Principio de funcionamiento de un empujador . . . . . . . . . . . . . . . . . . . . . . . . . . . . . . . . .59Función. . . . . . . . . . . . . . . . . . . . . . . . . . . . . . . . . . . . . . . . . . . . . . . . . . . . . . . . . . . . . . . 59Preparaciones antes de la puesta en marcha . . . . . . . . . . . . . . . . . . . . . . . . . . . . . . . . . .59Dispositivo acoplador . . . . . . . . . . . . . . . . . . . . . . . . . . . . . . . . . . . . . . . . . . . . . . . . . . . . .60Perforadora BBD 94 W. . . . . . . . . . . . . . . . . . . . . . . . . . . . . . . . . . . . . . . . . . . . . . . . . . . 60Perforadora RH 656 W . . . . . . . . . . . . . . . . . . . . . . . . . . . . . . . . . . . . . . . . . . . . . . . . . . 60Acoplar el empujador ala perforadora . . . . . . . . . . . . . . . . . . . . . . . . . . . . . . . . . . . . . . . . . . . . . . . . . . . . . . . . . . . .61Controles . . . . . . . . . . . . . . . . . . . . . . . . . . . . . . . . . . . . . . . . . . . . . . . . . . . . . . . . . . . . . . . .61Controles para ALF 72D, ALF 72D-1, ALF 67/80D y BMK 91RS. . . . . . . . . . . . . . . . . . . 61Controles para BMK 62S . . . . . . . . . . . . . . . . . . . . . . . . . . . . . . . . . . . . . . . . . . . . . . . . . 61Cómo perforar . . . . . . . . . . . . . . . . . . . . . . . . . . . . . . . . . . . . . . . . . . . . . . . . . . . . . . . . . . .62Poner en marcha la perforadora . . . . . . . . . . . . . . . . . . . . . . . . . . . . . . . . . . . . . . . . . . . 62Detener la perforadora . . . . . . . . . . . . . . . . . . . . . . . . . . . . . . . . . . . . . . . . . . . . . . . . . . . 62Reposicionar el empujador. . . . . . . . . . . . . . . . . . . . . . . . . . . . . . . . . . . . . . . . . . . . . . . . 62Cu<strong>and</strong>o haya terminado de perforar . . . . . . . . . . . . . . . . . . . . . . . . . . . . . . . . . . . . . . . . 62Mantenimiento . . . . . . . . . . . . . . . . . . . . . . . . . . . . . . . . . . . . . . . . . . . . . . . . . . . . . . . . . . .62Diferencias entre las piezas originales y otras piezas . . . . . . . . . . . . . . . . . . . . . . . . . . . 63Una vez cada turno (después de 8 horas de funcionamiento). . . . . . . . . . . . . . . . . . . . . 63Una vez a la semana (después de 40 horas de funcionamiento) . . . . . . . . . . . . . . . . . . 63Desecho de la máquina y eliminación de los residuos . . . . . . . . . . . . . . . . . . . . . . . . . .63Localización y resolución de problemas . . . . . . . . . . . . . . . . . . . . . . . . . . . . . . . . . . . . . .64Guía básica para la localización y resolución de problemas . . . . . . . . . . . . . . . . . . . . . . 64Accesorios . . . . . . . . . . . . . . . . . . . . . . . . . . . . . . . . . . . . . . . . . . . . . . . . . . . . . . . . . . . . . .65Datos técnicos . . . . . . . . . . . . . . . . . . . . . . . . . . . . . . . . . . . . . . . . . . . . . . . . . . . . . . . . . . .66Declaración CE de comformidad (Directiva 2006/42/CE) . . . . . . . . . . . . . . . . . . . . . . . . .6652© 2010 Atlas Copco Construction <strong>Tools</strong> AB | No. 9800 0680 71a | 2010-01-01Instrucciones originales
www.<strong>Crowder</strong>Supply.com • Toll Free: 888-883-5144ALF 72D, ALF 72D-1, ALF 67/80D, BMK 62S, BMK 91RSInstrucciones de seguridad y de funcionamiento<strong>Crowder</strong> Supply Co., Inc. • 8495 Roslyn St., Commerce City, CO 80022 • Toll Free: 888-883-5144 • www.<strong>Crowder</strong>Supply.comINSTRUCCIONES DESEGURIDADPara reducir el riesgo de ocasionar lesionesgraves o la muerte a usted o a otras personas, leaestas instrucciones de seguridad antes de utilizarla máquina.Cuelgue estas instrucciones de seguridad enlas zonas de trabajo, proporcione copias a losempleados y asegúrese de que todos las leanantes de utilizar la máquina o realizar las tareas demantenimiento de ésta.Siga todas las instrucciones de seguridadcontenidas en este manual.Todas las instrucciones de seguridad cumplenla legislación y directivas vigentes en la UniónEuropea.También deberá cumplir cualquier directivaadicional a escala nacional/regional.En los países que no pertenezcan a la UniónEuropea, las leyes y normativas locales vigentesserán de aplicación.Asimismo deberá cumplirse cualquier otralegislación y disposición local.Símbolos de seguridadutilizadosLos términos Peligro, Atención y Cuidado tienenlos siguientes significados:PeligroAtenciónCuidadoIndica una situación depeligro inminente que,si no se evita, podríaocasionar la muerte olesiones graves.Indica una situación deposible peligro que, si nose evita podría ocasionar lamuerte o lesiones graves.Indica una situación que, sino se evita, puede producirlesiones personales odaños al producto u otrosbienes.Riesgo durante el transporteCuidadoLa perforadora y su columna son pesadas. Paraevitar lesiones personales durante el transporte ala zona de trabajo►►Utilice una carretilla o pida ayuda a uncompañero durante el transporte.Peligros de utilización de lamáquina y las herramientasAtenciónDurante la utilización de la máquina podríaproducirse un movimiento súbito o inesperado deésta que podría provocar lesiones. Asimismo, sialguien pierde el equilibrio o resbala podría sufrirlesiones. Para reducir los riesgos:►►Asegúrese de estar siempre en una posiciónestable con los pies separados a la altura de loshombros, y con el peso del cuerpo equilibrado.►►Manténgase firmemente de pie y agarre siemprela máquina con ambas manos.►►No inicie la máquina cu<strong>and</strong>o esté en el suelo.►►Compruebe que la empuñadura esté limpia degrasa o aceite.AtenciónEl arranque accidental de la máquina puedeocasionar lesiones.►►Mantenga las manos alejadas del dispositivo depuesta en marcha y parada hasta que esté apunto de empezar a trabajar.AtenciónLa herramienta de trabajo está expuesta agr<strong>and</strong>es tensiones cu<strong>and</strong>o se utiliza la máquina,por lo que podría romperse tras un usoprolongado. Si se rompe la herramienta, puedeocasionar movimientos súbitos o violentos. Estosmovimientos súbitos o violentos pueden ocasionarlesiones graves.►►Asegúrese de estar siempre en una posiciónestable con los pies separados a la altura de loshombros, y con el peso del cuerpo equilibrado.►►Compruebe regularmente el desgaste de laherramienta de trabajo y compruebe si haysignos de daños o grietas visibles.AtenciónUnas dimensiones incorrectas del buje de la herramientade trabajo pueden dar lugar a que ésta se pierda oresbale durante su uso. Una herramienta que se pierdao resbale puede ocasionar lesiones.►►Antes de insertar la herramienta de trabajo,asegúrese de que las dimensiones del bujesean correctas para el uso de la máquina.►►Está prohibido el uso de herramientas de trabajosin collarín.© 2010 Atlas Copco Construction <strong>Tools</strong> AB | No. 9800 0680 71A | 2010-01-01Instrucciones originales53
Instrucciones de seguridad y de funcionamientowww.<strong>Crowder</strong>Supply.com • Toll Free: 888-883-5144ALF 72D, ALF 72D-1, ALF 67/80D, BMK 62S, BMK 91RS<strong>Crowder</strong> Supply Co., Inc. • 8495 Roslyn St., Commerce City, CO 80022 • Toll Free: 888-883-5144 • www.<strong>Crowder</strong>Supply.comAtenciónSi el retenedor de la herramienta de la máquina noestá en posición bloqueada, la herramienta podríaser expulsada con gran fuerza y provocar lesionesgraves.►►Cu<strong>and</strong>o se ha montado y bloqueado laherramienta de trabajo, debe comprobarseel funcionamiento del bloqueo tir<strong>and</strong>o de laherramienta hacia afuera enérgicamente.►►Compruebe que la herramienta de trabajo estétotalmente insertada y que su retenedor estéen la posición de bloqueo antes de poner elmarcha la máquina.►►No dirija nunca la herramienta de trabajo endirección a su cuerpo o a otra persona.AtenciónSi cambia la herramienta de trabajo mientras lamáquina está en marcha podría sufrir lesionesgraves.►►Antes de cambiar la herramienta, detengasiempre la máquina.►►Nunca agarre o toque una barrena deperforación mientras esté gir<strong>and</strong>o.AtenciónUna manguera de aire comprimido floja puedeasestar latigazos al operador o a las personas quese encuentren en las inmediaciones y ocasionarlesiones o incluso la muerte.Para reducir los riesgos:►►Compruebe que la manguera de airecomprimido y las conexiones no estén dañadas.►►Compruebe que todas las conexiones de airecomprimido estén correctamente fijadas.►►No intente nunca desconectar una manguerade aire comprimido que esté presurizada. Enprimer lugar, deberá cortar el suministro de airecomprimido del compresor y, a continuación,purgar la máquina activ<strong>and</strong>o el dispositivo depuesta en marcha y parada.AtenciónSi la barrena de perforación se atranca durante elfuncionamiento, toda la máquina empezará a girarsi deja de sujetarla. Este giro inesperado de todala máquina podría provocar lesiones graves.►►Manténgase de pie firmemente y agarre siemprela máquina con ambas manos.►►Compruebe que la empuñadura esté limpiade grasa o aceite.►►Nunca perfore un barreno antiguo.AtenciónExiste el riesgo de que algún objeto se veaarrastrado o atrapado por una barrena deperforación gir<strong>and</strong>o. Esto podría provocar lesionesgraves.►►Nunca agarre o toque una barrena deperforación mientras esté gir<strong>and</strong>o.►►Evite lleva prendas que podrían quedaratrapadas.Si tiene el pelo largo, cúbralo con una redecillao similar.Peligros de explosión eincendioPeligroSi la máquina entra en contacto con un explosivopodría producirse una explosión. Las explosionespueden provocar lesiones graves o la muerte.Para reducir el riesgo de una explosión:►►Nunca utilice el equipo para perforar cercade explosivos, incluyendo dinamita u otrosexplosivos en la roca.►►Asegúrese de que no hay explosivos en la roca.►►Nunca perfore un barreno antiguo.AtenciónAl perforar y trabajar con ciertos materialespueden generarse chispas que podrían encendergases explosivos y causar explosiones. Lasexplosiones pueden provocar lesiones graves o lamuerte.Para reducir el riesgo de una explosión:►►Nunca utilice la máquina en un entornoexplosivo.►►No utilice la máquina cerca de materiales, humoo polvo inflamables.►►Asegúrese de que no existen fuentes de gasocultas.54© 2010 Atlas Copco Construction <strong>Tools</strong> AB | No. 9800 0680 71a | 2010-01-01Instrucciones originales
www.<strong>Crowder</strong>Supply.com • Toll Free: 888-883-5144ALF 72D, ALF 72D-1, ALF 67/80D, BMK 62S, BMK 91RSInstrucciones de seguridad y de funcionamiento<strong>Crowder</strong> Supply Co., Inc. • 8495 Roslyn St., Commerce City, CO 80022 • Toll Free: 888-883-5144 • www.<strong>Crowder</strong>Supply.comPeligros relacionados conobjetos eléctricos/ocultosPeligroLa máquina no está aislada eléctricamente. Si lamáquina entra en contacto con electricidad, podríaprovocar lesiones graves o la muerte.►►Para reducir el riesgo de sufrir lesiones graveso la muerte, nunca utilice la máquina cerca decables eléctricos u otras fuentes de electricidad.►►Compruebe que no haya cables u otras fuentesde electricidad ocultos.AtenciónDurante la perforación, los cables y tubos ocultosconstituyen un peligro que pueden ocasionarlesiones graves o la muerte.►►Antes de empezar a perforar, compruebe lacomposición del material sobre el que debetrabajar.►►Vigile con los cables y tubos ocultos, comolíneas de electricidad, teléfono, agua, gas yaguas residuales.►►Si la herramienta parece haber topado con unobjeto oculto, apague la máquina de inmediato.►►Compruebe que no haya ningún peligro antesde continuar.Peligros relacionados conproyectilesAtenciónDurante la perforación del material, las astillas uotras partículas pueden convertirse en proyectilesy ocasionar lesiones al golpear al operario u otraspersonas.►►Utilice equipo de protección personal aprobado,incluyendo gafas de seguridad resistentes a losimpactos con protección lateral, para reducirel riesgo de sufrir lesiones ocasionadas por unproyectil.CuidadoDurante el barrido del barreno pueden expulsarsepartículas y agua sucia y se pueden producirlesiones personales.►►Póngase a un lado y tápese los ojos antes deempezar a purgar el barreno para limpiarlo.►►Utilice siempre protección ocular contraimpactos con protección lateral.►►Compruebe que no haya personal cerca cu<strong>and</strong>ose realice la limpieza por soplado.Riesgos relacionados con elruidoAtenciónLos niveles de ruido altos pueden provocar unapérdida auditiva permanente.►►Utilice protección auditiva de acuerdo con lasregulaciones de salud y seguridad laborales.Riesgos relacionados con elsílice o el polvoAtenciónLas exposiciones al sílice cristalino (a vecesllamado polvo de sílice) como resultado de lasperforaciones u otras actividades que incluyanpiedra, hormigón, asfalto u otros materialespueden causar silicosis (una seria enfermedad delos pulmones), enfermedades relacionadas conla silicosis, cáncer o la muerte. El sílice es uno delos principales componentes en los yacimientos derocas, áridos y minerales.Para reducir la exposición al sílice:►►Utilice controles de ingeniería adecuados parareducir la cantidad de sílice presente en el airey la acumulación de polvo sobre el equipo y lassuperficies. Algunos ejemplos de estos controlesson: sistemas de ventilación y captación depolvo, rociadores de agua y perforaciones conbarrido por agua. Compruebe que los controlesestén adecuadamente instalados y mantenidos.►►Lleve, mantenga y utilice correctamentemascarillas antipartículas aprobadas cu<strong>and</strong>o notenga suficiente con los controles de ingenieríapara reducir la exposición por debajo de nivelespermisibles.►►Participe en la supervisión de la calidad deaire, en exámenes médicos y programas deformación ofrecidos por su superior y cu<strong>and</strong>o laley así lo exija.►►Lleve ropa de protección que se pueda lavaro desechar en el lugar de trabajo; dúchese ypóngase ropa limpia antes de ab<strong>and</strong>onar ellugar de trabajo para evitar exponerse usted,otras personas, coches, viviendas y otras áreasal sílice.►►No coma, beba o fume en zonas donde hayapolvo que contenga sílice cristalino.►►Lávese las manos y la cara antes de comer,beber o fumar fuera de la zona de exposición.►►Trabaje con su superior para reducir laexposición al sílice en su lugar de trabajo.© 2010 Atlas Copco Construction <strong>Tools</strong> AB | No. 9800 0680 71A | 2010-01-01Instrucciones originales55
Instrucciones de seguridad y de funcionamientowww.<strong>Crowder</strong>Supply.com • Toll Free: 888-883-5144ALF 72D, ALF 72D-1, ALF 67/80D, BMK 62S, BMK 91RS<strong>Crowder</strong> Supply Co., Inc. • 8495 Roslyn St., Commerce City, CO 80022 • Toll Free: 888-883-5144 • www.<strong>Crowder</strong>Supply.comAtenciónEl polvo, los gases u otro material en suspensióngenerado durante el uso de la máquina puedecontener sustancias químicas que en el Estadode California se sabe que han producidocáncer y defectos de nacimiento u otros dañosreproductivos. Algunos ejemplos de estassustancias químicas son:►►Sílice cristalino, cemento y otros productos dealbañilería.►►Arsénico y cromo proveniente del cauchotratado con productos químicos.►►Plomo proveniente de pinturas al plomo.Para reducir su exposición a estas sustanciasquímicas, trabaje en una zona bien ventilada conequipos de seguridad aprobados, como máscarasde polvo, que estén especialmente diseñadas parafiltrar partículas microscópicas.Riesgos relativos a lasvibracionesAtenciónEl uso normal y correcto de la máquina expone eloperario a las vibraciones. La exposición regulary frecuente a las vibraciones puede ocasionarlesiones o trastornos, o contribuir a provocarlaso agravarlas, en los dedos, manos, muñecas,brazos, hombros y/u otras partes del cuerpodel operario, incluidas lesiones o trastornospermanentes y/o debilitantes que puedendesarrollarse gradualmente durante períodosde semanas, meses o años. Estas lesiones otrastornos pueden incluir el deterioro del sistemasanguíneo circulatorio, el sistema nervioso, lasarticulaciones y otros daños en distintas zonascorporales.Si siente que se le duerme algún miembrodel cuerpo, u hormigueos, dolor, torpeza, unacapacidad de agarre debilitado en las manos, lapiel pálida u otros síntomas en cualquier momento,al usar la máquina o en otro momento, deje deusarla y vaya al médico. El uso continuado de lamáquina tras el desarrollo de cualquier síntomaparecido puede aumentar el riesgo de que éste seagrave y/o se convierta en permanente.Las siguientes indicaciones pueden ayudar areducir la exposición a las vibraciones para eloperario:►►Deje que sea la máquina quien haga eltrabajo. Agárrela lo mínimo, para controlarlacorrectamente y que su uso sea seguro.►►Cu<strong>and</strong>o se active el mecanismo de percusión,el único contacto corporal con la máquinaque debería tener es el de las manos en lasempuñaduras. Evite cualquier otro contacto,como apoyar cualquier parte del cuerpo en lamáquina o apoyarse en ella para aumentarla fuerza de avance. También es importanteno mantener el arranque encendido al mismotiempo que se extrae la herramienta de lasuperficie de trabajo.►►Asegúrese de que la herramienta de trabajose encuentra en buenas condiciones, noestá gastada y es del tamaño adecuado. Lasherramientas de trabajo que no se encuentranen buenas condiciones, están gastadas o noson del tamaño adecuado alargan el tiempo derealización de una tarea (y de exposición a lasvibraciones) y pueden contribuir a la exposicióna niveles más altos de vibración.►►Deje de trabajar inmediatamente, si de repentela máquina empieza a vibrar violentamente.Antes de continuar trabaj<strong>and</strong>o, encuentrey elimine la causa del incremento de lasvibraciones.►►Cumpla con la presión del aire recomendado alutilizar la máquina. Una presión del aire inferioro superior a la recomendada puede causarniveles más altos de vibración.►►No agarre, sostenga o toque la herramientainsertada cu<strong>and</strong>o utilice la máquina.►►Participe en la supervisión de la calidad deaire, en exámenes médicos y programas deformación ofrecidos por su superior y cu<strong>and</strong>o laley así lo exija.Diríjase a la "Declaración de Ruidos y Vibraciones"de la máquina que se encuentra al final de estasinstrucciones de seguridad y funcionamiento.Riesgos de modificación dela máquinaAtenciónCualquier modificación de la máquina no aprobadapor Atlas Copco puede ocasionar lesiones gravesa usted y a otras personas.►►La máquina no debe modificarse sin elpermiso de Atlas Copco.►►Utilice exclusivamente las piezas y losaccesorios originales aprobados por AtlasCopco.56© 2010 Atlas Copco Construction <strong>Tools</strong> AB | No. 9800 0680 71a | 2010-01-01Instrucciones originales
www.<strong>Crowder</strong>Supply.com • Toll Free: 888-883-5144ALF 72D, ALF 72D-1, ALF 67/80D, BMK 62S, BMK 91RSInstrucciones de seguridad y de funcionamiento<strong>Crowder</strong> Supply Co., Inc. • 8495 Roslyn St., Commerce City, CO 80022 • Toll Free: 888-883-5144 • www.<strong>Crowder</strong>Supply.comInstrucciones de seguridadadicionales►►Las máquinas y los accesorios sólo debenutilizarse para su uso indicado.►►Sólo personas cualificadas y formadas puedenutilizar o mantener la máquina.►►Aprenda cómo apagar la máquina en caso deuna emergencia.►►No se debe exceder la presión máxima de airepermitida para la máquina.►►Suelte inmediatamente el dispositivo de puestaen marcha y parada en caso de interrupción delsuministro de energía.►►Inspeccione siempre el equipo antes de su uso.No utilice el equipo si cree que puede estardañado.►►Utilice siempre su sentido común y buen juicio.►►Preste atención y fíjese en lo que hace.►►No utilice la máquina si está cansado o seencuentra bajo los efectos de fármacos, alcoholo cualquier otra sustancia que pudiera afectar asu visión, a sus reacciones o a su juicio.►►Participe en cursos de seguridad y formación.►►No golpee nunca ni maltrate el equipo.►►Guarde la máquina y las herramientas en unlugar seguro, fuera del alcance de los niños ybajo llave.►►Asegúrese de que todo el equipo conectado yrelacionado recibe un mantenimiento adecuado.►►Se suministran con cada máquina símbolos yletreros con información importante relativa a laseguridad personal y al cuidado de la máquina.Asegúrese de que los símbolos estén siemprelegibles. Pueden pedirse símbolos y letrerosnuevos de la lista de piezas de repuesto.►►Asegúrese de que el personal no autorizado noentre en la zona de trabajo.►►Mantenga el lugar de trabajo limpio y libre deobjetos extraños.►►No dirija nunca una manguera de airecomprimido en dirección a su cuerpo o a otrapersona. Para evitar el riesgo de lesiones, noutilice nunca una manguera de aire comprimidopara limpiar el polvo, la suciedad u otraspartículas de sus ropas.Equipo de protecciónUtilice siempre equipo protector aprobado. Losoperarios y el resto del personal del área detrabajo deben llevar equipo protector, comomínimo:►►Casco de protección►►Protección para los oídos►►Protección ocular contra impactos conprotección lateral►►Protección respiratoria, cu<strong>and</strong>o sea conveniente►►Guantes protectores►►Botas protectorasServicio y mantenimientoEl mantenimiento regular es un prerrequisitopara que el uso de la máquina sea seguro yeficaz. Siga las instrucciones de funcionamientodetenidamente.Antes de realizar cualquier tarea de mantenimientoo cambiar la herramienta de trabajo en lasmáquinas neumáticas, desactive siempre elsuministro de aire y purgue la máquina puls<strong>and</strong>o eldispositivo de puesta en marcha y parada. Luegodesconecte la manguera de aire de la máquina.►►Siempre se deben utilizar piezas originales.Cualquier fallo o defecto originado por lautilización de piezas no originales produce laconsecuente pérdida de garantía.►►Cambie las piezas dañadas de inmediato.►►Sustituya los componentes dañados o gastadoscon el debido tiempo.►►Para realizar una reparación más completade la máquina, acuda al taller autorizado máscercano.►►Al limpiar piezas mecánicas con un disolvente,asegúrese de cumplir con las regulacionesactuales relativas a la salud y la seguridad y deque haya la suficiente ventilación.Herramientas de trabajo►►Mantenga las herramientas limpias y en buenestado. Inspeccione las herramientas de trabajocon regularidad y compruebe que estén afiladasy no estén gastadas.¡Importante! El uso de herramientas de trabajoincorrectas puede inutilizar lamáquina.© 2010 Atlas Copco Construction <strong>Tools</strong> AB | No. 9800 0680 71A | 2010-01-01Instrucciones originales57
www.<strong>Crowder</strong>Supply.com • Toll Free: 888-883-5144Instrucciones de seguridad y de funcionamientoALF 72D, ALF 72D-1, ALF 67/80D, BMK 62S, BMK 91RS<strong>Crowder</strong> Supply Co., Inc. • 8495 Roslyn St., Commerce City, CO 80022 • Toll Free: 888-883-5144 • www.<strong>Crowder</strong>Supply.comINSTRUCCIONES DEFUNCIONAMIENTODiseño y funcionamientoLos empujadores de Atlas Copco del tipo ALF 72D,ALF 72D-1, BMK 62S y ALF 67/80D se utilizan conperforadoras ligeras del tipo BBD y RH. ALF 72D,ALF 72D-1 y ALF 67/80D se utilizan junto con BBD94W y son de accionamiento doble con retornoautomático. BMK 62S se utiliza junto con RH 656W ydebe retraerse manualmente. ALF 72D, ALF 72D-1,BMK 62S y ALF 67/80D incluyen un cilindro de unafase. ALF 67/80D incluye un cilindro de doble fase.Los cilindros son de aluminio excepto por el BMK62S, que es de acero. Los empujadores vanconectados a la perforadora mediante un dispositivoacoplador especial. La presión de aire recomendadaes de 6 bares.El soporte del empujador sirve para ayudar al operadora alzar e empujar la perforadora durante las perforaciones.ACBA.Tipo de máquinaB. Presión de aire comprimido máxima permitidaC. Número de serieD. El símbolo de atención unido al símbolo del librosignifica que el usuario debe leer las instruccionesde seguridad y defuncionamiento antes de usar lamáquina por primera vez.E. El símbolo CE indica que la máquina tiene laaprobación de la CE. Consulte la declaración de laCE que se suministra con la máquina para obtenermás información. Si el símbolo CE no está, significaque la máquina no tiene la aprobación de la CE.DESímbolos y letreros de lamáquinaCada máquina incluye símbolos y letreros importantespara su seguridad y para el cuidado de la máquina.Puede solicitar nuevos letreros mediante la lista depiezas de repuesto.Los símbolos muestran información importante:El símbolo de advertencia, junto con el símbolo delibro, significan que debe leer las Instrucciones deseguridad y de funcionamiento antes de utilizar lamáquina.58© 2010 Atlas Copco Construction <strong>Tools</strong> AB | No. 9800 0680 71a | 2010-01-01Instrucciones originales
www.<strong>Crowder</strong>Supply.com • Toll Free: 888-883-5144ALF 72D, ALF 72D-1, ALF 67/80D, BMK 62S, BMK 91RSInstrucciones de seguridad y de funcionamiento<strong>Crowder</strong> Supply Co., Inc. • 8495 Roslyn St., Commerce City, CO 80022 • Toll Free: 888-883-5144 • www.<strong>Crowder</strong>Supply.comPrincipio de funcionamientode un empujadorFunciónEl movimiento de avance del empujador se alimentamediante aire comprimido, que se dirige al ladoinferior del pistón, empuj<strong>and</strong>o a éste fuera delcilindro. Para el retorno automático (excepto el BMK62S) de la barra del pistón al cilindro, se dirige airecomprimido al lado superior de éste.ALF 72DALF 72D-1BMK 62S1. M<strong>and</strong>o de control de avance2. Pasador de válvula3. Unión roscada de la manguera (12,5 mm)4. Cilindro de avance5. Barra del pistón6. Empuñadura7. Punta con soporte8. Etiqueta de advertenciaPreparaciones antes de lapuesta en marcha1. Compruebe el equipo de la perforadoraCompruebe que todo el equipo de la perforadoraesté en buen estado de funcionamiento.Compruebe que no haya ningún atasco en elpuerto de admisión.Compruebe que los acoplamientos esténfirmemente sujetos y que no presenten fugas.AdvertenciaCompruebe siempre que no haya mangueras oaccesorios dañados o sueltos antes de utilizar lamáquina. Si las mangueras se sueltan puedenprovocar lesiones graves.2. Purgar la manguera de airePurgue todos los días la manguera de aire paralimpiar la suciedad y humedad acumuladas antesde utilizar la perforadora.© 2010 Atlas Copco Construction <strong>Tools</strong> AB | No. 9800 0680 71A | 2010-01-01Instrucciones originales59
Instrucciones de seguridad y de funcionamientowww.<strong>Crowder</strong>Supply.com • Toll Free: 888-883-5144ALF 72D, ALF 72D-1, ALF 67/80D, BMK 62S, BMK 91RS<strong>Crowder</strong> Supply Co., Inc. • 8495 Roslyn St., Commerce City, CO 80022 • Toll Free: 888-883-5144 • www.<strong>Crowder</strong>Supply.com3. Llene el lubricador de aceite¡Nota! Compruebe que el casquillo de buje y el bujede la barrena de perforación estén siemprecubiertos de una película de aceite.¡Nota! Utilice siempre un lubricante recomendado.LubricanteAceite para herramientasde aireRecomendaciónUtilice un aceite mineral paraherramientas neumáticasTemperaturaambiente ºCGrado de viscosidad(ISO 3448)De -30 a 0 ISO VG 32-68De -10 a +20 ISO VG 68-100De +10 a +50 ISO VG 100-1504. Calibre la presión correcta del aire y el aguaUtilice el manómetro nº 9090 0550 80 de Atlas Copcopara comprobar la presión del aire y el agua cu<strong>and</strong>o laperforadora está en funcionamiento.Presión del aireCompruebe que el compresor pueda suministrar a laherramienta el volumen de aire requerido entre 4 y 6 barias.►►Alta presión provoca un funcionamiento brusco ydaños.►►Baja presión genera una velocidad de perforaciónlenta.Presión del aguaEl manómetro incluye una aguja que se inserta sobrela manguera para medir la presión de su interior.¡Importante! Compruebe que la presión del agua seaal menos 1 baria inferior a la presión delaire; si no es así, podría entrar agua enel mecanismo de impacto. Por ejemplo,si la presión del aire es de 6 bares, lapresión del agua debe ser inferior a 5bares para evitar que entre agua en elmecanismo de impacto.Dispositivo acopladorSe necesita un dispositivo acoplador para acoplar elempujador a la perforadora.Perforadora BBD 94 WEl acoplamiento se monta en la parte intermedia dela perforadora.Perforadora RH 656 WEl acoplamiento se monta en la perforadora fijándoloen los pernos laterales.60© 2010 Atlas Copco Construction <strong>Tools</strong> AB | No. 9800 0680 71a | 2010-01-01Instrucciones originales
www.<strong>Crowder</strong>Supply.com • Toll Free: 888-883-5144ALF 72D, ALF 72D-1, ALF 67/80D, BMK 62S, BMK 91RSInstrucciones de seguridad y de funcionamiento<strong>Crowder</strong> Supply Co., Inc. • 8495 Roslyn St., Commerce City, CO 80022 • Toll Free: 888-883-5144 • www.<strong>Crowder</strong>Supply.comAcoplar el empujador ala perforadoraEl empujador deberá fijarse a la perforadora mediante elacoplamiento de la bayoneta.ControlesControles para ALF 72D, ALF 72D-1, ALF67/80D y BMK 91RSM<strong>and</strong>o de control de extensión del empujador (1)Ajuste la fuerza de avance mediante el m<strong>and</strong>o decontrol de empuje del siguiente modo:Gire el botón hacia la izquierda (B) para incrementarla fuerza de alimentación.Gire el m<strong>and</strong>o hacia la derecha (A) para reducir lafuerza de empuje.Cu<strong>and</strong>o el m<strong>and</strong>o de control de avance está enposición cerrada, el empujador se retrae.Pasador de válvula (2)Cu<strong>and</strong>o el pasador de la válvula se empuja hacia elinterior, la fuerza de empuje cesa de forma súbita yanula el ajuste del m<strong>and</strong>o de control del empujador.Esta función se utiliza, por ejemplo, para ajustarla altura de la perforadora, cu<strong>and</strong>o se instala elempujador o cu<strong>and</strong>o hay una tendencia a obstruirse.Cu<strong>and</strong>o el pasador de válvula se presiona, la barradel pistón del empujador se retrae automáticamente.Controles para BMK 62SM<strong>and</strong>o de control de extensión del empujador (1)Ajuste la fuerza de avance mediante el m<strong>and</strong>o decontrol de empuje del siguiente modo:Gire el botón hacia la izquierda (B) para incrementarla fuerza de alimentación.Gire el m<strong>and</strong>o hacia la derecha (A) para reducir lafuerza de empuje.Cu<strong>and</strong>o el m<strong>and</strong>o de control de avance está enposición cerrada, el empujador se retrae.Pasador de válvula (2)Cu<strong>and</strong>o el pasador de la válvula se empuja hacia elinterior, la fuerza de empuje cesa de forma súbita yanula el ajuste del m<strong>and</strong>o de control del empujador.Esta función se utiliza, por ejemplo, para ajustarla altura de la perforadora, cu<strong>and</strong>o se instala elempujador o cu<strong>and</strong>o hay una tendencia a atrancarse.© 2010 Atlas Copco Construction <strong>Tools</strong> AB | No. 9800 0680 71A | 2010-01-01Instrucciones originales61
Instrucciones de seguridad y de funcionamientowww.<strong>Crowder</strong>Supply.com • Toll Free: 888-883-5144ALF 72D, ALF 72D-1, ALF 67/80D, BMK 62S, BMK 91RS<strong>Crowder</strong> Supply Co., Inc. • 8495 Roslyn St., Commerce City, CO 80022 • Toll Free: 888-883-5144 • www.<strong>Crowder</strong>Supply.comCómo perforarPoner en marcha la perforadoraA1. Abra la válvula principal para que salga el airecomprimido.2. Ajuste el m<strong>and</strong>o de control del empujador (C)para dar una fuerza de empuje adecuada paraempezar la perforación.3. Alinee la perforadora de forma que el aceropara barrenas toque el punto del barrenodeseado.4. Desplace la palanca de control (A) un pocohacia delante para accionar el agua de barrido,la percusión y la rotación.5. Empiece el orificio con fuerza de empujereducida.6. Desplace la palanca de control (A) totalmentehacia delante cu<strong>and</strong>o el acero para barrenas sehaya apoyado de manera firme en la roca.7. Ajuste la fuerza de empuje mediante el m<strong>and</strong>ode control (C) para lograr la máxima tasa depenetración.Detener la perforadora1. Tire de la palanca de control (A) hacia atráspara detener la percusión, la rotación y el aguade barrido.2. Gire el m<strong>and</strong>o de control de avance (C) a laposición de cierre.CBReposicionar el empujador1. Apague la percusión y el barrido de la perforadoracon la palanca de control (A).2. Presione el pasador de válvula (B), en el que labarra del pistón se empujará automáticamentehacia atrás, hacia el interior del cilindro delempujador (manualmente en el caso del BMK62S).3. Reposicione el empujador4. Suelte el pasador de válvula (B), en el que labarra del pistón vuelve a desplazarse haciafuera.5. Desplace la palanca de control (A) hacia delante,hasta la posición de funcionamiento.6. Observe que no es necesario tocar el m<strong>and</strong>ode control de avance (C) durante esteprocedimiento.Cu<strong>and</strong>o haya terminado de perforarColoque la perforadora sobre una roca, una tablade madera o un objeto similar para evitar que entrenfragmentos de la perforación y otros materiales extrañosen el casquillo del buje.Apague la presión del agua antes que la presión delaire. Ponga en marcha la perforadora durante unossegundos para eliminar el agua y la humedad despuésde apagar el suministro de agua.MantenimientoEl mantenimiento regular es un requisito previopara la seguridad de la máquina. Sustituya loscomponentes dañados o gastados con el debidotiempo. Para realizar una reparación más completade la máquina, acuda al taller autorizado máscercano.Compruebe si la máquina y las herramientas estándañadas o desgastadas a intervalos regulares. Noutilice herramientas muy desgastadas o dañadas.Al limpiar piezas mecánicas con un disolvente,asegúrese de cumplir con las regulaciones actualesrelativas a la salud y la seguridad y de que haya lasuficiente ventilación.El mantenimiento diario, comprobación regular delas piezas desgastadas y las reparaciones a tiempoevitan averías y aumentan la vida útil de la máquina.Lubrique siempre bien la perforadora y elempujador antes de guardarlos.Guárdelos en un lugar limpio y seco.Asegúrese de que no entren materiales extrañosen la máquina.Limpie siempre la perforadora y el empujador conuna manguera y un trapo después de utilizarlos.62© 2010 Atlas Copco Construction <strong>Tools</strong> AB | No. 9800 0680 71a | 2010-01-01Instrucciones originales
www.<strong>Crowder</strong>Supply.com • Toll Free: 888-883-5144ALF 72D, ALF 72D-1, ALF 67/80D, BMK 62S, BMK 91RSInstrucciones de seguridad y de funcionamiento<strong>Crowder</strong> Supply Co., Inc. • 8495 Roslyn St., Commerce City, CO 80022 • Toll Free: 888-883-5144 • www.<strong>Crowder</strong>Supply.comDiferencias entre las piezas originales yotras piezasAl comprar una pieza, lo primero que debe haceres comprobar que la pieza sea de Atlas Copco. Lamayoría de piezas pueden identificarse.Las piezas de la perforadora suelen estar marcadascon un número de designación y la marca de identidadde Atlas Copco, que es un círculo con una perforadoraen su interior. En algunos casos, la pieza está marcadasólo con el círculo o el número de designación.Las piezas de goma y plástico no suelen estarmarcadas.Las empresas que copian nuestras piezas suelenmarcar las piezas más gr<strong>and</strong>es y caras. Algunaspiezas sólo incluyen el número de pieza, peroalgunas también tienen una marca identificativacon las iniciales del nombre del fabricante. Losnúmeros de designación sobre piezas que no sonoriginales suelen estar estampadas manualmente, loque genera irregularidades. Los números de piezaestampados por Atlas Copco son regulares y cadacifra tiene el mismo tamaño. Además, la profundidadde las cifras y el espacio entre ellas en cada gruposon iguales.Una vez cada turno (después de 8 horas defuncionamiento)1. Compruebe la conexión de la perforadora alempujador.2. Compruebe las mangueras, acoplamientos y controlespor si presentan fugas o están dañados.3. Compruebe que la perforadora y el empujadorestén recibiendo suficiente lubricación. Viertatanto lubricante como sea necesario.4. Drene el separador de aguas.Una vez a la semana (después de 40 horasde funcionamiento)►►Realice una comprobación básica de todas lasfunciones de la perforadora.Desecho de la máquina yeliminación de los residuosLas máquinas usadas y gastadas deben desecharsede tal manera que pueda reciclarse la mayor parteposible de material y que los efectos sobre el medioambiente sean mínimos.© 2010 Atlas Copco Construction <strong>Tools</strong> AB | No. 9800 0680 71A | 2010-01-01Instrucciones originales63
Instrucciones de seguridad y de funcionamientowww.<strong>Crowder</strong>Supply.com • Toll Free: 888-883-5144ALF 72D, ALF 72D-1, ALF 67/80D, BMK 62S, BMK 91RSLocalización y resolución de problemas<strong>Crowder</strong> Supply Co., Inc. • 8495 Roslyn St., Commerce City, CO 80022 • Toll Free: 888-883-5144 • www.<strong>Crowder</strong>Supply.comGuía básica para la localización y resolución de problemasProblema Causa SoluciónFuerza de avanceinsuficienteBaja presión de aireLa válvula 3121 0726 80 se haatascado o las empaquetaduras0663 2124 00 están desgastadas(sólo los modelos ALF).Empaquetadura del vástagodesgastada o deformada.Aumente la presión de aire a 6 bares.Desmonte la válvula y límpiela si es necesario. Sustituyalas empaquetaduras si están desgastadas o deformadas.Sustituya la empaquetadura1Para ver los límites de desgaste y los pares de apriete, consulte la información del documento nº 9853 1086 01 del servicio técnico delas perforadoras Atlas Copco.2Calibrador para el mango hexagonal de 22mm (7/8”) del casquillo de buje nº 3091 0038 00 de Atlas Copco.3Utilice el manómetro nº 9090 0550 80 de Atlas Copco para comprobar la presión del agua y el aire.64© 2010 Atlas Copco Construction <strong>Tools</strong> AB | No. 9800 0680 71a | 2010-01-01Instrucciones originales
www.<strong>Crowder</strong>Supply.com • Toll Free: 888-883-5144ALF 72D, ALF 72D-1, ALF 67/80D, BMK 62S, BMK 91RSInstrucciones de seguridad y de funcionamientoAccesorios<strong>Crowder</strong> Supply Co., Inc. • 8495 Roslyn St., Commerce City, CO 80022 • Toll Free: 888-883-5144 • www.<strong>Crowder</strong>Supply.comAccesorioDesignaciónLubricador para BBC, BBD, RH:BLG 30, para aceite mineral 8202 5102 05CLG 30, para aceite mineral y sintético 8202 5102 39Separador de agua para BBC, BBD, RHVAM 5A, para circulación de aire hasta 120 l/seg (254 pcm) 8092 0110 82Accesorios de línea de aire para 25 mm (1’’)Manguera de goma, 30 m 9030 2041 00Acoplamiento de garra 9000 0313 00Abrazadera de manguera de dos piezas 9000 0197 00Manómetro para el aire comprimido y la presión del aguaCalibrador 9090 0550 80Conjunto de agujas extra 9090 0678 90Tubo de aire comprimido de 25 mm (1’’) para la perforadora yla alimentación, acoplado con conexiones para:BBD 94W junto con ALF 72D, ALF 72D-1, ALF 67/80D y BMK 91RS 9030 2068 00Manguera de aire comprimido de 20 mm (3/4’’) para la perforadoray el empujador, acoplado con conexiones para:RH 656W junto con BMK 62S 9030 2067 00© 2010 Atlas Copco Construction <strong>Tools</strong> AB | No. 9800 0680 71A | 2010-01-01Instrucciones originales65
Instrucciones de seguridad y de funcionamientowww.<strong>Crowder</strong>Supply.com • Toll Free: 888-883-5144ALF 72D, ALF 72D-1, ALF 67/80D, BMK 62S, BMK 91RSDatos técnicos<strong>Crowder</strong> Supply Co., Inc. • 8495 Roslyn St., Commerce City, CO 80022 • Toll Free: 888-883-5144 • www.<strong>Crowder</strong>Supply.comTipo Nº de pedido AdecuadoparaperforadoraTelescópicosimpleAlimentaciónlongitud(mm)Longitudretraído(mm)Longitudde extracción(mm)Peso(kg)Pistóndiámetrointerior(mm)ALF 72D 8321 0201 80 BBD 94W 1300 1970 3270 19 70ALF 72D-1 8321 0201 81 BBD 94W 1200 1830 3030 16 70BMK 62S 8321 0102 02 RH 656W 1300 1815 3115 17 53BMK 91RS 8321 0104 27 BBD 94W 1300 1730 3030 24 67TelescópicodobleALF 67/80D 8321 0201 69 BBD 94W 1855 1595 3450 19 67/80Declaración CE de comformidad (Directiva 2006/42/CE)Atlas Copco Construction <strong>Tools</strong> AB declara por la presente que las máquinas detalladas a continuación seajustana las disposiciones de las Directivas 2006/42/CE (Directiva sobre máquinas).Desbastadoras neumáticas manualesPmax (bar)ALF 72D 7ALF 72D-1 7BMK 62S 7BMK 91RS 7ALF 67/80D 7Representante autorizado para la documentación técnica:Erik SigfridssonAtlas Copco Construction <strong>Tools</strong> ABDragonvägen 2KalmarAdministrador general:Erik SigfridssonFabricante:Atlas Copco Construction <strong>Tools</strong> AB105 23 StockholmSwedenLugar y fecha: Kalmar, 2010-01-0166© 2010 Atlas Copco Construction <strong>Tools</strong> AB | No. 9800 0680 71a | 2010-01-01Instrucciones originales
www.<strong>Crowder</strong>Supply.com • Toll Free: 888-883-5144ALF 72D, ALF 72D-1, ALF 67/80D, BMK 62S, BMK 91RSInstrucciones de seguridad y de funcionamiento<strong>Crowder</strong> Supply Co., Inc. • 8495 Roslyn St., Commerce City, CO 80022 • Toll Free: 888-883-5144 • www.<strong>Crowder</strong>Supply.com© 2010 Atlas Copco Construction <strong>Tools</strong> AB | No. 9800 0680 71A | 2010-01-01Instrucciones originales67
Sumáriowww.<strong>Crowder</strong>Supply.com • Toll Free: 888-883-5144ALF-72D ALF-72D-1 ALF-67-80D BMK-62S BMK-91RSPORTUGUÊS<strong>Crowder</strong> Supply Co., Inc. • 8495 Roslyn St., Commerce City, CO 80022 • Toll Free: 888-883-5144 • www.<strong>Crowder</strong>Supply.comÍndiceINSTRUÇÕES DE SEGURANÇA . . . . . . . . . . . . . . . . . . . . . . . . . . . . . . . . . . . . . . . . . . . . . . . 69Símbolos de segurança usados . . . . . . . . . . . . . . . . . . . . . . . . . . . . . . . . . . . . . . . . . . . . .69Transporte perigoso . . . . . . . . . . . . . . . . . . . . . . . . . . . . . . . . . . . . . . . . . . . . . . . . . . . . . . .69Perigos na operação da máquina e da ferramenta . . . . . . . . . . . . . . . . . . . . . . . . . . . . . .69Perigo de explosão e incêndio . . . . . . . . . . . . . . . . . . . . . . . . . . . . . . . . . . . . . . . . . . . . . .70Perigos relacionados à eletricidade e a objetos escondidos . . . . . . . . . . . . . . . . . . . . .70Projéteis perigosos . . . . . . . . . . . . . . . . . . . . . . . . . . . . . . . . . . . . . . . . . . . . . . . . . . . . . . .71Ruídos perigosos . . . . . . . . . . . . . . . . . . . . . . . . . . . . . . . . . . . . . . . . . . . . . . . . . . . . . . . . .71Sílica e pós perigosos . . . . . . . . . . . . . . . . . . . . . . . . . . . . . . . . . . . . . . . . . . . . . . . . . . . . .71Vibração perigosa . . . . . . . . . . . . . . . . . . . . . . . . . . . . . . . . . . . . . . . . . . . . . . . . . . . . . . . .72Modificações perigosas na máquina . . . . . . . . . . . . . . . . . . . . . . . . . . . . . . . . . . . . . . . . .72Instruções adicionais de segurança . . . . . . . . . . . . . . . . . . . . . . . . . . . . . . . . . . . . . . . . .72Equipamento de proteção . . . . . . . . . . . . . . . . . . . . . . . . . . . . . . . . . . . . . . . . . . . . . . . . . .73Serviço e manutenção . . . . . . . . . . . . . . . . . . . . . . . . . . . . . . . . . . . . . . . . . . . . . . . . . . . .73Ferramentas de trabalho . . . . . . . . . . . . . . . . . . . . . . . . . . . . . . . . . . . . . . . . . . . . . . . . . . .73INSTRUÇÕES DE OPERAÇÃO . . . . . . . . . . . . . . . . . . . . . . . . . . . . . . . . . . . . . . . . . . . . . . . . 74Desenho e Função . . . . . . . . . . . . . . . . . . . . . . . . . . . . . . . . . . . . . . . . . . . . . . . . . . . . . . . .74Avisos e decalques na máquina . . . . . . . . . . . . . . . . . . . . . . . . . . . . . . . . . . . . . . . . . . . . .74Princípio de funcionamento de uma coluna extensível . . . . . . . . . . . . . . . . . . . . . . . . . .75Função . . . . . . . . . . . . . . . . . . . . . . . . . . . . . . . . . . . . . . . . . . . . . . . . . . . . . . . . . . . . . . . 75Preparo antes do início . . . . . . . . . . . . . . . . . . . . . . . . . . . . . . . . . . . . . . . . . . . . . . . . . . . .75Dispositivo de conexão . . . . . . . . . . . . . . . . . . . . . . . . . . . . . . . . . . . . . . . . . . . . . . . . . . . .76Martelo perfurador BBD 94 W . . . . . . . . . . . . . . . . . . . . . . . . . . . . . . . . . . . . . . . . . . . . . 76Martelo perfurador RH 656 W . . . . . . . . . . . . . . . . . . . . . . . . . . . . . . . . . . . . . . . . . . . . . 76Para conectar a coluna exten-sível ao martelo perfurador . . . . . . . . . . . . . . . . . . . . . . .77Controles . . . . . . . . . . . . . . . . . . . . . . . . . . . . . . . . . . . . . . . . . . . . . . . . . . . . . . . . . . . . . . . .77Controles para a ALF 72D, a ALF 72D-1, ALF 67/80D e a BMK 91RS . . . . . . . . . . . . . . 77Controles para a BMK 62S. . . . . . . . . . . . . . . . . . . . . . . . . . . . . . . . . . . . . . . . . . . . . . . . 77Perfuração . . . . . . . . . . . . . . . . . . . . . . . . . . . . . . . . . . . . . . . . . . . . . . . . . . . . . . . . . . . . . . .78Partida do martelo perfurador . . . . . . . . . . . . . . . . . . . . . . . . . . . . . . . . . . . . . . . . . . . . . 78Parada do martelo perfurador . . . . . . . . . . . . . . . . . . . . . . . . . . . . . . . . . . . . . . . . . . . . . 78Recolocação da coluna extensível. . . . . . . . . . . . . . . . . . . . . . . . . . . . . . . . . . . . . . . . . . 78Qu<strong>and</strong>o terminar a perfuração . . . . . . . . . . . . . . . . . . . . . . . . . . . . . . . . . . . . . . . . . . . . . 78Manutenção . . . . . . . . . . . . . . . . . . . . . . . . . . . . . . . . . . . . . . . . . . . . . . . . . . . . . . . . . . . . .78Diferenças entre peças originais e peças não-originais. . . . . . . . . . . . . . . . . . . . . . . . . . 79Uma vez por turno (após 8 horas de funcionamento) . . . . . . . . . . . . . . . . . . . . . . . . . . . 79Uma vez por semana (após 40 horas de funcionamento) . . . . . . . . . . . . . . . . . . . . . . . . 79Descarte de fragmentos e resíduos . . . . . . . . . . . . . . . . . . . . . . . . . . . . . . . . . . . . . . . . . .79Solução de Problemas . . . . . . . . . . . . . . . . . . . . . . . . . . . . . . . . . . . . . . . . . . . . . . . . . . . . .80Guia básico para solução de problemas . . . . . . . . . . . . . . . . . . . . . . . . . . . . . . . . . . . . . 80Acessórios . . . . . . . . . . . . . . . . . . . . . . . . . . . . . . . . . . . . . . . . . . . . . . . . . . . . . . . . . . . . . .81Dados Técnicos . . . . . . . . . . . . . . . . . . . . . . . . . . . . . . . . . . . . . . . . . . . . . . . . . . . . . . . . . .82Declaração de Conformidade da CE(Directiva da CE2006/42/CE) . . . . . . . . . . . . . . . . . . . . . . . . . . . . . . . . . . . . . . . . . . . . . . . .8268© 2010 Atlas Copco Construction <strong>Tools</strong> AB | No. 9800 0680 71a | 2010-01-01Instruções originais
www.<strong>Crowder</strong>Supply.com • Toll Free: 888-883-5144ALF 72D, ALF 72D-1, ALF 67/80D, BMK 62S, BMK 91RS Instruções de segurança e funcionamento<strong>Crowder</strong> Supply Co., Inc. • 8495 Roslyn St., Commerce City, CO 80022 • Toll Free: 888-883-5144 • www.<strong>Crowder</strong>Supply.comINSTRUÇÕES DESEGURANÇAPara reduzir o risco de danos graves ou de morte,leia as instruções de segurança antes de começara trabalhar com a máquina.Mantenha estas instruções de segurança àdisposição nos locais de trabalho, forneça cópiasaos funcionários e certifique-se de que todos leiamas instruções de segurança antes de começar atrabalhar e/ou fazer manutenção na máquina.Siga todas as instruções de segurança fornecidasneste manual.Todas as instruções de segurança estão emconformidade com a respectiva legislação emvigor na União Européia.Você também deve respeitar todas as outrasdiretrizes nacionais e regionais.Nos países que não pertencem à União Européia,deverá ser aplicada a legislação local em vigor.Todas as outras legislações deverão serobservadas.Símbolos de segurançausadosAs indicações Perigo, Atenção e Cuidado têm ossignificados a seguir:PerigoAtençãoCuidadoTransporte perigosoIndica uma situação deperigo iminente que, casonão seja evitada, resultaráem morte ou danos graves.Indica uma situação deperigo potencial que,caso não seja evitada,pode resultar em morte oudanos graves.Indica uma situação que,caso não seja evitada,pode resultar em danospessoais ou materiais.CuidadoO martelo perfurador e a coluna extensível sãopesados. Para evitar danos pessoais durante otransporte à área de operação►►Use um reboque ou peça auxílio a um colegadurante o transporte.Perigos na operação damáquina e da ferramentaAtençãoDurante a operação, a máquina pode movimentarsede forma repentina ou inesperada e isso podecausar danos. Além disso, perder o equilíbrio ouescorregar poderá causar danos. Para reduzir osriscos:►►Mantenha sempre uma posição estável, comos pés separados e alinhados aos seus ombrosde forma que o peso de seu corpo fique bemdistribuído.►►Permaneça firme e sempre segure a máquinacom ambas as mãos.►►Não coloque a máquina em funcionamentoqu<strong>and</strong>o esta estiver pousada no chão.►►Certifique-se de que a alça esteja limpa, semgraxa e óleo.AtençãoO funcionamento acidental da máquina podecausar danos.►►Deixe suas mãos distantes do dispositivo departida e de parada até que esteja pronto parainiciar o trabalho.AtençãoA ferramenta de trabalho é exposta a gr<strong>and</strong>estensões durante o uso da máquina e, após umdeterminado período de utilização, poderá partir-sedevido a fadiga. Se a ferramenta quebrar, podemocorrer movimentos inesperados ou bruscos.Esses movimentos inesperados ou bruscos podemcausar danos graves.►►Mantenha sempre uma posição estável, comos pés separados e alinhados aos seus ombrosde forma que o peso de seu corpo fique bemdistribuído.►►Regularmente, verifique se há desgaste naferramenta de trabalho e se há sinais de danosou rachaduras visíveis.AtençãoO uso de um tamanho incorreto da haste da ferramentade trabalho pode resultar na perda da ferramenta detrabalho ou ela poderá deslizar durante a operação.O deslizamento ou a perda da ferramenta de trabalhopode causar danos pessoais.►►Antes de inserir a ferramenta de trabalho,certifique-se de que o tamanho da haste estejacorreto para que ela possa ser usada namáquina.►►Ferramentas de trabalho sem colar não podemser usadas.© 2010 Atlas Copco Construction <strong>Tools</strong> AB | No. 9800 0680 71a | 2010-01-01Instruções originais69
www.<strong>Crowder</strong>Supply.com • Toll Free: 888-883-5144Instruções de segurança e funcionamento ALF 72D, ALF 72D-1, ALF 67/80D, BMK 62S BMK 91RS<strong>Crowder</strong> Supply Co., Inc. • 8495 Roslyn St., Commerce City, CO 80022 • Toll Free: 888-883-5144 • www.<strong>Crowder</strong>Supply.comAtençãoSe o retentor da ferramenta na máquina nãoestiver na posição travada, a ferramenta pode serejetada com muita força, o que pode causar danosgraves.►►Após montar e travar a ferramenta de trabalho,verifique o funcionamento da trava forç<strong>and</strong>o-ano sentido contrário.►►Certifique-se de que a ferramenta de trabalhoesteja totalmente inserida e que o retentor daferramenta esteja na posição travada antes deligar a máquina.►►Nunca aponte a ferramenta de trabalho paravocê ou para qualquer outra pessoa.AtençãoTrocar a ferramenta de trabalho enquanto amáquina estiver em funcionamento pode causardanos graves.►►Sempre desligue a máquina antes de trocar aferramenta.►►Nunca pegue ou toque no aço de uma broca emmovimento.AtençãoSe uma mangueira de ar comprimido se soltar, elapode chicotear e causar danos pessoais ou morte.Para reduzir os riscos:►►Verifique se a mangueira de ar comprimido e asconexões não estão danificadas.►►Verifique se todas as conexões de arcomprimido estão bem encaixadas.►►Nunca tente desconectar uma mangueira de arcomprimido pressurizada. Primeiro desligue ofornecimento de ar comprimido no compressore, em seguida, deixe a máquina sangrarativ<strong>and</strong>o o dispositivo de partida e de parada.AtençãoSe o aço da broca ficar presa durante a operação,a máquina toda começará a girar se não forsegurada com firmeza. Essa rotação inesperadade toda a máquina pode causar danos graves.►►Permaneça firme e sempre segure a máquinacom ambas as mãos.►►Certifique-se de que a alça esteja limpa,sem graxa e óleo.►►Nunca perfure em um orifício antigo.AtençãoHá o risco de que objetos sejam arrastados oucapturados pelo aço de uma broca em movimento.Isso pode causar danos graves.►►Nunca pegue ou toque no aço de uma broca emmovimento.►►Evite usar roupas que podem ficar presas.Se tiver cabelos compridos, prenda-os com umarede para cabelos.Perigo de explosão eincêndioPerigoSe a máquina entrar em contato com objetosexplosivos, poderá ocorrer uma explosão. Asexplosões podem causar danos graves ou morte.Para reduzir o risco de explosão:►►Nunca use o equipamento para fazerperfurações perto de explosivos, incluindodinamite e outros explosivos para rochas.►►Certifique-se de que não haja explosivos nasrochas.►►Nunca perfure em um orifício antigo.AtençãoA perfuração e o trabalho com determinadosmateriais podem causar faíscas que podeminflamar gases explosivos e causar explosões. Asexplosões podem causar danos graves ou morte.Para reduzir o risco de explosão:►►Nunca opere a máquina em um ambienteexplosivo.►►Não utilize a máquina próximo a materiaisinflamáveis, vapores ou poeira.►►Assegure-se de que não haja fontes de gás nãodetectadas.Perigos relacionados àeletricidade e a objetosescondidosPerigoA máquina não tem isolamento elétrico. Se elaentrar em contato com alguma eletricidade, poderáresultar em danos graves ou morte.►►Para reduzir o risco de danos ou morte, nuncaopere a máquina perto de fiação elétrica ou deoutra fonte de eletricidade.►►Certifique-se de que não haja uma fiaçãoelétrica escondida ou outras fontes deeletricidade.70© 2010 Atlas Copco Construction <strong>Tools</strong> AB | No. 9800 0680 71a | 2010-01-01Instruções originais
www.<strong>Crowder</strong>Supply.com • Toll Free: 888-883-5144ALF 72D, ALF 72D-1, ALF 67/80D, BMK 62S, BMK 91RS Instruções de segurança e funcionamento<strong>Crowder</strong> Supply Co., Inc. • 8495 Roslyn St., Commerce City, CO 80022 • Toll Free: 888-883-5144 • www.<strong>Crowder</strong>Supply.comAtençãoDurante a perfuração, fios e tubos escondidosconstituem um perigo que pode resultar em danosgraves.►►Antes de começar a perfuração, verifique acomposição do material em que o trabalho vaiser realizado.►►Fique atento a cabos e tubos escondidos (deeletricidade, telefone, água, gás e esgoto, porexemplo).►►Se, aparentemente, a ferramenta atingirum objeto escondido, desligue a máquinaimediatamente.►►Certifique-se de que não haja mais perigo antesde continuar.Projéteis perigososAtençãoDurante a perfuração, estilhaços ou outraspartículas do material perfurado podem se tornarprojéteis e causar danos pessoais ao atingir ooperador ou outras pessoas.►►Use equipamentos de proteção pessoalaprovados, inclusive óculos de segurança maisresistentes a impacto com proteção lateral parareduzir o risco de ferimento com um projétil.CuidadoDurante a limpeza, partículas e água suja podemser expelidas do orifício da broca e causar danospessoais.►►Afaste-se e proteja os olhos antes de limpar aperfuração com ar.►►Utilize sempre proteção ocular resistente aimpactos com proteção lateral.►►Certifique-se de que nenhum colega de trabalhoesteja próximo à máquina no momento dalimpeza.Ruídos perigososAtençãoNíveis de som altos podem causar perdapermanente da audição.►►Use protetores de ouvido de acordo com asregulamentações de saúde e segurança.Sílica e pós perigososAtençãoA exposição à sílica cristalina (algumas vezeschamada “pó de sílica”) proveniente da perfuração,ou de outras atividades envolvendo rochas,concreto, asfalto ou outros materiais, podecausar silicose (uma doença grave no pulmão)e enfermidades relacionadas à silicose, alémde câncer ou morte. A sílica é um dos principaiscomponentes de rocha, areia e minérios.Para reduzir a exposição à sílica:►►Use controles de maquinário adequadospara reduzir a quantidade de sílica no ar e aformação de pó em equipamentos e superfícies.Os exemplos desses controles incluem:ventilação de exaustão e sistemas de coletade pó, sprays de água e perfuração úmida.Certifique-se de que os controles estejaminstalados adequadamente e que recebammanutenção.►►Utilize corretamente os respiradores departículas aprovados (e faça a manutençãodeles) qu<strong>and</strong>o os controles de maquinário nãoforem suficientes para reduzir a exposição a umnível abaixo do permitido.►►Participe do monitoramento de ar, façaexames médicos e participe de programasde treinamento oferecidos aos funcionários equ<strong>and</strong>o exigidos por lei.►►Use roupas de proteção laváveis oudescartáveis no local de trabalho; tome banhoe vista roupas limpas antes de deixar o local detrabalho para reduzir a sua exposição à sílicae a de outras pessoas, carros, casas e outrasáreas também.►►Não coma, beba ou use produtos de tabaco emáreas em que haja pó contendo sílica cristalina.►►Lave as mãos e o rosto antes de comer, beberou usar produtos de tabaco fora da área deexposição.►►Trabalhe em conjunto com seu empregadorpara reduzir a exposição à sílica em seu localde trabalho.AtençãoAlguns tipos de pó, fumaça ou outros materiaisque permanecem no ar e são gerados durante ouso da máquina podem conter elementos químicosconhecidos no estado da Califórnia por causaremcâncer e defeitos congênitos ou outros danosreprodutivos. Alguns exemplos desses produtosquímicos são:© 2010 Atlas Copco Construction <strong>Tools</strong> AB | No. 9800 0680 71a | 2010-01-01Instruções originais71
www.<strong>Crowder</strong>Supply.com • Toll Free: 888-883-5144Instruções de segurança e funcionamento ALF 72D, ALF 72D-1, ALF 67/80D, BMK 62S BMK 91RS<strong>Crowder</strong> Supply Co., Inc. • 8495 Roslyn St., Commerce City, CO 80022 • Toll Free: 888-883-5144 • www.<strong>Crowder</strong>Supply.com►►Sílica cristalina e cimento e outros produtos dealvenaria.►►Arsênico e cromo de borracha quimicamentetratada.►►Chumbo de tintas à base de chumbo.Para reduzir a exposição a esses produtosquímicos, trabalhe em uma área bem ventiladae com equipamento de segurança aprovado,como máscaras de proteção contra pó elaboradasespecialmente para filtrar partículas microscópicas.Vibração perigosaAtençãoO uso normal e correto da máquina expõe ooperador a vibração. A exposição regular efreqüente do operador a vibração pode causarou agravar danos ou distúrbios nos dedos,mãos, punhos, braços, ombros e/ou outraspartes do corpo, incluindo danos debilitantesou permanentes ou distúrbios que podem sedesenvolver gradualmente por semanas, mesesou anos. Esses danos ou distúrbios podem incluirlesões no sistema circulatório, no sistema nervoso,nas juntas e, possivelmente, em outras estruturascorporais.Se ocorrerem sintomas como dormência,formigamento, dor, distúrbios motores, fraquezanas mãos, clareamento da pele ou outros aqualquer momento, ao usar a máquina ou mesmoqu<strong>and</strong>o não estiver us<strong>and</strong>o-a, interrompa suasatividades com a máquina e procure atendimentomédico. O uso contínuo da máquina apósa ocorrência de qualquer um dos sintomasmencionados pode aumentar o risco de que setornem mais graves e/ou permanentes.As recomendações a seguir podem ajudar ooperador a reduzir a exposição a vibração:►►Deixe que a ferramenta faça o trabalho. Faça omínimo de força com as mãos, o suficiente paracontrolar e operar a máquina corretamente ecom segurança.►►Qu<strong>and</strong>o o mecanismo de percussão for ativado,o único contato do seu corpo com a máquinadeve ser o de suas mãos com a alça. Evitequalquer outro tipo de contato, como porexemplo apoiar qualquer parte do corpo namáquina ou inclinar-se sobre ela na tentativade aumentar a força de operação. É importantetambém não manter o acionador engatadoenquanto estiver retir<strong>and</strong>o a ferramenta dasuperfície trabalhada.►►Certifique-se de que a ferramenta de trabalhotenha o tamanho apropriado, esteja em bomestado de conservação e não apresentedesgaste. As ferramentas de trabalhomalconservadas, desgastadas ou fora dotamanho apropriado, levam a um tempo maiorpara completar a tarefa (e um período maior deexposição a vibração) e podem resultar em umalto nível de exposição a vibração ou contribuirpara que isso ocorra.►►Interrompa imediatamente o trabalho sea máquina começar a vibrar com forçarepentinamente. Antes de reiniciar o trabalho,localize e remova a causa do aumento davibração.►►Siga a pressão do ar recomendada ao operara máquina. A pressão do ar mais alta ou maisbaixa pode resultar, potencialmente, em um altonível de vibração.►►Não pegue, segure ou toque na ferramenta detrabalho inserida ao usar a máquina.►►Participe da avaliação ou monitoramento dasaúde, dos exames médicos e dos programasde treinamento oferecidos aos funcionários equ<strong>and</strong>o exigidos por lei.Consulte a "Declaração de Ruído e Vibração" damáquina, localizada no final destas Instruções desegurança e operação.Modificações perigosas namáquinaAtençãoQualquer tipo de modificação nas máquinas sem aaprovação da Atlas Copco pode resultar em danosgraves a si mesmo e a outras pessoas.►►A máquina não deve ser modificada sem apermissão da Atlas Copco.►►Use somente peças e acessórios originaisaprovados pela Atlas Copco.Instruções adicionais desegurança►►As máquinas e acessórios só devem ser usadospara a finalidade proposta.►►Somente pessoas qualificadas e treinadaspodem operar ou fazer manutenção namáquina.72© 2010 Atlas Copco Construction <strong>Tools</strong> AB | No. 9800 0680 71a | 2010-01-01Instruções originais
www.<strong>Crowder</strong>Supply.com • Toll Free: 888-883-5144ALF 72D, ALF 72D-1, ALF 67/80D, BMK 62S, BMK 91RS Instruções de segurança e funcionamento<strong>Crowder</strong> Supply Co., Inc. • 8495 Roslyn St., Commerce City, CO 80022 • Toll Free: 888-883-5144 • www.<strong>Crowder</strong>Supply.com►►Saiba como desligar a máquina em caso deemergência.►►A pressão do ar máxima permitida para amáquina não deve ser excedida.►►Solte imediatamente o dispositivo de partidae parada no caso de interrupção da fonte dealimentação.►►Sempre inspecione o equipamento antes dautilização. Não utilize o equipamento se vocêsuspeitar que ele está danificado.►►Aja sempre com bom senso.►►Preste atenção e veja o que está fazendo.►►Não use a máquina qu<strong>and</strong>o estiver cansado ousob influência de drogas, álcool ou qualqueroutra coisa que possa afetar sua visão, suasreações ou sua capacidade de julgar e analisara situação.►►Participe dos cursos de segurança e detreinamento.►►Nunca golpeie ou faça mau uso de qualquer tipode equipamento.►►Mantenha a máquina e as ferramentas emlocal seguro, trancadas e fora do alcance decrianças.►►Certifique-se de que todos os equipamentosconectados e relacionados passem pormanutenção adequada.►►Em toda máquina há avisos e etiquetasimportantes para sua segurança e para ocuidado com a máquina. Certifique-se de que osavisos estejam sempre legíveis. Novos avisose etiquetas podem ser solicitados na lista depeças sobressalentes.►►Certifique-se de que nenhum indivíduo nãoautorizado tenha acesso à zona de trabalho.►►Mantenha o local de trabalho limpo e livre deobjetos estranhos.►►Nunca aponte uma mangueira de ar comprimidopara você ou para qualquer outra pessoa. Paraevitar o risco de sofrer alguma lesão, nunca usear comprimido para remover pó, sujeira, etc. desuas roupas.Equipamento de proteçãoSempre use equipamentos de proteção aprovados.Os operadores e todas as outras pessoas na áreade trabalho devem usar equipamentos de proteçãoque, no mínimo, incluam:►►Capacete de proteção►►Proteção auditiva►►Proteção ocular resistente a impactos comproteção lateral►►Proteção respiratória, qu<strong>and</strong>o apropriada►►Luvas de proteção►►Botas de proteçãoServiço e manutençãoA manutenção regular é um pré-requisito paramanter a segurança e eficiência da máquina. Sigaas instruções de operação com cuidado.Antes de realizar qualquer tipo de manutençãoou trocar a ferramenta de trabalho em máquinaspneumáticas, sempre desligue o fornecimentode ar e deixe a máquina sangrar pression<strong>and</strong>oo dispositivo de partida e parada. Em seguida,desconecte a mangueira de ar da máquina.►►Utilize apenas peças autorizadas. Quaisquerdanos ou mau funcionamento causados pelautilização de peças não autorizadas não sãoabrangidos pela Garantia ou Fiabilidade doProduto.►►Troque as peças danificadas imediatamente.►►Substitua os componentes danificados edesgastados no momento adequado.►►Para obter outros tipos de serviços, entre emcontato com a oficina autorizada mais próxima.►►Ao limpar as peças mecânicas com solvente,assegure-se de que tenha seguido asregulamentações atuais de saúde e segurançae que haja ventilação satisfatória.Ferramentas de trabalho►►Mantenha as ferramentas limpas e em boascondições de uso. Inspecione as ferramentasde trabalho regularmente e certifique-se de queelas estejam afiadas e sem sinais de desgaste.Observação! Pode ocorrer a destruição damáquina se forem utilizadas ferramentas detrabalho incorretas.© 2010 Atlas Copco Construction <strong>Tools</strong> AB | No. 9800 0680 71a | 2010-01-01Instruções originais73
www.<strong>Crowder</strong>Supply.com • Toll Free: 888-883-5144Instruções de segurança e funcionamento ALF 72D, ALF 72D-1, ALF 67/80D, BMK 62S BMK 91RS<strong>Crowder</strong> Supply Co., Inc. • 8495 Roslyn St., Commerce City, CO 80022 • Toll Free: 888-883-5144 • www.<strong>Crowder</strong>Supply.comINSTRUÇÕES DEOPERAÇÃODesenho e FunçãoAs colunas extensíveis da Atlas Copco do tipo ALF72D, ALF 72D-1, BMK 62S e ALF 67/80D são usadascom martelos perfuradores leves do tipo BBD e RH.As ALF 72D, ALF 72D-1 e ALF 67/80D são usadascom o BBD 94W e possuem ação dupla com retornoautomático. A BMK 62S é usada com o RH 656W eprecisa ser retraída manualmente. A ALF 72D, aALF 72D-1, a BMK 62S e a ALF 67/80D são equipadascom um cilindro de um estágio. A ALF 67/80Dé equi-pada com um cilindro de dois estágios. Oscilindros são feitos de alumínio com exceção daBMK 62S, cujo cilindro é de aço. As colunas extensíveissão conectadas ao martelo perfurador por umdispositivo especial de conexão. A pressão de arrecomendada é de 6 bar.O suporte da coluna extensível serve para ajudar ooperador a levantar e a avançar o martelo perfuradordurante as operações de perfuração.ACBA. Tipo de máquinaB. Pressão máxima permitida de ar comprimidoC. Número de sérieD. O símbolo de atenção, juntamente com o símbolode livro, significa que o utilizador temque ler asinstruções de segurança e operação antes de poderutilizar o equipamento pela primeira vez.E. O símbolo CE significa que a máquina estáaprovada pela CE. Consulte a Declaração CE queé fornecida com o equipamento para obter maisinformações. Se o símbolo CE não estiver presente,is so significa que a máquina não está aprovada pelaCE.DEAvisos e decalques namáquinaEm toda máquina há avisos e decalques importantespara sua segurança e para o cuidado com amáquina. Novos decalques podem ser solicitados nalista de peças sobressalentes.Os avisos mostram informações importantes:O símbolo de atenção junto com o símbolo do livrosignifica que as Instruções de segurança e operaçãodevem ser lidas antes de utilizar a máquina.74© 2010 Atlas Copco Construction <strong>Tools</strong> AB | No. 9800 0680 71a | 2010-01-01Instruções originais
www.<strong>Crowder</strong>Supply.com • Toll Free: 888-883-5144ALF 72D, ALF 72D-1, ALF 67/80D, BMK 62S, BMK 91RS Instruções de segurança e funcionamento<strong>Crowder</strong> Supply Co., Inc. • 8495 Roslyn St., Commerce City, CO 80022 • Toll Free: 888-883-5144 • www.<strong>Crowder</strong>Supply.comPrincípio de funcionamentode uma coluna extensívelFunçãoO movimento de avanço da coluna extensível é feitopelo ar comprimido, que é direcionado para o ladoinferior do pistão e empurra-o para fora do cilindro. Parao retorno automático (com exceção da BMK 62S) dahaste do pistão para dentro do cilindro, o ar comprimidoé direcionado para o lado superior do pistão.ALF 72DALF 72D-1BMK 62S1. Botão de controle de avanço2. Pino da válvula3. Bico da mangueira (12,5 mm)4. Cilindro de avanço5. Haste do pistão6. Cabo7. Cavilha com suporte8. Etiqueta de atençãoPreparo antes do início1. Verifique o equipamento de perfuraçãoVerifique se todo o equipamento de perfuraçãoestá em boas condições de funcionamento.Certifique-se de que a porta de entrada de ar nãoesteja obstruída.Certifique-se de que as uniões estejam bemapertadas e à prova de vazamentos.AtençãoVerifique sempre se há mangueiras e uniõesdanificadas ou frouxas antes da operação. Enrolaras mangueiras pode causar danos graves.2. Ventile através da mangueira de arTodos os dias, antes de usar o martelo perfurador,ventile a mangueira de ar para eliminar a sujeira ea umidade acumulada.3. Encha o canal lubrificante com óleoObservação! Certifique-se de que a bucha e ahaste do aço de perfuração sempreestejam revestidas por uma camadade óleo.© 2010 Atlas Copco Construction <strong>Tools</strong> AB | No. 9800 0680 71a | 2010-01-01Instruções originais75
www.<strong>Crowder</strong>Supply.com • Toll Free: 888-883-5144Instruções de segurança e funcionamento ALF 72D, ALF 72D-1, ALF 67/80D, BMK 62S BMK 91RS<strong>Crowder</strong> Supply Co., Inc. • 8495 Roslyn St., Commerce City, CO 80022 • Toll Free: 888-883-5144 • www.<strong>Crowder</strong>Supply.comObservação! Sempre use um lubrificanterecomendado.LubrificanteÓleo paraferramenta aar comprimidoRecomendaçõesUse um óleo com base mineralTemperaturaambiente °CGrau de viscosidade(ISO 3448)-30 a 0 ISO VG 32-68-10 a +20 ISO VG 68-100+10 a +50 ISO VG 100-1504. Calibre a pressão correta de ar e de águaUse o medidor de pressão Atlas Copco nº9090 0550 80 para verificar a pressão de águae de ar qu<strong>and</strong>o o martelo perfurador estiver emfuncionamento.Pressão do arAssegure-se de que o compressor possa fornecer ovolume de ar exigido na ferramenta com 4 a 6 bar depressão.►►Alta pressão causa operação irregular e danos.►►Baixa pressão resulta em uma velocidade lentana perfuraçãoPressão da águaO medidor de pressão é equipado com uma agulhaque é pressionada na mangueira para medir apressão interna.Observação! Certifique-se de que a pressão daágua seja pelo menos 1 bar a menosque a pressão do ar, caso contrário, aágua poderá entrar no mecanismo deimpacto. Por exemplo, se a pressãodo ar for 6 bar, a pressão da águadeve ser inferior a 5 bar para evitarque a água entre no mecanismo deimpacto.Dispositivo de conexãoÉ necessário usar um dispositivo de conexão paraacoplar a coluna extensível ao martelo perfurador.Martelo perfurador BBD 94 WA conexão é encaixada na parte intermediária domartelo perfurador.Martelo perfurador RH 656 WA conexão é encaixada no martelo perfurador combraçadeiras nos parafusos laterais.76© 2010 Atlas Copco Construction <strong>Tools</strong> AB | No. 9800 0680 71a | 2010-01-01Instruções originais
www.<strong>Crowder</strong>Supply.com • Toll Free: 888-883-5144ALF 72D, ALF 72D-1, ALF 67/80D, BMK 62S, BMK 91RS Instruções de segurança e funcionamento<strong>Crowder</strong> Supply Co., Inc. • 8495 Roslyn St., Commerce City, CO 80022 • Toll Free: 888-883-5144 • www.<strong>Crowder</strong>Supply.comPara conectar a coluna extensívelao martelo perfuradorA coluna extensível deve ser fixada ao marteloperfurador us<strong>and</strong>o a união da baioneta.ControlesControles para a ALF 72D, a ALF 72D-1,ALF 67/80D e a BMK 91RSBotão de controle de Avanço da ColunaExtensível (1)Ajuste a força de avanço us<strong>and</strong>o o botão de controlede avanço da seguinte maneira:Gire o botão em sentido anti-horário (B) para aumentara força de avanço.Gire o botão em sentido horário (A) para diminuir aforça de avanço.Qu<strong>and</strong>o o botão de controle de avanço estiver naposição fechada, a coluna extensível serápressurizada.Pino da válvula (2)Qu<strong>and</strong>o o pino da válvula for empurrado, a força deavanço será interrompida abruptamente, anul<strong>and</strong>o,assim, o ajuste no botão de controle de avanço. Orecurso é usado, por exemplo, para ajustar a alturado martelo perfurador ao acoplar a coluna extensívelou qu<strong>and</strong>o há tendência a um travamento.Qu<strong>and</strong>o o pino da válvula for pressionado, a hastedo pistão na coluna extensível será retraída automaticamente.Controles para a BMK 62SBotão de controle de Avanço da ColunaExtensível (1)Ajuste a força de avanço us<strong>and</strong>o o botão de controlede avanço da seguinte maneira:Gire o botão em sentido anti-horário (B) para aumentara força de avanço.Gire o botão em sentido horário (A) para diminuir aforça de avanço.Qu<strong>and</strong>o o botão de controle de avanço estiverna posição fechada, a coluna extensível serápressurizada.Pino da válvula (2)Qu<strong>and</strong>o o pino da válvula for empurrado, a força deavanço será interrompida abruptamente, anul<strong>and</strong>o,assim, o ajuste no botão de controle de avanço. Orecurso é usado, por exemplo, para ajustar a alturado martelo perfurador ao acoplar a coluna extensívelou qu<strong>and</strong>o há tendência a um travamento.© 2010 Atlas Copco Construction <strong>Tools</strong> AB | No. 9800 0680 71a | 2010-01-01Instruções originais77
www.<strong>Crowder</strong>Supply.com • Toll Free: 888-883-5144Instruções de segurança e funcionamento ALF 72D, ALF 72D-1, ALF 67/80D, BMK 62S BMK 91RS<strong>Crowder</strong> Supply Co., Inc. • 8495 Roslyn St., Commerce City, CO 80022 • Toll Free: 888-883-5144 • www.<strong>Crowder</strong>Supply.comPerfuraçãoPartida do martelo perfuradorA1. Abra a válvula principal de ar comprimido.2. Ajuste o botão de controle de avanço (C) deforma que ele possa fornecer uma força deavanço adequada para iniciar o emboque dofuro.3. Alinhe o martelo perfurador de modo que o açode perfuração encoste no ponto do emboquedesejado.4. Mova um pouco a alavanca de aceleração (A)para a frente. Isso iniciará o fluxo de água, apercussão e a rotação.5. Emboque o furo com força reduzida de avanço.6. Mova a alavanca de aceleração (A) totalmentepara a frente, assim que o aço de perfuraçãoficar sobre uma base segura na rocha.7. Ajuste a força de avanço us<strong>and</strong>o o botão decontrole (C) de modo que a taxa máxima depenetração seja obtida.Parada do martelo perfurador1. Puxe a alavanca de aceleração (A) para trás. Issoparará a percussão, a rotação e o fluxo de água.2. Gire o botão de controle de avanço (C) para aposição fechada.CBRecolocação da coluna extensível1. Desative a percussão e o fluxo do marteloperfurador com a alvanca de aceleração (A).2. Pressione o pino da válvula (B), onde a hastedo pistão é puxada automaticamente para trás,para o cilindro da coluna extensível (manualmentena BMK 62S).3. Recolocação da coluna extensível.4. Solte o pino da válvula (B), onde a haste dopistão movimenta-se para fora novamente.5. Mova a alavanca do acelerador (A) para frenteem direção à posição de trabalho.6. Observe que o botão de controle de avanço(C) não necessita ser tocado durante esteprocedimento.Qu<strong>and</strong>o terminar a perfuraçãoColoque o martelo perfurador sobre uma pedra, suportede madeira ou objeto similar para evitar queos detritos da furação e outros materiais estranhosentrem na bucha.Desligue a pressão da água antes da pressão doar. Faça o martelo perfurador funcionar por algunssegundos para limpar a água e a umidade depoisque a água tiver sido desligada.ManutençãoA manutenção regular é um pré-requisito para asegurança da máquina. Substitua os componentesdanificados e desgastados no momento adequado.Para obter outros tipos de serviços, entre em contatocom a oficina autorizada mais próxima.Verifique regularmente se há desgaste e danos namáquina e nas ferramentas. Não use ferramentasmuito desgastadas ou danificadas.Ao limpar as peças mecânicas com solvente, asseguresede que tenha seguido as regulamentaçõesatuais de saúde e segurança e garanta que hajaventilação suficiente.A manutenção diária, a verificação regular do desgastedas peças e a realização de reparos no tempocerto evita enguiços e aumenta a vida útil da máquina.Sempre coloque óleo no reservatório do marteloperfurador e da coluna extensível antes de guardálos.Guarde-os em local limpo e seco.Certifique-se de que não haja materiais estranhosna máquina.Sempre abaixe a mangueira e limpe o marteloperfurador e a coluna extensível após o uso.78© 2010 Atlas Copco Construction <strong>Tools</strong> AB | No. 9800 0680 71a | 2010-01-01Instruções originais
www.<strong>Crowder</strong>Supply.com • Toll Free: 888-883-5144ALF 72D, ALF 72D-1, ALF 67/80D, BMK 62S, BMK 91RS Instruções de segurança e funcionamento<strong>Crowder</strong> Supply Co., Inc. • 8495 Roslyn St., Commerce City, CO 80022 • Toll Free: 888-883-5144 • www.<strong>Crowder</strong>Supply.comDiferenças entre peças originais e peçasnão-originaisAo comprar uma peça, a primeira coisa a fazer éverificar se a peça é da Atlas Copco. A maioria daspeças pode ser identificada.As peças do martelo perfurador normalmente são marcadascom o número de peça e com a marca de identidadeda Atlas Copco que é um círculo com um marteloperfurador dentro dele. Em alguns casos, a peça é marcadaapenas com o círculo ou apenas com o número depeça.Peças plásticas e emborrachadas normalmente nãosão marcadas.Os concorrentes que copiam nossas peças, geralmentemarcam as peças maiores e mais caras.Algumas peças apresentam apenas o número depeça, mas algumas têm também uma marca de identidadecom as iniciais do nome do fabricante. Os númerosde peças não-originais são, na maioria, estampadosà mão, o que pode resultar em irregularidades.Os números de peças estampados pela Atlas Copcosão regulares e as figuras individuais são do mesmotamanho. Além disso, a profundidade das figuras e oespaçamento entre as figuras de cada grupo são osmesmos.Uma vez por turno (após 8 horas defuncionamento)1. Verifique a conexão do martelo perfurador coma coluna extensível.2. Verifique se há vazamento ou danos nasmangueiras, nas uniões e nos controles.3. Certifique-se de que o martelo perfuradore a coluna extensível estejam recebendolubrificação suficiente. Encha o canallubrificante de acordo com a necessidade.4. Drene o separador de água.Uma vez por semana (após 40 horas defuncionamento)►►Faça uma verificação básica de todas as funçõesdo equipamento de perfuração.Descarte de fragmentos eresíduosMáquinas usadas e desgastadas devem ser descartadasde forma que a maioria do material possa serreciclada e o impacto ambiental seja mínimo.© 2010 Atlas Copco Construction <strong>Tools</strong> AB | No. 9800 0680 71a | 2010-01-01Instruções originais79
www.<strong>Crowder</strong>Supply.com • Toll Free: 888-883-5144Instruções de segurança e funcionamento ALF 72D, ALF 72D-1, ALF 67/80D, BMK 62S BMK 91RSSolução de Problemas<strong>Crowder</strong> Supply Co., Inc. • 8495 Roslyn St., Commerce City, CO 80022 • Toll Free: 888-883-5144 • www.<strong>Crowder</strong>Supply.comGuia básico para solução de problemasProblema Causa SoluçãoForça de avançoinsuficienteBaixa pressão de arA válvula 3121 0726 80 estátravada ou as gaxetas 06632124 00 estão gastas (somentenos modelos ALF).Gaxeta da haste do pistãodesgastada ou deformadaAumente a pressão de ar para 6 bar.Desmonte a válvula e limpe-a, se for necessário. Substituaas gaxetas, se estiverem gastas ou deformadas.Substitua a gaxeta1Com relação a limites de desgaste e torques de aperto, consulte as informações do serviço de martelos perfuradores leves,documento nº 9853 1086 01 da Atlas Copco.2A medida da haste hexagonal da bucha é de 22mm (7/8"). Atlas Copco nº 3091 0038 00.3Use o medidor de pressão Atlas Copco nº 9090 0550 80 para testar a pressão da água e do ar.80© 2010 Atlas Copco Construction <strong>Tools</strong> AB | No. 9800 0680 71a | 2010-01-01Instruções originais
www.<strong>Crowder</strong>Supply.com • Toll Free: 888-883-5144ALF 72D, ALF 72D-1, ALF 67/80D, BMK 62S, BMK 91RS Instruções de segurança e funcionamentoAcessórios<strong>Crowder</strong> Supply Co., Inc. • 8495 Roslyn St., Commerce City, CO 80022 • Toll Free: 888-883-5144 • www.<strong>Crowder</strong>Supply.comAcessórioNº do pedidoLubrificante para BBC, BBD, RH:BLG 30, para óleo mineral 8202 5102 05CLG 30, para óleo mineral e sintético 8202 5102 39Separador de água para BBC, BBD, RH:VAM 5A, para fluxo de ar de até 120 l/s (254 cfm) 8092 0110 82Acessórios da linha de ar para 25 mm (1'')Mangueira de borracha, 30 m 9030 2041 00Engate rápido 9000 0313 00Abraçadeira para mangueira 9000 0197 00Medidor de pressão para ar comprimido e pressão da águaMedidor 9090 0550 80Conjunto de agulhas extras 9090 0678 90Mangueiras de ar comprimido de 25 mm (1") para martelo perfurador eavanço, ajustadas com as seguintes uniões:BBD 94W com ALF 72D, ALF 72D-1, ALF 67/80D e BMK 91RS 9030 2068 00Mangueiras de ar comprimido de 20 mm (3/4") para martelo perfurador eavanço, ajustadas com as seguintes uniões:RH 656W com BMK 62S 9030 2067 00© 2010 Atlas Copco Construction <strong>Tools</strong> AB | No. 9800 0680 71a | 2010-01-01Instruções originais81
www.<strong>Crowder</strong>Supply.com • Toll Free: 888-883-5144Instruções de segurança e funcionamento ALF 72D, ALF 72D-1, ALF 67/80D, BMK 62S BMK 91RSDados Técnicos<strong>Crowder</strong> Supply Co., Inc. • 8495 Roslyn St., Commerce City, CO 80022 • Toll Free: 888-883-5144 • www.<strong>Crowder</strong>Supply.comTipo Nº do pedido Serve paramarteloperfuradorTelescópioúnicoALF 72D 8321 020180ALF 72D-1 8321 020181BMK 62S 8321 010202BMK 91RS 8321 010427TelescópioduploALF 67/80D 8321 020169Avançocomprimento(mm)Comprimentoretraída(mm)Comprimentoextraída(mm)Peso(kg)Pistãodiâmetro(mm)BBD 94W 1300 1970 3270 19 70BBD 94W 1200 1830 3030 16 70RH 656W 1300 1815 3115 17 53BBD 94W 1300 1730 3030 24 67BBD 94W 1855 1595 3450 19 67/80Declaração de Conformidade da CE(Directiva da CE2006/42/CE)Nós, Atlas Copco Construction <strong>Tools</strong> AB, declaramos pela presente que as máquinas listadas abaixo seencontramem conformidade com as provisões da Directiva 2006/42/CE da CE (Directiva de Maquinaria).Desbastadores pneumáticos manuaisPmax (bar)ALF 72D 7ALF 72D-1 7BMK 62S 7BMK 91RS 7ALF 67/80D 7Representante autorizado para Documentação Técnica:Erik SigfridssonAtlas Copco Construction <strong>Tools</strong> ABDragonvägen 2KalmarDirector Geral:Erik SigfridssonFabricante:Atlas Copco Construction <strong>Tools</strong> AB105 23 StockholmSwedenLocal e data: Kalmar, 2010-01-0182© 2010 Atlas Copco Construction <strong>Tools</strong> AB | No. 9800 0680 71a | 2010-01-01Instruções originais
www.<strong>Crowder</strong>Supply.com • Toll Free: 888-883-5144ALF 72D, ALF 72D-1, ALF 67/80D, BMK 62S, BMK 91RS Instruções de segurança e funcionamento<strong>Crowder</strong> Supply Co., Inc. • 8495 Roslyn St., Commerce City, CO 80022 • Toll Free: 888-883-5144 • www.<strong>Crowder</strong>Supply.com© 2010 Atlas Copco Construction <strong>Tools</strong> AB | No. 9800 0680 71a | 2010-01-01Instruções originais83
Indicewww.<strong>Crowder</strong>Supply.com • Toll Free: 888-883-5144ALF-72D ALF-72D-1 ALF-67-80D BMK-62S BMK-91RSITALIANO<strong>Crowder</strong> Supply Co., Inc. • 8495 Roslyn St., Commerce City, CO 80022 • Toll Free: 888-883-5144 • www.<strong>Crowder</strong>Supply.comIndiceISTRUZIONI PER LA SICUREZZA . . . . . . . . . . . . . . . . . . . . . . . . . . . . . . . . . . . . . . . . . . . . . . 85Simboli di sicurezza utilizzati . . . . . . . . . . . . . . . . . . . . . . . . . . . . . . . . . . . . . . . . . . . . . . .85Pericolo di trasporto . . . . . . . . . . . . . . . . . . . . . . . . . . . . . . . . . . . . . . . . . . . . . . . . . . . . . .85Rischi connessi all'uso della macchina e dell'utensile . . . . . . . . . . . . . . . . . . . . . . . . . .85Pericolo di esplosione e incendio . . . . . . . . . . . . . . . . . . . . . . . . . . . . . . . . . . . . . . . . . . .86Pericoli correlati ad energia elettrica/oggetti nascosti . . . . . . . . . . . . . . . . . . . . . . . . . . .87Rischio di proiezione di oggetti . . . . . . . . . . . . . . . . . . . . . . . . . . . . . . . . . . . . . . . . . . . . .87Rischio correlato al rumore . . . . . . . . . . . . . . . . . . . . . . . . . . . . . . . . . . . . . . . . . . . . . . . . .87Rischio correlato con silice/polveri . . . . . . . . . . . . . . . . . . . . . . . . . . . . . . . . . . . . . . . . . .87Rischio correlato alle vibrazioni . . . . . . . . . . . . . . . . . . . . . . . . . . . . . . . . . . . . . . . . . . . . .88Rischio correlato a modifiche alla macchina . . . . . . . . . . . . . . . . . . . . . . . . . . . . . . . . . .88Istruzioni aggiuntive per la sicurezza . . . . . . . . . . . . . . . . . . . . . . . . . . . . . . . . . . . . . . . . .89Dispositivi di protezione . . . . . . . . . . . . . . . . . . . . . . . . . . . . . . . . . . . . . . . . . . . . . . . . . . .89Manutenzione . . . . . . . . . . . . . . . . . . . . . . . . . . . . . . . . . . . . . . . . . . . . . . . . . . . . . . . . . . .89Utensili di lavoro . . . . . . . . . . . . . . . . . . . . . . . . . . . . . . . . . . . . . . . . . . . . . . . . . . . . . . . . .89ISTRUZIONI PER L'USO. . . . . . . . . . . . . . . . . . . . . . . . . . . . . . . . . . . . . . . . . . . . . . . . . . . . . . 90Modello e funzioni . . . . . . . . . . . . . . . . . . . . . . . . . . . . . . . . . . . . . . . . . . . . . . . . . . . . . . . .90Segnali ed etichette adesive . . . . . . . . . . . . . . . . . . . . . . . . . . . . . . . . . . . . . . . . . . . . . . . .90Principio operativo di un servosostegno . . . . . . . . . . . . . . . . . . . . . . . . . . . . . . . . . . . . . .91Funzione. . . . . . . . . . . . . . . . . . . . . . . . . . . . . . . . . . . . . . . . . . . . . . . . . . . . . . . . . . . . . . 91Preparativi prima dell’accensione . . . . . . . . . . . . . . . . . . . . . . . . . . . . . . . . . . . . . . . . . . .91Dispositivo di collegamento . . . . . . . . . . . . . . . . . . . . . . . . . . . . . . . . . . . . . . . . . . . . . . . .92Perforatrice BBD 94 W . . . . . . . . . . . . . . . . . . . . . . . . . . . . . . . . . . . . . . . . . . . . . . . . . . 92Perforatrice RH 656 W . . . . . . . . . . . . . . . . . . . . . . . . . . . . . . . . . . . . . . . . . . . . . . . . . . 92Collegamento del servo-sostegno alla perforatrice . . . . . . . . . . . . . . . . . . . . . . . . . . . . .93Controlli . . . . . . . . . . . . . . . . . . . . . . . . . . . . . . . . . . . . . . . . . . . . . . . . . . . . . . . . . . . . . . . . .93Controlli per i modelli ALF 72D, ALF 72D-1, ALF 67/80D e BMK 91 RS . . . . . . . . . . . . . 93Controlli per il modello BMK 62S . . . . . . . . . . . . . . . . . . . . . . . . . . . . . . . . . . . . . . . . . . . 93Perforazione . . . . . . . . . . . . . . . . . . . . . . . . . . . . . . . . . . . . . . . . . . . . . . . . . . . . . . . . . . . . .94Avvio della perforatrice. . . . . . . . . . . . . . . . . . . . . . . . . . . . . . . . . . . . . . . . . . . . . . . . . . . 94Arresto della perforatrice . . . . . . . . . . . . . . . . . . . . . . . . . . . . . . . . . . . . . . . . . . . . . . . . . 94Riposizionamento del servosostegno. . . . . . . . . . . . . . . . . . . . . . . . . . . . . . . . . . . . . . . . 94Al termine della perforazione . . . . . . . . . . . . . . . . . . . . . . . . . . . . . . . . . . . . . . . . . . . . . . 94Manutenzione . . . . . . . . . . . . . . . . . . . . . . . . . . . . . . . . . . . . . . . . . . . . . . . . . . . . . . . . . . . .94Differenza tra parti originali e parti non originali . . . . . . . . . . . . . . . . . . . . . . . . . . . . . . . . 95Una volta ogni turno (dopo 8 ore di funzionamento) . . . . . . . . . . . . . . . . . . . . . . . . . . . . 95Una volta alla settimana (dopo 40 ore di funzionamento) . . . . . . . . . . . . . . . . . . . . . . . . 95Rottamazione e smaltimento parti usurate . . . . . . . . . . . . . . . . . . . . . . . . . . . . . . . . . . . .95Ricerca dei guasti . . . . . . . . . . . . . . . . . . . . . . . . . . . . . . . . . . . . . . . . . . . . . . . . . . . . . . . . .96Guida di base alla ricerca dei guasti . . . . . . . . . . . . . . . . . . . . . . . . . . . . . . . . . . . . . . . . 96Accessori . . . . . . . . . . . . . . . . . . . . . . . . . . . . . . . . . . . . . . . . . . . . . . . . . . . . . . . . . . . . . . .97Caratteristiche tecniche . . . . . . . . . . . . . . . . . . . . . . . . . . . . . . . . . . . . . . . . . . . . . . . . . . . .98Dichiarazione di conformità CE (Direttiva CE 2006/42/CE) . . . . . . . . . . . . . . . . . . . . . . .9884© 2010 Atlas Copco Construction <strong>Tools</strong> AB | No. 9800 0680 71a | 2010-01-01Istruzioni originali
www.<strong>Crowder</strong>Supply.com • Toll Free: 888-883-5144ALF 72D, ALF 72D-1, ALF 67/80D, BMK 62S, BMK 91RSIstruzioni per la sicurezza e per l'uso<strong>Crowder</strong> Supply Co., Inc. • 8495 Roslyn St., Commerce City, CO 80022 • Toll Free: 888-883-5144 • www.<strong>Crowder</strong>Supply.comISTRUZIONI PER LASICUREZZAPer ridurre il rischio di lesioni gravi o mortedell'operatore o di altre persone, leggere questeistruzioni per la sicurezza prima di accingersi autilizzare la macchina.Affiggere queste istruzioni per la sicurezzanelle sedi di lavoro, fornirne copia agli addetti eassicurarsi che tutti le leggano prima di procedereall'uso o alla manutenzione della macchina.Seguire tutte le istruzioni di sicurezza di questomanuale.Tutte le istruzioni di sicurezza sono conformialle leggi e alle direttive applicabili nell’UnioneEuropea.Rispettare anche eventuali alter direttive nazionali/regionali.In paesi fuori dell’Unione Europea, vanno applicatigli statuti e le regole locali valide.Rispettare tutte le eventuali leggi e regole locali.Simboli di sicurezza utilizzatiLe indicazioni Pericolo, Attenzione e Prudenzahanno il seguente significato:PericoloAttenzionePrudenzaPericolo di trasportoIndica una situazione dipericolo imminente che,qualora non sia evitata,può provocare gravi lesionipersonali o morte.Indica una situazionepotenzialmente pericolosache, qualora non siaevitata, può provocarelesioni personali gravi omorte.Indica una situazione chese non evitata, potrebbeprovocare lesioni personalio danni al prodotto o adaltre proprietà.PrudenzaLa perforatrice e il servosostegno sono pesanti.Per evitare lesioni personali durante il trasportonell'area di lavoro►►Utilizzare un carrello o richiedere assistenza adun collega durante il trasporto.Rischi connessi all'uso dellamacchina e dell'utensileAttenzioneDurante l'utilizzo della macchina possonoverificarsi movimenti improvvisi o inaspettati dellastessa, con possibile rischio di lesioni. Perditedi equilibrio o scivolamenti, inoltre, possonoprovocare gravi lesioni personali. Per ridurre irischi:►►Operare sempre in posizione stabile, con i piediallargati parallelamente alle spalle e con il pesodel corpo ben bilanciato.►►afferrare saldamente la macchina con entrambele mani;►►non avviare la macchina qu<strong>and</strong>o questa si trovacoricata al suolo;►►accertarsi che le impugnature siano pulite eprive di olio e grasso.AttenzioneL’avviamento accidentale della macchina puòprovocare gravi lesioni personali.►►Tenere lontane le mani dal dispositivo diavviamento e arresto qu<strong>and</strong>o non si lavora.AttenzioneL’utensile di lavoro è soggetto a notevolisollecitazioni durante l’uso della macchina e dopoun certo periodo d’utilizzo può rompersi. La rotturadell’utensile può provocare movimenti improvvisi orepentini. Tali movimenti possono provocare gravilesioni personali.►►Operare sempre in posizione stabile, con i piediallargati parallelamente alle spalle e con il pesodel corpo ben bilanciato.►►Verificare regolarmente che l'utensile di lavoronon sia usurato e controllarlo in caso di rischiodi danni o rotture evidenti.AttenzioneDimensioni errate del m<strong>and</strong>rino dell'utensile di lavoropossono causare perdita o slittamento dell'utensiledurante il funzionamento, con conseguenti lesionipersonali.►►Prima di inserire l'utensile di lavoro, accertarsiche le dimensioni del m<strong>and</strong>rino siano corretteper l'uso sulla macchina.►►Non utilizzare utensili di lavoro senza collare.© 2010 Atlas Copco Construction <strong>Tools</strong> AB | No. 9800 0680 71a | 2010-01-01Istruzioni originali85
Istruzioni per la sicurezza e per l'usowww.<strong>Crowder</strong>Supply.com • Toll Free: 888-883-5144ALF 72D, ALF 72D-1, ALF 67/80D, BMK 62S, BMK 91RS<strong>Crowder</strong> Supply Co., Inc. • 8495 Roslyn St., Commerce City, CO 80022 • Toll Free: 888-883-5144 • www.<strong>Crowder</strong>Supply.comAttenzioneQualora il trattenitore dell’utensile sulla macchinanon sia bloccato, l’utensile può essere scagliatocon gr<strong>and</strong>e forza provoc<strong>and</strong>o gravi lesionipersonali.►►Una volta montato e bloccato l'utensile di lavoro,controllare la funzione di blocco tir<strong>and</strong>olo conforza verso l'esterno.►►Prima di avviare la macchina, accertarsi chel’utensile sia inserito a fondo e che il relativofermo sia saldamente bloccato.►►Mai orientare l'utensile di lavoro verso se stessio verso un'altra persona.AttenzioneLa sostituzione dell’utensile con la macchina infunzione può provocare gravi lesioni personali.►►Arrestare sempre la macchina prima di sostituirel'utensile.►►Non afferrare o toccare mai una punta in acciaiorotante.AttenzioneUn tubo flessibile per aria compressa che siscolleghi può avere dei movimenti sferzanti ecausare lesioni personali o la morte.Per ridurre i rischi:►►verificare che il tubo flessibile e i collegamentiper l'aria compressa non siano danneggiati;►►verificare che tutti i collegamenti per l'ariacompressa siano corretti;►►non tentare mai di scollegare un tubo flessibileper aria compressa qu<strong>and</strong>o è pressurizzato.Interrompere innanzi tutto l'aria compressa sulcompressore e spurgare la macchina attiv<strong>and</strong>o ildispositivo di avviamento e arresto.AttenzioneQualora il fioretto si blocchi durante ilfunzionamento, l’intera macchina inizia a ruotarese si perde la presa. La rotazione improvvisa dellamacchina può provocare gravi lesioni personali.►►Afferrare saldamente la macchina con entrambele mani.►►Accertarsi che le impugnature siano pulite eprivedi olio e grasso.►►Non forare mai in un foro esistente.AttenzioneAlcuni oggetti possono impigliarsi nel fioretto inrotazione provoc<strong>and</strong>o gravi lesioni personali. Ciòpuò provocare gravi lesioni personali.►►Non afferrare o toccare mai un fioretto inrotazione.►►Non indossare indumenti che possono rimanereimpigliati.Raccogliere eventuali capelli lunghi.Pericolo di esplosione eincendioPericoloQualora la macchina venga a contatto con unasostanza esplosiva vi è il rischio di esplosioni. Leesplosioni possono causare lesioni personali gravio morte.Per ridurre il rischio di esplosioni:►►non utilizzare l'attrezzatura per praticare fori inprossimità di esplosivi, inclusi dinamite o altriesplosivi collocati nella roccia;►►accertarsi che non vi siano esplosivi all'internodella roccia.►►Non forare mai in un foro esistente.AttenzioneLe operazioni di perforazione e di lavorazionesu taluni materiali possono causare scintille, eincendiare gas provoc<strong>and</strong>o un'esplosione. Leesplosioni possono causare lesioni personali gravio morte.Per ridurre il rischio di esplosioni:►►non utilizzare la macchina in ambienti esplosivi;►►non utilizzare la macchina in prossimità dimateriali, vapori e polveri infiammabili;►►accertarsi che non siano presenti fonti di gasnon rilevate.86© 2010 Atlas Copco Construction <strong>Tools</strong> AB | No. 9800 0680 71a | 2010-01-01Istruzioni originali
www.<strong>Crowder</strong>Supply.com • Toll Free: 888-883-5144ALF 72D, ALF 72D-1, ALF 67/80D, BMK 62S, BMK 91RSIstruzioni per la sicurezza e per l'uso<strong>Crowder</strong> Supply Co., Inc. • 8495 Roslyn St., Commerce City, CO 80022 • Toll Free: 888-883-5144 • www.<strong>Crowder</strong>Supply.comPericoli correlati ad energiaelettrica/oggetti nascostiPericoloLa macchina non è isolata elettricamente. In casodi contatto della macchina con l'elettricità possonoderivarne lesioni personali gravi o morte.►►Per ridurre il rischio di lesioni o morte, nonutilizzare la macchina in prossimità di cavielettrici o altre sorgenti elettriche.►►Accertarsi che non siano presenti cavi nascostio altre sorgenti elettriche.AttenzioneDurante la perforazione, cavi e tubi nascostipossono provocare gravi lesioni personali.►►Prima di iniziare la perforazione, verificare lacomposizione del materiale da lavorare.►►Accertarsi che non vi siano cavi e condutturenascosti, ad es. di elettricità, linee telefoniche,acqua, gas e acque di rifiuto, ecc.►►Qualora si sospetti che l’utensile abbia urtato unoggetto nascosto, spegnere immediatamente lamacchina.►►Accertarsi che non vi siano pericoli prima dicontinuare.Rischio di proiezione dioggettiAttenzioneDurante la perforazione, schegge o altre particelledi materiale lavorato possono trasformarsi inproiettili e causare lesioni fisiche, colpendol'addetto o altre persone.►►Per ridurre il rischio di lesioni, utilizzaredispositivi di protezione individuali approvati, adesempio occhiali di sicurezza resistenti agli urticon protezioni laterali.PrudenzaDurante la pulizia con aria possono fuoriuscire dalforo particelle e acqua sporca e causare lesionipersonali.►►Spostarsi lateralmente e proteggere gli occhiprima di cominciare a rimuovere con aria i detritidella perforazione.►►Indossare sempre occhiali di sicurezza resistentiagli urti con protezioni laterali.►►Accertarsi che non siano presenti nell'area altrilavoratori qu<strong>and</strong>o si esegue la pulizia con aria.Rischio correlato al rumoreAttenzioneLivelli elevati di rumore possono causare la perditapermanente dell'udito.►►Utilizzare protezioni acustiche conformi allenormative sulla salute e la sicurezza nei luoghidi lavoro.Rischio correlato con silice/polveriAttenzioneL'esposizione alla silice cristallina (denominataanche “polvere di silice”), successiva aperforazione o altre attività con roccia, cemento,asfalto o altri materiali, può causare silicosi (unagrave malattia polmonare) o malattie ad essacorrelate, cancro o morte. La silice è uno deiprincipali componenti di roccia, sabbia e mineraligrezzi.Per ridurre l'esposizione alla silice:►►utilizzare controlli strutturali adeguati perridurre la quantità di silice nell'aria e l'accumulodi polvere sull'attrezzatura e le superfici.Alcuni esempi di tali controlli sono: sistemi diventilazione d'estrazione e di raccolta dellepolveri, spruzzi d'acqua e perforazione aumido. Accertarsi che questi controlli sianoadeguatamente installati e sottoposti amanutenzione;►►indossare, conservare e utilizzare in modocorretto respiratori approvati per particolatiqu<strong>and</strong>o i soli controlli strutturali non soddisfanola riduzione dell'esposizione al di sotto dei livelliconsentiti;►►partecipare ai monitoraggi sulla qualità dell'aria,agli esami medici e ai programmi di formazioneresi disponibili dal proprio datore di lavoro equ<strong>and</strong>o richiesto dalla legge;►►indossare indumenti protettivi lavabili omonouso sul luogo di lavoro; fare la doccia eindossare indumenti puliti prima di lasciare illuogo di lavoro per ridurre la propria esposizionealla silice e quella di altre persone, automobili,abitazioni e altre aree;►►non mangiare, bere né fare uso di prodottia base di tabacco in presenza di polvericontenenti silice cristallina;►►lavare le mani e la faccia prima di mangiare,bere o fare uso di prodotti a base di tabacco aldi fuori dell'area di esposizione;© 2010 Atlas Copco Construction <strong>Tools</strong> AB | No. 9800 0680 71a | 2010-01-01Istruzioni originali87
Istruzioni per la sicurezza e per l'usowww.<strong>Crowder</strong>Supply.com • Toll Free: 888-883-5144ALF 72D, ALF 72D-1, ALF 67/80D, BMK 62S, BMK 91RS<strong>Crowder</strong> Supply Co., Inc. • 8495 Roslyn St., Commerce City, CO 80022 • Toll Free: 888-883-5144 • www.<strong>Crowder</strong>Supply.com►►collaborare con il proprio datore di lavoro al finedi ridurre l'esposizione alla silice sul luogo dilavoro.AttenzioneAlcune polveri, fumi o altri materiali trasportatidall'aria, prodotti durante l'uso della macchina,possono contenere sostanze chimiche note pressolo Stato della California come cancerogene eportatrici di difetti neonatali o altri danni correlatialla riproduzione. Tra queste sostanze chimiche visono, a titolo esemplificativo:►►silice cristallina, cemento e altri prodotti perl'edilizia;►►arsenico e cromo derivati da gomma trattatachimicamente;►►vernici a base di piombo.Per ridurre la propria esposizione a tali sostanzechimiche, lavorare in un'area ben ventilata,avvalendosi di dispositivi di protezione approvati,quali mascherine antipolvere appositamenterealizzate per filtrare le particelle microscopiche.Rischio correlato allevibrazioniAttenzioneL'uso normale e corretto della macchina esponel'operatore a vibrazioni. Un'esposizione regolaree frequente alle vibrazioni può causare oaggravare, anche solo in parte, lesioni o disturbia dita, mani, polsi, braccia, spalle e/o altre partidel corpo dell'operatore, comprese lesioni odisturbi debilitanti e/o permanenti, che potrebberosvilupparsi gradualmente, nel corso di settimane,mesi o perfino anni. Tali lesioni o disturbi possonoprovocare danni al sistema circolatorio, sistemanervoso, articolazioni e anche ad altre strutturedell'organismo.Se in un qualunque momento dovesseromanifestarsi sintomi quali intorpidimento,formicolio, indebolimento della presa, dolore,pallore o altro, che si stia utilizz<strong>and</strong>o la macchinao meno, non riprenderne l'uso e rivolgersi aun medico. La prosecuzione nell'utilizzo dellamacchina dopo il verificarsi di uno di tali sintomiaumenta il rischio che esso diventi più grave e/opermanente.Per ridurre l'esposizione dell'operatore allevibrazioni, adottare le seguenti precauzioni:►►lasciare che sia l'utensile a eseguire il lavoro;utilizzare una presa minima sufficiente alcontrollo corretto e al funzionamento sicuro.►►Qu<strong>and</strong>o è attivato il meccanismo di percussione,il solo contatto che il corpo dell'operatoredeve avere con la macchina è delle manisull'impugnatura. Evitare altro contatto, ad es.addoss<strong>and</strong>o una parte del corpo alla macchinao appoggi<strong>and</strong>ovisi per aumentare la forza diavanzamento. Inoltre è importante mantenereil dispositivo di azionamento innestato durantel'estrazione dell'utensile dalla superficie dilavoro.►►Accertarsi che sull'utensile venga eseguita unacorretta manutenzione, che non sia usuratoe che sia delle dimensioni corrette. Utensilidi lavoro sui quali non venga eseguita unacorretta manutenzione, che siano usurati odi dimensioni errate impiegano più tempo acompiere un'operazione (quindi con un periodomaggiore di esposizione alle vibrazioni) epossono causare o contribuire a più alti livelli diesposizione alle vibrazioni.►►Interrompere immediatamente il lavoro se lamacchina improvvisamente inizia a vibrareeccessivamente. Prima di riprendere il lavoro,individuare e rimuovere la causa dell'aumentodelle vibrazioni.►►Nell'utilizzare la macchina, adottare la pressionedell'aria raccom<strong>and</strong>ata. Una pressione dell'ariamaggiore o inferiore può causare livelli più alti divibrazioni.►►Non afferrare, mantenere o toccare l'utensilequ<strong>and</strong>o la macchina è in uso.►►Partecipare a sorveglianza o monitoraggiosanitario, esami medici e programmi diformazione resi disponibili dal proprio datore dilavoro e qu<strong>and</strong>o richiesto dalla legge.Vedere la "Dichiarazione in materia di rumore evibrazioni" per quanto concerne la macchina, altermine di queste istruzioni per la sicurezza e perl'uso.Rischio correlato a modifichealla macchinaAttenzioneEventuali modifiche non autorizzate dalla AtlasCopco possono provocare gravi lesioni personali ase stessi e agli altri.►►La macchina non deve essere modificatasenza l’autorizzazione della Atlas Copco.►►Utilizzare esclusivamente ricambi edaccessori approvati dalla Atlas Copco.88© 2010 Atlas Copco Construction <strong>Tools</strong> AB | No. 9800 0680 71a | 2010-01-01Istruzioni originali
www.<strong>Crowder</strong>Supply.com • Toll Free: 888-883-5144ALF 72D, ALF 72D-1, ALF 67/80D, BMK 62S, BMK 91RSIstruzioni per la sicurezza e per l'uso<strong>Crowder</strong> Supply Co., Inc. • 8495 Roslyn St., Commerce City, CO 80022 • Toll Free: 888-883-5144 • www.<strong>Crowder</strong>Supply.comIstruzioni aggiuntive per lasicurezza►►Utilizzare macchine e accessori esclusivamenteper gli scopi previsti.►►L’uso e la manutenzione della macchina sonoriservati esclusivamente a personale addestratoe qualificato.►►Imparare come fermare la macchina in caso diemergenza.►►La pressione massima consentita dell’ariacompressa non deve mai essere superata.►►Rilasciare immediatamente il dispositivo diavviamento e arresto in caso di interruzione dicorrente.►►Ispezionare sempre l'attrezzatura prima dell'uso.Non utilizzare l'attrezzatura se si sospetta chesia danneggiata.►►Utilizzare sempre le regole del buon senso.►►Prestare sempre la massima attenzione duranteil lavoro.►►Non utilizzare la macchina qualora si siaestremamente stanchi o sotto l’effetto di farmaci,sostanze alcoliche o altre sostanze tali dacompromettere la propria visibilità e reattivitàoppure il proprio giudizio.►►Partecipare ai corsi sulla sicurezza e diformazione.►►Non colpire né utilizzare impropriamente alcunaattrezzatura.►►La macchina e gli utensili devono essereconservati in un luogo sicuro e fuori dalla portatadei bambini, chiuso a chiave.►►Assicurarsi che tutta l'attrezzatura sia sottopostaa corretta manutenzione.►►Su ogni macchina sono apposte targhette edetichette adesive importanti per la sicurezzadell’operatore e la cura della macchina.Accertarsi che siano sempre leggibili. Èpossibile ordinare nuove targhette e nuoveetichette adesive facendo riferimento all'elencodei pezzi di ricambio.►►Assicurarsi che nessuna persona nonautorizzata si introduca nella zona di lavoro.►►Mantenere il luogo di lavoro pulito e privo dicorpi estranei.►►Non orientare il tubo flessibile per ariacompressa verso se stessi o verso altri. Perevitare il rischio di lesioni, non utilizzare mail'aria compressa per eliminare ad es. polvere,sporco ecc. dagli abiti.Dispositivi di protezioneUtilizzare sempre dispositivi di protezioneapprovati. Gli operatori e tutte le altre personepresenti nella zona di lavoro devono adottare idispositivi di protezione, che comprenderannoalmeno:►►elmetto protettivo►►protezione acustica►►occhiali di sicurezza resistenti agli urti conprotezioni laterali►►protezione delle vie respiratorie, se necessario►►guanti protettivi►►calzature protettiveManutenzioneLa manutenzione regolare è essenziale per lasicurezza e l'efficacia della macchina. Seguireattentamente le istruzioni per l'uso.Prima di accingersi alla manutenzione o allasostituzione dell'utensile di lavoro su macchinepneumatiche, disinserire sempre l'alimentazionedell’aria e spurgare la macchina premendoil dispositivo di avviamento e arresto. Quindiscollegare il tubo dell'aria dalla macchina.►►Utilizzare esclusivamente ricambi originali.Eventuali danni o guasti dovuti dall'uso diricambi non originali non sono coperti daGaranzia o Responsabilità sul Prodotto.►►Sostituire immediatamente i pezzi danneggiati.►►Sostituire tempestivamente i componentidanneggiati e usurati.►►Per la manutenzione completa della macchina,rivolgersi al proprio centro di assistenzaautorizzato.►►In caso di pulizia delle parti meccaniche con unsolvente, rispettare tutte le norme di sicurezzavigenti e accertarsi che vi sia una ventilazioneadeguata.Utensili di lavoro►►Mantenere gli utensili puliti e in buonecondizioni. Controllare regolarmente gli utensilidi lavoro, accertarsi che siano affilati e nonusurati.Nota bene! L'uso errato degli utensili di lavoro puòdistruggere la macchina.© 2010 Atlas Copco Construction <strong>Tools</strong> AB | No. 9800 0680 71a | 2010-01-01Istruzioni originali89
www.<strong>Crowder</strong>Supply.com • Toll Free: 888-883-5144Istruzioni per la sicurezza e per l'usoALF 72D, ALF 72D-1, ALF 67/80D, BMK 62S, BMK 91RS<strong>Crowder</strong> Supply Co., Inc. • 8495 Roslyn St., Commerce City, CO 80022 • Toll Free: 888-883-5144 • www.<strong>Crowder</strong>Supply.comISTRUZIONI PER L'USOModello e funzioniI servosostegni Atlas Copco di tipo ALF 72D, ALF72D-1, BMK 62S e ALF 67/80D vengono utilizzaticon le perforatrici leggere di tipo BBD <strong>and</strong> RH. Imodelli ALF 72D, ALF 72D-1 e ALF 67/80D vengonoutilizzati con il modello BBD 94W e sono a doppioeffetto con un ritorno automatico. Il modello BMK 62Sè utilizzato con il modello RH 656W e deve essereritirato manualmente. I modelli ALF 72D, ALF 72D-1,BMK 62S e ALF 67/80D sono dotati di un cilindromonostadio. Il modello ALF 67/80D è dotato di uncilindro a due stadi. I cilindri sono in alluminio adeccezione del modello BMK 62S che è in acciaio.I servosostegni sono collegati alla perforatricemediante uno speciale dispositivo di collegamento.La pressione dell'aria consigliata è di 6 bar.Il supporto del servosostegno ha la funzionedi aiutare l'operatore a sollevare e avanzare laperforatrice durante le operazioni.ACBA. Tipo di macchinaB. Pressione pneumatica massima consentitaC. Numero di serieD. Il simbolo di attenzione insieme al simbolo dellibro indicano che occorre leggere le Istruzioni per lasicurezza e per l'uso qu<strong>and</strong>o ci si accinge a utilizzarela macchina per la prima volta.E. Il simbolo CE indica che la macchina è approvatadalla CE. Per ulteriori informazioni,consultarel'allegata dichiarazione CE. Se il simbolo CE manca,indica che la macchina non è approvata dalla CE.DESegnali ed etichette adesiveOgni macchina è dotata di segnali ed etichetteadesive importanti per la sua cura e la vostrasicurezza. È possibile ordinare nuove etichetteadesive utilizz<strong>and</strong>o il listino ricambi.I segnali riportano informazioni importanti:Il simbolo di attenzione insieme al simbolo del libroindicano che occorre leggere le Istruzioni per lasicurezza e per l'uso prima di utilizzare la macchina.90© 2010 Atlas Copco Construction <strong>Tools</strong> AB | No. 9800 0680 71a | 2010-01-01Istruzioni originali
www.<strong>Crowder</strong>Supply.com • Toll Free: 888-883-5144ALF 72D, ALF 72D-1, ALF 67/80D, BMK 62S, BMK 91RSIstruzioni per la sicurezza e per l'uso<strong>Crowder</strong> Supply Co., Inc. • 8495 Roslyn St., Commerce City, CO 80022 • Toll Free: 888-883-5144 • www.<strong>Crowder</strong>Supply.comPrincipio operativo di unservosostegnoFunzioneIl movimento di avanzamento del servosostegnoè alimentato dall'aria compressa, che viene direttasul lato inferiore del pistone spingendolo all'esternodel cilindro. Per il ritorno automatico (non per ilmodello BMK 62S) dello stelo del pistone all'internodel cilindro, l'aria compressa viene diretta sul latoinferiore del pistone.ALF 72DALF 72D-1BMK 62S1. Manopola di com<strong>and</strong>o avanzamento2. Spillo della valvola3. Nipplo del tubo flessibile (12,5 mm)4. Cilindro di avanzamento5. Stelo del pistone6. Impugnatura7. Incavigliatura con supporto8. Etichetta di avvertimentoPreparativi primadell’accensione1. Controllare l'attrezzatura di perforazioneControllare che l’intera attrezzatura di perforazionesia in buono stato operativo.Accertarsi che non vi siano ostruzioni sulla porta diingresso dell'aria.Accertarsi che le giunzioni siano ben serrate e chenon presentino perdite.AttenzioneVerificare sempre che non vi siano tubidanneggiati o allentati e controllare le giunzioniprima di dare inizio alle operazioni. I tubi allentatipossono colpire chiunque si trovi nelle vicinanze,provoc<strong>and</strong>o lesioni gravi.2. Pulire la condotta d’aria con ariacompressaOgni giorno, prima di utilizzare la perforatrice, pulirela condotta d’aria con aria compressa in mododa rimuovere lo sporco e l’umidità che si sonoaccumulati al suo interno.3. Riempire di olio l’oliatoreNota bene! Verificare che il m<strong>and</strong>rino e il codolodella punta di perforazione siano semprecoperti da uno strato di olio.© 2010 Atlas Copco Construction <strong>Tools</strong> AB | No. 9800 0680 71a | 2010-01-01Istruzioni originali91
Istruzioni per la sicurezza e per l'usowww.<strong>Crowder</strong>Supply.com • Toll Free: 888-883-5144ALF 72D, ALF 72D-1, ALF 67/80D, BMK 62S, BMK 91RS<strong>Crowder</strong> Supply Co., Inc. • 8495 Roslyn St., Commerce City, CO 80022 • Toll Free: 888-883-5144 • www.<strong>Crowder</strong>Supply.comNota bene! Utilizzare sempre un lubrificanteraccom<strong>and</strong>ato.LubrificanteOlio perutensilipneumaticiRaccom<strong>and</strong>azioneUtilizzare olio minerale per utensilipneumaticiTemperaturaambiente ºCGrado di viscosità(ISO 3448)da -30 a 0 ISO VG 32-68da -10 a +20 ISO VG 68-100da +10 a +50 ISO VG 100-1504. Misurare la giusta pressione diacqua e ariaUtilizzare il manometro Atlas Copco no. 9090 055080 per verificare la pressione di acqua e aria duranteil funzionamento della perforatrice.Pressione dell'ariaAccertarsi che il compressore sia in grado di produrrel'aria richiesta a 4 e 6 bar nell'utensile.►►Una pressione alta incide negativamente sulfunzionamento e provoca danni.►►Una pressione bassa rallenta la velocità diperforazione.Pressione dell’acquaIl manometro è dotato di un ago che viene inserito neltubo per misurarne la pressione interna.Nota bene! Verificare che la pressione dell’acquasia inferiore alla pressione dell’ariadi almeno 1 bar per non rischiareche l’acqua entri nel meccanismo diimpatto. Ad esempio, se la pressionedell’aria è pari a 6 bar, la pressionedell’acqua deve essere al di sotto dei 5bar per impedire che l’acqua entri nelmeccanismo di impatto.Dispositivo di collegamentoPer unire il servosostegno alla perforatrice ènecessario un dispositivo di collegamento.Perforatrice BBD 94 WL'accessorio viene applicato alla parte intermediadella perforatrice.Perforatrice RH 656 WL'accessorio si applica alla perforatrice agganci<strong>and</strong>oloai bulloni laterali.92© 2010 Atlas Copco Construction <strong>Tools</strong> AB | No. 9800 0680 71a | 2010-01-01Istruzioni originali
www.<strong>Crowder</strong>Supply.com • Toll Free: 888-883-5144ALF 72D, ALF 72D-1, ALF 67/80D, BMK 62S, BMK 91RSIstruzioni per la sicurezza e per l'uso<strong>Crowder</strong> Supply Co., Inc. • 8495 Roslyn St., Commerce City, CO 80022 • Toll Free: 888-883-5144 • www.<strong>Crowder</strong>Supply.comCollegamento del servosostegnoalla perforatriceIl servosostegno deve essere fissato alla perforatrice permezzo di un innesto a baionetta.ControlliControlli per i modelli ALF 72D, ALF 72D-1,ALF 67/80D e BMK 91 RSManopola di com<strong>and</strong>o avanzamento delservosostegno (1)Regolare la forza di alimentazione per mezzo dellamanopola di com<strong>and</strong>o avanzamento nel modoseguente:Ruotare la manopola in senso antiorario (B) peraumentare la forza di alimentazione.Ruotare la manopola in senso orario (A) per diminuirela forza di alimentazione.Qu<strong>and</strong>o la manopola di controllo avanzamento sitrova nella posizione di chiusura, il servosostegnoviene spurgato.Spillo della valvola (2)Qu<strong>and</strong>o si spinge lo spillo della valvola, la forzadi alimentazione si interrompe immediatamentee l’impostazione sulla manopola di com<strong>and</strong>oavanzamento viene esclusa. Questa funzione vieneusata, ad esempio, per regolare l’altezza dellaperforatrice qu<strong>and</strong>o si monta il servosostegno oqu<strong>and</strong>o esiste una tendenza al blocco.Premendo lo spillo della valvola, si riattival’impostazione del controllo di avanzamento.Controlli per il modello BMK 62SManopola di com<strong>and</strong>o avanzamento delservosostegno (1)Regolare la forza di alimentazione per mezzo dellamanopola di com<strong>and</strong>o avanzamento nel modoseguente:Ruotare la manopola in senso antiorario (B) peraumentare la forza di alimentazione.Ruotare la manopola in senso orario (A) per diminuirela forza di alimentazione.Qu<strong>and</strong>o la manopola di controllo avanzamento sitrova nella posizione di chiusura, il servosostegnoviene spurgato.Spillo della valvola (2)Qu<strong>and</strong>o si spinge lo spillo della valvola, la forzadi alimentazione si interrompe immediatamentee l’impostazione sulla manopola di com<strong>and</strong>oavanzamento viene esclusa. Questa funzione siusa, ad es., per regolare l'altezza della perforatrice,nell'allestimento del servosostegno o in presenza diuna tendenza all'inceppamento.© 2010 Atlas Copco Construction <strong>Tools</strong> AB | No. 9800 0680 71a | 2010-01-01Istruzioni originali93
Istruzioni per la sicurezza e per l'usowww.<strong>Crowder</strong>Supply.com • Toll Free: 888-883-5144ALF 72D, ALF 72D-1, ALF 67/80D, BMK 62S, BMK 91RS<strong>Crowder</strong> Supply Co., Inc. • 8495 Roslyn St., Commerce City, CO 80022 • Toll Free: 888-883-5144 • www.<strong>Crowder</strong>Supply.comPerforazioneAvvio della perforatriceA1. Aprire la valvola principale dell'aria compressa.2. Regolare la manopola di com<strong>and</strong>o avanzamento(C) affinché la forza di alimentazione siaadatta a realizzare la bocca del foro.3. Allineare la perforatrice in modo che la puntadi perforazione tocchi il punto previsto per larealizzazione della bocca del foro.4. Spostare leggermente in avanti la leva delgas (A), per avviare lo spurgo di acqua, lapercussione e la rotazione.5. Realizzare la bocca del foro con una forza dialimentazione ridotta.6. Spostare la leva del gas (A) completamente inavanti non appena la punta di perforazione hainiziato a perforare nettamente la roccia.7. Regolare la forza di alimentazione per mezzodella manopola di controllo (C) in modo daottenere la velocità di penetrazione minima.Arresto della perforatrice1. Spingere indietro la leva del gas (A), perarrestare la percussione, la rotazione e l’acquadi spurgo.2. Portare la manopola di controllo alimentazione(C) sulla posizione di chiusura.CBRiposizionamento del servosostegno1. Arrestare la percussione della perforatrice e lospurgo per mezzo della leva del gas (A).2. Premere lo spillo della valvola (B), in modoche l’asta del pistone venga automaticamentetirata indietro all’interno del cilindro delservosostegno (manualmente per il modelloBMK 62S).3. Riposizionare il servosostegno.4. Rilasciare lo spillo della valvola (B) in modo chel’asta del pistone fuoriesca nuovamente.5. Spostare la leva del gas (A) in avanti inposizione operativa.6. La manopola di controllo dell’alimentazione(C) non deve essere toccata durante questaoperazione.Al termine della perforazioneAppoggiare la perforatrice su una pietra, una tavoladi legno o un oggetto simile in modo da impedireche trucioli e altro materiale estraneo entrino nelm<strong>and</strong>rino.Interrompere la pressione dell’acqua prima dellapressione dell’aria. Dopo aver arrestato l’alimentazioneidrica, lasciare funzionare la perforatrice per alcunisecondi per eliminare acqua e umidità.ManutenzionePer garantire la sicurezza della macchina è fondamentaleuna manutenzione regolare. Sostituire tempestivamentecomponenti danneggiati o usurati.Per interventi di manutenzione straordinaria dellamacchina, contattare la più vicina officina autorizzata.Verificare regolarmente che la macchina e gli utensilinon siano usurati o danneggiati. Non utilizzare utensiliusurati o danneggiati.Accertarsi di eseguire la pulizia delle parti meccanichecon solventi in conformità alle vigenti normativesanitarie e di sicurezza e in un ambientesufficientemente aerato.Una manutenzione giornaliera, la verifica regolaredi parti usurate e l’esecuzione tempestiva delle riparazioniprevengono i guasti e allungano la vitaoperativa della macchina.Lubrificare sempre con cura la perforatrice e il servosostegnoprima di riporli.Riporli in un ambiente pulito e asciutto.Accertarsi che nella macchina non possa entraremateriale estraneo.Sfiatare sempre i flessibili e pulire la perforatrice e ilservosostegno dopo l'uso.94© 2010 Atlas Copco Construction <strong>Tools</strong> AB | No. 9800 0680 71a | 2010-01-01Istruzioni originali
www.<strong>Crowder</strong>Supply.com • Toll Free: 888-883-5144ALF 72D, ALF 72D-1, ALF 67/80D, BMK 62S, BMK 91RSIstruzioni per la sicurezza e per l'uso<strong>Crowder</strong> Supply Co., Inc. • 8495 Roslyn St., Commerce City, CO 80022 • Toll Free: 888-883-5144 • www.<strong>Crowder</strong>Supply.comDifferenza tra parti originali e parti nonoriginaliAl momento di acquistare una parte, la prima cosa dafare è verificare che la parte sia di Atlas Copco. Leparti sono quasi sempre identificabili.Le parti della perforatrice riportano solitamente sia lamarcatura del numero della parte sia la marcatura diidentificazione di Atlas Copco, ovvero un cerchio cheracchiude una perforatrice. In alcuni casi la parte riportasoltanto il cerchio o il numero della parte.Le parti in gomma e le parti in plastica solitamentenon sono marcate.I concorrenti che copiano le nostre parti spessomarcano soltanto le parti più importanti e costose.Alcune parti riportano soltanto il numero dellaparte, mentre altre hanno anche una marcatura diidentificazione sotto forma delle iniziali del nome delproduttore. I numeri sulle parti non originali vengonosolitamente stampigliati a mano, producendoirregolarità. I numeri delle parti stampigliati da AtlasCopco sono regolari e le cifre hanno tutte le stessedimensioni. Inoltre, la profondità delle cifre e laspaziatura tra di esse sono le stesse in ogni gruppo.Una volta ogni turno (dopo 8 ore difunzionamento)1. Verificare il collegamento della perforatrice alservosostegno.2. Controllare tubi, innesti e controlli nonpresentino perdite o danni.3. Verificare che la perforatrice e il servosostegnosiano stati lubrificati a sufficienza. Senecessario, rabboccare l’oliatore.4. Spurgare il separatore d'acqua.Una volta alla settimana (dopo 40 ore difunzionamento)►►Eseguire un controllo generale di tutte le funzionidell'attrezzatura di perforazione.Rottamazione e smaltimentoparti usurateLe macchine usate e usurate devono essere smaltitein modo tale che possa essere riciclata la maggiorquantità possibile di materiale e che l’impattosull’ambiente sia minimo.© 2010 Atlas Copco Construction <strong>Tools</strong> AB | No. 9800 0680 71a | 2010-01-01Istruzioni originali95
Istruzioni per la sicurezza e per l'usowww.<strong>Crowder</strong>Supply.com • Toll Free: 888-883-5144ALF 72D, ALF 72D-1, ALF 67/80D, BMK 62S, BMK 91RSRicerca dei guasti<strong>Crowder</strong> Supply Co., Inc. • 8495 Roslyn St., Commerce City, CO 80022 • Toll Free: 888-883-5144 • www.<strong>Crowder</strong>Supply.comGuida di base alla ricerca dei guastiProblema Causa SoluzioneForza dialimentazioneinsufficientePressione dell'aria bassaLa valvola 3121 0726 80 èbloccata o le guarnizioni 06632124 00 sono usurate (solo neimodelli ALF).Guarnizione dello stelo delpistone usurata o deformataAumentare la pressione a 6 bar.Se necessario, smontare la valvola e pulirla. Sostituire leguarnizioni usurate o deformate.Sostituire la guarnizione1Per i limiti di usura e le coppie di serraggio, vedere le informazioni sulla manutenzione di perforatrici leggere, documento Atlas Copcon. 9853 1086 01.2Calibro per codolo esagonale boccola m<strong>and</strong>rino 22 mm (7/8”) Atlas Copco n. 3091 0038 00.3Utilizzare il manometro Atlas Copco n. 9090 0550 80 per testare la pressione di acqua e aria.96© 2010 Atlas Copco Construction <strong>Tools</strong> AB | No. 9800 0680 71a | 2010-01-01Istruzioni originali
www.<strong>Crowder</strong>Supply.com • Toll Free: 888-883-5144ALF 72D, ALF 72D-1, ALF 67/80D, BMK 62S, BMK 91RSIstruzioni per la sicurezza e per l'usoAccessori<strong>Crowder</strong> Supply Co., Inc. • 8495 Roslyn St., Commerce City, CO 80022 • Toll Free: 888-883-5144 • www.<strong>Crowder</strong>Supply.comAccessorio Ordine n.Oliatore per BBC, BBD, RH:BLG 30, per olio minerale 8202 5102 05CLG 30, per olio minerale e sintetico 8202 5102 39Separatore d'acqua per BBC, BBD, RHVAM 5A, per flusso d'aria fino a 120 l/s (254 cfm) 8092 0110 82Accessori condotta aria 25 mm (1'')Tubo in gomma, 30 m 9030 2041 00Innesto a denti 9000 0313 00Fascetta stringitubo a due pezzi 9000 0197 00Manometro per aria compressa e pressione acquaManometro 9090 0550 80Set ago extra 9090 0678 90Tubo per aria compressa 25 mm (1") per perforatrice e slitta montata conraccordi per:Modello BBD 94W con i modelli ALF 72D, ALF 72D-1, ALF 67/80D e BMK 91RS 9030 2068 00Condotta aria compressa per 20 mm (3/4’’) per perforatrice e slitta montata conraccordi per:Modello RH 656W con BMK 62S 9030 2067 00© 2010 Atlas Copco Construction <strong>Tools</strong> AB | No. 9800 0680 71a | 2010-01-01Istruzioni originali97
Istruzioni per la sicurezza e per l'usowww.<strong>Crowder</strong>Supply.com • Toll Free: 888-883-5144ALF 72D, ALF 72D-1, ALF 67/80D, BMK 62S, BMK 91RSCaratteristiche tecniche<strong>Crowder</strong> Supply Co., Inc. • 8495 Roslyn St., Commerce City, CO 80022 • Toll Free: 888-883-5144 • www.<strong>Crowder</strong>Supply.comTipo Codice Indicato perperforatriceTelescopiosingoloALF 72D 8321 020180ALF 72D-1 8321 020181BMK 62S 8321 010202BMK 91RS 8321 010427TelescopiodoppioALF 67/80D 8321 020169Alimentatorelunghezza(mm)Lunghezzaretratta(mm)Lunghezzain estensione(mm)Peso(kg)Pistoneforo(mm)BBD 94W 1300 1970 3270 19 70BBD 94W 1200 1830 3030 16 70RH 656W 1300 1815 3115 17 53BBD 94W 1300 1730 3030 24 67BBD 94W 1855 1595 3450 19 67/80Dichiarazione di conformità CE (Direttiva CE 2006/42/CE)Atlas Copco Construction <strong>Tools</strong> AB, con il presente documento dichiara che i macchinari elencati di seguitosonoconformi ai requisiti specificati dalle Direttive CE 2006/42/CE (Direttiva macchine).Scalpellatori pneumatici manualiPmax (bar)ALF 72D 7ALF 72D-1 7BMK 62S 7BMK 91RS 7ALF 67/80D 7Rappresentante autorizzato Documentazione Tecnica:Erik SigfridssonAtlas Copco Construction <strong>Tools</strong> ABDragonvägen 2KalmarDirettore Generale:Erik SigfridssonProduttore:Atlas Copco Construction <strong>Tools</strong> AB105 23 StockholmSwedenLuogo e data: Kalmar, 2010-01-0198© 2010 Atlas Copco Construction <strong>Tools</strong> AB | No. 9800 0680 71a | 2010-01-01Istruzioni originali
www.<strong>Crowder</strong>Supply.com • Toll Free: 888-883-5144ALF 72D, ALF 72D-1, ALF 67/80D, BMK 62S, BMK 91RSIstruzioni per la sicurezza e per l'uso<strong>Crowder</strong> Supply Co., Inc. • 8495 Roslyn St., Commerce City, CO 80022 • Toll Free: 888-883-5144 • www.<strong>Crowder</strong>Supply.com© 2010 Atlas Copco Construction <strong>Tools</strong> AB | No. 9800 0680 71a | 2010-01-01Istruzioni originali99
Innehållwww.<strong>Crowder</strong>Supply.com • Toll Free: 888-883-5144ALF-72D ALF-72D-1 ALF-67-80D BMK-62S BMK 91RSSVENSKA<strong>Crowder</strong> Supply Co., Inc. • 8495 Roslyn St., Commerce City, CO 80022 • Toll Free: 888-883-5144 • www.<strong>Crowder</strong>Supply.comInnehållSÄKERHETSINSTRUKTION. . . . . . . . . . . . . . . . . . . . . . . . . . . . . . . . . . . . . . . . . . . . . . . . . . 101Säkerhetssymboler som används . . . . . . . . . . . . . . . . . . . . . . . . . . . . . . . . . . . . . . . . . .101Transportfara . . . . . . . . . . . . . . . . . . . . . . . . . . . . . . . . . . . . . . . . . . . . . . . . . . . . . . . . . . .101Faror vid användning av maskin och arbetsverktyg . . . . . . . . . . . . . . . . . . . . . . . . . . .101Risk för explosion och br<strong>and</strong> . . . . . . . . . . . . . . . . . . . . . . . . . . . . . . . . . . . . . . . . . . . . . .102Elektriska faror/faror från dolda föremål . . . . . . . . . . . . . . . . . . . . . . . . . . . . . . . . . . . . .102Faror från kringflyg<strong>and</strong>e föremål . . . . . . . . . . . . . . . . . . . . . . . . . . . . . . . . . . . . . . . . . . .103Bullerfaror . . . . . . . . . . . . . . . . . . . . . . . . . . . . . . . . . . . . . . . . . . . . . . . . . . . . . . . . . . . . . .103Faror från kiseldioxid/damm . . . . . . . . . . . . . . . . . . . . . . . . . . . . . . . . . . . . . . . . . . . . . . .103Vibrationsfaror . . . . . . . . . . . . . . . . . . . . . . . . . . . . . . . . . . . . . . . . . . . . . . . . . . . . . . . . . .104Faror vid maskinmodifieringar . . . . . . . . . . . . . . . . . . . . . . . . . . . . . . . . . . . . . . . . . . . . .104Ytterligare säkerhetsinstruktioner . . . . . . . . . . . . . . . . . . . . . . . . . . . . . . . . . . . . . . . . . .105Skyddsutrustning . . . . . . . . . . . . . . . . . . . . . . . . . . . . . . . . . . . . . . . . . . . . . . . . . . . . . . . .105Service och underhåll . . . . . . . . . . . . . . . . . . . . . . . . . . . . . . . . . . . . . . . . . . . . . . . . . . . .105Arbetsverktyg . . . . . . . . . . . . . . . . . . . . . . . . . . . . . . . . . . . . . . . . . . . . . . . . . . . . . . . . . . .105BRUKSANVISNING. . . . . . . . . . . . . . . . . . . . . . . . . . . . . . . . . . . . . . . . . . . . . . . . . . . . . . . . . 106Konstruktion och funktion . . . . . . . . . . . . . . . . . . . . . . . . . . . . . . . . . . . . . . . . . . . . . . . .106Skyltar och dekaler på maskinen . . . . . . . . . . . . . . . . . . . . . . . . . . . . . . . . . . . . . . . . . . .106Arbetsprincip för ett matarben . . . . . . . . . . . . . . . . . . . . . . . . . . . . . . . . . . . . . . . . . . . . .107Funktion . . . . . . . . . . . . . . . . . . . . . . . . . . . . . . . . . . . . . . . . . . . . . . . . . . . . . . . . . . . . . 107Förberedelser före start . . . . . . . . . . . . . . . . . . . . . . . . . . . . . . . . . . . . . . . . . . . . . . . . . . .107Anslutningsanordning . . . . . . . . . . . . . . . . . . . . . . . . . . . . . . . . . . . . . . . . . . . . . . . . . . . .108Bergborr BBD 94 W . . . . . . . . . . . . . . . . . . . . . . . . . . . . . . . . . . . . . . . . . . . . . . . . . . . . 108Bergborr RH 656 W . . . . . . . . . . . . . . . . . . . . . . . . . . . . . . . . . . . . . . . . . . . . . . . . . . . . 108Ansluta matarbenet tillbergborren . . . . . . . . . . . . . . . . . . . . . . . . . . . . . . . . . . . . . . . . . . . . . . . . . . . . . . . . . . . . .109Reglage . . . . . . . . . . . . . . . . . . . . . . . . . . . . . . . . . . . . . . . . . . . . . . . . . . . . . . . . . . . . . . . .109Reglage till ALF 72D, ALF 72D-1, ALF 67/80D och BMK 91RS. . . . . . . . . . . . . . . . . . . 109Reglage för BMK 62S. . . . . . . . . . . . . . . . . . . . . . . . . . . . . . . . . . . . . . . . . . . . . . . . . . . 109Borrning . . . . . . . . . . . . . . . . . . . . . . . . . . . . . . . . . . . . . . . . . . . . . . . . . . . . . . . . . . . . . . .110Starta bergborren . . . . . . . . . . . . . . . . . . . . . . . . . . . . . . . . . . . . . . . . . . . . . . . . . . . . . . 110Stoppa bergborren . . . . . . . . . . . . . . . . . . . . . . . . . . . . . . . . . . . . . . . . . . . . . . . . . . . . . 110Ompositionering av matarbenet . . . . . . . . . . . . . . . . . . . . . . . . . . . . . . . . . . . . . . . . . . . 110När du har borrat klart . . . . . . . . . . . . . . . . . . . . . . . . . . . . . . . . . . . . . . . . . . . . . . . . . . 110Underhåll . . . . . . . . . . . . . . . . . . . . . . . . . . . . . . . . . . . . . . . . . . . . . . . . . . . . . . . . . . . . . . .110Skillnader mellan originaldelar och kopior . . . . . . . . . . . . . . . . . . . . . . . . . . . . . . . . . . . 111En gång per skift (efter 8 timmars drift) . . . . . . . . . . . . . . . . . . . . . . . . . . . . . . . . . . . . . 111En gång i veckan (efter 40 timmars drift) . . . . . . . . . . . . . . . . . . . . . . . . . . . . . . . . . . . . 111Skrotning och avfallshantering . . . . . . . . . . . . . . . . . . . . . . . . . . . . . . . . . . . . . . . . . . . . . 111Felsökning . . . . . . . . . . . . . . . . . . . . . . . . . . . . . . . . . . . . . . . . . . . . . . . . . . . . . . . . . . . . .112Grundlägg<strong>and</strong>e felsökningsguide. . . . . . . . . . . . . . . . . . . . . . . . . . . . . . . . . . . . . . . . . . 112Tillbehör . . . . . . . . . . . . . . . . . . . . . . . . . . . . . . . . . . . . . . . . . . . . . . . . . . . . . . . . . . . . . . .113Tekniska specifikationer . . . . . . . . . . . . . . . . . . . . . . . . . . . . . . . . . . . . . . . . . . . . . . . . . .114EG-deklaration om överensstämmelse (EG-direktiv2006/42/EG) . . . . . . . . . . . . . . . . .114100© 2010 Atlas Copco Construction <strong>Tools</strong> AB | No. 9800 0680 71a | 2010-01-01Originalinstruktioner
www.<strong>Crowder</strong>Supply.com • Toll Free: 888-883-5144ALF 72D, ALF 72D-1, ALF 67/80D, BMK 62S, BMK 91RS Säkerhetsinstruktion och bruksanvisning<strong>Crowder</strong> Supply Co., Inc. • 8495 Roslyn St., Commerce City, CO 80022 • Toll Free: 888-883-5144 • www.<strong>Crowder</strong>Supply.comSÄKERHETSINSTRUKTIONFör att minska risken för allvarliga personskador(eller till och med dödsfall) för dig själv och <strong>and</strong>ra,ska du läsa igenom dessa säkerhetsinstruktionernoggrant innan du använder maskinen.Dessa säkerhetsinstruktioner ska finnas synliga påarbetsplatserna, kopior ska delas ut till de anställdaoch alla måste läsa säkerhetsinstruktionerna inn<strong>and</strong>e använder eller utför service på maskinen.Följ alla säkerhetsinstruktioner i manualen.Alla säkerhetsinstruktioner följer EU:s tillämpligalagar och direktiv.Du ska dessutom följa alla ytterligare nationella/regionala direktiv.I länder utanför EU gäller de lokala lagarna ochföreskrifterna.Alla ytterligare regionala lagar och föreskriftermåste följas.Säkerhetssymboler somanvändsAnvisningarna Fara, Varning och Varsamhet harfölj<strong>and</strong>e betydelser:FaraVarningVarsamhetTransportfaraIndikerar enöverhäng<strong>and</strong>e farligsituation som – omden inte undviks –kommer att resultera idödsfall eller allvarligpersonskada.Anger en potentielltfarlig situation som- om den inte undviks -kan resultera i dödsfalleller allvarlig olycka.Anger en situationsom kan, om den inteundviks, resulterai personskadaeller förstörelse avprodukten eller annanegendom.VarsamhetBergborrmaskinen och matarbenen är tunga.För att undvika personskador under transport tillarbetsområdet:►►Använd en vagn eller be en arbetskamrat omhjälp vid transport.Faror vid användning avmaskin och arbetsverktygVarningEn plötslig eller oväntad rörelse av maskinenkan inträffa under användning, vilket kan orsakapersonskador. Dessutom kan du göra illa dig omdenna rörelse får dig att förlora balansen ellerhalka. För att minska riskerna:►►Se till att du alltid står stabilt, med fötterna likabrett isär som dina axlar och med kroppen ibalans.►►Stå stadigt och håll alltid i maskinen med bådahänderna.►►Starta inte maskinen när den ligger på marken.►►Se till att h<strong>and</strong>taget är rent och fritt frånsmörjämnen och olja.VarningAtt råka starta maskinen av misstag kan orsakapersonskador.►►Håll händerna borta från trycket tills du är redoatt påbörja arbetet.VarningBorrstålet utsätts för hög belastning när maskinenanvänds och efter en viss tids användningkan insatsverktyget gå sönder på grund avmaterialutmattning. Om insatsverktyget går sönderkan maskinen göra plötsliga eller våldsamma kast.Dessa plötsliga eller våldsamma kast kan orsakaallvarliga personskador.►►Se till att du alltid står stabilt, med fötterna likabrett isär som dina axlar och med kroppen ibalans.►►Kontrollera regelbundet om arbetsverktyget ärslitet, och kontrollera att det inte finns någratecken på skador eller synliga sprickor.VarningEn felaktig dimension på verktygets nacke kanleda till att arbetsverktyget tappas eller glider urunder användningen. Ett arbetsverktyg som ärtappas eller glider ur kan orsaka personskador.►►Innan arbetsverktyget sätts i måste dukontrollera att nackens dimensioner är korrektaför maskinen.►►Arbetsverktyg utan krage får inte användas.© 2010 Atlas Copco Construction <strong>Tools</strong> AB | No. 9800 0680 71a | 2010-01-01Originalinstruktioner101
Säkerhetsinstruktion och bruksanvisningwww.<strong>Crowder</strong>Supply.com • Toll Free: 888-883-5144ALF 72D, ALF 72D-1, ALF 67/80D, BMK 62S, BMK 91RS<strong>Crowder</strong> Supply Co., Inc. • 8495 Roslyn St., Commerce City, CO 80022 • Toll Free: 888-883-5144 • www.<strong>Crowder</strong>Supply.comVarningOm verktygshållaren på maskinen inte är i låst lägekan arbetsverktyget kastas ut med stor kraft, vilketkan orsaka allvarliga personskador.►►När arbetsverktyget har monterats och låsts fastmåste du kontrollera låsfunktionen genom attdra verktyget hårt utåt.►►Se till att verktyget är helt isatt och attverktygshållaren är i låst läge innan maskinenstartas.►►Rikta aldrig arbetsverktyget mot dig själv ellernågon annan.VarningAtt försöka byta arbetsverktyget medan maskinenär igång kan orsaka allvarliga personskador.►►Stoppa alltid maskinen innan du byter verktyg.►►Ta aldrig tag i eller rör vid ett roter<strong>and</strong>e borrstål.VarningEn tryckluftsslang som lossnar kan slungas runtoch orsaka personskador eller dödsfall.För att minska riskerna:►►Kontrollera att tryckluftsslangen ochanslutningarna inte är skadade.►►Kontrollera att alla tryckluftsanslutningar ärkorrekt kopplade.►►Försök aldrig koppla isär en tryckluftsslang somär trycksatt. Stäng först av tryckluftsförsörjningenpå kompressorn och avlufta sedan maskinengenom att aktivera start- och stoppanordningen.VarningOm borrstålet fastnar under drift kommer helamaskinen att börja rotera om du förlorar greppetom den. Denna oväntade rotation av helamaskinen kan orsaka allvarliga personskador.►►Stå stadigt och håll alltid i maskinen med bådahänderna.►►Se till att h<strong>and</strong>taget är rent och fritt frånsmörjämnen och olja.►►Borra aldrig i ett gammalt hål.VarningDet finns risk för att föremål dras in i eller fastnar iett roter<strong>and</strong>e borrstål. Detta kan orsaka allvarligapersonskador.►►Ta aldrig tag i eller vidrör ett roter<strong>and</strong>e borrstål.►►Använd inte kläder som kan fastna. Om du harlångt hår ska du använda hårnät.Risk för explosion och br<strong>and</strong>FaraOm maskinen kommer i kontakt med ettsprängämne kan en explosion inträffa. Explosionerkan orsaka allvarliga personskador eller dödsfall.För att minska risken för explosioner:►►Använd aldrig utrustningen för att borra närasprängämnen, inklusive dynamit eller <strong>and</strong>rasprängämnen i klippblocket.►►Se till att det inte finns några sprängämnen iklippblocket.►►Borra aldrig i ett gammalt hål.VarningOm man borrar i eller arbetar med vissa materialkan gnistor uppstå som kan antända explosivagaser och orsaka explosioner. Explosioner kanorsaka allvarliga personskador eller dödsfall.För att minska risken för explosioner:►►Använd aldrig maskinen i explosiva miljöer.►►Använd inte maskinen nära brännbara material,brännbara ångor eller brännbart damm.►►Se till att det inte finns några okända gaskällor.Elektriska faror/faror fråndolda föremålFaraMaskinen är inte elektriskt isolerad. Om maskinenkommer i kontakt med elektricitet kan det leda tillallvarliga personskador eller dödsfall.►►För att minska risken för personskador ellerdödsfall får man aldrig använda maskinen inärheten av elledningar eller <strong>and</strong>ra elektriskakällor.►►Se till att det inte finns några dolda ledningareller <strong>and</strong>ra elektriska källor.102© 2010 Atlas Copco Construction <strong>Tools</strong> AB | No. 9800 0680 71a | 2010-01-01Originalinstruktioner
www.<strong>Crowder</strong>Supply.com • Toll Free: 888-883-5144ALF 72D, ALF 72D-1, ALF 67/80D, BMK 62S, BMK 91RS Säkerhetsinstruktion och bruksanvisning<strong>Crowder</strong> Supply Co., Inc. • 8495 Roslyn St., Commerce City, CO 80022 • Toll Free: 888-883-5144 • www.<strong>Crowder</strong>Supply.comVarningUnder borrning kan dolda ledningar och rörinnebära en fara som kan leda till allvarligapersonskador.►►Kontrollera sammansättningen av materialet duska arbeta med innan du börjar borra.►►Se upp för dolda ledningar och rör, exempelvisför el, telefon, vatten, gas och avlopp.►►Om insatsverktyget verkar ha slagit i ett doltföremål måste du omedelbart stänga avmaskinen.►►Påbörja inte arbetet igen förrän du är säker påatt det är riskfritt att fortsätta.Faror från kringflyg<strong>and</strong>eföremålVarningVid borrning kan personskador orsakas av flisoreller <strong>and</strong>ra partiklar från arbetsmaterialet somflyger iväg och träffar maskinanvändaren eller<strong>and</strong>ra personer.►►Använd godkänd personlig skyddsutrustning,inklusive stöttåliga skyddsglasögon medsidoskydd, för att minska risken för att skadasav kringflyg<strong>and</strong>e föremål.VarsamhetUnder urblåsningen kan partiklar och smutsigtspolvatten komma upp ur borrhålet och orsakapersonskada.►►Flytta dig åt sidan och skydda ögonen innan dubörjar blåsa borrhålet rent.►►Använd alltid stöttåliga skyddsglasögon medsidoskydd.►►Se till att inga medarbetare står i närheten närhålet blåses rent.BullerfarorVarningHöga ljudnivåer kan orsaka permanentahörselskador.►►Använd hörselskydd i enlighet med de gäll<strong>and</strong>eföreskrifterna för hälsa och säkerhet i arbetet.Faror från kiseldioxid/dammVarningExponering för kristallin kiseldioxid (kallas ibl<strong>and</strong>"kvartsdamm") som uppstår vid borrning eller<strong>and</strong>ra aktiviteter som berör sten, betong, asfalteller <strong>and</strong>ra material kan orsaka silikos (en allvarliglungsjukdom), silikosrelaterade sjukdomar, cancereller dödsfall. Kiseldioxid är en viktig beståndsdel isten, s<strong>and</strong> och mineralmalmer.För att minska exponeringen för kiseldioxid:►►Använd rätt tekniska metoder för att minskamängden kiseldioxid i luften och ansamlingen avdamm på utrustning och ytor. Exempel på dessatekniska metoder är: utsugningsventilationoch damminsamlingssystem, vattensprej ochvåtborrning. Se till att dessa tekniska metoderinförs och upprätthålls på rätt sätt.►►Godkända <strong>and</strong>ningsskydd med partikelfilter skabäras, användas och underhållas på rätt sätt närde tekniska metoderna inte ensamma räcker föratt minska exponeringen under de godkändanivåerna.►►Delta i luftkontroller, medicinska undersökningaroch utbildningsprogram när arbetsgivarenerbjuder det eller när lagen kräver det.►►Använd tvättbara skyddskläder ellerskyddskläder för engångsbruk på arbetsplatsen.Duscha och byt om till rena kläder inn<strong>and</strong>u lämnar arbetsplatsen för att minska dinexponering för kiseldioxid, liksom exponeringensom <strong>and</strong>ra personer, bilar, hem och områdenutsätts för.►►Man ska inte äta, dricka eller använda tobaksprodukterpå ställen där det finns damm sominnehåller kristallin kiseldioxid.►►Tvätta händerna och ansiktet innan du äter,dricker eller använder tobaksprodukter utanförexponeringsområdet.►►Arbeta tillsammans med arbetsgivaren föratt minska exponeringen för kiseldioxid påarbetsplatsen.© 2010 Atlas Copco Construction <strong>Tools</strong> AB | No. 9800 0680 71a | 2010-01-01Originalinstruktioner103
Säkerhetsinstruktion och bruksanvisningwww.<strong>Crowder</strong>Supply.com • Toll Free: 888-883-5144ALF 72D, ALF 72D-1, ALF 67/80D, BMK 62S, BMK 91RS<strong>Crowder</strong> Supply Co., Inc. • 8495 Roslyn St., Commerce City, CO 80022 • Toll Free: 888-883-5144 • www.<strong>Crowder</strong>Supply.comVarningDamm, ångor eller annat luftburet material somuppstår vid användning av maskinen kan innehållakemikalier som staten Kalifornien känner till kanorsaka cancer och ge upphov till fosterskador eller<strong>and</strong>ra fortplantningsskador. Några exempel pådessa kemikalier är:►►Kristallin kiseldioxid och cement och <strong>and</strong>raprodukter för murning.►►Arsenik och krom från kemiskt beh<strong>and</strong>latgummi.►►Bly från blybaserade målarfärger.För att minska exponeringen för dessa kemikalierska man arbeta i väl ventilerade utrymmen ochanvända godkänd säkerhetsutrustning, exempelvisdammasker som är specialkonstruerade för attfiltrera bort mikroskopiska partiklar.VibrationsfarorVarningNormal och korrekt användning av maskinenutsätter användaren för vibrationer. Regelbundenoch frekvent exponering för vibrationer kan orsaka,bidra till eller förvärra skador eller problem ianvändarens fingrar, händer, h<strong>and</strong>leder, armar,skuldror och/eller <strong>and</strong>ra kroppsdelar. Dettainkluderar försvagningar och/eller permanentaskador eller problem som kan utvecklas gradvisunder flera veckor, månader eller år. Bl<strong>and</strong> sådanaskador eller problem kan inräknas skador påblodomloppet, nervsystemet, leder och <strong>and</strong>rakroppsstrukturer.Om du märker av domningar, sveda, värk,försämrad finmotorik, försämrad greppförmåga, atthuden vitnar eller <strong>and</strong>ra symtom när du användermaskinen – eller efter användning av maskinen– ska du sluta använda maskinen och kontaktaläkare. Om du fortsätter att använda maskinennär sådana symtom uppstår ökar risken för attsymtomen blir allvarliga och/eller permanenta.Följ<strong>and</strong>e kan hjälpa dig att minska exponeringenför vibrationer:►►Låt verktyget göra jobbet. Håll inte hårdare ih<strong>and</strong>taget än vad som behövs för kontroll ochsäker drift.►►När slagmekanismen är aktiverad ska du inte hanågon annan kroppskontakt med maskinen ändina händer på h<strong>and</strong>tagen. Du ska till exempelundvika att stödja någon del av kroppen motmaskinen eller luta dig mot maskinen för attförsöka öka kraften. Det är dessutom viktigtatt du inte håller trycket intryckt när du drar urinsatsverktyget ur arbetsytan.►►Se till att insatsverktyget är i bra skick, inteär utslitet och har rätt storlek. Insatsverktygsom inte underhålls på rätt sätt, som ärutslitna eller som inte har rätt storlek gör attarbetsuppgifterna tar längre tid att utföra (vilketmedför längre exponering för vibrationer) ochkan resultera i eller bidra till ökad exponering förvibrationer.►►Sluta arbetet omedelbart om maskinen plötsligtbörjar vibrera våldsamt. Leta rätt på ochundanröj orsaken till de ökade vibrationernainnan du fortsätter arbetet.►►Använd det rekommenderade lufttrycket närdu använder maskinen. Såväl högre som lägrelufttryck kan leda till ökade vibrationer.►►Du får aldrig ta tag i, hålla i eller vidröra arbetsverktygetmedan du använder maskinen.►►Delta i hälsokontroller, medicinskaundersökningar och utbildningsprogram närarbetsgivaren erbjuder det eller när lagen kräverdet.Se maskinens "Buller- och vibrationsdeklaration"i slutet av det här avsnittet, säkerhetsinstruktioneroch bruksanvisning.Faror vidmaskinmodifieringarVarningAlla maskinmodifieringar som inte godkänts avAtlas Copco kan resultera i att du själv eller <strong>and</strong>rapersoner skadas allvarligt.►►Maskinen får inte modifieras utan AtlasCopcos godkänn<strong>and</strong>e.►►Använd endast orginaldelar och -tillbehörsom godkänts av Atlas Copco.104© 2010 Atlas Copco Construction <strong>Tools</strong> AB | No. 9800 0680 71a | 2010-01-01Originalinstruktioner
www.<strong>Crowder</strong>Supply.com • Toll Free: 888-883-5144ALF 72D, ALF 72D-1, ALF 67/80D, BMK 62S, BMK 91RS Säkerhetsinstruktion och bruksanvisning<strong>Crowder</strong> Supply Co., Inc. • 8495 Roslyn St., Commerce City, CO 80022 • Toll Free: 888-883-5144 • www.<strong>Crowder</strong>Supply.comYtterligaresäkerhetsinstruktioner►►Maskiner och tillbehör får endast användas fördet syfte de är avsedda för.►►Endast kvalificerad och utbildad personal fåranvända eller utföra underhåll på maskinen.►►Lär dig hur maskinen stängs av i händelse avnödfall.►►Det maximalt tillåtna lufttrycket för maskinen fårinte överskridas.►►Släpp trycket omedelbart omtryckluftförsörjningen avbryts.►►Inspektera alltid utrustningen före användning.Använd inte utrustningen om du misstänker attden är skadad.►►Använd alltid ditt sunda förnuft och godaomdöme.►►Var uppmärksam och titta på vad du gör.►►Använd inte maskinen när du är trött ellerpåverkad av läkemedel, alkohol eller annat somkan påverka din syn, dina reaktioner eller dittomdöme.►►Delta i säkerhetsutbildningar och <strong>and</strong>rautbildningar.►►Slå aldrig på utrustningen och missbruka deninte.►►Förvara maskinen och insatsverktygen på ensäker plats som är låst och utom räckhåll förbarn.►►Se till att all ansluten och tillhör<strong>and</strong>e utrustningunderhålls på rätt sätt.►►Skyltar och dekaler som är viktiga för dinsäkerhet och skötseln av maskinen följermed varje maskin. Se till att skyltarna alltid ärläsbara. Nya skyltar och dekaler kan beställasmed hjälp av reservdelslistan.►►Se till att obehörig personal inte kommer in påarbetsområdet.►►Håll arbetsplatsen ren och fri från främm<strong>and</strong>eföremål.►►Rikta aldrig en tryckluftsslang mot dig själv ellernågon annan. För att undvika skador ska dualdrig använda tryckluft för att blåsa bort t.ex.damm, smuts, m.m. från kläderna.SkyddsutrustningAnvänd alltid godkänd skyddsutrustning. Maskinanvändarnaoch alla <strong>and</strong>ra personer som vistasinom arbetsområdet måste bära skyddsutrustningsom minst består av följ<strong>and</strong>e:►►Skyddshjälm►►Hörselskydd►►Slagtåliga skyddsglasögon med sidoskydd►►Andningsskydd, när detta behövs►►Skyddsh<strong>and</strong>skar►►SkyddsskorService och underhållRegelbundet underhåll är en förutsättning föratt maskinen ska kunna fortsätta vara säker ocheffektiv. Följ instruktionerna noggrant.Innan något underhåll utförs på maskinen ellerarbetsverktyget byts, måste man alltid stängaav tryckluftsförsörjningen och avlufta maskinengenom att aktivera start- och stoppanordningen.Koppla sedan bort luftslangen från maskinen.►►Använd bara originaldelar. Skador eller fel somorsakas genom användning av piratdelar täcksinte av garanti eller företagets produktansvar.►►Byt omedelbart ut skadade delar.►►Byt ut skadade och utslitna komponenter i godtid.►►Kontakta din närmaste auktoriserade verkstadför mer omfatt<strong>and</strong>e service av maskinen.►►Se till att du följer de gäll<strong>and</strong>e föreskrifternaför hälsa och säkerhet och att det finnstillfredsställ<strong>and</strong>e ventilation när du rengör demekaniska delarna med lösningsmedel.Arbetsverktyg►►Håll verktygen rena och i gott skick. Kontrolleraregelbundet arbetsverktygen och se till att de ärvassa och inte utslitna.Observera! Maskinen kan förstöras om duanvänder fel arbetsverktyg.© 2010 Atlas Copco Construction <strong>Tools</strong> AB | No. 9800 0680 71a | 2010-01-01Originalinstruktioner105
Säkerhetsinstruktion och bruksanvisningwww.<strong>Crowder</strong>Supply.com • Toll Free: 888-883-5144ALF 72D, ALF 72D-1, ALF 67/80D, BMK 62S, BMK 91RS<strong>Crowder</strong> Supply Co., Inc. • 8495 Roslyn St., Commerce City, CO 80022 • Toll Free: 888-883-5144 • www.<strong>Crowder</strong>Supply.comBRUKSANVISNINGKonstruktion och funktionAtlas Copco matarben typ ALF 72D, ALF72D-1, BMK 62S och ALF 67/80D används medlätta bergborrar av typ BBD och RH. ALF 72D,ALF 72D-1 och ALF 67/80D används tillsammansmed BBD 94W och är dubbelverk<strong>and</strong>e med automatiskretur. BMK 62S används tillsammans medRH 656W och måste dras tillbaka manuellt. ALF72D, ALF 72D-1, BMK 62S och ALF 67/80D ärutrustade med en enstegscylinder. ALF 67/80Där utrustad med en tvåstegscylinder. BMK 91RSanvänds tillsammans med BBD 94W och ärutrustad med en enstegscylinder med automatiskretur. Cylindrarna är tillverkade i aluminium förutomBMK 62S och BMK 91RS som är tillverkade i stål.Matarbenen är anslutna till bergborren med enspeciell fastsättningsanordning. Rekommenderatlufttryck är 6 bar.Matarbenet hjälper operatören att lyfta och matabergborren under borrningen.ACBA. ModellB. Maximalt tillåtet lufttryckC. SerienummerD. Varningssymbol ihop med boksymbolinnebär att användaren ska läsa igenomsäkerhetsinstruktionen och bruksanvisningeninnan maskinen används för första gången.E. CE-symbolen betyder att maskinen är EGgodkänd.Se den EG-deklaration som medföljermaskinen för närmare information. Om CEsymbolensaknas betyder att maskinen inte är EGgodkänd.DESkyltar och dekaler påmaskinenSkyltar och dekaler som är viktiga för din säkerhetoch för skötseln av maskinen följer med varjemaskin. Nya dekaler kan beställas med hjälp avreservdelslistan.Skylten visar viktig information:Varningssymbolen tillsammans med boksymbolenbetyder att du måste läsa Säkerhetsinstruktion ochbruksanvisning innan du använder maskinen.106© 2010 Atlas Copco Construction <strong>Tools</strong> AB | No. 9800 0680 71a | 2010-01-01Originalinstruktioner
www.<strong>Crowder</strong>Supply.com • Toll Free: 888-883-5144ALF 72D, ALF 72D-1, ALF 67/80D, BMK 62S, BMK 91RS Säkerhetsinstruktion och bruksanvisning<strong>Crowder</strong> Supply Co., Inc. • 8495 Roslyn St., Commerce City, CO 80022 • Toll Free: 888-883-5144 • www.<strong>Crowder</strong>Supply.comArbetsprincip för ettmatarbenFunktionMatarbenets matningsrörelse drivs med tryckluftsom riktas mot kolvens undre sida och skjuter utden ur cylindern. För automatisk återgång (ejBMK 62S) av kolvstången in i cylindern, riktastryckluft mot kolvens övre del.ALF 72DALF 72D-1BMK 62S1. Matningsreglage2. Ventilpinne3. Slangnippel (12,5 mm)4. Matningscylinder5. Kolvstång6. H<strong>and</strong>tag7. Spets med stöd8. VarningsetikettFörberedelser före start1. Kontrollera borrutrustningen►►Kontrollera att all borrutrustning är i gott skick.►►Se till att luftintaget inte är tilltäppt.►►Se till att anslutningarna är täta och läckagesäkra.VarningKontrollera alltid om det finns några skadadeeller lösa slangar och anslutningar föreanvändning. Snärt<strong>and</strong>e slangar kan orsakaallvarliga personskador.2. Blås ur luftslangen►►Varje dag innan borren används ska luftslangenblåsas ur för att rengöra den från samlad smutsoch fukt.3. Fyll smörjapparaten med oljaObservera! Kontrollera att chucken och borrstålsnackenalltid är täckta med enoljefilm.© 2010 Atlas Copco Construction <strong>Tools</strong> AB | No. 9800 0680 71a | 2010-01-01Originalinstruktioner107
Säkerhetsinstruktion och bruksanvisningwww.<strong>Crowder</strong>Supply.com • Toll Free: 888-883-5144ALF 72D, ALF 72D-1, ALF 67/80D, BMK 62S, BMK 91RS<strong>Crowder</strong> Supply Co., Inc. • 8495 Roslyn St., Commerce City, CO 80022 • Toll Free: 888-883-5144 • www.<strong>Crowder</strong>Supply.comObservera! Använd alltid ett rekommenderatsmörjmedel.SmörjmedelLuftverktygsoljaRekommendationAnvänd en mineralbaseradluftverktygsolja.OmgivningstemperaturºCViskositet(ISO 3448)-30 till 0 ISO VG 32-68-10 till +20 ISO VG 68-100+10 till +50 ISO VG 100-1504. Kalibrera rätt luft- och vattentryckAnvänd tryckmanometern Atlas Copco nr 90900550 80 för att kontrollera vatten- och lufttrycketnär bergborren är igång.LufttryckSe till att kompressorn kan leverera den luftvolympå 4–6 bar som verktyget kräver.►►För högt tryck ger ojämn gång och skador.►►För lågt tryck ger en långsam borrhastighet.VattentryckTryckmanometern är försedd med en nål somtrycks in i slangen för att mäta trycket inuti.Observera! Se till att vattentrycket är minst1 bar lägre än lufttrycket annars kanvattnet tränga in i slagmekanismen.Om exempelvis lufttrycket är 6 barmåste vattentrycket vara under 5 barför att förhindra att vatten tränger in islagmekanismen.AnslutningsanordningDet behövs en anslutningsanordning för att kopplamatarbenet till bergborren.Bergborr BBD 94 WAnslutning monteras mittpå bergborren.Bergborr RH 656 WAnslutningen monteras på bergborren genom attspänna fast den på sidobultarna.108© 2010 Atlas Copco Construction <strong>Tools</strong> AB | No. 9800 0680 71a | 2010-01-01Originalinstruktioner
www.<strong>Crowder</strong>Supply.com • Toll Free: 888-883-5144ALF 72D, ALF 72D-1, ALF 67/80D, BMK 62S, BMK 91RS Säkerhetsinstruktion och bruksanvisning<strong>Crowder</strong> Supply Co., Inc. • 8495 Roslyn St., Commerce City, CO 80022 • Toll Free: 888-883-5144 • www.<strong>Crowder</strong>Supply.comAnsluta matarbenet tillbergborrenMatarbenet måste fästas på bergborren medbajonettkopplingen.ReglageReglage till ALF 72D, ALF 72D-1, ALF67/80D och BMK 91RSMatarbenets reglage (1)Justera matningskraften med hjälp av reglaget påfölj<strong>and</strong>e sätt:Vrid det moturs (B) för att öka matningskraften.Vrid det medurs (A) för att minska matningskraften.När reglaget är stängt (A) avluftas matarbenet.Ventilpinne (2)När ventilpinnen trycks in upphör matningskraftenomedelbart, utan hänsyn till matningsreglagetsinställning. Denna funktion används exempelvis föratt justera höjden på bergborren när matarbenetriggas upp eller när bergborren har en benägenhetatt fastna.När ventilpinnen trycks in dras kolvstången imatarbenet tillbaka automatiskt.Reglage för BMK 62SMatarbenets reglage (1)Justera matningskraften med hjälp av reglaget påfölj<strong>and</strong>e sätt:Vrid det moturs (B) för att öka matningskraften.Vrid det medurs (A) för att minska matningskraften.När reglaget är stängt (A) avluftas matarbenet.Ventilpinne (2)När ventilpinnen trycks in upphör matningskraftenomedelbart, utan hänsyn till matningsreglagetsinställning. Denna funktion används exempelvis föratt justera höjden på bergborren när matarbenetriggas upp eller när bergborren har en benägenhetatt fastna.© 2010 Atlas Copco Construction <strong>Tools</strong> AB | No. 9800 0680 71a | 2010-01-01Originalinstruktioner109
Säkerhetsinstruktion och bruksanvisningwww.<strong>Crowder</strong>Supply.com • Toll Free: 888-883-5144ALF 72D, ALF 72D-1, ALF 67/80D, BMK 62S, BMK 91RS<strong>Crowder</strong> Supply Co., Inc. • 8495 Roslyn St., Commerce City, CO 80022 • Toll Free: 888-883-5144 • www.<strong>Crowder</strong>Supply.comBorrningStarta bergborren1. Öppna ventilen för tryckluft.A2. Justera matningsreglaget (C) för att få enlämplig matningskraft för ansättning av hålet.3. Rikta in bergborren så att borrstålet vidrörden önskade ansatspunkten.4. Rör pådragsspaken (A) framåt lite gr<strong>and</strong> föratt starta vattenspolning, anslag och rotation.5. Påbörja hålet med reducerad matningskraft.6. För pådragsspaken (A) helt framåt närborrstålet har fått ett bra fäste i stenblocket.7. Justera matningskraften med reglaget (C) såatt maximal penetrationshastighet uppnås.Stoppa bergborren1. Dra pådragsspaken (A) bakåt för att stoppaanslag, rotering och vattenspolning.2. Vrid matningsreglaget (C) till stängt läge.CBOmpositionering av matarbenet1. Stäng av bergborrens anslag och spolningmed pådragsspaken (A).2. Tryck ner ventilpinnen (B) så dras kolvstångenautomatiskt in i matarbenets cylinder(manuellt på BMK 62S).3. Ompositionering av matarbenet.4. Frigör ventilpinnen (B) så åker kolvstångenut igen.5. För pådragsspaken (A) framåt i arbetsläge.6. Uppmärksamma att matningsreglaget(C) inte behöver röras under den härproceduren.När du har borrat klartLägg ner bergborren på en sten, träplanka ellerlikn<strong>and</strong>e, så att inte borrkax eller annat främm<strong>and</strong>ematerial kommer in i borrbussningen.Stäng av vattentrycket före lufttrycket. Kör bergborrennågra sekunder för att få bort vatten ochfukt efter det att vattnet har stängts av.UnderhållRegelbundet underhåll är en förutsättning förmaskinsäkerhet. Byt ut skadade och utslitnakomponenter i god tid. Kontakta din närmasteauktoriserade verkstad för en mer omfatt<strong>and</strong>eservice av maskinen.Kontrollera maskinen och insatsverktygen medregelbundna intervall för att se om det finns någotslitage eller några skador. Använd inte mycketutslitna eller skadade insatsverktyg.Se till att du följer de gäll<strong>and</strong>e föreskrifterna förhälsa och säkerhet och att det finns tillfredsställ<strong>and</strong>eventilation när du rengör de mekaniskadelarna med lösningsmedel.Dagligt underhåll, regelbunden kontroll av slitdelaroch utför<strong>and</strong>e av reparationer i god tid förhindrarmaskinhaverier och ökar maskinens livslängd.►►Olja alltid in bergborren och matarbenetordentligt innan du lägger undan dem förförvaring.►►Förvara på en ren och torr plats.►►Se till att inga främm<strong>and</strong>e föremål tränger in imaskinen.►►Spola alltid över bergborren och matarbenet ochtorka dem rena efter användning.110© 2010 Atlas Copco Construction <strong>Tools</strong> AB | No. 9800 0680 71a | 2010-01-01Originalinstruktioner
www.<strong>Crowder</strong>Supply.com • Toll Free: 888-883-5144ALF 72D, ALF 72D-1, ALF 67/80D, BMK 62S, BMK 91RS Säkerhetsinstruktion och bruksanvisning<strong>Crowder</strong> Supply Co., Inc. • 8495 Roslyn St., Commerce City, CO 80022 • Toll Free: 888-883-5144 • www.<strong>Crowder</strong>Supply.comSkillnader mellan originaldelar och kopiorNär du köper en del är det första du ska göra attkontrollera att delen verkligen kommer från AtlasCopco. De flesta delar kan identifieras.Delar till bergborrar är normalt märkta med ett artikelnummeroch Atlas Copcos symbol som är en cirkel meden bergborr inuti. I vissa fall är delen märkt med enbartcirkeln eller enbart artikelnumret.Delar i gummi och plast är normalt inte märkta.Konkurrenter som kopierar våra delar märkerofta upp större och dyrare delar. Vissa delar harbara artikelnumret, men en del av dem har ävenen identitetsmarkering i form av tillverkarensinitialer. Artikelnumren på kopiorna är för detmesta stämplade för h<strong>and</strong> vilket resulterar ioregelbundenheter. Artikelnumren som stämplasav Atlas Copco är regelbundna och de olikasiffrorna är av samma storlek. Dessutom är djupetpå siffrorna och avståndet mellan siffrorna i varjegrupp detsamma.En gång per skift (efter 8 timmars drift)1. Kontrollera bergborrens anslutning tillmatarbenet.2. Kontrollera slangar, kopplingar och reglageför att se om det finns några läckor ellerskador.3. Kontrollera att bergborren och matarbenetfår tillräckligt med smörjning. Fyll smörjapparatenvid behov.4. Töm vattenavskiljaren.En gång i veckan (efter 40 timmars drift)►►Utför en grundlägg<strong>and</strong>e kontroll av borrutrustningensalla funktioner.Skrotning ochavfallshanteringAnvända och utslitna maskiner måste skrotaspå ett sådant sätt att så mycket som möjligt avmaterialet kan återvinnas, så att påverkan påmiljön minimeras.© 2010 Atlas Copco Construction <strong>Tools</strong> AB | No. 9800 0680 71a | 2010-01-01Originalinstruktioner111
Säkerhetsinstruktion och bruksanvisningwww.<strong>Crowder</strong>Supply.com • Toll Free: 888-883-5144ALF 72D, ALF 72D-1, ALF 67/80D, BMK 62S, BMK 91RSFelsökning<strong>Crowder</strong> Supply Co., Inc. • 8495 Roslyn St., Commerce City, CO 80022 • Toll Free: 888-883-5144 • www.<strong>Crowder</strong>Supply.comGrundlägg<strong>and</strong>e felsökningsguideProblem Orsak LösningOtillräckligmatningskraftLågt lufttryckVentil 3121 0726 80 harfastnat eller packning 06632124 00 är utsliten (endastALF-modeller).Kolvstångens packning sliteneller deformerad.Öka lufttrycket till 6 bar.Demontera och rengör ventilen om nödvändigt. Byt utpackningen om den är sliten eller demformerad.Byt ut packningen1För slitagegränser och åtdragningsmoment, se serviceinformationen för lätta bergborrar, Atlas Copco dokument nr 9853 1086 01.2Tolk för borrbussning för 22 mm (7/8") sexkantsnacke, Atlas Copco nr 3091 0038 00.3Använd tryckmanometer Atlas Copco nr 9090 0550 80 för att testa vatten- och lufttrycket.112© 2010 Atlas Copco Construction <strong>Tools</strong> AB | No. 9800 0680 71a | 2010-01-01Originalinstruktioner
www.<strong>Crowder</strong>Supply.com • Toll Free: 888-883-5144ALF 72D, ALF 72D-1, ALF 67/80D, BMK 62S, BMK 91RS Säkerhetsinstruktion och bruksanvisningTillbehör<strong>Crowder</strong> Supply Co., Inc. • 8495 Roslyn St., Commerce City, CO 80022 • Toll Free: 888-883-5144 • www.<strong>Crowder</strong>Supply.comTillbehörOrdernummerSmörjapparat för BBC, BBD, RH:BLG 30, för mineralolja 8202 5102 05CLG 30, för både mineralolja och syntetisk olja 8202 5102 39Vattenavskiljare för BBC, BBD, RH:VAM 5A, för luftflöde upp till 120 l/s (254 cfm) 8092 0110 82Luftledningstillbehör för 25 mm (1")Gummislang, 30 m 9030 2041 00Klokoppling 9000 0313 00Tvådelad slangklämma 9000 0197 00Tryckmanometer för tryckluft och vattentryckManometer 9090 0550 80Extra uppsättning nålar 9090 0678 90Tryckluftsslang 25 mm (1’’) för bergborr och matning, försedd medkopplingar för:BBD 94W tillsammans med ALF 72D, ALF 72D-1, ALF 67/80D och BMK 91RS 9030 2068 00Tryckluftsslang 20 mm (3/4") för bergborr och matarben, förmonterad medkopplingar för:RH 656W tillsammans med BMK 62S 9030 2067 00© 2010 Atlas Copco Construction <strong>Tools</strong> AB | No. 9800 0680 71a | 2010-01-01Originalinstruktioner113
Säkerhetsinstruktion och bruksanvisningwww.<strong>Crowder</strong>Supply.com • Toll Free: 888-883-5144ALF 72D, ALF 72D-1, ALF 67/80D, BMK 62S, BMK 91RSTekniska specifikationer<strong>Crowder</strong> Supply Co., Inc. • 8495 Roslyn St., Commerce City, CO 80022 • Toll Free: 888-883-5144 • www.<strong>Crowder</strong>Supply.comTyp Ordernummer Lämplig förbergborrEnkeltteleskopALF 72D 8321 020180ALF 72D-1 8321 020181BMK 62S 8321 010202BMK 91RS 8321 010427DubbeltteleskopALF 67/80D 8321 020169Matninglängd(mm)Längdindragen(mm)Längdutdragen(mm)Vikt(kg)Cylinderlopp(mm)BBD 94W 1300 1970 3270 19 70BBD 94W 1200 1830 3030 16 70RH 656W 1300 1815 3115 17 53BBD 94W 1300 1730 3030 24 67BBD 94W 1855 1595 3450 19 67/80EG-deklaration om överensstämmelse (EG-direktiv2006/42/EG)Vi, Atlas Copco Construction <strong>Tools</strong> AB, försäkrar härmed att nedanstående maskiner uppfyllerbestämmelsernai EG-direktiv 2006/42/EG (Maskindirektivet).H<strong>and</strong>hållna pneumatiska matarbenPmax (bar)ALF 72D 7ALF 72D-1 7BMK 62S 7BMK 91RS 7ALF 67/80D 7Auktoriserad representant för teknisk dokumentation:Erik SigfridssonAtlas Copco Construction <strong>Tools</strong> ABDragonvägen 2KalmarProduktbolagschef:Erik SigfridssonTillverkare:Atlas Copco Construction <strong>Tools</strong> AB105 23 StockholmSwedenOrt och datum: Kalmar, 2010-01-01114© 2010 Atlas Copco Construction <strong>Tools</strong> AB | No. 9800 0680 71a | 2010-01-01Originalinstruktioner
www.<strong>Crowder</strong>Supply.com • Toll Free: 888-883-5144ALF 72D, ALF 72D-1, ALF 67/80D, BMK 62S, BMK 91RS Säkerhetsinstruktion och bruksanvisning<strong>Crowder</strong> Supply Co., Inc. • 8495 Roslyn St., Commerce City, CO 80022 • Toll Free: 888-883-5144 • www.<strong>Crowder</strong>Supply.com© 2010 Atlas Copco Construction <strong>Tools</strong> AB | No. 9800 0680 71a | 2010-01-01Originalinstruktioner115
www.<strong>Crowder</strong>Supply.com • Toll Free: 888-883-5144<strong>Crowder</strong> Supply Co., Inc. • 8495 Roslyn St., Commerce City, CO 80022 • Toll Free: 888-883-5144 • www.<strong>Crowder</strong>Supply.comAny unauthorized use or copying of the contents or any part thereof is prohibited.This applies in particular to trademarks, model denominations, part numbers <strong>and</strong>drawings.© 2010 Atlas Copco Construction <strong>Tools</strong> AB, Stockholm, Sweden | No. 9800 0680 71a | 2010-01-01www.atlascopco.com