

Hoover TCR4234 011 - TCR4234 011 mode d'emploi
Hoover TCR4234 011 - TCR4234 011 mode d'emploi
Hoover TCR4234 011 - TCR4234 011 mode d'emploi

You also want an ePaper? Increase the reach of your titles
YUMPU automatically turns print PDFs into web optimized ePapers that Google loves.
GB<br />
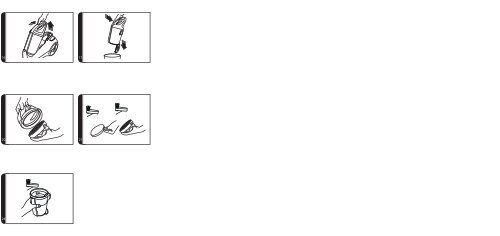
Using your cleaner<br />
1. Extract power cord and plug it into the power supply. Do not pull the cord beyond the<br />
red marker. [5]<br />
2. Adjust the telescopic tube to the desired height by moving the telescopic release button<br />
up and raise or lower the handle to the most comfortable cleaning position. [6]<br />
3. Select carpet care control height by pressing the pedal in the nozzle. [7]<br />
hard Floor – Brushes are lowered to protect the floor.<br />
carpet – Brushes are raised for the deepest clean.<br />
4. Switch the cleaner on by pressing the On/Off Button on the cleaner main body. [8]<br />
5. Adjust the power control regulator to the desired level. [9]<br />
6. Adjust the suction regulator to the desired level. [10]<br />
7. Switch off at the end of use by pressing the On/Off Button. Unplug and press the cord<br />
rewind button to wind the power cord back into the cleaner. [11]<br />
8. To store your cleaner adjust telescopic tube to the lowest height setting and park the<br />
nozzle in the park position on the cleaner main body. [12]<br />
Accessories<br />
Please see the <strong>mode</strong>l specification on the packaging label for inclusion of accessories to individual<br />
<strong>mode</strong>ls. All accessories can be purchased separately from <strong>Hoover</strong>. (See <strong>Hoover</strong> Spares<br />
and Consumable section).<br />
All accessories can be fitted to the end of the hose or the end of the telescopic tube.<br />
3 in 1 tool – Combines several functions in one. The 3 in 1 tool can be stored neatly underneath<br />
the hose handle.<br />
Crevice Tool – For corners and hard to reach areas. [13]<br />
Furniture Nozzle – For soft furniture and fabrics [14]<br />
Dusting Brush – For bookshelves, frames, keyboards and other delicate areas. To extend the<br />
brushes push the button on the body of the tool. [15]<br />
Parquet Caresse Nozzle* – For parquet floors and other delicate floors.<br />
Grand Turbo Nozzle* – Use the turbo nozzle for deep cleaning on carpets.<br />
Pet Hair Remover Mini Turbo Nozzle* - Use the mini turbo nozzle on stairs or for deepcleaning<br />
on textile surfaces and other hard to clean areas. Particularly suitable for pet hairs removal.<br />
Allergen Remover Mini Turbo Nozzle* – Use the mini turbo nozzle on stairs or for deepcleaning<br />
on textile surfaces and other hard to clean areas. Particularly suitable for allergen removal.<br />
IMPORTANT: Do not use the turbo and mini turbo nozzles on rugs with long fringes, animal<br />
hides and carpet pile deeper than 15mm. Do not keep the nozzle stationary while the brush<br />
is rotating.<br />
(*Certain Models Only)<br />
Cleaner Maintenance<br />
Emptying the Dust Container<br />
When the dust reaches the max level indicator in the container empty the dust container.<br />
IMPORTANT: To maintain optimum performance do not allow the dust to sit higher than the<br />
max level.<br />
1.<br />
2.<br />
3.<br />
Release the container by sliding the bin release button towards the rear of the cleaner.<br />
[16] Lift the dust container from the cleaner main body.<br />
Hold the dust container over a bin with one hand and press the bin container door open<br />
trigger. [17]<br />
Close the dust container door and refit to the cleaner main body.<br />
Cleaning the washable filters<br />
The cleaner is fitted with a blue hepa filter pack. To maintain optimum cleaning performance<br />
regularly remove the the filters and tap against the side of the bin to release dust. The filters<br />
should be washed every 3 months or when the filter has excessive dust level.<br />
IMPORTANT: Regularly check and maintain the filters.<br />
IMPORTANT: Always ensure the filter pack is fully dry before use.<br />
To access the filter:<br />
1. Release the container by sliding the bin release button towards the rear of the cleaner.<br />
[16] Lift the dust container from the cleaner main body.<br />
2. Hold the bin with one hand and with the other hand rotate the bin handle anti clockwise<br />
to release from the bin container. [18]<br />
3. Remove the foam filter from the hepa filter unit located in the bin handle. [19]<br />
4. Remove the hepa filter unit from the bin handle. [20]<br />
5. Gently tap and wash the grey foam filter using warm water. Do not use hot water or<br />
detergents. Remove excess water from the filter and leave to dry fully before re-using.<br />
[21]<br />
6. Gently tap and wash the Blue HEPA filter unit. Do not use hot water or detergents. Remove<br />
excess water from the filter and leave to dry fully before re-using. [21]<br />
7. Reassemble to filter pack once fully dry and refit to the cleaner.<br />
IMPORTANT: Do not use the product without the filter pack fitted.<br />
To access the exhaust filter:<br />
1. Unclip the exhaust filter from the rear of the cleaner. [22]<br />
2. Gently tap and wash the grey foam filter using warm water. Do not use hot water or detergents.<br />
Remove excess water from the filter and leave to dry fully before re-using. [22]<br />
2<br />
rush_48000513__1-4-gb.indd 2 15-07-2009 12:57:03


