


You also want an ePaper? Increase the reach of your titles
YUMPU automatically turns print PDFs into web optimized ePapers that Google loves.
Warranty<br />
The warranty conditions issued by our relevant sales<br />
company apply in all countries. We shall remedy possible<br />
malfunctions on your appliance within the warranty<br />
period free of cost, provided that a material or manufacturing<br />
defect is the cause. In a warranty case, please<br />
contact your dealer (with the purchase receipt) or the<br />
next authorised customer service site.<br />
(See overleaf for the address)<br />
Safety devices<br />
CAUTION<br />
Missing or modified safety devices<br />
Safety devices are provided for your own protection.<br />
Never modify or bypass safety devices.<br />
Symbols on the appliance<br />
(according to type of appliance)<br />
Risk of burns, surface of appliance becomes<br />
hot during operation<br />
Risk of scalding from steam<br />
Read operating instructions<br />
Pressure controller<br />
The pressure controller keeps the pressure in the steam<br />
boiler as constant as possible during operation. The<br />
heating is switched off when the maximum operating<br />
pressure is reached in the steam boiler and is activated<br />
if there is a pressure drop in the steam boiler as a result<br />
of a steam removal.<br />
Safety thermostat<br />
The safety thermostat prevents the device from overheating.<br />
If the pressure regulator and the boiler thermostat<br />
fail and the unit overheats, the safety thermostat<br />
switches the unit off. Before resetting of the safety thermostat,<br />
contact the responsible KÄRCHER Customer<br />
Service.<br />
Boiler thermostat<br />
The boiler thermostat switches off the heating in the<br />
event of a fault; for example, if there is no water in the<br />
steam boiler and the temperature in the steam boiler rises.<br />
As soon as you refill the water, the device is ready for<br />
use again.<br />
Maintenance lock<br />
The maintenance lock seals the steam boiler from the<br />
steam pressure present. The maintenance cap is also a<br />
pressure relief valve. If the pressure regulator is defective<br />
and the steam pressure in the steam boiler rises,<br />
the pressure relief valve opens and steam is escapes<br />
through the lock.<br />
Prior to restarting the device, contact the responsible<br />
KÄRCHER Customer Service.<br />
Device description<br />
The maximum amount of equipment is described in<br />
these operating instructions. Depending on the model<br />
used, there are differences in the scope of delivery (see<br />
packaging).<br />
For the figures, please refer to the graphics page<br />
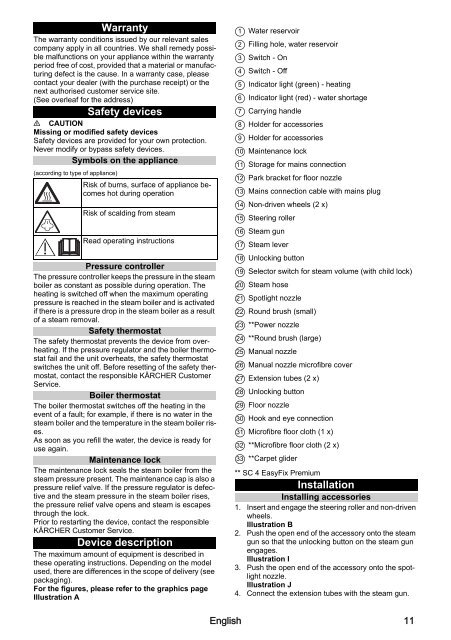
Illustration A<br />
1 Water reservoir<br />
2 Filling hole, water reservoir<br />
3 Switch - On<br />
4 Switch - Off<br />
5 Indicator light (green) - heating<br />
6 Indicator light (red) - water shortage<br />
7 Carrying handle<br />
8 Holder for accessories<br />
9 Holder for accessories<br />
10 Maintenance lock<br />
11 Storage for mains connection<br />
12 Park bracket for floor nozzle<br />
13 Mains connection cable with mains plug<br />
14 Non-driven wheels (2 x)<br />
15 Steering roller<br />
16 Steam gun<br />
17 Steam lever<br />
18 Unlocking button<br />
19 Selector switch for steam volume (with child lock)<br />
20 Steam hose<br />
21 Spotlight nozzle<br />
22 Round brush (small)<br />
23 **Power nozzle<br />
24 **Round brush (large)<br />
25 Manual nozzle<br />
26 Manual nozzle microfibre cover<br />
27 Extension tubes (2 x)<br />
28 Unlocking button<br />
29 Floor nozzle<br />
30 Hook and eye connection<br />
31 Microfibre floor cloth (1 x)<br />
32 **Microfibre floor cloth (2 x)<br />
33 **Carpet glider<br />
** <strong>SC</strong> 4 <strong>EasyFix</strong> Premium<br />
Installation<br />
Installing accessories<br />
1. Insert and engage the steering roller and non-driven<br />
wheels.<br />
Illustration B<br />
2. Push the open end of the accessory onto the steam<br />
gun so that the unlocking button on the steam gun<br />
engages.<br />
Illustration I<br />
3. Push the open end of the accessory onto the spotlight<br />
nozzle.<br />
Illustration J<br />
4. Connect the extension tubes with the steam gun.<br />
English 11


