

Sony TC-WE405 - TC-WE405 Consignes d’utilisation Portugais
Sony TC-WE405 - TC-WE405 Consignes d’utilisation Portugais
Sony TC-WE405 - TC-WE405 Consignes d’utilisation Portugais

You also want an ePaper? Increase the reach of your titles
YUMPU automatically turns print PDFs into web optimized ePapers that Google loves.
POWER<br />
DECK A<br />
DECK B<br />
COUNTER RESET<br />
DIRECTION<br />
D a RELAY<br />
SYNCHRO DUBBING A→B<br />
HIGH/NORMAL<br />
START(DECK B P)<br />
FADER<br />
PAUSE REC MUTE REC<br />
AUTO<br />
REC LEVEL<br />
DOLBY NR<br />
OFF B C<br />
5<br />
4<br />
6<br />
3<br />
7<br />
2<br />
8<br />
ARL<br />
1<br />
9<br />
0<br />
10<br />
PHONES<br />
POWER<br />
DECK A<br />
DECK B<br />
COUNTER RESET<br />
DIRECTION<br />
D a RELAY<br />
SYNCHRO DUBBING A→B<br />
HIGH/NORMAL FADER ARL<br />
START(DECK B P)<br />
PAUSE REC MUTE REC<br />
AUTO<br />
REC LEVEL<br />
DOLBY NR<br />
OFF B C<br />
5<br />
4<br />
6<br />
3<br />
7<br />
2<br />
8<br />
1<br />
9<br />
0<br />
10<br />
PHONES<br />
Advanced Recording Operations<br />
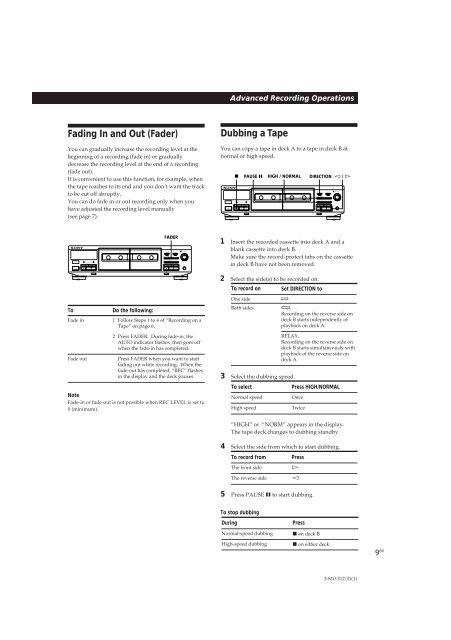
Fading In and Out (Fader)<br />
You can gradually increase the recording level at the<br />
beginning of a recording (fade in) or gradually<br />
decrease the recording level at the end of a recording<br />
(fade out).<br />
It is convenient to use this function, for example, when<br />
the tape reaches to its end and you don’t want the track<br />
to be cut off abruptly.<br />
You can do fade in or out recording only when you<br />
have adjusted the recording level manually<br />
(see page 7).<br />
Dubbing a Tape<br />
You can copy a tape in deck A to a tape in deck B at<br />
normal or high speed.<br />
p<br />
0 )<br />
p ª ·<br />
§<br />
PAUSE P HIGH / NORMAL DIRECTION ª / ·<br />
P<br />
R<br />
r<br />
0 )<br />
p ª ·<br />
§<br />
0 )<br />
p ª ·<br />
FADER<br />
P<br />
R<br />
r<br />
0 )<br />
p ª ·<br />
1 Insert the recorded cassette into deck A and a<br />
blank cassette into deck B.<br />
Make sure the record-protect tabs on the cassette<br />
in deck B have not been removed.<br />
§<br />
§<br />
2 Select the side(s) to be recorded on.<br />
To record on<br />
One side<br />
Set DIRECTION to<br />
A<br />
To<br />
Fade in<br />
Fade out<br />
Do the following:<br />
1 Follow Steps 1 to 4 of “Recording on a<br />
Tape” on page 6.<br />
2 Press FADER. During fade-in, the<br />
AUTO indicator flashes, then goes off<br />
when the fade-in has completed.<br />
Press FADER when you want to start<br />
fading out while recording. When the<br />
fade-out has completed, “REC” flashes<br />
in the display and the deck pauses.<br />
Both sides a.<br />
Recording on the reverse side on<br />
deck B starts independently of<br />
playback on deck A.<br />
3 Select the dubbing speed.<br />
RELAY.<br />
Recording on the reverse side on<br />
deck B starts simultaneously with<br />
playback of the reverse side on<br />
deck A.<br />
Note<br />
Fade-in or fade-out is not possible when REC LEVEL is set to<br />
0 (minimum).<br />
To select<br />
Normal speed<br />
High speed<br />
Press HIGH/NORMAL<br />
Once<br />
Twice<br />
“HIGH” or “NORM” appears in the display.<br />
The tape deck changes to dubbing standby.<br />
4 Select the side from which to start dubbing.<br />
To record from<br />
Press<br />
The front side ·<br />
The reverse side ª<br />
5 Press PAUSE P to start dubbing.<br />
To stop dubbing<br />
During<br />
Normal-speed dubbing<br />
High-speed dubbing<br />
Press<br />
p on deck B<br />
p on either deck<br />
9 EN<br />
3-810-312-31(1)


