D Espressoautomat ES 80 / ES 81 EN Espresso Machine ES ... - Graef
D Espressoautomat ES 80 / ES 81 EN Espresso Machine ES ... - Graef
D Espressoautomat ES 80 / ES 81 EN Espresso Machine ES ... - Graef

You also want an ePaper? Increase the reach of your titles
YUMPU automatically turns print PDFs into web optimized ePapers that Google loves.
D <strong><strong>Espresso</strong>automat</strong> <strong>ES</strong> <strong>80</strong> / <strong>ES</strong> <strong>81</strong><br />
<strong>EN</strong> <strong>Espresso</strong> <strong>Machine</strong> <strong>ES</strong> <strong>80</strong> / <strong>ES</strong> <strong>81</strong><br />
F <strong>Machine</strong> Expresso automatique <strong>ES</strong> <strong>80</strong> / <strong>ES</strong> <strong>81</strong><br />
Bedienungsanleitung<br />
Operating Instructions<br />
Notice d´utilisation
D<br />
<strong>EN</strong><br />
<strong>EN</strong><br />
F<br />
<strong>ES</strong><br />
Bedienungsanleitung<br />
Operating Instructions<br />
Notice d´utilisation<br />
3<br />
28<br />
51
<strong><strong>Espresso</strong>automat</strong> <strong>ES</strong> <strong>80</strong> / <strong>ES</strong> <strong>81</strong><br />
Vorwort<br />
Sehr geehrte Kundin, sehr geehrter<br />
Kunde,<br />
mit dem Kauf dieses <strong><strong>Espresso</strong>automat</strong>en<br />
<strong>ES</strong> <strong>80</strong> / <strong>ES</strong> <strong>81</strong> haben<br />
Sie eine gute Wahl getroffen. Sie<br />
haben ein anerkanntes Qualitätsprodukt<br />
erworben.<br />
Wir danken Ihnen für Ihren Kauf<br />
und wünschen Ihnen viel Freude<br />
mit Ihrem neuen <strong><strong>Espresso</strong>automat</strong>en.<br />
Für ein optimales Ergebnis Ihres<br />
neuen <strong><strong>Espresso</strong>automat</strong>en empfehlen<br />
wir die Verwendung von<br />
BRITA gefiltertem Wasser. Damit<br />
können sich die natürlichen Aromen<br />
Ihrer Heißgetränke besser<br />
entfalten und nebenbei schützt<br />
es Ihr Gerät vor Verkalkung. BRI-<br />
TA - für vollendeten Genuss Ihrer<br />
Heißgetränke und längere Lebensdauer<br />
Ihres Gerätes!<br />
Informationen zu dieser Bedienungsanleitung<br />
Diese Bedienungsanleitung ist<br />
Bestandteil des <strong><strong>Espresso</strong>automat</strong>en<br />
(nachfolgend als Gerät bezeichnet)<br />
und gibt Ihnen wichtige<br />
Hinweise für die Inbetriebnahme,<br />
die Sicherheit, den bestimmungsgemäßen<br />
Gebrauch und die Pflege<br />
des Gerätes.<br />
Die Bedienungsanleitung muss<br />
ständig am Gerät verfügbar sein.<br />
Sie ist von jeder Person zu lesen<br />
und anzuwenden, die mit der:<br />
© Gebr. <strong>Graef</strong> GmbH & Co. KG / 04<br />
● Inbetriebnahme,<br />
● Bedienung,<br />
● Störungsbehebung und/oder<br />
● Reinigung<br />
des Gerätes beauftragt ist.<br />
Bewahren Sie diese Bedienungsanleitung<br />
auf und geben Sie diese<br />
mit dem Gerät an Nachbesitzer<br />
weiter.<br />
Diese Bedienungsanleitung kann<br />
nicht jeden denkbaren Einsatz<br />
berücksichtigen. Für weitere Informationen<br />
oder bei Problemen,<br />
die in dieser Anleitung nicht oder<br />
nicht ausführlich genug behandelt<br />
werden, wenden Sie sich an<br />
den <strong>Graef</strong>-Kundendienst oder an<br />
Ihren Fachhandel.<br />
Warnhinweise<br />
In der vorliegenden Bedienungsanleitung<br />
werden folgende<br />
Warnhinweise und Signalwörter<br />
verwendet:<br />
WARNUNG<br />
Dies bezeichnet eine möglicherweise<br />
gefährliche Situation. Bei<br />
Nichtbeachten des Hinweises<br />
können schwere Verletzungen<br />
eintreten oder die Nichtbeachtung<br />
kann sogar zum Tode<br />
führen.<br />
3<br />
D
<strong><strong>Espresso</strong>automat</strong> <strong>ES</strong> <strong>80</strong> / <strong>ES</strong> <strong>81</strong><br />
D VORSICHT<br />
Dies bezeichnet eine möglicherweise<br />
gefährliche Situation. Bei<br />
Nichtbeachten des Hinweises<br />
können Sachschäden auftreten.<br />
4<br />
Wichtig!<br />
Dies bezeichnet Anwendungstipps<br />
und andere besondere<br />
wichtige Informationen!<br />
Bestimmungsgemäße<br />
Verwendung<br />
Dieses Gerät ist nicht für den gewerblichen<br />
Gebrauch bestimmt.<br />
Benutzen Sie den <strong><strong>Espresso</strong>automat</strong>en<br />
nur in geschlossenen Räumen.<br />
Dieses Gerät ist dazu bestimmt,<br />
im Haushalt und ähnlichen Anwendungen<br />
verwendet zu werden,<br />
wie beispielsweise<br />
• in Küchen für Mitarbeiter, in<br />
Läden und Büros;<br />
• in landwirtschaftlichen Anwesen;<br />
• von Gästen in Hotels, Motels<br />
und anderen Wohneinrichtungen;<br />
• in Frühstückspensionen<br />
Eine andere oder darüber hinausgehende<br />
Benutzung gilt als nicht<br />
bestimmungsgemäß.<br />
VORSICHT<br />
Gefahr durch nicht bestimmungsgemäße<br />
Verwendung!<br />
Von dem Gerät können bei<br />
nicht bestimmungsgemäßer<br />
Verwendung und/oder andersartiger<br />
Nutzung Gefahren<br />
ausgehen.<br />
► Das Gerät ausschließlich<br />
bestimmungsgemäß verwenden.<br />
► Die in dieser Bedienungsanleitung<br />
beschriebenen<br />
Vorgehensweisen einhalten.<br />
Ansprüche jeglicher Art wegen<br />
Schäden aus nicht bestimmungsgemäßer<br />
Verwendung sind ausgeschlossen.<br />
Das Risiko trägt allein der Benutzer.<br />
Haftungsbeschränkung<br />
Alle in dieser Bedienungsanleitung<br />
enthaltenen technischen Informationen,<br />
Daten und Hinweise<br />
für die Installation, den Betrieb<br />
und die Pflege entsprechen dem<br />
letzten Stand bei Drucklegung<br />
und erfolgen unter Berücksichtigung<br />
unserer bisherigen Erfahrungen<br />
und Erkenntnisse nach<br />
bestem Wissen.<br />
Aus den Angaben, Abbildungen<br />
und Beschreibungen in dieser Anleitung<br />
können keine Ansprüche<br />
hergeleitet werden.<br />
Der Hersteller übernimmt keine<br />
Haftung für Schäden aufgrund:<br />
● Nichtbeachtung der Anleitung
<strong><strong>Espresso</strong>automat</strong> <strong>ES</strong> <strong>80</strong> / <strong>ES</strong> <strong>81</strong><br />
● Nicht bestimmungsgemäßer<br />
Verwendung<br />
● Unsachgemäßer Reparaturen<br />
● Technischer Veränderungen<br />
● Verwendung nicht zugelassener<br />
Ersatzteile<br />
Übersetzungen werden nach bestem<br />
Wissen durchgeführt. Wir<br />
übernehmen keine Haftung für<br />
Übersetzungsfehler. Verbindlich<br />
bleibt allein der ursprüngliche<br />
deutsche Text.<br />
Kundendienst<br />
Sollte es vorkommen, dass Ihr<br />
<strong>Graef</strong>-Gerät einen Schaden hat,<br />
wenden Sie sich bitte an Ihren<br />
Fachhändler oder an den <strong>Graef</strong>-<br />
Kundendienst.<br />
Gebr. <strong>Graef</strong> GmbH & Co. KG<br />
Kundendienst<br />
Donnerfeld 6<br />
59757 Arnsberg<br />
Telefon: 02932-9703- 688<br />
Telefax: 02932-9703-90<br />
Email: service@graef.de<br />
Sicherheit<br />
In diesem Kapitel erhalten Sie<br />
wichtige Sicherheitshinweise im<br />
Umgang mit dem Gerät.<br />
Dieses Gerät entspricht den vorgeschriebenenSicherheitsbestimmungen.<br />
Ein unsachgemäßer<br />
Gebrauch kann jedoch zu Personen-<br />
und Sachschäden führen.<br />
© Gebr. <strong>Graef</strong> GmbH & Co. KG / 04<br />
Gefahr durch elektrischen<br />
Strom<br />
WARNUNG<br />
Lebensgefahr durch elektrischen<br />
Strom!<br />
Beim Kontakt mit unter Spannung<br />
stehenden Leitungen<br />
oder Bauteilen besteht Lebensgefahr!<br />
Beachten Sie die folgenden<br />
Sicherheitshinweise um eine<br />
Gefährdung durch elektrischen<br />
Strom zu vermeiden:<br />
► Benutzen Sie das Gerät<br />
nicht, wenn das Stromkabel<br />
oder der Stecker beschädigt<br />
ist.<br />
► Lassen Sie vor der Weiterbenutzung<br />
des Gerätes eine<br />
neue Anschlussleitung durch<br />
den <strong>Graef</strong>-Kundendienst<br />
oder einer autorisierten<br />
Fachkraft installieren.<br />
► Öffnen Sie auf keinen Fall<br />
das Gehäuse des Gerätes.<br />
Werden spannungsführende<br />
Anschlüsse berührt und der<br />
elektrische und mechanische<br />
Aufbau verändert, besteht<br />
Stromschlaggefahr.<br />
► Niemals unter Spannung stehende<br />
Teile berühren. Diese<br />
können einen elektrischen<br />
Schlag verursachen oder<br />
sogar zum Tode führen.<br />
5<br />
D
D<br />
<strong><strong>Espresso</strong>automat</strong> <strong>ES</strong> <strong>80</strong> / <strong>ES</strong> <strong>81</strong><br />
6<br />
Grundlegende Sicherheitshinweise<br />
Beachten Sie für einen sicheren<br />
Umgang mit dem Gerät die folgenden<br />
Sicherheitshinweise:<br />
■ Kontrollieren Sie das Gerät vor<br />
der Verwendung auf äußere<br />
sichtbare Schäden am Gehäuse,<br />
dem Anschlusskabel und<br />
-stecker. Nehmen Sie ein beschädigtes<br />
Gerät nicht in Betrieb.<br />
■ Reparaturen dürfen nur von einem<br />
Fachmann oder vom <strong>Graef</strong>-Kundendienst<br />
ausgeführt<br />
werden. Durch unsachgemäße<br />
Reparaturen können erhebliche<br />
Gefahren für den Benutzer entstehen.<br />
Zudem erlischt der Garantieanspruch.<br />
■ Eine Reparatur des Gerätes<br />
während der Garantiezeit darf<br />
nur vom <strong>Graef</strong>-Kundendienst<br />
vorgenommen werden, sonst<br />
besteht bei nachfolgenden<br />
Schäden kein Garantieanspruch<br />
mehr.<br />
■ Defekte Bauteile dürfen nur gegen<br />
Original-Ersatzteile ausgetauscht<br />
werden. Nur bei diesen<br />
Teilen ist gewährleistet, dass sie<br />
die Sicherheitsanforderungen<br />
erfüllen werden.<br />
■ Dieses Gerät ist nicht dafür<br />
bestimmt durch Personen<br />
(einschließlich Kindern) mit<br />
eingeschränkten physischen,<br />
sensorischen oder geistigen Fähigkeiten<br />
oder mangels Erfahrung<br />
und/oder mangels Wissen<br />
benutzt zu werden, es sei denn<br />
sie werden durch eine für ihre<br />
Sicherheit zuständige Person<br />
beaufsichtigt oder erhielten<br />
von ihr Anweisungen wie das<br />
Gerät zu benutzen ist.<br />
■ Kinder sollten beaufsichtigt<br />
werden, um sicherzustellen,<br />
dass sie nicht mit dem Gerät<br />
spielen.<br />
■ Die Zuleitung immer am Anschlussstecker<br />
aus der Steckdose<br />
ziehen, nicht am Anschlusskabel.<br />
■ Tragen Sie das Gerät nicht am<br />
Anschlusskabel.<br />
■ Niemals das Gerät während des<br />
Betriebes transportieren.<br />
■ Das Gerät ist nicht dazu bestimmt<br />
mit einer externen Zeitschaltuhr<br />
oder einer separaten<br />
Fernsteuerung verwendet zu<br />
werden.<br />
■ Fassen Sie den Stecker nicht mit<br />
feuchten Händen an.
<strong><strong>Espresso</strong>automat</strong> <strong>ES</strong> <strong>80</strong> / <strong>ES</strong> <strong>81</strong><br />
Inbetriebnahme<br />
Sicherheitshinweise<br />
VorSicht<br />
Bei der Inbetriebnahme des<br />
Gerätes können Personen- und<br />
Sachschäden auftreten!<br />
Beachten Sie die folgenden Sicherheitshinweise<br />
um Gefahren<br />
zu vermeiden:<br />
► Verpackungsmaterialien<br />
dürfen nicht zum Spielen<br />
verwendet werden. Es besteht<br />
Erstickungsgefahr.<br />
► Beachten Sie die Hinweise<br />
zu den Anforderungen an<br />
den Aufstellort sowie zum<br />
elektrischen Anschluss des<br />
Gerätes um Personen- und<br />
Sachschäden zu vermeiden.<br />
Lieferumfang und Transportinspektion<br />
Das Gerät wird standardmäßig<br />
mit folgenden Komponenten geliefert:<br />
● <strong><strong>Espresso</strong>automat</strong><br />
● Doppelwandige Siebeinsätze<br />
für 1 nd 2 Tassen<br />
● Einwandige Siebeinsätze für 1<br />
und 2 Tassen<br />
● Siebeinsatz für Hartpads<br />
● Milchbehälter aus Edelstahl<br />
600 ml<br />
● Siebträger<br />
● Reinigungsset<br />
© Gebr. <strong>Graef</strong> GmbH & Co. KG / 04<br />
● Kaffeelöffel<br />
● Tamper<br />
● Bedienungsanleitung<br />
Wichtig!<br />
► Prüfen Sie die Lieferung auf<br />
Vollständigkeit und auf sichtbare<br />
Schäden.<br />
► Melden Sie eine unvollständige<br />
Lieferung oder Schäden<br />
infolge mangelhafter Verpackung<br />
oder durch Transport<br />
sofort dem Spediteur und<br />
dem Lieferanten.<br />
Auspacken<br />
Zum Auspacken des Gerätes gehen<br />
Sie wie folgt vor:<br />
Entnehmen Sie das Gerät aus<br />
dem Karton.<br />
Entfernen Sie alle Verpackungsteile.<br />
Entfernen Sie eventuelle Aufkleber<br />
am Gerät (nicht das Typenschild).<br />
Entsorgung der Verpackung<br />
Die Verpackung schützt das Gerät<br />
vor Transportschäden. Die Verpackungsmaterialien<br />
sind nach<br />
umweltverträglichen und entsorgungstechnischenGesichtspunkten<br />
ausgewählt und deshalb recycelbar.<br />
Die Rückführung der Verpackung<br />
in den Materialkreislauf<br />
spart Rohstoffe und verringert<br />
7<br />
D
D<br />
<strong><strong>Espresso</strong>automat</strong> <strong>ES</strong> <strong>80</strong> / <strong>ES</strong> <strong>81</strong><br />
8<br />
das Abfallaufkommen. Entsorgen<br />
Sie nicht mehr benötigte Verpackungsmaterialien<br />
an den Sammelstellen<br />
für das Verwertungssystem<br />
»Grüner Punkt«.<br />
Wichtig!<br />
► Heben Sie wenn möglich die<br />
Originalverpackung während<br />
der Garantiezeit des Gerätes<br />
auf, um das Gerät im<br />
Garantiefall ordnungsgemäß<br />
verpacken zu können.<br />
Anforderungen an den<br />
Aufstellort<br />
Für einen sicheren und fehlerfreien<br />
Betrieb des Gerätes muss der<br />
Aufstellort folgende Voraussetzungen<br />
erfüllen:<br />
■ Das Gerät muss auf einer festen,<br />
flachen, waagerechten,<br />
rutschfesten und hitzebeständigen<br />
Unterlage mit einer ausreichenden<br />
Tragkraft aufgestellt<br />
werden.<br />
■ Wählen Sie den Aufstellort<br />
so, dass Kinder nicht an heiße<br />
Oberflächen des Gerätes gelangen<br />
können.<br />
■ Das Gerät ist nicht für den Einbau<br />
in einer Wand oder einem<br />
Einbauschrank vorgesehen.<br />
■ Stellen Sie das Gerät nicht in einer<br />
heißen, nassen oder feuchten<br />
Umgebung auf.<br />
■ Die Steckdose muss leicht zugänglich<br />
sein, so dass das<br />
Stromkabel notfalls leicht abgezogen<br />
werden kann.<br />
Elektrischer Anschluss<br />
Für einen sicheren und fehlerfreien<br />
Betrieb des Gerätes sind beim<br />
elektrischen Anschluss folgende<br />
Hinweise zu beachten:<br />
■ Vergleichen Sie vor dem Anschließen<br />
des Gerätes die Anschlussdaten<br />
(Spannung und<br />
Frequenz) auf dem Typenschild<br />
mit denen Ihres Elektronetzes.<br />
Diese Daten müssen übereinstimmen,<br />
damit keine Schäden<br />
am Gerät auftreten. Im Zweifelsfall<br />
fragen Sie Ihre Elektro-<br />
Fachkraft.<br />
■ Die Steckdose muss mindestens<br />
über einen 10A-Sicherungsschutzschalter<br />
abgesichert sein.<br />
■ Vergewissern Sie sich, dass das<br />
Stromkabel unbeschädigt ist<br />
und nicht über heiße Flächen<br />
oder scharfe Kanten verlegt<br />
wird.<br />
■ Das Anschlusskabel darf nicht<br />
straff gespannt sein.<br />
■ Die elektrische Sicherheit des<br />
Gerätes ist nur dann gewährleistet,<br />
wenn es an ein vorschriftsmäßig<br />
installiertes Schutzleitersystem<br />
angeschlossen wird.<br />
Der Betrieb an einer Steckdose<br />
ohne Schutzleiter ist verboten.<br />
Lassen Sie im Zweifelsfall die<br />
Hausinstallation durch eine<br />
Elektro-Fachkraft überprüfen.<br />
Der Hersteller übernimmt keine<br />
Verantwortung für Schäden,<br />
die durch einen fehlenden oder<br />
unterbrochenen Schutzleiter<br />
verursacht werden.
<strong><strong>Espresso</strong>automat</strong> <strong>ES</strong> <strong>80</strong> / <strong>ES</strong> <strong>81</strong><br />
Vor dem Erstgebrauch<br />
Vor dem Erstgebrauch oder längerem<br />
Nichtbenutzen sollten Sie<br />
das Gerät einmal entlüften. Drehen<br />
Sie dazu den Dampf- und<br />
Heißwasserregler auf und nach<br />
kurzer Zeit drehen Sie diesen wieder<br />
zu. Nun lassen Sie ein paar<br />
Tassen Wasser (ohne Kaffeemehl)<br />
durchlaufen. Verfahren Sie dabei<br />
wie unter "Vorbereitungen" beschrieben.<br />
Es kann sein, dass die<br />
Pumpzeit bis zu 8 Minuten dauert.<br />
Bei der Erstinbetriebnahme kann<br />
es zu einem Geruch nach "heißem<br />
Kunststoff" kommen. Dies<br />
ist normal und lässt nach kurzer<br />
Zeit nach.<br />
Aufbau und Funktion<br />
Leistungsmerkmale<br />
● <strong><strong>Espresso</strong>automat</strong><br />
● Aluminium- /Edelstahlgehäuse<br />
● Single-Thermoblock Heizer<br />
● Siebträger aus Messing<br />
● 360° schwenkbare Milchschaum-/Heißwasserdüse<br />
mit<br />
Pannarello<br />
● Wassertank 2,5 Liter<br />
● Frei wählbare Wassermenge<br />
● Wasserstandsanzeige<br />
● Warmhalteplatte für Tassen<br />
● Herausnehmbare Abtropfschale<br />
© Gebr. <strong>Graef</strong> GmbH & Co. KG / 04<br />
● Doppelwandiger Siebeinsatz<br />
für 1 Tasse und 2 Tassen<br />
● Einwandige Siebeinsätze für 1<br />
und 2 Tassen<br />
● Siebeinsatz für Hartpads<br />
● Milchbehälter aus Edelstahl<br />
● Kaffeelöffel<br />
● Reinigungsset<br />
● Tamper<br />
Ersatzteile<br />
Für dieses Gerät sind folgende Ersatzteile<br />
lieferbar:<br />
● Ersatz-Reinigungsset<br />
● Ersatz-Kaffeelöffel<br />
● Ersatz-Siebträger<br />
● Ersatz-Tamper<br />
● Ersatz-Filtereinsätze<br />
● Ersatz-Pannarello<br />
● Ersatz-Düse für Pannarello<br />
● Ersatz-Milchbehälter<br />
Wenden Sie sich an den Kundendienst,<br />
wenn Sie Ersatzteile zu Ihrem<br />
Gerät benötigen.<br />
9<br />
D
6<br />
D<br />
7<br />
<strong><strong>Espresso</strong>automat</strong> <strong>ES</strong> <strong>80</strong> / <strong>ES</strong> <strong>81</strong><br />
10<br />
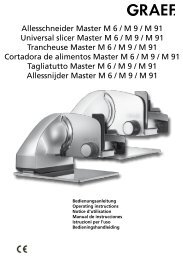
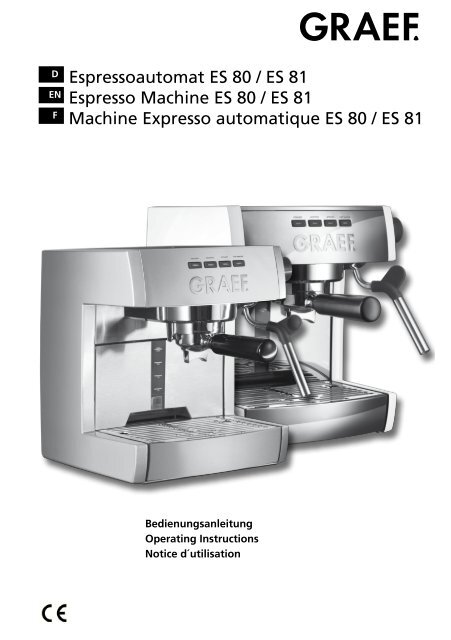
Technische Daten<br />
Gesamtübersicht<br />
5<br />
Abmessungen (L x B x H) 295 x 300 x 322 mm<br />
Gewicht ca. 8 kg<br />
Betriebsspannung 230 - 240 V<br />
Leistungsaufnahme 1470 - 1600 W<br />
Pumpendruck max. bis 15 bar<br />
1<br />
3<br />
4<br />
2<br />
1) Bedienfeld<br />
2) Dampf- und Heißwasserdrehregler<br />
3) Milchschaum-/ und<br />
Heißwasserdüse<br />
mit Pannarello<br />
4) Abnehmbare Abtropfschale<br />
5) Wasserbehälter<br />
6) Siebträger<br />
7) Warmhalteplatte
<strong><strong>Espresso</strong>automat</strong> <strong>ES</strong> <strong>80</strong> / <strong>ES</strong> <strong>81</strong><br />
Bedienung und Betrieb<br />
In diesem Kapitel erhalten Sie<br />
wichtige Hinweise zur Bedienung<br />
und Betrieb des Gerätes.<br />
Sicherheitshinweise<br />
VORSICHT<br />
Beachten Sie die folgenden<br />
Sicherheitshinweise um Gefahren<br />
und Sachschäden zu<br />
vermeiden:<br />
► Entfernen Sie niemals den<br />
mit Kaffeemehl gefüllten<br />
Siebträger während des<br />
Durchlaufs, da dieser unter<br />
Druck steht.<br />
► Benutzen Sie das Gerät nur,<br />
wenn das Abtropfgitter und<br />
die Auffangschale in Position<br />
sind.<br />
► Stellen Sie vor der Kaffeezubereitung<br />
sicher, dass der<br />
Siebträger gut festgezogen<br />
ist.<br />
Benutzen des Bedienfeldes<br />
POWER<br />
Mit der "POWER"- Taste schalten<br />
Sie das Gerät ein und aus.<br />
Am Anfang blinkt die "POWER"-<br />
Taste rot auf, d.h. Gerät heizt auf.<br />
Wird die Lampe grün und die<br />
restlichen Bedienknöpfe sind<br />
auch hinterleuchtet, ist das Gerät<br />
betriebsbereit. Bevor Sie mit der<br />
<strong>Espresso</strong>zubereitung beginnen,<br />
vergewissern Sie sich, dass der<br />
© Gebr. <strong>Graef</strong> GmbH & Co. KG / 04<br />
Drehregler für die Dampf- bzw.<br />
Heißwasserzubereitung geschlossen<br />
ist.<br />
STEAM<br />
Mit der STEAM-Funktion können<br />
Sie Milch aufschäumen. Um die<br />
Dampf-Funktion zu aktivieren,<br />
drücken Sie die "STEAM"-Taste.<br />
Die "STEAM" Lampe blinkt auf,<br />
"COFFEE" und "HOT WATER"<br />
erlischen. Nach einer kurzen<br />
Aufheizzeit hört die Lampe auf<br />
zu blinken. Nun können Sie mit<br />
dem Milchaufschäumen starten.<br />
Zum Milchaufschäumen drehen<br />
Sie den Drehregler auf "OP<strong>EN</strong>".<br />
Nach Beendigung des Vorganges<br />
drehen Sie den Drehregler wieder<br />
auf "OFF".<br />
HOT WATER<br />
Mit der Heißwasser-Funktion können<br />
Sie heißes Wasser aufheizen<br />
und z.B. für heiße Schokolade,<br />
zum Tassen aufheizen oder zum<br />
Tee brühen verwenden. Um die<br />
Heißwasser-Funktion zu aktivieren,<br />
drücken Sie die "HOT<br />
WATER"-Taste. Die "HOT WATER"<br />
Lampe blinkt auf, "COFFEE" und<br />
"STEAM" erlischen. Nach einer<br />
kurzen Aufheizzeit hört die Lampe<br />
auf zu blinken. Nun können<br />
Sie starten. Um heißes Wasser zu<br />
bekommen, drehen Sie den Drehregler<br />
auf "OP<strong>EN</strong>". Nach Beendigung<br />
des Vorganges drehen Sie<br />
den Drehregler wieder auf "OFF"<br />
11<br />
D
D<br />
<strong><strong>Espresso</strong>automat</strong> <strong>ES</strong> <strong>80</strong> / <strong>ES</strong> <strong>81</strong><br />
12<br />
Vorbereitungen<br />
Stecken Sie den Stecker in die Steckdose.<br />
Entnehmen Sie den<br />
Wasserbehälter.<br />
Drücken Sie die<br />
"POWER"-Taste und<br />
schalten Sie das Gerät<br />
an.<br />
Wählen Sie einen<br />
Filtereinsatz und setzen<br />
Sie diesen in den<br />
Siebträger.<br />
Befüllen Sie den<br />
Wasserbehälter mit<br />
kaltem Wasser.<br />
Sobald alle Knöpfe<br />
leuchten ist das Gerät<br />
betriebsbereit.<br />
Setzen Sie den Siebträger<br />
ein.<br />
Setzen Sie den Wasserbehälter<br />
wieder<br />
ein.<br />
Wärmen Sie die Tassen<br />
vor.<br />
Drehen Sie den Siebträger<br />
nach rechts,<br />
bis dieser fest sitzt.
<strong><strong>Espresso</strong>automat</strong> <strong>ES</strong> <strong>80</strong> / <strong>ES</strong> <strong>81</strong><br />
Stellen Sie ein Gefäß<br />
unter den Auslauf.<br />
Drücken Sie die<br />
"COFFEE"-Taste und<br />
lassen Sie Wasser<br />
durchlaufen. Zum<br />
Stoppen drücken Sie<br />
die Taste nach einigen<br />
Sekunden erneut.<br />
hinWeis<br />
Der Wasserdurchlauf muss manuell abgeschaltet werden.<br />
Das Wasser läuft sonst durch, bis der Tank leer ist. Dieses<br />
Gerät hat keine automatische Stoppfunktion.<br />
© Gebr. <strong>Graef</strong> GmbH & Co. KG / 04<br />
13<br />
D
D<br />
<strong><strong>Espresso</strong>automat</strong> <strong>ES</strong> <strong>80</strong> / <strong>ES</strong> <strong>81</strong><br />
14<br />
<strong>Espresso</strong>zubereitung<br />
Wählen Sie einen Filtereinsatz<br />
und setzen<br />
Sie diesen auf den<br />
Siebträger.<br />
Drücken Sie das Kaffeemehl<br />
mit dem<br />
beigefügten Kaffeelöffel<br />
oder Tamper<br />
fest. 3 mm Abstand<br />
zum Filtereinsatzrand<br />
sind optimal.<br />
Drehen Sie den Siebträger<br />
nach rechts,<br />
bis dieser fest sitzt.<br />
Halten Sie den Siebträger<br />
unter den<br />
Auslauf und lassen<br />
Sie kurz Wasser zum<br />
Aufwärmen durchlaufen.<br />
Entfernen Sie das<br />
überflüssige Kaffeemehl<br />
vom Rand.<br />
Stellen Sie die Tassen<br />
/ Gläser unter den<br />
Auslauf.<br />
Befüllen Sie nun den<br />
Filtereinsatz mit Kaffeemehl.<br />
Setzen Sie nun den<br />
Siebträger ein.<br />
Drücken Sie die<br />
"COFFEE"-Taste. <strong>Espresso</strong><br />
fließt nun in<br />
die Tasse. Zum Stoppen<br />
drücken Sie die<br />
Taste wieder.
<strong><strong>Espresso</strong>automat</strong> <strong>ES</strong> <strong>80</strong> / <strong>ES</strong> <strong>81</strong><br />
Drehen Sie den Siebträger<br />
nach links.<br />
hinWeis<br />
Der Tresterbehälter kann als Zubehör<br />
hinzugekauft werden.<br />
Nach Beendigung der <strong>Espresso</strong>zubereitung<br />
schalten Sie das<br />
Gerät wieder ab, indem Sie die<br />
"POWER"-Taste betätigen.<br />
Sollten Sie dieses einmal vergessen<br />
haben, schaltet das Gerät<br />
nach ca. 2 Stunden in den<br />
"Stand by" Modus (Energiesparmodus).<br />
Hierbei wird das<br />
Gerät auf einem abgesenkten<br />
Temperaturniveau gehalten.<br />
Um das Gerät erneut zu benutzen,<br />
drücken Sie die<br />
"POWER"-Taste, das Gerät<br />
heizt sich wieder auf. Nach einer<br />
kurzen Zeit können Sie wie<br />
unter "<strong>Espresso</strong>zubereitung"<br />
weiter verfahren.<br />
© Gebr. <strong>Graef</strong> GmbH & Co. KG / 04<br />
Klopfen Sie den Kaffeesatz<br />
am Tresterbehälter aus.<br />
<strong>Graef</strong> empfiehlt die Verwendung<br />
von BRITA gefiltertem<br />
Wasser<br />
Auch wenn Trinkwasser bei uns<br />
hohe Qualitätsstandards erfüllt,<br />
kann es durch die Filtration<br />
noch optimiert werden, denn<br />
je nach Herkunft enthält es individuelle<br />
Bestandteile, wie zum<br />
Beispiel Kalk, Chlor oder hausinstallationsbedingtvorkommende<br />
Metalle wie Blei und Kupfer.<br />
Ein BRITA Wasserfilter reduziert<br />
diese Substanzen. So können<br />
sich die natürlichen Aromen<br />
und der volle Geschmack Ihres<br />
Heißgetränks besser entfalten.<br />
Darüber hinaus wird Ihr Gerät<br />
vor Verkalkung geschützt. Es<br />
hat somit eine längere Lebensdauer<br />
bei konstant zuverlässiger<br />
Brühleistung und gleichbleibend<br />
niedrigem Energieverbrauch.<br />
BRITA - für vollendeten Genuss<br />
Ihrer Heißgetränke und längere<br />
Lebensdauer Ihres Gerätes!<br />
15<br />
D
D<br />
<strong><strong>Espresso</strong>automat</strong> <strong>ES</strong> <strong>80</strong> / <strong>ES</strong> <strong>81</strong><br />
16<br />
Milchaufschäumen<br />
hinWeis<br />
► Zum Milchaufschäumen benutzen<br />
Sie die Milchschaum-<br />
Heißwasserdüse immer mit<br />
aufgesetztem Pannarello.<br />
Drücken Sie die "STEAM"-<br />
Taste.<br />
Die Dampffunktion für die<br />
Erstellung des Milchschaums<br />
wird nun aktiviert.<br />
Nachdem das Lämpchen aufgehört<br />
hat zu blinken, ist die<br />
Düse betriebsbereit.<br />
Vergewissern Sie sich, dass immer<br />
genug Wasser im Behälter<br />
ist.<br />
Füllen Sie den beigefügten Behälter<br />
zu 1/3 mit kalter Milch.<br />
hinWeis<br />
► Um ein optimales Ergebnis<br />
zu erreichen, verwenden Sie<br />
nur max. 4°C kalte Milch.<br />
Vor der Benutzung der Milchschaumdüse<br />
sollte das sich darin<br />
gesammelte Kondenswasser<br />
abgelassen werden. Dies<br />
geschieht, indem Sie diese auf<br />
den Ablaufrost richten und<br />
den Dampf kurz aufdrehen.<br />
Warten Sie bis kein Wasser,<br />
sondern Dampf austritt und<br />
drehen Sie den Regler wieder<br />
zu.<br />
VorSicht<br />
Richten Sie die Milchschaumdüse<br />
nie auf sich selber oder<br />
auf andere Personen. VERBR<strong>EN</strong>-<br />
NUNGSGEFAHR!<br />
Benutzen Sie zum Bewegen<br />
der Milchschaumdüse stets<br />
den Griff. Fassen Sie die<br />
Milchschaumdüse nach dem<br />
Gebrauch nicht am Rohr an.<br />
Dieses wird sehr heiß!<br />
Tauchen Sie nun die Milchschaumdüse<br />
mit Pannarello in<br />
die Milch, ca. 1 cm unter die<br />
Oberfläche.<br />
Nun drehen Sie den Dampfregler<br />
bis zum Anschlag auf.<br />
Halten Sie dabei den Milchbehälter<br />
leicht schräg.<br />
Senken Sie die Milchkanne, sobald<br />
der Milchpegel steigt.<br />
BITTE BEACHT<strong>EN</strong> Sie, dass die<br />
Milch dabei nicht über 70°C<br />
erhitzt werden darf, sonst<br />
fällt der Schaum sehr schnell<br />
wieder zusammen und das<br />
Getränk schmeckt später zu<br />
süß oder gar nach verbrannter<br />
Milch!<br />
Eine guter Hinweis für die korrekte<br />
Temperatur ist, wenn Sie<br />
den Behälter nicht länger als 3<br />
Sek. anfassen können.
<strong><strong>Espresso</strong>automat</strong> <strong>ES</strong> <strong>80</strong> / <strong>ES</strong> <strong>81</strong><br />
VorSicht<br />
Verwenden Sie zum Milchaufschäumen<br />
nur den beigefügten<br />
Behälter oder einen anderen<br />
größeren Behälter. Verwenden<br />
Sie keine Tasse. Durch überschäumende<br />
Milch kann es zu<br />
Verbrennungen kommen.<br />
hinWeis<br />
Wir empfehlen die Ausgabe<br />
auf ca. 60 Sekunden zu beschränken.<br />
Drehen Sie nun den Drehregler<br />
wieder zu.<br />
Durch das Zudrehen des Ventils<br />
entsteht durch das Abkühlen<br />
des Dampfes in der Milchschaumdüse<br />
ein Unterdruck,<br />
so dass noch etwas Milch angesogen<br />
wird.<br />
Warten Sie daher einen kurzen<br />
Moment, bevor Sie die Milchschaumdüse<br />
aus der Milch ziehen.<br />
Nach dem Schäumen schlagen<br />
Sie die Milchkanne kurz auf<br />
die Tischplatte, um die letzten<br />
groben Luftbläschen zu beseitigen.<br />
Schwenken hilft auch, um den<br />
Schaum gleichmäßig zu verteilen.<br />
Reinigen Sie die Milchschaumdüse<br />
direkt nach Beendigung<br />
des Vorganges mit einem<br />
© Gebr. <strong>Graef</strong> GmbH & Co. KG / 04<br />
feuchten Tuch. Lassen Sie allerdings<br />
das Rohr einen kleinen<br />
Moment abkühlen, da dieses<br />
sehr heiß wird.<br />
Reinigen Sie die Milchschaumdüse<br />
auch mit einem kurzen<br />
Dampfstoß damit die Milchreste<br />
aus der Milchschaumdüse<br />
gepustet werden.<br />
Heißwasserzubereitung<br />
Drücken Sie die "HOT WA-<br />
TER"- Taste.<br />
Die Heißwasserfunktion wird<br />
nun aktiviert.<br />
Nachdem das Lämpchen aufgehört<br />
hat zu blinken, ist die<br />
Düse betriebsbereit.<br />
Vergewissern Sie sich, dass immer<br />
genug Wasser im Behälter<br />
ist.<br />
Drehen Sie die Milchschaum-/<br />
Heißwasserdüse nach außen.<br />
Platzieren Sie ein Gefäß unter<br />
der Milchschaum-/Heißwasserdüse.<br />
VorSicht<br />
Drehen Sie die Milchschaum-/<br />
Heißwasserdüse nie auf sich<br />
selber oder auf andere Personen.<br />
VERBR<strong>EN</strong>NUNGSGEFAHR!<br />
Benutzen Sie zum Bewegen der<br />
Milchschaum-/Heißwasserdüse<br />
stets den Griff, fassen Sie die<br />
Milchschaum-/Heißwasserdüse<br />
nach dem Gebrauch nicht am<br />
Rohr an. Dieses wird sehr heiß!<br />
17<br />
D
<strong><strong>Espresso</strong>automat</strong> <strong>ES</strong> <strong>80</strong> / <strong>ES</strong> <strong>81</strong><br />
D Drehen Sie den Drehregler auf.<br />
18<br />
Heißes Wasser strömt nun aus<br />
der Düse in das Gefäß.<br />
Nach Beendigung des Vorganges<br />
drehen Sie den Dreh-regler<br />
wieder zu.<br />
Weitere Programmiermöglichkeiten<br />
<strong>Espresso</strong> Thermoblock<br />
Temperatur<br />
Die Wassertemperatur dieses Gerätes<br />
ist auf ca. 92°C am Brühkopf<br />
abgestimmt. Die Temperatur<br />
des Wassers lässt sich im Schnitt<br />
von je 1°C um maximal +/- 3°C<br />
verändern.<br />
Gehen Sie dabei wie folgt vor:<br />
● Drücken Sie die "COFFEE"-Taste<br />
für 3 Sekunden.<br />
● Während Sie die "COFFEE"-<br />
Taste gedrückt halten, drücken<br />
Sie die "POWER"-Taste und<br />
lassen Sie die "POWER"-Taste<br />
wieder los.<br />
● Lassen Sie nun die "COFFEE"-<br />
Taste los.<br />
● Dies aktiviert die Programmierbarkeit<br />
des Gerätes. Um dies<br />
zu signalisieren, ertönen bei<br />
verschiedenen Stufen diverse<br />
Beep Sequenzen.<br />
Beep Sequenz Stufe<br />
3 kurze Beeps + 3<br />
2 kurze Beeps + 2<br />
1 kurzer Beep + 1<br />
1 langer und Werkseinstellung<br />
einer<br />
Beep<br />
kurzer<br />
1 langer Beep - 1<br />
2 lange Beeps - 2<br />
3 lange Beeps - 3<br />
hinWeis<br />
Die Lämpchen hinter der<br />
"STEAM"- Taste und der<br />
"HOT WATER"- Taste blinken<br />
auf.<br />
● Drücken Sie innerhalb von 30<br />
Sekunden eine der beiden Tasten<br />
und lassen Sie diese wieder<br />
los, abhängig davon, ob Sie<br />
die Temperatur erhöhen oder<br />
reduzieren möchten.<br />
● Eine Stufe hoch (+) : Drücken<br />
Sie "HOT WATER"<br />
● Eine Stufe runter (-) : Drücken<br />
Sie "STEAM"<br />
hinWeis<br />
Wenn Sie eine neue Temperaturstufe<br />
gewählt haben,<br />
ertönt eine Beep Sequenz,<br />
um zu signalisieren, dass die<br />
neue Temperatur eingestellt<br />
wurde.<br />
Um die neue Temperaturstufe<br />
zu speichern, drücken Sie für 3<br />
Sekunden die "COFFEE"- Taste.<br />
Ein langer, einzelner Signalton er-
<strong><strong>Espresso</strong>automat</strong> <strong>ES</strong> <strong>80</strong> / <strong>ES</strong> <strong>81</strong><br />
tönt. Dies signalisiert Ihnen, dass<br />
die Temperaturstufe gespeichert<br />
wurde.<br />
hinWeis<br />
Das Gerät schaltet sich automatisch<br />
ein und beginnt<br />
aufzuheizen.<br />
Das Gerät behält für ca. 30<br />
Sekunden die neue Temperaturstufe.<br />
Wird innerhalb<br />
der 30 Sekunden keine neue<br />
Temperaturstufe gewählt,<br />
schaltet das Gerät automatisch<br />
zurück in die Werkseinstellung,<br />
schaltet sich ein<br />
und beginnt aufzuheizen.<br />
Dampf Thermoblock<br />
Temperatur<br />
Die Dampftemperatur des Gerätes<br />
ist so eingestellt, dass beim<br />
Aufschäumen von Milch ein<br />
leistungsstarker und trockener<br />
Dampf entsteht. Die Temperatur<br />
des Dampfes lässt sich im Schnitt<br />
von je 1 °C um maximal +/- 3 °C<br />
verändern.<br />
Gehen Sie dabei wie folgt vor:<br />
● Schalten Sie das Gerät aus.<br />
● Drücken Sie die "STEAM"- Taste<br />
für 3 Sekunden.<br />
● Während Sie die "STEAM"-<br />
Taste gedrückt halten, drücken<br />
Sie die "POWER"-Taste und<br />
lassen Sie die "POWER"- Taste<br />
wieder los.<br />
● Lassen Sie nun die "STEAM"-<br />
Taste los.<br />
© Gebr. <strong>Graef</strong> GmbH & Co. KG / 04<br />
● Dies aktiviert die Programmierbarkeit<br />
der Dampftemperatur.<br />
Um dies zu signalisieren, ertönen<br />
bei verschiedenen Stufen<br />
diverse Beep Sequenzen.<br />
Beep Sequenz Stufe<br />
3 kurze Beeps + 3<br />
2 kurze Beeps + 2<br />
1 kurzer Beep + 1<br />
1 langer und Werkseinstellung<br />
einer<br />
Beep<br />
kurzer<br />
1 langer Beep - 1<br />
2 lange Beeps - 2<br />
3 lange Beeps - 3<br />
hinWeis<br />
Die Lämpchen hinter der<br />
"COFFEE"- Taste und der<br />
"HOT WATER"- Taste blinken<br />
auf.<br />
● Drücken Sie innerhalb von 30<br />
Sekunden eine der beiden Tasten<br />
und lassen Sie diese wieder<br />
los, abhängig davon, ob Sie<br />
die Temperatur erhöhen oder<br />
reduzieren möchten.<br />
● Eine Stufe hoch (+) : Drücken<br />
Sie "HOT WATER"<br />
● Eine Stufe runter (-) : Drücken<br />
Sie "COFFEE"<br />
19<br />
D
<strong><strong>Espresso</strong>automat</strong> <strong>ES</strong> <strong>80</strong> / <strong>ES</strong> <strong>81</strong><br />
D hinWeis<br />
Wenn Sie eine neue Temperaturstufe<br />
gewählt haben,<br />
ertönt eine Beep Sequenz,<br />
um zu signalisieren, dass die<br />
neue Temperatur eingestellt<br />
wurde.<br />
20<br />
● Um die neue Temperaturstufe<br />
zu speichern, drücken Sie für 3<br />
Sekunden die "STEAM"- Taste.<br />
Ein langer, einzelner Signalton<br />
ertönt. Dies signalisiert Ihnen,<br />
dass die Temperaturstufe gespeichert<br />
wurde.<br />
hinWeis<br />
Das Gerät schaltet sich automatisch<br />
ein und beginnt<br />
aufzuheizen.<br />
Das Gerät behält für ca. 30<br />
Sekunden die neue Temperaturstufe.<br />
Wird innerhalb<br />
der 30 Sekunden keine neue<br />
Temperaturstufe gewählt,<br />
schaltet das Gerät automatisch<br />
zurück in die Werkseinstellung,<br />
schaltet sich ein<br />
und beginnt aufzuheizen.<br />
Dampffeuchtigkeit und<br />
Pumpleistung<br />
Die Dampfpumpenfrequenz dieses<br />
Gerätes wurde voreingestellt;<br />
0,3 Sekunden „an“ und 0,5 Sekunden<br />
„aus“. Es besteht die<br />
Möglichkeit, diese Voreinstellung<br />
zu verändern. Eine Veränderung<br />
der Frequenz macht den Dampf<br />
nasser oder trockener bis hin zu<br />
einem starken trockenen Dampf,<br />
ideal zum Herstellen von stabilem<br />
Milchschaum. Die Pumpfrequenz<br />
(“aus”-Zeit) kann um 0,1 Sekunden<br />
hoch oder runter gestellt<br />
werden, so wie es Ihren Bedürfnissen<br />
entspricht.<br />
Gehen Sie dabei wie folgt vor:<br />
● Schalten Sie das Gerät aus.<br />
● Drücken Sie die "HOT WA-<br />
TER"- Taste für 3 Sekunden.<br />
● Während Sie die "HOT WA-<br />
TER"- Taste gedrückt halten,<br />
drücken Sie die "POWER"-<br />
Taste und lassen Sie die "POW-<br />
ER"- Taste wieder los.<br />
● Lassen Sie nun die "HOT WA-<br />
TER"- Taste los.<br />
● Dies aktiviert die Programmierbarkeit<br />
der Dampftemperatur.<br />
Um dies zu signalisieren, ertönen<br />
bei verschiedenen Stufen<br />
diverse Beep Sequenzen.<br />
Beep Sequenz Stufe<br />
3 kurze Beeps + 3<br />
2 kurze Beeps + 2<br />
1 kurzer Beep + 1<br />
1 langer und Werkseinstellung<br />
einer<br />
Beep<br />
kurzer<br />
1 langer Beep - 1<br />
2 lange Beeps - 2<br />
3 lange Beeps - 3
<strong><strong>Espresso</strong>automat</strong> <strong>ES</strong> <strong>80</strong> / <strong>ES</strong> <strong>81</strong><br />
hinWeis<br />
Die Lämpchen hinter der<br />
"COFFEE"- Taste und der<br />
"HOT WATER"- Taste blinken.<br />
● Drücken Sie innerhalb von 30<br />
Sekunden einen der beiden<br />
Knöpfe und lassen Sie diesen<br />
wieder los, abhängig davon,<br />
ob Sie die Temperatur erhöhen<br />
oder reduzieren möchten.<br />
● Eine Stufe hoch (+) : Drücken<br />
Sie "STEAM"<br />
● Eine Stufe runter (-) : Drücken<br />
Sie "COFFEE"<br />
hinWeis<br />
Wenn Sie eine neue Temperaturstufe<br />
gewählt haben,<br />
ertönt eine Beep Sequenz,<br />
um zu signalisieren, dass die<br />
neue Temperatur eingestellt<br />
wurde.<br />
● Um die neue Temperaturstufe<br />
zu speichern, drücken Sie für 3<br />
Sekunden die"HOT WATER"-<br />
Taste. Ein langer, einzelner Signalton<br />
ertönt. Dies signalisiert<br />
Ihnen, dass die Temperaturstufe<br />
gespeichert wurde.<br />
© Gebr. <strong>Graef</strong> GmbH & Co. KG / 04<br />
hinWeis<br />
Das Gerät schaltet sich automatisch<br />
ein und beginnt<br />
aufzuheizen.<br />
Das Gerät behält für ca. 30<br />
Sekunden die neue Temperaturstufe.<br />
Wird innerhalb<br />
der 30 Sekunden keine neue<br />
Temperaturstufe gewählt,<br />
schaltet das Gerät automatisch<br />
zurück in die Werkseinstellung,<br />
schaltet sich ein<br />
und beginnt aufzuheizen.<br />
Werkseinstellung<br />
Um alle Änderungen wieder in<br />
die vom Werk eingestellte Einstellung<br />
zurückzusetzen, halten Sie<br />
ca. 3 Sekunden die "POWER"-<br />
Taste gedrückt.<br />
Alle von Ihnen eingestellten Programmierungen,<br />
inklusive Siebträger-<br />
und Dampfthermoblock,<br />
sind nun auf Werkseinstellung<br />
zurückgesetzt worden.<br />
21<br />
D
D<br />
<strong><strong>Espresso</strong>automat</strong> <strong>ES</strong> <strong>80</strong> / <strong>ES</strong> <strong>81</strong><br />
22<br />
Störungsbehebung<br />
Sicherheitshinweise<br />
VORSICHT<br />
Beachten Sie die folgenden Sicherheitshinweise um Gefahren<br />
und Sachschäden zu vermeiden:<br />
► Reparaturen an Elektrogeräten dürfen nur von Fachleuten<br />
durchgeführt werden, die vom Hersteller geschult<br />
sind. Durch unsachgemäße Reparaturen können erhebliche<br />
Gefahren für den Benutzer und Schäden am Gerät<br />
entstehen.<br />
Störungsursachen und -behebung<br />
Die nachfolgende Tabelle hilft bei der Lokalisierung und Behebung<br />
kleinerer Störungen:<br />
Fehler Mögliche Ursache Behebung<br />
<strong>Espresso</strong> tritt oberhalb<br />
des Siebträgers<br />
aus<br />
Es tritt kein Wasser<br />
/ <strong>Espresso</strong> aus oder<br />
nur tröpfchenweise<br />
Der Siebträger ist nicht<br />
richtig eingesetzt.<br />
Es ist noch Kaffeemehl<br />
auf dem Rand des Siebträgers.<br />
Der Brühkopf ist verschmutzt.<br />
Der Brühkopf hat einen<br />
defekt.<br />
Die Brühkopfgummidichtung<br />
ist beschädigt<br />
oder abgenutzt.<br />
Kein Wasser im Wassertank.<br />
Der Wasserbehälter wurde<br />
nicht richtig eingesetzt.<br />
Setzen Sie den Siebträger<br />
so ein, dass<br />
dieser fest sitzt.<br />
Entfernen Sie das<br />
Kaffeemehl.<br />
Reinigen Sie den<br />
Brühkopf.<br />
Kontaktieren Sie den<br />
<strong>Graef</strong>-Kundendienst.<br />
Kontaktieren Sie den<br />
<strong>Graef</strong>-Kundendienst.<br />
Befüllen Sie den Wassertank.<br />
Setzen Sie den Wasserbehälter<br />
richtig ein.
<strong><strong>Espresso</strong>automat</strong> <strong>ES</strong> <strong>80</strong> / <strong>ES</strong> <strong>81</strong><br />
<strong>Espresso</strong> hat keine<br />
Crema<br />
Wasser läuft zu<br />
schnell durch<br />
Sehr lautes Pumpengeräusch<br />
Milchschaum- und Heißwasserdüsenregeler<br />
ist<br />
offen.<br />
Siebträger ist verstopft.<br />
Gerät verkalkt.<br />
Brühkopfsieb verschmutzt.<br />
Der Kaffee ist zu alt oder<br />
zu trocken.<br />
Das Kaffeemehl ist zu<br />
grob.<br />
Nicht genug Kaffee im<br />
Siebträger.<br />
Kaffeemehl nicht genügend<br />
angedrückt.<br />
Das Kaffeemehl ist zu<br />
grob.<br />
Das Kaffeemehl wurde<br />
nicht genug angedrückt.<br />
Es ist zu wenig Kaffeemehl<br />
im Siebträger.<br />
Kein Wasser im Wasserbehälter.<br />
Der Wasserbehälter wurde<br />
nicht richtig eingesetzt.<br />
Das Gerät ist verkalkt.<br />
© Gebr. <strong>Graef</strong> GmbH & Co. KG / 04<br />
Drehen Sie den Regler<br />
zu.<br />
Leeren Sie den Siebträger<br />
und füllen Sie erneut<br />
Kaffee ein. Achten<br />
Sie darauf, dass<br />
Sie den Kaffee nicht<br />
zu fest andrücken und<br />
dass der Kaffee nicht<br />
zu fein gemahlen ist.<br />
Entkalken Sie das Gerät.<br />
Reinigen Sie das Brühkopfsieb.<br />
Benutzen Sie frisches<br />
Kaffeemehl.<br />
Benutzen Sie feineres<br />
Kaffeemehl.<br />
Füllen Sie mehr Kaffeemehl<br />
ein.<br />
Drücken Sie das Kaffeemehl<br />
ein wenig fester<br />
an.<br />
Benutzen Sie feineres<br />
Kaffeemehl.<br />
Drücken Sie das Kaffeemehl<br />
ein wenig fester<br />
an.<br />
Füllen Sie mehr Kaffeemehl<br />
ein.<br />
Füllen Sie den Wasserbehälter<br />
auf.<br />
Setzen Sie den Wasserbehälter<br />
richtig ein.<br />
Entkalken Sie das Gerät.<br />
23<br />
D
D<br />
<strong><strong>Espresso</strong>automat</strong> <strong>ES</strong> <strong>80</strong> / <strong>ES</strong> <strong>81</strong><br />
24<br />
Kein Dampf<br />
Nicht genug Schaum<br />
beim Aufschäumen<br />
Kaffee ist zu kalt<br />
Gerät hat keine<br />
Funktion<br />
Die Dampfdüse ist verstopft.<br />
"STEAM"-Modus wurde<br />
nicht angewählt.<br />
Die Milch ist nicht frisch.<br />
Die Temperatur der<br />
Milch ist zu hoch.<br />
Die Dampfdüse ist verstopft.<br />
Die Milch wurde gekocht.<br />
Dampfdüse nicht korrekt<br />
positioniert.<br />
Tassen, Filtereinsatz und<br />
Siebträger sind kalt.<br />
Eventuell war die Milch<br />
beim Erstellen des Cappuccinos<br />
oder Latte noch<br />
nicht genug aufgeheizt.<br />
Das Gerät ist nicht an<br />
das Stromnetz angeschlossen.<br />
Brühkopffilter verstopft.<br />
Das Gerät ist verkalkt.<br />
Reinigen Sie die<br />
Dampfdüse.<br />
Drücken Sie die<br />
"STEAM"- Taste.<br />
Nehmen Sie frische<br />
Milch.<br />
Die Milch sollte gut gekühlt<br />
sein bevor diese<br />
benutzt wird.<br />
Reinigen Sie die<br />
Dampfdüse.<br />
Starten sich noch einmal,<br />
mit frischer Milch.<br />
Positionieren Sie die<br />
Dampfdüse ca. 1 cm<br />
unter der Milchoberfläche.<br />
Heizen Sie Tassen, Filtereinsatz<br />
und Siebträger<br />
einmal vor.<br />
Heizen Sie die Milch<br />
weiter auf, aber bringen<br />
Sie diese nicht<br />
zum Kochen.<br />
Stecken Sie den Stecker<br />
in die Steckdose.<br />
Reinigen Sie den Brühkopffilter.<br />
Entkalken Sie das Gerät.<br />
Wichtig!<br />
► Wenn Sie mit den oben genannten Schritten das Problem<br />
nicht lösen können, wenden Sie sich bitte an den<br />
Kundendienst.
<strong><strong>Espresso</strong>automat</strong> <strong>ES</strong> <strong>80</strong> / <strong>ES</strong> <strong>81</strong><br />
Reinigung und Pflege<br />
In diesem Kapitel erhalten Sie<br />
wichtige Hinweise zur Reinigung<br />
und Pflege des Gerätes.<br />
Sicherheitshinweise<br />
VORSICHT<br />
Beachten Sie die folgenden<br />
Sicherheitshinweise, bevor Sie<br />
mit der Reinigung des Gerätes<br />
beginnen:<br />
► Schalten Sie das Gerät vor<br />
dem Reinigen aus und ziehen<br />
Sie den Netzstecker aus<br />
der Steckdose.<br />
► Lassen Sie das Gerät vor<br />
jeder Reinigung abkühlen.<br />
► Benutzen Sie keine aggressiven<br />
oder scheuernden<br />
Reinigungsmittel und keine<br />
Lösungsmittel.<br />
► Kratzen Sie hartnäckige<br />
Verschmutzungen nicht mit<br />
harten Gegenständen ab.<br />
► Geben Sie das Gerät nicht in<br />
die Spülmaschine und halten<br />
Sie dieses auch nicht unter<br />
fließendes Wasser.<br />
Reinigung<br />
■ Reinigen Sie die Außenflächen<br />
des Gerätes mit einem weichen,<br />
angefeuchteten Tuch. Bei<br />
starker Verschmutzung kann<br />
ein mildes Reinigungsmittel<br />
verwendet werden.<br />
■ Ziehen Sie die Abtropfschale<br />
raus.<br />
© Gebr. <strong>Graef</strong> GmbH & Co. KG / 04<br />
■ Entnehmen Sie das Abtropfrost.<br />
■ Entleeren Sie die Abtropfschale.<br />
■ Reinigen Sie Abtropfschale sowie<br />
das Rost und den Sieb-träger<br />
unter fließendem Wasser.<br />
■ Setzen Sie anschließend die<br />
Abtropfschale samt Rost wieder<br />
ein.<br />
Reinigungsset<br />
■ Entnehmen Sie die Abtropfschale.<br />
■ Wenn Sie die Abtropfschale<br />
entfernt haben, finden Sie das<br />
Reinigungsset im Geräteinneren<br />
an dem Kunststoff.<br />
■ Entnehmen Sie das Reinigungsset.<br />
■ Mit dem dünneren Ende des<br />
Reinigungspinns reinigen Sie<br />
die Löcher der Filtereinsätze.<br />
■ Mit dem dickeren Ende des Reinigungspinns,<br />
reinigen Sie das<br />
Rohr der Milchschaum-/Heißwasserdüse.<br />
■ Reinigen Sie anschließend das<br />
Rohr mit einem feuchten Tuch.<br />
Entkalken<br />
Wie jedes Gerät, welches mit<br />
Wasser betrieben wird, muss auch<br />
der <strong><strong>Espresso</strong>automat</strong> regelmäßig<br />
entkalkt werden.<br />
Zum Entkalken empfehlen wir Ihnen<br />
die <strong>Graef</strong> Entkalkungstabletten.<br />
25<br />
D
D<br />
<strong><strong>Espresso</strong>automat</strong> <strong>ES</strong> <strong>80</strong> / <strong>ES</strong> <strong>81</strong><br />
26<br />
Gehen Sie dabei wie folgt vor:<br />
■ Den Wassertank entfernen und<br />
komplett leeren.<br />
■ Füllen Sie den Wassertank erneut<br />
mit Wasser (ca. 1 Liter)<br />
und vermischen Sie das Wasser<br />
- gemäß den Angaben des Herstellers<br />
- mit dem Entkalker.<br />
■ Positionieren Sie den Wassertank<br />
wieder in dem Gerät.<br />
■ Mit Hilfe eines Schraubenziehers<br />
entfernen Sie den Brühfilter<br />
/-dusche von der Unterseite<br />
des Brühkopfes.<br />
■ Entfernen und legen Sie Filter/Filtersieb,<br />
Dichtung und<br />
Schraube an einen sicheren Ort.<br />
hinWeis<br />
Passen Sie auf, dass Sie Filter/Filtersieb,<br />
Dichtung und<br />
Schraube nicht verlieren.<br />
■ Benutzen Sie eine kleine Bürste<br />
zum Reinigen des Brühkopfes,<br />
entfernen Sie alle Kaffeereste.<br />
■ Setzen Sie nun einen großen<br />
Behälter unter den Brühkopf.<br />
■ Schalten Sie das Gerät ein.<br />
■ Sobald das Gerät breit ist, drücken<br />
Sie auf die "COFFEE"- Taste.<br />
■ Sobald der Behälter voll ist,<br />
entleeren Sie diesen und wiederholen<br />
diese Prozedur mehrmals.<br />
■ Nach mehrmaligem Wiederholen<br />
schalten Sie das Gerät für<br />
ca. 10-15 min aus, damit der<br />
Entkalker seine Wirkung erzielen<br />
kann.<br />
■ Danach schalten Sie das Gerät<br />
wieder ein.<br />
■ Lassen Sie die restliche Entkalkerlösung<br />
durchlaufen, indem<br />
Sie die "COFFEE"- Taste drücken.<br />
■ Danach entnehmen Sie den<br />
Wassertank und spülen diesen<br />
gut aus.<br />
■ Befüllen Sie den Wassertank<br />
wieder mit frischem Wasser.<br />
■ Stellen Sie wieder einen Behälter<br />
unter den Brühkopf.<br />
■ Lassen Sie nun mehrmals frisches<br />
Wasser durchlaufen.<br />
■ Nach Beendigung der Durchläufe<br />
setzen Sie Filter/Filtersieb,<br />
Dichtung und die Schraube<br />
wieder ein.<br />
hinWeis<br />
Achten Sie darauf, dass die<br />
Schraube wieder fest angezogen<br />
wird.<br />
■ Befüllen Sie nun den Wassertank<br />
mit frischem Wasser.
<strong><strong>Espresso</strong>automat</strong> <strong>ES</strong> <strong>80</strong> / <strong>ES</strong> <strong>81</strong><br />
Entsorgung<br />
Garantie<br />
Dieses Produkt darf am Ende seiner Lebensdauer nicht über<br />
den normalen Hausmüll entsorgt werden, sondern muss an einem<br />
Sammelpunkt für das Recycling von elektronischen Haushaltsabfall<br />
entsorgt werden. Das Symbol auf dem Produkt und<br />
in der Gebrauchsanleitung weist darauf hin. Die Werkstoffe<br />
sind gemäß Ihrer Kennzeichnung wiederverwertbar. Mit der<br />
Wiederverwendung, der stofflichen Verwertung oder anderen<br />
Formen der Verwertung von Altgeräten, leisten Sie einen<br />
wichtigen Beitrag zum Schutze unserer Umwelt. Bitte fragen<br />
Sie bei Ihrer Gemeindeverwaltung nach der zuständigen Entsorgungsstelle.<br />
2 Jahre Garantie<br />
Für dieses Produkt übernehmen wir beginnend vom Verkaufsdatum<br />
24 Monate Herstellergarantie für Mängel, die auf Fertigungs-<br />
und Werkstofffehler zurückzuführen sind. Ihre gesetzlichen<br />
Gewährleistungsansprüche nach § 439 ff. BGB-E<br />
bleiben von dieser Regelung unberührt. In der Garantie nicht<br />
enthalten sind Schäden, die durch unsachgemäße Behandlung<br />
oder Einsatz entstanden sind sowie Mängel, welche die Funktion<br />
oder den Wert des Gerätes nur geringfügig beeinflussen.<br />
Weitergehend sind Transportschäden, soweit wir dies nicht zu<br />
verantworten haben, vom Garantieanspruch ausgeschlossen.<br />
Für Schäden, die durch eine nicht von uns oder eine unserer<br />
Vertretungen durchgeführte Reparatur entstehen, ist ein Garantieanspruch<br />
ausgeschlossen. Bei berechtigten Reklamationen<br />
werden wir das mangelhafte Produkt nach unserer Wahl<br />
reparieren oder gegen ein mängelfreies Produkt austauschen.<br />
© Gebr. <strong>Graef</strong> GmbH & Co. KG / 04<br />
27<br />
D
<strong>EN</strong><br />
<strong>Espresso</strong> <strong>Machine</strong> <strong>ES</strong> <strong>80</strong> / <strong>ES</strong> <strong>81</strong><br />
28<br />
Preface<br />
Dear customer,<br />
You made the right decision with<br />
the purchase of the <strong>ES</strong> <strong>80</strong> / <strong>ES</strong> <strong>81</strong><br />
group handle automatic machine.<br />
You have acquired an established<br />
quality product.<br />
We thank you for your purchase<br />
and wish you lots of joy with your<br />
new group handle automatic machine.<br />
We recommend using BRITA filtered<br />
water to obtain optimal results<br />
with your new group handle<br />
automatic. That allows your hot<br />
beverages to completely develop<br />
their natural aromas while at the<br />
same time protecting your unit<br />
from calcification. BRITA – For<br />
complete enjoyment of your hot<br />
drinks and longer lifetime of your<br />
machine!<br />
Information about these operating<br />
instructions<br />
These operating instructions are a<br />
component of the group handle<br />
automatic machine (in the following<br />
referred to as the unit)<br />
and provide important information<br />
about its first use, safety, the<br />
intended use and care of the unit.<br />
The operating instructions must<br />
always be kept available near the<br />
unit. Every person who deals<br />
with the following must read and<br />
apply them:<br />
● First use<br />
● Operation,<br />
● Repairing faults and/or<br />
● Cleaning<br />
of the unit.<br />
Keep the operating instructions<br />
and pass them on to the next owner<br />
together with the unit.<br />
These operating instructions cannot<br />
cover every possible use. For<br />
more information or if you have<br />
any problems not covered or not<br />
sufficiently dealt with in these<br />
instructions, please contact the<br />
GRAEF customer service department<br />
or your dealer.<br />
Warnings<br />
The following warnings and signal<br />
words are used in these operating<br />
instructions:<br />
WARNING<br />
That indicates a possibly<br />
dangerous situation. If the<br />
instructions are not complied<br />
with, severe injury can result or<br />
non-compliance can even lead<br />
to death.<br />
CAUTION<br />
That indicates a possibly dangerous<br />
situation. Non-compliance<br />
with the instruction can lead to<br />
property damage.<br />
important!
<strong>Espresso</strong> <strong>Machine</strong> <strong>ES</strong> <strong>80</strong> / <strong>ES</strong> <strong>81</strong><br />
This indicates useful tips and<br />
other important information!<br />
Use as intended<br />
This unit is not intended for commercial<br />
usage. Use the group<br />
handle automatic machine solely<br />
in closed rooms.<br />
This unit is intended to be used<br />
in household and similar applications<br />
such as:<br />
● staff kitchen areas in shops, offices<br />
and other working enviroments;<br />
● farm houses;<br />
● by clients in hotels, motels and<br />
other residental type enviroments;<br />
● bed and breakfast type enviroments.<br />
Any other use or use beyond and<br />
above that is considered non-intended<br />
usage.<br />
CAUTION<br />
Danger through non-intended<br />
usage!<br />
The unit can cause hazards if<br />
used other than intended and/<br />
or for alien usage.<br />
► Use the unit exclusively as<br />
intended.<br />
► Follow the procedures<br />
described in these operating<br />
instructions.<br />
All claims of any type due to nonintended<br />
usage are excluded.<br />
© Gebr. <strong>Graef</strong> GmbH & Co. KG - 03<br />
The risk is borne solely by the<br />
operator.<br />
Limitation of liability<br />
All technical information, data<br />
and instructions for installation,<br />
operation and care included in<br />
these operating instructions accord<br />
with the latest state at the<br />
time of printing and have been<br />
made to the best of our knowledge<br />
with consideration of our<br />
previous experiences and insights.<br />
No claims can be derived from<br />
the information, illustrations and<br />
descriptions in these instructions.<br />
The manufacturer does not assume<br />
any liability for damages due<br />
to:<br />
● Non-compliance with the instructions<br />
● Non-intended use<br />
● Improper repairs<br />
● Technical modifications<br />
● Use of non-approved spare<br />
parts<br />
Translations are made in good<br />
faith. We do not assume any liability<br />
for translation errors. Solely<br />
the original German text is binding.<br />
29<br />
<strong>EN</strong>
<strong>EN</strong><br />
<strong>Espresso</strong> <strong>Machine</strong> <strong>ES</strong> <strong>80</strong> / <strong>ES</strong> <strong>81</strong><br />
30<br />
Customer service<br />
If your GRAEF unit becomes damaged,<br />
please contact your dealer<br />
or the GRAEF customer service<br />
department.<br />
Gebr. <strong>Graef</strong> GmbH & Co. KG<br />
Kundendienst<br />
Donnerfeld 6<br />
59757 Arnsberg<br />
Telefon: 02932-9703- 6041<br />
Telefax: 02932-9703-90<br />
Email: service@graef.de<br />
Safety<br />
This chapter provides you with<br />
important safety instructions for<br />
handling the unit.<br />
This unit complies with the<br />
statutory safety regulations.<br />
Improper use can, however,<br />
lead to personal injury and<br />
property damage.<br />
Danger due to electric<br />
current<br />
WARNING<br />
Danger of death due to electric<br />
current!<br />
Touching live lines or components<br />
is mortally dangerous!<br />
Follow the safety instructions<br />
below to prevent hazards from<br />
electric current:<br />
► Do not use the unit if the<br />
power cord or plug are damaged.<br />
► If the supply cord is damaged,<br />
it must be replaced by<br />
the manufacturer, its service<br />
agent or similar qualified<br />
persons in order to avoid a<br />
hazard.<br />
► Never open the unit housing<br />
under any circumstances. If<br />
live connections are touched<br />
and the electrical or mechanical<br />
structure changes,<br />
there is a danger of electric<br />
shock.<br />
► Never touch any parts that<br />
are conducting electricity.<br />
They can cause an electric<br />
shock or even lead to death.<br />
Basic safety instructions<br />
To handle the unit safely, follow<br />
the instructions below:<br />
■ Check the unit for external, visible<br />
damage to the housing, the<br />
supply cord and the plug before<br />
using it. Do not put a damaged<br />
unit into operation.
<strong>Espresso</strong> <strong>Machine</strong> <strong>ES</strong> <strong>80</strong> / <strong>ES</strong> <strong>81</strong><br />
■ Repairs are only allowed to be<br />
performed by a specialist or by<br />
the GRAEF customer service department.<br />
Improper repairs can<br />
lead to extreme hazards for the<br />
user and damage the unit. Furthermore,<br />
the warranty claim<br />
expires.<br />
■ Only GRAEF customer service<br />
is authorised to repair the unit<br />
during the warranty period,<br />
otherwise there the warranty<br />
expires for additional damages.<br />
■ Defective components must be<br />
replaced solely with genuine<br />
spare parts. Fulfilment of the<br />
safety regulations is only guaranteed<br />
if these parts are used.<br />
■ This unit is not intended for use<br />
by people (including children)<br />
with restricted physical, sensory<br />
or mental capabilities, or who<br />
have a lack of experience and/<br />
or lack of knowledge, unless<br />
they are supervised by a person<br />
responsible for their safety or<br />
have received instructions from<br />
that person about how to use<br />
the unit.<br />
■ Children should be supervised<br />
to ensure that they do not play<br />
with the unit.<br />
■ Always pull the supply line<br />
from the electric socket using<br />
the connector plug, not on the<br />
supply cord.<br />
■ Do not carry the unit by the<br />
supply cord.<br />
■ Never transport the unit during<br />
operation.<br />
© Gebr. <strong>Graef</strong> GmbH & Co. KG - 03<br />
■ The unit is not intended to be<br />
used with an external timer or<br />
a separate telecontrol system.<br />
■ The unit is suitable solely for<br />
grinding coffee beans.<br />
■ Do not touch the plug with<br />
moist hands.<br />
■ If the supply cord is damaged,<br />
it must be replaced, it must be<br />
replaced by manufacturer, its<br />
service agent or similarly qualified<br />
person in order to avoid a<br />
hazard.<br />
■ The appliance must not be immersed.<br />
First use<br />
Safety instructions<br />
cautioN<br />
Personal harm or property<br />
damage could occur when the<br />
unit is being used for the first<br />
time!<br />
Follow the safety instructions<br />
below to prevent hazards and<br />
property damage:<br />
► Do not use the packing material<br />
as a toy.<br />
Danger of suffocation.<br />
► Follow the instructions regarding<br />
the requirements for<br />
the place of installation and<br />
on the unit's electrical connection<br />
to prevent personal<br />
harm and property damage.<br />
Scope of delivery and<br />
31<br />
<strong>EN</strong>
<strong>EN</strong><br />
<strong>Espresso</strong> <strong>Machine</strong> <strong>ES</strong> <strong>80</strong> / <strong>ES</strong> <strong>81</strong><br />
32<br />
shipping inspection<br />
The unit comes standard with the<br />
following components:<br />
● <strong>Espresso</strong> <strong>Machine</strong><br />
● Double filter basket<br />
● Single filter basket<br />
● 600 ml jug<br />
● Group handle<br />
● Cleaning tool<br />
● Measuring spoun<br />
● Tamper<br />
● Instruction manual<br />
important!<br />
► Check the delivery for<br />
completeness and for visible<br />
damage.<br />
► Immediately notify the carrier,<br />
insurance company and<br />
the supplier about an incomplete<br />
delivery or damages<br />
due to improper packing or<br />
caused by shipping.<br />
Unpacking<br />
To unpack the unit, proceed as<br />
below:<br />
Take the unit out of the carton.<br />
Remove all pieces of the packing.<br />
Remove any possibly extant<br />
labels on the unit.<br />
(not the rating plate).<br />
Dispose of the packing<br />
The packing protects the unit<br />
from shipping damage. The packing<br />
materials are selected for<br />
their environmental compatibility<br />
and from disposal aspects so they<br />
are recyclable.<br />
Returning the packing to the materials<br />
circuit saves raw materials<br />
and reduces the accumulation of<br />
waste. Dispose of packing material<br />
that is no longer needed at a<br />
collection point for the »Green<br />
Point« recycling system.<br />
important!<br />
► If possible, save the original<br />
packing during the unit's<br />
warranty period to be able<br />
to properly pack the unit in<br />
case of a warranty claim.<br />
Requirements for the installation<br />
location<br />
For safe and flawless operation<br />
of the unit, the place of<br />
location must meet these prerequisites:<br />
■ The unit must be set up on a<br />
firm, flat, level, non-slip and<br />
heat resistant base that has sufficient<br />
load bearing capacity.<br />
■ Select the place of location so<br />
that children cannot reach the<br />
hot surfaces of the unit.<br />
■ The unit is not intended for<br />
installation in a wall or a<br />
built-in cupboard.
<strong>Espresso</strong> <strong>Machine</strong> <strong>ES</strong> <strong>80</strong> / <strong>ES</strong> <strong>81</strong><br />
■ Do not set up the unit in a hot,<br />
wet or moist environment.<br />
■ The electric socket must be readily<br />
accessible so that the power<br />
cord can be easily unplugged.<br />
Electric connection<br />
Follow these instructions about<br />
the electrical connection for safe<br />
and flawless operation of the unit:<br />
■ Before connecting the unit,<br />
compare the connection information<br />
(voltage and frequency)<br />
on the rating plate with those of<br />
your electrical network. This information<br />
must match to avoid<br />
damage to the unit. If in doubt,<br />
ask your electrician.<br />
■ The socket must be fused with<br />
at least a 10A circuit breaker.<br />
■ Make sure that the power cord<br />
is not damaged. Do not conduct<br />
it over hot surfaces or sharp<br />
edges.<br />
■ The supply cord must not be<br />
pulled tight.<br />
■ The electrical safety of the unit<br />
is only ensured if it is connected<br />
to a properly installed protective<br />
conductor system. Operation<br />
on a socket without a protective<br />
conductor is prohibited. If in<br />
doubt, have the building installation<br />
checked by an electrician.<br />
The manufacturer does not<br />
assume any responsibility for<br />
damages caused by a missing<br />
or interrupted protective conductor.<br />
© Gebr. <strong>Graef</strong> GmbH & Co. KG - 03<br />
Before the first use<br />
Before using for the first time or<br />
after a long period of non-use,<br />
you should prepare several cups<br />
of water (without coffee grounds)<br />
to thoroughly flush the system.<br />
Proceed as described in the "Preparing<br />
espresso" section.<br />
Setup and Functioning<br />
Features<br />
● Filter support automatic machine<br />
● Aluminium/stainless steel<br />
housing<br />
● Single thermoblock heater<br />
● Brass filter support<br />
● 360 °C swivelling milk frother/<br />
hot water nozzle<br />
● 2.5 litre water tank<br />
● Freely programmable water volume<br />
● Freely programmable temperature<br />
● Water level indicator<br />
● Warming plate for cups<br />
● Removable drip dish<br />
● Double-walled filter insert for<br />
1 cup<br />
● Double-walled filter insert for 2<br />
cups<br />
● Stainless steel milk container<br />
● Coffee spoon<br />
● Cleaning set<br />
33<br />
<strong>EN</strong>
6<br />
<strong>EN</strong><br />
<strong>Espresso</strong> <strong>Machine</strong> <strong>ES</strong> <strong>80</strong> / <strong>ES</strong> <strong>81</strong><br />
34<br />
● Tamper<br />
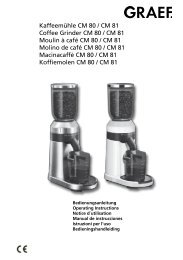
Technical data<br />
Dimensions (L x W x H) 30 x 29 x 33,2 cm<br />
Weight ca. 8,5 kg<br />
Operating voltage 230 - 240 V<br />
Power consumption 1 1470 - 1600 W<br />
Pump pressure 15 bar<br />
2<br />
Overview<br />
5<br />
Spare parts<br />
The following spare parts can be supplied for this unit:<br />
● Replacement cleaning kit<br />
● Replacement coffee spoon<br />
● Replacement filter insert<br />
● Replacement group handle bracket<br />
7<br />
3<br />
4<br />
1) Control Panel<br />
2) Steam and hot<br />
water control dial<br />
3) Steam and hot<br />
water wand<br />
4) Removable drip<br />
tray<br />
5) Water reservoir<br />
6) Group handle<br />
7) Warming Plate
<strong>Espresso</strong> <strong>Machine</strong> <strong>ES</strong> <strong>80</strong> / <strong>ES</strong> <strong>81</strong><br />
● Replacement tamper<br />
Contact customer service if you<br />
need spare parts for your unit.<br />
Control and operation<br />
This chapter provides you with<br />
important information on controlling<br />
and operating the unit.<br />
Safety instructions<br />
CAUTION<br />
Follow the safety instructions<br />
below to prevent hazards and<br />
property damage:<br />
► Never remove the group<br />
handle when it is filled with<br />
coffee grounds; it is pressurised.<br />
► Use the unit only when the<br />
drip grid and drip tray are<br />
properly positioned.<br />
► Before making coffee, make<br />
sure the group handle is<br />
tightened firmly.<br />
Using the control panel<br />
POWER<br />
Press the "POWER" button once<br />
to turn the unit on.<br />
The light behind the "POWER"<br />
button will illuminate red ad start<br />
flashing, this is to indicate that<br />
your unit is on and heating up.<br />
If the light turns to a constant<br />
green light, this indicates that the<br />
unit is heated and ready for use.<br />
Before activating the espresso<br />
© Gebr. <strong>Graef</strong> GmbH & Co. KG - 03<br />
coffee function ensure that the<br />
steam and hot water control dial<br />
is in the OFF position.<br />
STEAM<br />
You can froth-up milk with the<br />
STEAM function. To activate<br />
the steam function, press the<br />
"STEAM" button. The "STEAM"<br />
lamp flashes, "COFFEE" and<br />
"HOT WATER" extinguish. After<br />
a short heating-up period, the<br />
lamp stops flashing. You can now<br />
start frothing the milk. To froth<br />
up the milk, turn the rotary control<br />
to "OP<strong>EN</strong>". After completing<br />
the process, turn the rotary control<br />
back to "OFF"<br />
HOT WATER<br />
With the hot water function, you<br />
can use hot water for making<br />
hot chocolate, warming up cups<br />
or for brewing tea. To activate<br />
the hot water function, press the<br />
"HOT WATER" button. The "HOT<br />
WATER" lamp light, "COFFEE"<br />
and "STEAM" extinguish. After<br />
a short heating-up period, the<br />
lamp stops flashing. You can now<br />
start.To get the hot water, turn<br />
the rotary control to "OP<strong>EN</strong>". After<br />
completing the process, turn<br />
the rotary control back to "OFF"<br />
35<br />
<strong>EN</strong>
<strong>EN</strong><br />
<strong>Espresso</strong> <strong>Machine</strong> <strong>ES</strong> <strong>80</strong> / <strong>ES</strong> <strong>81</strong><br />
36<br />
Preparation<br />
Plug the plug into the electric socket.<br />
Remove water reservoir<br />
from front of<br />
unit.<br />
Press "POWER" button<br />
to turn unit on.<br />
Select appropriate<br />
filter and place into<br />
group handle.<br />
Fill at sink with cold<br />
water.<br />
Control panel lit and<br />
ready to us.<br />
Place group handle<br />
onto group head.<br />
Replace the water reservoir.<br />
Warming the espresso<br />
cups.<br />
Turn group handle<br />
to the right, so it<br />
is firmly locked into<br />
position.
<strong>Espresso</strong> <strong>Machine</strong> <strong>ES</strong> <strong>80</strong> / <strong>ES</strong> <strong>81</strong><br />
Place large container<br />
under both pouring<br />
spouts.<br />
Press the "COFFEE"<br />
button and allow<br />
the water to run<br />
through. Press button<br />
again.<br />
important!<br />
Make sure to manually stop the flow of water; otherwise,<br />
the water will keep flowing until the tank is empty. This unit<br />
does not have an automatic stop function.<br />
© Gebr. <strong>Graef</strong> GmbH & Co. KG - 03<br />
37<br />
<strong>EN</strong>
<strong>EN</strong><br />
<strong>Espresso</strong> <strong>Machine</strong> <strong>ES</strong> <strong>80</strong> / <strong>ES</strong> <strong>81</strong><br />
38<br />
Making the espresso<br />
Select appropriate<br />
filter and place into<br />
group handle.<br />
Tamp the coffee<br />
grinds. The level<br />
must be 3 mm below<br />
the filter basket rim.<br />
Turn group handle<br />
to the right, so it<br />
is firmly locked into<br />
position.<br />
Hold group handle<br />
under group head<br />
and purge with water<br />
to preheat.<br />
Wipe the edge of<br />
filter to remove any<br />
coffee grinds.<br />
Place glasses / cups<br />
below pouring spouts.<br />
Place finaly ground<br />
coffee into filter basket.<br />
Place group handle<br />
onto group head.<br />
Press the "COFFEE"<br />
button for a continuous<br />
pour. Press<br />
button again to stop<br />
pour.
<strong>Espresso</strong> <strong>Machine</strong> <strong>ES</strong> <strong>80</strong> / <strong>ES</strong> <strong>81</strong><br />
Remove group handle<br />
by truning to the<br />
left.<br />
important!<br />
You can purchase the waste bin<br />
as an accessory.<br />
Clean the group handle every<br />
time you prepare espresso to<br />
prevent mould growth.<br />
After finishing making the<br />
espresso, switch the unit off<br />
again by pressing the "POW-<br />
ER" button.<br />
If you do happen to forget,<br />
the unit switches into standby<br />
mode after about 2 hours.<br />
To start using the unit again,<br />
press the "POWER" button.<br />
The unit heats up again. After<br />
a short time, you can continue<br />
as described in "<strong>Espresso</strong> preparation".<br />
Discard the used coffee<br />
grinds.<br />
© Gebr. <strong>Graef</strong> GmbH & Co. KG - 03<br />
GRAEFF recommends using water<br />
filtered with the BRITA filter<br />
39<br />
<strong>EN</strong>
<strong>EN</strong><br />
<strong>Espresso</strong> <strong>Machine</strong> <strong>ES</strong> <strong>80</strong> / <strong>ES</strong> <strong>81</strong><br />
40<br />
Even though we have high quality<br />
drinking water, filtration can<br />
still be optimised because, depending<br />
on the origin of the<br />
water, it contains individual<br />
components such as lime, chlorine<br />
or metals such as lead and<br />
copper which could come from<br />
the building plumbing. A BRITA<br />
water filter reduces these substances.<br />
That in turn helps develop<br />
the natural aromas and<br />
full taste of your hot beverage.<br />
On top of that, it protects your<br />
unit from calcification. That extends<br />
the service life and keeps<br />
the brewing performance constant,<br />
plus the energy consumption<br />
remains at the same, low<br />
level.<br />
BRITA – For complete enjoyment<br />
of your hot drinks and longer<br />
lifetime of your machine!<br />
Milk frothing<br />
note<br />
► For milk frothing, always use<br />
the milk frother - hot water<br />
nozzle together with the attached<br />
Pannarello.<br />
Press the "STEAM" button.<br />
The steam function for making<br />
milk froth is now active.<br />
After the lamp has stopped<br />
flashing, the nozzle is ready for<br />
use.<br />
Make sure there is always<br />
enough water in the tank.<br />
Fill the enclosed container to<br />
1/3 with cold milk.<br />
note<br />
► To achieve optimal results,<br />
use only max. 4°C cold milk.<br />
Before using the milk frother<br />
nozzle, the condensate that<br />
has collected there should be<br />
drained off. To do that, aim it<br />
at the drain grate and briefly<br />
turn on the steam.<br />
Wait until only steam and no<br />
water escapes and close the<br />
control again.<br />
cautioN<br />
Never aim the milk frother<br />
nozzle towards yourself or any<br />
other person. DANGER OF<br />
BURNS!<br />
Always use the handle to move<br />
the milk frother nozzle. Never<br />
touch the milk frother nozzle<br />
on the pipe after using. It<br />
becomes very hot!<br />
Now immerse the milk frother<br />
nozzle with the Pannarello into<br />
the milk to approx. 1 cm under<br />
the surface.<br />
Open the steam control to the<br />
limit.<br />
Hold the milk container at a
<strong>Espresso</strong> <strong>Machine</strong> <strong>ES</strong> <strong>80</strong> / <strong>ES</strong> <strong>81</strong><br />
slight angle while doing so.<br />
Lower the milk can as soon as<br />
the milk level rises.<br />
PLEASE NOTE: The milk must<br />
not be heated to more than<br />
70°C during this process; otherwise,<br />
the froth will collapse<br />
and the beverage will taste<br />
too sweet or possibly even like<br />
burned milk!<br />
A good tip for the correct<br />
temperature is when the you<br />
cannot hold the container for<br />
more than 3 seconds.<br />
cautioN<br />
To froth the milk use only the<br />
enclosed container or another<br />
large container. Never use a<br />
cup. The overflowing milk can<br />
lead to burns.<br />
note<br />
We recommend limiting the<br />
serving time to ca. 60 seconds.<br />
Turn open the control knob<br />
again.<br />
By closing the valve and due<br />
to the steam cooling off a vacuum<br />
arises in the milk frother<br />
nozzle which then draws some<br />
more milk.<br />
For that reason, please wait a<br />
moment before you pull the<br />
milk frother nozzle out of the<br />
milk.<br />
After frothing, briefly knock<br />
the milk can on the table top<br />
© Gebr. <strong>Graef</strong> GmbH & Co. KG - 03<br />
to remove the last of the large<br />
air bubbles.<br />
Swirling also helps uniformly<br />
distribute the froth.<br />
Clean the milk frother nozzle<br />
immediately after finishing the<br />
process using a moist cloth.<br />
However, let the pipe cool<br />
down for a few moments as it<br />
becomes very hot.<br />
Also clean the milk frother nozzle<br />
with a short blast of steam<br />
so that the milk remnants are<br />
blown out of the milk frother<br />
nozzle.<br />
Making hot water<br />
Press the "HOT WATER" button.<br />
The hot water function is now<br />
active.<br />
After the lamp has stopped<br />
flashing, the nozzle is ready for<br />
use.<br />
Make sure there is always<br />
enough water in the tank.<br />
Turn the steam milk frother/hot<br />
water nozzle to the outside.<br />
Set a container under the milk<br />
frother/hot water nozzle.<br />
41<br />
<strong>EN</strong>
<strong>EN</strong><br />
<strong>Espresso</strong> <strong>Machine</strong> <strong>ES</strong> <strong>80</strong> / <strong>ES</strong> <strong>81</strong><br />
42<br />
cautioN<br />
Never turn the milk frother/hot<br />
water nozzle towards yourself<br />
or any other person. DANGER<br />
OF BURNS!<br />
To move the milk frother/hot<br />
water nozzle, always use the<br />
handle; never touch the milk<br />
frother/hot water nozzle on the<br />
pipe after using. It becomes<br />
very hot!<br />
Turn the control knob open.<br />
Hot water now flows from the<br />
nozzle into the container.<br />
After completing the process,<br />
close the rotary control again.<br />
Advanced Programming Options<br />
<strong>Espresso</strong> Thermoblock<br />
Temperature<br />
The water temperature of this<br />
unit has been calibrated to precise<br />
temperature of 92°C at the<br />
group head. The temperature of<br />
the water at the group head can<br />
be modified in increments of 2°C<br />
up and down should it be desired.<br />
To do this you need to follow the<br />
instructions below:<br />
Press the "COFFEE" button for 3<br />
seconds. While still holding down<br />
the "COFFEE"button briefly press<br />
the "POWER" button and re-<br />
lease. Release "COFFEE"button.<br />
This activates the programmability<br />
of the <strong>Espresso</strong> Temperature<br />
and to signal this, the unit will<br />
output the current setting with a<br />
sequence fo beeps.<br />
Beep Sequence Setting<br />
3 short Beeps + 3<br />
2 short Beeps + 2<br />
1 short Beep + 1<br />
1 short und 1<br />
long Beep<br />
Factory Setting<br />
1 long Beep - 1<br />
2 long Beeps - 2<br />
3 long Beeps - 3<br />
important!<br />
The lights behind the<br />
"STEAM" and "HOT WA-<br />
TER" buttons will start flashing.<br />
Within 30 seconds press and release<br />
one of the flashing buttons<br />
depending on the required temperature<br />
adjustment.<br />
Up (+) a setting : Press "HOT WA-<br />
TER"<br />
Down (-) a setting : Press<br />
"STEAM"<br />
important!<br />
When you have selected a<br />
new temperature setting the<br />
unit will sound a sequence<br />
of beeps to indicate the new<br />
temperature setting.<br />
To save your settings press and
<strong>Espresso</strong> <strong>Machine</strong> <strong>ES</strong> <strong>80</strong> / <strong>ES</strong> <strong>81</strong><br />
hold down the "COFFEE" button<br />
for 3 seconds. A single long beep<br />
will sound to indicate your settings<br />
have been saved.<br />
important!<br />
The unit will then automatically<br />
power on and begin<br />
heating up.<br />
The unit will stay in programming<br />
mode for up to<br />
30 seconds. If you do not select<br />
a new temperature setting<br />
within 30 seconds the<br />
programm will automatically<br />
return to the Factory Setting<br />
and the unit will the power<br />
on and begin heating up.<br />
Steam Thermoblock Temperature<br />
The steam temperature of this<br />
unit has been calibrated to deliver<br />
a powerful and dry steam for<br />
texturing milk. The temperature<br />
of the steam can be modified in<br />
increments of 3°C up and down<br />
should it be desired.<br />
To do this you need to follow the<br />
instructions below:<br />
Press the "STEAM" button for 3<br />
seconds.<br />
While still holding down the<br />
"STEAM"button briefly press the<br />
"POWER" button and release.<br />
Release "STEAM"button.<br />
This activates the programmability<br />
of the Steam Temperature<br />
and to signal this, the unit will<br />
© Gebr. <strong>Graef</strong> GmbH & Co. KG - 03<br />
output the current setting with a<br />
sequence fo beeps.<br />
Beep Sequenze Setting<br />
3 short Beeps + 3<br />
2 short Beeps + 2<br />
1 short Beep + 1<br />
1 short und 1<br />
long Beep<br />
Factory Setting<br />
1 long Beep - 1<br />
2 long Beeps - 2<br />
3 long Beeps - 3<br />
important!<br />
The lights behind the "COF-<br />
FEE" and "HOT WATER"<br />
buttons will start flashing.<br />
Within 30 seconds press and release<br />
one of the flashing buttons<br />
depending on the required temperature<br />
adjustment.<br />
Up (+) a setting : Press "HOT WA-<br />
TER"<br />
Down (-) a setting : Press "COFFEE"<br />
important!<br />
When you have selected a<br />
new temperature setting the<br />
unit will sound a sequence<br />
of beeps to indicate the new<br />
temperature setting.<br />
To save your settings press and<br />
hold down the "STEAM" button<br />
for 3 seconds. A single long beep<br />
will sound to indicate your settings<br />
have been saved.<br />
43<br />
<strong>EN</strong>
<strong>EN</strong><br />
<strong>Espresso</strong> <strong>Machine</strong> <strong>ES</strong> <strong>80</strong> / <strong>ES</strong> <strong>81</strong><br />
44<br />
important!<br />
The unit will then automatically<br />
power on and begin<br />
heating up.<br />
The unit will stay in programming<br />
mode for up to<br />
30 seconds. If you do not select<br />
a new temperature setting<br />
within 30 seconds the<br />
programm will automatically<br />
return to the Factory Setting<br />
and the unit will the power<br />
on and begin heating up.<br />
Steam Wetness or Steam<br />
Pump Rate<br />
The steam pump rate of this unit<br />
has been pre-set. Modifying the<br />
steam pump rate enables you to<br />
make the steam wetter or dryer<br />
and aids in the delivery of a powerful,<br />
dry steam - ideal for texturing<br />
milk. The steam pump rate<br />
can be modified in flow rate increments<br />
up or down should it be<br />
desired.<br />
To do this you need to follow the<br />
instructions below:<br />
Press the "HOT WATER" button<br />
for 3 seconds.<br />
While still holding down the<br />
"HOT WATER"button briefly<br />
press the "POWER" button and<br />
release.<br />
Release "HOT WATER"button.<br />
This activates the programmability<br />
of the steam pump rate and<br />
to signal this, the unit will output<br />
the current setting with a se-<br />
quence fo beeps.<br />
Beep Sequenze Setting<br />
3 short Beeps + 3<br />
2 short Beeps + 2<br />
1 short Beep + 1<br />
1 short und 1<br />
long Beep<br />
Factory Setting<br />
1 long Beep - 1<br />
2 long Beeps - 2<br />
3 long Beeps - 3<br />
important!<br />
The lights behind the "COFFEE"<br />
and "STEAM" buttons will start<br />
flashing.<br />
Within 30 seconds press and release<br />
one of the flashing buttons<br />
depending on the required temperature<br />
adjustment.<br />
Up (+) a setting : Press "STEAM"<br />
Down (-) a setting : Press "COFFEE"<br />
important!<br />
When you have selected a<br />
new temperature setting the<br />
unit will sound a sequence<br />
of beeps to indicate the new<br />
temperature setting.<br />
To save your settings press and<br />
hold down the "HOT WATER"<br />
button for 3 seconds. A single<br />
long beep will sound to indicate<br />
your settings have been saved.<br />
important!
<strong>Espresso</strong> <strong>Machine</strong> <strong>ES</strong> <strong>80</strong> / <strong>ES</strong> <strong>81</strong><br />
The unit will then automatically<br />
power on and begin<br />
heating up.<br />
The unit will stay in programming<br />
mode for up to<br />
30 seconds. If you do not select<br />
a new temperature setting<br />
within 30 seconds the<br />
programm will automatically<br />
return to the Factory Setting<br />
and the unit will the power<br />
on and begin heating up.<br />
Factory Reset<br />
To undo any changes made to the<br />
program you can revert back to<br />
the original factory settings.<br />
This resist ALL the programm<br />
settings back to factory settings,<br />
including the espresso and steam<br />
thermoblock temperatures and<br />
the steam pump rate.<br />
Repairing faults<br />
Safety instructions<br />
© Gebr. <strong>Graef</strong> GmbH & Co. KG - 03<br />
Rest Mode<br />
1. The <strong>Machine</strong> is on READY<br />
mode.<br />
2. Press and hold down the "PO-<br />
WER" button for 3 seconds.<br />
3. Release the "POWER" button.<br />
CAUTION<br />
Follow the safety instructions below to prevent hazards and<br />
property damage:<br />
► Only electricians trained by the manufacturer are authorised<br />
to repair electrical units. Improper repairs can lead<br />
to extreme hazards for the user and damage the unit.<br />
Causes of faults and how to repair<br />
45<br />
<strong>EN</strong>
<strong>EN</strong><br />
<strong>Espresso</strong> <strong>Machine</strong> <strong>ES</strong> <strong>80</strong> / <strong>ES</strong> <strong>81</strong><br />
46<br />
The following table helps repair and localise small faults<br />
Fault Possible cause Repair<br />
Coffee runs down<br />
the side of the<br />
group handle<br />
No Coffee runs<br />
through / Coffee<br />
pours out in drops<br />
<strong>Espresso</strong> does not<br />
have any crema.<br />
Group handle is not<br />
attached correctly<br />
Edge of filter basket<br />
is not free of coffee<br />
grinds.<br />
Ensure the handle is<br />
firmly positioned onto<br />
the group head.<br />
Wipe the group handle<br />
clean of coffee.<br />
The group head is dirty. Clean the group head.<br />
The group head is defective.<br />
Group head rubber seal<br />
is damaged or worn.<br />
No water in the water<br />
reservoir.<br />
Water reservoir not correctly<br />
positioned.<br />
Steam and hot water<br />
control dial left open.<br />
Group filter maybe blocked.<br />
Unit blocked by scale<br />
build up.<br />
Brewing head is dirty<br />
Contact the <strong>Graef</strong>-customer<br />
service.<br />
Contact the <strong>Graef</strong>-customer<br />
service.<br />
Fill reservoir with water.<br />
Ensure it is correctly<br />
positioned.<br />
Ensure the steam and<br />
hot water control dial<br />
is in the off position.<br />
Empty out the filter<br />
and rinse under water<br />
to clean. Wipe the<br />
group head with a<br />
cloth. Repack the filter<br />
and do not tamp the<br />
grounds to firmly.<br />
Descale the unit<br />
Clean the brewing<br />
head.<br />
Coffee is old or dry Use fresh coffee.<br />
Coffee too coarse.<br />
Grind the coffee to a<br />
finer texture.
<strong>Espresso</strong> <strong>Machine</strong> <strong>ES</strong> <strong>80</strong> / <strong>ES</strong> <strong>81</strong><br />
Water flows<br />
through to quickly<br />
Pump makes an<br />
unusually load<br />
noise<br />
Not a enough coffee in<br />
filter.<br />
Coffee not compacted<br />
firmly enough.<br />
The coffee grounds are<br />
too course<br />
The coffee grounds<br />
were not pressed down<br />
enough.<br />
There are too few coffee<br />
grounds in the group<br />
handle<br />
No water in water reservoir<br />
Water reservoir not correctly<br />
positioned.<br />
Unit blocked by scale<br />
build up.<br />
No steam Steam nozzle is blocked<br />
Not enough froth<br />
when frothing<br />
Coffee is to cold<br />
"STEAM" mode is not<br />
selected.<br />
© Gebr. <strong>Graef</strong> GmbH & Co. KG - 03<br />
Fill in more coffee.<br />
Compact coffee<br />
grounds more firmly.<br />
Use a finer coffee<br />
grind<br />
Press the coffee<br />
grounds a little bit<br />
more firmly.<br />
Fill more coffee<br />
grounds.<br />
Fill reservoir with water.<br />
Ensure it is correctly<br />
positioned.<br />
Descale the unit<br />
Clean the steam nozzle.<br />
Press "STEAM" button.<br />
Milk is not fresh Take fresh milk.<br />
Milk temperature is too<br />
warm to begin with.<br />
Steam nozzle is blocked<br />
Milk has been boiled.<br />
Steam nozzle not in correct<br />
position.<br />
Cups, filter basket and<br />
group handle are cold.<br />
Ensure that the milk is<br />
well refrigerated before<br />
use.<br />
Clean the steam nozzle.<br />
Start again with fresh,<br />
chilled milk.<br />
Position steam nozzle<br />
just below the surface<br />
of the milk.<br />
Pre-heat cups, filters<br />
and group handle.<br />
47<br />
<strong>EN</strong>
<strong>EN</strong><br />
<strong>Espresso</strong> <strong>Machine</strong> <strong>ES</strong> <strong>80</strong> / <strong>ES</strong> <strong>81</strong><br />
Unit does not operate.<br />
important!<br />
Safety instructions<br />
48<br />
If making a cappuccino<br />
or latte the milk may not<br />
be heated enough.<br />
The unit is not connected<br />
to the mains.<br />
Group head filter may be<br />
blocked.<br />
Unit blocked by scale<br />
build up.<br />
► If you cannot solve the problem with the above steps,<br />
please contact our customer service department.<br />
Cleaning and Care<br />
Ensure the milk is heated<br />
properly during<br />
texturing, but be sure<br />
not to boil the milk.<br />
Plug the plug into the<br />
electric socket.<br />
Clean the group head.<br />
Descale the unit<br />
This chapter provides you with important information on cleaning and ca-<br />
ring for the unit.<br />
CAUTION<br />
Follow the safety instructions<br />
below before you start cleaning<br />
the unit:<br />
► Switch the unit off before<br />
cleaning and pull the power<br />
cord from the electric socket.<br />
► Let the unit cool off before<br />
cleaning.<br />
► Do not use any aggressive or<br />
abrasive cleaning agents and<br />
do not use any solvents.<br />
► Do not scratch off stubborn<br />
soiling with hard objects.<br />
► Do not put the unit in the<br />
dishwasher and do not hold<br />
it under flowing water.<br />
Cleaning
<strong>Espresso</strong> <strong>Machine</strong> <strong>ES</strong> <strong>80</strong> / <strong>ES</strong> <strong>81</strong><br />
For the taste of your coffee<br />
■ Clean the exterior of the unit<br />
with a soft, moist cloth. If heavily<br />
soiled, a mild detergent can<br />
be used.<br />
■ Pull out the drip dish.<br />
■ Remove the drip grate.<br />
■ Empty the drip dish.<br />
■ Clean the drip tray and the grate<br />
and the group handle under<br />
running water.<br />
■ Replace the drip dish together<br />
with the grate.<br />
Cleaning set<br />
■ Remove the drip dish.<br />
■ After you have removed the<br />
drip dish, you will find the<br />
cleaning set in the interior of<br />
the unit on the plastic.<br />
■ Take out the cleaning set.<br />
■ Clean the holes in the filter insert<br />
with the thin end of the<br />
cleaning pin.<br />
■ Use the thick end of the<br />
cleaning pin to clean the milk<br />
frother/hot water nozzle pipe.<br />
■ Then clean the pipe with a<br />
moist cloth.<br />
Descaling<br />
Just as with any unit that is operated<br />
with water, the group handle<br />
automatic machine also requires<br />
periodic descaling.<br />
You can use a commercially availa-<br />
© Gebr. <strong>Graef</strong> GmbH & Co. KG - 03<br />
ble descaler for descaling your<br />
coffee machine.<br />
To do so, proceed as follows:<br />
■ Remove the water tank and<br />
completely empty it.<br />
■ Fill the water tank with water<br />
again and mix the water<br />
as stated in the descaler<br />
manufacturer's instructions.<br />
■ Put the water tank back into<br />
the unit.<br />
■ Use a screwdriver to remove the<br />
brewing filter / shower from the<br />
bottom of the brewing head.<br />
■ Remove and place the filter /<br />
filter screen, seal and screw in a<br />
safe location.<br />
note<br />
Make sure you never lose<br />
the filter/filter screen, seal<br />
and screw.<br />
■ Use a small brush to clean the<br />
brewing head. Remove the<br />
coffee remnants.<br />
■ Now place a large container<br />
under the brewing head.<br />
■ Switch on the unit.<br />
■ As soon as it is ready, press<br />
"COFFEE".<br />
■ As soon as the container is full,<br />
empty it and repeat the process<br />
several times.<br />
■ After multiple repetitions,<br />
switch off the unit for 10 - 15<br />
minutes so that the descaler<br />
can achieve its full effect.<br />
■ After that, switch the machine<br />
49<br />
<strong>EN</strong>
<strong>EN</strong><br />
<strong>Espresso</strong> <strong>Machine</strong> <strong>ES</strong> <strong>80</strong> / <strong>ES</strong> <strong>81</strong><br />
50<br />
back on.<br />
■ Let the remaining mixture run<br />
through once more.<br />
■ Remove the water tank and rinse<br />
thoroughly.<br />
■ Fill the water tank again with<br />
fresh water.<br />
■ Place a container under the<br />
brewing head again.<br />
■ Let fresh water run through several<br />
times.<br />
■ After completing that process,<br />
put the filter / filter screen, seal<br />
and screw back on.<br />
note<br />
Make sure the screw is firmly<br />
retightened.<br />
■ Now fill the water tank with<br />
fresh water.<br />
Disposal<br />
At the end of its service life, this<br />
product must not be disposed<br />
through normal domestic waste;<br />
rather it must be disposed at<br />
a collection point for recycling<br />
electronic domestic refuse. The<br />
symbol on the product and in the<br />
operating instructions points this<br />
out. The materials can be recycled<br />
in accordance with their markings.<br />
By recycling, making use<br />
of the materials or other forms<br />
of recycling old units you are making<br />
an important contribution<br />
to protecting our environment.<br />
Please ask your municipal administration<br />
about the responsible<br />
disposal sites.<br />
Warranty<br />
2 year warranty<br />
Starting with the date of<br />
purchase, we assume a 24 month<br />
manufacturer's warranty for defects<br />
that are attributable to manufacturing<br />
and material defects.<br />
Your legal warranty rights in accordance<br />
with § 439 ff. German<br />
Civil Code-E remain unaffected<br />
by this clause. Not included in the<br />
warranty are damages that have<br />
arisen due to improper handling<br />
and use as well as defects which<br />
have only a slight influence on<br />
the functioning or value of the<br />
unit. Furthermore, shipping damages,<br />
unless our responsibility,<br />
are excluded from warranty<br />
rights. Warranty claims are excluded<br />
for damages that arise due to<br />
repairs we or our representatives<br />
have not performed. In case of a<br />
justified complaint, we will repair<br />
or replace the defective product<br />
with a flawless product as we<br />
choose.
<strong>Machine</strong> Expresso automatique <strong>ES</strong> <strong>80</strong> / <strong>ES</strong> <strong>81</strong><br />
Avant-propos<br />
Chère cliente, cher client,<br />
En optant pour cette machine<br />
expresso automatique <strong>ES</strong> <strong>80</strong> / <strong>ES</strong><br />
<strong>81</strong>, vous avez fait le bon choix.<br />
Vous avez acheté un produit reconnu<br />
pour sa qualité.<br />
Nous vous remercions pour votre<br />
achat et nous vous souhaitons<br />
beaucoup de plaisir avec votre<br />
nouvelle machine expresso automatique.<br />
Pour un résultat optimal de votre<br />
nouvelle machine expresso automatique,<br />
nous recommandons<br />
d'utiliser de l'eau filtrée avec un<br />
filtre BRITA. Cela permet aux<br />
arômes naturels et au plein goût<br />
de mieux se déployer dans la<br />
boisson chaude et protège en<br />
outre votre machine contre le<br />
tartre. BRITA - pour mieux savourer<br />
vos boissons chaudes et pour<br />
une plus longue durée de vie de<br />
votre machine !<br />
Informations relatives à cette<br />
notice d'utilisation<br />
Cette notice d'utilisation fait<br />
partie de la machine expresso<br />
automatique (ci-après désignée<br />
la machine) et vous donne des<br />
consignes importantes pour la<br />
mise en service, la sécurité, l'utilisation<br />
conforme et l'entretien de<br />
la machine.<br />
La notice d'utilisation doit toujours<br />
être conservée auprès de la<br />
machine. Elle doit être lue et res-<br />
© Gebr. <strong>Graef</strong> GmbH & Co. KG - 03<br />
pectée par toute personne chargée<br />
:<br />
● de la mise en service,<br />
● de l'utilisation,<br />
● de la réparation et/ou<br />
● du nettoyage<br />
de la machine.<br />
Conservez cette notice d'utilisation<br />
et remettez-la avec la machine<br />
à son prochain propriétaire.<br />
Cette notice d'utilisation ne tient<br />
pas compte de toutes les utilisations<br />
possibles. Pour de plus<br />
amples informations ou en cas<br />
de problème non abordé ou non<br />
suffisamment détaillé dans cette<br />
notice d'utilisation, veuillez vous<br />
adresser au service après-vente<br />
<strong>Graef</strong> ou à votre revendeur.<br />
Avertissements<br />
Les avertissements et les mots<br />
suivants sont utilisés dans la présente<br />
notice d'utilisation :<br />
ATT<strong>EN</strong>TION<br />
Indique une situation éventuellement<br />
dangereuse. Le non-respect<br />
de cet avertissement peut<br />
entraîner des blessures graves<br />
ou même mortelles.<br />
PRUD<strong>EN</strong>CE<br />
51<br />
F
F<br />
<strong>Machine</strong> Expresso automatique <strong>ES</strong> <strong>80</strong> / <strong>ES</strong> <strong>81</strong><br />
52<br />
Indique une situation éventuellement<br />
dangereuse. Le nonrespect<br />
de cet avertissement<br />
peut entraîner des dommages<br />
matériels.<br />
important !<br />
Indique des conseils d'utilisation<br />
et d'autres informations<br />
importantes !<br />
Utilisation conforme<br />
Cette machine n'est pas destinée<br />
à un usage professionnel. Utilisez<br />
la machine expresso automatique<br />
uniquement dans des pièces fermées.<br />
Cette machine est destinée à<br />
être utilisée chez soi ou dans un<br />
contexte domestique similaire,<br />
par exemple<br />
● dans les cuisines, pour le personnel<br />
dans les magasins, les<br />
bureaux ou ailleurs au travail ;<br />
● dans les propriétés agricoles ;<br />
● pour les clients dans les hôtels,<br />
les motels et les établissements<br />
résidentiels quels qu'ils soient ;<br />
● pour les petits-déjeuners dans<br />
les pensions.<br />
Toute autre utilisation est considérée<br />
comme non conforme.<br />
PRUD<strong>EN</strong>CE<br />
Risques liés à une utilisation<br />
non conforme !<br />
En cas d'utilisation non<br />
conforme et/ou différente, la<br />
machine peut représenter un<br />
danger.<br />
► Toujours utiliser la machine<br />
de manière conforme.<br />
► Respecter les consignes<br />
décrites dans cette notice<br />
d'utilisation.<br />
Toute réclamation pour des dommages<br />
causés par une utilisation<br />
non conforme est exclue.<br />
L'utilisateur est seul responsable<br />
des risques.<br />
Limitation de la responsabilité<br />
Toutes les informations techniques,<br />
données et consignes<br />
pour l'installation, l'utilisation et<br />
l'entretien figurant dans cette notice<br />
d'utilisation correspondent à<br />
la dernière impression et ont été<br />
établies en toute bonne foi selon<br />
nos connaissances actuelles.<br />
Les indications, illustrations et<br />
descriptions figurant dans cette<br />
notice d'utilisation ne donnent<br />
droit à aucune prétention.<br />
Le fabricant décline toute responsabilité<br />
pour les dommages causés<br />
par :<br />
● le non-respect de la notice<br />
d'utilisation<br />
● une utilisation non conforme
<strong>Machine</strong> Expresso automatique <strong>ES</strong> <strong>80</strong> / <strong>ES</strong> <strong>81</strong><br />
● des réparations non conformes<br />
● des modifications techniques<br />
● l'utilisation de pièces de rechange<br />
non autorisées<br />
Les traductions sont réalisées en<br />
âme et conscience. Nous déclinons<br />
toute responsabilité pour<br />
les erreurs de traduction. Seul, le<br />
texte original allemand fait foi.<br />
Après-vente<br />
Si votre machine <strong>Graef</strong> présente<br />
un dommage, veuillez vous<br />
adresser à votre revendeur ou au<br />
service après-vente <strong>Graef</strong>.<br />
Gebr. <strong>Graef</strong> GmbH & Co. KG<br />
Après-vente<br />
Donnerfeld 6<br />
59757 Arnsberg<br />
Tél. : +2932-9703-6041<br />
Fax : +2932-9703-90<br />
E-mail : service@graef.de<br />
Sécurité<br />
Dans ce chapitre, vous trouverez<br />
toutes les consignes de sécurité<br />
importantes pour l'utilisation de<br />
la machine.<br />
Cette machine est conforme aux<br />
normes de sécurité obligatoires.<br />
Une utilisation non conforme<br />
peut cependant entraîner des<br />
dommages corporels et matériels.<br />
© Gebr. <strong>Graef</strong> GmbH & Co. KG - 03<br />
Risque d'électrocution<br />
AVERTISSEM<strong>EN</strong>T<br />
Danger de mort par électrocution<br />
!<br />
Danger de mort en cas de<br />
contact avec des câbles ou des<br />
pièces sous tension !<br />
Respectez les consignes de<br />
sécurité suivantes afin d'éviter<br />
tout risque d'électrocution :<br />
► N'utilisez pas la machine si le<br />
câble électrique ou la fiche<br />
sont endommagés.<br />
► Avant de réutiliser la machine,<br />
faites installer un nouveau<br />
câble d'alimentation<br />
par le service après-vente<br />
<strong>Graef</strong> ou par un technicien<br />
agréé.<br />
► N'ouvrez en aucun cas le<br />
boîtier de la machine. Risque<br />
d'électrocution en cas de<br />
contact avec les raccords<br />
électriques et de modification<br />
du montage électrique<br />
et mécanique.<br />
► Ne touchez jamais aux pièces<br />
sous tension. Cela risque de<br />
provoquer une électrocution<br />
et même être mortel.<br />
Consignes de sécurité de<br />
base<br />
Pour une utilisation sûre de la<br />
machine, veuillez respecter les<br />
consignes de sécurité suivantes :<br />
■ Avant l'utilisation, vérifiez si la<br />
machine ne présente pas de<br />
53<br />
F
F<br />
<strong>Machine</strong> Expresso automatique <strong>ES</strong> <strong>80</strong> / <strong>ES</strong> <strong>81</strong><br />
54<br />
dommages apparents : sur le<br />
boîtier, le câble d'alimentation<br />
et la fiche. Ne mettez pas la<br />
machine en marche si elle est<br />
endommagée.<br />
■ Les réparations peuvent uniquement<br />
être effectuées par<br />
un technicien ou par le service<br />
après-vente <strong>Graef</strong>. Les réparations<br />
non conformes peuvent<br />
entraîner des risques graves<br />
pour l'utilisateur. Elles entraînent<br />
également l'annulation de<br />
la garantie.<br />
■ Durant la période de garantie,<br />
les réparations peuvent uniquement<br />
être réalisées par le<br />
service après-vente <strong>Graef</strong>, dans<br />
le cas contraire, les dommages<br />
suivants ne sont plus couverts<br />
par la garantie.<br />
■ Les pièces défectueuses peuvent<br />
uniquement être remplacées<br />
par des pièces de rechange<br />
originales. Seules les pièces de<br />
rechange originales garantissent<br />
le respect des normes de<br />
sécurité.<br />
■ Cet appareil ne peut être utilisé<br />
par des personnes (y compris<br />
des enfants) aux capacités physiques,<br />
sensorielles ou mentales<br />
réduites ou sans expérience et/<br />
ou connaissances spécifiques,<br />
à moins qu'elles ne soient surveillées<br />
par une personne responsable<br />
de leur sécurité ou<br />
qu'elles n'aient obtenu les instructions<br />
pour l'utilisation de<br />
l'appareil.<br />
■ Les enfants doivent être sur-<br />
veillés afin de garantir qu'ils ne<br />
jouent pas avec la machine.<br />
■ Pour couper l'alimentation<br />
électrique de la machine, toujours<br />
tirer sur la fiche et non sur<br />
le câble.<br />
■ Ne portez pas la machine en la<br />
tenant pas le câble.<br />
■ Ne transportez jamais la machine<br />
lorsqu'elle est en marche.<br />
■ La machine ne peut être utilisée<br />
avec une minuterie externe ou<br />
un système de commande à<br />
distance.<br />
■ Ne touchez pas à la prise avec<br />
les mains mouillées.<br />
Mise en service<br />
Consignes de sécurité<br />
PruD<strong>EN</strong>cE<br />
La mise en service de la machine<br />
peut entraîner des dommages<br />
corporels et matériels !<br />
Veuillez respecter les consignes<br />
de sécurité suivantes afin d'éviter<br />
tout danger :<br />
► Le matériel d'emballage ne<br />
peut être utilisé pour jouer.<br />
Danger d'asphyxie.<br />
► Respectez les consignes relatives<br />
au lieu d'installation et<br />
au raccordement électrique<br />
de la machine afin d'éviter<br />
tout dommage corporel et<br />
matériel.
<strong>Machine</strong> Expresso automatique <strong>ES</strong> <strong>80</strong> / <strong>ES</strong> <strong>81</strong><br />
Fourniture et contrôle du<br />
transport<br />
La machine standard est livrée<br />
avec les composantes suivantes :<br />
● <strong>Machine</strong> Expresso automatique<br />
● Filtre à double paroi pour 1<br />
tasse<br />
● Filtre à double paroi pour 2<br />
tasses<br />
● Récipient à lait en inox 600 ml<br />
● Porte-filtre<br />
● Set de nettoyage<br />
● Cuillère à café<br />
● Pilon<br />
● Notice d'utilisation<br />
important !<br />
► Lors de la livraison, vérifiez si<br />
la machine est complète et<br />
ne présente pas de dommages<br />
apparents.<br />
► En cas de livraison incomplète<br />
ou de dommage causé<br />
par un emballage insuffisant<br />
ou par le transport, informez<br />
immédiatement le transporteur<br />
et le fournisseur.<br />
Déballage<br />
Procédez comme suit pour déballer<br />
la machine :<br />
Sortez la machine du carton.<br />
Retirez toutes les parties de<br />
l'emballage.<br />
© Gebr. <strong>Graef</strong> GmbH & Co. KG - 03<br />
Retirez les éventuels autocollants<br />
sur la machine (pas la<br />
plaque signalétique).<br />
Élimination de l'emballage<br />
L'emballage protège la machine<br />
des dommages durant le transport.<br />
Le matériel d'emballage a<br />
été sélectionné pour son caractère<br />
écologique et recyclable.<br />
Le retour de l'emballage dans le<br />
circuit de matériaux économise<br />
des matières premières et réduit<br />
les déchets. Éliminez le matériel<br />
d'emballage dont vous n'avez<br />
plus besoin dans un point de collecte<br />
pour le système de recyclage<br />
« Point vert ».<br />
important !<br />
► Si possible, conservez<br />
l'emballage d'origine durant<br />
la période de garantie de<br />
la machine afin de pouvoir<br />
l'emballer de manière<br />
conforme en cas de recours<br />
à la garantie.<br />
Lieu d'installation<br />
Pour une utilisation sûre et sans<br />
dérangements de la machine, le<br />
lieu d'installation doit répondre<br />
aux conditions suivantes :<br />
■ La machine doit être installée<br />
sur une surface solide, plate,<br />
horizontale, antidérapante et<br />
résistant à la chaleur et avec<br />
une force portante suffisante.<br />
■ Choisissez le lieu d'installation<br />
55<br />
F
F<br />
<strong>Machine</strong> Expresso automatique <strong>ES</strong> <strong>80</strong> / <strong>ES</strong> <strong>81</strong><br />
56<br />
de manière à ce que les enfants<br />
ne puissent accéder aux surfaces<br />
chaudes de la machine.<br />
■ La machine ne convient pas<br />
pour un montage mural ou<br />
dans une armoire encastrée.<br />
■ N'installez pas la machine dans<br />
un environnement chaud,<br />
mouillé ou humide.<br />
■ Die Steckdose muss leicht zugänglich<br />
sein, so dass das<br />
Stromkabel notfalls leicht abgezogen<br />
werden kann.<br />
Raccordement électrique<br />
Pour une utilisation sûre et sans<br />
dérangements de la machine, les<br />
consignes suivantes doivent être<br />
respectées lors du raccordement<br />
électrique :<br />
■ Avant de raccorder la machine,<br />
comparez les données de raccordement<br />
(tension et fréquence)<br />
sur la plaque signalétique<br />
avec les données de votre<br />
réseau électrique. Ces données<br />
doivent correspondre afin<br />
d'éviter tout dommage sur la<br />
machine. En cas de doute, renseignez-vous<br />
auprès de votre<br />
électricien.<br />
■ Le prise doit au moins être protégée<br />
par un disjoncteur de<br />
10A.<br />
■ Veillez à ce que le câble électrique<br />
ne soit pas endommagé<br />
et posé sur des surfaces chaudes<br />
ou des bords coupants.<br />
■ Le câble d'alimentation ne doit<br />
pas être entièrement tendu.<br />
■ La sécurité électrique de la<br />
machine est uniquement garantie<br />
si elle est raccordée à<br />
un système de mise à la terre<br />
conforme. L'utilisation avec<br />
une prise sans mise à la terre<br />
est interdite. En cas de doute,<br />
faites vérifier votre installation<br />
électrique par un électricien.<br />
Le fabricant décline toute responsabilité<br />
pour les dommages<br />
causés par l'absence ou l'interruption<br />
de mise à la terre.<br />
Avant la première utilisation<br />
Avant la première utilisation ou<br />
après une période prolongée<br />
sans utilisation, désaérez la machine.<br />
Pour cela, ouvrez le bouton<br />
de réglage de vapeur et d'eau<br />
chaude et refermez-le après un<br />
court instant. Préparez maintenant<br />
quelques tasses d'eau (sans<br />
café moulu). Pour cela, suivez les<br />
instructions du chapitre « Préparation<br />
». Le temps de pompage<br />
peut durer jusqu'à 8 minutes.<br />
Lors de la première mise en<br />
marche, il y aura peut-être une<br />
légère odeur de « plastique<br />
chaud ». C'est normal et ça disparaît<br />
rapidement.<br />
Montage et fonctionnement
<strong>Machine</strong> Expresso automatique <strong>ES</strong> <strong>80</strong> / <strong>ES</strong> <strong>81</strong><br />
Caractéristiques de puissance<br />
● <strong>Machine</strong> Expresso automatique<br />
● Boîtier en aluminium/inox<br />
● Chauffage à bloc thermique unique<br />
● Porte-filtre en laiton<br />
● Buse de mousse de lait/d’eau chaude orientable à 360° avec Pannarello<br />
● Réservoir d'eau de 2,5 litres<br />
● Quantité d'eau programmable<br />
● Indicateur de niveau d’eau<br />
● Plaque chauffante pour tasses<br />
● Collecteur de gouttes amovible<br />
● Filtre à double paroi pour 1 tasse<br />
● Filtre à double paroi pour 2 tasses<br />
● Récipient à lait en inox<br />
● Cuillère à café<br />
● Set de nettoyage<br />
● Pilon<br />
Caractéristiques techniques<br />
Dimensions (L x L x H) 30 x 29 x 33,2 cm<br />
Poids env. 8 kg<br />
Tension de service 230 - 240 volts<br />
Puissance 1470 - 1600 W<br />
Pression de la pompe max. jusqu'à 15 bars<br />
© Gebr. <strong>Graef</strong> GmbH & Co. KG - 03<br />
57<br />
F
6<br />
F<br />
<strong>Machine</strong> Expresso automatique <strong>ES</strong> <strong>80</strong> / <strong>ES</strong> <strong>81</strong><br />
7<br />
58<br />
Vue d'ensemble<br />
5<br />
Pièces de rechange<br />
Les pièces de rechange suivantes<br />
sont disponibles pour cette machine<br />
:<br />
● Set de nettoyage de rechange<br />
● Cuillère à café de rechange<br />
● Porte-filtre de rechange<br />
● Pilon de rechange<br />
● Filtres de rechange<br />
1<br />
3<br />
4<br />
2<br />
1) Panneau de commande<br />
2) Bouton de réglage<br />
de la vapeur et de<br />
l'eau chaude<br />
3) Buse de mousse de<br />
lait/d'eau chaude<br />
avec Pannarello<br />
4) Collecteur de<br />
gouttes amovible<br />
5) Réservoir d'eau<br />
6) Porte-filtre<br />
7) Plaque chauffante<br />
● Pannarello de rechange<br />
● Buse de rechange pour pannarello<br />
● Récipient à lait de rechange<br />
Contactez le service après-vente<br />
si vous avez besoin de pièces de<br />
rechange pour votre machine.
<strong>Machine</strong> Expresso automatique <strong>ES</strong> <strong>80</strong> / <strong>ES</strong> <strong>81</strong><br />
Utilisation et fonctionnement<br />
Dans ce chapitre, vous trouverez<br />
des consignes importantes pour<br />
l'utilisation et le fonctionnement<br />
de la machine.<br />
Consignes de sécurité<br />
PRUD<strong>EN</strong>CE<br />
Veuillez respecter les consignes<br />
de sécurité suivantes afin d'éviter<br />
les dangers et endommagements<br />
:<br />
► Ne retirez jamais le portefiltre<br />
rempli de café moulu<br />
pendant l'écoulement de<br />
l'eau, car il est sous pression.<br />
► Utilisez la machine uniquement<br />
si la grille et le bac récolte-gouttes<br />
sont en place.<br />
► Avant de préparer le café,<br />
vérifiez si le porte-filtre est<br />
bien serré.<br />
Utilisation du panneau<br />
de commande<br />
POWER<br />
La touche « POWER » permet<br />
d'allumer et d'éteindre la machine.<br />
Au début, la touche «<br />
POWER » clignote en rouge,<br />
cela signifie que la machine est<br />
en train de chauffer. Lorsque la<br />
lumière devient verte et que les<br />
autres boutons de commande<br />
sont éclairés, la machine est prête<br />
à l'emploi. Avant de commencer<br />
la préparation de votre expresso,<br />
© Gebr. <strong>Graef</strong> GmbH & Co. KG - 03<br />
assure-vous que le bouton de<br />
réglage de la buse de vapeur et<br />
d'eau chaude est fermé.<br />
STEAM<br />
La fonction STEAM permet de<br />
faire mousser du lait. Pour activer<br />
la fonction vapeur, poussez sur<br />
la touche « STEAM ». Le voyant<br />
« STEAM » s'allume, « COFFEE »<br />
et « HOT WATER » s'éteignent.<br />
Après un bref temps de chauffage,<br />
la lumière arrête de clignoter.<br />
Vous pouvez alors faire mousser<br />
votre lait. Pour faire mousser<br />
du lait, tournez le bouton de réglage<br />
sur « OP<strong>EN</strong> ». Une fois la<br />
procédure terminée, tournez le<br />
bouton de réglage sur « OFF ».<br />
HOT WATER<br />
La fonction « HOT WATER » permet<br />
d'utiliser de l'eau chaude<br />
pour préparer du chocolat chaud,<br />
chauffer des tasses ou préparer<br />
du thé. Pour activer la fonction<br />
eau chaude, appuyez sur<br />
la touche « HOT WATER ». Le<br />
voyant « HOT WATER » clignote,<br />
« COFFEE » et « STEAM » s'éteignent.<br />
Après un bref temps de<br />
chauffage, la lumière arrête de<br />
clignoter. Vous pouvez commencer.<br />
Pour obtenir de l'eau chaude,<br />
tournez le bouton de réglage sur<br />
« OP<strong>EN</strong> ». Une fois la procédure<br />
terminée, tournez le bouton de<br />
réglage sur « OFF ».<br />
Préparation<br />
59<br />
F
F<br />
<strong>Machine</strong> Expresso automatique <strong>ES</strong> <strong>80</strong> / <strong>ES</strong> <strong>81</strong><br />
60<br />
Branchez la machine dans la prise de courant.<br />
Retirez le réservoir<br />
d'eau chaude.<br />
Appuyez sur la<br />
touche « POWER »<br />
et mettez la machine<br />
en marche.<br />
Choisissez un filtre<br />
et placez-le dans le<br />
porte-filtre.<br />
Remplissez le réservoir<br />
d'eau froide.<br />
Lorsque tous les boutons<br />
sont allumés, la<br />
machine est prête à<br />
l'emploi.<br />
Réinsérez le réservoir<br />
d'eau.<br />
Préchauffez les<br />
tasses.<br />
Insérez le porte-filtre. Tournez le portefiltre<br />
vers la droite<br />
jusqu'à ce qu'il soit<br />
bien serré.
<strong>Machine</strong> Expresso automatique <strong>ES</strong> <strong>80</strong> / <strong>ES</strong> <strong>81</strong><br />
Placez un récipient<br />
sous la buse de sortie.<br />
Appuyez sur la<br />
touche « COF-<br />
FEE » et laisser l'eau<br />
s'écouler. Pour arrêter,<br />
appuyez sur la<br />
touche au bout de<br />
quelques secondes.<br />
remarque<br />
Arrêter l'écoulement d'eau manuellement sinon l'eau<br />
s'écoule jusqu'à ce que le réservoir soit vide. Cette machine<br />
n'est pas équipée d'une fonction d'arrêt automatique.<br />
© Gebr. <strong>Graef</strong> GmbH & Co. KG - 03<br />
Préparation d'un expres-<br />
61<br />
F
F<br />
<strong>Machine</strong> Expresso automatique <strong>ES</strong> <strong>80</strong> / <strong>ES</strong> <strong>81</strong><br />
62<br />
so<br />
Choisissez un filtre<br />
et placez-le dans le<br />
porte-filtre.<br />
Tassez le café moulu<br />
à l'aide de la cuillère<br />
à café fournie ou<br />
d'un pilon. Remplissez<br />
jusqu'à 3 mm en<br />
dessous du bord du<br />
filtre.<br />
Tournez le portefiltre<br />
vers la droite<br />
jusqu'à ce qu'il soit<br />
bien serré.<br />
Placez le porte-filtre<br />
sous la buse de sortie<br />
et laissez s'écouler<br />
un peu d'eau pour<br />
préchauffer.<br />
Retirez l'excédent de<br />
café aux bords.<br />
Placez des tasses/<br />
verres sous la buse<br />
de sortie.<br />
Remplissez maintenant<br />
le filtre de café.<br />
Replacez ensuite le<br />
porte-filtre.<br />
Appuyez sur la touche<br />
« COFFEE ». De l'expresso<br />
coule alors dans la<br />
tasse. Pour arrêter la machine,<br />
appuyez une seconde<br />
fois sur la touche.
<strong>Machine</strong> Expresso automatique <strong>ES</strong> <strong>80</strong> / <strong>ES</strong> <strong>81</strong><br />
Tournez le portefiltre<br />
vers la gauche.<br />
remarque<br />
Le tiroir à marc est disponible<br />
comme accessoire à acheter en<br />
supplément.<br />
Une fois l'expresso préparé,<br />
éteignez la machine<br />
en appuyant sur la touche<br />
« POWER ».<br />
Si vous oubliez d'éteindre la<br />
machine, elle se met en veille<br />
après 2 heures (mode d'économie<br />
d'énergie). La machine<br />
est maintenue à un niveau de<br />
température réduit.<br />
Pour réutiliser la machine,<br />
appuyez sur la touche<br />
« POWER », elle se réchauffe.<br />
Après quelques minutes, vous<br />
pouvez procéder comme décrit<br />
au chapitre « Préparation d'un<br />
expresso ».<br />
Videz le marc en tapotant<br />
sur le tiroir à marc.<br />
© Gebr. <strong>Graef</strong> GmbH & Co. KG - 03<br />
<strong>Graef</strong> recommande d'utiliser un<br />
filtre à eau BRITA.<br />
Même si, chez nous, l'eau du<br />
robinet est toujours d'une excellente<br />
qualité, on peut encore<br />
l'optimiser en la filtrant car<br />
elle peut, selon d'où elle vient,<br />
contenir certains éléments désagréables<br />
tels que du calcaire, du<br />
chlore ou des métaux provenant<br />
de l'installation domestique<br />
(par ex. du plomb et du cuivre).<br />
Un filtre à eau BRITA réduit ces<br />
substances. Cela permet aux<br />
arômes naturels et au plein goût<br />
de mieux se déployer dans la<br />
boisson chaude. Votre machine<br />
expresso est en outre également<br />
protégée contre le tartre.<br />
Elle a une plus longue durée<br />
de vie, fait un meilleur café et<br />
consomme moins d'électricité.<br />
BRITA - pour mieux savourer<br />
vos boissons chaudes et pour<br />
une plus longue durée de vie de<br />
votre machine !<br />
63<br />
F
F<br />
<strong>Machine</strong> Expresso automatique <strong>ES</strong> <strong>80</strong> / <strong>ES</strong> <strong>81</strong><br />
64<br />
Faire mousser le lait<br />
remarque<br />
► Pour mousser du lait, utilisez<br />
toujours la buse de mousse<br />
de lait/d'eau chaude avec le<br />
pannarello dessus.<br />
Appuyez sur la touche<br />
« STEAM ».<br />
La fonction de vapeur pour<br />
faire mousser le lait est alors<br />
activée.<br />
Lorsque la lumière ne clignote<br />
plus, la buse est prête à l'emploi.<br />
Veillez à ce qu'il y ait toujours<br />
suffisamment d'eau dans le réservoir.<br />
Remplissez le récipient fourni<br />
avec 1/3 de lait froid.<br />
remarque<br />
► Pour un résultat optimal,<br />
utilisez du lait à une température<br />
max. de 4°C.<br />
Avant d'utiliser la buse mousse<br />
de lait, laissez échapper l'eau<br />
condensée qui s'y est amassée.<br />
Pour cela, dirigez la buse vers<br />
la grille récolte-gouttes et ouvrez<br />
brièvement la vapeur.<br />
Lorsqu'il ne sort plus d'eau<br />
mais seulement de la vapeur,<br />
refermez le bouton de réglage.<br />
PruD<strong>EN</strong>cE<br />
Ne dirigez jamais la buse<br />
mousse de lait vers vous ou vers<br />
une autre personne. RISQUE DE<br />
BRÛLURE !<br />
Pour déplacer la buse mousse<br />
de lait, utilisez toujours la poignée.<br />
Ne saisissez pas la buse<br />
mousse de lait au tube après<br />
l'utilisation car elle est très<br />
chaude !<br />
Introduisez la buse mousse de<br />
lait avec le pannarello env. 1<br />
cm dans le lait.<br />
Ouvrez maintenant le bouton<br />
de réglage vapeur jusqu'à la<br />
butée.<br />
Tenez le récipient à lait légèrement<br />
incliné.<br />
Abaisser le récipient à lait dès<br />
que le niveau de lait monte.<br />
ATT<strong>EN</strong>TION : Ne chauffez pas<br />
le lait à plus de 70°C sinon la<br />
mousse retombe très rapidement<br />
et la boisson aura un<br />
goût beaucoup trop sucré ou<br />
même de lait brûlé !<br />
A titre d'indication, la température<br />
est correcte si vous ne<br />
pouvez pas tenir le récipient<br />
dans la main pendant plus de<br />
3 secondes.
<strong>Machine</strong> Expresso automatique <strong>ES</strong> <strong>80</strong> / <strong>ES</strong> <strong>81</strong><br />
PruD<strong>EN</strong>cE<br />
Utilisez uniquement le récipient<br />
fourni ou un autre grand<br />
récipient pour faire mousser<br />
le lait. N'utilisez pas de tasse.<br />
Le débordement de lait peut<br />
causer des brûlures.<br />
remarque<br />
Nous conseillons de limiter<br />
la sortie de vapeur à 60 secondes.<br />
Ouvrez à nouveau le bouton<br />
de réglage.<br />
Suite à la fermeture de la soupape<br />
et au refroidissement de<br />
la vapeur, il se forme une souspression<br />
dans la buse mousse<br />
de lait et il y a un peu de lait<br />
d'aspiré.<br />
Attendez par conséquent un<br />
court instant avant de retirer la<br />
buse mousse de lait du lait.<br />
Après avoir fait mousser le lait,<br />
tapotez doucement le récipient<br />
de lait sur la table pour<br />
éliminer les dernières grosses<br />
bulles d'air.<br />
Vous pouvez également l'agiter<br />
légèrement pour répartir la<br />
mousse.<br />
Nettoyez la buse mousse de<br />
lait avec un chiffon humide<br />
aussitôt après l'avoir utilisée.<br />
Laissez cependant refroidir le<br />
tube quelques minutes, car il<br />
© Gebr. <strong>Graef</strong> GmbH & Co. KG - 03<br />
devient très chaud.<br />
Nettoyez également la buse<br />
mousse de lait avec un petit<br />
coup de vapeur pour évacuer<br />
les restes de lait à l'intérieur.<br />
Préparation d'eau chaude<br />
Appuyez sur la touche « HOT<br />
WATER ».<br />
La fonction eau chaude est<br />
alors activée.<br />
Lorsque la lumière ne clignote<br />
plus, la buse est prête à l'emploi.<br />
Veillez à ce qu'il y ait toujours<br />
suffisamment d'eau dans le réservoir.<br />
Tournez la buse de mousse de<br />
lait/d'eau chaude vers l'extérieur.<br />
Placez un récipient sous la<br />
buse de mousse de lait/d'eau<br />
chaude.<br />
PruD<strong>EN</strong>cE<br />
Ne tournez jamais la buse de<br />
mousse de lait/d'eau chaude<br />
vers vous ou vers une autre personne.<br />
RISQUE DE BRÛLURE !<br />
Utilisez toujours la poignée<br />
pour déplacer la buse mousse<br />
de lait/d'eau chaude, ne saisissez<br />
pas la buse de mousse de<br />
lait/d'eau chaude au tube après<br />
l'avoir utilisée car il devient très<br />
chaud !<br />
Ouvrez le bouton de réglage.<br />
65<br />
F
F<br />
<strong>Machine</strong> Expresso automatique <strong>ES</strong> <strong>80</strong> / <strong>ES</strong> <strong>81</strong><br />
66<br />
L'eau chaude sort de la buse et<br />
coule dans le récipient.<br />
Une fois l'eau chaude obtenue,<br />
refermez le bouton de réglage.<br />
Autres programmations possibles<br />
Température bloc<br />
thermique expresso<br />
La température de l'eau de cette<br />
machine est réglée sur 92 °C au<br />
niveau de la buse d'écoulement.<br />
La température de l'eau est modifiable<br />
de +/- 3°C au maximum,<br />
par degrés de 1° C.<br />
Pour cela, procédez comme suit :<br />
Appuyez sur la touche « COF-<br />
FEE » pendant 3 secondes.<br />
Appuyez en même temps sur<br />
la touche « COFFEE » et sur la<br />
touche « POWER », et relâchez<br />
ensuite la touche « POWER ».<br />
Relâchez ensuite la touche<br />
« COFFEE ».<br />
La machine est alors programmable.<br />
Pour le signaler, la machine<br />
émet diverses séquences de<br />
bips correspondant à différents<br />
niveaux.<br />
Séquence de bips Niveau<br />
3 bips courts + 3<br />
2 bips courts + 2<br />
1 bip court + 1<br />
1 bip long et 1 bip<br />
court<br />
1 bip long - 1<br />
2 bips longs - 2<br />
3 bips longs - 3<br />
Réglage<br />
d'usine<br />
remarque<br />
Les voyants lumineux derrière<br />
la touche « STEAM » et<br />
la touche « HOT WATER » se<br />
mettent à clignoter.<br />
Appuyez sur l'une des deux<br />
touches dans les 30 secondes et<br />
relâchez-la selon que vous voulez<br />
augmenter ou diminuer la température.<br />
Augmenter d'un niveau (+) :<br />
Poussez sur « HOT WATER »<br />
Diminuer d'un niveau (-) : Poussez<br />
sur « STEAM »<br />
remarque<br />
Une fois le nouveau niveau<br />
de température choisi, vous<br />
entendrez une séquence de<br />
bips qui signale que la nouvelle<br />
température a été réglée.<br />
Pour enregistrer le nouveau niveau<br />
de température, appuyez<br />
sur la touche « COFFEE » pendant<br />
3 secondes. Un seul bip long retentit.<br />
Cela signale que le niveau<br />
de température a été enregistré.<br />
remarque
<strong>Machine</strong> Expresso automatique <strong>ES</strong> <strong>80</strong> / <strong>ES</strong> <strong>81</strong><br />
La machine se met automatiquement<br />
en marche et commence<br />
à chauffer.<br />
La machine retient le nouveau<br />
niveau de température<br />
durant 30 secondes. Si aucun<br />
autre niveau de température<br />
n'est sélectionné dans<br />
les 30 secondes, la machine<br />
revient automatiquement<br />
au réglage standard, se met<br />
en marche et commence à<br />
chauffer.<br />
Température bloc<br />
thermique vapeur<br />
La température de vapeur de la<br />
machine est réglée de façon à<br />
produire une vapeur puissante et<br />
sèche pour faire mousser le lait.<br />
La température de la vapeur est<br />
modifiable de +/- 3 °C au maximum,<br />
par degrés de 1° C.<br />
Pour cela, procédez comme suit :<br />
Appuyez sur la touche « STEAM »<br />
pendant 3 secondes.<br />
Appuyez en même temps sur<br />
la touche « STEAM » et sur la<br />
touche « POWER », et relâchez<br />
ensuite la touche « POWER ».<br />
Relâchez ensuite la touche<br />
« STEAM ».<br />
La température de la vapeur peut<br />
alors être programmée. Pour le signaler,<br />
la machine émet diverses<br />
séquences de bips correspondant<br />
à différents niveaux.<br />
Séquence de bips Niveau<br />
© Gebr. <strong>Graef</strong> GmbH & Co. KG - 03<br />
3 bips courts + 3<br />
2 bips courts + 2<br />
1 bip court + 1<br />
1 bip long et 1 bip Réglage<br />
court<br />
d'usine<br />
1 bip long - 1<br />
2 bips longs - 2<br />
3 bips longs - 3<br />
remarque<br />
Les voyants lumineux derrière<br />
la touche « COFFEE » et<br />
la touche « HOT WATER » se<br />
mettent à clignoter.<br />
Appuyez sur l'une des deux<br />
touches dans les 30 secondes et<br />
relâchez-la selon que vous voulez<br />
augmenter ou diminuer la température.<br />
Augmenter d'un niveau (+) :<br />
Poussez sur « HOT WATER »<br />
Diminuer d'un niveau (-) : Poussez<br />
sur « COFFEE »<br />
remarque<br />
Une fois le nouveau niveau<br />
de température choisi, vous<br />
entendrez une séquence de<br />
bips qui signale que la nouvelle<br />
température a été réglée.<br />
Pour enregistrer le nouveau niveau<br />
de température, appuyez<br />
sur la touche « STEAM » pendant<br />
3 secondes. Un seul bip long retentit.<br />
Cela signale que le niveau<br />
de température a été enregistré.<br />
67<br />
F
F<br />
<strong>Machine</strong> Expresso automatique <strong>ES</strong> <strong>80</strong> / <strong>ES</strong> <strong>81</strong><br />
68<br />
remarque<br />
La machine se met automatiquement<br />
en marche et commence<br />
à chauffer.<br />
La machine retient le nouveau<br />
niveau de température<br />
durant 30 secondes. Si aucun<br />
autre niveau de température<br />
n'est sélectionné dans<br />
les 30 secondes, la machine<br />
revient automatiquement<br />
au réglage standard, se met<br />
en marche et commence à<br />
chauffer.<br />
Humidité de la vapeur et<br />
puissance de pompage<br />
La puissance de pompage de la<br />
vapeur de cette machine a été<br />
préréglée : « marche » pendant<br />
0,3 secondes, « arrêt » pendant<br />
0,5 secondes. Ce préréglage peut<br />
être modifié. Une modification<br />
de la fréquence permet d'obtenir<br />
une vapeur plus mouillée ou plus<br />
sèche, voir même une puissance<br />
vapeur sèche qui est idéale pour<br />
avoir une mousse de lait qui ne<br />
tombe pas. Vous pouvez augmenter<br />
ou réduire la fréquence<br />
de pompage (temps « arrêt ») de<br />
0,1 secondes, en fonction de vos<br />
besoins.<br />
Pour cela, procédez comme suit :<br />
Appuyez sur la touche « HOT<br />
WATER » pendant 3 secondes.<br />
Appuyez en même temps sur<br />
la touche « STEAM » et sur la<br />
touche « POWER », et relâchez<br />
ensuite la touche « POWER ».<br />
Relâchez ensuite la touche « HOT<br />
WATER ».<br />
La température de la vapeur peut<br />
alors être programmée. Pour le signaler,<br />
la machine émet diverses<br />
séquences de bips correspondant<br />
à différents niveaux.<br />
Séquence de bips Niveau<br />
3 bips courts + 3<br />
2 bips courts + 2<br />
1 bip court + 1<br />
1 bip long et 1 bip Réglage<br />
court<br />
d'usine<br />
1 bip long - 1<br />
2 bips longs - 2<br />
3 bips longs - 3<br />
remarque<br />
Les voyants lumineux derrière<br />
la touche « COFFEE » et<br />
la touche « HOT WATER » se<br />
mettent à clignoter.<br />
Appuyez sur l'une des deux<br />
touches dans les 30 secondes et<br />
relâchez-la selon que vous voulez<br />
augmenter ou diminuer la température.<br />
Augmenter d'un niveau (+) :<br />
Poussez sur « STEAM »<br />
Diminuer d'un niveau (-) : Poussez<br />
sur « COFFEE »<br />
remarque
<strong>Machine</strong> Expresso automatique <strong>ES</strong> <strong>80</strong> / <strong>ES</strong> <strong>81</strong><br />
Une fois le nouveau niveau<br />
de température choisi, vous<br />
entendrez une séquence de<br />
bips qui signale que la nouvelle<br />
température a été réglée.<br />
Pour enregistrer le nouveau niveau<br />
de température, appuyez<br />
sur la touche « HOT WATER »<br />
pendant 3 secondes. Un seul bip<br />
long retentit. Cela signale que le<br />
niveau de température a été enregistré.<br />
remarque<br />
La machine se met automatiquement<br />
en marche et commence<br />
à chauffer.<br />
La machine retient le nouveau<br />
niveau de température<br />
durant 30 secondes. Si aucun<br />
autre niveau de température<br />
n'est sélectionné dans<br />
les 30 secondes, la machine<br />
revient automatiquement<br />
au réglage standard, se met<br />
en marche et commence à<br />
chauffer.<br />
Réglage d'usine<br />
Pour annuler toutes les modifications<br />
et rétablir le réglage<br />
d'usine, maintenez la touche<br />
« POWER » enfoncée pendant<br />
env. 3 secondes.<br />
Toutes les programmations que<br />
vous avez effectuées, y compris<br />
© Gebr. <strong>Graef</strong> GmbH & Co. KG - 03<br />
pour le bloc thermique expresso<br />
et vapeur, sont alors annulées et<br />
le réglage d'usine est rétabli.<br />
Réparation de dérangements<br />
Consignes de sécurité<br />
PRUD<strong>EN</strong>CE<br />
Veuillez respecter les consignes<br />
de sécurité suivantes afin d'éviter<br />
les dangers et endommagements<br />
:<br />
► Les réparations d'appareils<br />
électriques peuvent uniquement<br />
être effectuées par<br />
des techniciens spécialisés et<br />
formés par le fabricant. Les<br />
réparations non conformes<br />
peuvent entraîner des risques<br />
graves pour l'utilisateur et<br />
endommager la machine.<br />
Causes et réparation des<br />
dérangements<br />
Le tableau ci-dessous vous aidera<br />
à localiser et à réparer des dérangements<br />
mineurs :<br />
Dérangement Cause possible<br />
De l'expresso<br />
déborde du portefiltre<br />
Le porte-filtre n'est p<br />
correctement installé<br />
69<br />
F
F<br />
<strong>Machine</strong> Expresso automatique <strong>ES</strong> <strong>80</strong> / <strong>ES</strong> <strong>81</strong><br />
70<br />
L'eau/l'expresso<br />
ne sort pas ou seulement<br />
au goutte à<br />
goutte<br />
L'expresso n'a pas<br />
de mousse<br />
Il reste du café moulu<br />
sur le bord du portefiltre.<br />
La buse d'écoulement<br />
est encrassée.<br />
La buse d'écoulement<br />
est défectueuse.<br />
Le joint en caoutchouc<br />
de la buse d'écoulement<br />
est endommagé ou usé.<br />
Il n'y a pas d'eau dans le<br />
récipient à eau.<br />
Le réservoir d'eau n'a<br />
pas été correctement<br />
installé.<br />
Le bouton de réglage<br />
de la buse de mousse<br />
de lait/d'eau chaude est<br />
ouvert.<br />
Le porte-filtre est obstrué.<br />
Enlevez l'excédent de<br />
café moulu.<br />
Nettoyez la buse<br />
d'écoulement.<br />
Contactez le service<br />
après-vente <strong>Graef</strong>.<br />
Contactez le service<br />
après-vente <strong>Graef</strong>.<br />
Remplissez le récipient<br />
à eau.<br />
Installez correctement<br />
le réservoir d'eau.<br />
Fermer le bouton.<br />
Videz le porte-filtre et<br />
remplissez-le à nouveau<br />
de café. Veillez<br />
à ne pas trop tasser<br />
le café et à ce qu'il ne<br />
soit pas trop finement<br />
moulu.<br />
<strong>Machine</strong> entartrée. Détartrez la machine.<br />
Filtre de la buse d'écoulement<br />
encrassé.<br />
Le café est trop vieux ou<br />
trop sec.<br />
Le café est moulu trop<br />
grossièrement.<br />
Pas assez de café dans le<br />
porte-filtre.<br />
Nettoyez le filtre de la<br />
buse d'écoulement.<br />
Utilisez du café fraîchement<br />
moulu.<br />
Utilisez du café plus finement<br />
moulu.<br />
Ajoutez du café moulu.
<strong>Machine</strong> Expresso automatique <strong>ES</strong> <strong>80</strong> / <strong>ES</strong> <strong>81</strong><br />
L'eau s'écoule trop<br />
rapidement<br />
Pompe très<br />
bruyante<br />
Pas de vapeur<br />
La mousse n'est pas<br />
suffisante<br />
Le café est trop<br />
froid<br />
Le café moulu n'est pas<br />
suffisamment tassé.<br />
Le café est moulu trop<br />
grossièrement.<br />
Le café moulu n'a pas<br />
été suffisamment tassé.<br />
Il n'y a pas suffisamment<br />
de café moulu dans le<br />
porte-filtre.<br />
Il n'y a pas d'eau dans le<br />
réservoir d'eau.<br />
Le réservoir d'eau n'a<br />
pas été correctement<br />
installé.<br />
La machine est entartrée.<br />
La buse à vapeur est<br />
bouchée.<br />
Le mode « STEAM » n'a<br />
pas été sélectionné.<br />
© Gebr. <strong>Graef</strong> GmbH & Co. KG - 03<br />
Tassez un peu plus le<br />
café moulu.<br />
Utilisez du café plus finement<br />
moulu.<br />
Tassez un peu plus le<br />
café moulu.<br />
Ajoutez du café moulu.<br />
Remplissez le réservoir<br />
d'eau.<br />
Installez correctement<br />
le réservoir d'eau.<br />
Détartrez la machine.<br />
Nettoyez la buse à vapeur.<br />
Appuyez sur la touche<br />
« STEAM ».<br />
Le lait n'est pas frais. Utilisez du lait frais.<br />
La température du lait<br />
est trop élevée.<br />
La buse à vapeur est<br />
bouchée.<br />
Le lait a été bouilli.<br />
La buse à vapeur n'est<br />
pas correctement positionnée.<br />
Les tasses, le filtre et le<br />
porte-filtre sont froids.<br />
Refroidissez le lait<br />
avant de l'utiliser.<br />
Nettoyez la buse à vapeur.<br />
Recommencez avec du<br />
lait frais.<br />
Introduisez la buse à<br />
vapeur env. 1 cm dans<br />
le lait<br />
Réchauffez les tasses,<br />
le filtre et le portefiltre.<br />
71<br />
F
F<br />
<strong>Machine</strong> Expresso automatique <strong>ES</strong> <strong>80</strong> / <strong>ES</strong> <strong>81</strong><br />
72<br />
La machine ne<br />
fonctionne pas<br />
Lors de la préparation du<br />
cappuccino ou du latte,<br />
le lait était peut-être trop<br />
froid.<br />
La machine n'est pas<br />
branchée.<br />
Le filtre de la buse<br />
d'écoulement est bouché.<br />
La machine est entartrée.<br />
Réchauffez le lait sans<br />
le faire bouillir<br />
Branchez la machine<br />
dans la prise de courant.<br />
Nettoyez le filtre de la<br />
buse d'écoulement.<br />
Détartrez la machine.<br />
important !<br />
► Si vous n'arrivez pas à solutionner le problème en suivant<br />
les consignes ci-dessus, veuillez vous adresser au service<br />
après-vente.<br />
Nettoyage et entretien<br />
Dans ce chapitre, vous trouverez des consignes importantes pour le nettoyage<br />
et l'entretien de la machine.<br />
Consignes de sécurité<br />
PRUD<strong>EN</strong>CE
<strong>Machine</strong> Expresso automatique <strong>ES</strong> <strong>80</strong> / <strong>ES</strong> <strong>81</strong><br />
Respectez les consignes de<br />
sécurité suivantes avant de<br />
commencer le nettoyage de la<br />
machine :<br />
► Avant de nettoyer la machine,<br />
éteignez-la et retirez<br />
la fiche de la prise.<br />
► Laissez refroidir la machine<br />
avant de la nettoyer.<br />
► N'utilisez pas de produits de<br />
lavage agressifs ou abrasifs<br />
ni de solvants.<br />
► Ne grattez pas les saletés<br />
tenaces avec des objets durs.<br />
► Ne mettez pas la machine au<br />
lave-vaisselle et ne la rincez<br />
pas non plus sous l'eau<br />
courante.<br />
Nettoyage<br />
■ Nettoyez les surfaces extérieures<br />
de la machine à l'aide<br />
d'un chiffon doux et humide.<br />
En cas de forte salissure, vous<br />
pouvez utiliser un nettoyant<br />
doux.<br />
■ Retirez le collecteur de gouttes.<br />
■ Retirez la grille d'écoulement.<br />
■ Videz le collecteur de gouttes.<br />
■ Nettoyez le bac et la grille récolte-gouttes<br />
ainsi que le portefiltre<br />
à l'eau courante.<br />
■ Replacez ensuite le bac et la<br />
grille récolte-gouttes.<br />
Set de nettoyage<br />
■ Retirez le collecteur de gouttes.<br />
■ Une fois le bac récolte-gouttes<br />
© Gebr. <strong>Graef</strong> GmbH & Co. KG - 03<br />
retiré, vous trouverez le kit de<br />
nettoyage à l'intérieur de la machine<br />
au niveau du plastique.<br />
■ Retirez le kit de nettoyage.<br />
■ Nettoyez les trous du filtre à<br />
l'aide de l'extrémité fine de la<br />
pointe de nettoyage.<br />
■ Nettoyez le tuyau de la buse de<br />
mousse de lait/d'eau chaude à<br />
l'aide de l'extrémité épaisse de<br />
la pointe de nettoyage.<br />
■ Ensuite, nettoyez le tuyau avec<br />
un chiffon humide.<br />
Détartrage<br />
Comme tout appareil qui fonctionne<br />
avec de l'eau, la machine<br />
expresso automatique doit être<br />
régulièrement détartrée.<br />
Pour la détartrer, vous pouvez<br />
utiliser un produit détartrant classique<br />
pour machines à café ou les<br />
pastilles de détartrage <strong>Graef</strong>.<br />
Pour cela, procédez comme suit :<br />
■ Retirez le réservoir d'eau et videz-le<br />
entièrement.<br />
■ Remplissez à nouveau le réservoir<br />
d'eau et mélangez l'eau<br />
avec le produit détartrant<br />
conformément aux indications<br />
du fabricant.<br />
■ Replacez le réservoir d'eau dans<br />
la machine.<br />
■ À l'aide d'un tournevis, retirez<br />
le filtre sous la buse d'écoulement.<br />
■ Retirez le filtre et déposez-le<br />
dans un endroit sûr avec le joint<br />
73<br />
F
F<br />
<strong>Machine</strong> Expresso automatique <strong>ES</strong> <strong>80</strong> / <strong>ES</strong> <strong>81</strong><br />
74<br />
et la vis.<br />
remarque<br />
Veillez à ne pas perdre le<br />
filtre, le joint et la vis.<br />
■ Utilisez une petite brosse pour<br />
nettoyer la buse d'écoulement, retirez<br />
tous les restes de café.<br />
■ Placez ensuite un grand récipient<br />
sous la buse d'écoulement.<br />
■ Mettez la machine en marche.<br />
■ Dès que la machine est prête,<br />
appuyez sur la touche « COF-<br />
FEE ».<br />
■ Une fois le récipient rempli,<br />
videz-le et répétez plusieurs fois<br />
l'opération.<br />
■ Lorsque vous aurez effectué<br />
plusieurs fois cette procédure,<br />
éteignez la machine durant 10-15<br />
minutes pour que le produit détartrant<br />
puisse agir.<br />
■ Remettez ensuite la machine en<br />
marche.<br />
■ Laissez passer le reste de la solution<br />
détartrante en appuyant sur<br />
la touche « COFFEE ».<br />
■ Ensuite, retirez le réservoir<br />
d'eau et rincez-le soigneusement.<br />
■ Remplissez le réservoir d'eau<br />
fraîche.<br />
■ Replacez un récipient sous la<br />
buse d'écoulement.<br />
■ Laissez s'écouler plusieurs fois<br />
l'eau fraîche.<br />
■ Une fois l'écoulement terminé,<br />
replacez le filtre, le joint et la vis.<br />
remarque<br />
Veillez à bien resserrer la vis.<br />
■ Remplissez ensuite le réservoir<br />
d'eau fraîche.
<strong>Machine</strong> Expresso automatique <strong>ES</strong> <strong>80</strong> / <strong>ES</strong> <strong>81</strong><br />
Élimination<br />
Garantie<br />
Une fois hors d'usage, ce produit ne peut être jeté dans les<br />
ordures ménagères mais doit être rapporté dans un point de<br />
collecte pour le recyclage des déchets ménagers électroniques.<br />
C'est ce qu'indique le symbole sur le produit et dans la notice<br />
d'utilisation. Les matériaux sont recyclables conformément à<br />
leur marquage. Avec le recyclage, le recyclage des matériaux<br />
ou d'autres formes de recyclage, vous contribuez à la protection<br />
de l'environnement. Veuillez vous renseigner auprès de<br />
votre administration communale pour connaître les centre de<br />
recyclage.<br />
Garantie de 2 ans<br />
À compter de la date d'achat, cette machine est garantie 24<br />
mois pour les dommages causés par des défauts de fabrication<br />
ou de matériaux. Il n'est pas dérogé à vos droits de garantie selon<br />
le § 439 et suivants du code civile allemand E. Sont exclus<br />
de la garantie les dommages causés par une manipulation ou<br />
une utilisation non conforme ainsi que les dommages mineurs<br />
qui ne nuisent pas significativement au fonctionnement ou à<br />
la valeur de la machine. Par ailleurs, les dommages causés par<br />
le transport sont également exclus de la garantie dans la mesure<br />
où nous n'en sommes pas responsables. Toute demande<br />
en garantie est exclue pour les dommages à la suite d'une<br />
réparation qui n'a pas été réalisée par nous ou par l'un de nos<br />
représentants. En cas de réclamation justifiée, nous déciderons<br />
de réparer ou de remplacer le produit défectueux.<br />
© Gebr. <strong>Graef</strong> GmbH & Co. KG - 03<br />
75<br />
F
Gebr. GRAEF GmbH & Co. KG<br />
04<br />
/<br />
Donnerfeld 6<br />
59757 Arnsberg 24005