7 AC 8 B CM 4.1 - Ciclosport
7 AC 8 B CM 4.1 - Ciclosport
7 AC 8 B CM 4.1 - Ciclosport

Create successful ePaper yourself
Turn your PDF publications into a flip-book with our unique Google optimized e-Paper software.
<strong>CM</strong> <strong>4.1</strong> Bed.-Anl/alle 11.01.2007 15:55 Uhr Seite 1<br />
<strong>CM</strong> <strong>4.1</strong><br />
1<br />
2<br />
3<br />
4<br />
5<br />
6<br />
45°<br />
90°<br />
7 <strong>AC</strong><br />
8<br />
A<br />
B<br />
KLICK!<br />
✁<br />
Lieferumfang:<br />
- CICLOMASTER <strong>CM</strong> <strong>4.1</strong><br />
- Batterie Typ CR 2032<br />
- Lenkerhalter mit Kabelbindern für die Befestigung<br />
- Sender<br />
- Speichenmagnet<br />
- Batteriedeckel<br />
- Kabelbinder<br />
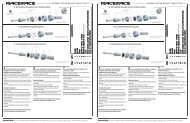
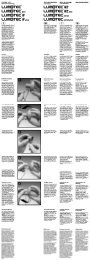
1. Montage<br />
Bild 1: Montage am Lenker (Position A) und am<br />
Vorbau (Position B) möglich<br />
Bild 2: Für Montage am Vorbau (Position B) Oberteil<br />
umschrauben.<br />
Schutzfolie auf der Unterseite des Lenkerhalters<br />
abziehen<br />
Lenkerhalter auf gewünschte Stelle setzen, leicht<br />
andrücken und mit den Kabelbindern befestigen<br />
Bild 3: Sensor mit den Kabelbindern an der Gabel<br />
befestigen und überstehende Enden abschneiden<br />
(max. Abstand vom Lenkerhalter 60 cm; am besten ist<br />
eine rechtsseitige Montage, Lenkerhalter und Sender<br />
sollten auf der gleichen Seite sein)<br />
Bild 4: Magnet an einer Speiche gegenüber des<br />
Senders befestigen<br />
Bild 5: Sender und Magnet ausrichten (Abstand max.<br />
3 mm)<br />
Bild 6: <strong>CM</strong> <strong>4.1</strong> um eine Vierteldrehung nach links<br />
gedreht in den Lenkerhalter setzen, zum Einrasten eine<br />
Vierteldrehung nach rechts machen. Zum Abnehmen<br />
den <strong>CM</strong> <strong>4.1</strong> wieder um eine Vierteldrehung nach links<br />
drehen und abnehmen.<br />
2. Inbetriebnahme<br />
Der <strong>CM</strong> <strong>4.1</strong> hat keine Tasten im herkömmlichen Sinn,<br />
die Einstellungen werden mit den zwei 'Tasten' auf der<br />
Unterseite gemacht. Diese Tasten können z.B. mit<br />
einem Kugelschreiber gedrückt werden.<br />
Bezeichnung der Tasten: (siehe Abb. 7)<br />
Einlegen der Batterie:<br />
Batterie Typ CR2032 mit dem Pluspol nach oben<br />
einlegen. Batteriedeckel auflegen und mit Hilfe einer<br />
Münze schließen. Nach dem Einlegen der Batterie<br />
erscheint im Display die Anzeige des Radumfangs,<br />
dabei blinkt die erste Stelle.<br />
(Um erneut in den Einstellmodus zu kommen, im<br />
normalen Betriebsmodus Set-Taste 3 Sek. lang<br />
drücken.)<br />
Um alle Werte und Einstellungen zu löschen, <strong>AC</strong>-Knopf<br />
auf der Rückseite kurz drücken.<br />
Für alle Einstellungen gilt: mit der SET-Taste wird<br />
der blinkende Wert verändert, mit der STORE-Taste<br />
wird der Wert gespeichert und zum nächsten Wert<br />
übergegangen bzw. die nächste Einstellung angezeigt.<br />
Einstellen des Radumfangs<br />
Voreinstellung: 2155 mm<br />
Wertebereich: 0000-3999 mm<br />
Einstellen mit SET- und STORE-<br />
Taste, weiter mit STORE-Taste.<br />
Der Radumfang kann der Tabelle entnommen<br />
oder selber gemessen werden.<br />
Reifengröße Radumfang<br />
40-559 26 x 1,5 2026 mm<br />
44-559 26 x 1,6 2051 mm<br />
47-559 26 x 1,75 2070 mm<br />
50-559 26 x 1,9 2026 mm<br />
54-559 26 x 2,00 2089 mm<br />
57-559 26 x 2,125 2114 mm<br />
37-590 26 x 1 3/8 2133 mm<br />
32-620 27 x 1 1/4 2199 mm<br />
40-622 28 x 1,5 2224 mm<br />
47-622 28 x 1,75 2268 mm<br />
40-635 28 x 1 1/2 2265 mm<br />
37-622 28 x 1 3/8 2205 mm<br />
20-622 700 x 20C 2114 mm<br />
23-622 700 x 23C 2133 mm<br />
25-622 700 x 25C 2146 mm<br />
28-622 700 x 28C 2149 mm<br />
32-622 700 x 32C 2174 mm<br />
Wenn der Radumfang selber gemessen werden soll,<br />
eine Markierung am Vorderreifen und auf dem Boden<br />
(z.B. mit Kreide) setzen. Mit dem Rad geradeaus,<br />
genau eine Reifenumdrehung (mit richtigem Luftdruck<br />
und Fahrergewicht) fahren und Stelle am Boden markieren.<br />
Jetzt kann der exakte Radumfang zwischen<br />
den beiden Markierungen am Boden abgemessen<br />
werden (in mm) – s. Abb 8.<br />
Im Display erscheint die Anzeige<br />
km/h.<br />
Durch jeweils kurzes Drücken der SET-Taste kann<br />
gewählt werden, ob die Anzeige in Kilometern (km/h)<br />
oder in Meilen (m/h) erfolgen soll. Mit der STORE-Taste<br />
wird der Wert gespeichert.<br />
Anschließend erscheint das<br />
Display zum Einstellen der<br />
Gesamtkilometer (bzw. Gesamtmeilen),<br />
dabei blinkt die letzte<br />
Stelle.<br />
Wertebereich: 00000-99999<br />
km bzw. mi (= Meilen)<br />
Einstellen mit SET- und STORE-Taste, weiter mit<br />
STORE-Taste.<br />
Im Display blinkt nun die Zahl<br />
'24' zur Auswahl der Stundenanzeige<br />
(24- oder 12- Stundenformat).<br />
Beim 12-Stundenformat<br />
erscheint neben der Uhrzeit die<br />
Anzeige A/P.<br />
Mit der SET-Taste wird zwischen<br />
den Werten gewechselt, mit der<br />
STORE-Taste wird der Wert<br />
gespeichert und die Uhrzeit kann<br />
eingestellt werden.<br />
Dabei werden zuerst die<br />
Minuten mit der SET-Taste<br />
eingestellt, durch kurzes<br />
Drücken der STORE-Taste<br />
blinken jetzt die Stunden und<br />
können ebenfalls mit der SET-<br />
Taste eingestellt werden.<br />
Mit der STORE-Taste wird die<br />
Uhrzeit gespeichert und und der<br />
<strong>CM</strong> <strong>4.1</strong> zeigt nach 2 Sek. den<br />
normalen Betriebsmodus an.<br />
BEDIENUNGSANLEITUNG<br />
Herzlichen Glückwunsch!<br />
Mit dem CICLOMASTER <strong>CM</strong> <strong>4.1</strong> haben Sie einen drahtlosen Fahrradcomputer von<br />
höchster Präzision erworben. Er verfügt über modernste Elektronik und ist wetterfest. Bitte<br />
lesen Sie diese Bedienungsanleitung genau durch.<br />
Die Besonderheit des <strong>CM</strong> <strong>4.1</strong>: nach dem Einstellen der nötigen Voreinstellungen sind<br />
keine Tastenbetätigungen mehr nötig, die Anzeige von Geschwindigkeit, Durchschnittsgeschwindigkeit<br />
und Distanz erfolgt automatisch kurz nach der ersten Radumdrehung.<br />
Garantieschein:<br />
Absender:<br />
Name Vorname<br />
Straße, Nr.<br />
PLZ/Ort<br />
Telefon (tagsüber) Fax<br />
E-Mail<br />
D<br />
Grund der Einsendung:<br />
3. Funktionen<br />
Der <strong>CM</strong> <strong>4.1</strong> hat einen automatischen Start/Stopp im<br />
Fahrbetrieb. Sobald der <strong>CM</strong> <strong>4.1</strong> in den Lenkerhalter<br />
gesetzt wird, schaltet der eingebaute Empfänger intern<br />
an (das Display bleibt aber noch im 'Schlafmodus')<br />
und wartet auf Signale vom Sender (deswegen sollte<br />
der <strong>CM</strong> <strong>4.1</strong> bei Nichtnutzung aus dem Lenkerhalter<br />
genommen werden, das verlängert die Batterielebensdauer).<br />
Ca. 4 Sek. nach der ersten Radumdrehung zeigt der<br />
<strong>CM</strong> <strong>4.1</strong> dann im Display folgende Funktionen:<br />
Oben:<br />
Durchschnittsgeschwindigkeit in<br />
Kilometern pro Stunde (km/h)<br />
oder Meilen pro Stunde (m/h)<br />
Anzeigebereich 0 – 199,99<br />
km/h bzw. m/h<br />
Mitte:<br />
Aktuelle Geschwindigkeit in Kilometern pro Stunde<br />
(km/h) oder Meilen pro Stunde (m/h)<br />
Anzeigebereich 0 – 199,9 km/h bzw. m/h<br />
Unten:<br />
Tagesdistanz (DST) in Kilometern oder Meilen<br />
Anzeigebereich 0 – 999,99 km bzw. mi<br />
Nach 1 Minute ohne Radsignal<br />
wird im Display oben die Uhrzeit<br />
und unten die Gesamtdistanz in<br />
Kilometern oder Meilen (bis<br />
max. 99999 km bzw. mi)<br />
angezeigt ('Schlafmodus').<br />
Sobald erneut ein Radsignal kommt (oder kurz eine der<br />
'Tasten' gedrückt wird), erscheint wieder der normale<br />
Betriebsmodus.<br />
Die Tagesdistanz und die Durchschnittsgeschwindigkeit<br />
werden 12 Stunden nach dem letzten<br />
Radsignal automatisch auf Null gesetzt.<br />
Um die Gesamtdistanz auf Null zu setzen, <strong>AC</strong>-Knopf<br />
auf der Rückseite drücken oder Batterie entnehmen<br />
(Achtung: damit werden auch alle Einstellungen<br />
gelöscht).<br />
4 . Wechseln der Batterie<br />
<strong>CM</strong> <strong>4.1</strong>: Schraubverschluß auf der Rückseite des<br />
Computers mit Hilfe einer Münze nach links aufdrehen.<br />
Alte Batterie entfernen und neue 3V-Lithium-Batterie<br />
Typ CR 2032 mit dem Pluspol nach oben einlegen.<br />
Schraubverschluß wieder zudrehen.<br />
Sender: Deckel auf der Oberseite des Senders mit<br />
einer Münze öffnen. Alte Batterie entfernen und neue<br />
12 V Batterie, Typ 23A mit dem Pluspol nach oben<br />
einlegen. Deckel wieder zuschrauben.<br />
Bitte die entleerte Batterie nicht in den Hausmüll<br />
werfen, sondern fachgerecht entsorgen.<br />
5. Störungsbeseitigung<br />
Fehlerhafte oder keine Anzeige im Display<br />
-Batterie auf korrekten Sitz überprüfen bzw. Batterie<br />
erneuern<br />
Momentangeschwindigkeit wird nicht angezeigt<br />
- Sender auf korrekte Montage prüfen<br />
- Senderbatterie überprüfen, ggf. erneuern<br />
- überprüfen, ob Speichenmagnet richtig an der<br />
Speiche montiert ist (direkt gegenüber dem Sender<br />
mit max. 3 mm Abstand)<br />
- Abstand zwischen Sender und Lenkerhalter<br />
überprüfen (max. 60 cm)<br />
- überprüfen, ob <strong>CM</strong> <strong>4.1</strong> richtig im Lenkerhalter<br />
eingerastet ist<br />
- eingestellten Radumfang überprüfen<br />
Geschwindigkeit zu hoch bzw. zu niedrig<br />
- eingestellten Radumfang überprüfen<br />
- Maßeinheit überprüfen<br />
- Senderbatterie überprüfen, ggf. erneuern<br />
- Störung z.B. durch andere Sender, GPS-Systeme,<br />
spez. Radbeleuchtung etc. Nach Verlassen des<br />
Störbereichs erscheint wieder normale Anzeige<br />
6. Garantie<br />
Wir leisten auf den <strong>CM</strong> <strong>4.1</strong> eine Garantie von 24<br />
Monaten. Die Garantie beschränkt sich auf Materialund<br />
Verarbeitungsfehler. Ausgenommen von der<br />
Garantie sind die Batterien.<br />
Die Garantie ist nur gültig, wenn der Computer mit<br />
Zubehör vorschriftsmäßig und sorgfältig behandelt<br />
wurde.<br />
Im Garantiefall wenden Sie sich bitte an Ihren<br />
Händler oder Ihren lokalen Distributor oder schicken<br />
Sie den Computer mit dem Kaufbeleg (Datum) und<br />
allen Zubehörteilen ausreichend frankiert an:<br />
CICLO SPORT SERVICE<br />
K. W. Hochschorner GmbH<br />
Konrad- Zuse- Bogen 8<br />
D-82152 Krailling<br />
Telefon: 089 / 71 66 98 12<br />
Telefax: 089 / 714 07 83<br />
E-Mail: ciclo-service@ciclosport.de<br />
Bitte lesen Sie vor Einsendung des Gerätes<br />
nochmals sorgfältig die Bedienungsanleitung<br />
durch und überprüfen Sie die Batterien.<br />
Bei berechtigten Garantieansprüchen wird das reparierte<br />
Gerät oder ein Austauschgerät kostenlos zurückgesandt.<br />
Reparatur:<br />
Wird das Gerät zur Reparatur eingesandt oder wird<br />
ein Garantieanspruch nicht anerkannt, erfolgt eine<br />
Reparatur bis Euro 15.- automatisch.<br />
Die Rücksendung des reparierten Gerätes erfolgt per<br />
Nachnahme.<br />
Nach Ablauf der Garantie sollen Reparaturen bis Euro durchgeführt werden.<br />
SPD<br />
✁<br />
GB/USA<br />
OPERATING MANUAL<br />
Congratulations on your purchase!<br />
With the CICLOMASTER <strong>CM</strong> <strong>4.1</strong> you have acquired a wireless electronic bike computer<br />
with state of the art electronics, the highest level of precision and it is weatherproof.<br />
Special feature: After initial setting no more buttons need to be pressed, speed, average<br />
speed and distance are automatically shown short after the first wheel rotation.<br />
Please read through this operating manual carefully before use.<br />
Contents:<br />
- CICLOMASTER <strong>CM</strong> <strong>4.1</strong><br />
-Battery Type CR 2032<br />
- handlebar bracket with cable ties for mounting<br />
- transmitter<br />
-spoke magnet<br />
-battery cap<br />
-cable ties<br />
1. Mounting<br />
Picture 1: Mounting is possible on handlebar bracket<br />
(Position A) or stem (Position B)<br />
Picture 2: Change bracket mounting orientation from<br />
Position A to Position B.<br />
Remove the protective tape<br />
Place the handle bar and fasten it with the cable ties<br />
Picture 3: Secure the sensor on the fork by tightening<br />
the cable ties and cut off the loose ends (max.<br />
distance between transmitter and handlebar bracket is<br />
60 cm)<br />
Picture 4: Fix the magnet on a spoke so that it will<br />
face the sensor<br />
Picture 5: Adjust the magnet position and fine tune<br />
the sensor if necessary<br />
Picture 6: Rotate the <strong>CM</strong> <strong>4.1</strong> to 45 degree left and install<br />
the <strong>CM</strong> <strong>4.1</strong> into the bracket. Then rotate it 45<br />
degrees right to lock it. To unlock, rotate 45 degrees to<br />
the left.<br />
2. Preparation<br />
Using the buttons:<br />
There are no buttons in the conventional sense on the<br />
<strong>CM</strong> <strong>4.1</strong>, the settings are made with the two 'buttons'<br />
on the rear of unit.<br />
These buttons can be pressed e.g. with a ballpoint<br />
pen (see pict. 7).<br />
Inserting the battery:<br />
Insert battery type CR2032 with plus-pole facing up.<br />
Close battery cap with a coin, being sure not to over<br />
tighten. After inserting the battery the display will show<br />
the setting of the circumferrence with the first value<br />
flashing.<br />
(To enter again setting mode, press Set-button for 3<br />
sec. when <strong>CM</strong> <strong>4.1</strong> is in normal mode.)<br />
The following applies for all settings:<br />
SET-button changes flashing value, STORE-button<br />
stores this value and changes to the next value or the<br />
next setting display appears.<br />
Setting the wheel circumference<br />
Start setting: 2155 mm<br />
Range: 0000-3999 mm<br />
Adjust with SET- and STOREbutton,<br />
continue with STOREbutton.<br />
The wheel circumference can be taken from the<br />
following table or measured by yourself.<br />
Size circumference<br />
40-559 26 x 1,5 2026 mm<br />
44-559 26 x 1,6 2051 mm<br />
47-559 26 x 1,75 2070 mm<br />
50-559 26 x 1,9 2026 mm<br />
54-559 26 x 2,00 2089 mm<br />
57-559 26 x 2,125 2114 mm<br />
37-590 26 x 1 3/8 2133 mm<br />
32-620 27 x 1 1/4 2199 mm<br />
40-622 28 x 1,5 2224 mm<br />
47-622 28 x 1,75 2268 mm<br />
40-635 28 x 1 1/2 2265 mm<br />
37-622 28 x 1 3/8 2205 mm<br />
20-622 700 x 20C 2114 mm<br />
23-622 700 x 23C 2133 mm<br />
25-622 700 x 25C 2146 mm<br />
28-622 700 x 28C 2149 mm<br />
32-622 700 x 32C 2174 mm<br />
Measurement of the wheel circumference (U)<br />
(for more precise adjustment):<br />
Make a marker on the front tire and on the floor (e.g.<br />
with chalk). Move the bike straight ahead by exactly<br />
one tire rotation (for a more precise measurement<br />
ensure tire pressures are correct and be seated on the<br />
bike) and mark the location on the floor. Now measure<br />
the distance exactly between the two markers on the<br />
floor to give you the wheel circumference (in mm) –<br />
s. pict. 8.<br />
Now display shows km/h<br />
(kilometers per hour).<br />
If preferred, change to miles per hour with SET-button,<br />
save setting and continue with STORE-button.<br />
After this the display shows<br />
adjustable total distance.<br />
Range: 00000-99999 km or mi<br />
(kilometers or miles)<br />
Adjust with SET- and STOREbutton,<br />
continue with STOREbutton.<br />
Display shows flashing '24' to<br />
choose time-display (24 – or<br />
12- hour). 12-hour setting<br />
shows A/P in the display when<br />
time is shown.<br />
Change with SET-button, store<br />
and continue to time setting with<br />
STORE-button.<br />
Adjust minutes with SET-button,<br />
store with STORE-button and<br />
now adjust hours with the SETbutton.<br />
Store the adjusted time with<br />
STORE-button.<br />
Now all settings are finished and<br />
<strong>CM</strong> <strong>4.1</strong> is ready for operation.<br />
Guarantee certificate:<br />
Sender:<br />
Name First name<br />
Street, No.<br />
Code/Location<br />
Telephone (during the day) Fax<br />
E-Mail<br />
Reason for return:<br />
3. Functions<br />
The <strong>CM</strong> <strong>4.1</strong> has an automatic start/stop while riding.<br />
When the <strong>CM</strong> <strong>4.1</strong> is set into the handlebar bracket, the<br />
implemented receiver is switched on (but display stays<br />
in sleep mode). 4 sec. after the first signal from the<br />
transmitter (wheel turn), the display switches on and<br />
shows following:<br />
Upper display<br />
average speed<br />
Range 0 – 299,99 km/h or m/h<br />
Middle of the display<br />
current speed (km/h or m/h)<br />
Range 0 – 299,9 km/h or m/h<br />
Lower display<br />
daily distance (DST)<br />
Range 0 – 999,99 km or mi<br />
1 minute after the last turn of<br />
the wheel the <strong>CM</strong> <strong>4.1</strong> changes<br />
to sleep mode – upper display<br />
shows time and lower display<br />
shows total distance (ODO: 0 -<br />
99999 km or mi).<br />
After receiving the next signal from the wheel sensor,<br />
the complete display appears again (also with pressing<br />
SET- or STORE-button).<br />
When <strong>CM</strong> <strong>4.1</strong> is not used, it should be removed from<br />
the handlebar bracket to save battery power.<br />
Daily distance and average speed are automatically set<br />
to zero after 12 hours without receiving a signal from<br />
the wheel-sensor.<br />
Total distance is set to zero by pressing the <strong>AC</strong>-button<br />
on the back of the computer or removing the battery<br />
(Attention: that also will clear all settings in the<br />
<strong>CM</strong> <strong>4.1</strong>).<br />
4 . Changing the battery<br />
<strong>CM</strong> <strong>4.1</strong>: Unscrew battery cap at the rear of the <strong>CM</strong><br />
<strong>4.1</strong> anti-clockwise with the help of a coin. Remove old<br />
battery and insert a new 3V-Lithium-battery type CR<br />
2032 with plus-pole facing up Screw cap back on<br />
clockwise.<br />
Transmitter: Open battery cap on top of the transmitter<br />
with the help of a coin. Remove old battery and<br />
insert a new 12 V battery, type 23A with plus-pole<br />
facing up. Close battery cap.<br />
Please don't discard spent batteries in regular<br />
household garbage. Use the correct method of<br />
disposal.<br />
5. Trouble shooting<br />
Faulty or no display<br />
- check to see if battery is installed properly or replace<br />
battery (Attention: removing battery will clear all<br />
settings and values in the <strong>CM</strong> <strong>4.1</strong>)<br />
Speed not displayed<br />
- check to see if transmitter is mounted properly<br />
- check transmitter battery<br />
- check the position of the spoke magnet (max. 3 mm<br />
distance to wheel-sensor)<br />
- check distance between transmitter and handlebar<br />
bracket (max. 60 cm)<br />
- make sure <strong>CM</strong> <strong>4.1</strong> is mounted in bracket correctly<br />
- check wheel circumference<br />
Speed to high or to low<br />
- check wheel circumference<br />
check to see if you are using miles or kilometers<br />
- check transmitter battery<br />
- malfunction due to other transmitters, GPS-systems,<br />
certain lights, etc. After leaving the area of<br />
malfunction, speed will be displayed as usual<br />
6. Guarantee<br />
We offer a guarantee for 24 months from the date of<br />
purchase on the <strong>CM</strong> <strong>4.1</strong>. The guarantee is limited to<br />
material and processing faults. The batteries are<br />
excluded from the guarantee.<br />
The guarantee is valid only if the computer, with<br />
accessories, has been handled and maintained<br />
carefully and according to operating instructions.<br />
To return the <strong>CM</strong> <strong>4.1</strong> under conditions/terms of<br />
the guarantee, please refer to your dealer, your<br />
local distributor or send the computer with the proof of<br />
purchase(date) and all accessories, and with sufficient<br />
postage, to:<br />
CICLO SPORT SERVICE<br />
K. W. Hochschorner GmbH<br />
Konrad-Zuse-Bogen 8<br />
D - 82152 Krailling<br />
Phone: 0049 / 89 / 71 66 98 12<br />
Fax: 0049 / 89 / 714 07 83<br />
E-Mail: ciclo-service@ciclosport.de<br />
After expiry of the guarantee: Repairs should be carried out up to a value of Euro:<br />
Please read through the operating manual again<br />
carefully before sending in the device and check<br />
the batteries.<br />
In case of valid guarantee claims, the repaired device<br />
or a replacement device will be returned free of<br />
charge.<br />
Repair:<br />
If your <strong>CM</strong> <strong>4.1</strong> is sent in for repair (or battery change)<br />
or if a guarantee claim is not valid, repairs up to EUR<br />
15.- will be carried out automatically.<br />
In case of higher repair costs you will be notified. The<br />
repaired device will be sent back COD.<br />
SPD<br />
✁<br />
Contenu:<br />
- CICLOMASTER <strong>CM</strong> <strong>4.1</strong><br />
- Batterie Type CR 2032<br />
- Support du guidon avec attaché-câbles<br />
- Transmetteur<br />
- Magnéto de rayon<br />
- Couvercle de batterie<br />
- Serre-câbles<br />
1. Montage<br />
Figure 1: Montage possible sur le guidon (Position A)<br />
et sur l'avant-corps (Position B)<br />
Figure 2: Pour le montage sur avant-corps (Position<br />
B) inverser les boulons de la partie supérieure.<br />
Ôter le film protecteur du côté inférieur du support du<br />
guidon<br />
Positionner le support du guidon à l'endroit souhaité,<br />
exercer une légère pression et accrocher avec<br />
l’attache-câbles<br />
Figure 3: Fixer le transmetteur avec les attachecâbles<br />
à la fourche et couper les parties excédentaires<br />
(distance maximale du support guidon 60 cm; le<br />
montage sur le côté droit est idéal car le support du<br />
guidon et le transmetteur devraient se trouver du<br />
même côté)<br />
Figure 4: Fixer la magnéto sur un rayon face au<br />
transmetteur<br />
Figure 5: Aligner le transmetteur et la magnéto<br />
(distance max. 3 mm)<br />
Figure 6: Déplacer le <strong>CM</strong> <strong>4.1</strong> sur le support du guidon<br />
d'un quart de tour vers la gauche, pour le serrage<br />
faire un quart de tour vers la droite. Pour ôter le <strong>CM</strong><br />
<strong>4.1</strong> effectuer à nouveau un quart de tour vers la<br />
gauche et ôter du support du guidon.<br />
2. Mise en marche<br />
Le <strong>CM</strong> <strong>4.1</strong> ne présente pas de touches dans le sens<br />
commun du terme, les réglages se font grâce à deux<br />
„touches“ positionnées sur le côté inférieur. Ces<br />
touches peuvent être pressées par exemple avec la<br />
pointe d'un stylo à bille.<br />
Dénomination des touches: (voir Figure 7)<br />
Branchement de la pile:<br />
Branchez la pile du type CR2032 avec le pôle positif<br />
vers le haut. Posez le couvercle de la pile et fermez-le<br />
à l'aide d'une pièce de monnaie. Après le branchement<br />
de la pile on verra apparaître sur l'affichage<br />
l’indication du tour de roue, dont le premier numéro<br />
clignotera.<br />
(Pour revenir au mode réglage, appuyez de nouveau 3<br />
secondes sur la touche ‘SET’ de la modalité de<br />
fonction normale).<br />
Si vous appuyez sur le bouton <strong>AC</strong> (du revers), toutes<br />
les valeurs et tous les réglages seront effacés.<br />
Pour tous les réglages: grâce à la touche SET on<br />
modifie la valeur clignotante, avec la touche STORE on<br />
mémorise la valeur et on passe à la valeur suivante ou<br />
au réglage suivant.<br />
Préréglage du tour de roue<br />
Préréglage initial: 2155 mm<br />
Plage des valeurs:<br />
0000-3999 mm<br />
Prérégler à l'aide des touches<br />
SET et STORE, procéder avec la<br />
touche STORE.<br />
Le tour de roue peut être calculé à partir du<br />
tableau ci-dessous ou bien il peut être calculé<br />
personnellement.<br />
Dimension du pneu Tour de roue<br />
40-559 26 x 1,5 2026 mm<br />
44-559 26 x 1,6 2051 mm<br />
47-559 26 x 1,75 2070 mm<br />
50-559 26 x 1,9 2026 mm<br />
54-559 26 x 2,00 2089 mm<br />
57-559 26 x 2,125 2114 mm<br />
37-590 26 x 1 3/8 2133 mm<br />
32-620 27 x 1 1/4 2199 mm<br />
40-622 28 x 1,5 2224 mm<br />
47-622 28 x 1,75 2268 mm<br />
40-635 28 x 1 1/2 2265 mm<br />
37-622 28 x 1 3/8 2205 mm<br />
20-622 700 x 20C 2114 mm<br />
23-622 700 x 23C 2133 mm<br />
25-622 700 x 25C 2146 mm<br />
28-622 700 x 28C 2149 mm<br />
32-622 700 x 32C 2174 mm<br />
Si l'on mesure personnellement le tour de roue, il<br />
faudra tracer une marque sur la roue même et une<br />
autre au même niveau sur le sol (par ex. avec de la<br />
craie). Rouler ensuite tout droit jusqu'à accomplir<br />
exactement un tour de roue (avec la bonne pression et<br />
le bon poids du cycliste) et tracer une deuxième<br />
marque sur le sol. À présent l'on peut calculer le tour<br />
exact de la roue en mesurant la ligne tracée entre les<br />
deux marques sur le sol (en mm) – v. Figure 8.<br />
Sur l'affichage apparaît l’indication<br />
km/h.<br />
En poussant brièvement la touche SET il est possible<br />
de choisir si l’indication doit être donnée en Kilomètres<br />
(km/h) ou bien en Milles (m/h).<br />
La valeur est mémorisée grâce à<br />
la touche STORE.<br />
Ensuite apparaît l'affichage pour<br />
le préréglage des kilomètres au<br />
total (ou milles au total), où le<br />
premier chiffre clignote.<br />
Plage des valeurs: 00000-99999 km ou bien mi (=<br />
Milles)<br />
Prérégler grâce aux touches SET et STORE, procéder<br />
avec la touche STORE.<br />
Sur l'affichage le chiffre 24 clignote<br />
pour le choix de l'indication<br />
horaire (format horaire à<br />
12 ou à 24 heures). Dans le cas<br />
du format à 12 heures, à côté<br />
de l'horaire l’indication A/P<br />
s’affiche.<br />
Grâce à la touche SET on peut<br />
changer les valeurs, avec la<br />
touche STORE la valeur est<br />
mémorisée et on peut prérégler<br />
l'heure.<br />
Certificat de garantie:<br />
Expéditeur:<br />
Nom Prénom<br />
adresse:<br />
CP/Lieu<br />
Téléphone (pendant le jour) Fax<br />
E-Mail<br />
F<br />
Motif de l'envoi:<br />
Avec la touche SET on peut<br />
prérégler d'abord les minutes,<br />
puis en poussant brièvement la<br />
touche STORE ce sont les<br />
heures qui clignotent, que l'on<br />
peut aussi prérégler avec la<br />
touche SET.<br />
En agissant sur la touche<br />
STORE, on mémorise l'horaire<br />
et le <strong>CM</strong> <strong>4.1</strong> bascule en modalité<br />
de fonction normale d’exercice<br />
après 2 secondes.<br />
3. Fonctions<br />
Le <strong>CM</strong> <strong>4.1</strong> présente une Marche/Arrêt automatique en<br />
modalité de conduite. A cette fin il est nécessaire qu’il<br />
soit fixé sur le support de guidon (si vous n’utilisez pas<br />
le <strong>CM</strong> <strong>4.1</strong> vous ne devriez pas le laisser sur le support<br />
de guidon).<br />
Environ 4 secondes après le premier tour de roue,<br />
l'affichage du <strong>CM</strong> <strong>4.1</strong> fait apparaître les fonctions<br />
suivantes:<br />
Dessus:<br />
Vitesse moyenne en kilomètres<br />
SPD<br />
à l'heure (km/h) ou bien milles à<br />
l'heure (m/h)<br />
Plage d'indication 0 – 199,9<br />
km/h ou bien m/h<br />
Centre:<br />
Vitesse actuelle en kilomètres à l'heure (km/h) ou bien<br />
milles à l'heure (m/h)<br />
Plage d'indication 0 – 199,9 km/h ou bien m/h<br />
Dessous:<br />
Distance quotidienne (DST) en kilomètres ou milles<br />
Plage d'indication 0 – 999,99 km ou mi<br />
1 minute après que le signal de<br />
roue est absent, sur l'affichage<br />
n'est plus visible que l’heure et<br />
la distance totale (ODO: 0 –<br />
99999 km ou mi).<br />
Dès qu’il y a un nouvel signal de roue ou qu’une<br />
touche (SET ou STORE) que sera appuyee, l’indicateur<br />
sera complètement réactivé.<br />
La distance quotidienne et la vitesse moyenne sont<br />
remis à zéro automatiquement 12 heures après le<br />
dernier signal de roue.<br />
Pour remettre à zéro la distance totale, appuyez le<br />
bouton <strong>AC</strong> ou enlevez et remettez la pile dans sa<br />
cavité.<br />
(Attention: NB: tous les préréglages disparaissent<br />
automatiquement).<br />
4 . Remplacement de la batterie<br />
<strong>CM</strong> <strong>4.1</strong>: À l'aide d'une pièce de monnaie dévisser<br />
dans le sens contraire aux aiguilles d'une montre la<br />
fermeture à vis sur l'arrière de l'ordinateur. Sortir la<br />
batterie usagée et brancher la nouvelle batterie lithium<br />
3V du type CR 2032, avec pôle positif vers le haut.<br />
Revisser la fermeture à vis.<br />
Transmetteur: le transmetteur sans fil contient une<br />
pile de 12 V. Pour cela, sur le côté de le transmetteur,<br />
tournez le vouvercle du boitier de la pile vers la gauche<br />
à l’aide d’une piece de monnaie. Enlevez l’ancienne<br />
pile et installez une nouvelle pile de 12 V de type 23A<br />
avec le pôle positif vers le haut. Revisser le couvercle.<br />
Prière de ne pas jeter la batterie déchargée dans<br />
les ordures ménagères, mais de la déposer aux<br />
endroits prévus à cet effet.<br />
5. Détection des pannes<br />
Indication défectueuse ou absente sur l'affichage<br />
-Vérifier la bonne position de la batterie ou remplacer<br />
la batterie<br />
La vitesse actuelle n'est pas indiquée<br />
- Vérifier que le transmetteur a été mont correctement<br />
- Contrôler la batterie du transmetteur, la remplacer le<br />
cas échéant<br />
- Vérifier si la magnéto des rayons est correctement<br />
montée sur le rayon (directement en face du<br />
transmetteur à une distance max. de 3 mm)<br />
- Vérifier la distance séparant le transmetteur et le<br />
support du guidon (max. 60 cm)<br />
- Contrôler si le <strong>CM</strong> <strong>4.1</strong> est correctement accroché<br />
sur le support du guidon<br />
-Vérifier le tour de roue préréglé<br />
Vitesse trop élevée ou trop faible<br />
- Vérifier le tour de roue préréglé<br />
- Contrôler l’unité de mesure<br />
- Contrôler la batterie du transmetteur, la remplacer le<br />
cas échéant<br />
- Contrôler qu'il n'y ait pas de dérangements dus, par<br />
ex., à d'autres transmetteurs, à des systèmes GPS, à<br />
des éclairages spéciaux de la roue, etc. Dans ce cas,<br />
en s'éloignant du rayon d'action de la source de<br />
dérangement, la normale indication réapparaîtra<br />
6. Garantie<br />
MANUEL OPÉRATOIRE<br />
Félicitations!<br />
Grâce à votre achat de CICLOMASTER <strong>CM</strong> <strong>4.1</strong> vous êtes devenu l'heureux propriétaire<br />
d'un ordinateur à vélo sans fils de très haute précision disposant de l'électronique la plus<br />
moderne et résistant aux intempéries. Nous vous conseillons de lire attentivement le<br />
présent manuel opératoire.<br />
La particularité du <strong>CM</strong> <strong>4.1</strong>: après la prédisposition du préréglage indispensable, aucun<br />
bouton ne doit plus être activé, l’indication de la vitesse, de la vitesse moyenne et de la<br />
distance s'afficheront automatiquement peu après le premier tour de roue.<br />
Nous appliquons à <strong>CM</strong> <strong>4.1</strong> une garantie de 24 mois.<br />
La garantie ne couvre que les défauts de matériel et<br />
de fabrication. Les batteries sono exclues de la<br />
garantie. La garantie n'est valable que si l'ordinateur et<br />
les accessoires ont été manipulés en suivant les<br />
instructions d'utilisation et avec soin.<br />
En cas de droit à la garantie, nous vous prions<br />
de bien vouloir vous adresser à votre fournisseur<br />
ou à votre distributeur local ou bien envoyez<br />
l'ordinateur, en même temps que la preuve d'achat<br />
(date) et que tous les accessoires, en affranchissant<br />
convenablement, à:<br />
CICLO SPORT SERVICE<br />
K. W. Hochschorner GmbH<br />
Konrad- Zuse- Bogen 8<br />
D-82152 Krailling<br />
Téléphone: 0049 / 89 / 71 66 98 12<br />
Téléfax: 0049 / 089 / 714 07 83<br />
E-Mail: ciclo-service@ciclosport.de<br />
Avant l'envoi de l'appareil nous vous prions de<br />
lire encore une fois attentivement les instructions<br />
d'utilisation et de vérifier la batterie.<br />
En cas de droit à la garantie justifié, l’appareil réparé,<br />
ou un autre appareil de remplacement, sera livré<br />
gratuitement.<br />
Réparations: au cas où l'appareil serait renvoyé pour<br />
la réparation ou bien au cas où l'on ne reconnaîtrait<br />
pas le droit à la garantie, il sera procédé automatiquement<br />
à la réparation jusqu'à concurrence de 15<br />
Euros,-. Le retour de l'appareil réparé sera effectué<br />
contre remboursement.<br />
La garantie expirée, les réparations devront être effectuées jusqu'à concurrence de Euros.
<strong>CM</strong> <strong>4.1</strong> Bed.-Anl/alle 11.01.2007 15:55 Uhr Seite 2<br />
<strong>CM</strong> <strong>4.1</strong><br />
1<br />
2<br />
3<br />
4<br />
5<br />
6<br />
45°<br />
90°<br />
7 <strong>AC</strong><br />
8<br />
A<br />
B<br />
KLICK!<br />
✁<br />
Contenuto:<br />
- CICLOMASTER <strong>CM</strong> <strong>4.1</strong><br />
- Batteria Typ CR 2032<br />
- Supporto manubrio con fermacavi<br />
- Trasmettitore<br />
- Magnete da raggio<br />
- Coperchio batteria<br />
- Fermacavi<br />
1. Montaggio<br />
Figura 1: Montaggio possibile al manubrio (Posizione<br />
A) ed all’avancorpo (Posizione B)<br />
Figura 2: Per il montaggio all’avancorpo (Posizione B)<br />
invertire la bullonatura della parte superiore<br />
Togliere la pellicola protettiva dal lato inferiore del<br />
supporto manubrio<br />
Posizionare il supporto manubrio nel punto desiderato,<br />
premere leggermente ed agganciare le fermacavi<br />
Figura 3: Fissare il sensore con il fermacavi alla<br />
forcella e tagliare le parti eccedenti (distanza massima<br />
dal supporto manubrio 60 cm; ideale è il montaggio<br />
sul lato destro poiché il supporto manubrio ed il<br />
trasmettitore dovrebbero trovarsi dallo stesso lato)<br />
Figura 4: Fissare il magnete ad un raggio di fronte al<br />
trasmettitore<br />
Figura 5: Allineare il trasmettitore ed il magnete<br />
(distanza max. 3 mm)<br />
Figura 6: Spostare il <strong>CM</strong> <strong>4.1</strong> sul supporto manubrio di<br />
un quarto di giro verso sinistra, per il serraggio fare un<br />
quarto di giro verso destra. Per togliere il <strong>CM</strong> <strong>4.1</strong><br />
effettuare di nuovo un quarto di giro verso sinistra e<br />
sfilare dal supporto manubrio.<br />
2. Messa in funzione<br />
Il <strong>CM</strong> <strong>4.1</strong> non presenta tasti nel senso comune del termine,<br />
le regolazioni avvengono mediante due „tasti“<br />
posizionati sul lato inferiore. Questi tasti possono<br />
essere premuti ad esempio con la punta di una penna<br />
a sfera.<br />
Denominazione dei tasti: (vedi Figura 7)<br />
Inserimento della batteria:<br />
Inserire la batteria tipo CR2032 con il polo positivo in<br />
alto. Appoggiare il coperchio batteria e chiuderlo con<br />
l’aiuto di una moneta. Dopo aver inserito la batteria sul<br />
display appariranno l’indicazione della circonferenza<br />
della ruota, il primo numero lampeggerà.<br />
(Usate questo sistema per cambiare qualsiasi installazione,<br />
premete il taste ‘SET’ per 3 secondi in funzioni<br />
normale).<br />
Per tutte le regolazioni: con il tasto SET si modifica<br />
il valore lampeggiante, con il tasto STORE si memorizza<br />
il valore e si passa al valore successivo o alla<br />
regolazione successiva.<br />
Impostazione della circonferenza<br />
ruota<br />
Impostazione iniziale: 2155 mm<br />
Range dei valori:<br />
0000-3999 mm<br />
Impostare con i tasti SET e<br />
STORE, procedere con il tasto STORE.<br />
La circonferenza della ruota può essere ricavata<br />
dalla tabella seguente oppure misurata personalmente.<br />
Dimensione pneumatico Circonferenza<br />
40-559 26 x 1,5 2026 mm<br />
44-559 26 x 1,6 2051 mm<br />
47-559 26 x 1,75 2070 mm<br />
50-559 26 x 1,9 2026 mm<br />
54-559 26 x 2,00 2089 mm<br />
57-559 26 x 2,125 2114 mm<br />
37-590 26 x 1 3/8 2133 mm<br />
32-620 27 x 1 1/4 2199 mm<br />
40-622 28 x 1,5 2224 mm<br />
47-622 28 x 1,75 2268 mm<br />
40-635 28 x 1 1/2 2265 mm<br />
37-622 28 x 1 3/8 2205 mm<br />
20-622 700 x 20C 2114 mm<br />
23-622 700 x 23C 2133 mm<br />
25-622 700 x 25C 2146 mm<br />
28-622 700 x 28C 2149 mm<br />
32-622 700 x 32C 2174 mm<br />
Se si misura personalmente la circonferenza della<br />
ruota, dovrà essere apposta una marcatura sulla ruota<br />
anteriore ed al suolo (ad es. con gesso). Avanzare con<br />
la ruota diritto e compiere esattamente una rotazione<br />
della ruota (con la giusta pressione ed il giusto peso<br />
del ciclista) ed apporre una marcatura sul suolo. Ora<br />
può essere misurata l’esatta circonferenza della ruota<br />
tra le due marcature sul suolo (in mm) – v. Figura 8.<br />
Sul display compare l’indicazione<br />
km/h.<br />
Premendo brevemente il tasto SET è possibile scegliere<br />
se l’indicazione debba avvenire in Chilometri (km/h)<br />
oppure in Miglia (m/h).<br />
Il valore viene memorizzato grazie al tasto STORE.<br />
Successivamente appare il display<br />
per l’impostazione dei chilometri<br />
totali (o miglia totali), dove<br />
l’ultima cifra lampeggia.<br />
Range dei valori: 00000-99999<br />
km oppure mi (= Miglia)<br />
Impostare con i tasti SET e STORE, procedere con il<br />
tasto STORE.<br />
Sul display lampeggia la cifra 24<br />
per la scelta dell’indicazione<br />
oraria (formato orario a 12 o 24<br />
ore). Nel caso del formato a 12<br />
ore apparirà accanto all’orario,<br />
l’indicazione A/P.<br />
Grazie al tasto SET si cambia tra<br />
i valori, con il tasto STORE il<br />
valore viene memorizzato e può<br />
essere impostata l’ora.<br />
Con il tasto SET si impostano<br />
prima I minuti, poi premendo<br />
brevemente il tasto STORE<br />
lampeggeranno le ora che<br />
possono essere altresì impostati<br />
con il tasto SET.<br />
Azionando il tasto STORE si<br />
memorizza l’orario ed il <strong>CM</strong> <strong>4.1</strong><br />
entra in modalità di funzione<br />
normale d’esercizio doppo 2<br />
secondi.<br />
3. Funzioni<br />
Il <strong>CM</strong> <strong>4.1</strong> presenta uno Start/Stop automatico in<br />
modalità di guida. E necessario che sia montato sul<br />
supporto del manubrio (se il <strong>CM</strong> <strong>4.1</strong> non viene<br />
utilizzato è consigliabile non lasciarlo montato sul<br />
supporto del manubrio).<br />
Ca. 4 secondi dopo il primo giro di ruota, il display del<br />
<strong>CM</strong> <strong>4.1</strong> mostra le seguenti funzioni:<br />
Sopra:<br />
Velocità media in chilometri<br />
all’ora (km/h) oppure miglia<br />
all’ora (m/h)<br />
Range di indicazione 0 – 199,9<br />
km/h oppure m/h<br />
Centro:<br />
Velocità attuale in chilometri all’ora (km/h) oppure<br />
miglia all’ora (km/h)<br />
Range di indicazione 0 – 199,9 km/h oppure m/h<br />
Sotto:<br />
Distanza giornaliera (DST) in chilometri o miglia<br />
Range di indicazione 0 – 999,99 km o mi<br />
Dopo 1 minuto con segnale<br />
ruota assente, sul display è<br />
visibile l’orario e la distanza<br />
totale (ODO: 0 – 99999 km<br />
oppure mi).<br />
L’indicatore si riattiva completamente quando un<br />
segnale ruota registrato oppure premente un tasti.<br />
La distanza giornaliera e velocità media viene azzerata<br />
automaticamente 12 ore dopo l’ultimo segnale ruota.<br />
Per azzerare la distanza totale, premente il tasto <strong>AC</strong><br />
oppure estrarre brevemente la batteria.<br />
(Attenzione: annulla tutte le impostazioni effettuate)<br />
4 . Sostituzione della batteria<br />
<strong>CM</strong> <strong>4.1</strong>: Con l’aiuto di una moneta svitare in senso<br />
antiorario la chiusura a vite sul retro del computer.<br />
Estrarre la batteria usata ed inserire la nuova batteria<br />
litio 3V tipo CR 2032, con il polo positivo in alto.<br />
Riavvitare la chiusura a vite.<br />
Trasmettitore: Il trasmettitore usa una batteria da 12<br />
volt. Svitare il tappo sulla parte superiore del trasmettitore.<br />
Togliere la vecchia batteria e installarne una<br />
nuova di 12 volt, tipo 23A, con il polo positive (+) in<br />
alto. Avvitare il tappo senza stringere eccessivamente.<br />
Si prega di non gettare la batteria scarica nei<br />
rifiuti domestici, bensì di smaltirla negli appositi<br />
contenitori.<br />
5. Rilevazione dei guasti<br />
Indicazione difettosa o assente sul display<br />
-Verificare la corretta posizione della batteria o<br />
sostituire la batteria<br />
La velocità attuale non viene indicata<br />
- Verificare il corretto montaggio del trasmettitore<br />
- Controllare la batteria del trasmettitore,<br />
eventualmente sostituirla<br />
- Verificare se il magnete da raggi sia correttamente<br />
montato sul raggio (direttamente di fronte al<br />
trasmettitore con una distanza max. di 3 mm)<br />
- Verificare la distanza tra trasmettitore e supporto<br />
manubrio (max. 60 cm)<br />
- Controllare se il <strong>CM</strong> <strong>4.1</strong> sia correttamente<br />
agganciato nel supporto manubrio<br />
-Verificare la circonferenza ruota impostata<br />
Velocità troppo alta o troppo bassa<br />
- Verificare la circonferenza ruota impostata<br />
- Controllare l’unità di misura<br />
- Controllare la batteria trasmettitore, eventualmente<br />
sostituirla<br />
- Controllare che non si verifichino disturbi ad es.<br />
dovuti ad altri trasmettitori, sistemi GPS, speciali<br />
illuminazioni ruota, etc. In questo caso<br />
allontanandosi dal raggio d’azione della fonte di<br />
disturbo, riapparirà la normale indicazione<br />
6. Garanzia<br />
MANUALE OPERATIVO<br />
Congratulazioni!<br />
Con l’acquisto del CICLOMASTER <strong>CM</strong> <strong>4.1</strong> siete entrati in possesso di un computer da<br />
bicicletta senza fili di altissima precisione che dispone della più moderna elettronica ed è<br />
resistente alle intemperie. Vi consigliamo di leggere attentamente il presente manuale<br />
operativo.<br />
La particolarità del <strong>CM</strong> <strong>4.1</strong>: dopo l’impostazione della necessaria pre-regolazione nessun<br />
pulsante deve più essere azionato, l’indicazione della velocità, velocità media e distanza<br />
appariranno automaticamente poco dopo la prima rotazione della ruota.<br />
Certificato di garanzia:<br />
Mittente:<br />
Cognome Nome<br />
Via, Nr.<br />
CAP/Luogo<br />
Telefono (durante il giorno) Fax<br />
E-Mail<br />
I<br />
Motivo dell’invio:<br />
Al <strong>CM</strong> <strong>4.1</strong> applichiamo una garanzia di 24 mesi. La<br />
garanzia si limita a difetti di materiale e lavorazione. Le<br />
batterie sono escluse dalla garanzia.<br />
La garanzia è valida solo se il computer e gli accessori<br />
siano stati maneggiati secondo le istruzioni d’uso e<br />
con cura.<br />
In caso di diritto a garanzia, Vi preghiamo di<br />
rivolgerVi al Vostro negoziante o al Vostro distributore<br />
locale oppure inviate il computer, unitamente<br />
alla prova d’acquisto (data) ed ai tutti gli accessori, con<br />
sufficiente affrancatura, a:<br />
CICLO SPORT SERVICE<br />
K. W. Hochschorner GmbH<br />
Konrad- Zuse- Bogen 8<br />
D-82152 Krailling<br />
Telefono: 0049 / 89 / 71 66 98 12<br />
Telefax: 0049 / 89 / 714 07 83<br />
E-Mail: ciclo-service@ciclosport.de<br />
A garanzia scaduta dovranno essere effettuate riparazioni fino a concorrenza di Euro:<br />
Prima dell’invio dell’apparecchio Vi preghiamo<br />
di leggere ancora attentamente le istruzioni<br />
d’uso e di verificare la batteria.<br />
In caso di giustificato diritto a garanzia, l’apparecchio<br />
riparato o altro apparecchio di sostituzione, verrà<br />
riconsegnato gratuitamente.<br />
Riparazioni:<br />
qualora l’apparecchio venga inviato per la riparazione<br />
oppure qualora non venga riconosciuto il diritto alla<br />
garanzia, si procederà automaticamente alla riparazione<br />
fino a concorrenza di Euro 15,-. Il rinvio dell’<br />
apparecchio riparato sarà effettuato in contrassegno.<br />
SPD<br />
✁<br />
Contenido:<br />
- CICLOMASTER <strong>CM</strong> <strong>4.1</strong><br />
- Batería Tipo CR 2032<br />
- Soporte manubrio con ganchos para cables<br />
- Transmisor<br />
- Magneto para rayo<br />
- Cubierta de la batería<br />
- Ganchos para cables<br />
1. Montaje<br />
Figura 1: Montaje posible en el manubrio (Posición A)<br />
y en la parte delantera (Posición B)<br />
Figura 2: Para el montaje en la parte delantera<br />
(Posición B) invertir los pernos de la parte superior.<br />
Quitar la película de protección del lado inferior del<br />
soporte manubrio<br />
Colocar el soporte manubrio en el punto deseado,<br />
presionar ligeramente y enganchar los ganchos para<br />
cables<br />
Figura 3: Fijar el sensor con el gancho para cables a<br />
la horquilla y cortas las partes sobrantes (distancia<br />
máxima del soporte manubrio 60 cm; lo ideal es el<br />
montaje en el lado derecho, ya que el soporte<br />
manubrio y el transmisor deberían encontrarse en el<br />
mismo lado)<br />
Figura 4: Fijar el magneto a un rayo frente al<br />
transmisor<br />
Figura 5: Alinear el transmisor y el magneto (distancia<br />
máxima 3 mm)<br />
Figura 6: Mover el <strong>CM</strong> <strong>4.1</strong> sobre el soporte manubrio<br />
en un cuarto de giro hacia la izquierda, para apretar<br />
darle un cuarto de giro hacia la derecha. Para quitar el<br />
<strong>CM</strong> <strong>4.1</strong> efectuar de nuevo un cuarto de giro a la<br />
izquierda y quitarlo del soporte manubrio.<br />
2. Puesta en funcionamiento<br />
El <strong>CM</strong> <strong>4.1</strong> no presenta teclas, en el sentido común del<br />
término, las regulaciones se producen mediante dos<br />
“teclas” ubicadas en la parte inferior. Estas teclas<br />
pueden apretarse, por ejemplo, con la punta de un<br />
bolígrafo.<br />
Denominación de las teclas: (ver Figura 7)<br />
Colocación de la batería:<br />
Poner la pila tipo CR2032 con el polo positivo hacia<br />
arriba. Apoyar la tapa de la pila y cerrarla con la ayuda<br />
de una moneda. Después de haber colocado la pila, en<br />
la pantalla se visualizan la indicación de la<br />
circunferencia de la rueda, cuyo primero número<br />
brillará intermitentemente.<br />
(Para regresar al modo de configuración vuela a pulsar<br />
durante 3 segundos la tecla ‘SET’ al modalità di<br />
funzione normale).<br />
Pulsando el botón <strong>AC</strong> (en el lado trasero) se borran<br />
todos los valores y ajustes.<br />
Para todas las regulaciones: con la tecla SET se<br />
modifica el valor que brilla a intermitencia, con la tecla<br />
STORE se memoriza el valore y se pasa al valor<br />
sucesivo o a la regulación sucesiva.<br />
Determinación de la<br />
circunferencia de la rueda.<br />
Valor inicial: 2155 mm<br />
Rango de los valores:<br />
0000-3999 mm<br />
Regular con las teclas SET y<br />
STORE, proceder con la tecla STORE.<br />
La circunferencia de la rueda puede obtenerse<br />
del cuadro siguiente, o bien midiéndola personalmente.<br />
Dimensión del neumático Circunferencia<br />
40-559 26 x 1,5 2026 mm<br />
44-559 26 x 1,6 2051 mm<br />
47-559 26 x 1,75 2070 mm<br />
50-559 26 x 1,9 2026 mm<br />
54-559 26 x 2,00 2089 mm<br />
57-559 26 x 2,125 2114 mm<br />
37-590 26 x 1 3/8 2133 mm<br />
32-620 27 x 1 1/4 2199 mm<br />
40-622 28 x 1,5 2224 mm<br />
47-622 28 x 1,75 2268 mm<br />
40-635 28 x 1 1/2 2265 mm<br />
37-622 28 x 1 3/8 2205 mm<br />
20-622 700 x 20C 2114 mm<br />
23-622 700 x 23C 2133 mm<br />
25-622 700 x 25C 2146 mm<br />
28-622 700 x 28C 2149 mm<br />
32-622 700 x 32C 2174 mm<br />
Si se mide personalmente la circunferencia de la<br />
rueda deberá ser marcarse en la rueda anterior y en el<br />
suelo (por ejemplo, con una tiza). Avanzar con la rueda<br />
en línea recta y cumplir exactamente una rotación de<br />
la rueda (con la justa presión y el justo peso del<br />
ciclista) y poner una marca en el suelo. Ahora puede<br />
medirse la exacta circunferencia de la rueda entre las<br />
dos marcas en el suelo (en mm) – v. Figura 8.<br />
En la pantalla aparece la indicación<br />
km/h.<br />
Apretando brevemente la tecla SET es posible escoger<br />
si se desea la indicación en kilómetros (km/h) o en<br />
millas (m/h).<br />
El valor se memoriza gracias a la tecla STORE.<br />
Sucesivamente aparece la visualización<br />
para la configuración<br />
de los kilómetros totales (o<br />
millas totales), con la última cifra<br />
que se enciende a intermitencia.<br />
Rango de los valores: 00000-<br />
99999 km o mi (= Millas)<br />
Configurar con las teclas SET y STORE, proceder con<br />
la tecla STORE.<br />
En la pantalla se enciende intermitentemente<br />
la cifra 24 para la<br />
elección de la indicación de la<br />
hora (formato horario a 12 o 24<br />
horas). En el caso del formato a<br />
12 horas, junto con el horario, la<br />
indicación A/P.<br />
Gracias a la tecla SET se cambia<br />
entre los valores, con la tecla<br />
STORE el valor es memorizado y<br />
puede configurarse la hora.<br />
Con la tecla SET se configuran<br />
primero los minutos, y luego<br />
apretando brevemente la tecla<br />
STORE se prenden y apagan las<br />
horas, que pueden configurarse asimismo con la tecla<br />
SET.<br />
Accionando la tecla STORE se<br />
memoriza el horario y el <strong>CM</strong> 2.1<br />
entra en modalidad de función<br />
normal de ejercicio después 2<br />
seg.<br />
3. Funciones<br />
El <strong>CM</strong> <strong>4.1</strong> presenta un Start/Stop automático en<br />
modalidad de guía. Para ello es necesario que se<br />
encuentre sobre el soporte de manillar (al no utilizar el<br />
<strong>CM</strong> <strong>4.1</strong> no debería permanecer sobre el soporte de<br />
manillar).<br />
Unos 4 segundos después del primer giro de la rueda,<br />
la pantalla del <strong>CM</strong> <strong>4.1</strong> muestra las siguientes<br />
funciones:<br />
Arriba:<br />
Velocidad medial en kilómetros<br />
por hora (km/h) o millas por<br />
hora (m/h)<br />
Rango de indicación 0 – 199,9<br />
km/h o m/h<br />
Centro:<br />
Velocidad actual en kilómetros por hora (km/h) o millas<br />
por hora (m/h)<br />
Rango de indicación 0 – 199,9 km/h o m/h<br />
Abajo:<br />
Distancia diaria (DST) en kilómetros o millas<br />
Rango de indicación 0 – 999,99 km o mi<br />
Al cabo de 1 minuto con señal<br />
de rueda ausente, en la pantalla<br />
es visible el horario en la<br />
distancia total (ODO: 0 – 99999<br />
kmo mi).<br />
Apenas se registra nuevamente un señal de rueda o<br />
pulsando una tecla, el indicador se reactiva completamente.<br />
La distancia diaria se pone en cero automáticamente a<br />
las 12 horas de la última señal de rueda.<br />
Para poner en cero la distancia total, pulsando la tecla<br />
<strong>AC</strong> o extraer brevemente la pila.<br />
(Atención: anula todas las regulaciones efectuadas.)<br />
4 . Sustitución de la batería<br />
<strong>CM</strong> <strong>4.1</strong>: Con la ayuda de una moneda, girar en<br />
sentido antihorario el cierre de rosca de la parte<br />
trasera del ordenador. Extraer la batería usada y<br />
colocar la nueva batería al litio 3V tipo CR 2032, con el<br />
polo positivo hacia arriba. Volver a girar el cierre de<br />
rosca.<br />
Transmisor: El transmisor contiene una batería de 12<br />
volt. Para lo cual desroscar con una moneda la tapa de<br />
la batería en la parte superior del transmisor, retirar la<br />
batería gastada y montar una batería nueva de 12 volt<br />
del tipo 23A con el polo positive hacia arriba. Roscar<br />
de nuevo la tapa de batería. Preste atención de no<br />
pasar de rosca la tapa.<br />
Se ruega no tirar la batería descargada en los<br />
residuos domésticos, sino de usar los contenedores<br />
correspondientes.<br />
5. Detección de los desperfectos<br />
Indicación defectuosa o ausente en la pantalla<br />
-Verificar la correcta posición de la batería o sustituir<br />
la batería.<br />
La velocidad actual no está indicada<br />
- Verificar el correcto montaje del transmisor<br />
- Controlar la batería del transmisor, eventualmente<br />
sustituirla<br />
- Verificar si el magneto para rayos está correctamente<br />
montado en el rayo (directamente enfrente<br />
del transmisor con una distancia máxima de 3 mm)<br />
- Verificar la distancia entre el transmisor y el soporte<br />
manubrio (máx. 60 cm)<br />
- Controlar si el <strong>CM</strong> <strong>4.1</strong> está correctamente<br />
enganchado en el soporte manubrio<br />
-Verificar la circunferencia de la rueda configurada<br />
Velocidad demasiado alta o demasiado baja<br />
- Verificar la circunferencia de la rueda configurada<br />
- Controlar la unidad de medida<br />
- Controlar la batería del transmisor, eventualmente<br />
sustituirla<br />
- Controlar que no se verifiquen interferencias, por<br />
ejemplo causadas por otros transmisores, sistemas<br />
GPS, iluminaciones especiales de la rueda, etc. En<br />
este caso, alejándose del radio de acción de la<br />
fuente de interferencia, volverá a aparecer la<br />
indicación normal<br />
6. Garantía<br />
MANUAL OPERATIVO<br />
¡Felicitaciones!<br />
Con la compra del CICLOMASTER <strong>CM</strong> <strong>4.1</strong> usted tiene ahora en su poder un ordenador<br />
para bicicleta inalámbrico de altísima precisión que dispone de las últimas innovaciones<br />
electrónicas y es resistente a la intemperie. Le aconsejamos leer atentamente el presente<br />
manual operativo.<br />
La particularidad del <strong>CM</strong> <strong>4.1</strong>: después de la efectuación de la necesaria regulación previa,<br />
no se debe tocar ninguna tecla, la indicación de la velocidad, la velocidad media y distancia<br />
aparecerán automáticamente poco después de la primera rotación de la rueda.<br />
Certificado de garantía:<br />
Remitente:<br />
Apellido Nombre<br />
Calle, Nr.<br />
C.P./Localidad<br />
Teléfono (en horario diurno) Fax<br />
E-Mail<br />
E<br />
Motivo del envío:<br />
Al <strong>CM</strong> <strong>4.1</strong> se aplica una garantía de 24 meses. La<br />
garantía se limita a defectos de material y de producción.<br />
Las baterías están excluidas de la garantía.<br />
La garantía es válida sólo si el ordenador y los<br />
accesorios han sido manejados siguiendo las<br />
instrucciones de uso y con cuidado.<br />
En caso de derecho de garantía, les rogamos<br />
dirigirse a su vendedor o a su distribuidor local, o<br />
enviar el ordenador, junto con el comprobante de<br />
compra (fecha) y con todos los accesorios, con sellos<br />
suficientes, a:<br />
CICLO SPORT SERVICE<br />
K. W. Hochschorner GmbH<br />
Konrad- Zuse- Bogen 8<br />
D-82152 Krailling<br />
Teléfono: 0049 / 89 / 71 66 98 12<br />
Telefax: 0049 / 89 / 714 07 83<br />
E-Mail: ciclo-service@ciclosport.de<br />
Antes de enviar el aparato, les rogamos leer<br />
nuevamente y con atención las instrucciones de<br />
uso y verificar la batería.<br />
En caso de justificado derecho a la garantía, el aparato<br />
reparado u otro aparato en sustitución, serán entregados<br />
gratuitamente.<br />
Reparaciones:<br />
En caso de que el aparato sea enviado para la<br />
reparación, o cuando no se reconozca el derecho a la<br />
garantía, se procederá automáticamente a la reparación<br />
hasta un importe de 15 Euros. El envío del aparato<br />
al remitente será efectuado contra reembolso.<br />
Cuando la garantía esté vencida, deberán efectuarse las reparaciones hasta llegar a un importe en Euros de<br />
SPD<br />
✁<br />
Inhoud:<br />
- CICLOMASTER <strong>CM</strong> <strong>4.1</strong><br />
- Batterij Type CR 2032<br />
- Stuurhouder met kabelklem voor de bevestiging<br />
- Zender<br />
- Spaakmagneet<br />
- Deksel batterij<br />
- Kabelklem<br />
1. Montage<br />
Afbeelding 1: Montage mogelijk op het stuur (Positie<br />
A) en op het voorste deel (Positie B)<br />
Afbeelding 2: Voor de montage op het voorste deel<br />
(Positie B) moet u de bouten van de bovenkant<br />
verwisselen<br />
Verwijder de beschermende folie van de onderkant van<br />
de stuurhouder<br />
Breng de stuurhouder op het gewenste punt in positie,<br />
oefen een lichte druk uit bevestig de stuurhouder met<br />
de kabelklem<br />
Afbeelding 3: Bevestig de sensor op de vork en snij<br />
de overtollige delen af (maximumafstand vanaf de<br />
stuurhouder 60 cm. De montage aan de rechterkant is<br />
ideaal aangezien de stuurhouder en de zender zich<br />
aan dezelfde kant moeten bevinden)<br />
Afbeelding 4: Bevestig de magneet aan een spaak<br />
tegenover de zender<br />
Afbeelding 5: Lijn de zender en de magneet uit (max.<br />
afstand 3 mm)<br />
Afbeelding 6: Verplaats de <strong>CM</strong> <strong>4.1</strong> op de stuurhouder<br />
een kwartslag naar links en om hem vast te zetten een<br />
kwartslag naar rechts. Om de <strong>CM</strong> <strong>4.1</strong> te verwijderen<br />
draait u hem opnieuw een kwartslag naar links en trekt<br />
u hem van de stuurhouder.<br />
2. Inwerkingstelling<br />
De <strong>CM</strong> 2.1 heeft geen toetsen in de gewone zin van<br />
het woord. De instellingen vinden plaats met de twee<br />
“toetsen” die zich op de onderzijde bevinden. Deze<br />
toetsen kunnen ingedrukt worden met bijvoorbeeld de<br />
punt van een ballpoint.<br />
Benaming van de toetsen: (zie Afbeelding 7)<br />
Plaatsing van de batterij:<br />
Plaats de batterij type CR2032 met de positieve pool<br />
omhoog. Plaats het batterijdeksel en sluit het met<br />
behulp van een muntje. Na de plaatsing van de batterij<br />
verschijnt de aanduiding van de omtrek op het display.<br />
(Om weer in de instelmodus te komen, dient u in de<br />
normale modus de toets ‚SET’ 3 seconden lang<br />
ingedrukt te houden).<br />
Knop '<strong>AC</strong>' aan de onderzijde van het apparaat<br />
indrukken, schrapt alle waarden en instellingen.<br />
Voor alle instellingen: met de toets SET wijzigt u de<br />
knipperende waarde, met de toets STORE bewaart u<br />
de waarde en gaat u over naar de volgende waarde, of<br />
naar de volgende instelling.<br />
Instelling van de omtrek van<br />
het wiel<br />
Begininstelling: 2155 mm<br />
Range van de waarden:<br />
0000-3999 mm<br />
Instellen met de toetsen SET en<br />
STORE, verdergaan met de toets STORE.<br />
De omtrek van het wiel kan afgeleid worden uit<br />
de tabel of zelf gemeten worden.<br />
Afmetingen luchtband Omtrek<br />
40-559 26 x 1,5 2026 mm<br />
44-559 26 x 1,6 2051 mm<br />
47-559 26 x 1,75 2070 mm<br />
50-559 26 x 1,9 2026 mm<br />
54-559 26 x 2,00 2089 mm<br />
57-559 26 x 2,125 2114 mm<br />
37-590 26 x 1 3/8 2133 mm<br />
32-620 27 x 1 1/4 2199 mm<br />
40-622 28 x 1,5 2224 mm<br />
47-622 28 x 1,75 2268 mm<br />
40-635 28 x 1 1/2 2265 mm<br />
37-622 28 x 1 3/8 2205 mm<br />
20-622 700 x 20C 2114 mm<br />
23-622 700 x 23C 2133 mm<br />
25-622 700 x 25C 2146 mm<br />
28-622 700 x 28C 2149 mm<br />
32-622 700 x 32C 2174 mm<br />
Indien u zelf de omtrek van het wiel meet, dient u een<br />
merkteken op het voorwiel en op de grond aan te<br />
brengen (met krijt bijvoorbeeld). Beweeg het wiel nu<br />
recht vooruit en laat het exact één rotatie verrichten<br />
(met de juiste druk en het juiste gewicht van de<br />
wielrijder) en breng een merkteken aan op de grond.<br />
Nu kunt u de exacte omtrek van het wiel meten tussen<br />
de twee merktekens op de grond (in mm) – zie<br />
Afbeelding 8.<br />
Op het display verschijnt de<br />
aanduiding km/h.<br />
Door kort op de toets SET te drukken, is het mogelijk<br />
te kiezen of de aanduiding in kilometers (km/h) of in<br />
mijlen (m/h) getoond moet worden. Verdergaan met de<br />
toets STORE.<br />
Vervolgens verschijnt het display<br />
voor de instelling van het totaal<br />
aantal kilometers (of het totaal<br />
aantal mijlen), waarvan het<br />
eerste cijfer knippert.<br />
Range van de waarden: 00000-<br />
99999 km of mi (= mijlen)<br />
Instellen met de toetsen SET en STORE.<br />
De waarde wordt bewaard<br />
dankzij de toets STORE en op<br />
het display knippert het cijfer 24<br />
voor de keuze van de uuraanduiding<br />
(uurformaat in 12 of 24<br />
uur). Bij het formaat van 12 uur,<br />
verschijnt naast het uur de aanduiding A/P.<br />
Dankzij de toets SET kunt u zich<br />
tussen de waarden verplaatsen,<br />
met de toets STORE wordt de<br />
waarde bewaard en kan het uur<br />
ingesteld worden.<br />
Met de toets SET worden eerst<br />
de minuten ingesteld en vervolgens,<br />
door kort op STORE te<br />
drukken, zullen de uren knipperen,<br />
die eveneens ingesteld<br />
kunnen worden met de toets<br />
SET.<br />
Door op de toets STORE te<br />
drukken, wordt de tijd bewaard<br />
en na 2 seconden neemt de<br />
<strong>CM</strong> 2.1 de werkwijze voor het<br />
normale gebruik aan.<br />
3. Functies<br />
De <strong>CM</strong> <strong>4.1</strong> heeft een automatische Start/Stop in de<br />
besturingswerkwijze. Daarvor is het noodzakelijk dat<br />
de computer zich op de stuurhouder bevindt (indien de<br />
<strong>CM</strong><strong>4.1</strong> niet gebruikt wordt, mag de <strong>CM</strong> <strong>4.1</strong> niet op de<br />
stuurhouder blijven).<br />
Ongeveer 4 seconden na de eerste draaiing van het<br />
wiel toont het display van de <strong>CM</strong> <strong>4.1</strong> de volgende<br />
functies:<br />
Boven:<br />
Gemiddelde snelheid in kilometers<br />
per uur (km/h) of in<br />
mijlen per uur (m/h)<br />
Range van de aanduiding<br />
0 – 199,9 km/h of m/h<br />
Midden:<br />
Actuele snelheid in kilometers per uur (km/h) of in<br />
mijlen per uur (m/h)<br />
Range van de aanduiding 0 – 199,9 km/h of m/h<br />
Onder:<br />
Dagafstand (DST) in kilometers of mijlen<br />
Range van de aanduiding 0 – 999,99 km of mi<br />
Na 1 minute zonder signaal van<br />
de zender, zal het display alleen<br />
nog maar de tijd en de totale<br />
afstand (ODO: 0 – 99999 km of<br />
mi) tonen.<br />
Zodra een nieuw signaal van de zender geregistreerd<br />
wordt of een toets wordt gedrukt, zal de indicator<br />
opnieuw volledig geactiveerd worden.<br />
12 uur na het laatste wielsignaal zal de dagafstand<br />
automatisch op nul gezet worden.<br />
Om de totale afstand op nul te zetten, knop '<strong>AC</strong>' aan<br />
de onderzijde van het apparaat indrukken of dient u de<br />
batterij kort weg te nemen.<br />
(Let op: het annuleert alle uitgevoerde instellingen)<br />
4 . Vervanging van de batterij<br />
<strong>CM</strong> <strong>4.1</strong>: Met behulp van een muntje schroeft u tegen<br />
de wijzers van de klok in de schroefsluiting op de<br />
achterkant van de computer los. Neem de gebruikte<br />
batterij weg en plaats een nieuwe lithiumbatterij 3V<br />
type CR 2032, met de positieve pool omhoog. Schroef<br />
de schroefsluiting opnieuw vast.<br />
Zender: De zender heeft een 12 V batterij nodig.<br />
Schroef het deksel van het batterijvak ann de<br />
achterkant van de zender los en haal de oude batterij<br />
eruit. Zet er een nieuwe batterij in van het type 23A<br />
met de plus (+) naar boven. Schroef het deksel weer<br />
stevig, maar zonder te forceren, ob het batterijvak.<br />
Gooi de lege batterij niet weg met het huishoudelijk<br />
afval maar in de speciale bakken voor<br />
batterijen.<br />
5. Aanduiding van defecten<br />
Aanduiding defect of afwezig op het display<br />
- Controleer de correcte positie van de batterij of<br />
vervang de batterij<br />
De huidige snelheid wordt niet getoond<br />
- Controleer de correcte montage van de zender<br />
- Controleer de batterij van de zender en vervang deze<br />
zonodig<br />
- Controleer of de spaakmagneet correct op de spaak<br />
gemonteerd is (rechtstreeks tegenover de zender, op<br />
een max.afstand van 3 mm)<br />
- Controleer de afstand tussen de zender en de<br />
stuurhouder (max. 60 cm)<br />
- Controleer of de <strong>CM</strong> <strong>4.1</strong> correct op de stuurhouder<br />
geplaatst is<br />
- Controleer de ingestelde omtrek van het wiel<br />
Te hoge of te lage snelheid<br />
- Controleer de ingestelde omtrek van het wiel<br />
- Controleer de meeteenheid<br />
- Controleer de batterij van de zender, en vervang deze<br />
zonodig<br />
- Controleer of zich geen storingen voordoen, door<br />
bijvoorbeeld andere zenders, GPS-systemen,<br />
speciale verlichting van het wiel, enz. In dit geval zal<br />
de normale aanduiding verschijnen zodra u zich<br />
verwijderd uit de actieradius van de storingsbron.<br />
6. Garantie<br />
De <strong>CM</strong> <strong>4.1</strong> wordt 24 maanden door garantie gedekt.<br />
De garantie wordt beperkt tot materiaal en bewerkingsdefecten.<br />
De batterijen maken geen deel uit van<br />
de garantie.<br />
De garantie is alleen geldig indien de computer en de<br />
accessoires behandeld zijn volgens de instructie voor<br />
het gebruik en met zorg.<br />
Indien u recht op garantie heeft, dient u zich te<br />
wenden tot uw verkoper of uw plaatselijke<br />
distributeur, of stuurt u de computer samen met het<br />
koopbewijs (datum) en alle accessoires, voldoende<br />
gefrankeerd op naar:<br />
CICLO SPORT SERVICE<br />
K. W. Hochschorner GmbH<br />
Konrad- Zuse- Bogen 8<br />
D-82152 Krailling<br />
HANDLEIDING<br />
Gefeliciteerd!<br />
Met de aankoop van de CICLOMASTER <strong>CM</strong> <strong>4.1</strong> bent u in het bezit gekomen van een<br />
draadloze fietscomputer met een zeer hoge precisie, die over de modernste elektronica<br />
beschikt en bestand is tegen weer en wind. Wij raden u aan deze handleiding met<br />
aandacht te lezen.<br />
Het bijzondere van de <strong>CM</strong> <strong>4.1</strong>: na de instelling van de benodigde voorafstelling hoeft u op<br />
geen enkele knop meer te drukken, de indicatie van de snelheid, de gemiddelde snelheid<br />
en de afstand verschijnen automatisch, kort na het eerste draaien van het wiel.<br />
Garantiecertificaat:<br />
Afzender:<br />
Achternaam Naam<br />
Straat, nr.<br />
Postcode/Plaats<br />
Telefoon (overdag) Fax<br />
E-Mail<br />
NL<br />
Reden van verzending:<br />
Telefoon: 0049 / 89 / 71 66 98 12<br />
Telefax: 0049 / 89 / 714 07 83<br />
E-mail: ciclo-service@ciclosport.de<br />
Voordat u het toestel verstuurt, dient u eerst<br />
nogmaals met aandacht de instructies voor het<br />
gebruik na te lezen en de batterij te controleren.<br />
Indien uw recht op garantie gerechtvaardigd is, zal het<br />
gerepareerde toestel, of een ander vervangend toestel,<br />
u gratis toegezonden worden.<br />
Reparaties:<br />
Indien het toestel verstuurd wordt voor reparatie, of<br />
indien het recht op garantie niet toegekend wordt, zal<br />
automatisch overgegaan worden tot reparatie tot een<br />
bijdrage van 15 Euro. De terugzending van het toestel<br />
zal plaatsvinden onder rembours.<br />
Bij een vervallen garantie zullen de reparaties uitgevoerd worden tot een bijdrage van Euro.<br />
SPD