MANUAL www .hughes-and-kettner.com
MANUAL www .hughes-and-kettner.com
MANUAL www .hughes-and-kettner.com

You also want an ePaper? Increase the reach of your titles
YUMPU automatically turns print PDFs into web optimized ePapers that Google loves.
ZENAMP-<strong>MANUAL</strong><br />
8.2 AC POWER AND THE GLOBAL CURRENT ADAPTER<br />
NOTE: Before plugging into the wall socket, make certain the amp<br />
is set to the proper voltage for your locale. You can read the amp's<br />
voltage setting in the Voltage Selector window found on the back<br />
of the unit. Also check the fuse specifications printed above the<br />
amp's power cord socket, <strong>and</strong> ensure that the fuses you are using<br />
have the correct value for your local current.<br />
zenAmp can operate at AC currents of 230 volts, 117 volts or<br />
100 volts. Use the VOLTAGE SELECTOR to adjust the voltage<br />
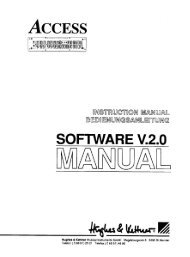
accordingly (see Diagram 1):<br />
• Press the fuse's safety latch (1) towards the window (3) with a<br />
small screwdriver <strong>and</strong> remove it with the two fuses.<br />
• Pull the cartridge (4) out of its socket.<br />
• Rotate the cartridge (4) <strong>and</strong> plug it back into the socket so the<br />
desired voltage is legible.<br />
• Replace the previously mounted fuses (5). Make certain the<br />
values of your fuses are identical to those required for your local<br />
voltage. The values are specified above the amp's power cord<br />
socket.<br />
• Reinsert the fuse cartridge (2) with the new fuses (5).<br />
• Before you plug into the wall socket, check again to ensure the<br />
correct voltage rating is legible in the VOLTAGE SELECTOR<br />
window (3)<br />
48<br />
8.2 NETZANSCHLUSS UND WELTSPANNUNGSADAPTION<br />
HINWEIS: Stellen Sie bitte vor dem Anschluss des zenAmp sicher,<br />
daß die vorh<strong>and</strong>ene Netzspannung mit dem im Sichtfenster des<br />
VOLTAGE SELECTORS angegebenen Spannungswert übereinstimmt.<br />
Überprüfen Sie auch die Sicherungswerte entsprechend dem<br />
Aufdruck nahe der Anschlußbuchse.<br />
Der zenAmp kann an den Netzspannungen 230 V, 117 V und 100 V<br />
betrieben werden. Die Anpassung erfolgt mittels des in die<br />
Netzbuchse integrierten VOLTAGE SELECTORS. Dazu wird wie folgt<br />
vorgegangen (siehe Abb.1):<br />
• Mittels eines kleinen Schraubendrehers die Sperre (1) des<br />
Sicherungshalters in Richtung Sichtfenster (3) drücken und diesen<br />
zusammen mit den beiden Sicherungen herausziehen.<br />
• Den Steckeinsatz (4) herausziehen.<br />
• Der Steckeinsatz (4) wird so gedreht und wieder eingesteckt, daß<br />
der Aufdruck der gewünschten Netzspannung nach außen zeigt.<br />
• Die vorher montierten Sicherungen (5) werden ersetzt. Verwende<br />
nur den nahe der Anschlußbuchse aufgedruckten<br />
Sicherungswert, der für die neue Netzspannung vorgesehen ist!<br />
• Den Sicherungshalter (2) zusammen mit den neuen Sicherungen<br />
(5) einsetzen.<br />
• Vor dem Netzanschluß nochmals prüfen, ob der richtige<br />
Spannungswert im Sichtfenster (3) des VOLTAGE SELECTORS<br />
erkennbar ist.<br />
MAINS IN / VOLTAGE SELECTOR