ReptiBreeder - Dohse Aquaristik KG
ReptiBreeder - Dohse Aquaristik KG
ReptiBreeder - Dohse Aquaristik KG

You also want an ePaper? Increase the reach of your titles
YUMPU automatically turns print PDFs into web optimized ePapers that Google loves.
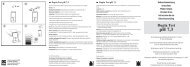
<strong>ReptiBreeder</strong><br />
Usage instructions<br />
Please read the <strong>ReptiBreeder</strong> instruction manual before use to get<br />
optimum hatching quotas and healthy offspring.<br />
1. Features:<br />
The <strong>ReptiBreeder</strong> hobby incubator has a two-piece Styrofoam<br />
housing. The upper part contains the viewing-window and, on<br />
the inside, the heating-cord and the temperature feeler, with the<br />
digital temperature control on the outside. The lower part has<br />
air holes, and, at the bottom, water channels for regulating the<br />
humidity during incubation and hatching phases.<br />
The incubator’s interior measurements are designed for the use<br />
of house-cricket boxes that are very well suited for fi lling with<br />
incubation material. A foam-plastic inlay is included for eggs that<br />
are to be incubated without substrate.<br />
2. Getting Started:<br />
Use the incubator in a room with constant temperature, as variations<br />
of the ambient temperature of the incubator affect its inside<br />
temperature. The incubator should be placed away from heat<br />
sources and direct sunlight. Place the incubator on a level surface<br />
free of vibrations or shocks, and take care that the air-holes are<br />
not obstructed.<br />
Reaching the desired temperature can take several hours, depending<br />
on the outside temperature, the desired inside temperature,<br />
the temperature feeler’s position and the number of boxes with<br />
incubation material. We recommend running the incubator for<br />
one day before placing the eggs so that the incubation material<br />
can absorb the heat necessary to reach the desired temperature.<br />
Take care to adjust the height of the temperature feeler using the<br />
included holder so that it is on a level with the eggs inside the<br />
incubating substrate.<br />
Insert the eggs into the substrate within the boxes following<br />
the one-day warm-up-period. Due to opening the incubator as<br />
well as the number and temperature of the eggs introduced the<br />
temperature may drop and vary and only slowly return to the<br />
preset value. Please do not change your programming during this<br />
adjustment period.<br />
Slight variations in temperature may also occur in the course of<br />
incubation. This is caused by environmental temperature, the<br />
number of incubation boxes and eggs, incubation material and<br />
humidity. This, however, has no negative effects on the incubation<br />
process, as natural environments do not have constant temperatures<br />
either.<br />
A good hatching rate depends, among other factors, on the selection<br />
of the proper incubation substrate and its humidity; these<br />
may vary according to the species of the reptile. We have included<br />
some general advice for incubation in this instruction manual.<br />
However, in case of unsatisfactory results we cannot give you<br />
detailed instructions on account of the different reptile species and<br />
the incubation requirements of their eggs. We recommend the<br />
book: “Incubation of Reptile Eggs Basics, Guidelines, Experiences”<br />
by Gunther Köhler.<br />
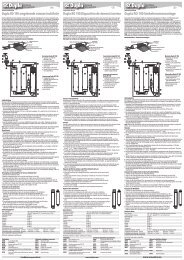
3. Using the Temperature Control:<br />
3.1 Hardware and Display Panel<br />
� LED Indicator<br />
� Plus Button<br />
� LCD Display<br />
� Minus Button<br />
� Temperature Indicator<br />
� Displays “H” or “A” for “HEAT”<br />
or “ALARM” Programming<br />
� “HEAT” indicator when heat is on<br />
� “TEM“ indicator when<br />
programming temperature alarm<br />
� Alarm symbol<br />
3.2 Switching On:<br />
When the current is connected, all symbols are shown on the<br />
display, half a second later the system switches into the operation<br />
mode. At the fi rst start-up the default settings are used, later the<br />
memory chip stores your last programmed settings.<br />
3.3 Programming the Temperature:<br />
29,5 H<br />
Push „+“ button, the display shows the set temperature, “H”<br />
indicates that you are in the temperature programming mode.<br />
Use the “+“ and “-“ buttons to set the desired temperature. The<br />
value can be set in 0.1° C intervals between 20 and 45° C.<br />
Without further button-pushing the system switches into the<br />
operation mode after 6 seconds. For safety reasons the heater is<br />
switched off in the programming mode.<br />
In the operation mode heating is indicated by the lit LED (1) and<br />
the “HEAT“ (7) on the display.<br />
3.4 Programming the Alarm:<br />
00<br />
A<br />
TEM<br />
Push “-“ button, the display shows the alarm temperature, “A”<br />
indicates that you are in the alarm programming mode.<br />
Use the “+“ and “-“ buttons to set the desired alarm temperature.<br />
The value can be set in 1° C intervals between 1 and 15° C.<br />
(Setting 00 switches the alarm off)<br />
Without further button-pushing the system switches into the<br />
operation mode after 6 seconds. For safety reasons the heater is<br />
switched off in the programming mode.<br />
3.5. Operation mode:<br />
26.0<br />
29<br />
HE AT<br />
In this example the measured temperature is 26.0° C. 29.0<br />
indicates the set temperature rounded off without digits after the<br />
decimal point.<br />
If the measured temperature is above or below the set alarm temperature,<br />
the alarm symbol, the indicator, “TEM“ and the display<br />
background light blink.<br />
3.6 Default Settings:<br />
Set temperature: 20° C<br />
Temperature Alarm: 00 (not activated)<br />
3.7 Technical Data:<br />
Temperature display range: -9.9° C to 99.9 ° C<br />
Temperature control range 20.0° C – 45.0° C<br />
Temperature control accuracy: 0.1° C<br />
Display indicator accuracy: 0.1° C<br />
Alarm programming and measuring range: 1-15° C<br />
Heating-cord power: 60 W<br />
�<br />
�<br />
� � � � � �<br />
Eine Marke der<br />
<strong>Dohse</strong> <strong>Aquaristik</strong> <strong>KG</strong><br />
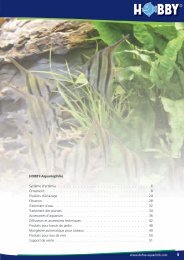
4. General Recommendations for Incubating:<br />
Brooding eggs in a brooding apparatus is called incubation It<br />
is practiced to protect the eggs from predating parents and to<br />
control brooding at optimum temperature and humidity. Only<br />
collect the eggs when the female has completed her laying. If the<br />
laying-process is interrupted – e.g. due to stress – the females can<br />
fall into a lethal laying-distress.<br />
The eggs are removed from the parents’ terrarium and placed in<br />
the prepared incubator. They must be laid in the incubation substrate<br />
in the same position as they were found, i.e. they must not<br />
be turned. The eggs must not be moved until hatching. Otherwise<br />
there is the danger that changing the position of the egg poles<br />
causes the foetus to be crushed by the yolk-sac, as reptile eggs,<br />
unlike birds’ eggs, have no chalazae. If eggs are later overturned<br />
by baby animals, this danger no longer exists due to the advanced<br />
stage of development of the hatchlings.<br />
If eggs of different species or of different age of the same species<br />
are incubated simultaneously, it may be necessary to mark the<br />
eggs accordingly. Wait until the eggshells have hardened before<br />
you mark them. Many an impatient terrarium-owner has poked<br />
a hole into a delicate eggshell with her pencil. Naturally, hardshelled<br />
eggs too must be handled carefully.<br />
The humidity of the substrate has an important infl uence on the<br />
development of reptile eggs. Soft-shelled eggs especially absorb a<br />
great amount of humidity during incubation. Inadequate humidity<br />
of the substrate would dehumidify the eggs and cause death of<br />
the developing animal by dehydration.<br />
Vermiculite is an incubating substrate suitable for several species<br />
of reptiles; its humidity can be controlled by choosing the right<br />
grain size and by adding water. Fine-grained vermiculite can hold<br />
more water and adheres to the eggs more closely. It is recommended<br />
for small and soft-shelled eggs. Coarse-grained vermiculite<br />
improves the gas exchange due to its greater number of air-fi lled<br />
pores. It is recommended for large and hard-shelled eggs. We<br />
sell both grades of vermiculite under our brand-name HOBBY in<br />
4-litre packages. Evaporated water from the incubation substrate<br />
must be replaced regularly. The total weight of the eggs in a single<br />
container should not exceed half the weight of the respective<br />
saturated substrate.<br />
Depending on the reptile species other incubation substrates<br />
such as a 1:1 mixture of sand and peat or seramis may be used.<br />
Alternatives are bits of foamed plastic or foamed plastic blocks<br />
that are only moist at the bottom, with holes to hold the eggs.<br />
Hard-shelled eggs of geckos and turtles may often be successfully<br />
brooded without any substrate on a grate above the water-surface<br />
or on coarse gravel. Eggs of some species like gerrhosaurus fl avigularis,<br />
basiliscus or ameiva ameiva may react unfavourably to toohigh<br />
humidity towards the end of the brooding-period. Brooding<br />
these species without substrate has proved to be successful.<br />
The time of hatching can vary greatly within a single clutch. The<br />
incubation period can vary between several weeks and several<br />
months. By the time the last babies hatch, the fi rst-to-arrive may<br />
already have grown substantially. Temperature and humidity are<br />
the decisive factors. To get out of the egg the hatchling breaks the<br />
shell with its egg tooth that develops in the embryonic stage and<br />
is shed a couple of days after hatching.<br />
Always disinfect the incubator with Reptix Health cleansing-spray<br />
after each incubation.<br />
Source: Slightly altered with kind permission from the book „Faszination<br />
Terraristik” by Oliver Drewes, published by Wachtberg<br />
Verlag.<br />
5. Safety Notes:<br />
- the apparatus may no longer be used if power or heating cords<br />
are defective<br />
- heating-cords must be cleaned of dust and dirt particles before<br />
use<br />
- disconnect the power cord before opening the incubator, maintenance<br />
and cleaning<br />
- clean the upper part with a damp cloth only, do not immerse it<br />
in water and do not use a hose<br />
DOHSE AQUARISTIK <strong>KG</strong> • OTTO-HAHN-STR. 9 • D-53501 GRAFSCHAFT-GELSDORF • Telefon: +49 (0)2225-9415-0 • www.dohse-terraristik.com<br />
�