(europa) user's manual and warranty (europe / usa) - DT Swiss
(europa) user's manual and warranty (europe / usa) - DT Swiss
(europa) user's manual and warranty (europe / usa) - DT Swiss

You also want an ePaper? Increase the reach of your titles
YUMPU automatically turns print PDFs into web optimized ePapers that Google loves.
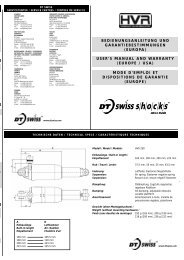
<strong>DT</strong><strong>Swiss</strong>.QXD:PRO_BE~1.QXD 17.10.2007 15:53 Uhr Seite 1<br />
WICHTIG!<br />
WICHTIG!<br />
WICHTIG!<br />
WICHTIG!<br />
Set A<br />
DEUTSCH<br />
BEDIENUNGSANLEITUNG UND GARANTIEBESTIMMUNGEN (EUROPA)<br />
Wir gratulieren Ihnen zum Kauf Ihres neuen <strong>DT</strong> <strong>Swiss</strong> Dämpfers! Sie haben sich für ein Schweizer Qualitätsprodukt führender Dämpfertechnologie entschieden.<br />
Lesen Sie die gesamte Bedienungsanleitung vor der Inbetriebnahme des Dämpfers aufmerksam durch! Die Bedienungsanleitung muss auch an Drittpersonen vor der Fahrt ausgehändigt werden.<br />
Der SSD 225 ist ausschliesslich als Feder- /Dämpfereinheit für Fahrräder zu gebrauchen. Die Verwendung des Dämpfers oder dessen Teile als Werkzeug oder Spielzeug sowie eine von der Bedienungsanleitung abweichende H<strong>and</strong>habung ist nicht zulässig.<br />
Die Einhaltung der nachstehenden Bestimmungen betreffend Montage, Einstellung und Wartung des Dämpfers ist Voraussetzung für ein einw<strong>and</strong>freies Funktionieren und einen unfallfreien Einsatz. Die Nichtbeachtung der Bestimmungen<br />
kann zu Unfällen mit unter Umständen schwerwiegenden Verletzungen führen. Ausserdem fällt in diesem Fall die Produktegarantie der Herstellerfirma dahin.<br />
Set B<br />
O-Ring<br />
MONTAGE<br />
Drehmomentschlüssel<br />
1<br />
Einbaubuchsensets auf Vollständigkeit<br />
prüfen. Pro Dämpfereinbauseite muss ein<br />
2 Überprüfen Sie, ob der Dämpfer in vorliegender<br />
Einbaulänge vom Rahmenhersteller<br />
3<br />
Richtigkeit des Montagebuchsenmasses<br />
prüfen (± 0.2 mm).<br />
4<br />
Montagebuchsensatz mit Dämpfer<br />
vollständig montieren.<br />
5<br />
Schrauben mit Anzugsmoment gemäss<br />
Rahmenherstellerangabe anziehen.<br />
6<br />
Set A oder B wie abgebildet vorh<strong>and</strong>en<br />
sein.<br />
zugelassen ist.<br />
ACHTUNG! Nur vom Rahmenhersteller<br />
vorgeschriebene Befestigungsschrauben<br />
verwenden!<br />
WICHTIG!<br />
A) PASSENDEN LUFTDRUCK EINSTELLEN<br />
± 0.2 mm<br />
7<br />
Ventildeckel mit der H<strong>and</strong> öffnen.<br />
8<br />
a) Pumpe gemäss Bedienungsanleitung des Pumpenherstellers auf Ventilkörper<br />
aufschrauben. Der erforderliche Luftdruck hängt von der Rahmengeometrie, dem<br />
9<br />
ACHTUNG! Plötzlicher<br />
Druckverlust möglich!<br />
Fahrergewicht und dem Fahrstil ab.<br />
b) Für die erste Einstellung auf 7 bar aufpumpen.<br />
c) Pumpe aufgeschraubt lassen.<br />
ACHTUNG! Plötzlicher Druckverlust möglich! Angegebenes Anzugsmoment des<br />
Pumpenherstellers beachten! Maximaler Luftdruck 18 bar!<br />
Pumpe entfernen.<br />
10 11<br />
B) AUSFEDERGESCHWINDIGKEIT<br />
(ZUGSTUFE) EINSTELLEN<br />
152mm/165mm/190mm/200mm<br />
ACHTUNG! Plötzlicher Druckverlust möglich! Ein leichtes Zischgeräusch (komprimierte<br />
Luft aus der Pumpe) ist normal.<br />
WICHTIG!<br />
WICHTIG!<br />
Ventilklappe aufschrauben.<br />
Freigängigkeit an Rahmen und Schwinge<br />
eingefedert und ausgefedert prüfen.<br />
ACHTUNG! Wenn der Dämpfer<br />
den Rahmen berührt, darf das Fahrrad<br />
nicht verwendet werden!<br />
Schritt 1: Pumpen bis der gewünschte Luftdruck erreicht ist. Etwa 0.5 bar überpumpen, da beim Abnehmen der Pumpe etwas Luft entweicht.<br />
ACHTUNG! Maximaler Luftdruck 18 bar!<br />
ACHTUNG! Beim Luftablassen Schutzbrille tragen!<br />
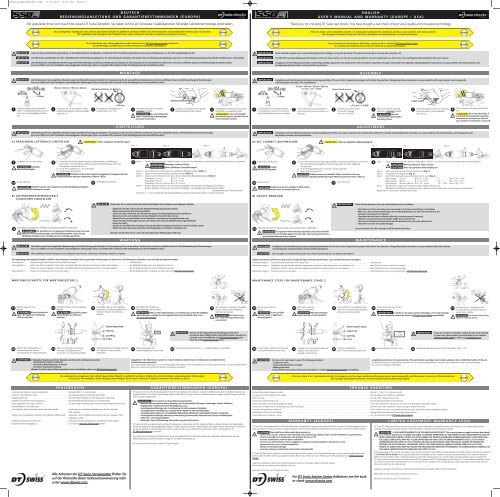
Schritt 2: Den O-Ring bis zum Anschlag an das Gehäuse des Dämpfers schieben (Abb. 1).<br />
Schritt 3: Setzen Sie sich vorsichtig auf den Sattel des Fahrrades (Abb. 2).<br />
Schritt 4: Steigen Sie vom Fahrrad ab und messen Sie den Abst<strong>and</strong> des Negativfederweges A (Abb. 3):<br />
Einbaulänge: 152 mm ❯A=6-11mm<br />
Einbaulänge: 165 mm ❯ A=8-13mm<br />
Einbaulänge: 190 mm / 200 mm ❯ A=10-18mm<br />
Schritt 5: ❯Wenn Abst<strong>and</strong> A grösser ist als unter Schritt 4 angegeben: Dem Dämpfer geringfügig Luft hinzufügen!<br />
❯Wenn Abst<strong>and</strong> A kleiner ist als unter Schritt 4 angegeben: Geringfügig Luft aus dem Dämpfer ablassen<br />
(Betriebsanleitung der Pumpe beachten)!<br />
Die Schritte 1 - 5 sind zu wiederholen bis der Negativfederweg A dem entsprechenden Wert aus Schritt 4 entspricht.<br />
Überprüfen Sie vor jedem Einsatz die Funktionstüchtigkeit Ihres Dämpfers nach folgenden Punkten:<br />
Die regelmässige Wartung des Dämpfers verhilft zu einer längeren Lebensdauer und zu optimalen Fahrleistungen auf Jahre hinaus. Die Wartung des Dämpfers muss wie folgt durchgeführt werden:<br />
Wartungsstufe 1.............Äusseres Reinigen des Dämpfers mit einem feuchten Lappen........................................................................................................................nach jeder Fahrt<br />
Wartungsstufe 2.............Fetten von Luftkammergehäuse, Dichtungen und Negativ-Feder bei starker Beanspruchung / schlammigem Gelände..........................alle 40 Betriebsstunden durch einen erfahrenen Fachmann<br />
Fetten von Luftkammergehäuse, Dichtungen und Negativ-Feder bei geringer Beanspruchung / trockenem Gelände.............................alle 100 Betriebsstunden durch einen erfahrenen Fachmann<br />
Wartungsstufe 3.............Grosser Service (Wechseln von Öl und Dichtungen).........................................................................................................................................alle 200 Beriebsstunden, mindestens einmal pro Jahr durch <strong>DT</strong> <strong>Swiss</strong> Servicecenter<br />
WARTUNGSSCHRITTE FÜR WARTUNGSSTUFE 2<br />
Ein unsachgemäss eingebauter oder schlecht gewarteter Dämpfer ist gefährlich und kann Unfälle mit unter Umständen schwerwiegenden Verletzungen verursachen.<br />
Wir empfehlen Ihnen dringend, Ihren Dämpfer durch einen erfahrenen Fachmann montieren und warten zu lassen.<br />
Die Einhaltung der hier aufgeführten Bestimmungen betreffend Montage des Dämpfers ist Voraussetzung für ein einw<strong>and</strong>freies Funktionieren und einen unfallfreien Einsatz. Die Nichtbeachtung der Bestimmungen<br />
kann zu Unfällen mit unter Umständen schwerwiegenden Verletzungen führen. Ausserdem fällt in diesem Fall die Produktegarantie der Herstellerfirma dahin.<br />
1. 2.<br />
13<br />
Dämpfer ausbauen und<br />
reinigen.<br />
14<br />
Ventildeckel öffnen und Luft vollständig<br />
ablassen.<br />
15<br />
Sicherstellen, dass die Luft vollständig<br />
abgelassen ist! Luftkammergehäuse von<br />
16<br />
Überprüfen des Dämpfers auf<br />
Beschädigungen oder Verschleiss.<br />
17<br />
ACHTUNG! Keine Hochdruckreiniger<br />
oder aggressive Reinigungs-<br />
ACHTUNG! Schutzbrille tragen!<br />
Kleine Mengen an Öl können<br />
H<strong>and</strong> aufschrauben und vorsichtig<br />
abziehen.<br />
WICHTIG! Ölfilm auf der Kolbenstange ist zur Schmierung normal! Bei allfälligen<br />
Beschädigungen wenden Sie sich umgehend an Ihren Fachhändler oder an ein<br />
mittel verwenden!<br />
austreten.<br />
<strong>DT</strong> <strong>Swiss</strong> Servicecenter!<br />
Cellasto-Negativfeder<br />
Stützring<br />
Quad-Ring<br />
O-Ring<br />
5Nm<br />
Falls verschlissen, Stützring (2), Quad-Ring<br />
(3) und O-Ring (4) (siehe Abbildung<br />
Schritt 20) demontieren.<br />
ACHTUNG! Zur Demontage<br />
kein scharfkantiges Werkzeug<br />
verwenden!<br />
Säubern des Innengewindes am<br />
Luftkammergehäuse und des<br />
Fetten von Führungen, Dichtungen,<br />
Gewinden und Elastomeren mit<br />
Aussengewindes am Dämpferabschluss. slick honeyTM 18 19 20<br />
Vollständigkeit bei der Montage beachten.<br />
Nur Original <strong>DT</strong> <strong>Swiss</strong> Ersatzteile<br />
21<br />
Festes Aufschrauben des<br />
Luftkammergehäuses mit der H<strong>and</strong>.<br />
22<br />
Dämpfer gemäss Arbeitsschritten 1 - 12 wieder einbauen und einstellen.<br />
(im Fachh<strong>and</strong>el erhältlich). verwenden!<br />
ACHTUNG!<br />
In folgenden Situationen darf der Dämpfer ab sofort nicht weiterbenutzt werden:<br />
- bei plötzlichem starkem Luftverlust<br />
- bei äusserer Beschädigung (z. B. Beulen)<br />
- bei starker Geräuschentwicklung<br />
Wenden Sie sich in diesen Fällen umgehend an Ihren Fachhändler oder an ein <strong>DT</strong> <strong>Swiss</strong> Servicecenter!<br />
FEHLERSUCHE<br />
Dämpferaufnahme im Rahmen<br />
WICHTIG!<br />
Luftverlust nach längerer Lagerung oder Betrieb . . . . . . . . . . . . . . . . . . . . . . .Normaler Effekt (1 - 2 bar je Monat).<br />
Leichte Öl- oder Fettspuren aussen . . . . . . . . . . . . . . . . . . . . . . . . . . . . . . . . . .Normale Rückstände von Montage oder Betrieb.<br />
Kolbenstange ist ölig . . . . . . . . . . . . . . . . . . . . . . . . . . . . . . . . . . . . . . . . . . . . . .Normaler Effekt (Schleppöl zur Schmierung der Luftdichtung).<br />
Dämpfer macht leichtes Strömungsgeräusch . . . . . . . . . . . . . . . . . . . . . . . . . .Normaler Effekt (Drosselwirkung von Öl und Bohrung).<br />
Druck steigt beim Aufpumpen schnell an . . . . . . . . . . . . . . . . . . . . . . . . . . . . .Sitz der Pumpe kontrollieren oder Pumpe wechseln (Ventil öffnet sich nicht).<br />
Dämpfer lässt sich nicht aufpumpen<br />
(Luft entweicht beim Abschrauben der Pumpe sofort wieder) . . . . . . . . . . .Ventileinsatz vom Händler kontrollieren lassen. Einsatz nachziehen<br />
oder wechseln.<br />
Dämpfer hat im eingebautem Zust<strong>and</strong> in den Gelenken fühlbares Spiel . . .Überprüfen, ob die richtige Buchsen verbaut, resp. die Schrauben richtig<br />
angezogen wurden.<br />
Deutlicher Ölaustritt an der Ölkammer. . . . . . . . . . . . . . . . . . . . . . . . . . . . . . . .Dichtungen an der Verschleissgrenze, deshalb Dichtungen ersetzen.<br />
Dämpfer macht Schmatzgeräusch . . . . . . . . . . . . . . . . . . . . . . . . . . . . . . . . . .Luft im Öl (an <strong>DT</strong> <strong>Swiss</strong> Servicecenter senden).<br />
EINSTELLUNG<br />
Die Einhaltung der hier aufgeführten Bestimmungen betreffend Einstellung des Dämpfers ist Voraussetzung für ein einw<strong>and</strong>freies Funktionieren und einen unfallfreien Einsatz. Die Nichtbeachtung der Bestimmungen<br />
kann zu Unfällen mit unter Umständen schwerwiegenden Verletzungen führen. Ausserdem fällt in diesem Fall die Produktegarantie der Herstellerfirma dahin.<br />
ACHTUNG! Beim Luftablassen Schutzbrille tragen!<br />
Abb. 1 Abb. 2 Abb. 3<br />
WARTUNG<br />
Die Einhaltung der hier aufgeführten Bestimmungen betreffend Wartung des Dämpfers ist Voraussetzung für ein einw<strong>and</strong>freies Funktionieren und einen unfallfreien Einsatz. Die Nichtbeachtung der Bestimmungen<br />
kann zu Unfällen mit unter Umständen schwerwiegenden Verletzungen führen. Ausserdem fällt in diesem Fall die Produktegarantie der Herstellerfirma dahin.<br />
Wir empfehlen Ihnen dringend, Ihren Dämpfer durch einen erfahrenen Fachmann warten zu lassen.<br />
Bei Unklarheiten oder Schwierigkeiten wenden Sie sich an ein <strong>DT</strong> <strong>Swiss</strong> Servicecenter und lassen<br />
Sie die Montage und Wartung von einem erfahrenen Fachmann durchführen.<br />
WICHTIG!<br />
Können Sie die entsprechenden Einstellungen nicht selbst<br />
vornehmen oder allfällige Fehler nicht selbst beheben, wenden Sie<br />
sich bitte an Ihren Fachhändler, ein <strong>DT</strong> <strong>Swiss</strong> Servicecenter oder<br />
sehen Sie unter www.dtswiss.com nach.<br />
Längsriefen in der Ölkammer, verursacht z. B. durch Schlamm, stellen keinen Funktionsverlust und daher keinen<br />
Gewährleistungsanspruch dar.<br />
Durch übermässigen Wasserdruck (z. B. Hochdruckreiniger) kann Wasser in die Funktionselemente und Dichtungen eindringen, was den Dämpfer beschädigen<br />
kann. Keine Lösungsmittel und Tenside zum Reinigen verwenden!<br />
Ein unsachgemäss eingebauter oder schlecht gewarteter Dämpfer ist gefährlich und kann Unfälle mit unter Umständen schwerwiegenden Verletzungen<br />
verursachen. Wir empfehlen Ihnen dringend, Ihren Dämpfer durch einen erfahrenen Fachmann montieren und warten zu lassen.<br />
Alle Adressen der <strong>DT</strong> <strong>Swiss</strong> Servicecenter finden Sie<br />
auf der Rückseite dieser Gebrauchsanweisung oder<br />
unter www.dtswiss.com.<br />
GARANTIEBESTIMMUNGEN (EUROPA)<br />
<strong>DT</strong> <strong>Swiss</strong> AG mit Sitz in Biel (Schweiz) gewährt für die <strong>DT</strong> <strong>Swiss</strong> Dämpfer ab Kaufdatum zwei Jahre (24 Monate) Garantie bei allfälligen Material- und<br />
Produktionsfehlern. <strong>DT</strong> <strong>Swiss</strong> AG repariert oder ersetzt Produkte, die nach Ihrem Ermessen als defekt anerkannt werden. Andere Ansprüche sind von<br />
dieser Garantie ausgeschlossen.<br />
ACHTUNG! Kein Anspruch auf Garantieleistung besteht bei:<br />
- Normaler Abnutzung oder starker Alterung von Verschleissteilen (Führungen, Dichtungen, deren Laufflächen,<br />
Kugelgelenke, Funktionselemente der Dämpfung usw.)<br />
- Unsachgemässer Montage oder in Verbindung mit nicht passenden Produkten<br />
- Unsachgemässe Inst<strong>and</strong>haltung, unsachgemässer Reparatur oder Veränderungen<br />
- Unsachgemässem Gebrauch, unsorgfältiger Beh<strong>and</strong>lung, Missbrauch, Nachlässigkeit, leichter und grober<br />
Fahrlässigkeit bei Montage, Wartung und Benutzung, kommerzieller Gebrauch oder Einsatz in Wettkämpfen<br />
- Lieferungs- und Transportschäden<br />
- Änderung, Unkenntlichmachung oder Entfernung der Seriennummer<br />
<strong>DT</strong> <strong>Swiss</strong> AG haftet aus dieser Garantie nicht auf Schadensersatz, insbesondere nicht für indirekte Schäden, mittelbare Schäden und Folgeschäden.<br />
Zwingende gesetzliche Haftungsregelungen bleiben von dieser Garantie unberührt. Sollten Arbeiten unter dieser Garantie nötig werden, wenden Sie<br />
sich an das Geschäft, in dem der Dämpfer erworben wurde. Dämpfer, die zur Überprüfung eingeschickt werden, sind frachtfrei an ein<br />
<strong>DT</strong> <strong>Swiss</strong> Servicecenter zu schicken.<br />
Gerichtsst<strong>and</strong> und Erfüllungsort ist Biel (Schweiz). Es gilt schweizerisches Recht. Technische Änderungen vorbehalten. Bitte bewahren Sie diese<br />
Bedienungsanleitung und Garantiebestimmungen für künftige Verwendungen auf.<br />
Wir wünschen Ihnen viel Spass mit Ihrem <strong>DT</strong> <strong>Swiss</strong> Dämpfer!<br />
A<br />
Set A<br />
ENGLISH<br />
USER'S MANUAL AND WARRANTY (EUROPE / USA)<br />
Thank you for choosing <strong>DT</strong> <strong>Swiss</strong> rear shocks. You have bought a rear shock of best <strong>Swiss</strong> quality <strong>and</strong> innovative technology.<br />
Please read the complete <strong>user's</strong> <strong>manual</strong> attentively before installing or using the rear shock! The <strong>manual</strong> has to be given to every rider using the unit.<br />
The SSD 225 is a spring-/damping-unit for bicycles, <strong>and</strong> is only to be used as such. Do not use the rear shock or any of its components as a tool or toy or for anything else than described in the <strong>user's</strong> <strong>manual</strong>.<br />
Compliance with the following instructions concerning assembly, adjustment <strong>and</strong> maintenance of the rear shock is imperative for proper <strong>and</strong> accident-free operation. Disregarding these instructions can cause accidents with serious injuries, <strong>and</strong><br />
consequently void the product-<strong>warranty</strong> of the manufacturer.<br />
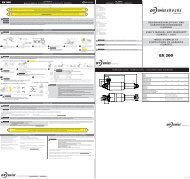
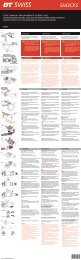
ASSEMBLY<br />
torque wrench<br />
1<br />
Check damper <strong>and</strong> mounting hardware<br />
for completeness. One set A or B per rear<br />
2 Check if the rear shock is permitted for<br />
your frame by the frame-manufacturer in<br />
3<br />
± 0.2 mm / ± 0.008”<br />
Check the correct dimensions<br />
of mounting hardware<br />
4 Make sure, that the mounting<br />
hardware is completely installed.<br />
5 Check the tightness of the unit's mounting<br />
screws according to the framebuilder's<br />
6<br />
shock assemble side (as shown) is needed. this length.<br />
(± 0.2 mm / ± 0.008”).<br />
CAUTION! Use only<br />
user <strong>manual</strong>.<br />
recommended frame builder<br />
mounting screws!<br />
A) SET CORRECT AIR-PRESSURE<br />
Open valve cover by h<strong>and</strong>.<br />
CAUTION! Sudden<br />
pressure loss possible!<br />
Remove pump.<br />
Set B<br />
O-Ring<br />
CAUTION! Sudden pressure loss possible! A slight hissing<br />
sound (condensed air from the pump itself) is ok.<br />
B) ADJUST REBOUND<br />
152 mm / 165 mm / 190 mm / 200 mm<br />
6” / 6.5 “ / 7.5 “ / 7.875”<br />
+<br />
- Überprüfen Sie den sicheren Sitz der Dämpferbefestigungsschrauben gemäss<br />
Bedienungsanleitung des Rahmenherstellers.<br />
- Stellen Sie sicher, dass keine Teile des Fahrrads (ausser den Montagebuchsen) zu irgendeinem<br />
Moment des Ein- und Ausfederns mit dem Dämpfer in Kontakt treten können.<br />
- Überprüfen Sie, ob ausreichend Luft im Dämpfer ist, und pumpen Sie gegebenenfalls nach.<br />
- Stellen Sie durch mehrmaliges Belasten des Sattels sicher, dass der Dämpfer keine ungewöhnlichen<br />
Geräusche macht.<br />
- Säubern Sie die Ölkammer (schlankes Ende des Dämpfers) vor jedem Fahrantritt mit einem feuchten Lappen.<br />
+<br />
12<br />
Ausfedergeschwindigkeit am Verstellrad wie abgebildet einstellen (+ REBOUND -).<br />
ACHTUNG! Das Verstellrad nur mit geringem Kraftaufw<strong>and</strong> und von H<strong>and</strong><br />
bedienen. Nicht gewaltsam gegen den Endanschlag drehen. Lassen Sie das<br />
Verstellrad mindestens eine ⁄ Umdrehung vom Anschlag weg stehen.<br />
- Stellen Sie sicher, dass keine äusserlichen Beschädigungen am Dämpfer vorh<strong>and</strong>en sind.<br />
Benutzen Sie das Fahrrad erst, wenn alle oben genannten Bedingungen erfüllt sind.<br />
12<br />
Adjust rebound with the regulator-wheel as demonstrated here (+ REBOUND -).<br />
CAUTION! The regulator-wheel should be adjusted by h<strong>and</strong> <strong>and</strong> with little<br />
force. Do not turn it forcefully against the limit stop. Stop turning at minimum a<br />
quarter before the limit stop is reached.<br />
7<br />
10<br />
IMPORTANT!<br />
IMPORTANT!<br />
IMPORTANT!<br />
IMPORTANT!<br />
IMPORTANT!<br />
CAUTION!<br />
CAUTION!<br />
a) Screw the pump onto the valve body according to the pump manufacturer's user <strong>manual</strong>.<br />
The correct air-pressure depends on the frame-geometry, the rider's weight <strong>and</strong><br />
the riding-style.<br />
b) For the first adjustment pump until 7 bar / 100 psi is attained.<br />
c) Leave the pump screwed on.<br />
CAUTION! Sudden pressure loss possible! Follow instructions of pumpmanufacturer<br />
regarding tightening torque! Maximum pressure 18 bar / 255 psi!<br />
Close valve cover.<br />
Check clearance of the frame <strong>and</strong> the rear<br />
arm.<br />
CAUTION! Do not use the bicycle, if<br />
any bicycle parts (except the mounting<br />
hardware) can touch the rear shock at<br />
any moment of compression or rebound.<br />
Step 1: Pump, until the correct sag is attained. Inflate approx. 0,5 bar / 7 psi more, as some air may escape when removing the pump.<br />
CAUTION! Maximum pressure 18 bar / 255 psi!<br />
CAUTION! Wear eye protection while releasing air!<br />
Step 2: Push o-ring until it touches the rear shock-housing (Fig. 1).<br />
Step 3: Sit carefully on the bicycle seat (Fig. 2).<br />
Step 4: Get off the bicycle <strong>and</strong> measure the distance of the sag A (Fig. 3):<br />
Built-in-length: 152 mm ❯A = 6 - 11 mm 6” ❯A = 0.24” - 0.43”<br />
Built-in-length: 165 mm ❯ A = 8 - 13 mm 6.5" ❯A = 0.31" - 0.51"<br />
Built-in-length: 190 mm / 200 mm ❯ A = 10 - 18 mm 7.5” / 7.875” ❯ A = 0.39" - 0.71"<br />
Step 5: ❯If distance A is larger than mentioned in step 4: Inflate a little more air!<br />
❯If distance A is smaller than mentioned in step 4: Release a little air (follow <strong>user's</strong> <strong>manual</strong> of pump manufacturer)!<br />
Repeat steps 1-5 until sag A is as mentioned in step 4.<br />
Check the functioning of your rear shock before every use as follows:<br />
- Check the rear shock's mounting screws according to the frame-manufacturer's instructions.<br />
- Make sure that no bicycle parts (except the mounting hardware) can touch the rear shock at any<br />
moment of compression or rebound.<br />
- Check that the rear shock is inflated sufficiently. Increase pressure if necessary.<br />
- Check for unusual noises by pressing the saddle down several times.<br />
- Clean the oil chamber (small end of the rear shock) before every ride with a damp cloth.<br />
- Check the rear shock for outside damages.<br />
Use your bicycle only after carrying out all the above instructions.<br />
Regular maintenance of the rear shock ensures a longer life span <strong>and</strong> better performance. Carry out the maintenance as follows:<br />
Maintenance stage 1......External cleaning of rear shock with a damp cloth...........................................................................................................................................after each ride<br />
Maintenance stage 2......Lubricate air chamber housing, seals <strong>and</strong> negative-spring (elastomer) under heavy stress or on muddy ground:.....................................after 40 hours of use by experienced expert<br />
Lubricate air chamber housing, seals <strong>and</strong> negative-spring (elastomer) under low stress or on dry ground:................................................after 100 hours of use by experienced expert<br />
Maintenance stage 3......Full service (change oil <strong>and</strong> seals)........................................................................................................................................................................after 200 hours of use or once a year through a <strong>DT</strong> <strong>Swiss</strong> Service Centre<br />
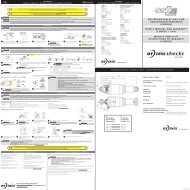
MAINTENANCE STEPS FOR MAINTENANCE STAGE 2<br />
1. 2.<br />
13<br />
Remove rear shock <strong>and</strong><br />
clean it.<br />
14<br />
Open valve cover <strong>and</strong><br />
release air completely.<br />
15<br />
Check whether air is completely let out.<br />
Screw off air chamber housing by h<strong>and</strong><br />
16<br />
Check whether the rear shock is<br />
damaged or worn.<br />
17<br />
CAUTION! Do not use high<br />
CAUTION! Wear eye protection <strong>and</strong> remove housing carefully.<br />
IMPORTANT! An oil film on the piston rod for lubricating is ok! If major damage<br />
pressure water or aggressive<br />
cleaning agents!<br />
against possible oil spray droplets!<br />
has occurred please contact the dealer or <strong>DT</strong> <strong>Swiss</strong> Service Centre immediately!<br />
cellasto-negative-spring<br />
support-ring<br />
quad-ring<br />
o-ring<br />
Clean inside air chamber housing thread<br />
<strong>and</strong> outside thread at the rear shock.<br />
Lubricate the housing, seals, threads <strong>and</strong><br />
elastomer with slick honeyTM 18 19<br />
(available in bicycle shops).<br />
20<br />
Check for completeness.<br />
Use <strong>DT</strong> <strong>Swiss</strong> original spare parts only!<br />
21<br />
Re-assemble the housing by h<strong>and</strong>. 22 Re-assemble <strong>and</strong> adjust the rear shock as described in steps 1 - 12.<br />
CAUTION!<br />
Do not use the rear shock, in any of the following situations:<br />
- Sudden loss of air<br />
- External damage (dents or similar)<br />
- Making loud noise<br />
In any of these cases, please contact your local dealer or national <strong>DT</strong> <strong>Swiss</strong> Service Centre immediately!<br />
WARRANTY (EUROPE)<br />
Frame shock mount<br />
IMPORTANT!<br />
5Nm<br />
3.7 Lb.ft<br />
If support-ring (2), quad-ring (3) <strong>and</strong><br />
o-ring (4) are worn (see picture step 20)<br />
remove them carefully.<br />
CAUTION! Do not use any sharp<br />
tools to remove parts!<br />
Longitudinal scratches on the outer surface of the oil-chamber caused by mud or similar substances do not effect the function of the unit.<br />
Therefore this case is not covered by our <strong>warranty</strong>! Do not use high pressure washers, as water can get inside the unit <strong>and</strong> could cause damage.<br />
Do not use any solvents or detergents!<br />
Air loss after long-term storage or riding . . . . ..............................................................................................Normal(1-2bar/15-30psipermonth).<br />
Tinyamountsofoilorgreaseontheoutside ............................................................................................ . .Normal residue from installation or operation.<br />
Pistonrodisoily ......................................................................................................................Normal(oilforlubricatingtheairseal).<br />
Shock makes slight flowing sound . . . . . . . . . . .............................................................................................Normal(dampeningeffectofoil<strong>and</strong>bores).<br />
Pressure indicated on the pressure gauge rises rapidly . . .....................................................................................Check the positioning of the pump on the shock or change pump (valve doesn't open).<br />
Shock can't be inflated (the air instantly leaks out of the shock again) ..........................................................................Havethevalveinsertcheckedbyadealer.Changeorretightenthe insert.<br />
Shockhasnoticeableplayatballjoints....................................................................................................Check whether the correct mounting hardware was used, whether the screws are tightened correctly.<br />
Noticeablelossofoilattheoilchamber...................................................................................................Sealings are at their wear limits (have sealings replaced soon!).<br />
Shock makes loud "smacking" sound . . . . . . ..............................................................................................Airintheoil(returnshockto<strong>DT</strong> <strong>Swiss</strong> Service Centre)<br />
<strong>DT</strong> <strong>Swiss</strong> LTD, with registered office in Biel (Switzerl<strong>and</strong>), gives a guarantee on material <strong>and</strong> production faults of two years (24 months) beginning at the<br />
date of purchase. <strong>DT</strong> <strong>Swiss</strong> LTD repairs or replaces products, which shall be accepted as being defective at its discretion. Other claims shall be excluded.<br />
CAUTION! There shall be no claim under the guarantee for:<br />
- normal wear of parts, subject to wear (housing, seals, ball bearings, sliding surface, function-elements of suspension etc.)<br />
- incorrect assembly or in combination with products that do not fit<br />
- incorrect maintenance, incorrect repair or alteration<br />
- incorrect use, bad treatment, misuse, negligence, carelessness during installation, maintenance or use,<br />
commercial use or use in cycling competitions<br />
- delivery <strong>and</strong> transport damage<br />
- removing, altering or making the serial number indecipherable<br />
<strong>DT</strong> <strong>Swiss</strong> LTD shall reject any liability for both indirect damage caused by accidents <strong>and</strong> consequential damage. In case of <strong>warranty</strong> repair/replacement<br />
please contact the dealer where you bought the product. Rear shocks which have to be checked, can be sent postage paid to a <strong>DT</strong> <strong>Swiss</strong> Service<br />
Centre.<br />
Legal venue <strong>and</strong> place of performance is Biel (Switzerl<strong>and</strong>). <strong>Swiss</strong> law shall apply. Subject to technical changes.<br />
Please keep the user <strong>manual</strong> <strong>and</strong> <strong>warranty</strong> for future use.<br />
Have a lot of fun with your <strong>DT</strong> <strong>Swiss</strong> rear shock!<br />
If the rear shock is not assembled correctly or is improperly maintained it is dangerous <strong>and</strong> may cause accidents with serious injuries.<br />
We strongly recommend having the rear shock assembled <strong>and</strong> maintained by an experienced expert.<br />
Compliance with the following instructions concerning assembly of the rear shock is imperative for proper <strong>and</strong> accident-free operation. Disregarding these instructions can cause accidents with serious injuries, <strong>and</strong> consequently<br />
void the product-<strong>warranty</strong> of the manufacturer.<br />
ADJUSTMENT<br />
Compliance with the following instructions concerning adjustment of the rear shock is imperative for a perfect <strong>and</strong> accident-free working. Disregarding these instructions can cause accidents with serious injuries, <strong>and</strong> consequently void<br />
the product-<strong>warranty</strong> of the manufacturer.<br />
8<br />
CAUTION! Wear eye protection while releasing air!<br />
Fig. 1 Fig. 2 Fig. 3<br />
MAINTENANCE<br />
Compliance with the following instructions concerning maintenance of the rear shock is imperative for proper <strong>and</strong> accident-free operation. Disregarding these instructions can cause accidents with serious injuries,<br />
<strong>and</strong> consequently void the product-<strong>warranty</strong> of the manufacturer.<br />
We strongly recommend having the rear shock maintained by an experienced expert!<br />
If you encounter uncertainties or difficulties, please contact a national <strong>DT</strong> <strong>Swiss</strong> Service Centre,<br />
for assembly <strong>and</strong> maintainance of the rear shock by an experienced expert.<br />
IMPORTANT!<br />
If the rear shock is not maintained correctly it is dangerous <strong>and</strong> can cause accidents with serious injuries <strong>and</strong> consequently void the product-<strong>warranty</strong> of the manufacturer.<br />
We strongly recommend having the rear shock maintained by experienced expert!<br />
For <strong>DT</strong> <strong>Swiss</strong> Service Centre Addresses see the back<br />
or check www.dtswiss.com.<br />
11<br />
TROUBLE SHOOTING<br />
9<br />
If you are not able to assemble or adjust the rear shock correctly<br />
on your own, please contact your local dealer or our national<br />
<strong>DT</strong> <strong>Swiss</strong> Service Centre or check out www.dtswiss.com.<br />
LIMITED EQUIPMENT WARRANTY (USA)<br />
<strong>DT</strong> <strong>Swiss</strong> LTD makes every effort to assure that its product meets high quality <strong>and</strong> durability st<strong>and</strong>ards <strong>and</strong> warrants to the original retail consumer/<br />
purchaser of our product that each product is free from defects in materials <strong>and</strong> workmanship as follows:<br />
CAUTION! 2 YEAR LIMITED WARRANTY ON THIS REAR SHOCK PRODUCT. This <strong>warranty</strong> does not apply to defects due directly<br />
or to a lack of maintenance. <strong>DT</strong> SWISS LTD LIMITS ALL IMPLIED WARRANTIES TO THE PERIOD OF TWO YEARS FROM THE DATE OF<br />
INITIAL PURCHASE AT RETAIL. EXCEPT AS STATED HEREIN, ANY IMPLIED WARRANTIES OF MERCHANTABILITY AND FITNESS ARE<br />
EXCLUDED. SOME STATES MAY NOT ALLOW LIMITATIONS ON HOW LONG THE IMPLIED WARRANTY LASTS, SO THE ABOVE<br />
LIMITATION MAY NOT APPLY TO YOU. <strong>DT</strong> SWISS LTD SHALL IN NO EVENT BE LIABLE FOR DEATH, INJURIES TO PERSONS OR<br />
PROPERTY OR FOR INCIDENTAL, CONTINGENT, SPECIAL OR CONSEQUENTIAL DAMAGES ARISING FROM THE USE OF OUR<br />
PRODUCTS. SOME STATES MAY NOT ALLOW THE EXCLUSION OR LIMITATION OF INCIDENTAL OR CONSEQUENTIAL DAMAGES, SO<br />
THE ABOVE LIMITATION OR EXCLUSION MAY NOT APPLY TO YOU.<br />
To take advantage of this <strong>warranty</strong>, the product or part must be returned for examination, postage prepaid, to the dealer where you bought the product or<br />
to a <strong>DT</strong> <strong>Swiss</strong> Service Center. Proof of purchase date <strong>and</strong> an explanation of the complaint must accompany the product. If our inspection discloses a<br />
defect, <strong>DT</strong> <strong>Swiss</strong> will either repair or replace the product or refund the purchase price, if we cannot readily <strong>and</strong> quickly provide a repair or replacement.<br />
<strong>DT</strong> <strong>Swiss</strong> will return repaired product or replacement at <strong>DT</strong> <strong>Swiss</strong> expense, but if it is determined there is no defect, or that the defect resulted from causes<br />
not within the scope of this <strong>warranty</strong>, then the user must bear the cost of shipping. This <strong>warranty</strong> gives you specific legal rights, <strong>and</strong> you may also have<br />
other rights which vary from state to state.<br />
Legal venue <strong>and</strong> place of performance is Biel (Switzerl<strong>and</strong>). <strong>Swiss</strong> law shall apply. Subject to technical changes.<br />
Please keep the user <strong>manual</strong> <strong>and</strong> <strong>warranty</strong> for future use.<br />
Have a lot of fun with your <strong>DT</strong> <strong>Swiss</strong> rear shock!<br />
A