You also want an ePaper? Increase the reach of your titles
YUMPU automatically turns print PDFs into web optimized ePapers that Google loves.
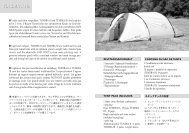
pHaSE 2<br />
Schließen Sie die Reißverschlüsse des<br />
kompletten Zeltzugangs (auch am<br />
Moskitonetz). Fixieren Sie alle fünf<br />
Bodeneckpunkte des Zeltes an den verstellbaren<br />
Bandschlaufen mit Heringen<br />
(1) und ziehen Sie dabei die Bodeneckpunkte<br />
straff aus (2). Öffnen Sie nun<br />
die die Reißverschlüsse des kompletten<br />
Zeltzugangs (auch am Moskitonetz)<br />
und fixieren Sie die mitgelieferte<br />
Bodenplane mit den Kunststoffhaken<br />
in die Ringe in allen Bodenecken des<br />
Zeltinneren. Die rote Markierung an<br />
der Bodenplane muss mit der roten<br />
Markierung am Außenzelt übereinstimmen<br />
(3). Fixieren sie auch die Aufstellstäbchen<br />
am Klett in den drei Lüftern<br />
in der Zeltspitze (4).<br />
6<br />
Ensure that the entrance zips are<br />
closed (including the zip on the mosquito<br />
mesh). Anchor all five corners<br />
of the tent fly by pegging out the<br />
adjustable tape loops (1) and pull the<br />
groundsheet out flat (2).<br />
Next, open the entrance zips (including<br />
the zip on the mosquito mesh)<br />
and fix the groundsheet in place by<br />
clipping the plastic hooks to the rings<br />
located at each corner of the inner<br />
tent. Ensure that the red markers on<br />
the groundsheet correspond to the<br />
red markers on the flysheet (3). Fix the<br />
vent struts in position using the velcro<br />
tabs in the three vents in the apex of<br />
the tent (4).