diamond Tarp - JACK WOLFSKIN
diamond Tarp - JACK WOLFSKIN
diamond Tarp - JACK WOLFSKIN

Create successful ePaper yourself
Turn your PDF publications into a flip-book with our unique Google optimized e-Paper software.
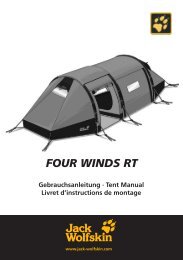
<strong>diamond</strong> <strong>Tarp</strong><br />
Gebrauchsanleitung · Tent Manual<br />
Livret d’instructions de montage
<strong>diamond</strong> <strong>Tarp</strong><br />
ZELTpaCKSaCKinHaLT<br />
· 1 Zeltplane und 1 Einlegeboden<br />
· 14 Heringe, Reparaturmaterialien<br />
& Nahtabdichter im Heringspackbeutel<br />
· 1 Aufstellstange im Stangenpack-<br />
beutel<br />
ConTEnT oF TEnT paCK SaCK<br />
· 1 fly sheet and 1 groundsheet<br />
· 14 pegs, repair materials & seam<br />
selant in peg bag<br />
· 1 pole bag containing 1 rigging<br />
pole<br />
ConTEnU dU SaC dE TEnTE<br />
· 1 toile de tente et 1 bâche de sol<br />
· 14 piquets, du matériel de<br />
réparation & mastic d’étanchéité<br />
dans le sac de piquets<br />
· 1 sac d´armature contenant<br />
1 armature d´installation<br />
<strong>JACK</strong> <strong>WOLFSKIN</strong> entwickelt seine Produkte ständig weiter. Wir behalten uns vor, einzelne Komponenten zu verändern.<br />
Abbildungen der Aufbauanleitung können vom aktuellen Produkt abweichen.<br />
At <strong>JACK</strong> <strong>WOLFSKIN</strong> we are continually improving and upgrading our products. We therefore reserve the right to make<br />
changes to individual components. Diagrams used for the pitching instructions may differ slightly from the actual product.<br />
<strong>JACK</strong> <strong>WOLFSKIN</strong> développe et améliore ses produits en permanence. De ce fait nous nous réservons la possibilité de modifier<br />
certains composants. Les illustrations du mode de montage peuvent différer légèrement de celles du produit actuel.<br />
2
pFLEGE<br />
Reinigen Sie Ihr Zelt in aufgebautem Zustand<br />
ausschließ-lich mit Wasser und wenig Seife. Auf<br />
keinen Fall in die Waschmaschine oder Reinigung<br />
geben.<br />
FEUEr<br />
Offenes Feuer und Flammen sind eine Gefahr<br />
für Zeltge-webe. Vermeiden Sie offenes Feuer in<br />
unmittelbarer Nähe des Zeltes.<br />
rEparaTUrEn<br />
Produktionsfehler werden im Rahmen der<br />
Garantie-leistungen repariert. Andere Reparaturen<br />
führen wir gegen eine Gebühr gerne<br />
aus. Schicken Sie das gerei-nigte Zelt mit klarer<br />
Reparaturkennzeichnung/-anweisung und Ihrem<br />
Kaufbeleg über Ihren Fachhändler ein.<br />
LaGErUnG<br />
Bevor Sie Ihr Zelt längere Zeit lagern, muss es<br />
vollkommen durchgetrocknet sein, sonst besteht<br />
Gefahr von Schimmel-und Stockfleckenbildung.<br />
UV STraHLUnG<br />
Ultraviolette (UV) Strahlung zerstört mit der<br />
Zeit alle modernen Zeltmaterialien. Das spezielle<br />
Polyester-Zelt-material erhöht die Lebensdauer<br />
gegenüber herkömmlichen Nylon-Zeltmaterialien,<br />
kann aber auch auf Dauer der Natur nicht<br />
trotzen. <strong>JACK</strong> <strong>WOLFSKIN</strong> übernimmt keine<br />
Garantie für Schäden durch UV Strahlung.<br />
CarE and mainTEnanCE<br />
Clean your tent when pitched, using only a little<br />
soap and water. On no account should the tent<br />
be machine washed or dry cleaned, since this<br />
could cause irreversible damage to the protective<br />
coating on the tent fabric.<br />
FirE prEVEnTion<br />
Open fires and flames are a hazard for tent<br />
materials. Avoid naked flames in the immediate<br />
vicinity of the tent.<br />
rEpairS<br />
Production faults will be repaired under the<br />
terms of our guarantee. Our service department<br />
will be pleased to perform other repairs for a<br />
small charge. Please send in your cleaned tent<br />
via your nearest dealer, enclosing clear repair<br />
instructions and proof of purchase.<br />
SToraGE<br />
Allow your tent to dry thoroughly while still<br />
assembled before storing it for any longer<br />
period. This will prevent mildew and damp stains<br />
forming.<br />
UV LiGHT<br />
Ultraviolet (UV) radiation reduces the tearstrength<br />
of all tent materials in the course of<br />
time. The special polyester tent material increases<br />
the service life in comparison with conventional<br />
nylon materials. Tent materials, however,<br />
cannot permanently defy the effects of nature.<br />
<strong>JACK</strong> <strong>WOLFSKIN</strong> will not assume any liability for<br />
damage caused by ultraviolet light.<br />
EnTrETiEn<br />
Pour nettoyer votre tente<br />
lorsqu‘elle est montée, veuillez<br />
utiliser exclusivement de l‘eau<br />
et un peu de savon. Surtout ne jamais mettre<br />
au lave-linge ni au pressing.<br />
FEU<br />
Les feux ouverts et les flammes représentent un<br />
danger pour le tissu de la tente. Eviter les feux<br />
ouverts tout près de la tente.<br />
rEparaTionS<br />
Les défauts de production sont réparés dans le<br />
cadre de la garantie. Nous effectuons volontiers<br />
toutes autres réparations, cependant celles-ci<br />
seront payantes. Veuillez nous faire parvenir, via<br />
votre revendeur spécialisé, votre tente nettoyée<br />
en indiquant clairement - soit directement sur<br />
la tente ou par instructions séparées - ce qu‘il<br />
convient de réparer et en joignant votre ticket<br />
de caisse.<br />
SToCKaGE<br />
Si vous souhaitez stocker votre tente durant<br />
une période prolongée, il faut que celle-ci soit<br />
complètement sèche, sinon il y a un risque de<br />
formation de moisissures et de mouillures.<br />
raYonnEmEnT UV<br />
Au fil du temps, le rayonnement ultraviolet<br />
(UV) détruit tous les types modernes de tissus<br />
pour tentes. Notre tissu spécial en polyester a<br />
cependant une plus grande longévité que les<br />
tissus conventionnels en nylon, mais ne résiste<br />
pas non plus à la nature à l‘infini. Jack Wolfskin<br />
n‘assume aucune garantie pour les dégâts<br />
causés par le rayonnement UV.<br />
3
pHaSE 1<br />
Beim ersten Aufbau: Sie sollten Ihr<br />
neues Zelt erst einmal probeweise<br />
aufbauen, und sich vor Antritt der<br />
ersten Reise mit allen Aufbauschritten<br />
vertraut machen.<br />
Wählen Sie zunächst einen geeigneten<br />
Standort für Ihr Zelt aus (1) und entfernen<br />
Sie dort alle spitzen Gegenstände,<br />
die den Zeltboden beschädigen könnten.<br />
Breiten Sie Ihr Zelt flach auf dem<br />
Boden aus und fügen Sie die Segmente<br />
der Alustangen sorgfältig zusammen,<br />
so dass diese fest ineinander sitzen (2).<br />
Achten Sie darauf, dass während des<br />
Aufbaus alle Reißverschlüsse geschlossen<br />
sind.<br />
4<br />
Pitching your tent for the first time:<br />
We recommend you to do a dry run<br />
pitching your new tent, in order to<br />
become familiar with all the pitching<br />
instructions before your first trip.<br />
Choose a suitable pitching site (1),<br />
removing all sharp objects which may<br />
damage the groundsheet. Spread out<br />
the tent on the ground and carefully<br />
connect all pole sections, ensuring a<br />
tight fit (2).<br />
Ensure that all zips are closed when<br />
pitching the tent.
Le premier montage de votre tente:<br />
Afin de vous familiariser avec les<br />
instruc-tions de montage nous vous<br />
conseillons de faire un essai de montage<br />
de votre tente neuve avant de<br />
partir en voyage.<br />
Choisissez d’abord un emplacement<br />
approprié pour dresser votre tente<br />
(1), en prenant soin d’enlever tous les<br />
objets pointus pouvant endommager<br />
le tapis de sol de la tente. Étalez votre<br />
tente à plat sur le sol et assemblez<br />
soigneuse-ment tous les arceaux, de<br />
manière à ce qu’ils soient bien emboîtés<br />
les uns dans les autres (2). Assurez à<br />
ce que toutes les fermetures à glissière<br />
soient bien fermées pendant le montage<br />
de la tente.<br />
5
pHaSE 2<br />
Schließen Sie die Reißverschlüsse des<br />
kompletten Zeltzugangs (auch am<br />
Moskitonetz). Fixieren Sie alle fünf<br />
Bodeneckpunkte des Zeltes an den verstellbaren<br />
Bandschlaufen mit Heringen<br />
(1) und ziehen Sie dabei die Bodeneckpunkte<br />
straff aus (2).<br />
Öffnen Sie nun die die Reißverschlüsse<br />
des kompletten Zeltzugangs (auch am<br />
Moskitonetz) und fixieren Sie die mitgelieferte<br />
Bodenplane mit den Kunststoffhaken<br />
in die Ringe in allen Bodenecken<br />
des Zeltinneren (3). Fixieren sie<br />
auch die Aufstellstäbchen am Klett in<br />
den drei Lüftern in der Zeltspitze (4).<br />
6<br />
Ensure that the entrance zips are<br />
closed (including the zip on the mosquito<br />
mesh screen).<br />
Anchor all five corners of the tent by<br />
pegging out the adjustable tape loops<br />
(1) and pull the groundsheet out flat<br />
(2).<br />
Next, open the entrance zips (including<br />
the zip on the mosquito mesh<br />
screen) and fix the groundsheet in<br />
place by clipping the plastic hooks to<br />
the rings located at each corner of the<br />
inner tent (3). Fix the vent struts in<br />
position using the velcro tabs in the<br />
three vents in the apex of the tent (4).
Fermez complètement les fermetures à<br />
glissière de l’entrée de la tente (également<br />
de la moustiquaire). Fixez avec les<br />
piquets les tirants flexibles à chacun des<br />
cinq coins du sol de la tente (1) et tirez<br />
les coins du sol en même temps (2).<br />
Ouvrez ensuite complètement la fermeture<br />
à glissière de l’entrée et celle<br />
de la moustiquaire puis fixez la bâche<br />
de sol (fait partie de la livraison) avec<br />
les clips en plastiques dans les boucles<br />
aux chaques coins du sol de la tente<br />
intérieure (3). Fixez aussi les bâtonnets<br />
d’installation au ruban crochets dans les<br />
3 dispositifs d’aération de la pointe de<br />
la tente (4).<br />
7
pHaSE 3<br />
Führen Sie die Aufstellstange in das<br />
Zelt ein (1) und positionieren Sie das<br />
obere Stangenende in die verstärkte<br />
Dachspitze (2). Stellen Sie nun das untere<br />
Ende der Stange auf die Verstärkung<br />
in der Mitte des Zeltbodens (3).<br />
Bitte wenden Sie keine Gewalt an, falls<br />
Sie die Stange nicht aufstellen können.<br />
Lösen Sie die Spannung der Zelthaut<br />
etwas über die 5 verstellbaren Bodeneckbänder.<br />
8<br />
Introduce the rigging pole into the<br />
tent (1) and position the top end of<br />
the pole in the reinforced roof apex<br />
(2). Then place the bottom end of the<br />
pole on the reinforced area in the<br />
middle of the groundsheet (3).<br />
Please do not use force. If the rigging<br />
pole cannot be positioned upright,<br />
release the tension on the tent fabric<br />
by slackening off the 5 adjustable<br />
corner tapes.
Passez l´armature d´installation dans<br />
la tente (1) et positionnez l’extrémité<br />
supérieure de l´armature dans la<br />
pointe renforcée du toit de la tente<br />
(2). Positionner ensuite l’extrémité<br />
inférieure de l´armature sur le centre<br />
renforcé du sol de tente (3).<br />
N’utilisez pas la force, si l´armature ne<br />
s´installe pas facilement.<br />
Détendez un peu la toile de tente en<br />
ajustant la tension des cinq bandes<br />
angulaires au sol.<br />
9
pHaSE 4<br />
Zum finalen Abspannen (1) schließen<br />
Sie wieder die Reißverschlüsse des<br />
kompletten Zeltzugangs (auch am Moskitonetz)<br />
und spannen sie die 5 Bodeneckbänder<br />
an den Metallstäbchen straff<br />
ab (2).<br />
Spannen Sie nachfolgend alle Abspannleinen<br />
in der Mitte der Zeltdachseiten<br />
und an den Zeltecken mit den restlichen<br />
Heringen ab (3/ 4).<br />
Bei Nässe kann sich das Zeltmaterial<br />
dehnen. Es muss dann etwas nachgespannt<br />
werden.<br />
10<br />
For the final guying procedure (1), ensure<br />
that all of the entrance zips are<br />
again closed (including the zip on the<br />
mosquito mesh screen) and tension<br />
the 5 corner tapes on the metal struts<br />
tightly (2).<br />
Next, tension all of the guylines in the<br />
middle of the side walls of the tent<br />
and at the corners of the tent using<br />
the remaining pegs (3/4).<br />
When wet the fabric of the tent may<br />
stretch. Re-guy where necessary.
Enfin, pour tendre la tente au maximum<br />
(1), fermez de nouveau complètement<br />
les fermetures à glissière de<br />
l’entrée de la tente (et également de<br />
la moustiquaire) et tendez bien les 5<br />
bandes angulaires au sol aux bâtonnets<br />
d’installation (2).<br />
Tendez ensuite à l’aide des piquets restants<br />
tous les haubans qui se trouvent<br />
au milieu du toit de la tente et aux<br />
coins de cette derniere (3/4).<br />
Par temps humide, il arrive que le tissu<br />
de la toile de tente se détende. Il faut<br />
alors la retendre un peu.<br />
11
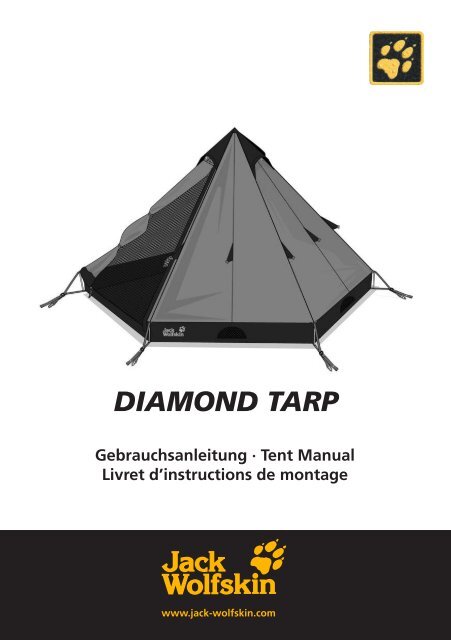
<strong>diamond</strong> <strong>Tarp</strong><br />
Zelt, <strong>Tarp</strong> oder Moskitoschutz –<br />
das DIAMOND TARP ist ein vielseitiger<br />
Wetterschutz und bietet reichlich Platz für<br />
4 Personen.<br />
Tent, tarp or mosquito shelter –<br />
the DIAMOND TARP is a versatile combination.<br />
It offers full weather protection and<br />
ample room for 4 persons.<br />
08/11<br />
La tente, le tarp ou la moustiquaire –<br />
le DIAMOND TARP présente une très<br />
bonne résistance aux intempéries et peut<br />
accueillir facilement 4 personnes.