Aufbauanleitung - JACK WOLFSKIN
Aufbauanleitung - JACK WOLFSKIN
Aufbauanleitung - JACK WOLFSKIN

You also want an ePaper? Increase the reach of your titles
YUMPU automatically turns print PDFs into web optimized ePapers that Google loves.
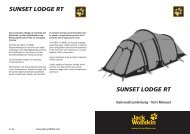
time tunnel ii Rt<br />
time tunnel iii Rt<br />
Gebrauchsanleitung · Tent Manual<br />
Livret d’instructions de montage
time tunnel ii / iii Rt<br />
TIME TUNNEL II RT TIME TUNNEL III RT<br />
ZeltPACKSACKinHAlt<br />
· 1 Innenzelt/Außenzelt-Kombination<br />
· 14 (18)* Heringe, Reparaturmate-<br />
rialien im Heringspackbeutel<br />
· 1 Stangenpackbeutel<br />
· 2 (3) vorgebogene Alustangen<br />
· 1 Reparaturhülse<br />
* Die Angaben für TIME TUNNEL III RT stehen<br />
immer in Klammern<br />
COntentS OF tent PACK SACK<br />
· 1 Inner tent/ flysheet combination<br />
· 14 (18)* pegs, repair materials<br />
in peg bag<br />
· 1 pole bag<br />
· 2 (3) preshaped aluminium pole<br />
sections<br />
· 1 pole repair sleeve<br />
* data for TIME TUNNEL III RT appear in this<br />
order in brackets<br />
COntenu Du SAC De tente<br />
· 1 tente intérieure/ensemble double<br />
toit<br />
· 14 (18)* piquets, du matériel de<br />
réparation dans le sac de piquets<br />
· 1 sac d’armatures<br />
· 2 (3) arceaux en aluminium<br />
· 1 douille de réparation<br />
* Les indications entre paranthèse correspon-<br />
dent au modèle TIME TUNNEL III RT.<br />
<strong>JACK</strong> <strong>WOLFSKIN</strong> entwickelt seine Produkte ständig weiter. Wir behalten uns vor, einzelne Komponenten zu verändern.<br />
Abbildungen der <strong>Aufbauanleitung</strong> können vom aktuellen Produkt abweichen.<br />
At <strong>JACK</strong> <strong>WOLFSKIN</strong> we are continually improving and upgrading our products. We therefore reserve the right to make<br />
changes to individual components. Diagrams used for the pitching instructions may differ slightly from the actual product.<br />
<strong>JACK</strong> <strong>WOLFSKIN</strong> développe et améliore ses produits en permanence. De ce fait nous nous réservons la possibilité de modifier<br />
certains composants. Les illustrations du mode de montage peuvent différer légèrement de celles du produit actuel.<br />
2
BelÜFtunG<br />
Ihr Zelt ist mit ausreichenden Belüftungsmöglichkeiten<br />
ausgestattet. Sorgen Sie immer für<br />
eine gute Luftzirkulation um die Gefahr der<br />
Kondenswasserbildung zu vermindern. Dennoch<br />
ist Kondenswasserbildung unvermeidbar.<br />
Verwechseln Sie Kondenswasser bitte nicht mit<br />
eindringender Feuchtigkeit.<br />
PFleGe<br />
Reinigen Sie Ihr Zelt in aufgebautem Zustand<br />
ausschließlich mit Wasser und wenig Seife. Befreien<br />
Sie vor allem die Reißverschlüsse regelmäßig<br />
von Schmutz und Sand. Auf keinen Fall<br />
in die Waschmaschine oder Reinigung geben,<br />
da hier die Beschichtung irreversibel zerstört<br />
werden kann. Geeignete Silikonschmiermittel<br />
schützen Stangen vor Korrosion und Reißverschlüsse<br />
vor dem Einfrieren.<br />
FeueR<br />
Offenes Feuer und Flammen sind eine Gefahr<br />
für Zeltgewebe. Vermeiden Sie offenes Feuer<br />
in unmittelbarer Nähe des Zeltes.<br />
VentilAtOn<br />
Your tent is equipped with sufficient ventilation<br />
options. Try to ensure that there is always<br />
a good flow of air through the tent to reduce<br />
the risk of condensation build-up. However,<br />
condensation cannot completely be avoided.<br />
Please do not confuse condensation with<br />
actual water penetration through the fabric of<br />
the tent.<br />
CARe AnD mAintenAnCe<br />
Clean your tent when pitched, using only a little<br />
soap and water. Zips in particular should be<br />
cleaned regularly to remove dirt and grit. On<br />
no account should the tent be machine washed<br />
or dry cleaned, since this could cause irreversible<br />
damage to the protective coating on the<br />
tent fabric. Suitable silicone-based lubricants<br />
protect poles from corrosion and prevent zips<br />
freezing.<br />
FiRe PReVentiOn<br />
Open fires and flames are a hazard for tent<br />
materials. Avoid naked flames in the immediate<br />
vicinity of the tent.<br />
VentilAtiOn<br />
Votre tente est suffisamment équipée<br />
d’options pour une bonne ventilation. Assurezvous<br />
de toujours avoir une bonne circulation<br />
d’air dans la tente pour réduire la condensation.<br />
Malgré tout il est impossible de prévenir<br />
totalement la formation d’eau de condensation.<br />
Ne confondez pas cependant eau de<br />
condensation et pénétration d’eau au travers<br />
de la toile de tente.<br />
entRetien<br />
Nettoyez votre tente montée, uniquement<br />
à l’eau un peu savonneuse. Les fermetures à<br />
glissière doivent être nettoyées régulièrement<br />
pour les débarrasser de la saleté et du sable.<br />
Ne surtout pas laver la tente à la machine, ne<br />
pas faire à nettoyer à sec, ces types de nettoyage<br />
causeraient une altération irréversible de<br />
l’enduit protecteur de la toile. Des lubrifiants<br />
appropriés à base de silicone, protègent les<br />
arceaux de la corrosion et les fermetures à<br />
glissière du gel.<br />
Feu<br />
Le feu confiné et toute flamme en général<br />
représentent un risque pour la toile. Évitez<br />
d’approcher toute flamme nue de la toile.<br />
3
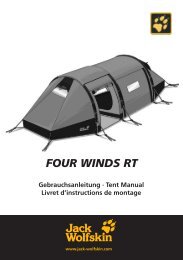
PHASe 1<br />
Beim ersten Aufbau: Sie sollten Ihr<br />
neues Zelt erst einmal probeweise<br />
aufbauen, und sich vor Antritt der<br />
ersten Reise mit allen Aufbauschritten<br />
vertraut machen.<br />
Wählen Sie zunächst einen geeigneten<br />
Standort für Ihr Zelt aus (1) und entfernen<br />
Sie dort alle spitzen Gegenstände,<br />
die den Zeltboden beschädigen könnten.<br />
Breiten Sie Ihr Zelt flach auf dem<br />
Boden aus und fügen Sie die Segmente<br />
der Alustangen sorgfältig zusammen,<br />
so dass diese fest ineinander sitzen (2).<br />
Achten Sie darauf, dass während des<br />
Aufbaus alle Reißverschlüsse geschlossen<br />
sind.<br />
4<br />
Pitching your tent for the first time:<br />
We recommend you to do a dry run<br />
pitching your new tent, in order to<br />
become familiar with all the pitching<br />
instructions before your first trip.<br />
Choose a suitable pitching site (1),<br />
removing all sharp objects which may<br />
damage the groundsheet. Spread out<br />
the tent on the ground and carefully<br />
connect all pole sections, ensuring a<br />
tight fit (2).<br />
Ensure that all zips are closed when<br />
pitching the tent.
Le premier montage de votre tente:<br />
Afin de vous familiariser avec les<br />
instructions de montage nous vous<br />
conseillons de faire un essai de montage<br />
de votre tente neuve avant de<br />
partir en voyage.<br />
Choisissez d’abord un emplacement<br />
approprié pour dresser votre tente<br />
(1), en prenant soin d’enlever tous les<br />
objets pointus pouvant endommager<br />
le tapis de sol de la tente. Étalez votre<br />
tente à plat sur le sol et assemblez<br />
soigneuse-ment tous les arceaux, de<br />
manière à ce qu’ils soient bien emboîtés<br />
les uns dans les autres (2). Assurez à<br />
ce que toutes les fermetures à glissière<br />
soient bien fermées pendant le montage<br />
de la tente.<br />
5
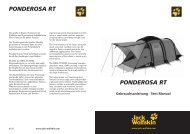
PHASe 2<br />
Führen Sie die Stangen nun vorsichtig<br />
in die entsprechenden außen liegenden<br />
Stangenkanäle ein (1). Wenden Sie<br />
keine Gewalt an. Wenn Sie auf Widerstand<br />
stoßen während Sie die Stangen<br />
einführen oder spannen, machen Sie<br />
das Problem ausfindig und beheben<br />
Sie es.<br />
Setzen Sie die Stangen unter Spannung,<br />
indem Sie die spitzen Stangenenden<br />
jeweils in die dafür<br />
vorgesehenen Ösen am offenen Stangenkanalende<br />
einstecken (2A oder 2B).<br />
6<br />
Carefully insert the poles into their<br />
respective external pole channels (1).<br />
Do not use force. If resistance is met<br />
when the poles are inserted or tensioned,<br />
check and remedy the problem.<br />
Tension the poles by inserting the<br />
pole ends into their respective eyelets<br />
at the open ends of the pole channels<br />
(2A or 2B).
Introduisez les arceaux d’armature<br />
dans leurs fourreaux extérieures<br />
correspondants avec précaution (1).<br />
Ne forcez pas. Si vous vous heurtez<br />
à de la résistance pendant que vous<br />
introduisez les arceaux ou que vous<br />
les tendez, cherchez-en la cause et<br />
éliminez-la.<br />
Tendez les arceaux en insérant leurs<br />
extrémités dans leurs oeillets respectifs<br />
placés à la fin des fourreaux (2A ou<br />
2B).<br />
7
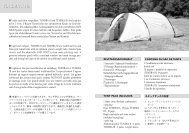
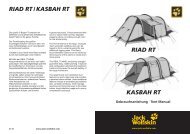
PHASe 3<br />
Stellen Sie sicher, dass alle Reißverschlüsse<br />
geschlossen sind und fixieren<br />
Sie Ihr Zelt am Fußende (1).<br />
Nehmen Sie dann die beiden vorderen<br />
Apsidenbefestigungen in die Hand<br />
und ziehen Sie das Zelt nach vorne hin<br />
wie eine Ziehharmonika auseinander.<br />
Richten Sie das Zelt gerade aus und<br />
spannen Sie die vordere und hintere<br />
Apsis an den Abspannpunkten mit<br />
Heringen.<br />
Achten Sie darauf, dass die Bodenspannbänder<br />
des Außenzeltes gleichmäßig<br />
gespannt sind und das Zelt in<br />
einer Linie steht (2).<br />
8<br />
45°<br />
Making sure all zips are closed, anchor<br />
your tent at the rear end (1).<br />
Next, take hold of the two front<br />
porch anchor points and pull the tent<br />
forward, opening it up like a concertina.<br />
Straighten the tent and peg out the<br />
front and rear porches. Make sure<br />
that the flysheet guying tapes at<br />
ground level are equally tensioned<br />
and that the tent is positioned in a<br />
straight line (2).
Après que vous vous êtes assuré que<br />
toutes les fermetures à glissière soient<br />
fermées,fixez l’arrière de votre tente<br />
avec un piquet. Puis saisissez les deux<br />
boucles de tension de l’abside d’entrée<br />
et déployez votre tente en la tirant<br />
vers l’avant comme un accordéon. Tendez<br />
la tente jusqu’à ce qu’elle soit bien<br />
droite en fixant les piquets de l’abside<br />
frontal et arrière (1).<br />
Assurez-vous que les fixations des<br />
haubans du double toit au niveau du<br />
sol soient tendues de manière égale et<br />
que le positionnement de la tente soit<br />
en ligne droite (2).<br />
9
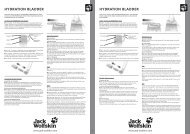
PHASe 4<br />
Fixieren und straffen Sie nachfolgend<br />
alle übrigen Befestigungsschlaufen<br />
und REAL TUNNEL Abspanndreiecke<br />
(1). Spannen Sie Ihr Zelt anschließend<br />
mit Hilfe der dafür vorgesehenen<br />
Abspannleinen und der restlichen Heringe<br />
sturmstabil aus (2).<br />
Die Abspannleinen an den in Längsrichtung<br />
hinteren und vorderen<br />
Gestängekanälen sollen schräg nach<br />
außen gespannt werden, so dass auch<br />
in Längsrichtung des Zeltes Spannung<br />
entsteht (3).<br />
Bei Nässe kann sich das Zeltmaterial<br />
dehnen. Es muss dann etwas nachgespannt<br />
werden (1).<br />
10<br />
Continue to tension the tent by pegging<br />
out the remaining anchor points<br />
and REAL TUNNEL tensioning triangles<br />
(1). Peg out the remaining guy<br />
lines to make the tent wind stable (2).<br />
The guy lines on the front and rear<br />
pole channels should be tensioned<br />
diagonally outwards so that longitudinal<br />
tension is also created (3).<br />
When wet, the polyester flysheet material<br />
may stretch slightly. Retension if<br />
necessary (1).
Continuez à dresser la tente en fixant<br />
les points d’attache restante et les<br />
haubans à triangle du REAR TUNNEL<br />
(1).<br />
Fixez avec des piquets les haubans<br />
restants afin de stabiliser la tente au<br />
vent (2/3).<br />
Par temps humide, le double toit en<br />
polyester peut légèrement se détendre.<br />
Si nécessaire retendre (1).<br />
45°<br />
11
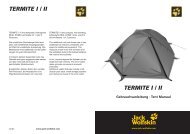
FAltAnleitunG<br />
Achten Sie beim Einfalten des Zeltes<br />
darauf, dass die REAL TUNNEL Stabilisatoren<br />
immer parallel zur Rollrichtung<br />
liegen.<br />
Legen Sie das Zelt längs halbiert auf<br />
die Seite (1) und und schlagen Sie die<br />
Apsiden ein (2).<br />
Dritteln Sie das Zelt erst längs (3) und<br />
dann quer (4).<br />
Schließlich wird das Zelt mit Hilfe des<br />
Gestängesacks eingerollt (5/6).<br />
FOlDinG tHe tent:<br />
When folding the tent, make sure<br />
that the REAL TUNNEL stabilisers<br />
always lie at right angles to the direction<br />
in which the tent is rolled up.<br />
Fold the tent in two, lay it on its side<br />
(1) and fold in the vestibule sections<br />
(2).<br />
Fold the tent lengthways into three<br />
(3) and then crossways (4).<br />
Finally, roll the tent up around the<br />
pole bag (5/6).<br />
12
FOlDinG<br />
inStRuCtiOn<br />
PliAGe De lA tente:<br />
Avant de plier votre tente assurezvous<br />
que les stabilisateurs du REAR<br />
TUNNEL soient toujours étalés à angle<br />
droit et dans la direction vers laquelle<br />
vous allez rouler la tente.<br />
Pliez la tente en deux, étalez-la son<br />
côté (1) et pliez-la en trois comme sur<br />
le croquis (2).<br />
Pliez la section de l’abside (3), puis<br />
pliez la tente dans sa longueur en six<br />
(4).<br />
Pour finir, roulez la tente autour du<br />
sac d’arceaux (5/6).<br />
13
inFO<br />
RePARAtuRen<br />
Reparaturmaterialien<br />
für<br />
kleine Reparaturenunterwegs<br />
liegen<br />
bei. Produktionsfehler werden im Rahmen der<br />
Garantieleistungen repariert. Andere Reparaturen<br />
führen wir gegen eine Gebühr gerne<br />
aus. Schicken Sie das gereinigte Zelt mit klarer<br />
Reparaturkennzeichnung/-anweisung und Ihrem<br />
Kaufbeleg über Ihren Fachhändler ein.<br />
lAGeRunG<br />
Bevor Sie Ihr Zelt längere Zeit lagern, muss es<br />
vollkommen durchgetrocknet sein, sonst besteht<br />
Gefahr von Schimmel- und Stockfleckenbildung.<br />
uV StRAHlunG<br />
Ultraviolette (UV) Strahlung zerstört mit der Zeit<br />
alle modernen Zeltmaterialien. Das spezielle<br />
Polyester-Zeltmaterial erhöht die Lebensdauer<br />
gegenüber herkömmlichen Nylon-Zeltmaterialien,<br />
kann aber auch auf Dauer der Natur nicht trotzen.<br />
Bitte vermeiden Sie deshalb dauerhafte intensive<br />
Sonneneinwirkung. Jack Wolfskin übernimmt<br />
keine Garantie für Schäden durch UV Strahlung.<br />
RePAiRS<br />
Repair materials for minor repairs during usage<br />
are provided. Production faults will be repaired<br />
under the terms of our guarantee. Our service<br />
department will be pleased to perform other<br />
repairs for a small charge. Please send in your<br />
cleaned tent via your nearest dealer, enclosing<br />
clear repair instructions and proof of purchase.<br />
StORAGe<br />
Allow your tent to dry thoroughly while still<br />
assembled before storing it for any longer<br />
period. This will prevent mildew and damp<br />
stains forming.<br />
uV liGHt<br />
Ultraviolet (UV) radiation reduces the tearstrength<br />
of all tent materials in the course of<br />
time. The special polyester tent material increases<br />
the service life in comparison with conventional<br />
nylon materials. Tent materials, however,<br />
cannot permanently defy the effects of nature.<br />
Therefore, please avoid subjecting the tent to<br />
intensive sunlight for extended periods of time.<br />
<strong>JACK</strong> <strong>WOLFSKIN</strong> will not assume any liability for<br />
damage caused by ultraviolet light.<br />
14<br />
RÉPARAtiOnS<br />
Le matériel pour les petites réparations en cours<br />
de voyage est fourni avec la tente. Tout défaut<br />
de fabrication est couvert par la garantie. Nous<br />
effectuons volontiers les autres réparations<br />
contre paiement à un tarif raisonnable. Veuillez<br />
nous envoyer la tente nettoyée, en joignant<br />
le ticket de caisse, par l’intermédiaire de votre<br />
magasin spécialisé le plus proche, avec de claires<br />
instructions de réparation.<br />
StOCKAGe<br />
Avant d’être stockée pendant une durée prolongée,<br />
la tente doit être entièrement sèche, afin<br />
de prévenir la formation de moisissures et de<br />
tâches d‘humidité.<br />
RAYOnnement ultRAViOlet<br />
Avec le temps, les rayons ultraviolets réduisent la<br />
résistance de toutes les toiles de tente. La toile<br />
spéciale en polyester accroît la longévité de la<br />
tente par rapport à celles en Nylon traditionnelles,<br />
mais à la longue, elle ne peut résister de<br />
manière permanente aux effets de la nature.<br />
De ce fait nous vous prions donc d’éviter toute<br />
exposition intensive de longue durée au soleil.<br />
<strong>JACK</strong> WOLSKIN n’assume aucune garantie pour<br />
les dommages causés par les rayons ultraviolets.
WeiteRe tiPPS<br />
Überprüfen Sie den Sitz der Stangen in den<br />
Stangenkanälen. Auf den geschlossenen Seiten<br />
sollen die abgerundeten Stangenenden sauber<br />
in den Bandtaschen einrasten. Ziehen Sie die<br />
spitzen Stangenenden über die Bandösen-Verstellung<br />
an den offenen Stangenkanal-Enden<br />
fest an.<br />
Auch die REAL TUNNEL Abspannungen müssen<br />
straff gespannt sein: Nur die stramme<br />
Grundspannung der Stangen ist die Vorraussetzung<br />
für besten Stand und Sturmstabilität<br />
Ihres Zeltes.<br />
nAHtDiCHteR<br />
Die wichtigsten Nähte sind mit einer speziellen<br />
Nahtbandversiegelung versehen. Es<br />
empfiehlt sich Nahtstellen, in die Bänder oder<br />
Gummilitzen mit eingefasst sind und die so<br />
die Bandabklebung unterbrechen, von innen<br />
und außen zusätzlich mit beiliegendem PU<br />
Nahtdichter abzudichten. Eine Garantie für die<br />
Verklebung ist ausgeschlossen.<br />
FuRtHeR tiPS<br />
Check to ensure that the poles are positioned<br />
correctly inside the pole channels. The rounded<br />
end of the pole section should slot snugly into<br />
the tape pouch at the closed end of the pole<br />
channel.<br />
Vary the position of the pointed pole tips in<br />
the tape eyelets at the open end of the pole<br />
channels to ensure that the poles and the REAL<br />
TUNNEL guying system are correctly tensioned.<br />
This is the prerequisite for a secure, wind<br />
stable pitch.<br />
SeAm SeAlAnt<br />
The important seams are specially tape sealed.<br />
However we do recommend additional sealing<br />
with the PU seam sealant provided, particularly<br />
at those points of the seam where tapes or<br />
rubber tensioning loops are integrated into<br />
seam and thus interrupt the continuity of the<br />
tape seal. We offer no guarantee on the seam<br />
taping of the seams.<br />
COnSeilS SuPPlementAiReS<br />
Assurez-vous que les arceaux sont correctement<br />
positionnés dans les fourreaux. Les<br />
extrémités arrondies sur les côtés fermés doivent<br />
s’insérer facilement dans les poches des<br />
sangles. Tirez sur les extrémités pointues des<br />
arceaux dans les œillets se situant à l’extrémité<br />
des fourreaux.<br />
Les ancrages REAL TUNNEL doivent également<br />
être fermement tendus. Votre tente ne sera<br />
stable et résistante au vent que si les arceaux<br />
sont très tendus.<br />
COlle imPeRmeABiliSAnte<br />
Les coutures importantes ont été recouvertes<br />
d’une bande scellée spéciale. Nous vous recommandons<br />
toutefois de traiter, à l’intérieur<br />
comme à l’extérieur, avec la colle imperméabilisante<br />
PU fournie avec la tente, les endroits où<br />
des bandes et des cordons en caoutchouc sont<br />
insérés dans la couture et interrompent donc<br />
la continuité de collage des bandes. Le collage<br />
des bandes scellées n’est pas couvert par la<br />
garantie.<br />
15
time tunnel ii / iii Rt<br />
TIME TUNNEL II RT und TIME TUNNEL III<br />
RT sind sturmstabile Leicht-Tunnelzelte<br />
mit viel Komfort für den anspruchvollen<br />
Einsatz.<br />
Die <strong>JACK</strong> <strong>WOLFSKIN</strong> REAL TUNNEL Konstruktion<br />
ermöglicht eine enorme Windstabilität,<br />
erhöht den nutzbaren Innenraum<br />
und vereinfacht das Handling. Durch die<br />
außen liegenden Gestängekanäle und<br />
die REAL TUNNEL Abspannungen ist das<br />
komplette Zelt in einem Vorgang leicht<br />
und schnell aufzubauen – bei normalen<br />
Windverhältnissen sind keine Abspannleinen<br />
mehr nötig.<br />
Die große Apsis und die 2 verschließbaren<br />
Belüftungen erhöhen die Lebensqualitäten.<br />
Zusätzlichen Nutzen bieten der variable<br />
Kompressions-Packsack, die Netztaschen<br />
und Wäscheleinenschlaufen im Innenzelt.<br />
TIME TUNNEL II RT and TIME TUNNEL III RT<br />
are wind stable, light tunnel tents with<br />
many convenient, comfort-plus features<br />
and are designed for demanding use.<br />
The tents are constructed in accordance<br />
with the <strong>JACK</strong> <strong>WOLFSKIN</strong> REAL TUNNEL<br />
design principle, which improves the wind<br />
stability enormously, increases the usable<br />
space within the tent and simplifies the<br />
pitching procedure. External pole channels<br />
and the REAL TUNNEL guying system make<br />
the tent extremely easy to pitch and dispense<br />
with the need for guy lines (in normal<br />
wind conditions).<br />
The generous vestibule area and the two<br />
sealable ventilation ducts improve tentbound<br />
life considerably. Additional useful<br />
features include a volume-adjustable pack<br />
sack, and mesh storage pouches and drying<br />
line loops inside the tent.<br />
08/11<br />
Les tentes TIME TUNNEL II RT et TIME TUN-<br />
NEL III RT sont construites pour une utilisation<br />
fréquente; elles sont stables au vent,<br />
avec les avantages des tentes en forme de<br />
tunnel ultra légères, et leurs accessoires<br />
pour un plus grand confort.<br />
Les tentes sont construites selon le principe<br />
de conception du REAL TUNNEL <strong>JACK</strong> WOLS-<br />
KIN, améliorant énormément leur stabilité<br />
au vent, accroissant l’espace intérieur utilisable<br />
de la tente et simplifiant la procédure<br />
de montage. Les fourreaux extérieurs et le<br />
système de tension spécial REAR TUNNEL<br />
permettent un montage très facile de la tente<br />
et dispense le besoin de fixer les haubans<br />
(dans des conditions de vent normales).<br />
L’aire généreuse de l’abside et les deux<br />
calottes d’aération améliorent considérablement<br />
la vie à l’intérieur de la tente. Le<br />
sac de tente de taille réglable, les poches de<br />
rangement en filet et la corde à linge avec<br />
boucles à l’intérieur de la tente sont d’autres<br />
accessoires bien utiles.