
Create successful ePaper yourself
Turn your PDF publications into a flip-book with our unique Google optimized e-Paper software.
9<br />
5<br />
4<br />
3<br />
<strong>ENGLISH</strong> country (you will find its phone number in the world-wide guarantee leaflet). If <strong>BAHASA</strong> <strong>MELAYU</strong><br />
Congratulations on acquiring your new <strong>Philips</strong> kettle! In these instructions for<br />
use you will find all important information, so you can optimally enjoy your<br />
kettle as long as possible.<br />
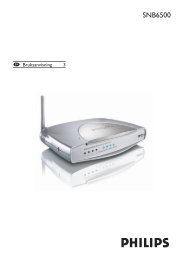
Description<br />
1) On/Off switch (I/O) 6) Base<br />
2) Pilot lamp 7) Scale filter<br />
3) Safety lid 8) Double-action filter<br />
4) Spout 9) Triple-action filter<br />
5) Water-level indicator 10) Filter<br />
Important<br />
◗ This kettle is only meant to be used for boiling water.<br />
◗ Never fill the kettle beyond the maximum level indication. If the kettle has<br />
been overfilled, there is a risk that boiling water will be ejected from the<br />
spout.<br />
◗ Never fill the kettle below the minimum level. In case of kettles with a flat<br />
heating element: never put less than 0.1 litre of water in the kettle to<br />
prevent the kettle from boiling dry. In case of kettles with a spiral heating<br />
element: never put less than 0.4 litre of water in the kettle, unless the<br />
water-level indicator indicates a different minimal water-level . In case of<br />
metal kettles: never put less than 0.2 litre of water in the kettle.<br />
◗ Some condensation may appear on the base of the kettle.This is perfectly<br />
normal and does not mean that the kettle has any defects.<br />
◗ Depending on the hardness of the water in your area, small spots may<br />
appear on the heating element of your kettle when you use it.This<br />
phenomenon is the result of scale build-up on the heating element and on<br />
the inside of the kettle over time.The harder the water, the faster scale<br />
will build up. Scale can occur in different colours.Although scale is<br />
harmless, too much scale can influence the performance of your kettle.<br />
Please follow the instructions for descaling the kettle given in this leaflet.<br />
◗ 3100 watts kettle:This <strong>Philips</strong> rapid boil kettle can draw up to 13 amps<br />
from the power supply in your home. Make sure that the electrical system<br />
in your home and the circuit to which the kettle is connected can cope<br />
with this level of power consumption. Do not let too many other<br />
appliances draw power from the same circuit while the kettle is being<br />
used.<br />
◗ Keep the kettle and the cord out of the reach of children.<br />
◗ Excess cord can be stored in or around the base of the kettle.<br />
◗ Boiling water can cause serious burns. Please take care when the kettle<br />
contains hot water.<br />
◗ Directly removing the lid after brewing can cause hot steam coming out<br />
of the kettle.<br />
◗ Only use the kettle in combination with its original base.<br />
◗ If your kettle is damaged in any way, please contact a service centre<br />
authorised by <strong>Philips</strong>. Do not attempt to make any repairs yourself.<br />
Boil-dry protection<br />
The heating element of your kettle is protected by a safety cut-out device.This<br />
device will automatically switch the kettle off if it is accidentally switched on<br />
without any water or with insufficient water.The on/off switch will stay in the 'I'<br />
position and the pilot light, if available, will stay on. Please switch the kettle off<br />
and wait 10 minutes for the kettle to cool down.Then lift the kettle from its<br />
base to reset the boil-dry protection.The kettle is ready for use again.<br />
Using the kettle<br />
1 Place the kettle base on a flat surface and put the plug in the wall socket.<br />
2 Fill the kettle with water either through the spout or through the open<br />
lid<br />
3 Close the lid.<br />
Make sure that the lid is properly closed to prevent the kettle from boiling dry.<br />
4 Set the on/off switch to on (1)<br />
The kettle starts heating up.<br />
For kettles without a base<br />
1 Close the lid.<br />
2 Put the plug in the wall socket<br />
The kettle starts heating up.<br />
Only for metal kettles<br />
Be careful, the body of a metal kettle becomes hot!<br />
◗ The kettle switches off ('O' position) automatically when the water has<br />
reached boiling point.<br />
◗ You can interrupt the boiling process by setting the on/off switch to 'O'.<br />
Cleaning and descaling the kettle<br />
1 Remove the plug from the wall socket.<br />
2 Clean the outside of the kettle with a soft, damp cloth moistened with<br />
warm water and some mild cleaning agent.<br />
Do not use any abrasive cleaning agents, scourers etc. to clean the kettle.<br />
Never immerse the kettle or its base in water.<br />
◗ Regular descaling will prolong the life of the kettle.<br />
In case of normal use (up to 5 times a day), the following descaling frequency is<br />
recommended:<br />
1) once every 3 months for soft water areas (up to 18 dH)<br />
2) once every month for hard water areas (more than 18 dH)<br />
Descaling the kettle<br />
1 Fill the kettle with water up to three-quarters of the maximum level and<br />
bring the water to the boil.<br />
2 After the kettle has switched off, add white vinegar (8%) to the<br />
maximum level.<br />
3 Leave the solution in the kettle overnight.<br />
4 Empty the kettle and rinse the inside thoroughly.<br />
5 Fill the kettle with clean water and boil the water.<br />
6 Empty the kettle and rinse it with clean water again.<br />
◗ Repeat the procedure if there is still some scale in the kettle.<br />
◗ You can also use an appropriate descaler.<br />
Cleaning the filter<br />
Scale is not harmful to your health but it may give your drink a powdery taste.<br />
The scale filter prevents scale particles from ending up in your drink. Models<br />
with a double-action filter and triple-action filter have also been equipped with<br />
a mesh that attracts scale from the water. Clean the scale filter regularly.<br />
◗ The mesh of filters is to be cleaned by squeezing and rotating it under a<br />
running tap.<br />
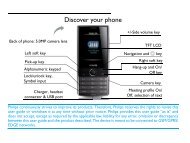
◗ The triple-action filter can be cleaned as follows:<br />
1) Remove the basket from the filter by sliding it.<br />
2) Take the stainless steel mesh out of the basket and clean it by squeezing and<br />
rotating it under a running tap (fig. 1-3).<br />
◗ All filters can be cleaned by:<br />
- leaving it in the kettle during descaling the whole appliance<br />
- gently brushing the filter with a soft nylon brush under a running tab<br />
- in the dishwasher.<br />
Replacement<br />
7, 8<br />
Replacement filters for <strong>Philips</strong> kettles can only be purchased from your <strong>Philips</strong><br />
dealer or your local <strong>Philips</strong> service centre.The table below indicates which<br />
filters are suitable for which type of kettle.<br />
If the kettle or the mains cord of the appliance is damaged, it may only be<br />
replaced by a service centre authorised by <strong>Philips</strong>, as special tools and/or<br />
parts are required.<br />
Information and service<br />
6<br />
HD 4657, HD 4653 & HD 4652<br />
2<br />
1<br />
5<br />
4<br />
HD 4659, HD 4651 & HD 4650<br />
If you need information or if you have a problem, please visit the <strong>Philips</strong> Web<br />
3<br />
1, 2<br />
6<br />
7<br />
5<br />
4<br />
3<br />
1<br />
HD 4673 & HD 4672<br />
6<br />
10<br />
5<br />
4<br />
3<br />
HD 4642, HD 4641<br />
7<br />
1<br />
5<br />
6<br />
4<br />
3<br />
max<br />
3.0 1.7<br />
pt l<br />
2.0<br />
1.0<br />
1.0<br />
0.9 0.5<br />
min<br />
HD 4628<br />
1 2<br />
3<br />
1<br />
2<br />
6<br />
7<br />
1<br />
4<br />
3<br />
HD 4637<br />
Filter type(s)<br />
HD4966 (normal filter) or HD4970<br />
(double action filter)<br />
HD4967<br />
HD4960<br />
HD4973<br />
HD4971 (normal filter)<br />
HD4977 (triple-action filter)<br />
HD4976 (triple-action filter)<br />
HD4978<br />
HD4974<br />
1<br />
6<br />
4<br />
HD 4638<br />
site at www.philips.com or contact the <strong>Philips</strong> Customer Care Centre in your<br />
there is no Customer Care Centre in your country, turn to your local <strong>Philips</strong><br />
dealer or contact the Service Department of <strong>Philips</strong> Domestic Appliances and<br />
Personal Care BV.<br />
Kettle type(s)<br />
HD4628<br />
HD4637<br />
HD4642<br />
HD4650<br />
HD4651 and HD4659<br />
HD4652<br />
HD4653 and HD4657<br />
HD4602 and HD4603<br />
HD4672 and HD4673<br />
3<br />
6<br />
1<br />
4<br />
3<br />
HD 4399<br />
Tahniah di atas pembelian cerek baru Phillips anda! Di dalam arahan-arahan<br />
untuk penggunaan ini, anda akan dapati semua maklumat penting, supaya ada<br />
boleh secara optima menikmati cerek anda seberapa lama yang boleh.<br />
Huraian<br />
1) Suis Pasang/Matikan (I/O) 6) Dasar<br />
2) Lampu penunjuk 7) Penuras skel<br />
3) Penutup keselamatan 8) Penuras dua tindakan<br />
4) Muncung 9) Penuras tiga tindakan<br />
5) Penunjuk tahap air 10) Penuras<br />
Penting<br />
◗ Gunakan cerek ini hanya untuk mendidih air.<br />
◗ Jangan isikan air melepasi tanda paras maksimum. Jika cerek terlalu penuh,<br />
ada risiko air mendidih terpercik dari muncung.<br />
◗ Jangan sekali-kali mengisi cerek di bawah tahap minima. Dalam kes cerekcerek<br />
dengan elemen pemanas yang leper: jangan sekali-kali mengisi<br />
kurang daripada 0.1 liter air ke dalam cerek untuk mengelakkan cerek dari<br />
mendidih hingga kering. Dalam kes cerek-cerek dengan elemen pemanas<br />
berbentuk gegelung: jangan sekali-kali mengisi kurang daripada 0.4 liter air<br />
ke dalam cerek kecuali jika penunjuk tahap air menunjukkan tahap minima<br />
air yang berlainan. Dalam kes-kes cerek logam: jangan sekali-kali mengisi<br />
kurang daripada 0.2 liter air ke dalam cerek.<br />
◗ Sedikit pemeluwapan akan terjadi pada dasar cerek. Ini adalah biasa dan<br />
tidak bermakna yang cerek mempunyai kecacatan.<br />
◗ Bergantung kepada 'kekerasan' air di kawasan anda, tompok-tompok kecil<br />
akan berada atas elemen pemanas cerek anda apabila anda<br />
menggunakannya. Fenomena ini adalah hasil dari skel terbina atas elemen<br />
pemanas dan di dalam cerek sekian masa. Lebih 'keras' airnya, lebih cepat<br />
skel terbina. Skel boleh didapati dalam berbagai warna.Walaupun skel tidak<br />
bahaya, terlalu banyak skel mempengaruhi keupayaan cerek anda. Sila ikuti<br />
arahan-arahan bagi penyah skel cerek yang diberikan dalam risalah.<br />
◗ Cerek 3100 watts: Cerek cepat didih ini boleh menarik 13 amp dari<br />
bekalan kuasa di rumah anda. Pastikan sistem elektrik dalam rumah anda<br />
dan litar yang tersambung ke cerek berkenaan boleh menampung<br />
keperluan bekalan kuasa. Jangan biarkan terlalu banyak peralatan lain<br />
menggunakan kuasa dari litar yang sama semasa cerek digunakan.<br />
◗ Jauhkan cerek dan wayarnya dari dicapai oleh kanak-kanak.<br />
◗ Wayar yang terlebih boleh disimpan dalam atau dililit pada kaki cerek.<br />
◗ Air yang mendidih dapat menyebabkan luka terbakar yang parah. Silakan<br />
hati-hati kalau cerek berisi air panas.<br />
◗ Menanggalkan penutup secara terus dari cerek selepas mendidih boleh<br />
menyebabkan wap panas keluar dari cerek.<br />
◗ Cuma menggunakan cerek bersama dengan kaki yang asli.<br />
◗ Jika cerek anda rosak dengan apa jua cara, sila berhubung dengan pusat<br />
perkhidmatan yang ditauliahkan oleh <strong>Philips</strong>. Jangan cuba membaiki<br />
peralatan sendiri.<br />
Perlindungan mendidih-kering<br />
Elemen pemanas cerek anda adalah dilindungi oleh alat keselamatan pemutus<br />
litar. Alat ini akan secara automatik mematikan cerek jika ianya tidak tersengaja<br />
dipasangkan tanpa berisi air atau air tidak mencukupi. Suis pasang/matikan akan<br />
berada di kedudukan "I" dan lampu penanda, jika ada, akan terus menyala.<br />
Tolong matikan cerek dan tunggu 10 minit untuk cerek sejuk. Kemudian angkat<br />
cerek dari kakinya untuk reset perlindungan mendidih-kering. Cerek kini sedia<br />
digunakan semula.<br />
Menggunakan cerek<br />
1 Letakkan dasar cerek pada permukaan rata dan masukkan plag dalam<br />
soket dinding.<br />
2 Isi cerek dengan air sama ada melalui muncung cerek atau dari ruang<br />
terbuka penutup.<br />
3 Tutup penutupnya.<br />
Pastikan penutup ditutup rapat untuk mengelakkan cerek mendidih kering.<br />
4 Setkan suis hidup/ matikan pada hidup (1)<br />
Cerek akan mula memanas.<br />
Untuk cerek tanpa kaki.<br />
1 Tutup penutupnya.<br />
2 Masukkan plag dalam soket dinding<br />
Cerek akan mula memanas.<br />
Hanya untuk cerek-cerek besi<br />
Berhati-hati, badan cerek besi menjadi panas!<br />
◗ Cerek otomatik dimatikan ( kedudukan 'O' ) bila air mencapai takat didih.<br />
◗ Anda boleh menamatkan proses mendidih dengan menetapkan suis pasang<br />
/matikan pada 'O'.<br />
Pembersihan dan menyah skel cerek<br />
1 Keluarkan plag dari soket dinding.<br />
2 Bersihkan bahagian luar cerek dengan kain lembut yang lembap dengan<br />
air suam dan agen pembersih.<br />
Jangan gunakan ejen-ejen pembersih kasar scourers dan lain-lain untuk<br />
membersihkan cerek.<br />
Jangan mencelup cerek atau kakinya di dalam air.<br />
◗ Anda boleh memanjangkan usia cerek dengan menyah skel selalu.<br />
Bagi penggunaan biasa (sehingga 5 kali sehari), frekuensi nyah skel berikut<br />
disyorkan: 1) sekali setiap tiga bulan untuk air lembut sehingga 18 dH), 2) sekali<br />
setiap bulan untuk kawasan air keras (lebih dari 18dH).<br />
Menyah skel cerek<br />
1 Isikan cerek dengan air sehingga tiga suku paras maksimum dan didihkan<br />
air.<br />
2 Setelah cerek dimatikan, tambah cuka putih (8%) ke paras maksimum.<br />
3 Membiarkan larutan di dalam cerek semalaman.<br />
4 Mengosongkan cerek dan membasuh bahagian dalam dengan sebersihbersihnya.<br />
5 Mengisi cerek dengan air bersih dan mendidih air itu.<br />
6 Mengosongkan cerek dan membasuhnya sekali lagi dengan air bersih.<br />
◗ Ulangi prosidur jika masih ada skel dalam cerek.<br />
◗ Anda boleh juga gunakan bahan menyah skel.<br />
Membersihkan penuras<br />
Skel tidak berbahaya kepada kesihatan anda tetapi ia mungkin menyebabkan<br />
minuman anda terasa berserbuk. Penapis skel menghalang partikel dari berakhir<br />
dalam minuman anda. Model-model yang mempunyai penapis dua-tindakan<br />
dan tiga tindakan juga dilengkapkan dengan penapis yang menapis skel dari air.<br />
Bersihkan penapis skel secara berkala.<br />
◗ Jaringan penuras harus dibersihkan dengan memerah dan<br />
memutarkannya di bawah air paip yang sedang mengalir.<br />
◗ Penuras tiga tindakan boleh dibersihkan seperti berikut:<br />
1) Alihkan bakul dari penuras dengan menggelongsorkannya.<br />
2) Ambil penapis keluli tahan karat keluar dari bakul dan bersihkannya dengan<br />
memicit dan memutarkannya di bawah air paip yang mengalir (fig. 1-3).<br />
◗ Kesemua penuras boleh dibersihkan dengan:<br />
- membiarkannya di dalam cerek semasa proses penanggalan skel seluruh<br />
peralatan itu<br />
- dengan memberus penuras dengan perlahan dengan menggunakan berus<br />
nilon lembut di bawah air paip yang mengalir<br />
- dalam mesin pencuci pinggan<br />
Pengganti<br />
2<br />
1<br />
7<br />
4<br />
HD 4603, HD 4602<br />
2<br />
1<br />
Turas penggantian untuk cerek Phillips anda hanya boleh dibeli daripada<br />
peniaga Phillips anda atau pusat khidmat Phillips tempatan anda.Jadual di bawah<br />
menunjukkan turas mana yang sesuai dengan jenis cereknya.<br />
Jika cerek atau kord utama peralatan adalah rosak ia boleh digantikan hanya<br />
oleh pusat perkhidmatan yang ditauliahkan oleh <strong>Philips</strong> kerana perkakas dan/<br />
atau alat ganti khas diperlukan.<br />
3<br />
6<br />
u www.philips.com<br />
4222 001 94735<br />
Maklumat dan perkhidmatan<br />
Jika anda perlukan maklumat atau jika anda mengalami masalah, sila lawati<br />
laman jaringan <strong>Philips</strong> di www.philips.com atau hubungi Pusat Jagaan Pelanggan<br />
<strong>Philips</strong> dalam negara (anda akan dapati nombor telefon dalam risalah jaminan<br />
antarabangsa ). Jika tiada Pusat Jagaan Pelanggan dalam negara anda, beralih ke<br />
pembekal <strong>Philips</strong> tempatan atau hubungi Pusat Perkhidmatan di Peralatan<br />
Dalaman <strong>Philips</strong> dan Jagaan Persendirian BV<br />
Jenis-jenis cerek<br />
HD4628<br />
HD4637<br />
HD4642<br />
HD4650<br />
HD4651 dan HD4659<br />
HD4652<br />
HD4653 dan HD4657<br />
HD4602 dan HD4603<br />
HD4672 dan HD4673<br />
Jenis-jenis penuras<br />
HD4966 (penuras biasa ) atau HD4970<br />
(penuras aksi kembar)<br />
HD4967<br />
HD4960<br />
HD4973<br />
HD4971 (penuras biasa)<br />
HD4977 (penuras tiga tindakan)<br />
HD4976 (penuras tiga tindakan)<br />
HD4978<br />
HD4974
◗<br />
◗<br />
◗<br />
◗<br />
◗<br />
◗<br />
◗<br />
◗<br />
◗<br />
◗<br />
◗<br />
◗<br />
◗<br />
1<br />
2<br />
3<br />
4<br />
1<br />
2<br />
◗<br />
◗<br />
◗<br />
1<br />
2<br />
1<br />
2<br />
3<br />
4<br />
5<br />
6<br />
◗<br />
◗<br />
◗<br />
◗<br />
◗<br />
9<br />
5<br />
4<br />
3<br />
6<br />
HD 4657, HD 4653 & HD 4652<br />
2<br />
1<br />
7, 8<br />
5<br />
4<br />
3<br />
1, 2<br />
HD 4659, HD 4651 & HD 4650<br />
6<br />
7<br />
5<br />
4<br />
3<br />
1<br />
HD 4673 & HD 4672<br />
6<br />
10<br />
5<br />
4<br />
3<br />
HD 4642, HD 4641<br />
7<br />
1<br />
5<br />
6<br />
4<br />
3<br />
max<br />
3.0 1.7<br />
pt l<br />
2.0<br />
1.0<br />
1.0<br />
0.9 0.5<br />
min<br />
HD 4628<br />
1 2<br />
3<br />
1<br />
2<br />
6<br />
7<br />
1<br />
4<br />
3<br />
HD 4637<br />
1<br />
6<br />
4<br />
HD 4638<br />
3<br />
6<br />
1<br />
◗<br />
◗<br />
◗<br />
◗<br />
◗<br />
◗<br />
◗<br />
◗<br />
◗<br />
◗<br />
◗<br />
◗<br />
4<br />
1<br />
2<br />
3<br />
4<br />
1<br />
2<br />
◗<br />
◗<br />
◗<br />
1<br />
2<br />
1<br />
2<br />
3<br />
4<br />
5<br />
6<br />
◗<br />
◗<br />
◗<br />
◗<br />
◗<br />
◗<br />
◗<br />
3<br />
HD 4399<br />
2<br />
1<br />
7<br />
4<br />
HD 4603, HD 4602<br />
3<br />
6<br />
2<br />
1


![03_[DE] - Philips](https://img.yumpu.com/25100096/1/184x260/03-de-philips.jpg?quality=85)