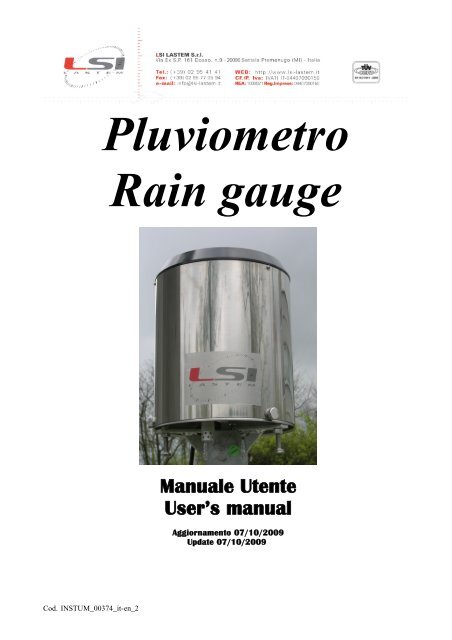
Pluviometro Rain gauge Manuale Utente User's manual - LSI - Lastem
Pluviometro Rain gauge Manuale Utente User's manual - LSI - Lastem
Pluviometro Rain gauge Manuale Utente User's manual - LSI - Lastem

You also want an ePaper? Increase the reach of your titles
YUMPU automatically turns print PDFs into web optimized ePapers that Google loves.
Cod. INSTUM_00374_it-en_2<br />
<strong>Pluviometro</strong><br />
<strong>Rain</strong> <strong>gauge</strong><br />
<strong>Manuale</strong> <strong>Utente</strong><br />
User’s <strong>manual</strong><br />
Aggiornamento 07/10/2009<br />
Update 07/10/2009
<strong>LSI</strong> LASTEM <strong>Pluviometro</strong>/<strong>Rain</strong> Gauge – <strong>Manuale</strong> <strong>Utente</strong>/User’s <strong>manual</strong><br />
Sommario<br />
1. DESCRIZIONE....................................................................................................................<br />
3<br />
1.1. Introduzione...................................................................................................................................................................<br />
3<br />
1.2. Caratteristiche principali............................................................................................................................................<br />
3<br />
1.3. Versioni...........................................................................................................................................................................<br />
4<br />
2. ACCESSORI.......................................................................................................................<br />
4<br />
3. CARATTERISTICHE TECNICHE.......................................................................................<br />
5<br />
4. ISTRUZIONI PER IL MONTAGGIO...................................................................................<br />
5<br />
4.1. Montaggio testa palo.....................................................................................................................................................<br />
6<br />
4.2. Montaggio a lato palo....................................................................................................................................................<br />
6<br />
4.3. Montaggio sul terreno...................................................................................................................................................<br />
6<br />
5. MANUTENZIONE PERIODICA E VERIFICA DEL FUNZIONAMENTO.............................<br />
7<br />
6. USO CONVERTITORE INTEGRATO I100A......................................................................<br />
9<br />
6.1. Caratteristiche tecniche................................................................................................................................................<br />
9<br />
6.2. Connessione elettrica.....................................................................................................................................................<br />
9<br />
6.3. Verifica funzionale........................................................................................................................................................<br />
9<br />
6.4. Calibrazione.................................................................................................................................................................<br />
10<br />
6.5. Individuazione di guasti..............................................................................................................................................<br />
10<br />
7. DISEGNI / DRAWINGS.....................................................................................................<br />
20<br />
7.1. Montaggio / Assembly.................................................................................................................................................<br />
20<br />
7.2. Connessioni elettriche / Electrical connections<br />
....................................................................................................... 22<br />
7.3. Ingombro e caratteristiche / Dimensions and features............................................................................................<br />
25<br />
7.4. Connessione ad acquisitori <strong>LSI</strong> LASTEM / Connection to data logger <strong>LSI</strong> LASTEM.......................................<br />
27<br />
7.5. Connessione a convertitore integrato I100A / Connection to integrating convertor I100A................................<br />
29<br />
Si veda pag.11 per la versione in lingua inglese del <strong>manual</strong>e.<br />
See pag.11 for User’s <strong>manual</strong> in English language.<br />
Copyright 2007-2009 <strong>LSI</strong> LASTEM. Tutti i diritti riservati.<br />
Le informazioni contenute nel presente <strong>manual</strong>e sono soggette a modifiche senza preavviso.<br />
Nessuna parte di questo <strong>manual</strong>e può essere riprodotta in qualsiasi forma o mezzo elettronico o meccanico, per alcun<br />
uso, senza il permesso scritto di <strong>LSI</strong> LASTEM.<br />
<strong>LSI</strong> LASTEM si riserva il diritto di intervenire sul prodotto, senza l’obbligo di aggiornare tempestivamente questo<br />
documento<br />
2
1.Descrizione<br />
1.1.Introduzione<br />
<strong>LSI</strong> LASTEM <strong>Pluviometro</strong>/<strong>Rain</strong> Gauge – <strong>Manuale</strong> <strong>Utente</strong>/User’s <strong>manual</strong><br />
La precipitazione viene definita come “il prodotto liquido o solido della condensazione del vapor<br />
d'acqua proveniente dalle nuvole o depositato dall'aria sul terreno. Essa comprende nel primo caso<br />
pioggia, grandine e neve mentre nel secondo rugiada e brina”.<br />
Il totale della precipitazione che raggiunge il terreno in un determinato periodo di tempo è espresso<br />
come l'altezza alla quale essa copre, in forma liquida, una proiezione orizzontale della superficie<br />
terrestre. La precipitazione viene pertanto misurata in unità lineari riferite al tempo in cui è avvenuta:<br />
mm/min, mm/ora, mm/giorno, ecc. ottenute dividendo il volume di acqua raccolta per la superficie da<br />
essa attraversata, cioè la "sezione pluviometrica".<br />
<strong>Pluviometro</strong> modelli DQA030 e DQA035 <strong>Pluviometro</strong> modello DQA130<br />
1.2.Caratteristiche principali<br />
Il dispositivo di misura è costituito essenzialmente da un cono per la raccolta dell'acqua e posto sotto<br />
di esso, un elemento ad altalena (bascula) consistente nell'accoppiamento di due vaschette simmetriche<br />
ruotanti attorno a un asse orizzontale in equilibrio instabile.<br />
Un dispositivo elettronico, costituito da due interruttori magnetici (relè reed) posti in corrispondenza<br />
delle due posizioni di riposo, o da un interruttore posto in posizione centrale, conta il numero di<br />
basculate fornendo un impulso conteggiabile; sommando questo impulso si risale alla quantità di<br />
precipitazione caduta.<br />
relè reed<br />
bascula<br />
3
1.3.Versioni<br />
<strong>LSI</strong> LASTEM <strong>Pluviometro</strong>/<strong>Rain</strong> Gauge – <strong>Manuale</strong> <strong>Utente</strong>/User’s <strong>manual</strong><br />
Codice<br />
Descrizione<br />
Alimentazione<br />
Uscita<br />
-<br />
impuls.<br />
24 Vca<br />
impuls.<br />
<strong>Pluviometro</strong> (superficie di raccolta 324 cm2 ) con un relè reed<br />
<strong>Pluviometro</strong> (superficie di raccolta 324 cm2 ) con due relè reed<br />
DQA030<br />
<strong>Pluviometro</strong> (superficie di raccolta 324 cm2 ) con un relè reed DQA130<br />
<strong>Pluviometro</strong> (superficie di raccolta 324 cm2 ) con un relè reed<br />
<strong>Pluviometro</strong> (superficie di raccolta 324 cm<br />
DQA131<br />
2 ) con riscaldamento e un<br />
relè reed<br />
<strong>Pluviometro</strong> (superficie di raccolta 324 cm2 ) con riscaldamento e due<br />
relè reed<br />
DQA031<br />
<strong>Pluviometro</strong> (superficie di raccolta 1000 cm2) con un relè reed<br />
<strong>Pluviometro</strong> (superficie di raccolta 1000 cm2) con due relè reed<br />
<strong>Pluviometro</strong> (superficie di raccolta 1000 cm<br />
DQA035<br />
2 ) con riscaldamento e un<br />
relè reed<br />
<strong>Pluviometro</strong> (superficie di raccolta 1000 cm2 ) con riscaldamento e<br />
due relè reed<br />
DQA036<br />
2. Accessori<br />
Cod. Descrizione<br />
DYA042 Base per fissaggio pluviometri a terreno<br />
DYA040 Supporto pluviometro per montaggio su pali diam. 50 mm<br />
DYA058 Barra per montaggio pluviometro a lato pali diam. 50 mm<br />
(deve essere utilizzata con supporto DYA040)<br />
DYA005 Paletto per pluviometri H=1m<br />
DYA020 Base per fissaggio palo al plinto in cemento<br />
DEA280 Integratore. Alimentazione: 24Vca Campo:0…20 mm/H2O Uscita:4…20 mA<br />
DEA281 Integratore. Alimentazione: 24Vca Campo:0…20 mm/H2O Uscita:0…20 mA<br />
DEA282 Integratore. Alimentazione: 12Vcc Campo:0…20 mm/H2O Uscita:0…5 V<br />
DEA285 Integratore. Alimentatore: 12Vcc Campo:0…20 mm/H2O<br />
Uscita: 4…20 mA<br />
I100A Convertitore integrato<br />
DWA510 Cavo L. 10m per pluviometro DQA130-DQA131<br />
DWA525 Cavo L. 25m per pluviometro DQA130-DQA131<br />
DWA526 Cavo L. 50m per pluviometro DQA130-DQA131<br />
4
<strong>LSI</strong> LASTEM <strong>Pluviometro</strong>/<strong>Rain</strong> Gauge – <strong>Manuale</strong> <strong>Utente</strong>/User’s <strong>manual</strong><br />
3.Caratteristiche tecniche<br />
DQA030 DQA035 DQA130<br />
Superficie di raccolta 324 cm2 1000 cm2 324 cm2 Diametro del cono di<br />
raccolta<br />
203 mm 357 mm 203 mm<br />
Campo di misura Max 10 mm/min 180 mm/hr Max 10 mm/min<br />
Risoluzione 0.2 mm/impulso (opzione 0.1 e 0.5 mm)<br />
Tolleranza<br />
0÷1mm/min:±1basculata<br />
1÷10mm/min: ±1%<br />
0÷1 mm/min: ±1%<br />
1÷3 mm/min: ±2%<br />
3÷5 mm/min: ±4%<br />
5÷10 mm/min: ±8%<br />
0÷1mm/min:±1basculata<br />
1÷10mm/min: ±1%<br />
Contatto n. 1 relè reed a secco (opzione n.2 relè)<br />
Portata 50 mA/24 V non induttivo<br />
Durata impulso 100 msec ± 50<br />
Materiale del cono di<br />
raccolta<br />
Ottone anodizzato Alluminio<br />
Materiale del fasciame o<br />
AISI304 Alluminio<br />
struttura esterna<br />
Materiale della base AISI304 Alluminio<br />
Materiale della bascula Alluminio teflonato<br />
Limiti ambientali 0 ÷ 50 °C<br />
Cavo 3 fili, 10 m (incluso) DWA5xx (non incluso)<br />
Connessione Morsetti<br />
Connettore x cavo<br />
DWAxxx<br />
Dimensioni massime Ø 232 x 274 Ø 420 x 365 Ø 210 x 477<br />
Peso 4.3 kg 5.3 kg 2,8 kg<br />
Montaggio<br />
Su pali Ø 50 mm per mezzo supporto a crocera DYA040<br />
oppure supporto laterale DYA058<br />
Solo versioni riscaldate DQA031 DQA036 DQA131<br />
Riscaldamento<br />
Termocoperta 60 W<br />
Alimentazione 24 Vac<br />
Termocoperta 100 W<br />
Alimentazione 24 Vac<br />
Termocoperta 60 W<br />
Alimentazione 24 Vac<br />
Cavo 5 fili, 10 m (incluso) DWA5xx (non incluso)<br />
Limiti operativi -15 ÷ +50 °C<br />
Peso 4.6 kg 6.3 kg 3.1 kg<br />
4. Istruzioni per il montaggio<br />
Per l’installazione dello strumento scegliere un luogo ben esposto. Questo luogo deve essere<br />
abbastanza lontano da muri, alberi, costruzioni, ecc. che non permetterebbero, in caso di pioggia<br />
trasversale, che tutta l'acqua caduta entri nel cono del pluviometro.<br />
Il WMO (World Meteorological Organization) consiglia l'installazione in un luogo dove la distanza<br />
del pluviometro da oggetti, sia uguale o maggiore a quattro volte l'altezza di questi oggetti.<br />
Se il sensore è posto sul terreno, esso non deve essere posto su una superficie dura (cemento etc.)<br />
che favorirebbe il fenomeno dell’"in-splashing", ovvero la ricaduta (tramite rimbalzo) all’interno del<br />
cono di raccolta pluviometro di gocce di pioggia cadute effettivamente esternamente.<br />
Si faccia riferimento ai disegni riportati al §7.1<br />
5
4.1.Montaggio testa palo<br />
<strong>LSI</strong> LASTEM <strong>Pluviometro</strong>/<strong>Rain</strong> Gauge – <strong>Manuale</strong> <strong>Utente</strong>/User’s <strong>manual</strong><br />
Per l’installazione del pluviometro in testa al palo meteo con supporto DYA040:<br />
1) Sfilare il corpo cilindrico del pluviometro allentando le tre viti godronate radiali.<br />
(ATTENZIONE: nelle versioni riscaldate vi è un cavo che collega la base del pluviometro alla<br />
termocoperta aderente al cono, rimuovere il cono con cura e staccare la spina dalla scatola<br />
posta sulla base)<br />
2) Rimuovere le tre viti fissate sulla base del pluviometro e montarle (con la testa rivolta verso il<br />
basso) sul supporto DYA040.<br />
3) Fissare ora la base, mediante le tre apposite viti, al supporto DYA040.<br />
4) Serrare il supporto DYA040 al palo, mediante le sue viti.<br />
5) Regolare i bulloni di fissaggio del sensore al supporto DYA 040, in modo che l'apparecchio sia<br />
in piano, aiutandosi con l'apposito segnalatore a bolla posto sopra la base del pluviometro.<br />
6) Fissare definitivamente i tre controdadi dei bulloni con apposite chiavi.<br />
7) Togliere l'elastico dalla bascula, (solo versioni riscaldate: ricollegare la spina del sistema di<br />
riscaldamento, facendo attenzione che il cavo non vada a posizionarsi sulla bascula).<br />
8) Rimontare e collegare lo strumento.<br />
4.2.Montaggio a lato palo<br />
In caso di montaggio a lato palo, fissare la barra di accoppiamento DYA058 al palo.<br />
Montare successivamente il supporto DYA040 sulla barra DYA058 e procedere con l’installazione<br />
seguendo le fasi descritte nel §4.1.<br />
4.3.Montaggio sul terreno<br />
Per l’installazione del pluviometro direttamente sul terreno, utilizzare la piastra in acciaio DYA042.<br />
Fissare quindi la base del pluviometro alla piastra stessa mediante le tre lunghe viti fornite assieme alla<br />
piastra.<br />
Posizionare la piastra in una posizione adatta e conforme alle caratteristiche richieste dal WMO e,<br />
aiutandosi con una mazza, bloccarla al terreno mediante i quattro picchetti in acciaio DYA043.<br />
Assicurarsi che la piastra risulti in posizione perfettamente orizzontale, togliere quindi l’elastico dalla<br />
bascula interna al pluviometro ed effettuare conclusivamente i collegamenti all'utenza prevista<br />
seguendo le connessioni descritte nel disegno relativo allo strumento allegato nel §6.<br />
6
<strong>LSI</strong> LASTEM <strong>Pluviometro</strong>/<strong>Rain</strong> Gauge – <strong>Manuale</strong> <strong>Utente</strong>/User’s <strong>manual</strong><br />
5.Manutenzione periodica e verifica<br />
del funzionamento<br />
<strong>LSI</strong> LASTEM consiglia di sottoporre il sensore di precipitazione a controlli periodici, soprattutto per<br />
quanto riguarda ciò che compete il controllo visivo.<br />
Il non corretto funzionamento del sensore comprometterebbe notevolmente la misura rilevata,<br />
arrivando addirittura anche alla possibilità di mancata registrazione.<br />
Per procedere a questa fase di test serve l’attrezzatura di un normale laboratorio.<br />
I controlli seguenti possono essere eseguiti su ogni strumento:<br />
Controllo visivo<br />
a) Controllo esterno<br />
- Verificare che il pluviometro sia ben fissato alla struttura che lo assicura al palo di supporto.<br />
- Verificare che la parte superiore del pluviometro sia ben fissata, mediante le 3 viti godronate<br />
radiali, alla base del pluviometro.<br />
- Verificare che il filtro posto all'imboccatura del cono sia ben pulito.<br />
- Verificare che il cono sia ben pulito, se non lo è pulirlo con dell’acqua ed un panno.<br />
b) Controllo interno<br />
ATTENZIONE:<br />
PER I MODELLI RISCALDATI PRIMA DI SFILARE IL CONO DEL PLUVIOMETRO TOGLIERE<br />
ASSOLUTAMENTE TENSIONE AL SISTEMA<br />
Dopo aver allentato le 3 viti godronate radiali, sfilare il cono del pluviometro (ATTENZIONE: nelle<br />
versioni riscaldate vi è un cavo che collega la base del pluviometro alla termocoperta aderente al cono;<br />
rimuovere quindi il cono con cura e staccare la spina dalla scatola posta sulla base).<br />
- Verificare, mediante il segnalatore a bolla posto sulla base del pluviometro, che esso sia<br />
posizionato in piano; se non lo è intervenire sui 2 bulloni posti sotto la base del pluviometro<br />
regolandone l'altezza.<br />
- Verificare che il foro di scarico dell'acqua, posto sulla base del pluviometro, non sia otturato.<br />
7
<strong>LSI</strong> LASTEM <strong>Pluviometro</strong>/<strong>Rain</strong> Gauge – <strong>Manuale</strong> <strong>Utente</strong>/User’s <strong>manual</strong><br />
- Verificare che la parte terminale del cono non sia occlusa da sporcizia.<br />
- Per i modelli DQA030 e DQA031 verificare che il sifone posto sotto il cono di raccolta sia ben<br />
pulito. Per eseguire tale controllo si dovrà svitare il sifone dalla sua sede. Eventualmente<br />
lavarlo con acqua corrente o con uno straccio eventualmente inumidito.<br />
Controllo meccanico<br />
- Verificare che la vaschetta ribaltabile basculi senza sforzo, e che la spina di appoggio della<br />
bascula sui rulli sia ben pulita; se così non fosse pulirlo con un pennellino o aria compressa.<br />
- Verificare che il relè reed (opzionale: n°2 relè reed) scatti ad ogni passaggio della bascula,<br />
ascoltando un flebile rumore ad ogni contatto.<br />
Controllo funzionale<br />
a) Verifica della tolleranza<br />
1. Munirsi di un contaimpulsi elettromeccanico a tre cifre.<br />
2. Collegare il contaimpulsi al reed (per modelli a due reed mettere gli stessi in parallelo)<br />
seguendo lo schema relativo allo strumento incluso in fondo al <strong>manual</strong>e.<br />
3. Far passare lentamente un litro d'acqua (in circa 30-40 minuti) nello strumento.<br />
4. Alla fine della prova si devono contare, con risoluzione della bascula impostata a 0,2 mm:<br />
Modello Quantità di H2O<br />
DQA035<br />
-<br />
DQA036<br />
DQA030<br />
-<br />
DQA031<br />
-<br />
DQA130<br />
Tempo di<br />
versamento<br />
N° impulsi<br />
da registrare<br />
Corrispondenza<br />
in mm<br />
1 litro 30-40 minuti 50 ± 1 impulsi 10 ± 0,1 mm<br />
1 litro 30-40 minuti 154 ± 3 impulsi 30,8 ± 0,3 mm<br />
b) Verifica del termostato – resistenze (solo per modelli DQA031 e DQA036)<br />
Irrorare il termostato posto sopra la scatola dei reed con del gas refrigerante o mettendo a contatto<br />
del ghiaccio.<br />
Modello DQA031<br />
Verificare una resistenza di 7 Ohm sui fili rosso-bianco. Se essa non è presente il problema può<br />
essere sul termostato.<br />
Modello DQA036<br />
Verificare una resistenza di 4 Ohm sui fili rosso-bianco. Se essa non è presente il problema può<br />
essere sul termostato.<br />
c) Verifica corretta acquisizione su acquisitore <strong>LSI</strong> LASTEM:<br />
1. Leggere il valore visualizzato sul display dell’acquisitore<br />
2. Muovere la bascula interna al pluviometro dando un impulso<br />
3. Verificare ora che il valore precedentemente letto venga incrementato di 0,2 mm. Ricordarsi<br />
che dall’impulso meccanico alla visualizzazione sul display dell’acquisitore passeranno alcuni<br />
istanti.<br />
8
<strong>LSI</strong> LASTEM <strong>Pluviometro</strong>/<strong>Rain</strong> Gauge – <strong>Manuale</strong> <strong>Utente</strong>/User’s <strong>manual</strong><br />
6.Uso convertitore integrato I100A<br />
Il convertitore integrato I100A permette ai vari segnali (che dal sensore arrivano al convertitore al<br />
quale si è connessi), di essere unificati in un’uscita standard, sia in corrente che in tensione.<br />
È costituito da un corpo a connessione rimovibile alloggiato in una scatola con protezione IP40; la<br />
morsettiera con i terminali per la connessione elettrica viene fornita assieme al convertitore.<br />
6.1.Caratteristiche tecniche<br />
Uscita<br />
4÷20 mA (opzionale: 0÷20 mA oppure 0÷5 V<br />
oppure 0÷1 V)<br />
Ingresso 0÷20 mm H2O (0÷100 risoluzione impulso 0,2 mm)<br />
Resistenza di carico Max 500 Ohm<br />
Temperatura operativa 0÷50°C (opzionale: -20÷50°C)<br />
Alimentazione 24 Vac<br />
Consumo 1,5 W<br />
Dimensioni 48x110x105 mm<br />
Peso 320g<br />
Nota: ritorna automaticamente ad inizio scala alla fine di ogni arrivo di fondo scala.<br />
6.2.Connessione elettrica<br />
Connessione a pluviometri DQA030, DQA035, DQA130: vedere disegno DISACC1764 (§7.5)<br />
Connessione a pluviometri DQA031, DQA036: vedere disegno 1900a (§7.5)<br />
6.3.Verifica funzionale<br />
a) Controllare che l’assemblaggio e la connessione tra pluviometro e convertitore sia fatto<br />
correttamente e appaia in buono stato.<br />
b) Collegare un multimetro adatto ai terminali 5 (+) e 6 (-) del convertitore I100A.<br />
c) Versare lentamente ½ L. di acqua nel cono di raccolta del pluviometro; in queste condizioni si<br />
dovrebbe misurare un totale di 74 (±1) basculate. La corrispondenza tra l’uscita elettrica generale<br />
e l’uscita elettrica per ogni basculata è riportata nella tabella qui sotto:<br />
Uscita 0÷20 mA 0,2 mA x basculata<br />
Uscita 4÷20 mA 0,16 mA x basculata<br />
Uscita 0÷1 V 0,1 V x basculata<br />
Uscita 0÷5 V 0,5 V x basculata<br />
9
6.4.Calibrazione<br />
<strong>LSI</strong> LASTEM <strong>Pluviometro</strong>/<strong>Rain</strong> Gauge – <strong>Manuale</strong> <strong>Utente</strong>/User’s <strong>manual</strong><br />
a) Collegare un generatore di impulsi con contatore agli ingressi 10 (-) e 11 (+) del convertitore.<br />
b) Collegare un multimetro adatto agli ingressi 5 (-) e 6 (+) del convertitore.<br />
c) Impostare il punto di zero con il trimmer P2.<br />
d) Fornire 100 implusi al convertitore ed impostare il fondo scala sugli ingressi 5 (+) e 6 (-) con il<br />
trimmer P3.<br />
e) Fornire un impulso al convertitore e controllare che l’uscita restituisca il punto di zero<br />
precedentemente fissato.<br />
6.5.Individuazione di guasti<br />
Questo test ha lo scopo di accertare, in caso di malfunzionamento, se il guasto è dovuto al<br />
convertitore o al sensore al quale è connesso.<br />
Se il convertitore non restituisce alcuna uscita elettrica, sia in corrente (mA) che in tensione (mV),<br />
disconnettere il convertitore dalla morsettiera e usando il tester:<br />
- controllare che la resistenza tra gli ingresso 10 e 11 sia aperta;<br />
- controllare che ritorni il valore di zero quando il basculino si muove tra i due opposti della<br />
bascula passando dalla posizione centrale.<br />
a) Se i valori rilevati non sono corretti, sostituire l’unità reed del pluviometro.<br />
b) Se i valori rilevati sono corretti, sostituire il convertitore.<br />
10
<strong>LSI</strong> LASTEM <strong>Pluviometro</strong>/<strong>Rain</strong> Gauge – <strong>Manuale</strong> <strong>Utente</strong>/User’s <strong>manual</strong><br />
Summary<br />
1. DESCRIPTION..................................................................................................................<br />
12<br />
1.1. Introduction..................................................................................................................................................................<br />
12<br />
1.2. Main features...............................................................................................................................................................<br />
12<br />
1.3. Versions........................................................................................................................................................................<br />
13<br />
2. LIST OF SPARE PARTS.................................................................................................<br />
13<br />
3. TECHNICAL CHARACTERISTICS...................................................................................<br />
14<br />
4. ASSEMBLY INSTRUCTIONS...........................................................................................<br />
14<br />
4.1. Mounting on the top of pole........................................................................................................................................<br />
15<br />
4.2. Mounting on lateral support.......................................................................................................................................<br />
15<br />
4.3. Mounting on the ground..............................................................................................................................................<br />
15<br />
5. PERIODIC MAINTENANCE AND OPERATIONAL CHECKS<br />
......................................... 16<br />
6. USE OF INTEGRATING CONVERTOR I100A.................................................................<br />
18<br />
6.1. Technical specifications<br />
............................................................................................................................................ 18<br />
6.2. Electric connections.....................................................................................................................................................<br />
18<br />
6.3. Testing: operational control.......................................................................................................................................<br />
18<br />
6.4. Calibration...................................................................................................................................................................<br />
19<br />
6.5. Fault checks..................................................................................................................................................................<br />
19<br />
7. DISEGNI / DRAWINGS.....................................................................................................<br />
20<br />
7.1. Montaggio / Assembly.................................................................................................................................................<br />
20<br />
7.2. Connessioni elettriche / Electrical connections........................................................................................................<br />
22<br />
7.3. Ingombro e caratteristiche / Dimensions and features............................................................................................<br />
25<br />
7.4. Connessione ad acquisitori <strong>LSI</strong> LASTEM / Connection to data logger <strong>LSI</strong> LASTEM.......................................<br />
27<br />
7.5. Connessione a convertitore integrato I100A / Connection to integrating convertor I100A................................<br />
29<br />
Copyright 2007-2009 <strong>LSI</strong> LASTEM. All rights reserved.<br />
This <strong>manual</strong> can be modified without notice.<br />
Anybody can copy, print or publish this <strong>manual</strong> without <strong>LSI</strong> LASTEM written authorization.<br />
<strong>LSI</strong> LASTEM reserves the right to modify the product without an immediate revision of this document.<br />
11
1.Description<br />
1.1.Introduction<br />
<strong>LSI</strong> LASTEM <strong>Pluviometro</strong>/<strong>Rain</strong> Gauge – <strong>Manuale</strong> <strong>Utente</strong>/User’s <strong>manual</strong><br />
It defines rainfall: “the liquid or solid product of steam’s condensation coming from clouds or left on<br />
the soil. In the first case it’s called rain, hail and snow; in the second case it’s called dew and<br />
hoarfrost”.<br />
Total rainfall, which gets to the soil during a stated period of time, consists of the high of liquid<br />
(rainfall) that covers an horizontal area of the ground. So the rainfall’s unit of measurement is the<br />
following: linear units referred to the time; i.e. mm/min, mm/hour, mm/day, etc. They have been<br />
obtained dividing the collected water’s quantity by the inlet surface, i.e. the “pluviometric section”<br />
<strong>Rain</strong> <strong>gauge</strong> model DQA030 e DQA035 <strong>Rain</strong> <strong>gauge</strong> model DQA130<br />
1.2.Main features<br />
The gauging equipment consists of one funnel for collection of the water and one seesaw part<br />
(tipping bucket). This one consists of two symmetric tubs which rotates on their own axis on unstable<br />
equilibrium.<br />
The electronic device consists of: two magnetic switches (reed relay) placed on two stand-by<br />
positions, or one switch placed in central position.<br />
The electronic device counts the number of tipping buckets and gives out a countable impulse; the<br />
addition of impulses computes the rainfall quantity.<br />
Reed relay<br />
Tipping<br />
bucket<br />
12
1.3.Versions<br />
Description<br />
<strong>LSI</strong> LASTEM <strong>Pluviometro</strong>/<strong>Rain</strong> Gauge – <strong>Manuale</strong> <strong>Utente</strong>/User’s <strong>manual</strong><br />
Power supply<br />
Output<br />
-<br />
impuls.<br />
Code<br />
24 Vca<br />
impuls.<br />
<strong>Rain</strong> <strong>gauge</strong> (inlet surface 324 cm2 ) with one reed relay<br />
<strong>Rain</strong> <strong>gauge</strong> (inlet surface 324 cm2 ) with two reed relay<br />
DQA030<br />
<strong>Rain</strong> <strong>gauge</strong> (inlet surface 324 cm2 ) with one reed relay DQA130<br />
<strong>Rain</strong> <strong>gauge</strong> (inlet surface 324 cm2 ) with one reed relay DQA131<br />
<strong>Rain</strong> <strong>gauge</strong> (inlet surface 324 cm2 ) with heater and one reed relay<br />
<strong>Rain</strong> <strong>gauge</strong> (inlet surface 324 cm2 ) with heater and two reed relay<br />
DQA031<br />
<strong>Rain</strong> <strong>gauge</strong> (inlet surface 1000 cm2) with one reed relay<br />
<strong>Rain</strong> <strong>gauge</strong> (inlet surface 1000 cm2) with two reed relay<br />
DQA035<br />
<strong>Rain</strong> <strong>gauge</strong> (inlet surface 1000 cm2 ) with heater and one reed relay<br />
<strong>Rain</strong> <strong>gauge</strong> (inlet surface 1000 cm2 ) with heater and two reed relay<br />
DQA036<br />
2. List of spare parts<br />
Code Description<br />
DYA042 Baseplate for ground installation<br />
DYA040 Cross-type support for rain <strong>gauge</strong>s to the top of meteo poles diam. 50 mm<br />
DYA058 Lateral support for rain <strong>gauge</strong> on meteo pole diam. 50 mm<br />
(it must be added to DYA040)<br />
DYA005 Meteo pole H=1m and diam. 50 mm<br />
DYA020 Base for meteo poles diam. 50 mm fitted onto cement plinth<br />
DEA280 Converter/Integrator. Power supply: 24Vca Range:0…20 mm/H2O<br />
Output:4…20 mA<br />
DEA281 Converter/Integrator. Power supply: 24Vca Range:0…20 mm/H2O<br />
Output:0…20 mA<br />
DEA282 Converter/Integrator. Power supply: 12Vcc Range:0…20 mm/H2O<br />
Output:0…5 V<br />
DEA285 Converter/Integrator. Power supply: 12Vcc Range:0…20 mm/H2O<br />
Output: 4…20 mA<br />
I100A Integrating convertor<br />
DWA510 Cable L. 10m with connector for linearizate output for rain <strong>gauge</strong> DQA130-DQA131<br />
DWA525 Cable L. 25m with connector for linearizate output for rain <strong>gauge</strong> DQA130-DQA131<br />
DWA526 Cable L. 50m with connector for linearizate output for rain <strong>gauge</strong> DQA130-DQA131<br />
13
<strong>LSI</strong> LASTEM <strong>Pluviometro</strong>/<strong>Rain</strong> Gauge – <strong>Manuale</strong> <strong>Utente</strong>/User’s <strong>manual</strong><br />
3.Technical characteristics<br />
DQA030 DQA035 DQA130<br />
Inlet surface 324 cm 2 1000 cm 2 324 cm 2<br />
Funnel diameter 203 mm 357 mm 203 mm<br />
Range Max 10 mm/min 180 mm/hr Max 10 mm/min<br />
Resolution 0.2 mm/imp. (option adjustable 0.1 and 0.5 mm)<br />
Accuracy<br />
0÷1mm/min:±1tip<br />
1÷10mm/min: ±1%<br />
rainfall<br />
0÷1 mm/min: ±1%<br />
1÷3 mm/min: ±2%<br />
3÷5 mm/min: ±4%<br />
0÷1mm/min:±1tip<br />
1÷10mm/min: ±1% rainfall<br />
Contact<br />
5÷10 mm/min: ±8%<br />
n. 1 dry reed relay (option n.2 reed relay)<br />
Load 50 mA/24 V non inductive<br />
Impulse duration 100 msec ± 50<br />
Cone material Anodized brass Alluminium<br />
Outside plating material AISI304 Alluminium<br />
Basis material AISI304 Alluminium<br />
Tipping bucket material Teflonate alluminium<br />
Enviromental limits 0 ÷ 50°C<br />
Cable 3 fili, 10 m (enclosed) DWA5xx (not enclosed)<br />
Connection Terminals<br />
Connector for cable<br />
DWAxxx<br />
Extreme dimensions Ø 232 x 274 Ø 420 x 365 Ø 210 x 477<br />
Weight 4.3 kg 5.3 kg 2,8 kg<br />
Mounting<br />
On meteo pole Ø 50 mm by means DYA040 (on the top)<br />
or DYA058 (lateral)<br />
Only heated versions DQA031 DQA036 DQA131<br />
Heater<br />
Thermo-cover 60 W<br />
Power supply 24 Vac<br />
Thermo-cover 100 W<br />
Power supply 24 Vac<br />
Thermo-cover 60 W<br />
Power supply 24 Vac<br />
Cable 5 wires, 10 m (enclosed) DWA5xx (not enclosed)<br />
Operative limits -15 ÷ +50 °C<br />
Weight 4.6 kg 6.3 kg 3.1 kg<br />
4.Assembly instructions<br />
Install your equipment in exposed area. This open space has to be a long way to walls, trees,<br />
buildings, etc., because in case of cross rainfall they could obstruct the filling of rain <strong>gauge</strong>’s<br />
funnel.<br />
WMO (World Meteorological Organization) recommends that the distance between the rain <strong>gauge</strong><br />
and the objects must be 4 times the height of these objects or more.<br />
If the sensor is placed on the ground, do not put it on hard surface (cement, etc), because it could<br />
give “in-splashing”, that is the relapse (through rebound) inside the cone of rain <strong>gauge</strong> of drops of<br />
rain falls indeed externally.<br />
See drawings at §7.1<br />
14
<strong>LSI</strong> LASTEM <strong>Pluviometro</strong>/<strong>Rain</strong> Gauge – <strong>Manuale</strong> <strong>Utente</strong>/User’s <strong>manual</strong><br />
4.1.Mounting on the top of pole<br />
Instructions for mounting of rain <strong>gauge</strong> on the top of pole by means of DYA040:<br />
1) Unscrew three radial knurled screws and remove the cylindrical casing of the rain <strong>gauge</strong>.<br />
(WARNING: the heated versions have one cable that connects the rain <strong>gauge</strong>’s base to the<br />
thermo-cover sticking to the cone, remove the cone carefully and disconnect the plug placed on<br />
the base).<br />
2) Remove three screws fixed on the base of rain <strong>gauge</strong> and mount them (with their head looks<br />
down) on DYA040 support .<br />
3) Now fix the base to DYA040 by means of three suitable screws.<br />
4) Clamp DYA040 to pole, by means of its screws.<br />
5) Set the sensor’s locking bolts to DYA 040 support by means of suitable water level (it’s on the<br />
base of rain <strong>gauge</strong>) and lay flat the equipment.<br />
6) Clamp three lock-nuts of the bolts definitively, using suitable spanners..<br />
7) Remove the elastic band from the tipping bucket, (only heated versions: reconnect the plug of<br />
heating system making attention that the cable shouldn’t lay on the tipping bucket).<br />
8) Reassemble and connect the instrument.<br />
4.2.Mounting on lateral support<br />
In case of mounting on lateral support, clamp DYAO58 connection bar to pole.<br />
Afterwards mount DYA040 support on DYA058 bar and start the installation following the<br />
instruction in §4.1.<br />
4.3.Mounting on the ground<br />
For mounting of the rain <strong>gauge</strong> on the ground use DYA042 steel plate.<br />
Fix the base of rain <strong>gauge</strong> on the steel plate by menas of three long screws (supplied together with the<br />
plate).<br />
Place the plate in suitable position and according to WMO advices and fix it on the ground by means<br />
of four DYA043 steel pegs (using a sledgehammer). Make sure that plate lays in perfect horizontal<br />
position, then remove the elastic band from the tipping bucket inside the rain <strong>gauge</strong> and connect to<br />
the power, like specified by drawings in §6.<br />
15
<strong>LSI</strong> LASTEM <strong>Pluviometro</strong>/<strong>Rain</strong> Gauge – <strong>Manuale</strong> <strong>Utente</strong>/User’s <strong>manual</strong><br />
5.Periodic maintenance and<br />
operational checks<br />
<strong>LSI</strong> LASTEM recommends to check the rain <strong>gauge</strong> periodically; visual check is especially very<br />
important.<br />
The uncorrect operation of the sensor could survey a wrong measurement and avoid its recording.<br />
The user needs standard laboratory instruments in order to arrange this test.<br />
Following checks can be performed for each instrument:<br />
Visual check<br />
a) Outer check<br />
- check that rain <strong>gauge</strong> is fixed to the frame which secures it to support pole.<br />
- check that upper side of the rain <strong>gauge</strong> is well fixed to the base of rain <strong>gauge</strong> by means of<br />
three radial knurled screws.<br />
- check that filter, on the top of funnel, is cleaned.<br />
- check that funnel is cleaned; at the opposite clean it using some water and a cloth<br />
b) Inner check<br />
WARNING: IN HEATED MODELS DISCONNECT ELECTRICITY SUPPLY BEFORE<br />
REMOVING CONE OF RAIN GAUGE .<br />
Loosen three radial knurled screws, remove the cone of rain <strong>gauge</strong> (WARNING: the heated versions<br />
have one cable that connects the rain <strong>gauge</strong>’s base to the thermo-cover sticking to the cone, remove<br />
the cone carefully and disconnect the plug placed on the base).<br />
- check that rain <strong>gauge</strong> is laid flat (use suitable water level on the base of rain <strong>gauge</strong>); at the<br />
opposite set it using two bolts under the base of raing <strong>gauge</strong>, and adjust its heigh.<br />
- check that water drain hole, on the base of rain <strong>gauge</strong>, isn’t clogged.<br />
- check that no dirty occludes the end of cone.<br />
16
<strong>LSI</strong> LASTEM <strong>Pluviometro</strong>/<strong>Rain</strong> Gauge – <strong>Manuale</strong> <strong>Utente</strong>/User’s <strong>manual</strong><br />
- As regards models DQA030 and DQA031 check that siphon, under collecting cone, is cleaned.<br />
In order to do this inspection unscrew the siphon. If necessary wash it with some running water<br />
or clean it with a damp cloth.<br />
Mechanical check<br />
- Check that dumping tub can seesaw with no efforts, and that pin for bearing of the tipping<br />
buckets on the rollers is well clean; at the opposite clean it using a small brush or compressed<br />
air.<br />
- Check that reed relay (optional: n. 2 relay reeds) releases at every passing of tipping bucket<br />
(you can hear a weak noise at every touch).<br />
Operation check<br />
a) Check of tolerance<br />
1. Supply oneself with electromechanical pulses-counter (with three digits).<br />
2. Connect the pulses-counter to the reed (in case of models with two reeds connect them in<br />
parallel) following the instruction of drawing at the end of this <strong>manual</strong>.<br />
3. Run slowly (about 30-40 minutes) one litre water into the instrument.<br />
4. At the end of the test you have to count as follow (with tipping bucket’s resolutions set at 0,2<br />
mm):<br />
Model Quantity of H2O<br />
DQA035<br />
-<br />
DQA036<br />
DQA030<br />
-<br />
DQA031<br />
-<br />
DQA130<br />
Time of<br />
effusion<br />
N° tips<br />
recording<br />
Relation<br />
in mm<br />
1 liter 30-40 minutes 50 ± 1 tips 10 ± 0,1 mm<br />
1 liter 30-40 minutes 154 ± 3 tips 30,8 ± 0,3 mm<br />
b) Check of thermostat – resistances (only for models DQA031 and DQA036)<br />
Spray the thermostat, on the reeds box, with some cooling gas or put it against some ice.<br />
DQA031 Model<br />
Check resistance of 7 Ohm for red-white cables. If there isn’t this resistance, the thermostat may<br />
have a problem.<br />
DQA036 Model<br />
Check resistance of 4 Ohm for red-white cables. If there isn’t this resistance, the thermostat may<br />
have a problem.<br />
c) Check right acquisition of <strong>LSI</strong> LASTEM data logger:<br />
1. Read the value on data logger’s display.<br />
2. Move the internal rain-<strong>gauge</strong> tipping bucket and give it a push.<br />
3. Now check that value, You had read before, has been increased of 0,2 mm. Note that it needs<br />
some instants from mechanical impulse to display.<br />
17
<strong>LSI</strong> LASTEM <strong>Pluviometro</strong>/<strong>Rain</strong> Gauge – <strong>Manuale</strong> <strong>Utente</strong>/User’s <strong>manual</strong><br />
6.Use of integrating convertor I100A<br />
I100A integrating convertor allows the various signals arriving from the sensors to which the<br />
convertor is connected, to be unified into one standard output, whether current or voltage.<br />
It consists of a connector-type removable body housed in an IP40 tin box. Screw terminal-type<br />
electrical connections are provided.<br />
6.1.Technical specifications<br />
Output 4÷20 mA (opt. 0÷20 mA or 0÷5 V or 0÷1 V)<br />
Input 0÷20 mm H2O (0÷100 impulsive resolution 0,2 mm)<br />
Load resistance Max 500 Ohm<br />
Working temperature 0÷50°C (opt. -20÷50°C)<br />
Power supply 24 Vac<br />
Consumption 1,5 W<br />
Dimensions 48x110x105 mm<br />
Weight 320g<br />
Note: automatic return to starting scale at the end of each count at full scale.<br />
6.2.Electric connections<br />
Connection to DQA030, DQA035, DQA130 rain <strong>gauge</strong>s: see drawing DISACC1764 (§7.5)<br />
Connection to DQA031, DQA036 rain <strong>gauge</strong>s: see drawing 1900a (§7.5)<br />
6.3.Testing: operational control<br />
a) Check that the rain <strong>gauge</strong> + convertor assembly is in a good working order.<br />
b) Connect a suitably equipped multimeter to terminals 5 (+) and 6 (-) on the I100A convertor.<br />
c) Drip ½ L. of water slowly into the rain <strong>gauge</strong> funnel; in these conditions, there should be a total<br />
of 74 (±1) tips measuring. In the table below the correspondence between general electric output<br />
and electric output for tip:<br />
Output 0÷20 mA 0,2 mA x tip<br />
Output 4÷20 mA 0,16 mA x tip<br />
Output 0÷1 V 0,1 V x tip<br />
Output 0÷5 V 0,5 V x tip<br />
18
6.4.Calibration<br />
<strong>LSI</strong> LASTEM <strong>Pluviometro</strong>/<strong>Rain</strong> Gauge – <strong>Manuale</strong> <strong>Utente</strong>/User’s <strong>manual</strong><br />
a) Connect a pulse generator with a counter to terminals 10 (-) and 11 (+).<br />
b) Connect a suitably equipped multimeter to 5 (-) and 6 (+).<br />
c) Set the start point with trimmer P2.<br />
d) Supply 100 pulses and set the full scale on terminals 5 (+) and 6 (-) with trimmer P3.<br />
e) Supply one pulse and check that the output returns to the zero-setting.<br />
6.5.Fault checks<br />
This series of checks is aimed at ascertaining whether a fault originates form the convertor or the<br />
sensor to which it is connected.<br />
If there is no output signal from the convertor in either current (mA) or tension (mV), disconnect the<br />
convertor from the terminal strip and using a tester:<br />
- check the resistance between terminals 10 and 11 where it should open.<br />
- Value should return to a zero-setting, as the tipping bucket moves back to a central position<br />
and should then reappear when it tips over to the opposite side.<br />
a) If the value isn’t correct, replace the sensor reed unit.<br />
b) If the value is correct, replace the convertor.<br />
19
7.Disegni / Drawings<br />
7.1.Montaggio / Assembly<br />
<strong>LSI</strong> LASTEM <strong>Pluviometro</strong>/<strong>Rain</strong> Gauge – <strong>Manuale</strong> <strong>Utente</strong>/User’s <strong>manual</strong><br />
Installazione pluviometro testa palo – Mounting rain <strong>gauge</strong> on the top of the pole<br />
20
<strong>LSI</strong> LASTEM <strong>Pluviometro</strong>/<strong>Rain</strong> Gauge – <strong>Manuale</strong> <strong>Utente</strong>/User’s <strong>manual</strong><br />
Installazione pluviometro in posizione laterale al palo – Mounting rain <strong>gauge</strong> on lateral support<br />
21
<strong>LSI</strong> LASTEM <strong>Pluviometro</strong>/<strong>Rain</strong> Gauge – <strong>Manuale</strong> <strong>Utente</strong>/User’s <strong>manual</strong><br />
Installazione pluviometro direttamente sul terreno – Mounting rain <strong>gauge</strong> on the ground<br />
7.2.Connessioni elettriche /<br />
Electrical connections<br />
<strong>Pluviometro</strong> DQA030 - <strong>Rain</strong> <strong>gauge</strong> DQA030<br />
22
<strong>LSI</strong> LASTEM <strong>Pluviometro</strong>/<strong>Rain</strong> Gauge – <strong>Manuale</strong> <strong>Utente</strong>/User’s <strong>manual</strong><br />
<strong>Pluviometro</strong> DQA031 – <strong>Rain</strong> <strong>gauge</strong> DQA031<br />
<strong>Pluviometro</strong> DQA035 – <strong>Rain</strong> <strong>gauge</strong> DQA035<br />
23
<strong>LSI</strong> LASTEM <strong>Pluviometro</strong>/<strong>Rain</strong> Gauge – <strong>Manuale</strong> <strong>Utente</strong>/User’s <strong>manual</strong><br />
<strong>Pluviometro</strong> DQA036 – <strong>Rain</strong> <strong>gauge</strong> DQA036<br />
<strong>Pluviometro</strong> DQA130 e DQA131 – <strong>Rain</strong> <strong>gauge</strong> DQA130 and DQA131<br />
24
<strong>LSI</strong> LASTEM <strong>Pluviometro</strong>/<strong>Rain</strong> Gauge – <strong>Manuale</strong> <strong>Utente</strong>/User’s <strong>manual</strong><br />
7.3.Ingombro e caratteristiche / Dimensions and<br />
features<br />
Pluviometri DQA030 – DQA031 – DQA035 – DQA036<br />
<strong>Rain</strong> <strong>gauge</strong> DQA030 – DQA031 – DQA035 – DQA036<br />
25
<strong>LSI</strong> LASTEM <strong>Pluviometro</strong>/<strong>Rain</strong> Gauge – <strong>Manuale</strong> <strong>Utente</strong>/User’s <strong>manual</strong><br />
<strong>Pluviometro</strong> DQA130 - <strong>Rain</strong> <strong>gauge</strong> DQA130<br />
26
<strong>LSI</strong> LASTEM <strong>Pluviometro</strong>/<strong>Rain</strong> Gauge – <strong>Manuale</strong> <strong>Utente</strong>/User’s <strong>manual</strong><br />
7.4.Connessione ad acquisitori <strong>LSI</strong> LASTEM /<br />
Connection to data logger <strong>LSI</strong> LASTEM<br />
Collegamento ad acquisitore <strong>LSI</strong> LASTEM BABUC ABC<br />
Connection to data logger <strong>LSI</strong> LASTEM BABUC ABC<br />
27
<strong>LSI</strong> LASTEM <strong>Pluviometro</strong>/<strong>Rain</strong> Gauge – <strong>Manuale</strong> <strong>Utente</strong>/User’s <strong>manual</strong><br />
Collegamento ad acquisitore <strong>LSI</strong> LASTEM ELOG<br />
Connection to data logger <strong>LSI</strong> LASTEM ELOG<br />
28
<strong>LSI</strong> LASTEM <strong>Pluviometro</strong>/<strong>Rain</strong> Gauge – <strong>Manuale</strong> <strong>Utente</strong>/User’s <strong>manual</strong><br />
7.5.Connessione a convertitore integrato I100A /<br />
Connection to integrating convertor I100A<br />
Schema di interconnessione convertitore I100A e pluviometro DQA030-035<br />
Interconnection diagram between I100A convertor and rain <strong>gauge</strong> DQA030-035<br />
29
<strong>LSI</strong> LASTEM <strong>Pluviometro</strong>/<strong>Rain</strong> Gauge – <strong>Manuale</strong> <strong>Utente</strong>/User’s <strong>manual</strong><br />
Schema di interconnessione convertitore I100A e pluviometro DQA031-036/<br />
Interconnection diagram between I100A convertor and rain <strong>gauge</strong> DQA031-036<br />
30
<strong>LSI</strong> LASTEM <strong>Pluviometro</strong>/<strong>Rain</strong> Gauge – <strong>Manuale</strong> <strong>Utente</strong>/User’s <strong>manual</strong><br />
Schema di interconnessione convertitore I100A e pluviometro DQA130-131/<br />
Interconnection diagram between I100A convertor and rain <strong>gauge</strong> DQA130-131<br />
31


![[ Titolo ] - LSI - Lastem](https://img.yumpu.com/15269624/1/184x260/-titolo-lsi-lastem.jpg?quality=85)