

istruzioni Di iMPioMBAturA sPLiCE's instruCtions
istruzioni Di iMPioMBAturA sPLiCE's instruCtions
istruzioni Di iMPioMBAturA sPLiCE's instruCtions

Create successful ePaper yourself
Turn your PDF publications into a flip-book with our unique Google optimized e-Paper software.
Passata<br />
tuCking<br />
Finitura<br />
Finishing<br />
i s t r u z i o n i D i i M P i o M B A t u r A s P L i C E ' s i n s t r u C t i o n s<br />
Osservando attentamente il cavo si vede che è formato da coppie di<br />
legnoli che si intersecano a spina di pesce. Per passata si intende il<br />
passaggio della coppia di legnoli corrente sotto due e sopra uno di<br />
quella dormiente in modo tale che si muova parallelo all’asse del cavo<br />
lungo quella che abbiamo chiamato spina di pesce. In questa operazione<br />
bisogna fare molta attenzione affinché le coppie di legnoli correnti<br />
non si attorciglino fra loro e procedano paralleli.<br />
eseCuzione<br />
perForMing<br />
Si dispongono i legnoli in modo che siano allineati<br />
con l’asse del cavo e si fanno tre passate piene<br />
con tutte e sei le coppie. Si toglie un legnolo<br />
da ciascuna coppia tagliandolo sotto il nastro in<br />
modo tale che mantenga la sua lunghezza e si<br />
fanno altre due passate. Infine si fanno altre due<br />
passate solamente con tre legnoli.<br />
Per diametri fino a 18 cm l’eccesso dei legnoli può essere tagliato<br />
e saldato con la fiamma. Per diametri maggiori invece è consigliabile<br />
tagliare i legnoli non troppo corti e fermarli con del nastro<br />
telato o con una legatura piana di filo cerato.<br />
Arrange the strands aligned with the rope axix<br />
and make three complete crossings with all the<br />
six pairs.<br />
Remove a strand from each pair cutting it beneath<br />
the adhesive tape so that it maintains its<br />
length and make other two crossings.<br />
Finally make other two tucking just with<br />
three strands.<br />
Carefully observing the wire it is noticeable that it is made up of strand<br />
pairs intersecting in a herringbone pattern. The word “Tucking”<br />
stands for the passage of the pair of running strands under two<br />
and over one standing one so that it moves parallel to the long<br />
rope axix which we previously described as herringbone<br />
pattern. This operation requires prudence to avoid the<br />
twisting of the running strand pairs and in order to<br />
make them proceed parallely.<br />
soPra<br />
on<br />
sotto<br />
under<br />
For what concerns diameters up to 18 cm the exceeding part of the<br />
strands can be cut and flame sealed. For wider diameters instead<br />
it is advisable to cut the strands not too shortly and fix them with<br />
linen tape or with a sail-yarn.<br />
lavoro Finito Con nastro telato<br />
Finished operation with linen tape<br />
eseCuzione di tutte le Passate<br />
all Crossing perForMing<br />
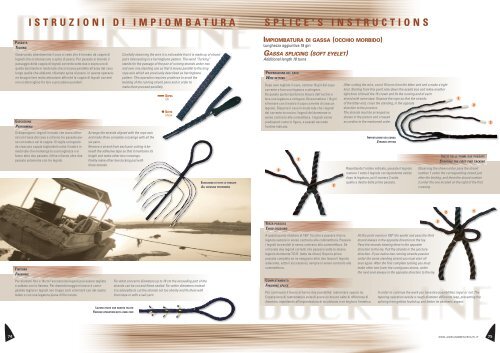
impiombatura di gaSSa (occhio morbido)<br />
Lunghezza aggiuntiva 18 giri<br />
gassa spLicing (soft eyeLet)<br />
Additional length 18 turns<br />
PreParazione del Cavo<br />
wire setting<br />
Dopo aver tagliato il cavo, contare 16 giri dal capo<br />
corrente e fare una legatura a stringere.<br />
Da questo punto riportare la misura dell’occhio e<br />
fare una legatura a stringere. <strong>Di</strong>sconnettere i 16 giri<br />
e fermare con il nastro il capo corrente di ciascun<br />
legnolo. <strong>Di</strong>sporre il cavo in modo tale che i legnoli<br />
del corrente incrocino i legnoli del dormiente in<br />
senso contrario alla connettitura. I legnoli vanno<br />
predisposti come in figura, e passati secondo<br />
l’ordine indicato.<br />
A questo punto ribaltare di 180° l’occhio e passare il terzo<br />
legnolo sempre in senso contrario alla commettitura. Passare<br />
i legnali torcendoli in senso contrario alla commettitura. Se<br />
vi trovate due legnali correnti che passano sotto lo stesso<br />
legnolo dormiente T.D.R. (tutto da rifare). Dopo la prima<br />
passata completa se ne eseguono altre due (sopra il legnolo<br />
adiacente, sotto il successivo), sempre in senso contrario alla<br />
commettitura.<br />
At this point overturn 180° the eyelet and pass the third<br />
strand always in the apposite direction to the lay.<br />
Pass the strands twisting them in the opposite<br />
direction to the lay. Pull the strands in the juncture<br />
direction. If you notice two running strands passino<br />
under the same standing strand you must start all<br />
over again. After the first complete tucking you must<br />
make other two (over the contiguous strans, under<br />
the next one) always in the apposite direction to the lay.<br />
74 www.adrianobenvenuti.it 75<br />
3<br />
terza Passata<br />
third Crossing<br />
CoMPletaMento<br />
Finishing spliCe<br />
1<br />
Per continuare il lavoro si hanno due possibilità: rastremare oppure no.<br />
L’operazione di rastrematura evita di avere un brusco salto di differenza di<br />
diametro, impedendo all’impiombatura di incattivarsi e ne migliora l’estetica.<br />
2<br />
After cutting the wire, count 16 turns from the bitter end and a make a tight<br />
knot. Starting from this point note down the eyelet size and make another<br />
tight knot. Unbraid the 16 crown and fix the running end of each<br />
strand with some tape. <strong>Di</strong>spose the rope so that the strands<br />
of the bitter end, cross the standing, in the opposte<br />
direction to the juncture.<br />
The strands must be arranged as<br />
shown in the picture and crossed<br />
accordino to the mentioned order.<br />
iMPostazione dei legnoli<br />
strands setting<br />
Rispettando l’ordine indicato, passate il legnolo<br />
numero 1 sotto il legnolo corrispondente subito<br />
dopo la legatura, poi il numero 2 sotto<br />
quello a destra della prima passata.<br />
inizio delle PriMe due Passate<br />
starting the First two taCking<br />
Observing the shown order pass the strand<br />
number 1 under the corresponding strand just<br />
after the binding, and them the strand number<br />
2 under the one located on the right of the first<br />
crossing.<br />
In order to continue the work you have two possibilities: taper or not. The<br />
tapering operation avoids a rough diameter differente leap, preventing the<br />
splicing from gettino fouled up and better its aesthetic aspect.<br />
3<br />
2<br />
1<br />
2<br />
1<br />
3