

istruzioni Di iMPioMBAturA sPLiCE's instruCtions
istruzioni Di iMPioMBAturA sPLiCE's instruCtions
istruzioni Di iMPioMBAturA sPLiCE's instruCtions

Create successful ePaper yourself
Turn your PDF publications into a flip-book with our unique Google optimized e-Paper software.
68<br />
i s t r u z i o n i D i i M P i o M B A t u r A s P L i C E ' s i n s t r u C t i o n s<br />
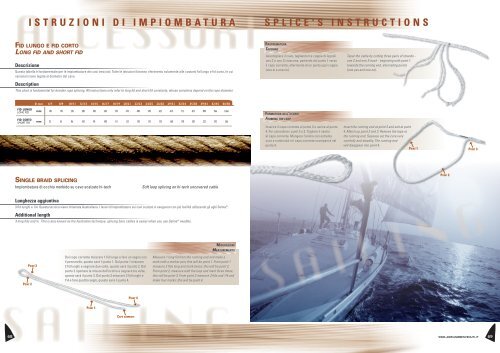
Fid lungo e Fid corto<br />
Long fid and short fid<br />
Descrizione<br />
Questa tabella è fondamentale per le impiombature dei cavi trecciati. Tutte le <strong>istruzioni</strong> faranno riferimento solamente alle costanti fid lungo e fid corto, le cui<br />
variazioni sono legate al diametro del cavo.<br />
Description<br />
This chart is fundamental for braiden rope splicing. All instructions only refer to long fid and short fid constants, whose variations depend on the rope diameter.<br />
Point 2<br />
Point 3<br />
Ø mm 6/7 8/9 10/11 12/13 14/15 16/17 18/19 20/21 22/23 24/25 26/28 29/31 32/34 35/38 39/41 42/45 46/50<br />
FID LUNGO<br />
LONG FID mm 140 170 230 280 300 360 370 410 480 540 622 674 712 812 890 966 1.066<br />
FID CORTO<br />
SHORT FID mm 52 63 86 105 90 108 111 123 120 135 155 168 178 203 222 242 266<br />
Single braid Splicing<br />
Impiombatura di occhio morbido su cavo scalzato hi-tech Soft loop splicing on hi-tech uncovered cable<br />
Lunghezza aggiuntiva<br />
3 fid lunghi e 1\4. Questa tecnica viene chiamata Australiana. I lavori di impiombatura sui cavi scalzati si eseguono con più facilità utilizzando gli aghi Selma ® .<br />
Additional length<br />
3 long fids and ¼. This is also known as the Australian technique. splicing bare cables is easier when you use Selma ® needles.<br />
Dal capo corrente misurare 1 fid lungo e fare un segno con<br />
il pennarello, questo sarà il punto 1. Dal punto 1 misurare<br />
2 fid lunghi e segnare due volte, questo sarà il punto 2. Dal<br />
punto 2 riportare la misura dell’occhio e segnare tre volte,<br />
questo sarà il punto 3. Dal punto 3 misurare 3 fid lunghi e<br />
1\4 e fare quattro segni, questo sarà il punto 4.<br />
Point 1<br />
Point 4<br />
CaPo Corrente<br />
Misurazioni<br />
MeasureMents<br />
Measure 1 long fid from the running end and make a<br />
mark with a marker pen; this will be point 1. From point 1<br />
measure 2 fids long and mark twice; this will be point 2.<br />
From point 2, measure with the loop and mark three times;<br />
this will be point 3. From point 3 measure 3 fids and 1\4 and<br />
make four marks; this will be point 4.<br />
rastreMatura<br />
tapering<br />
Assottigliare il cavo, tagliando tre coppie di legnoli<br />
uno Z e uno S ciascuna, partendo dal punto 1 verso<br />
il capo corrente, alternando di un punto ogni coppia<br />
(una si e una no).<br />
ForMatura dell'oCChio<br />
ForMing the loop<br />
Inserire il capo corrente al punto 3 e uscire al punto<br />
4. Far coincidere i punti 2 e 3. Togliere il nastro<br />
al capo corrente. Mungere l’anima con estrema<br />
cura e continuità e il capo corrente scomparirà nel<br />
punto 4.<br />
Taper the cable by cutting three pairs of strands -<br />
one Z and one S each - beginning with point 1<br />
towards the running end, alternating points<br />
(one yes and one no).<br />
Insert the running end at point 3 and exit at point<br />
4. Match up point 2 and 3. Remove the tape at<br />
the running end. Squeeze out the core very<br />
carefully and steadily. The running end<br />
will disappear into point 4.<br />
Point 1<br />
Point 2<br />
Point 3<br />
www.adrianobenvenuti.it<br />
69
i s t r u z i o n i D i i M P i o M B A t u r A s P L i C E ' s i n s t r u C t i o n s<br />
double braid Splicing<br />
Impiombatura di occhio morbido con fibre standard - Quantità aggiuntiva: Un fid lungo e 1/2.<br />
Soft loop splicing with standard fibre - Additional quantity: A long fid and 1/2.<br />
PreParazione del Cavo<br />
preparation oF the Cable<br />
Mettere un giro di nastro sul capo corrente. Da questo<br />
misurare 6 fid lunghi e fare un nodo scorsoio.<br />
segnatura della Calza<br />
soCket Marking<br />
Dal capo corrente misurare un fid lungo e fare un segno con il pennarello.<br />
Questo sarà il punto 1. Dal punto 1 riportare la misura dell’occhio e fare un altro<br />
segno. Questo sarà il punto 2. Dal punto 2 riportare la misura i 1/3 di fid lungo e<br />
segnare. Questo sarà il punto 3. Se non si desidera che sul cavo rimangano dei<br />
segni, questa operazione può essere fatta con ago e filo, facendo attenzione a<br />
non infilare anche l’anima.<br />
Dal punto 1 si contano verso il capo corrente 8 punti e si fa un segno. Questo<br />
sarà il punto X. Dal punto X si contano 5 punti e si segnano i due legnoli, quello<br />
Z e quello S. Da questo si contano 4 punti e si segnano i due legnoli Z e S, si<br />
prosegue così fino a raggiungere il capo corrente. In questo caso si può usare il<br />
pennarello perché la parte segnata non sarà visibile a lavoro finito.<br />
estrazione dell’aniMa<br />
Core extraCtion<br />
Dal punto 2 con l’ausilio del punteruolo si allargano i legnoli della calza, e si<br />
estrae l’anima, il cui capo corrente va protetto subito con un giro di nastro.<br />
Estrarre con molta cura dal punto 2, tirando con una mano, quanta più anima<br />
possibile. Partendo dal nodo scorsoio mungere il cavo più volte. Posizionare<br />
appaiati su di un piano calza e anima. Può succedere che l’anima sia più<br />
lunga della calza. Tagliare la parte eccedente e rimettere un giro di nastro.<br />
Put a lap belt on the current head. Starting from this,<br />
measure 6 long fids and make a slip knot.<br />
Point 3<br />
Point 1<br />
Point 2<br />
Point 1<br />
From the current head, measure one long fid and make a sign with a marker.<br />
This will be point 1. From point 1, indicate the eye measure and make another<br />
sign. This will be point 2. From point 2, indicate the measure of 1/3 of long fid<br />
and mark. This will be point 3. If you don’t want that any sign remains on the<br />
cable, this process can be done using a needle and a thread, paying attentino<br />
not to put also the core.<br />
From point 1, count 8 points towards the current head and make a sign. This<br />
will be point X. From point X, count 5 points and mark two strands with Z and<br />
S, then go on till reaching the current head. In this case, you can use the<br />
marker because the marked part is not visible when the work is finished.<br />
From point 2 with the help of a sharp tool cover the strands and extract the<br />
core whose head must be immediately protected with one layer of tape.<br />
Extract with extreme care from point 2, pulling with one hand, as much core<br />
as possibile. Starting from the slipknot smooth repeatedly the rope. Position<br />
cover and core paired on a surface. The core could appear longer than the<br />
cover. Cut the exceeding part and place one layer of tape.<br />
Point a<br />
Point 2<br />
Point 2<br />
Point 1<br />
Point X<br />
Point 3<br />
Misurazione dell'aniMa<br />
Core MeasureMent<br />
Segnare il punto di uscita dell’anima<br />
dalla calza con il pennarello. Questo è il<br />
punto A. Estrarre l’anima dalla calza. Dal<br />
punto A misurare un fid corto, verso il<br />
nodo scorsoio, e segnare con due linee.<br />
Questo è il punto B. Dal punto B misurare<br />
un fid lungo più uno corto e segnare con<br />
tre linee, sempre verso il nodo scorsoio.<br />
Questo è il punto C.<br />
rastreMatura della Calza<br />
Cover tapering<br />
Make the exit point of the<br />
core from the cover with a<br />
marker. This is point A. Extract<br />
the core from the cover. From<br />
point A measure a short fid, towards<br />
the slipknot and make two<br />
marks. This is point B. From point<br />
B measure a long fid and a short<br />
one and make three marks, always<br />
towards the slipknot. This is point C.<br />
Partendo dal punto X estrarre i legnoli già segnati, facendo attenzione a non<br />
togliere il nastro sul capo corrente che al termine dell’operazione risulterà<br />
largo, e quindi andrà sostituito.<br />
Tagliare i legnoli, non troppo corti, per poter essere reinseriti nella calza.<br />
Mano a mano che si procede può succedere che gli ultimi legnoli non siano<br />
più a coppie.<br />
Non usare il calore per fermarli, se sporgono non è un problema.<br />
Questa operazione va fatta in due o più step a seconda delle dimensioni<br />
dell’occhio.<br />
step 1<br />
Inserire il fid nella calza appena sopra il punto X (se non è visibile, con<br />
cura, estrarlo dall’anima) e uscire come finisce il tratto di calza senz’anima.<br />
Nastrare strettamente il capo corrente dell’anima per infilarlo nel fid e con il<br />
calcatoio spingere fuori entrambi. Questa operazione, se l’occhio è di grandi<br />
dimensioni, va fatta in più volte.<br />
step 2<br />
Reinserire il fid da dove è uscito e con forza uscire al punto 3. Mettere il<br />
capo dell’anima nel fid e con il calcatoio spingere fuori entrambi. Questa<br />
operazione può risultare faticosa, perché nel tratto tra 2 e 3 è presente<br />
l’anima del cavo. Nell’immagine si nota l’ammassamento della calza,<br />
fatto per favorire il passaggio del fid. Anche l’anima si trova nella stessa<br />
situazione per permettere la fuoriuscita della calza.<br />
Punto 2 di estrazione<br />
Point 2 extraction Point 1<br />
Inserire il fid al punto B (II) e uscire al punto C<br />
(III). Mettere il capo corrente della calza rastremata<br />
nel fondello del fid e con il calcatoio<br />
spingere entrambi fuori a C. Fermare il capo<br />
della calza in modo che non rientri nell’anima,<br />
basta una molletta. Vedi immagine.<br />
1 Fid Corto + 1 lungo<br />
1 Fid Corto<br />
Point C<br />
1 short fid + 1 long<br />
Point B<br />
1 short fid<br />
Point a<br />
Starting from point X extract the strands already<br />
marked, paying attention not to remove the tape positioned<br />
in the bitter end which will appear wide at the end<br />
of the operarion and will therefore have to be replaced. Cut<br />
the strands, not too short, in order to insert them in the cover.<br />
While proceeding the last strands may not be in pairs anymore.<br />
Don’t use heat to fix them, if they protrude it doesn’t matter.<br />
inseriMento della Calza nell’aniMa<br />
inserting the Cover inside the Core<br />
Insert the fid in point B (II) and make it come out at<br />
point C (III). Put the bitter end of the tapered cover<br />
in the fid bottom and with the beater push them<br />
both out at point C. Fix the end of the cover so that<br />
it doesn’t re-enter inside the core, a peg is enough.<br />
See picture.<br />
inseriMento dell'aniMa nella Calza<br />
inserting the Core into the soCk<br />
This operation must be done in two or more steps according to the<br />
eyelet size.<br />
Step 1<br />
Insert the fid in the cover just above point X (if not visible, carefully extract it<br />
from the core) and take it out at the end of the part where there is no core.<br />
Tightly wrap with adhesive tape the bitter end of the core and insert it in the<br />
fid and push them both out with the pusher. This operation, if the eyelet is<br />
big, must be repeated several times.<br />
Step 2<br />
Reinsert the fid where it came out from and roughly take it out at point 3.<br />
Put the core end in the fid and push them both out with the pusher. This<br />
operation may be hard because in the distance existing between point 2<br />
and 3 there is the core of the rope. The picture shows the accumulation of<br />
the cover realized to support the fid passage. Even the core is in the same<br />
situation to allow the exit of the cover.<br />
Point 3<br />
70 www.adrianobenvenuti.it 71<br />
Crossover
i s t r u z i o n i D i i M P i o M B A t u r A s P L i C E ' s i n s t r u C t i o n s<br />
sisteMazione del Crossover<br />
Crossover arrangeMent<br />
Adesso ci troviamo in questa situazione, dal punto 3 fuoriesce<br />
l’anima e dal punto C fuoriesce la calza (foto sopra). Con<br />
cautela, tirare i capi correnti della calza e dell’anima uno alla<br />
volta e avvicinare i punti X e B. Il loro incontro è il crossover.<br />
Da questo, mungere entrambe le parti (calza e anima).<br />
Ripetere l’operazione fino a che il crossover non avrà il<br />
più piccolo diametro possibile e tutte le pieghe saranno<br />
scomparse. A questo punto togliere la molletta di fermo sulla<br />
calza e mungere fino a che la calza scompare all’interno<br />
dell’anima. tutto l’eccesso di calza deve essere portato<br />
verso il nodo scorsoio.<br />
riduzione del diaMetro dell’aniMa e sua sCoMParsa<br />
diaMeter reduCtion oF the Core and its disappearanCe<br />
Questa operazione va fatta in due step:<br />
step 1<br />
Segnare l’anima dove fuoriesce dal punto 3.<br />
Questo sarà il punto E. Al punto 2 segnare<br />
l’anima con il pennarello. Questo sarà il<br />
punto D.<br />
spet 2<br />
Con cautela estrarre l’anima dal punto 3 fino<br />
a far uscire il punto D. togliere tre legnoli al<br />
punto D e tagliarli, e altri tre a metà strada<br />
tra D ed E. al punto E tagliare l’anima con un<br />
taglio angolato di circa 30° per rastremarla<br />
ulteriormente. Mungere la calza verso il<br />
nodo scorsoio e l’anima scomparirà al suo<br />
interno. Se ne rimane fuori una piccola<br />
parte, ripetere l’operazione ritirando fuori<br />
l’anima togliendo la parte esubero. Evitare di<br />
tagliarla direttamente sul posto.<br />
sCoMParsa del Crossover nell’aniMa<br />
Crossover disappearanCe in the Core<br />
Con una operazione di mungitura portiamo tutto il surplus di calza<br />
verso il nodo scorsoio. Questo lavoro deve essere fatta con attenzione,<br />
e in particolare il crossover non deve presentare pieghe.<br />
Fissare il nodo scorsoio a un punto fisso, tenere il cavo in tensione<br />
legando una cima appena dopo il punto 1 (tra 1 e 2) a un altro<br />
punto fisso, opposto al precedente. L’ideale sarebbe un winch,<br />
perché la tensione diminuisce i diametri facilitando la scomparsa<br />
del crossover all’interno del cavo, che si ottiene mungendo dal<br />
nodo scorsoio verso l’occhio con gradualità, ma con molta forza.<br />
Durante questa operazione il punto 2 avanzerà fino ad appaiare<br />
il punto 1. Per questo lavoro è consigliato l’uso di un buon paio di<br />
guanti da lavoro. Quando i punti 1 e 2 sono affiancati si completa<br />
l’impiombatura piegandola e lisciandola tra le mani, facendo<br />
scomparire tutte le pieghe. È possibile per diametri fino a 30 mm<br />
usare un solo punto fisso alternando l’operazione di mungitura<br />
alla tensione esercitata sull’occhio.<br />
This is the situation: the core comes out from point 3 and the cover (see picture above) comes<br />
out at point C. Carefully pull the bitter ends of the cover and the core one by one and bring<br />
point X and B closer. Now smooth both parts (cover and core). Their meeting point is the<br />
crossover. Repeat the operation until the crossover reaches the smallest diameter possible<br />
and all the slack disappear. Now remove the peg from the cover and smooth until the cover<br />
disappears inside the core. The exceeding cover mustt be brought towards the slip knot.<br />
surPlus di Calza<br />
cover surPlus<br />
This operation must be carried out in two<br />
steps.<br />
Step 1<br />
Mark the core where it comes out from point<br />
3. This will be point E. at point 2 mark the<br />
core with a marker. This will be point D.<br />
Step 2<br />
Carefully extract the core from point 3 until<br />
point D comes out.<br />
Remove three strands at point D and cut<br />
them, then remove other three half way<br />
between D and E. At point E cut the core<br />
with an angled cut of about 30° in order<br />
to taper it further more. Smooth the cover<br />
towards the slipknot and the core will<br />
disappear inside of it. If a small part remains<br />
out repeat the operation pulling the core<br />
out again and removing the exceeding part.<br />
Avoid cutting it directly on spot.<br />
Point 3<br />
lavoro Pronto Per la "tiratura"<br />
operation gear to drought<br />
Point 2<br />
steP 1<br />
steP 2<br />
Point d<br />
Point e<br />
Point d<br />
Point 1<br />
Point e<br />
Point 2<br />
Point 2 Point 1 Crossover<br />
Point X Point B<br />
Point 3<br />
With a squeezing operation take the surplus cover towards the slipknot. This operation must<br />
be carried out carefully and particularly the crossover mustn’t present creases. Fix the slipknot<br />
on a fixed point, hold the rope in tension tying an end just after point 1 (between 1 and 2)<br />
to another fixed point opposite to the previous. The ideal thing would be a winch, because the<br />
tension makes the diameters decrease facilitating the disappearance of the crossover inside<br />
the rope, obtained gradually, but with great strength, squeezing from the slipknot towards the<br />
eyelet. During this operation point 2 will proceed until it matches point 1. For this operation<br />
the use of a good pair of working gloves is recommended. When point 1 and 2 are placed<br />
side by side the splicing can be completed folding and smoothening with the hands to make<br />
all the creases disappear. It is possible for diameters up to 30 mm to use just one fixed point<br />
alternating the milking operation and the tension exerted on the eyelet.<br />
72 www.adrianobenvenuti.it 73<br />
Finitura<br />
Finished<br />
Il lavoro va completato obbligatoriamente con una cucitura incrociata o a<br />
ghirlanda.<br />
Cavo a sei CoPPie di legnoli<br />
six pairs strands rope<br />
L’immagine ci consente di vedere la commettitura<br />
e di valutare la lunghezza di un<br />
punto.<br />
Lunghezza aggiuntiva<br />
Sono necessari venti punti più la lunghezza<br />
dell’occhio.<br />
Misurazione<br />
Misurare 20 punti dal capo corrente e fare<br />
un nodo a stringere.<br />
Questo sarà il punto 1.<br />
Dal punto 1 riportare a lunghezza dell’occhio<br />
e fare un nodo a stringere.<br />
Questo sarà il punto 2.<br />
Preparazione del cavo<br />
<strong>Di</strong>sconnettere il cavo fino al punto 1. Bloccare<br />
con il nastro le sei coppie di legnoli,<br />
formate da un legnolo Z e uno S.<br />
Primo fissaggio<br />
Le tre coppie più favorevoli dal punto di<br />
vista della loro disposizione, vanno passate<br />
con l’aiuto della caviglia attraverso il cavo<br />
appena sotto il punto 2.<br />
oCChio CoMPleto<br />
Finished eyelet<br />
lavoro Finito Con CuCitura "a ghirlanda"<br />
Finished operation with "garland" seaM<br />
occhio morbido per cavo a dodici legnoli<br />
Questo particolare tipo di cavo, utilizzato in campo nautico per ormeggio e lavori di banchina, si può trovare con due tipi di trecciatura, una con sei coppie di<br />
legnoli e un’altra con dodici legnoli singoli. A prima vista l’impiombatura australiana sembrerebbe quella più idonea, ma non ci troviamo di fronte a un cavo di<br />
tipo tubolare come può essere l’anima di un cavo a doppia treccia. Nel suo interno vi è poco spazio e gli inserimenti vanno molto rastremati con gravi perdite<br />
di carico. Pertanto è necessario ricorrere a un’impiombatura a passate come per il cavo piano.<br />
soft eyeLet fot tweLve strands wire<br />
This particolar braided rope, used in nautical field for mooring and dock operations, can be found with two kinds of braiding one with six pairs of strands and<br />
another one with twelve single strands. At first sight the Australian splicing could seem the most suitable but this is not a tubular rope such as for example<br />
the core of a double braid wire. Inside there is little space and the insertions are highly tapered with great load losses. Therefore it is necessary to resort to a<br />
tucks splicing like for the flat rope.<br />
Punto 1<br />
The picture allows visualizing the juncture<br />
and evaluating the length of a point.<br />
Additional length<br />
Twenty points plus the length of the eyelet<br />
are necessary.<br />
Measurement<br />
Measure 20 points from the bitter end and<br />
make a tight knot.<br />
This will be point 1.<br />
Starting from point 1 note down the length<br />
of the eyelet and make a tight knot.<br />
This will be point 2.<br />
Rope setting<br />
<strong>Di</strong>sconnect the rope till point 1. Block with<br />
adhesive tape the six pairs of strands made<br />
up of a strand Z and one S.<br />
First tucking<br />
The three pairs which are more suitable<br />
according to their position, must be crossed,<br />
with the help of the treenail, through<br />
the wire just beneath point 2.<br />
The operation must obligatorily be completed with a lock stitching.<br />
Point 1<br />
Point 2
Passata<br />
tuCking<br />
Finitura<br />
Finishing<br />
i s t r u z i o n i D i i M P i o M B A t u r A s P L i C E ' s i n s t r u C t i o n s<br />
Osservando attentamente il cavo si vede che è formato da coppie di<br />
legnoli che si intersecano a spina di pesce. Per passata si intende il<br />
passaggio della coppia di legnoli corrente sotto due e sopra uno di<br />
quella dormiente in modo tale che si muova parallelo all’asse del cavo<br />
lungo quella che abbiamo chiamato spina di pesce. In questa operazione<br />
bisogna fare molta attenzione affinché le coppie di legnoli correnti<br />
non si attorciglino fra loro e procedano paralleli.<br />
eseCuzione<br />
perForMing<br />
Si dispongono i legnoli in modo che siano allineati<br />
con l’asse del cavo e si fanno tre passate piene<br />
con tutte e sei le coppie. Si toglie un legnolo<br />
da ciascuna coppia tagliandolo sotto il nastro in<br />
modo tale che mantenga la sua lunghezza e si<br />
fanno altre due passate. Infine si fanno altre due<br />
passate solamente con tre legnoli.<br />
Per diametri fino a 18 cm l’eccesso dei legnoli può essere tagliato<br />
e saldato con la fiamma. Per diametri maggiori invece è consigliabile<br />
tagliare i legnoli non troppo corti e fermarli con del nastro<br />
telato o con una legatura piana di filo cerato.<br />
Arrange the strands aligned with the rope axix<br />
and make three complete crossings with all the<br />
six pairs.<br />
Remove a strand from each pair cutting it beneath<br />
the adhesive tape so that it maintains its<br />
length and make other two crossings.<br />
Finally make other two tucking just with<br />
three strands.<br />
Carefully observing the wire it is noticeable that it is made up of strand<br />
pairs intersecting in a herringbone pattern. The word “Tucking”<br />
stands for the passage of the pair of running strands under two<br />
and over one standing one so that it moves parallel to the long<br />
rope axix which we previously described as herringbone<br />
pattern. This operation requires prudence to avoid the<br />
twisting of the running strand pairs and in order to<br />
make them proceed parallely.<br />
soPra<br />
on<br />
sotto<br />
under<br />
For what concerns diameters up to 18 cm the exceeding part of the<br />
strands can be cut and flame sealed. For wider diameters instead<br />
it is advisable to cut the strands not too shortly and fix them with<br />
linen tape or with a sail-yarn.<br />
lavoro Finito Con nastro telato<br />
Finished operation with linen tape<br />
eseCuzione di tutte le Passate<br />
all Crossing perForMing<br />
impiombatura di gaSSa (occhio morbido)<br />
Lunghezza aggiuntiva 18 giri<br />
gassa spLicing (soft eyeLet)<br />
Additional length 18 turns<br />
PreParazione del Cavo<br />
wire setting<br />
Dopo aver tagliato il cavo, contare 16 giri dal capo<br />
corrente e fare una legatura a stringere.<br />
Da questo punto riportare la misura dell’occhio e<br />
fare una legatura a stringere. <strong>Di</strong>sconnettere i 16 giri<br />
e fermare con il nastro il capo corrente di ciascun<br />
legnolo. <strong>Di</strong>sporre il cavo in modo tale che i legnoli<br />
del corrente incrocino i legnoli del dormiente in<br />
senso contrario alla connettitura. I legnoli vanno<br />
predisposti come in figura, e passati secondo<br />
l’ordine indicato.<br />
A questo punto ribaltare di 180° l’occhio e passare il terzo<br />
legnolo sempre in senso contrario alla commettitura. Passare<br />
i legnali torcendoli in senso contrario alla commettitura. Se<br />
vi trovate due legnali correnti che passano sotto lo stesso<br />
legnolo dormiente T.D.R. (tutto da rifare). Dopo la prima<br />
passata completa se ne eseguono altre due (sopra il legnolo<br />
adiacente, sotto il successivo), sempre in senso contrario alla<br />
commettitura.<br />
At this point overturn 180° the eyelet and pass the third<br />
strand always in the apposite direction to the lay.<br />
Pass the strands twisting them in the opposite<br />
direction to the lay. Pull the strands in the juncture<br />
direction. If you notice two running strands passino<br />
under the same standing strand you must start all<br />
over again. After the first complete tucking you must<br />
make other two (over the contiguous strans, under<br />
the next one) always in the apposite direction to the lay.<br />
74 www.adrianobenvenuti.it 75<br />
3<br />
terza Passata<br />
third Crossing<br />
CoMPletaMento<br />
Finishing spliCe<br />
1<br />
Per continuare il lavoro si hanno due possibilità: rastremare oppure no.<br />
L’operazione di rastrematura evita di avere un brusco salto di differenza di<br />
diametro, impedendo all’impiombatura di incattivarsi e ne migliora l’estetica.<br />
2<br />
After cutting the wire, count 16 turns from the bitter end and a make a tight<br />
knot. Starting from this point note down the eyelet size and make another<br />
tight knot. Unbraid the 16 crown and fix the running end of each<br />
strand with some tape. <strong>Di</strong>spose the rope so that the strands<br />
of the bitter end, cross the standing, in the opposte<br />
direction to the juncture.<br />
The strands must be arranged as<br />
shown in the picture and crossed<br />
accordino to the mentioned order.<br />
iMPostazione dei legnoli<br />
strands setting<br />
Rispettando l’ordine indicato, passate il legnolo<br />
numero 1 sotto il legnolo corrispondente subito<br />
dopo la legatura, poi il numero 2 sotto<br />
quello a destra della prima passata.<br />
inizio delle PriMe due Passate<br />
starting the First two taCking<br />
Observing the shown order pass the strand<br />
number 1 under the corresponding strand just<br />
after the binding, and them the strand number<br />
2 under the one located on the right of the first<br />
crossing.<br />
In order to continue the work you have two possibilities: taper or not. The<br />
tapering operation avoids a rough diameter differente leap, preventing the<br />
splicing from gettino fouled up and better its aesthetic aspect.<br />
3<br />
2<br />
1<br />
2<br />
1<br />
3
astreMatura<br />
tapering<br />
Finitura<br />
Finishing<br />
i s t r u z i o n i D i i M P i o M B A t u r A s P L i C E ' s i n s t r u C t i o n s<br />
Sfilare i legnoli del 50% dei trefoli. Si legano con<br />
un nodo a stringere e si rimuovono quelli centrali<br />
che sono saldati poi con l’accendino. Con i legnoli<br />
così sfilati si effettuano tre passate.<br />
L’impiombatura rastremata si finisce passando i legnoli sopra quello adiacente<br />
e sotto lo stesso legnolo nello stesso senso della commettitura e<br />
si continua sempre nel medesimo legnolo (impiombatura da velaio o<br />
rovescia). Rispettivamente una volta con il numero 1, due volte con il<br />
numero 2, tre volte con il numero 3. Si mette in trazione fortemente ancorando<br />
l’occhio su una bitta o simile e si tagliano i legnoli. Si rilascia<br />
il cavo e le filacce sono saldate e nascoste all’interno.<br />
senza rastreMatura<br />
without tapering<br />
Si esegue un’altra passata piena, si mette in<br />
trazione il cavo e si tagliano i legnoli. Si rilascia il<br />
cavo e le filacce saldate rimangono in vista.<br />
Unstring the strands by 50% of the strands. Tie<br />
them with a tight knot and remove the central<br />
ones sealed with a lighter. With the unstrung<br />
strands make three tucking.<br />
sFilatura del legnolo<br />
strand's unstringing<br />
Make another complete tucking, put the rope in<br />
traction and cut the strands. The wire is then released<br />
and the sealed rope yarns remain visible.<br />
The tapering splicing must be finished passing the strands over the<br />
contiguous one and under the same strand in the same lay direction and<br />
proceeding always on the same strand (sail maker or reverse splicing).<br />
Respectively once with number 1, twice with number 2 and three times<br />
with number 3. Place it in strong traction anchoring the eyelet on a<br />
bollard or similar and cut the strands. The wire is then released and<br />
the rope yarns are sealed and hidden inside.<br />
gassa rastreMata<br />
tapering gassa<br />
legnoli nasCosti<br />
hidden strands<br />
Passata a rovesCio<br />
revers Crossing<br />
Punto di sFilatura<br />
unstringing Point<br />
Misura dell'oCChio<br />
eyelet measure<br />
Finitura Con Passate a rovesCio<br />
Finishing with reverse tuCking<br />
Se si vuole rendere più graduale la finitura, non si effettua la passata<br />
aggiuntiva, il primo legnolo si lascia così com’è, il secondo si<br />
passa a rovescio una volta e il terzo due volte. Si mette in trazione<br />
il cavo e si tagliano i legnoli, si allenta e le filacce sono saldate e<br />
nascoste all’interno.<br />
Finitura Con legatura Piana<br />
Finishing with lashing<br />
gassa Finita Con Passante a rovesCio<br />
Finished gassa with revers Crossing<br />
Per un lavoro esteticamente più accurato, si disconnettono i<br />
legnoli, la metà di uno si lega con una legatura piana con la metà di<br />
quello adiacente e si tagliano a piacere senza saldature. In questo<br />
caso si può lavorare senza mettere in tensione il cavo e senza fare<br />
passate aggiuntive.<br />
gassa Finita Con legatura Piana<br />
Finished gassa with Flat binding<br />
If you need to make the finishing more gradual, you mustn’t undergo<br />
the additional tucking, leave the first strand as it is, pass the<br />
second one reverse once and the third twice.<br />
Put the rope in traction and cut the strands, then release.<br />
The rope yarns are sealed and hidden inside.<br />
For a more aesthetical accurate work disconnect the strands, tie<br />
half of one with a flat lashing with half of the contiguous one, then<br />
cut at pleasure without seals. In this case you can operate without<br />
putting the rope in tension and without adding<br />
tucking.<br />
76 www.adrianobenvenuti.it 77