Kit Volante F1 per Smart ForTwo 450 e Roadster 452 - SmartKits
Kit Volante F1 per Smart ForTwo 450 e Roadster 452 - SmartKits
Kit Volante F1 per Smart ForTwo 450 e Roadster 452 - SmartKits

You also want an ePaper? Increase the reach of your titles
YUMPU automatically turns print PDFs into web optimized ePapers that Google loves.
Installazione <strong>Kit</strong> <strong>Volante</strong> <strong>F1</strong> <strong>per</strong> <strong>Smart</strong> <strong>ForTwo</strong> <strong>450</strong> - <strong>Roadster</strong> <strong>452</strong><br />
<strong>Kit</strong> <strong>Volante</strong> <strong>F1</strong> <strong>per</strong> <strong>Smart</strong> <strong>ForTwo</strong> <strong>450</strong> e<br />
<strong>Roadster</strong> <strong>452</strong><br />
Prodotto da <strong>Smart</strong><strong>Kit</strong>s SKs<br />
Grazie <strong>per</strong> aver scelto il Nostro <strong>Kit</strong> <strong>Volante</strong> <strong>F1</strong> <strong>per</strong> vetture <strong>Smart</strong> .<br />
Leggere le istruzioni prima dell'installazione!<br />
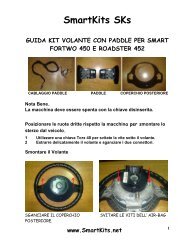
Materiale in dotazione<br />
<br />
CABLAGGIO PADDLE PADDLE COPERCHIO POSTERIORE<br />
Collegamento fili<br />
Cablaggio Paddle :<br />
• Connettori Paddle: Paddle + e Paddle -<br />
• Filo Marrone e Nero: Collegamento sterzo<br />
• Filo Nero: Collegamento clacson<br />
Per maggiori informazioni rivolgersi al rivenditore/installatore o direttamente al produttore<br />
<strong>Smart</strong><strong>Kit</strong>s SKs<br />
Telefono : +39 392 43 86 709<br />
E-Mail : <strong>Smart</strong><strong>Kit</strong>s@<strong>Smart</strong><strong>Kit</strong>s.net - Sito : www.<strong>Smart</strong><strong>Kit</strong>s.net<br />
<strong>Kit</strong> <strong>Volante</strong> <strong>F1</strong> <strong>per</strong> <strong>Smart</strong> <strong>ForTwo</strong> <strong>450</strong> - <strong>Roadster</strong> <strong>452</strong><br />
www.<strong>Smart</strong><strong>Kit</strong>s.net<br />
1
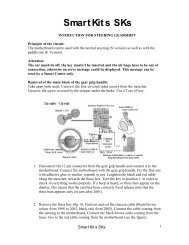
Nota Bene.<br />
Lavorare a quadro spento<br />
Smontare lo sterzo<br />
Installazione <strong>Kit</strong> <strong>Volante</strong> <strong>F1</strong> <strong>per</strong> <strong>Smart</strong> <strong>ForTwo</strong> <strong>450</strong> - <strong>Roadster</strong> <strong>452</strong><br />
Posizionare le ruote dritte rispetto alla macchina e smontare lo sterzo dal veicolo.<br />
1. Utilizzare una chiave Torx 40 <strong>per</strong> svitate la vite posizionata in basso allo sterzo<br />
2. Estrarre delicatamente il volante e sganciare il conettore rosso e quello nero (optional)<br />
Sganciare il co<strong>per</strong>chio posteriore dello sterzo e svitare le viti dell’air-bag<br />
<strong>Kit</strong> <strong>Volante</strong> <strong>F1</strong> <strong>per</strong> <strong>Smart</strong> <strong>ForTwo</strong> <strong>450</strong> - <strong>Roadster</strong> <strong>452</strong><br />
www.<strong>Smart</strong><strong>Kit</strong>s.net<br />
2
Installazione <strong>Kit</strong> <strong>Volante</strong> <strong>F1</strong> <strong>per</strong> <strong>Smart</strong> <strong>ForTwo</strong> <strong>450</strong> - <strong>Roadster</strong> <strong>452</strong><br />
Sganciare lo spinotto giallo dell’air-bag e la mezza luna del clacson facendo una pressione sui 3 fermi<br />
Sganciare lo spinotto della mezza luna del clacson e tagliare il filo nero<br />
<strong>Kit</strong> <strong>Volante</strong> <strong>F1</strong> <strong>per</strong> <strong>Smart</strong> <strong>ForTwo</strong> <strong>450</strong> - <strong>Roadster</strong> <strong>452</strong><br />
www.<strong>Smart</strong><strong>Kit</strong>s.net<br />
3
Installazione <strong>Kit</strong> <strong>Volante</strong> <strong>F1</strong> <strong>per</strong> <strong>Smart</strong> <strong>ForTwo</strong> <strong>450</strong> - <strong>Roadster</strong> <strong>452</strong><br />
Spellare il filo Nero e Marrone dello sterzo e saldare con il filo Nero e Marrone del cablaggio paddle.<br />
Saldare il filo nero con lo spinotto del clacson al secondo filo nero del cablaggio paddle. Isolare le<br />
saldature con del nastro isolante<br />
Posizionare l’air-bag e il cablaggio paddle allo sterzo come da foto :<br />
Punto A – Spinotto Picco (Paddle -)<br />
Punto B – Spinotto Grande (Paddle +)<br />
Punto C – Spinotto Clacson<br />
Avvitare le viti dell’air-bag<br />
<strong>Kit</strong> <strong>Volante</strong> <strong>F1</strong> <strong>per</strong> <strong>Smart</strong> <strong>ForTwo</strong> <strong>450</strong> - <strong>Roadster</strong> <strong>452</strong><br />
www.<strong>Smart</strong><strong>Kit</strong>s.net<br />
4
Installazione <strong>Kit</strong> <strong>Volante</strong> <strong>F1</strong> <strong>per</strong> <strong>Smart</strong> <strong>ForTwo</strong> <strong>450</strong> - <strong>Roadster</strong> <strong>452</strong><br />
Posizionare il co<strong>per</strong>chio posteriore allo sterzo ed agganciare i paddle al cablaggio<br />
Fissare i paddle con le viti ed il bulloni forniti nel kit ed agganciare lo spinotto del clacson<br />
<strong>Kit</strong> <strong>Volante</strong> <strong>F1</strong> <strong>per</strong> <strong>Smart</strong> <strong>ForTwo</strong> <strong>450</strong> - <strong>Roadster</strong> <strong>452</strong><br />
www.<strong>Smart</strong><strong>Kit</strong>s.net<br />
5
Verifica<br />
Installazione <strong>Kit</strong> <strong>Volante</strong> <strong>F1</strong> <strong>per</strong> <strong>Smart</strong> <strong>ForTwo</strong> <strong>450</strong> - <strong>Roadster</strong> <strong>452</strong><br />
Agganciare la mezza luna del clacson facendo leva sui ganci. Montare il volante e verificare il<br />
funzionamento dei paddle e del clason<br />
• Paddle + : aumenta di marcia<br />
• Paddle - : decrement di marcia<br />
• Clacson : suona il clacson<br />
<strong>Kit</strong> <strong>Volante</strong> <strong>F1</strong> <strong>per</strong> <strong>Smart</strong> <strong>ForTwo</strong> <strong>450</strong> - <strong>Roadster</strong> <strong>452</strong><br />
www.<strong>Smart</strong><strong>Kit</strong>s.net<br />
6