MANUAL INSTALACION LE MANS - DIGITAL (U.I.).pdf
MANUAL INSTALACION LE MANS - DIGITAL (U.I.).pdf
MANUAL INSTALACION LE MANS - DIGITAL (U.I.).pdf

You also want an ePaper? Increase the reach of your titles
YUMPU automatically turns print PDFs into web optimized ePapers that Google loves.
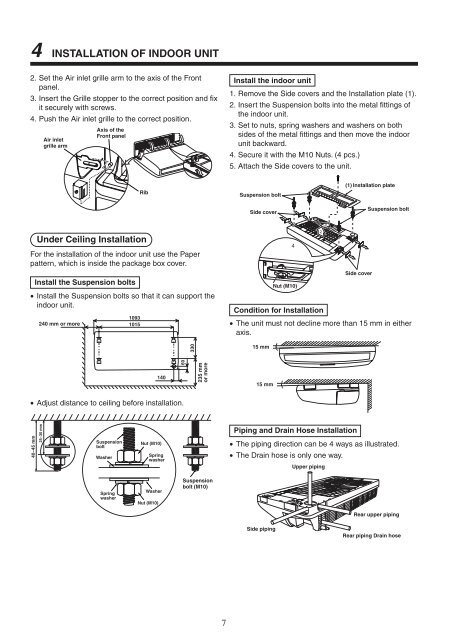
4 INSTALLATION OF INDOOR UNIT<br />
2. Set the Air inlet grille arm to the axis of the Front<br />
panel.<br />
3. Insert the Grille stopper to the correct position and fix<br />
it securely with screws.<br />
4. Push the Air inlet grille to the correct position.<br />
Air inlet<br />
grille arm<br />
Axis of the<br />
Front panel<br />
Rib<br />
Under Ceiling Installation<br />
For the installation of the indoor unit use the Paper<br />
pattern, which is inside the package box cover.<br />
Install the Suspension bolts<br />
• Install the Suspension bolts so that it can support the<br />
indoor unit.<br />
240 mm or more<br />
• Adjust distance to ceiling before installation.<br />
40~45 mm<br />
25~30 mm<br />
Suspension<br />
bolt<br />
Washer<br />
Spring<br />
washer<br />
1093<br />
1015<br />
Nut (M10)<br />
Spring<br />
washer<br />
Washer<br />
Nut (M10)<br />
140<br />
60<br />
330<br />
235 mm<br />
or more<br />
Suspension<br />
bolt (M10)<br />
7<br />
Install the indoor unit<br />
1. Remove the Side covers and the Installation plate (1).<br />
2. Insert the Suspension bolts into the metal fittings of<br />
the indoor unit.<br />
3. Set to nuts, spring washers and washers on both<br />
sides of the metal fittings and then move the indoor<br />
unit backward.<br />
4. Secure it with the M10 Nuts. (4 pcs.)<br />
5. Attach the Side covers to the unit.<br />
Suspension bolt<br />
Side cover<br />
15 mm<br />
4<br />
Nut (M10)<br />
2<br />
3<br />
(1) Installation plate<br />
Side cover<br />
Suspension bolt<br />
Condition for Installation<br />
• The unit must not decline more than 15 mm in either<br />
axis.<br />
15 mm<br />
Piping and Drain Hose Installation<br />
• The piping direction can be 4 ways as illustrated.<br />
• The Drain hose is only one way.<br />
Side piping<br />
Upper piping<br />
Rear upper piping<br />
Rear piping Drain hose