MANUAL INSTALACION LE MANS - DIGITAL (U.I.).pdf
MANUAL INSTALACION LE MANS - DIGITAL (U.I.).pdf
MANUAL INSTALACION LE MANS - DIGITAL (U.I.).pdf

Create successful ePaper yourself
Turn your PDF publications into a flip-book with our unique Google optimized e-Paper software.
6 REFRIGERANT PIPING<br />
Refrigerant Piping<br />
1. If the outdoor units are to be mounted on a wall, make sure that the platform supporting is sufficiently strong. The<br />
platform should be designed and manufactured to maintain its strength over a long period of time, and sufficient<br />
consideration should be given to ensuring that the outdoor unit will not fall.<br />
2. Use copper pipe with 0.8 mm or more thickness.<br />
3. Flare nut and flare works are also different from those of the conventional refrigerant. Take out the flare nut<br />
attached to the main unit of the air conditioner, and use it.<br />
CAUTION<br />
IMPORTANT 4 POINTS FOR PIPING WORK<br />
1. Take away dust and moisture from the inside of the connecting pipes.<br />
2. Tight connection (between pipes and unit)<br />
3. Evacuate the air in the connecting pipes using VACUUM PUMP.<br />
4. Check the gas leakage. (Connected points)<br />
Permissible Piping Length and Head<br />
The maximum piping length from the outdoor to indoor unit The maximum height difference outdoor/indoor unit<br />
30 m (Without charge 20 m) 50 m (Without charge 20 m) Outdoor unit is above Outdoor unit is below<br />
(RAV-SM562AT-E) (RAV-SM802AT-E) 30 m 15 m<br />
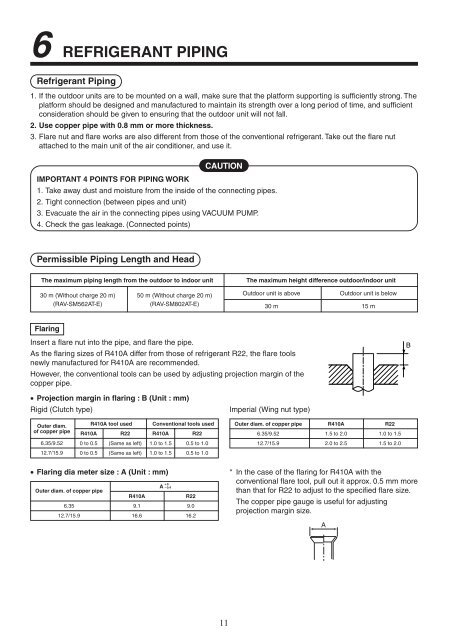
Flaring<br />
Insert a flare nut into the pipe, and flare the pipe.<br />
As the flaring sizes of R410A differ from those of refrigerant R22, the flare tools<br />
newly manufactured for R410A are recommended.<br />
However, the conventional tools can be used by adjusting projection margin of the<br />
copper pipe.<br />
• Projection margin in flaring : B (Unit : mm)<br />
Rigid (Clutch type) Imperial (Wing nut type)<br />
Outer diam.<br />
of copper pipe<br />
6.35/9.52<br />
12.7/15.9<br />
R410A tool used<br />
R410A R22<br />
0 to 0.5 (Same as left)<br />
0 to 0.5 (Same as left)<br />
• Flaring dia meter size : A (Unit : mm)<br />
Outer diam. of copper pipe<br />
Conventional tools used<br />
R410A R22<br />
1.0 to 1.5 0.5 to 1.0<br />
1.0 to 1.5 0.5 to 1.0<br />
A<br />
+0<br />
– 0.4<br />
R410A R22<br />
6.35 9.1 9.0<br />
12.7/15.9 16.6 16.2<br />
11<br />
Outer diam. of copper pipe R410A R22<br />
6.35/9.52 1.5 to 2.0 1.0 to 1.5<br />
12.7/15.9 2.0 to 2.5 1.5 to 2.0<br />
* In the case of the flaring for R410A with the<br />
conventional flare tool, pull out it approx. 0.5 mm more<br />
than that for R22 to adjust to the specified flare size.<br />
The copper pipe gauge is useful for adjusting<br />
projection margin size.<br />
A<br />
B