
Create successful ePaper yourself
Turn your PDF publications into a flip-book with our unique Google optimized e-Paper software.
Esec_<strong>LRx</strong>ABD_ITA-ING 24-11-2006 10:40 Pagina 25<br />
The Universal Sound<br />
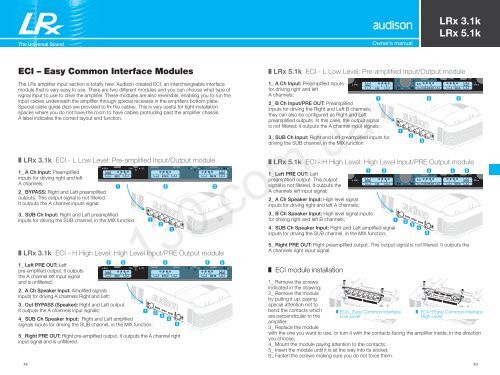
ECI – Easy Common Interface Modules<br />
The <strong>LRx</strong> amplifier input section is totally new. Audison created ECI, an interchangeable interface<br />
module that is very easy to use. There are two different modules and you can choose what type of<br />
signal input to use to drive the amplifier. These modules are also reversible, enabling you to run the<br />
input cables underneath the amplifier through special recesses in the amplifiers bottom plate.<br />
Special cable guide clips are provided to fix the cables. This is very useful for tight installation<br />
spaces where you do not have the room to have cables protruding past the amplifier chassis.<br />
A label indicates the correct layout and function.<br />
I <strong>LRx</strong> <strong>3.1k</strong> ECI - L Low Level: Pre-amplified Input/Output module<br />
1_ A Ch Input: Preamplified<br />
inputs for driving right and left<br />
A channels;<br />
2_ BYPASS: Right and Left preamplified<br />
outputs. This output signal is not filtered.<br />
It outputs the A channel inputs signal;<br />
3_ SUB Ch Input: Right and Left preamplified<br />
inputs for driving the SUB channel, in the MIX function.<br />
I <strong>LRx</strong> <strong>3.1k</strong> ECI - H High Level: High Level Input/PRE Output module<br />
1_ Left PRE OUT: Left<br />
pre-amplified output. It outputs<br />
the A channel left input signal<br />
and is unfiltered;<br />
2_ A Ch Speaker Input: Amplified signals<br />
inputs for driving A channels Right and Left;<br />
3_ Out BYPASS (Speaker): Right and Left output.<br />
It outputs the A channels input signals;<br />
4_ SUB Ch Speaker Input: Right and Left amplified<br />
signals inputs for driving the SUB channel, in the MIX function;<br />
5_ Right PRE OUT: Right pre-amplified output. It outputs the A channel right<br />
input signal and is unfiltered.<br />
Owner’s manual<br />
I ECI-L Easy Common Interface<br />
Low Level<br />
<strong>LRx</strong> <strong>3.1k</strong><br />
<strong>LRx</strong> <strong>5.1k</strong><br />
I <strong>LRx</strong> <strong>5.1k</strong> ECI - L Low Level: Pre-amplified Input/Output module<br />
1_ A Ch Input: Preamplified inputs<br />
for driving right and left<br />
A channels;<br />
2_ B Ch Input/PRE OUT: Preamplified<br />
inputs for driving the Right and Left B channels;<br />
they can also be configured as Right and Left<br />
preamplified outputs. In this case, the output signal<br />
is not filtered; it outputs the A channel input signals;<br />
3_ SUB Ch Input: Right and Left preamplified inputs for<br />
driving the SUB channel, in the MIX function<br />
I <strong>LRx</strong> <strong>5.1k</strong> ECI - H High Level: High Level Input/PRE Output module<br />
1_ Left PRE OUT: Left<br />
preamplified output. This output<br />
signal is not filtered. It outputs the<br />
A channels left input signal;<br />
2_ A Ch Speaker Input: High level signal<br />
inputs for driving right and left A channels;<br />
3_ B Ch Speaker Input: High level signal inputs<br />
for driving right and left B channels;<br />
4_ SUB Ch Speaker Input: Right and Left amplified signal<br />
inputs for driving the SUB channel, in the MIX function;<br />
130.com.ua<br />
5_ Right PRE OUT: Right preamplified output. This output signal is not filtered. It outputs the<br />
A channels right input signal.<br />
I ECI module installation<br />
1_ Remove the screws<br />
indicated in the drawing;<br />
2_ Remove the module<br />
by pulling it up, paying<br />
special attention not to<br />
bend the contacts which<br />
are perpendicular to the<br />
amplifier;<br />
3_ Replace the module<br />
I ECI-H Easy Common Interface<br />
High Level<br />
with the one you want to use, or turn it with the contacts facing the amplifier inside, in the direction<br />
you choose;<br />
4_ Mount the module paying attention to the contacts;<br />
5_ Insert the module until it is all the way into its socket;<br />
6_ Fasten the screws making sure you do not force them.<br />
48 49<br />
Autogood products internet store http://130.com.ua