LNCMBO De Tacx Cyclemotion Stand is een zeer ... - Van Bokhoven
LNCMBO De Tacx Cyclemotion Stand is een zeer ... - Van Bokhoven
LNCMBO De Tacx Cyclemotion Stand is een zeer ... - Van Bokhoven

Create successful ePaper yourself
Turn your PDF publications into a flip-book with our unique Google optimized e-Paper software.
D<br />
A<br />
1<br />
<strong>De</strong> <strong>Tacx</strong> CycleMotion <strong>Stand</strong> <strong>is</strong> <strong>een</strong> <strong>zeer</strong> stabiele<br />
montagestandaard voor het onderhoud van en<br />
reparaties aan fietsen. Waarom Motion?<br />
1 Twee manieren om fiets te bevestigen<br />
• Door de voorvork in de blockage te klemmen kan<br />
ondermeer aan derailleur, ketting, achterwiel, zadel en<br />
remkabels worden gewerkt<br />
• Door de achtervork vast te zetten kan er vrij gewerkt<br />
worden aan het balhoofd, stuur, remmen en voorwiel.<br />
2 Inklapbaar, daarom compact<br />
dus gemakkelijk op te bergen of mee te nemen<br />
3 Geschikt voor alle ATB, race- en hybride fietsen<br />
Met <strong>een</strong> wielmaat van 24, 26 en 28 inch.<br />
4 Meerdere posities vorkhouders<br />
<strong>De</strong> voor- en achtervorkhouder zijn zowel in hoogte als<br />
in lengte verschuifbaar.<br />
5 Achtervorkhouder met kettingrol<br />
Speciaal ontworpen om de fietsketting te geleiden.<br />
Schakelen <strong>is</strong> nog steeds mogelijk om bv. de werking<br />
van de derailleur te testen of deze te smeren.<br />
6 Verplaatsbaar montageblad<br />
Met opstaande rand en speciale gaten om bv. schroevendraaiers<br />
in te plaatsen.<br />
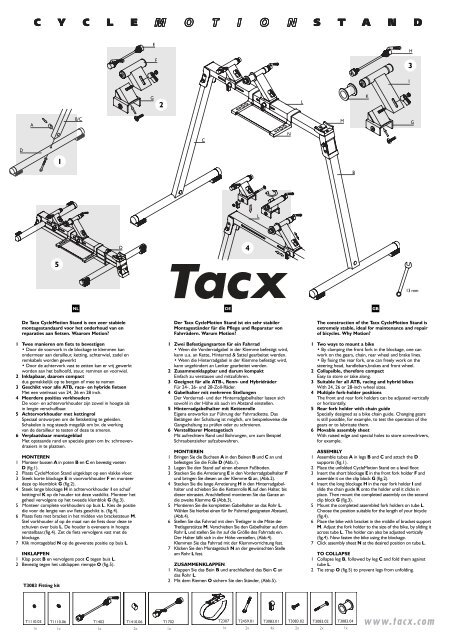
MONTEREN<br />
1 Monteer bussen A in poten B en C en bevestig voeten<br />
D (fig.1).<br />
2 Plaats CycleMotion <strong>Stand</strong> uitgeklapt op <strong>een</strong> vlakke vloer.<br />
3 Steek korte blockage E in voorvorkhouder F en monteer<br />
deze op klemblok G (fig.2).<br />
4 Steek lange blockage H in achtervorkhouder I en schuif<br />
kettingrol K op de houder tot deze vastklikt. Monteer het<br />
geheel vervolgens op het tweede klemblok G (fig.3).<br />
5 Monteer complete vorkhouders op bu<strong>is</strong> L. Kies de positie<br />
die voor de lengte van uw fiets geschikt <strong>is</strong>. (fig.4).<br />
6 Plaats fiets met bracket in het midden van bracketsteun M.<br />
Stel vorkhouder af op de maat van de fiets door deze te<br />
schuiven over bu<strong>is</strong> L. <strong>De</strong> houder <strong>is</strong> even<strong>een</strong>s in hoogte<br />
verstelbaar.(fig.4). Zet de fiets vervolgens vast met de<br />
blockage.<br />
7 Klik montageblad N op de gewenste positie op bu<strong>is</strong> L.<br />
INKLAPPEN<br />
1 Klap poot B en vervolgens poot C tegen bu<strong>is</strong> L.<br />
2 Bevestig tegen het uitklappen riempje O (fig.5).<br />
T1110.03<br />
1x<br />
5<br />
T3083 Fitting kit<br />
T1110.06<br />
1x<br />
B/C<br />
O<br />
NL DE<br />
T1402<br />
1x<br />
T1410.06<br />
2x<br />
G<br />
E<br />
F<br />
2<br />
T1702<br />
1x<br />
C<br />
<strong>De</strong>r <strong>Tacx</strong> CycleMotion <strong>Stand</strong> <strong>is</strong>t ein sehr stabiler<br />
Montageständer für die Pflege und Reparatur von<br />
Fahrrädern. Warum Motion?<br />
1 Zwei Befestigungsarten für ein Fahrrad<br />
• Wenn die Vorderradgabel in der Klemme befestigt wird,<br />
kann u.a. an Kette, Hinterrad & Sattel gearbeitet werden.<br />
• Wenn die Hinterradgabel in der Klemme befestigt wird,<br />
kann ungehindert an Lenker gearbeitet werden.<br />
2 Zusammenklappbar und darum kompakt<br />
Einfach zu verstauen und mitzuführen.<br />
3 Geeignet für alle ATB-, Renn- und Hybridräder<br />
Für 24-, 26- und 28-Zoll-Räder.<br />
4 Gabelhalter mit mehreren Stellungen<br />
<strong>De</strong>r Vorderrad- und der Hinterradgabelhalter lassen sich<br />
sowohl in der Höhe als auch im Abstand einstellen.<br />
5 Hinterradgabelhalter mit Kettenrolle<br />
Eigens entworfen zur Führung der Fahrradkette. Das<br />
Betätigen der Schaltung <strong>is</strong>t möglich, um be<strong>is</strong>pielswe<strong>is</strong>e die<br />
Gangschaltung zu prüfen oder zu schmieren.<br />
6 Verstellbarer Montaget<strong>is</strong>ch<br />
Mit aufrechtem Rand und Bohrungen, um zum Be<strong>is</strong>piel<br />
Schraubenzieher aufzubewahren.<br />
MONTIEREN<br />
1 Bringen Sie die Buchsen A in den Beinen B und C an und<br />
befestigen Sie die Füße D (Abb.1).<br />
2 Legen Sie den <strong>Stand</strong> auf einen ebenen Fußboden.<br />
3 Stecken Sie die Arretierung E in den Vorderradgabelhalter F<br />
und bringen Sie diesen an der Klemme G an, (Abb.2).<br />
4 Stecken Sie die lange Arretierung H in den Hinterradgabelhalter<br />
und schieben Sie die Kettenrolle K auf den Halter, b<strong>is</strong><br />
dieser einrastet. Anschließend montieren Sie das Ganze an<br />
die zweite Klemme G (Abb.3).<br />
5 Montieren Sie die kompletten Gabelhalter an das Rohr L.<br />
Wählen Sie hierbei einen für Ihr Fahrrad geeigneten Abstand,<br />
(Abb.4).<br />
6 Stellen Sie das Fahrrad mit dem Tretlager in die Mitte der<br />
Tretlagerstütze M. Verschieben Sie den Gabelhalter auf dem<br />
Rohr L und stellen Sie ihn auf die Größe des Fahrrads ein.<br />
<strong>De</strong>r Halter läßt sich in der Höhe verstellen, (Abb.4).<br />
Klemmen Sie das Fahrrad mit der Klemmvorrichtung fest.<br />
7 Klicken Sie den Montaget<strong>is</strong>ch N an der gewünschten Stelle<br />
am Rohr L fest.<br />
ZUSAMMENKLAPPEN<br />
1 Klappen Sie das Bein B und anschließend das Bein C an<br />
das Rohr L.<br />
2 Mit dem Riemen O sichern Sie den Ständer, (Abb.5).<br />
T2307<br />
1x<br />
4<br />
T2459.01<br />
2x<br />
L<br />
T3083.01<br />
4x<br />
N<br />
L<br />
T3083.02<br />
2x<br />
M<br />
B<br />
GB<br />
13 mm<br />
The construction of the <strong>Tacx</strong> CycleMotion <strong>Stand</strong> <strong>is</strong><br />
extremely stable, ideal for maintenance and repair<br />
of bicycles. Why Motion?<br />
1 Two ways to mount a bike<br />
• By clamping the front fork in the blockage, one can<br />
work on the gears, chain, rear wheel and brake lines.<br />
• By fixing the rear fork, one can freely work on the<br />
steering head, handlebars,brakes and front wheel.<br />
2 Collapsible, therefore compact<br />
Easy to store or take along.<br />
3 Suitable for all ATB, racing and hybrid bikes<br />
With 24, 26 or 28-inch wheel sizes.<br />
4 Multiple fork-holder positions<br />
The front and rear fork holders can be adjusted vertically<br />
or horizontally.<br />
5 Rear fork holder with chain guide<br />
Specially designed as a bike chain guide. Changing gears<br />
<strong>is</strong> still possible, for example, to test the operation of the<br />
gears or to lubricate them.<br />
6 Movable assembly sheet<br />
With ra<strong>is</strong>ed edge and special holes to store screwdrivers,<br />
for example.<br />
ASSEMBLY<br />
1 Assemble tubes A in legs B and C and attach the D<br />
supports (fig.1).<br />
2 Place the unfolded CycleMotion <strong>Stand</strong> on a level floor.<br />
3 Insert the short blockage E in the front fork holder F and<br />
assemble it on the clip block G (fig.2).<br />
4 Insert the long blockage H in the rear fork holder I and<br />
slide the chain guide K onto the holder until it clicks in<br />
place. Then mount the completed assembly on the second<br />
clip block G (fig.3).<br />
5 Mount the completed assembled fork holders on tube L.<br />
Choose the position suitable for the length of your bicycle<br />
(fig.4).<br />
6 Place the bike with bracket in the middle of bracket support<br />
M. Adjust the fork holder to the size of the bike, by sliding it<br />
across tube L. The holder can also be adjusted vertically<br />
(fig.4). Now fasten the bike using the blockage.<br />
7 Click assembly sheet N at the desired position on tube L.<br />
TO COLLAPSE<br />
1 Collapse leg B, followed by leg C and fold them against<br />
tube L.<br />
2 Tie strap O (fig.5) to prevent legs from unfolding.<br />
T3083.02<br />
2x<br />
T3083.04<br />
1x<br />
K<br />
3<br />
I<br />
H<br />
G
D<br />
A<br />
1<br />
Le <strong>Tacx</strong> CycleMotion <strong>Stand</strong> est un support de<br />
montage très stable pour l'entretien et la réparation<br />
des bicyclettes. Pourquoi Motion?<br />
1 <strong>De</strong>ux manières de fixer le vélo<br />
• En calant la fourche avant dans le blocage, on peut<br />
travailler entre autres au dérailleur, à la chaîne, à la roue<br />
arrière, à la selle et aux câbles de frein.<br />
• En calant la fourche arrière, on peut travailler librement<br />
au tube de direction, au guidon, aux freins et à la roue avant.<br />
2 Repliable, donc compact<br />
D'où facilité de rangement et de transport.<br />
3 Convient pour tous les vélos-cross, course et hybrides<br />
Avec une taille de roue de 24, 26 et 28 pouces.<br />
4 Plusieurs positions pour les porte-fourches<br />
Les porte-fourches avant et arrière sont réglables en<br />
hauteur aussi bien qu'en longueur.<br />
5 Porte-fourche arrière à rouleau de chaîne<br />
Spécialement conçu pour guider la chaîne de vélo. Il reste<br />
toujours possible de changer de vitesse, par exemple pour<br />
tester le fonctionnement du dérailleur ou pour le gra<strong>is</strong>ser.<br />
6 Plateau de montage mobile<br />
Avec rebord et trous spéciaux permettant l'introduction<br />
notamment de tournev<strong>is</strong>.<br />
MONTAGE<br />
1 Montez les manchons A dans les pieds B et C et fixez les<br />
pieds D (fig.1).<br />
2 Placez le CycleMotion <strong>Stand</strong> déplié sur un sol plan.<br />
3 Introdu<strong>is</strong>ez le blocage court E dans le porte-fourche avant F<br />
et montez celui-ci sur le bloc de serrage G (fig.2).<br />
4 Introdu<strong>is</strong>ez le blocage long H dans le porte-fourche arrière I<br />
et faites gl<strong>is</strong>ser le rouleau de chaîne K sur le support jusqu'à<br />
ce celui-ci soit calé en fa<strong>is</strong>ant entendre un déclic. Cela fait,<br />
montez l'ensemble sur le second bloc de serrage G (fig.3).<br />
5 Montez les porte-fourches complets sur le tube L.<br />
Cho<strong>is</strong><strong>is</strong>sez la position adaptée à la longueur de vélo (fig.4).<br />
6 D<strong>is</strong>posez le vélo, pédalier au milieu du support de pédalier M.<br />
Réglez le porte-fourche sur la taille du vélo en le fa<strong>is</strong>ant<br />
coul<strong>is</strong>ser sur le tube L. Le support peut également se régler<br />
en hauteur (fig.4). Fixez ensuite le vélo avec le blocage.<br />
7 Faites cliquer le plateau de montage N en position voulue<br />
sur le tube L.<br />
RABATTEMENT<br />
1 Repliez le pied B, pu<strong>is</strong> le pied C contre le tube L.<br />
2 Fixez la petite sangle O pour empêcher le relèvement (fig.5).<br />
T1110.03<br />
1x<br />
5<br />
T3083 Fitting kit<br />
T1110.06<br />
1x<br />
B/C<br />
O<br />
C<br />
FR ES IT<br />
T1402<br />
1x<br />
T1410.06<br />
2x<br />
G<br />
E<br />
F<br />
2<br />
T1702<br />
1x<br />
El <strong>Tacx</strong> CycleMotion <strong>Stand</strong> es un soporte de montaje<br />
muy estable para el mantenimiento y las rev<strong>is</strong>iones<br />
de bicicletas. ¿Por qué Motion?<br />
1 Dos maneras de asegurar la bicicleta<br />
• Apretando la horquilla delantera en el bloqueo se pueden<br />
realizar trabajos p.e. en el cambio de marchas, la cadena,<br />
la rueda trasera, el sillín y los cables de frenado.<br />
• Apretando la horquilla trasera se pueden realizar trabajos<br />
sin obstáculos en la cabeza de horquilla, el manillar, los<br />
frenos y la rueda delantera.<br />
2 Plegable, por lo tanto compacto<br />
y así fácil de guardar o de transportar.<br />
3 Adecuado para todas las bicicletas ATB e de carreras<br />
con ruedas de 24, 26 y 28 pulgadas de medición.<br />
4 Diferentes posiciones del soporte de la horquilla<br />
Los soportes de las horquillas delantera y trasera se dejan<br />
ajustar hacia arriba y abajo así como a lo largo.<br />
5 Soporte de la horquilla trasera con cadena guía<br />
Específicamente d<strong>is</strong>eñado para conducir la cadena.<br />
6 Tablero de montaje transportable<br />
Con un borde sobresaliente y agujeros especiales p.e.<br />
para introducir destornilladores.<br />
MONTAJE<br />
1 Acomode el conducto A en los pies B y C y asegure los pies<br />
D (fig.1).<br />
2 Instale el CycleMotion <strong>Stand</strong> de forma plegada en una<br />
superficie l<strong>is</strong>a.<br />
3 Inserte el bloqueo corto E en el soporte de la horquilla<br />
delantera F y acomódelo en el bloque de sujeción G (fig.2).<br />
4 Inserte el bloqueo largo H en el soporte de la horquilla<br />
trasera I y encaje la cadena guía K en el soporte haciendo<br />
clic. A continuación, acomode el conjunto en el segundo<br />
bloque de sujeción G (fig.3 ).<br />
5 Acomode los soportes completos de las horquillas en el<br />
tubo L. Elija la posición que sea adecuada para la altura de<br />
su bicicleta (fig.4).<br />
6 Coloque la bicicleta con soporte en el centro del soporte<br />
M. Ajuste el soporte de la horquilla según la medida de la<br />
bicicleta haciéndolo encajar sobre el tubo L. El soporte<br />
también se deja ajustar hacia arriba y hacia abajo (fig.4).<br />
Asegure ahora la bicicleta con el bloqueo.<br />
7 Coloque el tablero de montaje N en la posición deseada del<br />
tubo L haciendo clic.<br />
PLEGAR<br />
1 Pliegue el pie B y a continuación el pie C contra el tubo L.<br />
2 Acomode la cinta O para que no se despliegue (fig.5).<br />
T2307<br />
1x<br />
4<br />
T2459.01<br />
2x<br />
L<br />
T3083.01<br />
4x<br />
N<br />
L<br />
T3083.02<br />
2x<br />
T3083.02<br />
2x<br />
M<br />
B<br />
T3083.04<br />
1x<br />
K<br />
3<br />
I<br />
H<br />
G<br />
13 mm<br />
Il <strong>Tacx</strong> CycleMotion <strong>Stand</strong> è un cavalletto smontabile<br />
molto stabile per la manutenzione e riparazione<br />
delle biciclette. Perché Motion?<br />
1 Due maniere per f<strong>is</strong>sare la bicicletta<br />
• Inserendo la forcella anteriore nella ganascia di bloccaggio<br />
si può lavorare, tra l'altro, al cambio di velocità, alla catena,<br />
alla ruota posteriore, al sellino e ai cavi dei freni.<br />
• F<strong>is</strong>sando la forcella posteriore si è liberi di lavorare alla<br />
testa del manubrio, al manubrio e alla ruota anteriore.<br />
2 Pieghevole, e perciò compatto<br />
e quindi facile da mettere via o da portarsi dietro.<br />
3 Adatto per tutte le MTB e le biciclette da corsa<br />
con ruota di m<strong>is</strong>ura 24, 26 e 28 pollici.<br />
4 Sostegni della forcella variamente posizionabili<br />
Tanto il sostegno della forcella anteriore quanto quello<br />
della forcella posteriore possono assumere diverse m<strong>is</strong>ure<br />
di altezza e lunghezza.<br />
5 Sostegno della forcella posteriore dotato di rullo<br />
per la catena<br />
Progettato specialmente come conduttore della catena.<br />
6 Piano di montaggio spostabile<br />
Con bordo sollevato e fori speciali, per esempio per<br />
infilarci i cacciavite.<br />
MONTAGGIO<br />
1 Montare le boccole A sulle gambe B e C e f<strong>is</strong>sare i piedi<br />
D (fig.1).<br />
2 Aprire il <strong>Stand</strong> e metterlo su un pavimento piano.<br />
3 Infilare il bloccaggio breve E nel sostegno della forcella<br />
anteriore F e montarlo sul blocco a ganascia G (fig.2).<br />
4 Infilare il bloccaggio lungo H nel sostegno della forcella<br />
posteriore I e fare scorrere il rullo della catena K lungo il<br />
sostegno finché non si blocca con un clic. Montare poi il<br />
tutto sul secondo blocco a ganascia G (fig.3).<br />
5 Montare i sostegni delle forcelle completi sul tubo L.<br />
Scegliere la posizione adatta per la lunghezza della<br />
bicicletta (fig.4).<br />
6 Mettere la bicicletta in modo tale che la ruota dentata stia<br />
nel centro del sostegno della ruota dentata M. Adattare il<br />
sostegno della forcella alla m<strong>is</strong>ura della bicicletta facendo<br />
scivolare questa lungo il tubo L. Anche il sostegno è di<br />
altezza regolabile (fig.4).<br />
7 F<strong>is</strong>sare il piano di montaggio N con un clic all'altezza<br />
desiderata lungo il tubo L.<br />
RIPIEGARE<br />
1 Chiudere prima la gamba B e poi la gamba C serrandole<br />
contro il tubo L.<br />
2 Perché non si riapra da solo, f<strong>is</strong>sarlo con il cinturino O (fig.5).