istruzioni mont ARCOM.qxd - Gruppo Atma
istruzioni mont ARCOM.qxd - Gruppo Atma
istruzioni mont ARCOM.qxd - Gruppo Atma

You also want an ePaper? Increase the reach of your titles
YUMPU automatically turns print PDFs into web optimized ePapers that Google loves.
ISTRUZIONI MONTAGGIO<br />
SCHEDA PRODOTTO<br />
ASSEMBLY INSTRUCTIONS<br />
PRODUCT DATA SHEET<br />
Architettura in bagno<br />
Furnishing elements to live in the bathroom
INDICE<br />
ISTRUZIONI MONTAGGIO<br />
4. I MATERIALI DI <strong>ARCOM</strong><br />
6. I MATERIALI IMPIEGATI PER I LAVABI<br />
DA <strong>ARCOM</strong><br />
7. MONTAGGIO PIANI SP. 6 cm<br />
8. SUPPORTO ATTACCAGLIA<br />
9. REGOLAZIONE ATTACCAGLIA<br />
10. MONTAGGIO FISSAGGIO TRAFILE<br />
11. MONTAGGIO FISSAGGIO LAVABO<br />
SOAP SEMINCASSO<br />
12. BASE PORTALAVABO CUBO<br />
14. MONTAGGIO PILETTA CON SIFONE<br />
SALVASPAZIO<br />
14. SCARICHI PER LAVABO SOSPESO<br />
15. CASSETTI · CASSETTONI<br />
17. CRICCHETTO (Tipo nuovo)<br />
17. CASSETTO SUPERIORE CON CRICCHETTO<br />
18. CASSETTO INFERIORE<br />
18. MOBILE COMPLANARE<br />
19. ANTA COMPLANARE<br />
21. ANTA SCORREVOLE<br />
22. CERNIERE<br />
22. SUPPORTO A SCOMPARSA PER MENSOLE<br />
23. PARETE ATTREZZATA IN FOLDING<br />
SCHEDA PRODOTTO<br />
24. CONFORMAZIONE VARI PRODOTTI<br />
E ACCESSORI<br />
25. CONFORMAZIONE MATERIALI<br />
DEI MODELLI<br />
CONTENTS<br />
ASSEMBLY INSTRUCTIONS<br />
28. <strong>ARCOM</strong>’S MATERIALS<br />
30. MATERIALS USED BY <strong>ARCOM</strong><br />
FOR THEIR WASHBASINS<br />
31. ASSEMBLING 6cm THICK TOPS<br />
32. FIXING SUPPORT<br />
33. ADJUSTING THE FIXINGS<br />
34. MONTAGGIO FISSAGGIO TRAFILE<br />
35. MONTAGGIO FISSAGGIO LAVABO<br />
SOAP SEMINCASSO<br />
36. BASE PORTALAVABO CUBO<br />
38. MONTAGGIO PILETTA CON SIFONE<br />
SALVASPAZIO<br />
38. DRAINS FOR WALL-HUNG BASINS<br />
39. DRAWERS AND DEEP DRAWERS<br />
41. PUSH-PULL DEVICE (New type)<br />
41. TOP DRAWER WITH PUSH-PULL DEVICE<br />
42. BOTTOM DRAWER<br />
42. MOBILE COMPLANARE<br />
43. PULLOUT SLIDING DOORS<br />
45. SLIDING DOOR<br />
46. HINGES<br />
46. CONCEALED SUPPORT FOR SHELVES<br />
47. FOLDED PANELS WITH ACCESSORIES<br />
PRODUCT DATA SHEET<br />
48. VARIOUS PRODUCTS AND ACCESSORIES<br />
49. MATERIALS OF MODELS
LAVABO / WASHBASIN<br />
SQUARE 3<br />
259 229 60 230 60 12<br />
663<br />
187<br />
850<br />
121<br />
229<br />
525<br />
60<br />
850<br />
230<br />
60<br />
325<br />
150<br />
LAVABO INCASSO / RECESSED BASINS<br />
CORIAN<br />
3
I MATERIALI DI <strong>ARCOM</strong><br />
IL LEGNO<br />
I piani in essenza legno sono fra i più preziosi, quindi è necessario<br />
utilizzarli con una certa cura. Il legno è un materiale “vivo”, particolarmente<br />
sensibile al calore e all’umidità. Eventuali cambiamenti di<br />
colore nel tempo, dovuti alla luce, non rappresentano un difetto, ma<br />
al contrario sottolineano il fatto che si tratta di materiale naturale.<br />
Attenzione per la pulizia dei piani top in legno è sufficiente utilizzare<br />
un panno inumidito con comuni prodotti di pulizia per vetri (acqua e<br />
vetril) o acqua e sapone di Marsiglia, si raccomanda di asciugare<br />
eventuali gocce d’acqua nei top legno in quanto con il passare del<br />
tempo l’acqua stagnante penetra negli incavi derivati dalla spazzolatura<br />
e provoca il distacco della vernice a causa dell’aumento dell’umidità<br />
del legno.<br />
I LACCATI<br />
Le superfici laccate richiedono una manutenzione particolarmente<br />
attenta per evitare i graffi.<br />
Per la pulizia sono sufficienti prodotti per vetri o alcool diluito con<br />
molta acqua, asciugando subito con panni morbidi e non abrasivi.<br />
Non usare polveri abrasive.<br />
Non utilizzare prodotti eccessivamente aggressivi per la superficie<br />
laccata come ammoniaca o acetone.<br />
Evitare anche le cere per mobili e il contatto diretto con profumi o<br />
prodotti a base acida.<br />
IL MARMO<br />
Differenze di tonalità rispetto al campione, piccoli fori e venature più<br />
o meno marcate sono una caratteristica del marmo che conferma l’autentica<br />
natura del prodotto.<br />
I marmi e i graniti tendono ad assorbire attraverso le loro microscopiche<br />
porosità i liquidi per poi liberarli tramite evaporazione. Questa<br />
caratteristica li espone al rischio di assorbimento di sostanze che<br />
potrebbero macchiarli irrimediabilmente (smalti, cosmetici, profumi ed<br />
altre sostanze).<br />
Una buona e costante manutenzione, senza eccedere nell’uso di<br />
saponi o detergenti inadatti, conserva la brillantezza del marmo.<br />
È consigliabile proteggere le superfici del piano con l’utilizzo di un<br />
prodotto idrorepellente antimacchia.<br />
IL PORFIDO<br />
Il porfido è la roccia più resistente che venga estratta in Europa, di<br />
origine vulcanica presenta notevoli caratteristiche: ottima resistenza<br />
all’usura, agenti chimici, elevato carico di rottura a compressione.<br />
Arcom utilizza il porfido in tre spessori: 2-3-6 cm, nella lavorazione<br />
“filo lucido” e “spacco vivo” e solo per lo spessore 2 cm taglio a 45°.<br />
Arcom inoltre propone la superficie dei piani top in due finiture:<br />
- LEVIGATA FINE (superficie liscia);<br />
- SPAZZOLATA FIAMMATA (superficie bocciardata).<br />
4
I MATERIALI DI <strong>ARCOM</strong><br />
IL VETRO<br />
Arcom utilizza il vetro sia per la realizzazione di lavabi, sia per piani<br />
top da 1,5 e 1,9 cm di spessore (in 18 colori). I lavabi in vetro curvato<br />
vengono creati dalla fusione del vetro posato su di uno stampo ed inserito<br />
in forno. Una volta raffreddato il lavabo viene lavorato, squadrato,<br />
forato ed eventualmente anche sabbiato e verniciato. Da questa fusione<br />
otteniamo un vetro ad alta resistenza e qualità. Arcom utilizza per i suoi<br />
lavabi tre differenti tipologie di vetro. I lavabi modello Sfera vengono<br />
realizzati con vetro comune dove si può notare una costante riflessione<br />
verde-azzurra. Il lavabo Karma viene realizzato con vetro extrachiaro,<br />
un vetro completamente trasparente, dove, anche colorato non ha nessuna<br />
alterazione di colore. Il lavabo Sun viene realizzato con Vetro<br />
Freddo un materiale innovativo e composto da pigmenti vetrosi e resine,<br />
di facile pulizia, basta un panno o una spugna non abrasiva.<br />
ITALIANO<br />
IL CORIAN<br />
Corian è un materiale da costruzione fabbricato dall’uomo, resistente<br />
all’usura e solido. Esso è commercializzato da DuPont sotto forma di<br />
lastre e vasche (lavelli e lavabi da toilette). Corian è durevole, non<br />
poroso, di facile conservazione e riparabile, se danneggiato, nella<br />
maggior parte dei casi. Corian è fatto per durare: è una miscela<br />
composta da una resina acrilica, un minerale naturale e pigmenti.<br />
La sua superficie ha un aspetto opalescente estremamente gradevole<br />
all’occhio; compatto ed omogeneo in tutto il suo spessore; Corian non<br />
è permeabile dai liquidi e non si macchia; non ha e non cede odori.<br />
Corian supera la maggior parte dei tipici incidenti domestici e non è<br />
danneggiato dai prodotti chimici per la casa. In caso di “incidente”,<br />
eventuali piccoli tagli, graffi e macchie possono essere rimossi<br />
usando carta vetrata a grana fine e tamponi abrasivi Scotch-Brite.<br />
IL TEKNORIT<br />
Il Teknorit è un composto di resina, cariche minerali e pigmenti che<br />
assemblate creano un manufatto solido, non poroso, omogeneo,<br />
rinnovabile leggero e più resistente della pietra.<br />
Il Teknorit ha raggiunto ottimi risultati in 2 importanti prove di<br />
“resistenza”:<br />
1. resistenza alla macchia superiore ed estremamente importante sia<br />
per i prodotti utilizzati in cucina che nel bagno.<br />
2. resistenza allo shock termico, quindi alla rottura in caso di<br />
alternanza di sbalzi di temperatura (acqua calda/acqua fredda).<br />
La pulizia dei lavabi in Teknorit può essere effettuata con prodotti<br />
abrasivi in polvere, con scocht brite o con carta abrasiva sottile.<br />
5
I MATERIALI IMPIEGATI PER I LAVABI DA <strong>ARCOM</strong><br />
CERAMICA<br />
Lavabi in varie forme e dimensioni sono<br />
disponibili nella versione incasso sottopiano<br />
o soprapiano e nella versione “tutto fuori”.<br />
CORIAN<br />
Lavabi di forma quadrata o rettangolare<br />
disponibili nella versione incasso soprapiano<br />
o “tutto fuori”.<br />
MINERALGUSS<br />
Lavabo di forma quadrata disponibile nella<br />
versione “tutto fuori”.<br />
TEKNORIT<br />
Lavabi di varie forme, disponibile nella<br />
versione “tutto fuori”, incasso soprapiano o<br />
come semincasso.<br />
CERAMICA COLORATA<br />
Lavabo Ginko disponibile nella versione<br />
“tutto fuori” in ceramica colorata, nei<br />
seguenti colori: CHAMPAGNE e VISONE.<br />
VETRO<br />
Lavabi di forma rettangolare (mod. Karma<br />
bianco o nero) e di forma sferica (mod.<br />
Sfera satinato o trasparente). Disponibile<br />
nella versione soprapiano o “tutto fuori”.<br />
VETRO FREDDO<br />
Disponibile in 2 colori: arancio e cognac.<br />
6
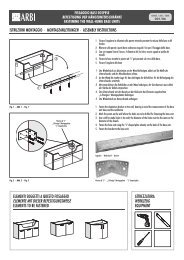
MONTAGGIO PIANI SP. 6 cm<br />
STAFFE<br />
4A<br />
SPINE<br />
ITALIANO<br />
2A<br />
3<br />
SPINE<br />
1A<br />
4B<br />
3 1B<br />
2B<br />
ISTRUZIONI MONTAGGIO<br />
Per l’assemblaggio dei piani top sp. 6 cm, seguire il<br />
seguente ordine:<br />
1) Eventuali elementi sospesi (1A) o inseriti tra due<br />
piani (1B);<br />
2) I piani top sp. 6 cm, sottostanti i vari elementi (2B)<br />
(fissaggio con staffe) o sovrastanti (2A) (senza<br />
staffe);<br />
3) Le gambe verticali, di unione tra i due piani (3)<br />
(unione con semplici spine);<br />
4) Il piano dove viene in seguito fissato il lavabo, và<br />
installato con staffe (4A) o in appoggio ad eventuali<br />
elementi sottostanti o a seconda dei vari casi sia, in<br />
appoggio che installato con una o più staffe (4B).<br />
ATTENZIONE! Prima di fissare definitivamente le<br />
staffe o i supporti, regolarli fino ad accertarsi della<br />
perpendicolarità dei vari elementi a parete.<br />
PULIZIA E MANUTENZIONE PIANI<br />
TOP IN LEGNO<br />
Il LEGNO è un materiale “vivo”, particolarmente<br />
sensibile al calore e all’umidità. Eventuali<br />
cambiamenti di colore nel tempo, dovuti alla luce,<br />
non rappresentano un difetto, ma al contrario<br />
sottolineano il fatto che si tratta di materiale naturale.<br />
ATTENZIONE! Per la pulizia dei piani top in legno è<br />
sufficiente utilizzare un panno inumidito con comuni<br />
prodotti di pulizia per vetri (acqua e vetril) o acqua e<br />
sapone di marsiglia (si raccomanda di asciugare<br />
eventuali gocce d’acqua nei top legno).<br />
NON UTILIZZARE prodotti abrasivi, acetone, cloro o<br />
diluenti; non passare cere o lucidi per mobili, che per<br />
il particolare trattamento protettivo eseguito non sono<br />
necessari e possono anzi danneggiare la vernice.<br />
PULIZIA E MANUTENZIONE PIANI<br />
TOP LACCATI<br />
Le SUPERFICI LACCATE richiedono una manutenzione<br />
particolarmente attenta per evitare i graffi della<br />
superficie.<br />
ATTENZIONE! Per la pulizia sono sufficienti prodotti<br />
per vetri o alcool diluito con molta acqua,<br />
asciugando subito con panni morbidi e non abrasivi.<br />
NON UTILIZZARE polveri abrasive, non utilizzare<br />
prodotti eccessivamente aggressivi per la superficie<br />
laccata come ammoniaca o acetone.<br />
Evitare anche le cere per mobili.<br />
7
SUPPORTO ATTACCAGLIA<br />
Viti passanti<br />
per bloccaggio.<br />
4 viti su ogni fianco.<br />
Coperchio copri attaccaglia da<br />
inserire a fine regolazione.<br />
Viti per regolare l’attaccaglia<br />
in altezza e profondità.<br />
Fissaggio a parete<br />
con tassello Ø 8 mm<br />
Fissaggio a parete con tassello Ø 6 mm<br />
Fissaggio mobile con viti autofilettanti.<br />
8
REGOLAZIONE ATTACCAGLIA<br />
(B) Vite per la regolazione angolare<br />
(A) Ingranaggio per la regolazione verticale<br />
ITALIANO<br />
VISTA DIETRO DEL PENSILE<br />
max 15°<br />
Movimento<br />
verticale<br />
18 mm<br />
Movimento<br />
angolare<br />
COME REGOLARE L’ATTACCAGLIA DALL’INTERNO PENSILE<br />
1) Aprire l’anta del pensile<br />
2) Togliere i 2 coprifori agli angoli in alto<br />
3) Munirsi di cacciavite a stella<br />
4) Con esso regolare l’altezza del pensile agendo sull’ingranaggio (A)<br />
5) Regolare il distacco dalla parete agendo sulla vite (B)<br />
9
MONTAGGIO FISSAGGIO TRAFILE (per lavabi sottopiano)<br />
2 trafile con 4 piolini (regolabili). Posizionare la trafila in modo obliquo rispetto alla<br />
base.<br />
Ruotare la trafila di alcuni gradi.<br />
Inserire la trafila nella apposita sede.<br />
Portare la trafila parallela al fianco.<br />
Regolare la distanza in base alla lunghezza del<br />
lavabo.<br />
Regolare i piolini fino all’appoggio del lavabo.<br />
10
MONTAGGIO FISSAGGIO LAVABO SOAP SEMINCASSO<br />
ITALIANO<br />
1 - Avvitare la barra filettata nella bussola presente<br />
nel lavabo.<br />
2 - Avvitare la vite “galletto” nella barra filettata<br />
sino a toccare il lavabo (vedi foto 3).<br />
3 - Vite “galletto” avvitata nella barra filettata. 4 - Avvitare la seconda vite “galletto” capovolta rispetto<br />
alla prima fino ad arrivare paralleli con il piano top.<br />
5 - Inserire la piattina. 6 - Avvitare la piattina con la vite nelle bussole presenti<br />
nei piani top.<br />
7 - Inserire la rondella nella barra filettata. 8 - Serrare il tutto con la vite “galletto”.<br />
11
BASE PORTALAVABO CUBO CON LAVABO CENTRALE<br />
Dado e rondella<br />
per bloccaggio.<br />
Vite TSP+ metrica<br />
Rondella distanziale per lavabo, da<br />
inserire tra il fianco ed il lavabo.<br />
Il <strong>mont</strong>aggio di questa rondella è<br />
importante in quanto evita che il<br />
cassetto, in apertura, tocchi il<br />
lavabo.<br />
Nel caso ci fossero difficoltà<br />
nell’inserimento del lavabo,<br />
rimuovere le rondelle, e centrare il<br />
lavabo avvitando o svitando i bulloni<br />
di bloccaggio, come mostrato in<br />
figura.<br />
12
BASE PORTALAVABO CUBO<br />
ITALIANO<br />
Piedino di regolazione<br />
per l’inclinazione del<br />
lavabo.<br />
Dado e rondella<br />
per bloccaggio.<br />
Rondella distanziale<br />
per lavabo.<br />
Vite TSP +<br />
metrica.<br />
Il <strong>mont</strong>aggio di questa rondella<br />
è importante in quanto evita<br />
che il cassetto, in apertura,<br />
tocchi il lavabo.<br />
13
MONTAGGIO PILETTA CON SIFONE SALVASPAZIO<br />
PER LAVABO “SOAP” SEMINCASSO<br />
2<br />
1<br />
N.B.: installare la piletta<br />
senza la relativa sottopiletta.<br />
3<br />
1 Piletta<br />
2 Sottopiletta<br />
3 Sifone Salvaspazio<br />
SCARICHI PER LAVABO SOSPESO (Senza troppo pieno)<br />
AC 360<br />
Ø46,5<br />
21<br />
AC 379 (H 160 MM)<br />
AC 329 (H 175 MM)<br />
AC 319 (H 100 MM)<br />
Ø62<br />
AC 351 (H 15 MM)<br />
AC 352 (H 25 MM)<br />
AC 353 (H 35 MM)<br />
AC 354 (H 45 MM)<br />
14
CASSETTI E CASSETTONI<br />
Montaggio, s<strong>mont</strong>aggio e regolazione<br />
Bloccaggio del cassetto<br />
Regolazione verticale<br />
ITALIANO<br />
+ 2,5 mm<br />
Cassetto in legno (estrazione parziale)<br />
Sistema di fissaggio<br />
Cassetto in legno (estrazione parziale)<br />
Sistema regolazione cassetto<br />
TANDEMBOX / INTRABOX<br />
Montaggio frontale<br />
Regolazione verticale<br />
±2 mm<br />
Cassettone<br />
Regolazione laterale<br />
1 mm verso destra<br />
1 mm verso sinistra<br />
2<br />
1<br />
1<br />
2<br />
15
CASSETTI E CASSETTONI<br />
Montaggio, s<strong>mont</strong>aggio e regolazione<br />
TANDEMBOX / INTRABOX - Cassettone<br />
Montaggio ringhierine<br />
1 3<br />
2<br />
S<strong>mont</strong>aggio ringhierine<br />
dietro<br />
1<br />
Regolazione<br />
dell’inclinazione<br />
3<br />
davanti<br />
1. Inserire la ringhierina<br />
2. Sollevare posteriormente la ringhierina<br />
3. Incastrare la ringhierina sulla schienale<br />
2<br />
1. Staccare la ringhierina dallo schienale<br />
2. Ridurre l’espansione della bussola<br />
3. Estrarre la bussola<br />
TANDEMBOX / INTRABOX - Cassetto interno<br />
Montaggio del frontale<br />
S<strong>mont</strong>aggio del frontale<br />
1<br />
3<br />
2<br />
1<br />
2<br />
1. Inserire nel frontale i<br />
relativi attacchi<br />
2. Avvitare la vite<br />
3. Incastrare gli attacchi<br />
nelle spondine del<br />
cassetto<br />
16
CRICCHETTO (Tipo nuovo)<br />
Schema di <strong>mont</strong>aggio<br />
Vista frontale<br />
Sezione laterale<br />
ITALIANO<br />
Tappini di<br />
tamponamento<br />
Retro<br />
Guida<br />
Guida<br />
Sezione in pianta<br />
Svitando la testa<br />
del cricchetto si<br />
regola la battuta<br />
dell’anta.<br />
1. Barra in alluminio<br />
2. Cricchetto<br />
3. Supporto di fissaggio per cricchetto<br />
CASSETTO SUPERIORE CON CRICCHETTO<br />
Schema di <strong>mont</strong>aggio<br />
Vista retro<br />
Vista laterale<br />
1. Cricchetto<br />
2. Supporto di fissaggio per cricchetto<br />
Guida<br />
Guida<br />
Vista dal basso<br />
Svitando la testa<br />
del cricchetto si<br />
regola la battuta<br />
dell’anta.<br />
Guida<br />
17
CASSETTO INFERIORE<br />
Schema di <strong>mont</strong>aggio<br />
Vista retro<br />
Vista laterale<br />
Guida<br />
Guida<br />
Vista dal basso<br />
Guida<br />
MOBILE COMPLANARE<br />
Regolazione fondo<br />
Per una corretta apertura delle<br />
ante, è necessario che il<br />
mobile sia perfettamente a<br />
squadra.<br />
Una volta terminato il<br />
<strong>mont</strong>aggio, livellare il fondo<br />
del mobile con gli appositi<br />
piedini regolabili, in modo<br />
che sia perfettamente a bolla.<br />
Sollevare i tappi<br />
copriforo e riporli una<br />
volta regolati i piedini<br />
Regolare l’altezza del piedino<br />
avvitando o svitando la vite.<br />
SI<br />
NO<br />
18
ANTA COMPLANARE<br />
Regolazioni orizzontali<br />
Regolare l’aria di mm 4 tra le ante (vedi fig. 1)<br />
agendo con la chiave esagonale da mm 3 in<br />
dotazione, nell’impronta di sinistra (vedi fig. 2).<br />
ITALIANO<br />
fig. 2<br />
fig. 1<br />
Regolazioni verticali<br />
IMPORTANTE<br />
Aprire con cura la prima anta, facendola scorrere<br />
fino a fine corsa (vedi fig. 3) e metterla in bolla<br />
agendo sui regolatori verticali con la chiave<br />
esagonale da mm 3 in dotazione, nell’impronta di<br />
destra (vedi fig. 5).<br />
Allo stesso modo, regolare la posizione in altezza<br />
rispetto alla struttura (vedi fig. 4). Ripetere le<br />
operazioni anche sulla seconda anta.<br />
fig. 5<br />
fig. 3<br />
fig. 4<br />
Verificare che l’aria tra le ante risulti parallela.<br />
In caso contrario, AD ANTE CHIUSE, agire sui<br />
regolatori verticali (vedi fig. 5).<br />
19
ANTA COMPLANARE<br />
Regolazioni delle ante in prodondità<br />
Per allineare le ante in profondità (vedi fig. 6),<br />
agire sulla staffa superiore, fissata sull’anta, nel<br />
seguente modo:<br />
A) allentare le due viti di fissaggio della piastra<br />
orizzontale con un cacciavite a stella (vedi fig. 7)<br />
Nel caso in cui, terminate le regolazioni<br />
precedentemente elencate, la rotellina della staffa<br />
superiore non si trovi completamente all’interno della<br />
guida (vedi fig. 9), agire, con la chiave esagonale<br />
da mm 3, sul suo perno regolabile (vedi fig. 10).<br />
B) con chiave esagonale da mm 3 agire<br />
sull’eccentrico modificando la posizione in<br />
profondità della piastra orizzontale (vedi fig. 8)<br />
C) chiudere le viti allentate al punto A.<br />
fig. 9<br />
posizione non corretta della<br />
rotellina nella guida<br />
fig. 6<br />
fig. 10<br />
posizione corretta della rotellina<br />
nella guida<br />
fig. 7<br />
fig. 8<br />
20
ANTA SCORREVOLE<br />
ATTENZIONE!<br />
Prima di effettuare il <strong>mont</strong>aggio del mobile scorrevole sbloccare le ante svitando il<br />
perno (1) e portandolo dalla posizione A alla posizione B (7 mm) per mezzo della<br />
brugola (2) diametro 2 mm in dotazione.<br />
ITALIANO<br />
VISTA DALL’ALTO<br />
Schema di <strong>mont</strong>aggio<br />
4<br />
3<br />
La regolazione dell’anta in altezza si ottiene<br />
SVITANDO (salita anta) o AVVITANDO<br />
(discesa anta) la vite a brugola.<br />
La regolazione dell’anta nella parte frontale<br />
si ottiene SVITANDO i fermi per pattino e<br />
facendoli scorrere lungo il binario.<br />
Avvitando<br />
Svitando<br />
1. Binario superiore<br />
2. Pattino superiore<br />
3. Fermi per pattino<br />
4. Vite a brugola<br />
VISTA DALL’ALTO<br />
21
CERNIERE (Salice - Serie 900)<br />
Montaggio tradizionale con basi Serie 200<br />
1 2<br />
CLICK<br />
Inserire la cerniera sulla base.Posizionamento con<br />
fine corsa prestabilito.<br />
Serrare la vite di fissaggio.<br />
3 4<br />
L 0,7<br />
A <strong>mont</strong>aggio terminato tra anta e fianco vi è una<br />
“L” di 0,7 mm.<br />
Aggancio di sicurezza.<br />
SUPPORTO A SCOMPARSA PER MENSOLE<br />
Vite di regolazione<br />
bolla<br />
22
PARETE ATTREZZATA IN FOLDING<br />
Schema di <strong>mont</strong>aggio<br />
B<br />
• Fissare la guida A al muro con le apposite viti e<br />
fischer in confezione.<br />
• Avvicinare la parete in folding al muro e farla<br />
scendere in modo che la guida B predisposta nella<br />
parete si agganci alla guida A fissata<br />
precedentemente al muro.<br />
ITALIANO<br />
A<br />
Attenzione! Lungo lo spessore della parete attrezzata<br />
sono predisposti dei fori per l’inserimento delle spine<br />
per una miglior tenuta.<br />
Parete della stanza<br />
Attenzione! L’ultimo pannello in alto se lo spazio in<br />
altezza del soffitto non permette lo scorrimento può<br />
essere fissato solo con le spine.<br />
Fori per spine<br />
RETRO PARETE<br />
Guida A<br />
Guida B<br />
Foro per fissare la<br />
guida A al muro<br />
Fissare la guida A e tenere un<br />
lasco di 5 mm tra la guida e lo<br />
spessore interno della parete<br />
attrezzata.<br />
23
SCHEDA<br />
PRODOTTO<br />
Nota realizzata a tutela dell’acquirente in base alla legge 126 del 10.04.91 “Norme per l’informazione<br />
del consumatore” e al decreto n° 101 del 08.02.97 “Regolamento di attuazione”, da<br />
apporre al prodotto esposto in modo ben visibile e consegnare unitamente alla merce venduta.<br />
SCOCCA<br />
Pannelli di particelle di legno 18 mm classe E1 ( * ) ,<br />
parte interna del mobile nobilitata in varie tinte e finiture,<br />
la parte esterna può essere impiallacciata in<br />
varie essenze oppure laccata nei vari colori opachi<br />
o lucidi in base al nostro campionario.<br />
Bordi assolutamente atossici in ABS o in legno verniciato.<br />
Schiena sp. 3 mm in MDF classe E1 ( * ) nobilitato<br />
nella parte interna con varie finiture.<br />
RIPIANI<br />
Sono realizzati in cristallo sp. 6 mm.<br />
PARACOLPI<br />
Sull’anta vengono inseriti dei paracolpi in materiale<br />
plastico atossico con inserti in gomma per ammortizzare<br />
la chiusura delle ante.<br />
PIANO LAVABO<br />
Disponibile nei materiali marmo, marmo tecnico o<br />
pietre naturali con spessore 20 o 30 mm con trattamento<br />
antimacchia (da ripetere periodicamente per<br />
un buon mantenimento del piano); in legno listellare<br />
o multistrato marino sp. 60, 18 oppure 12 mm<br />
impiallacciato e tinto in varie finiture (come indicato<br />
a listino); in pannello agglomerato di particelle di<br />
legno in classe E1 con trattamento idrorepellente<br />
V100 sp. 30 o 60 mm placcato in laminato finitura<br />
legno o laccato nei vari colori opachi o lucidi; piani<br />
in cristallo sp. 15 o 19 mm nei colori a listino;<br />
in mineralguss o ceramica con lavabo integrato; in<br />
porfido con spessore 3-6 cm nelle lavorazioni “filo<br />
lucido” e “spacco vivo”.<br />
CORNICI<br />
Sono realizzate, a seconda del modello, in massello<br />
di abete o MDF in classe E1 ( * ) impiallacciato con<br />
essenze in tonalità alla finitura delle ante.<br />
ZOCCOLI<br />
Sono realizzati in MDF in classe E1 impiallacciati<br />
nelle varie finiture delle ante oppure laccato lucido o<br />
opaco nelle varie finiture a listino.<br />
INTERNI CASSETTI<br />
A seconda dell’articolo possono essere di due tipi:<br />
1) internamente in multistrato di betulla con guida<br />
metallica applicata lateralmente;<br />
2) con sponde laterali in metallo con guida incorporata<br />
(a scorrimento interno invisibile) ad estrazione<br />
totale e con fondo in agglomerato di particelle<br />
di legno classe E1 ( * ) con finitura melaminica grigia.<br />
CERNIERE<br />
Testate per oltre 200.000 aperture secondo le normative<br />
CTBA-LGA, sono realizzate in zama e sono<br />
registrabili su tre assi mediante apposite viti in cui<br />
agire con un semplice cacciavite.<br />
ATTACCAGLIE<br />
Sono regolabili in altezza e profondità.<br />
SPECCHIERE<br />
A seconda dell’articolo possono essere con cornici in<br />
acciaio inox, legno impiallacciato o laccato in varie<br />
finiture opache o lucide, in abs colore legno oppure<br />
laccate opache o lucide in basse alle finiture del listino.<br />
Gli specchi sono sp. 4 mm tipo MNG. Le schiene<br />
sono in agglomerato di particelle di legno in classe<br />
E1 ( * ) sp. 18 o 16 mm con finitura melaminica bianca.<br />
PARTI ELETTRICHE E FARETTI<br />
Sono tutte a normativa CE e relative norme elettriche.<br />
PIEDINI<br />
Possono essere realizzati in legno con finitura ad<br />
effetto noce antico, materiale plastico ad alta resistenza<br />
con sistema di regolazione per il livellamento<br />
degli elementi oppure in alluminio con inserto d’appoggio<br />
in plastica ad alta resistenza.<br />
LAVABI<br />
Possono essere realizzati in cinque materiali differenti:<br />
1) ceramica (mat. naturale)<br />
2) corian (resina composta)<br />
3) mineralguss (resina composta)<br />
4) teknorit (resina composta)<br />
5) vetro (trasparente o colorato)<br />
6) vetro freddo (resina poliestere e pigmenti vetrosi)<br />
RUBINETTI E SIFONI<br />
Vedi scheda allegata direttamente su ogni singolo<br />
modello.<br />
ACCESSORI<br />
Possono essere in legno in varie finiture a seconda<br />
del modello, in metallo con finitura cromata oppure<br />
ad effetto oro; in acciaio inox con particolari in vetro<br />
oppure teknorit.<br />
ECOLOGIA<br />
Alla fine della sua utilizzazione non disperdere il<br />
mobile nell’ambiente, ma chiamare l’Azienda Comunale<br />
di smaltimento rifiuti solidi urbani per il trasporto<br />
in discarica o recupero.<br />
PROVATO DA:<br />
Campioni rappresentativi di piani Arcom in listellare<br />
impiallacciato da 6,2 cm sono stati testati dal CATAS.<br />
Le prove applicate hanno constatato la resistenza<br />
alle macchie (EN 12720/97), al rigonfiamento<br />
dopo 24 ore di immersione in acqua (EN 317/93),<br />
all’adesione all’umido (prENV927-8/N343) e la<br />
resistenza dei bordi all’acqua (UNI 10460/95) con<br />
buoni risultati.<br />
( * ) A bassa emissione di formaldeide 24<br />
REV. 00/05/05
SCHEDA MODELLI<br />
MODELLO SCOCCA FRONTALE VARIANTE FRONTALE<br />
POLLOCK<br />
CILIEGIO<br />
ROVERE SCURO E CHIARO<br />
In truciolare (idrofugo V100)<br />
impiallacciato ciliegio,<br />
rovere scuro o rovere chiaro.<br />
In truciolare premassellato<br />
impiallacciato ciliegio,<br />
rovere scuro o rovere chiaro.<br />
Vetro satinato.<br />
In MDF poliesterato e<br />
laccato colorato opaco o<br />
lucido in varie tonalità.<br />
ITALIANO<br />
BIANCO OPACO<br />
O LUCIDO<br />
In truciolare (idrofugo V100)<br />
nobilitato e laccato bianco<br />
opaco o bianco lucido.<br />
In MDF poliesterato e<br />
laccato bianco opaco o<br />
bianco lucido.<br />
Vetro satinato.<br />
In MDF poliesterato e<br />
laccato colorato opaco o<br />
lucido in varie tonalità.<br />
COLORATO OPACO<br />
O LUCIDO<br />
In truciolare (idrofugo V100)<br />
nobilitato e laccato colorato<br />
opaco o lucido in varie<br />
tonalità.<br />
In MDF poliesterato e<br />
laccato colorato opaco o<br />
lucido in varie tonalità.<br />
Vetro satinato.<br />
GOYA<br />
CILIEGIO<br />
ROVERE SCURO E CHIARO<br />
In truciolare (idrofugo V100)<br />
impiallacciato ciliegio,<br />
rovere scuro o rovere chiaro.<br />
In truciolare premassellato<br />
impiallacciato ciliegio,<br />
rovere scuro o rovere chiaro.<br />
Vetro satinato.<br />
In MDF poliesterato e<br />
laccato colorato opaco o<br />
lucido in varie tonalità.<br />
BIANCO OPACO<br />
O LUCIDO<br />
In truciolare (idrofugo V100)<br />
nobilitato e laccato bianco<br />
opaco o bianco lucido.<br />
In MDF poliesterato e<br />
laccato bianco opaco o<br />
bianco lucido.<br />
Vetro satinato.<br />
In MDF poliesterato e<br />
laccato colorato opaco o<br />
lucido in varie tonalità.<br />
COLORATO OPACO<br />
O LUCIDO<br />
In truciolare (idrofugo V100)<br />
nobilitato e laccato colorato<br />
opaco o lucido in varie<br />
tonalità.<br />
In MDF poliesterato e<br />
laccato colorato opaco o<br />
lucido in varie tonalità.<br />
Vetro satinato.<br />
DE CHIRICO<br />
BIANCO OPACO<br />
O LUCIDO<br />
In truciolare (idrofugo V100)<br />
nobilitato e laccato bianco<br />
opaco o bianco lucido.<br />
In MDF poliesterato e<br />
laccato bianco opaco o<br />
bianco lucido.<br />
Vetro satinato.<br />
In MDF poliesterato e<br />
laccato colorato opaco o<br />
lucido in varie tonalità.<br />
COLORATO OPACO<br />
O LUCIDO<br />
In truciolare (idrofugo V100)<br />
nobilitato e laccato colorato<br />
opaco o lucido in varie<br />
tonalità.<br />
In MDF poliesterato e<br />
laccato colorato opaco o<br />
lucido in varie tonalità.<br />
Vetro satinato.<br />
CEZANNE<br />
BIANCO OPACO<br />
In truciolare (idrofugo V100)<br />
nobilitato e laccato bianco<br />
opaco o impiallacciato<br />
ciliegio.<br />
In MDF poliesterato e<br />
laccato bianco opaco.<br />
Vetro satinato.<br />
In MDF poliesterato laccato<br />
colorato opaco in varie<br />
tonalità.<br />
Vetro satinato.<br />
CILIEGIO<br />
O COLORATO OPACO<br />
In truciolare (idrofugo V100)<br />
nobilitato e laccato colorato<br />
opaco in varie tonalità o<br />
impiallacciato ciliegio.<br />
Ante telaio in legno massello<br />
ed il pannello interno impiall.<br />
ciliegio o in MDF poliesterato<br />
e laccato colorato opaco in<br />
varie tonalità. Vetro satinato.<br />
25
SCHEDA MODELLI<br />
MODELLO SCOCCA FRONTALE VARIANTE FRONTALE<br />
DALÌ<br />
NOCE ARTE POVERA<br />
In truciolare (idrofugo V100)<br />
impiallacciato noce “arte<br />
povera”, i fianchi sagomati<br />
sono in legno massello con<br />
finitura noce.<br />
Anta e telaio in legno<br />
massello con finitura noce.<br />
Vetro anticato con particolari<br />
colorati rilegato al piombo<br />
con finitura bronzata.<br />
N.B.: Nel modello DALÌ le<br />
specchiere, i pensili e le<br />
colonne sono di serie complete<br />
di cornice-cappello. (Altezza<br />
totale composizione H 202).<br />
KARMA<br />
LARICE MONOCOLORE<br />
In truciolare (idrofugo V100)<br />
impiallacciato in larice<br />
spazzolato monocolore<br />
in varie tonalità.<br />
In truciolare premassellato<br />
impiallacciato larice<br />
spazzolato monocolore<br />
in varie tonalità.<br />
Vetro satinato.<br />
Di serie ante e cassetti con<br />
apertura “push-pull”.<br />
LARICE BICOLORE In truciolare (idrofugo V100)<br />
impiallacciato in larice<br />
spazzolato bicolore<br />
in varie tonalità.<br />
In truciolare premassellato<br />
impiallacciato larice<br />
spazzolato bicolore<br />
in varie tonalità.<br />
Vetro satinato.<br />
Di serie ante e cassetti con<br />
apertura “push-pull”.<br />
RUSH<br />
ZEBRANO COLORE<br />
In truciolare (idrofugo V100)<br />
impiallacciato zebrano<br />
colore.<br />
In truciolare premassellato<br />
impiallacciato zebrano<br />
colore in varie tonalità.<br />
Vetro satinato.<br />
LA FENICE<br />
BIANCO OPACO<br />
O LUCIDO<br />
COLORATO OPACO<br />
O LUCIDO<br />
In truciolare (idrofugo V100)<br />
nobilitato e laccato bianco<br />
opaco, bianco lucido.<br />
In truciolare (idrofugo V100)<br />
nobilitato e laccato colorato<br />
opaco o lucido in varie<br />
tonalità.<br />
In Mdf poliesterato e laccato<br />
bianco opaco o bianco<br />
lucido.<br />
In Mdf poliesterato e laccato<br />
colorato opaco o lucido in<br />
varie tonalità.<br />
NOCE CANALETTO In truciolare (idrofugo V100)<br />
impiallacciato noce<br />
canaletto.<br />
In truciolare premassellato e<br />
impiallacciato noce<br />
canaletto.<br />
ESCAPE<br />
BIANCO OPACO<br />
O LUCIDO<br />
In truciolare (idrofugo V100)<br />
nobilitato e laccato bianco<br />
opaco, bianco lucido.<br />
In Mdf poliesterato e laccato<br />
bianco opaco o bianco<br />
lucido.<br />
COLORATO OPACO<br />
O LUCIDO<br />
ROVERE NERO, ROVERE<br />
BIANCO O NOCCIOLA<br />
In truciolare (idrofugo V100)<br />
nobilitato e laccato colorato<br />
opaco o lucido in varie<br />
tonalità.<br />
In truciolare (idrofugo V100)<br />
impiallacciato rovere<br />
bianco, rovere nero o<br />
nocciola.<br />
In Mdf poliesterato e laccato<br />
colorato opaco o lucido in<br />
varie tonalità.<br />
In truciolare premassellato e<br />
impiallacciato rovere nero,<br />
rovere bianco o nocciola.<br />
26
ANNOTAZIONI<br />
ITALIANO<br />
27
<strong>ARCOM</strong>’S MATERIALS<br />
WOOD<br />
Solid wood tops are amongst the most precious and this is why they<br />
must be used with a certain care.<br />
Wood is a “live” material and is particularly sensitive to heat and<br />
humidity. Any changes in colour in the course of time due to sunlight<br />
must not be considered as a defect, rather a confirmation of the fact<br />
that it is a natural product. Attention: to clean wooden tops it is<br />
sufficient to use a cloth dampened in common glass cleaning products<br />
(water and a commercial glass cleaner) or water and neutral soap. It<br />
is important to dry any drops of water from wooden tops because, in<br />
the course of time, stagnating water penetrates the grooves of the<br />
brushed finish and causes the varnish to come away due to an<br />
increase in the humidity of the wood.<br />
LACQUERS<br />
Lacquered surfaces require particularly careful maintenance to avoid<br />
scratching them.<br />
For cleaning purposes, simply use glass cleaning products or alcohol<br />
diluted in lots of water and dry immediately with a soft, non-abrasive<br />
cloth.<br />
Do not use abrasive powders.<br />
Do not use excessively aggressive products such as ammonia or<br />
acetone for lacquered surfaces.<br />
Also avoid using furniture polish and direct contact with perfumes or<br />
acid-based products.<br />
MARBLE<br />
Differences in shade compared to the sample and small holes and<br />
veins that differ in intensity are special features of marble and confirm<br />
the authentic nature of the product.<br />
Marble and granite have the tendency of absrbing liquids through<br />
their microscopic pores and then releasing them through evaporation.<br />
This characteristic means that they may absorb substances that could<br />
irreparably stain them (varnishes, cosmetics, perfumes and the like).<br />
Good and constant maintenance, without the excessive use of<br />
unsuitable soaps or detergents, conserve the shine of marble.<br />
We suggest you protect the surfaces of the top by using a waterrepellent<br />
stain-resistant product.<br />
PORPHYRY<br />
Porphyry is the most resistant rock extracted in Europe. It is of<br />
volcanic origin and has excellent characteristics: it is highly resistant<br />
to wear and tear and chemical agents, and has a high compressionbreaking<br />
load. Arcom uses porphyry in three thicknesses: 2-3-6 cm,<br />
with “straight edge” or “split face” finishes and, only for 2 cm thick<br />
slabs, cut at 45°.<br />
Furthermore, Arcom offers top surfaces in two finishes:<br />
- FINE HONED (smooth surface);<br />
- BRUSHED AND FLAMED (bushhammered surface).<br />
28
<strong>ARCOM</strong>’S MATERIALS<br />
GLASS<br />
Arcom uses glass both for its washbasins and for its 1.5 and 1.9 cm thick<br />
tops (in 18 colours). The curved glass basins are made by melting the glass<br />
and pouring it into a mould that is then put into a kiln. Once it has cooled,<br />
the basin is worked, squared, drilled and, if necessary, sandblasted and<br />
varnished. This process results in glass that has an excellent resistance and<br />
quality. Arcom uses two different types of glass for its basins. The Sfera model<br />
basins are made from lime glass which has a constant greeny blue sheen. The<br />
Karma basin is made from extra-clear glass, a completely transparent glass<br />
that, even when coloured, has not colour alteration. The Sun basin is made<br />
from “Vetro Freddo” an innovative material, comprising glass pigments and<br />
resins, which is easy to clean with a cloth or non-abrasive sponge.<br />
CORIAN<br />
Corian is a man-made building material that is resistant to wear and<br />
sturdy. It is marketed by DuPont in the form of slabs and bowls (sinks and<br />
washbasins). Corian is long-lasting, non-porous and easy to look after<br />
and repair, in most cases, if damaged. Corian is made to last: it is a<br />
mixture of acrylic resin, a natural mineral and pigments. Its<br />
surface has a very pleasant opal appearance and is compact and even<br />
throughout. Corian is not permeable to liquids and does not stain. It is<br />
odourless and cannot transmit odours. Corian resists to most typical<br />
household accidents and cannot be damaged by chemical household<br />
products. In the case of an “accident”, small cuts, scratches and stains<br />
can be removed using fine-grain sanding paper and Scotch-Brite pads.<br />
TEKNORIT<br />
Teknorit is a composite material consisting in resins, mineral particles<br />
and pigments that blended create a sturdy, non-porous, even,<br />
renewable and lightweight product that is more resistant than stone.<br />
Teknorit has reached excellent results in 2 important resistant tests:<br />
1. excellent stain-resistance that is very important both for kitchen and<br />
bathroom products.<br />
2. it is resistant to thermal shock, i.e. it does not crack in case of<br />
alternating temperatures (cold/hot water).<br />
Teknorit washbasins can be cleaned using abrasive powder products,<br />
scotch-brite or fine-grain sanding paper.<br />
ENGLISH<br />
29
MATERIALS USED BY <strong>ARCOM</strong> FOR THEIR WASHBASINS<br />
CERAMIC<br />
Washbasins in various shapes and sizes are<br />
available in the recessed undercounter or<br />
overcounter versions as well as the “tutto<br />
fuori” version.<br />
CORIAN<br />
Square or rectangular shaped washbasins<br />
available in the recessed overcounter or<br />
“tutto fuori” version.<br />
MINERALGUSS<br />
Square shaped washbasin available in the<br />
“tutto fuori” version.<br />
TEKNORIT<br />
Washbasins of various shapes, available in<br />
the “tutto fuori”, recessed overcounter or<br />
semi-recessed versions.<br />
COLOURED CERAMIC<br />
“Ginko” washbasin available in coloured<br />
ceramic in the “tutto fuori” version in the following<br />
colours: CHAMPAGNE and MINK.<br />
GLASS<br />
Rectangular shaped (mod. Karma white or<br />
black) and round shaped (mod. Sfera satin or<br />
transparent) washbasins. Available in the<br />
overcounter or “tutto fuori” version.<br />
VETRO FREDDO<br />
Available in 2 colours: Orrange or Cognac.<br />
30
ASSEMBLING 6cm THICK TOPS<br />
4A<br />
BRACKETS<br />
PIN<br />
2A<br />
3<br />
PIN<br />
1A<br />
4B<br />
3 1B<br />
2B<br />
ASSEMBLY INSTRUCTIONS<br />
To assemble the 6 cm thick tops, please proceed in<br />
the following order:<br />
1) Any wall-hung elements (1A) or those inserted<br />
between the two tops (1B);<br />
2) The 6cm thick tops, below the different elements<br />
(2B) (fasten with brackets), or above (2A) (without<br />
brackets);<br />
3) The vertical legs, connecting the two tops (3)<br />
(simple pin connection);<br />
4) The top the washbasin is to be inserted in, must be<br />
installed with brackets (4A); it must be placed on any<br />
underlying elements or, depending on the case, it must be<br />
fitted on and installed using one or more brackets (4B).<br />
WARNING! Before permanently fastening the<br />
brackets or supports, adjust them to check that all the<br />
wall-hung elements are perpendicular to the wall.<br />
CLEANING AND LOOKING AFTER<br />
WOODEN TOPS<br />
WOOD is a “live” material and is particularly<br />
sensitive to heat and humidity. Any change in colour<br />
in the course of time, due to sunlight, must not be<br />
considered a defect, rather a confirmation of the fact<br />
that it is a natural material.<br />
WARNING! To clean wooden tops, simply use a cloth<br />
moistened with normal cleaning products for glass<br />
(water and Vetril) or water and Marseille laundry<br />
soap (it is advisable to dry any drops of water on<br />
wooden tops).<br />
DO NOT USE abrasive products, acetone, chlorine or<br />
solvents; do not use furniture wax or polish, as the<br />
tops do not require any special protective treatment,<br />
which might damage the varnish.<br />
CLEANING AND LOOKING AFTER<br />
LACQUERED TOPS<br />
LACQUERED SURFACES require particularly careful<br />
maintenance to avoid scratches.<br />
WARNING! For cleaning purposes, simply use<br />
cleaning products for glass or alcohol diluted in<br />
plenty of water, and dry immediately with a soft nonabrasive<br />
cloth.<br />
DO NOT USE abrasive powders, or excessively<br />
aggressive products, such as ammonia or acetone,<br />
on lacquered surfaces.<br />
Furniture wax must also be avoided.<br />
ENGLISH<br />
31
FIXING SUPPORT<br />
Through screws<br />
for anchoring.<br />
4 screws on each side panel<br />
Fixings cover cap to be<br />
inserted after adjusting<br />
Screws for adjusting fixings<br />
in height and depth<br />
Fastening to the wall<br />
using a dowel Ø 8 mm<br />
Fastening to the wall using a dowel Ø 6 mm<br />
Fastening the unit using self-tapping screws<br />
32
ADJUSTING THE FIXING<br />
(B) Screw for angle adjustment<br />
(A) Gear for vertical adjustment<br />
VIEW BEHIND THE WALL UNIT<br />
max 15°<br />
Vertical<br />
movement<br />
18 mm<br />
Angle<br />
movement<br />
ENGLISH<br />
HOW TO ADJUST THE FIXING FROM INSIDE THE WALL UNIT<br />
1) Open the wall unit door<br />
2) Remove the 2 hole caps from the top corners<br />
3) Take a cross head screwdriver<br />
4) Use it to adjust the height of the wall unit, using the gear (A)<br />
5) Adjust the distance from the wall using the screw (B)<br />
33
ASSEMBLING AND FIXING THE SUPPORT BARS (for undercounter washbasins)<br />
2 support bars with 4 pins (adjustable). Position the support bar diagonally across the base<br />
unit.<br />
Turn the support bar a few degrees.<br />
Insert the support bar into its place.<br />
Bring the support bar parallel with the side panel.<br />
Adjust the distance according to the length of the<br />
washbasin.<br />
Adjust the pins until the washbasin is resting on it.<br />
34
ASSEMBLING AND FIXING THE “SOAP” SEMI-RECESSED WASHBASIN<br />
1 - Tighten the threaded bar on the bush on the<br />
washbasin.<br />
2 - Tighten the wing nut on the threaded bar until it<br />
touches the washbasin (see photo 3).<br />
3 - The wing nut tightened on the threaded bar. 4 - Tighten the second wing nut, facing the opposite<br />
direction to the first, until it is parallel with the top.<br />
ENGLISH<br />
5 - Insert the plate. 6 - Tighten the plate using the screw on the bush on<br />
the tops.<br />
7 - Insert the washer into the threaded bar. 8 - Tighten it all with the wing nut.<br />
35
“CUBO” WASHBASIN UNIT WITH CENTRAL WASHBASIN<br />
Nut and washer<br />
for anchoring.<br />
Countersunk flat head<br />
screw + metric adjustment<br />
Spacer washer for washbasin, to be<br />
inserted between the side panel and<br />
the washbasin.<br />
When attaching this washer, it is<br />
important to ensure that the drawer<br />
does not touch the washbasin when<br />
opened.<br />
If there should be any difficulty with<br />
inserting the washbasin, remove the<br />
washers and centre the washbasin by<br />
tightening or<br />
loosening the anchor bolts, as shown<br />
in the diagram.<br />
36
“CUBO” WASHBASIN UNIT<br />
ENGLISH<br />
Adjustment foot for<br />
adjusting the<br />
washbasin angle.<br />
Nut and washer<br />
for anchoring.<br />
Spacer washer for<br />
washbasin.<br />
Countersunk flat<br />
head screw +<br />
metric adjustment.<br />
When attaching this washer, it<br />
is important to ensure that the<br />
drawer does not touch the<br />
washbasin when opened.<br />
37
ASSEMBLING THE WASTE WITH SPACE-SAVER TRAP<br />
FOR “SOAP” SEMI-RECESSED WASHBASIN<br />
2<br />
1<br />
N.B. Fit the waste<br />
without the kit.<br />
3<br />
1 Waste<br />
2 Waste kit<br />
3 Space-saver trap<br />
DRAINS FOR WALL-HUNG BASIN (Without overflow)<br />
AC 360<br />
Ø46,5<br />
21<br />
AC 379 (H 160 MM)<br />
AC 329 (H 175 MM)<br />
AC 319 (H 100 MM)<br />
Ø62<br />
AC 351 (H 15 MM)<br />
AC 352 (H 25 MM)<br />
AC 353 (H 35 MM)<br />
AC 354 (H 45 MM)<br />
38
DRAWERS AND DEEP DRAWERS<br />
Assembling, dismantling and adjusting<br />
Drawer blocking system<br />
Vertical adjustment<br />
+ 2,5 mm<br />
Wooden drawer (partial extension)<br />
Fixing system<br />
Wooden drawer (partial extension)<br />
Drawer adjustment system<br />
TANDEMBOX / INTRABOX<br />
Assembling the front<br />
Vertical adjustment<br />
±2 mm<br />
Deep drawer<br />
ENGLISH<br />
Side adjustment<br />
1 mm to the right<br />
1 mm to the left<br />
2<br />
1<br />
1<br />
2<br />
39
DRAWERS AND DEEP DRAWERS<br />
Assembling, dismantling and adjusting<br />
TANDEMBOX / INTRABOX - Deep drawer<br />
Assembling the rails<br />
1 3<br />
2<br />
Dismantling the rail<br />
back<br />
1<br />
Adjusting the<br />
angle<br />
3<br />
front<br />
1. Insert the rail<br />
2. Lift the rail up at the back<br />
3. Slot the rail into the back<br />
2<br />
1. Remove the rail from the back<br />
2. Reduce bush expansion<br />
3. Remove the bush<br />
TANDEMBOX / INTRABOX - Inside drawer<br />
Assembling the front<br />
Dismantling the front<br />
1<br />
3<br />
2<br />
1<br />
2<br />
1. Insert the fixings into<br />
the front<br />
2. Tighten the screw<br />
3. Slot the fixings into<br />
the drawer sides<br />
40
PUSH-PULL DEVICE (New type)<br />
Assembly diagram<br />
Front view<br />
Side section<br />
Filler caps<br />
Back<br />
Runner<br />
Runner<br />
Section as per plan<br />
Unscrew the pushpull<br />
device end to<br />
adjust door line up<br />
1. Aluminium rail<br />
2. Push-pull device<br />
3. Fixing support for push-pull device<br />
TOP DRAWER WITH PUSH-PULL DEVICE<br />
Assembly diagram<br />
Back view<br />
Runner<br />
Side view<br />
1. Push-pull device<br />
2. Fixing support for push-pull device<br />
ENGLISH<br />
Runner<br />
Bottom view<br />
Unscrew the pushpull<br />
device end to<br />
adjust door line up<br />
Runner<br />
41
BOTTOM DRAWER<br />
Assembly diagram<br />
Back view<br />
Side view<br />
Runner<br />
Runner<br />
Bottom view<br />
Runner<br />
UNIT WITH PULLOUT SLIDING DOORS<br />
Adjusting the bottom<br />
panel<br />
For correct door opening, it is<br />
necessary for the unit to be<br />
perfectly squared up.<br />
Once it has been assembled,<br />
adjust the bottom panel of the<br />
unit so that it is perfectly<br />
aligned, using the adjustable<br />
feet provided.<br />
Remove the hole cover<br />
caps and replace them<br />
after<br />
the feet<br />
have been adjusted.<br />
Adjust the height of the foot<br />
by tightening or loosening<br />
the screw.<br />
SI YES<br />
NO<br />
NO<br />
42
PULLOUT SLIDING DOOR<br />
Horizontal adjustments<br />
Leave a space of 4 mm between the doors (see fig.1).<br />
Use the 3 mm hexagon wrench provided, in the left<br />
slot (see fig. 2).<br />
fig. 2<br />
fig. 1<br />
Vertical adjustments<br />
IMPORTANT<br />
Open the first wing with care by sliding it until it<br />
stops (see fig. 3), then level it through the vertical<br />
adjustment system using the 3 mm. hexagon wrench<br />
provided, in the right slot (see fig. 5).<br />
Similarly, adjust the height position referred to the<br />
structure (see fig. 4).<br />
Repeat the same operations on the second wing.<br />
fig. 3<br />
fig. 5<br />
ENGLISH<br />
fig. 4<br />
Check that the space between the doors is always<br />
equal. If it’s not, operate on parallel adjusting<br />
systems when WINGS ARE CLOSED (see fig. 5).<br />
43
PULLOUT SLIDING DOOR<br />
Depth adjustments of doors<br />
To align wings in depth (see fig. 6), operate on the<br />
upper bracket (fixed on the wing), as follows:<br />
A) loosen the two locking screws on the horizontal<br />
plate through a star screwdriver (see fig. 7)<br />
Should the upper bracket wheel not be fully inside<br />
the guide even after the above mentioned<br />
adjustments (see fig. 9), operate on the adjustable<br />
pin using the 3 mm hexagon wrench provided<br />
(see fig. 10).<br />
B) adjust the cam using a 3 mm hexagonal key,<br />
modifying the depth position of the horizontal plate<br />
(see fig. 8)<br />
C) tighten the screws loosened in step A.<br />
fig. 9<br />
the wheel is not correctly<br />
inserted in the runner<br />
fig. 6<br />
fig. 10<br />
the wheel is correctly inserted in<br />
the runner<br />
fig. 7<br />
fig. 8<br />
44
SLIDING DOOR<br />
WARNING!<br />
Before assembling the unit with sliding door, unlock the doors by loosening the pin<br />
(1) and move it from position A to position B (7 mm) using the 2 mm diameter<br />
Allen key (2) provided.<br />
TOP VIEW<br />
Assembly diagram<br />
4<br />
3<br />
Adjust the height of the door by LOOSEN-<br />
ING (door up) or TIGHTENING (door down)<br />
the socket head screw.<br />
Adjust the door front by LOOSENING the<br />
slide stops, and sliding them along the track.<br />
ENGLISH<br />
Loosen<br />
Tighten<br />
1. Top runner<br />
2. Top slide<br />
3. Slide stops<br />
4. Socket head screw<br />
VIEW FROM TOP<br />
45
HINGES (Salice - 900 Series)<br />
Traditional assembly for 200 Series base units<br />
1 2<br />
CLICK<br />
Fasten the hinge to the base unit. This position has<br />
a pre-established end stop.<br />
Tighten the fastening screw.<br />
3 4<br />
L 0,7<br />
After assembling, there is a 0.7 mm gap between<br />
the door and the side.<br />
Safety device.<br />
CONCEALED SUPPORT FOR SHELVES<br />
Level adjustment<br />
screw<br />
46
FOLDED PANELS WITH ACCESSORIES<br />
Wall of the room<br />
• Fix guide A to the wall using the special screws and<br />
screw plugs supplied.<br />
B<br />
• Place the folded panel against the wall and position<br />
it so that the guide B on the panel attaches to the<br />
guide A that has already been fixed to the wall.<br />
A<br />
Attention! There are some holes along the edges of<br />
the panel for the application of pins that can be<br />
added to increase stability.<br />
Room’s wall<br />
Attention! If the space available in height does not<br />
allow the panel to slide into the guide, the top panel<br />
will be fixed using pins only.<br />
Pin holes<br />
REAR SIDE OF PANEL<br />
Guide A<br />
Guide B<br />
Hole to fix guide<br />
to the wall<br />
A<br />
ENGLISH<br />
Fix guide A and leave a gap of<br />
5 mm between the guide and<br />
the inner edge of the panel.<br />
47
PRODUCT<br />
DATA SHEET<br />
Note intended to safeguard the purchaser in compliance with Law 126 of 10.04.91 - “Regulations<br />
for consumer information” and Decree no. 101 of 08.02.97-“Implementation regulations”, to<br />
affix to the exhibited product so that it is clearly visible and to be delivered with the sold goods.<br />
CARCASS<br />
Class E1 ( * ) 18 mm wood particleboard panels. The<br />
inside of the unit is melamine-faced in a choice of<br />
colours and finishes, the outside can be veneered in<br />
a choice of wood finishes or lacquered in a choice<br />
of matt or gloss colours according to our sample collection.<br />
Completely non-toxic ABS or varnished wood edges.<br />
Class E1 ( * ) 3 mm MDF back. The inside of the unit is<br />
melamine-faced with a choice of finishes.<br />
SHELVES<br />
Made from 6 mm glass.<br />
BUFFERS<br />
Doors are fitted with non-toxic plastic buffers with<br />
rubber inserts for soft--closing.<br />
WASHBASIN TOPS<br />
Available in 20 or 30 mm marble, technical marble<br />
or natural stone, with stain-proof treatment (to be<br />
repeated regularly to preserve the top well); in<br />
60,18 or 12 mm strip wood or marine plywood,<br />
veneered and coloured in a choice of finishes (as<br />
indicated in the priced catalogue); in Class E, 30 or<br />
60 mm wood particleboard panel with water-repellent<br />
treatment V100, 15 or19 mm laminate-faced<br />
with wood finish or lacquered in a choice of matt or<br />
gloss colours; glass top, in the colours indicated in<br />
the price-list; in Mineralguss or ceramic with integrated<br />
washbasin; in 3-6 cm porphyry, with “straight<br />
edge” or “split face” finishes.<br />
FRAMES<br />
Depending on the model, available in solid<br />
pinewood or Class E1 ( * ) MDF veneered with wood<br />
finishes in colours to match the door finish.<br />
PLINTHS<br />
In Class E1 MDF veneered in a choice of door finishes<br />
or in gloss or matt lacquer in a choice of finishes<br />
as indicated in the price-list.<br />
DRAWER INSIDES<br />
These are available in two types, depending on the<br />
model:<br />
1) with insides in birch plywood with metal runners<br />
attached to the sides;<br />
2) with metal side panels and incorporated full-extension<br />
runners (concealed inner sliding) and with a<br />
Class E1 ( * ) wood particleboard bottom with grey<br />
melamine finish .<br />
HINGES<br />
Tested for over 200,000 opening cycles in<br />
compliance with CTBA-LGA regulations, these come<br />
in ZAMAK alloy and can be adjusted to three<br />
positions using special screws and a simple<br />
screwdriver.<br />
FITTINGS<br />
These can be adjusted in height and depth.<br />
MIRRORS<br />
Depending on the model, these come with frames in<br />
stainless steel, veneered or lacquered wood in a<br />
choice of matt or gloss finishes, in wood-coloured<br />
ABS or matt or gloss lacquered in the colours indicated<br />
in the priced catalogue. Mirrors are 4 mm, type<br />
MNG. Back panels are in Class E1 ( * ) 18 pr 16 mm<br />
wood particleboard, with white melamine finish.<br />
ELECTRIC PARTS AND SPOTLIGHTS<br />
These all comply with CE regulations and related<br />
electrical regulations.<br />
LEGS<br />
Legs are available in wood with antique walnut finish,<br />
high-resistant plastic with an adjustment system<br />
for levelling parts or in aluminium with a high-resistant<br />
plastic support insert.<br />
WASHBASINS<br />
These are available in five different materials:<br />
1) Ceramic (natural material)<br />
2) Corian (composite resin)<br />
3) Mineralguss (composite resin)<br />
4) Teknorit (composite resin)<br />
5) Glass (transparent or coloured)<br />
6) Vetro freddo (polyester resin and glass pigments)<br />
TAPS AND DRAIN TRAPS<br />
See chart attached to each separate model.<br />
ACCESSORIES<br />
These are available in wood in a choice of finishes<br />
depending on the model, in metal with chrome or<br />
gold finish; in stainless steel with glass details, or in<br />
Teknorit.<br />
ECOLOGY<br />
When you have finished with the furnishing item, do<br />
not throw it away, instead call your local Municipal<br />
solid urban waste company to take it to the dump or<br />
for recycling.<br />
TESTED BY:<br />
Samples of Arcom tops in 6.2 cm veneered strip wood<br />
have been tested by CATAS.<br />
The tests results inform that these tops are stain-resistant<br />
(EN 12720/97), resistant to moisture expansion<br />
after steeping 24 hours in water (EN 317/93), resistant<br />
to humidity (prENV927-8/N343) and have<br />
highly water-resistant edges (UNI 10460/95).<br />
( * ) With low formaldehyde emission 48<br />
REV. 00/05/05
MODEL DATA SHEET<br />
MODEL CARCASS FRONT FRONT OPTIONS<br />
POLLOCK<br />
CHERRY<br />
DARK OR LIGHT OAK<br />
Cherry, dark oak or light<br />
oak veneered chipboard<br />
(water-repellent V100).<br />
In cherry, dark or light oak<br />
veneered pre-edged<br />
chipboard. Satin glass.<br />
In polyester coated MDF,<br />
lacquered in various matt or<br />
gloss colours.<br />
MATT OR GLOSS WHITE<br />
Melamine-faced chipboard<br />
(water-repellent V100)<br />
lacquered in matt or gloss<br />
white<br />
In polyester coated MDF,<br />
lacquered in matt or gloss<br />
white.<br />
Satin glass.<br />
In polyester coated MDF,<br />
lacquered in various matt or<br />
gloss colours.<br />
MATT OR GLOSS LACQUER<br />
Melamine-faced chipboard<br />
(water-repellent V100)<br />
lacquered in various matt or<br />
gloss colours.<br />
In polyester coated MDF,<br />
lacquered in various matt or<br />
gloss colours.<br />
Satin glass.<br />
GOYA<br />
CHERRY<br />
DARK OR LIGHT OAK<br />
Cherry, dark oak or light<br />
oak veneered chipboard<br />
(water-repellent V100).<br />
Cherry, dark oak or light<br />
oak veneered pre-edged<br />
chipboard (water-repellent<br />
V100). Satin glass.<br />
In polyester coated MDF,<br />
lacquered in various matt or<br />
gloss colours.<br />
MATT OR GLOSS WHITE<br />
Melamine-faced chipboard<br />
(water-repellent V100)<br />
lacquered in matt or gloss<br />
white.<br />
In polyester coated MDF,<br />
lacquered in matt or gloss<br />
white.<br />
Satin glass.<br />
In polyester coated MDF,<br />
lacquered in various matt or<br />
gloss colours.<br />
MATT OR GLOSS LACQUER<br />
Melamine-faced chipboard<br />
(water-repellent V100)<br />
lacquered in various matt or<br />
gloss colours.<br />
In polyester coated MDF,<br />
lacquered in various matt or<br />
gloss colours.<br />
Satin glass.<br />
DE CHIRICO<br />
MATT OR GLOSS WHITE<br />
Melamine-faced chipboard<br />
(water-repellent V100)<br />
lacquered in matt or gloss<br />
white.<br />
In polyester coated MDF,<br />
lacquered in matt or gloss<br />
white.<br />
Satin glass.<br />
In polyester coated MDF,<br />
lacquered in various matt or<br />
gloss colours.<br />
ENGLISH<br />
MATT OR GLOSS LACQUER<br />
Melamine-faced chipboard<br />
(water-repellent V100)<br />
lacquered in various matt or<br />
gloss colours.<br />
In polyester coated MDF,<br />
lacquered in various matt or<br />
gloss colours.<br />
Satin glass.<br />
CEZANNE<br />
MATT WHITE<br />
Melamine-faced chipboard<br />
(water-repellent V100)<br />
lacquered in matt white or<br />
cherry veneered chipboard.<br />
In polyester coated MDF,<br />
lacquered in matt white.<br />
Satin glass<br />
In polyester coated MDF,<br />
lacquered in various matt<br />
colours.<br />
Satin glass.<br />
CHERRY<br />
OR MATT LACQUER<br />
Melamine-faced chipboard<br />
(water-repellent V100)<br />
lacquered in various matt<br />
colours or cherry veneered<br />
chipboard.<br />
Door with solid wood frame and<br />
cherry veneered or polyester<br />
coated MDF interior panel<br />
lacquered in various matt or<br />
gloss colours. Satin glass.<br />
49
MODEL DATA SHEET<br />
MODEL CARCASS FRONT FRONT OPTIONS<br />
DALÌ<br />
“ARTE POVERA” WALNUT<br />
Chipboard (water-repellent<br />
V100) veneered in “Arte<br />
Povera” walnut, with shaped<br />
sides in solid wood with<br />
walnut finish.<br />
Solid wood door and frame<br />
with walnut finish. Antiquefinish<br />
leaded glass with a<br />
bronzed finish and coloured<br />
details.<br />
N.B. The DALÌ model has<br />
standard mirrors, wall units<br />
and tall units, which include<br />
a top cornice. (Total height<br />
for the arrangement H. 202).<br />
KARMA<br />
UNICOLOUR LARCH<br />
Unicolour brushed larch<br />
veneered chipboard (waterrepellent<br />
V100) in various<br />
colours.<br />
Unicolour brushed larch<br />
veneered pre-edged<br />
chipboard in various<br />
colours. Satin glass.<br />
Standard doors and drawers<br />
with “push-pull” opening<br />
mechamism.<br />
BICOLOUR LARCH<br />
Bicolour brushed larch<br />
veneered chipboard (waterrepellent<br />
V100) in various<br />
colours.<br />
Bicolour brushed larch<br />
veneered pre-edged<br />
chipboard in various<br />
colours. Satin glass.<br />
Standard doors and drawers<br />
with “push-pull” opening<br />
mechamism.<br />
RUSH<br />
COLOURED ZEBRANO<br />
WOOD<br />
Zebrano veneered<br />
chipboard (water-repellent<br />
V100) in various colours.<br />
Zebrano veneered preedged<br />
chipboard in various<br />
colours.<br />
Satin glass.<br />
LA FENICE<br />
MATT OR GLOSS<br />
WHITE<br />
Melamine-faced chipboard<br />
(water-repellent V100)<br />
lacquered in matt or gloss<br />
white.<br />
In polyester coated MDF,<br />
lacquered in matt or gloss<br />
white.<br />
MATT OR GLOSS<br />
LACQUER<br />
Melamine-faced chipboard<br />
(water-repellent V100)<br />
lacquered in various matt or<br />
gloss colours.<br />
In polyester coated MDF,<br />
lacquered in various matt or<br />
gloss colours.<br />
BLACK WALNUT<br />
Black walnut veneered<br />
chipboard (water-repellent<br />
V100).<br />
Black walnut veneered preedged<br />
chipboard.<br />
ESCAPE<br />
MATT OR GLOSS<br />
LACQUER<br />
Melamine-faced chipboard<br />
(water-repellent V100)<br />
lacquered in matt or gloss<br />
white.<br />
In polyester coated MDF,<br />
lacquered in matt or gloss<br />
white.<br />
MATT OR GLOSS<br />
LACQUER<br />
Melamine-faced chipboard<br />
(water-repellent V100)<br />
lacquered in various matt or<br />
gloss colours.<br />
In polyester coated MDF,<br />
lacquered in various matt or<br />
gloss colours.<br />
BLACK OAK, WHITE OAK<br />
OR HAZELNUT OAK<br />
Black oak, white oak or<br />
hazelnut oak veneered<br />
chipboard (water-repellent<br />
V100).<br />
Black oak, white oak or<br />
hazelnut oak veneered preedged<br />
chipboard.<br />
50
REMARKS
<strong>ARCOM</strong> srl<br />
33070 Maron di Brugnera/Pn/Italy<br />
Viale Lino Zanussi, 34/B<br />
Tel. +39.0434.613 619<br />
Fax +39.0434.608 137<br />
E-mail: arcom.srl@libero.it<br />
E-mail: gruppoatma@gruppoatma.it<br />
http://www.gruppoatma.it