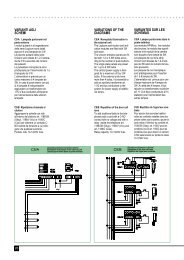
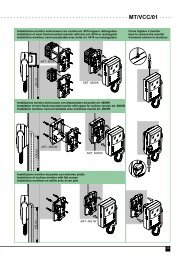
MT/VCC/01 1¡parte - door entry systems
MT/VCC/01 1¡parte - door entry systems
MT/VCC/01 1¡parte - door entry systems

You also want an ePaper? Increase the reach of your titles
YUMPU automatically turns print PDFs into web optimized ePapers that Google loves.
<strong>MT</strong>/<strong>VCC</strong>/<strong>01</strong><br />
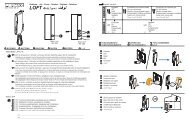
Assemblaggio e installazione<br />
pulsantiera Logicom<br />
Assembly and installation<br />
of Logicom entrance panel<br />
Assemblage et installation de la<br />
plaque de rue Logicom<br />
160÷165 cm<br />
• Come murare la scatola<br />
da incasso<br />
• How to recess the<br />
flush-mounted box<br />
• Comment placer la boîte<br />
à encastrement dans le mur<br />
• Come accostare più scatole<br />
con distanziatori<br />
• How to line up several boxes<br />
with spacers<br />
• Comment juxtaposer plusieurs<br />
boîtes à l'aide des entretoites<br />
• Come assemblare i moduli nel<br />
telaio e fissare la testata superiore<br />
• How to assemble the modules in<br />
the module-holder frame and fix<br />
the top bracket<br />
• Comment assembler les modules<br />
sur le cadre et fixer<br />
la garniture supérieur<br />
• Come inserire il portiere audio<br />
nel modulo<br />
• How to insert the speaker unit<br />
in the module<br />
• Comment introduire le<br />
HP/micro dans le module<br />
• Come fissare la copritestata<br />
superiore<br />
• How to fix the upper bracket<br />
• Comment fixer la garniture du<br />
bord supérieur<br />
• Come fissare la testata inferiore<br />
• How to fix the lower bracket<br />
• Comment fixer la garniture<br />
inférieure<br />
• Come agganciare la pulsantiera<br />
ed eseguire il collegamento dei<br />
conduttori. Allentare 1 delle 3 viti<br />
che bloccano l’orientamento<br />
della telecamera<br />
• How to hang the panel and<br />
connect the wires. Loosen one of<br />
the three screws blocking the<br />
view field setting<br />
• Comment accrocher la plaque de<br />
rue et faire le fixage des conducteurs.<br />
Dévisser un peu<br />
les trois vis qui bloquent<br />
l’orientation de la caméra<br />
• Come orientare la telecamera.<br />
Premere col dito in basso,<br />
togliere la finestrella, orientare<br />
la telecamera a piacere,<br />
rimettere la finestrella e fissare<br />
la vite allentata sul retro<br />
• How to set the view field.<br />
Take away the window by<br />
pushing on the lower side of it,<br />
set the camera position as<br />
required, replace the window<br />
and block the screw previously<br />
loosened<br />
• Comment orienter la caméra.<br />
Appuyer par le doit en bas.<br />
Enlever la petite fenêtre,<br />
orienter la caméra, remettre la<br />
petite fenêtre et fixer les trois vis<br />
sur la partie derrière<br />
• Come completare il fissaggio e<br />
chiudere il portellino<br />
• How to complete fixing and<br />
closure of the panel<br />
• Comment compléter la fixation<br />
et fermer la porte<br />
• Come togliere i cartellini<br />
portanome<br />
• How to remove the<br />
nameplate labels<br />
• Comment ôter les<br />
étiquettes porte-noms<br />
• Come fissare la visiera<br />
da incasso<br />
• How to fix the flush-mounted<br />
rain shield<br />
• Comment fixer la protection<br />
anti-pluie à encastrement<br />
• Come fissare la cornice<br />
• How to fix the cornice<br />
• Comment fixer le couvre-joint<br />
• Come fissare la custodia<br />
da parete<br />
• How to fix the surface housing<br />
• Comment fixer le boîtier au mur<br />
11