Register and win! Puzzi 100 Puzzi 200 - Karcher
Register and win! Puzzi 100 Puzzi 200 - Karcher
Register and win! Puzzi 100 Puzzi 200 - Karcher

Create successful ePaper yourself
Turn your PDF publications into a flip-book with our unique Google optimized e-Paper software.
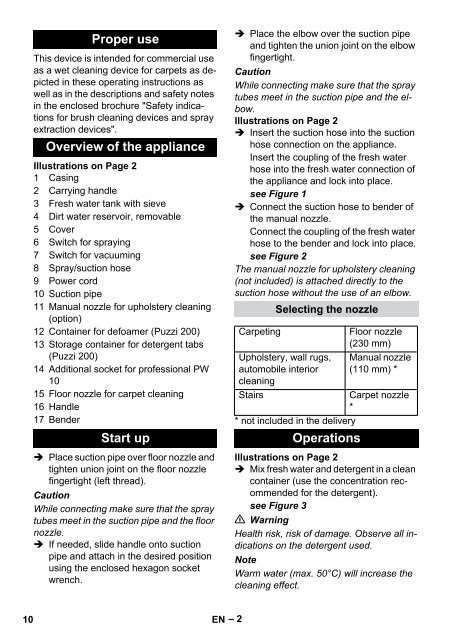
Proper use<br />
This device is intended for commercial use<br />
as a wet cleaning device for carpets as depicted<br />
in these operating instructions as<br />
well as in the descriptions <strong>and</strong> safety notes<br />
in the enclosed brochure "Safety indications<br />
for brush cleaning devices <strong>and</strong> spray<br />
extraction devices".<br />
Overview of the appliance<br />
Illustrations on Page 2<br />
1 Casing<br />
2 Carrying h<strong>and</strong>le<br />
3 Fresh water tank with sieve<br />
4 Dirt water reservoir, removable<br />
5 Cover<br />
6 Switch for spraying<br />
7 Switch for vacuuming<br />
8 Spray/suction hose<br />
9 Power cord<br />
10 Suction pipe<br />
11 Manual nozzle for upholstery cleaning<br />
(option)<br />
12 Container for defoamer (<strong>Puzzi</strong> <strong>200</strong>)<br />
13 Storage container for detergent tabs<br />
(<strong>Puzzi</strong> <strong>200</strong>)<br />
14 Additional socket for professional PW<br />
10<br />
15 Floor nozzle for carpet cleaning<br />
16 H<strong>and</strong>le<br />
17 Bender<br />
Start up<br />
Place suction pipe over floor nozzle <strong>and</strong><br />
tighten union joint on the floor nozzle<br />
fingertight (left thread).<br />
Caution<br />
While connecting make sure that the spray<br />
tubes meet in the suction pipe <strong>and</strong> the floor<br />
nozzle.<br />
If needed, slide h<strong>and</strong>le onto suction<br />
pipe <strong>and</strong> attach in the desired position<br />
using the enclosed hexagon socket<br />
wrench.<br />
Place the elbow over the suction pipe<br />
<strong>and</strong> tighten the union joint on the elbow<br />
fingertight.<br />
Caution<br />
While connecting make sure that the spray<br />
tubes meet in the suction pipe <strong>and</strong> the elbow.<br />
Illustrations on Page 2<br />
Insert the suction hose into the suction<br />
hose connection on the appliance.<br />
Insert the coupling of the fresh water<br />
hose into the fresh water connection of<br />
the appliance <strong>and</strong> lock into place.<br />
see Figure 1<br />
Connect the suction hose to bender of<br />
the manual nozzle.<br />
Connect the coupling of the fresh water<br />
hose to the bender <strong>and</strong> lock into place.<br />
see Figure 2<br />
The manual nozzle for upholstery cleaning<br />
(not included) is attached directly to the<br />
suction hose without the use of an elbow.<br />
Selecting the nozzle<br />
Carpeting<br />
Upholstery, wall rugs,<br />
automobile interior<br />
cleaning<br />
Floor nozzle<br />
(230 mm)<br />
Manual nozzle<br />
(110 mm) *<br />
Stairs<br />
Carpet nozzle<br />
*<br />
* not included in the delivery<br />
Operations<br />
Illustrations on Page 2<br />
Mix fresh water <strong>and</strong> detergent in a clean<br />
container (use the concentration recommended<br />
for the detergent).<br />
see Figure 3<br />
Warning<br />
Health risk, risk of damage. Observe all indications<br />
on the detergent used.<br />
Note<br />
Warm water (max. 50°C) will increase the<br />
cleaning effect.<br />
10 EN – 2