3500 Series Rotor Aspersor de turbina de la serie 3500 Rotor da ...
3500 Series Rotor Aspersor de turbina de la serie 3500 Rotor da ...
3500 Series Rotor Aspersor de turbina de la serie 3500 Rotor da ...

Create successful ePaper yourself
Turn your PDF publications into a flip-book with our unique Google optimized e-Paper software.
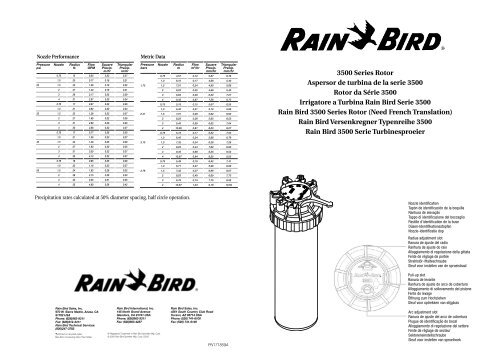
Nozzle Performance<br />
Pressure Nozzle Radius Flow Square Triangu<strong>la</strong>r<br />
psi ft. GPM Precip. Precip.<br />
in/hr in/hr<br />
0.75 15 0.54 0.23 0.27<br />
1.0 20 0.77 0.18 0.21<br />
25 1.5 23 1.06 0.19 0.22<br />
2 27 1.40 0.18 0.21<br />
3 29 2.17 0.25 0.29<br />
4 31 2.97 0.30 0.34<br />
0.75 17 0.67 0.22 0.26<br />
1.0 21 0.92 0.20 0.23<br />
35 1.5 23 1.28 0.23 0.27<br />
2 27 1.69 0.22 0.26<br />
3 31 2.60 0.26 0.30<br />
4 33 3.58 0.32 0.37<br />
0.75 17 0.77 0.26 0.30<br />
1.0 21 1.06 0.23 0.27<br />
45 1.5 24 1.48 0.25 0.29<br />
2 27 1.93 0.30 0.35<br />
3 31 3.00 0.32 0.37<br />
4 35 4.13 0.32 0.37<br />
0.75 18 0.85 0.25 0.29<br />
1.0 22 1.18 0.23 0.27<br />
55 1.5 24 1.65 0.28 0.32<br />
2 28 2.15 0.26 0.30<br />
3 32 3.25 0.31 0.35<br />
4 35 4.60 0.36 0.42<br />
Metric Data<br />
Pressure Nozzle Radius Flow Square Triangu<strong>la</strong>r<br />
bars m m 3 /hr Precip. Precip.<br />
mm/hr mm/hr<br />
0,75 4,57 0,12 5,87 6,78<br />
1,0 6,10 0,17 4,68 5,40<br />
1,72 1,5 7,01 0,24 4,90 5,66<br />
2 8,23 0,32 4,68 5,40<br />
3 8,84 0,49 6,30 7,27<br />
4 9,45 0,67 7,56 8,73<br />
0,75 5,18 0,15 5,67 6,55<br />
1,0 6,40 0,21 5,10 5,89<br />
2,41 1,5 7,01 0,29 5,92 6,83<br />
2 8,23 0,38 5,65 6,53<br />
3 9,45 0,59 6,62 7,64<br />
4 10,06 0,81 8,03 9,27<br />
0,75 5,18 0,17 6,52 7,53<br />
1,0 6,40 0,24 5,88 6,79<br />
3,10 1,5 7,32 0,34 6,28 7,26<br />
2 8,23 0,44 7,62 8,80<br />
3 9,45 0,68 8,25 9,52<br />
4 10,67 0,94 8,25 9,52<br />
0,75 5,49 0,19 6,42 7,41<br />
1,0 6,71 0,27 5,96 6,89<br />
3,79 1,5 7,32 0,37 6,99 8,07<br />
2 8,53 0,49 6,69 7,73<br />
3 9,75 0,74 7,75 8,95<br />
4 10,67 1,04 9,18 10,59<br />
<strong>3500</strong> <strong>Series</strong> <strong>Rotor</strong><br />
<strong>Aspersor</strong> <strong>de</strong> <strong>turbina</strong> <strong>de</strong> <strong>la</strong> <strong>serie</strong> <strong>3500</strong><br />
<strong>Rotor</strong> <strong>da</strong> Série <strong>3500</strong><br />
Irrigatore a Turbina Rain Bird Serie <strong>3500</strong><br />
Rain Bird <strong>3500</strong> <strong>Series</strong> <strong>Rotor</strong> (Need French Trans<strong>la</strong>tion)<br />
Rain Bird Versenkregner Typenreihe <strong>3500</strong><br />
Rain Bird <strong>3500</strong> Serie Turbinesproeier<br />
Precipitation rates calcu<strong>la</strong>ted at 50% diameter spacing, half circle operation.<br />
Nozzle i<strong>de</strong>ntification<br />
Tapón <strong>de</strong> i<strong>de</strong>ntificación <strong>de</strong> <strong>la</strong> boquil<strong>la</strong><br />
Ranhura <strong>de</strong> elevação<br />
Tappo di i<strong>de</strong>ntificazione <strong>de</strong>l boccaglio<br />
Pastille d'i<strong>de</strong>ntification <strong>de</strong> <strong>la</strong> buse<br />
Düsen-I<strong>de</strong>ntifikationsstopfen<br />
Nozzle-i<strong>de</strong>ntificatie dop<br />
Radius adjustment slot<br />
Ranura <strong>de</strong> ajuste <strong>de</strong>l radio<br />
Ranhura <strong>de</strong> ajuste do raio<br />
Alloggiamento di rego<strong>la</strong>zione <strong>de</strong>l<strong>la</strong> gittata<br />
Fente <strong>de</strong> rég<strong>la</strong>ge <strong>de</strong> portée<br />
Strahlstör-/Halteschraube<br />
Sleuf voor instellen van <strong>de</strong> sproeistraal<br />
Pull-up slot<br />
Ranura <strong>de</strong> levante<br />
Ranhura <strong>de</strong> ajuste do arco <strong>de</strong> cobertura<br />
Alloggiamento di sollevamento <strong>de</strong>l pistone<br />
Fente <strong>de</strong> levage<br />
Öffnung zum Hochziehen<br />
Sleuf voor optrekken van stijgbuis<br />
Rain Bird Sales, Inc.<br />
970 W. Sierra Madre, Azusa, CA<br />
91702 USA<br />
Phone: (626)963-9311<br />
Fax: (626)812-3411<br />
Rain Bird Technical Services:<br />
(800)247-3782<br />
C Printed on recycled paper.<br />
Rain Bird. Conserving More Than Water.<br />
Rain Bird International, Inc.<br />
145 North Grand Avenue<br />
Glendora, CA 91741 USA<br />
Phone: (626)963-9311<br />
Fax: (626)963-4287<br />
® Registered Tra<strong>de</strong>mark of Rain Bird Sprinkler Mfg. Corp.<br />
© 2000 Rain Bird Sprinkler Mfg. Corp. 03/00<br />
Rain Bird Sales, Inc.<br />
4261 South Country Club Road<br />
Tucson, AZ 85714 USA<br />
Phone: (520) 741-6100<br />
Fax: (520) 741-6146<br />
PN171859A<br />
Arc adjustment slot<br />
Ranura <strong>de</strong> ajuste <strong>de</strong>l arco <strong>de</strong> cobertura<br />
Plugue <strong>de</strong> i<strong>de</strong>ntificação do bocal<br />
Alloggiamento di rego<strong>la</strong>zione <strong>de</strong>l settore<br />
Fente <strong>de</strong> rég<strong>la</strong>ge <strong>de</strong> secteur<br />
Sektoreneinstellschraube<br />
Sleuf voor instellen van sproeihoek
1<br />
1. Remove nozzle TREE from rotor<br />
2. Select <strong>de</strong>sired nozzle<br />
3. Lift-up stem<br />
4. Installing nozzles: a. Insert nozzle, (press firmly until nozzle seats), b. Turn radius<br />
reduction screw to retain nozzle<br />
5. Setting the arc: Arc is adjustable from 40-360 <strong>de</strong>grees. a. Find fixed LEFT edge,<br />
b. To increase arc, turn right (clockwise), c. To <strong>de</strong>crease arc, turn left (counterclockwise)<br />
6. Removing nozzles<br />
7. Cleaning filter screen: a. Remove internals from case, b. Remove Filter screen<br />
5c<br />
2<br />
3<br />
4a<br />
4b<br />
1. Remueva el portaboquil<strong>la</strong> “TREE” <strong>de</strong>l aspersor <strong>de</strong> <strong>turbina</strong><br />
2. Seleccione <strong>la</strong> boquil<strong>la</strong><br />
3. Levante el vástago<br />
4. La insta<strong>la</strong>ción <strong>de</strong> <strong>la</strong>s boquil<strong>la</strong>s: a. Introduzca <strong>la</strong> boquil<strong>la</strong> (presione firmemente hasta que <strong>la</strong><br />
boquil<strong>la</strong> se asiente), b. Gire el tornillo <strong>de</strong> ajuste <strong>de</strong>l radio para fijar <strong>la</strong> boquil<strong>la</strong>.<br />
5. El reg<strong>la</strong>je <strong>de</strong>l arco <strong>de</strong> cobertura: El arco <strong>de</strong> cobertura pue<strong>de</strong> ser ajustado <strong>de</strong>s<strong>de</strong> 40 hasta<br />
360 grados. a. Ubique el bor<strong>de</strong> izquierdo <strong>de</strong>l punto <strong>de</strong> para<strong>da</strong>, b. Para aumentar el arco <strong>de</strong><br />
cobertura, gire hacia <strong>la</strong> <strong>de</strong>recha (en el sentido <strong>de</strong> <strong>la</strong>s manecil<strong>la</strong>s <strong>de</strong>l reloj), c. Para disminuir<br />
el arco <strong>de</strong> cobertura, gire hacia <strong>la</strong> izquier<strong>da</strong> (en el sentido contrario al <strong>de</strong> <strong>la</strong>s<br />
manecil<strong>la</strong>s <strong>de</strong>l reloj).<br />
6. Cómo se quitan <strong>la</strong>s boquil<strong>la</strong>s<br />
7. La limpieza <strong>de</strong>l filtro <strong>de</strong> mal<strong>la</strong>: a. Remueva el mecanismo interno <strong>de</strong> <strong>la</strong> carcasa,<br />
b. Remueva el filtro <strong>de</strong> mal<strong>la</strong>.<br />
1. Remova o porta-bocais “TREE” do rotor<br />
2. Selecione o bocal <strong>de</strong>sejado<br />
3. Levante a haste<br />
4. Insta<strong>la</strong>ção dos bocais: a. Insira o bocal (pressione firmemente até ele ficar bem assentado),<br />
b. Gire o parafuso <strong>de</strong> redução para fixar o bocal.<br />
5. Configuração do arco <strong>de</strong> cobertura: o arco <strong>de</strong> cobertura po<strong>de</strong> ser ajustado <strong>de</strong> 40 a 360<br />
graus. a. Encontre a bor<strong>da</strong> esquer<strong>da</strong> do ponto <strong>de</strong> para<strong>da</strong> fixa, b. Para aumentar o arco <strong>de</strong><br />
cobertura, gire para a direita (sentido horário), c. Para reduzir o arco <strong>de</strong> cobertura, gire para<br />
a esquer<strong>da</strong> (sentido anti-horário).<br />
6. Remoção <strong>de</strong> bocais<br />
7. Limpeza <strong>da</strong> te<strong>la</strong> <strong>de</strong> filtro. a. Remova a parte interna <strong>da</strong> carcaça, b. Remova a te<strong>la</strong> <strong>de</strong> filtro<br />
1. Staccare il i boccagli <strong>da</strong>ll’irrigatore<br />
2. Scegliere il boccaglio <strong>de</strong>si<strong>de</strong>rato<br />
3. Sollevare il pistone<br />
4. Instal<strong>la</strong>zione <strong>de</strong>i boccagli: a. Inserire il boccaglio (premere fortemente per posizionare il<br />
boccaglio), b. Avvitare <strong>la</strong> vite di rego<strong>la</strong>zione <strong>de</strong>lle gittata per<br />
bloccare il boccaglio.<br />
5. Rego<strong>la</strong>zione <strong>de</strong>l settore: Il settore è rego<strong>la</strong>bile <strong>da</strong> 40° a 360°. a. Trovare il punto fermo<br />
sinistro, b. Girare il cacciavite in senso orario per aumentare il<br />
settore, c. Girare il cacciavite in senso antiorario per aumentare il settore.<br />
6. Rimozione <strong>de</strong>i boccagli<br />
7. Pulizia <strong>de</strong>l flirto: a. Rimuovere in meccanismo interno <strong>da</strong>l corpo <strong>de</strong>ll’irrigatore b.<br />
Rimuovere il filtro<br />
6<br />
7a<br />
7b<br />
1. Nehmen Sie <strong>de</strong>n Düsensatz vom Regner ab<br />
2. Wählen Sie die gewünschte Düse<br />
3. Ziehen Sie <strong>de</strong>n Aufsteiger hoch<br />
4. Einsetzen <strong>de</strong>r Düsen: a. Setzen Sie die Düse fest ein, b. Drehen Sie die<br />
Strahlstör-/Halteschraube, um die Düse zu arretieren<br />
5. Sektoreneinstellung: <strong>de</strong>r Sektor ist von 40° bis 360° einstellbar: a. Suchen Sie<br />
<strong>de</strong>n fixierten LINKEN Ansch<strong>la</strong>g, b. Um <strong>de</strong>n Sektor zu vergrößern, drehen Sie die<br />
Schraube nach rechts (in Uhrzeigerrichtung), c. Um <strong>de</strong>n Sektor zu verkleinern,<br />
drehen Sie die Schraube nach links (gegen die Uhrzeigerrichtung)<br />
6. Herausnehmen <strong>de</strong>r Düsen<br />
7. Reinigen <strong>de</strong>s Filters: a. Nehmen Sie <strong>da</strong>s Innenteil heraus, b. Ziehen Sie <strong>de</strong>n<br />
Filter heraus<br />
1. Verwij<strong>de</strong>r <strong>de</strong> nozzleboom van <strong>de</strong> sproeier<br />
2. Kies <strong>de</strong> gewenste nozzle<br />
3. Trek <strong>de</strong> stijgbuis omhoog<br />
4. Installeren van <strong>de</strong> nozzles: a. Schuif <strong>de</strong> nozzle in <strong>de</strong> <strong>da</strong>artoe bestem<strong>de</strong> opening (druk<br />
door tot <strong>de</strong> nozzle goed op zijn p<strong>la</strong>ats zit), b. Draai <strong>de</strong> afstelschroef om <strong>de</strong> nozzle<br />
vast te zetten<br />
5. Instellen van <strong>de</strong> sproeihoek: Sproeihoek is afstelbaar van 40-360 gra<strong>de</strong>n.<br />
a. Zoek het vaste LINKER omkeerpunt, b. Om <strong>de</strong> sproeihoek te vergroten, draai<br />
rechtsom (met <strong>de</strong> kok mee) c. Om <strong>de</strong> sproeihoek te verkleinen, draai linksom (tegen<br />
<strong>de</strong> klok in)<br />
6. Verwij<strong>de</strong>ren van <strong>de</strong> nozzles<br />
7. Schoonmaken van het filter. a. Verwij<strong>de</strong>r het binnenwerk uit <strong>de</strong> doos<br />
b. Verwij<strong>de</strong>r het filter<br />
Radius reduction up to 35%<br />
Sproeistraal vermin<strong>de</strong>ring tot 35%<br />
La portée peut être réduite <strong>de</strong> 35%<br />
Die Wurfweite kann bis zu 35% verringert wer<strong>de</strong>n<br />
Riduzione <strong>de</strong>l<strong>la</strong> gittata fino al 35%<br />
Redução do raio <strong>de</strong> até 35%<br />
Se pue<strong>de</strong> reducir el radio hasta un 35%<br />
5a<br />
5b<br />
1. Enlever <strong>la</strong> grappe <strong>de</strong> buses du rotor<br />
2. Choisir <strong>la</strong> buse désirée<br />
3. Tirer <strong>la</strong> tige <strong>de</strong> l'arroseur<br />
4. Instal<strong>la</strong>tion <strong>de</strong>s buses: a. Inserrer <strong>la</strong> buse (presser fortement), b. Tourner le vis brise-jet<br />
pour bloquer <strong>la</strong> buse<br />
5. Rég<strong>la</strong>ge du secteur arrosé: <strong>de</strong> 40 à 360 <strong>de</strong>grés: a. Repérer <strong>la</strong> butée gauche,<br />
b. Pour accroître le secteur arrosé, touner <strong>da</strong>ns le sens <strong>de</strong>s aiguilles d'une montre, c. Pour<br />
diminuer le secteur, touner en sens inverse <strong>de</strong>s aiguilles d'une montre<br />
6. Pour enlever les buses<br />
7. Nettoyage du filtre: a. Enlever <strong>la</strong> partie interne, b. Enlever le filtre