IS 2180-5_85x120_Osteuropa.indd - Steinel
IS 2180-5_85x120_Osteuropa.indd - Steinel
IS 2180-5_85x120_Osteuropa.indd - Steinel

Create successful ePaper yourself
Turn your PDF publications into a flip-book with our unique Google optimized e-Paper software.
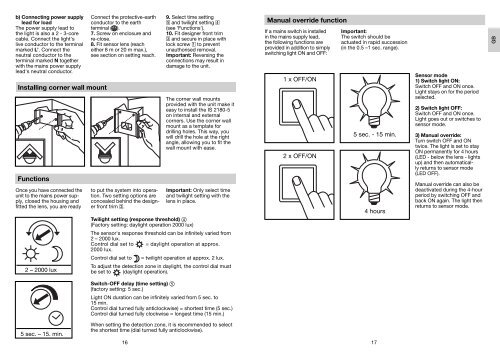
) Connecting power supply<br />
lead for load<br />
The power supply lead to<br />
the light is also a 2 - 3-core<br />
cable. Connect the light's<br />
live conductor to the terminal<br />
marked L’. Connect the<br />
neutral conductor to the<br />
terminal marked N together<br />
with the mains power supply<br />
lead's neutral conductor.<br />
Installing corner wall mount<br />
Functions<br />
Once you have connected the<br />
unit to the mains power supply,<br />
closed the housing and<br />
fitted the lens, you are ready<br />
2 – 2000 lux<br />
Connect the protective-earth<br />
conductor to the earth<br />
terminal ( ).<br />
7. Screw on enclosure and<br />
re-close.<br />
8. Fit sensor lens (reach<br />
either 8 m or 20 m max.),<br />
see section on setting reach.<br />
to put the system into operation.<br />
Two setting options are<br />
concealed behind the designer<br />
front trim .<br />
9. Select time setting<br />
and twilight setting <br />
(see 'Functions').<br />
10. Fit designer front trim<br />
and secure in place with<br />
lock screw to prevent<br />
unauthorised removal.<br />
Important: Reversing the<br />
connections may result in<br />
damage to the unit.<br />
The corner wall mounts<br />
provided with the unit make it<br />
easy to install the <strong>IS</strong> <strong>2180</strong>-5<br />
on internal and external<br />
corners. Use the corner wall<br />
mount as a template for<br />
drilling holes. This way, you<br />
will drill the hole at the right<br />
angle, allowing you to fit the<br />
wall mount with ease.<br />
Important: Only select time<br />
and twilight setting with the<br />
lens in place.<br />
Twilight setting (response threshold) <br />
(Factory setting: daylight operation 2000 lux)<br />
The sensor's response threshold can be infinitely varied from<br />
2 – 2000 lux.<br />
Control dial set to = daylight operation at approx.<br />
2000 lux.<br />
Control dial set to = twilight operation at approx. 2 lux.<br />
To adjust the detection zone in daylight, the control dial must<br />
be set to (daylight operation).<br />
Manual override function<br />
If a mains switch is installed<br />
in the mains supply lead,<br />
the following functions are<br />
provided in addition to simply<br />
switching light ON and OFF:<br />
1 x OFF/ON<br />
2 x OFF/ON<br />
Important:<br />
The switch should be<br />
actuated in rapid succession<br />
(in the 0.5 –1 sec. range).<br />
5 sec. - 15 min.<br />
4 hours<br />
Sensor mode<br />
1) Switch light ON:<br />
Switch OFF and ON once.<br />
Light stays on for the period<br />
selected.<br />
2) Switch light OFF:<br />
Switch OFF and ON once.<br />
Light goes out or switches to<br />
sensor mode.<br />
3) Manual override:<br />
Turn switch OFF and ON<br />
twice. The light is set to stay<br />
ON permanently for 4 hours<br />
(LED - below the lens - lights<br />
up) and then automatically<br />
returns to sensor mode<br />
(LED OFF).<br />
Manual override can also be<br />
deactivated during the 4-hour<br />
period by switching OFF and<br />
back ON again. The light then<br />
returns to sensor mode.<br />
GB<br />
5 sec. – 15. min.<br />
Switch-OFF delay (time setting) <br />
(factory setting: 5 sec.)<br />
Light ON duration can be infinitely varied from 5 sec. to<br />
15 min.<br />
Control dial turned fully anticlockwise) = shortest time (5 sec.)<br />
Control dial turned fully clockwise = longest time (15 min.)<br />
When setting the detection zone, it is recommended to select<br />
the shortest time (dial turned fully anticlockwise).<br />
16 17