DEDALO ANGOLO T 1 ANTA BATTENTE E FISSO - Sanikoop
DEDALO ANGOLO T 1 ANTA BATTENTE E FISSO - Sanikoop
DEDALO ANGOLO T 1 ANTA BATTENTE E FISSO - Sanikoop

You also want an ePaper? Increase the reach of your titles
YUMPU automatically turns print PDFs into web optimized ePapers that Google loves.
Riflessi<br />
di un’opera d’arte<br />
ARBLU srl<br />
Via Fossaluzza, 5<br />
Z.I. 33074 Fontanafredda/PN/Italy<br />
Telefono +39-0434599015<br />
Telefax +39-0434599016<br />
E-mail: info@arblu.it<br />
<strong>DEDALO</strong> <strong>ANGOLO</strong> T<br />
1 <strong>ANTA</strong> <strong>BATTENTE</strong> E <strong>FISSO</strong><br />
(I) Istruzioni di montaggio<br />
(GB) Assembly instructions<br />
(D) Montageanleitung<br />
IM000031 - REV. 04 DEL 26/10/2009<br />
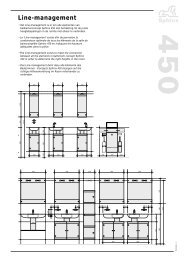
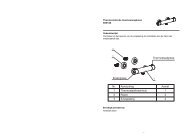
Sacchetto ferramenta per installazione destra. L’installazione sinistra è speculare.<br />
Hardware kit for right installation. The left installation is specular.<br />
Eisenwahren kit für Rechtsausführung. Spiegel-Linksausführung.<br />
9a<br />
9b<br />
1 2<br />
3 4 5<br />
L<br />
N° 4 - Ø 6x30mm N° 4 - A 4,2x32 TCC A2 N° 4 - 4x12<br />
N°4<br />
N° 4 - A 3,9x9,5 TCC A2<br />
6 7 8 9 10<br />
10<br />
9<br />
N° 4<br />
N° 2 N° 1 N° 1<br />
N° 1<br />
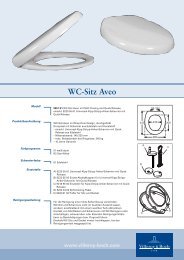
Infilare il fermabordino (SX<br />
nell’esempio di montaggio). Fare<br />
molta attenzione al verso!<br />
Thread the profile fastener (on the left hand of<br />
the assembling example). Take care of the right<br />
side!<br />
Profilanschlag (links im Montagebeispiel)<br />
einfügen. Richtige Seite beachten!<br />
Appoggiare il bordino ed il<br />
fermabordino, e prendere la misura<br />
“L”.<br />
Thread the profile and the profile fastener, and<br />
take the lenght “L”.<br />
Profilanschlag und Tropfschutzprofil stellen. Die<br />
Länge “L” messen.<br />
9c 9d<br />
L+30mm<br />
Ø3mm<br />
Ø6mm<br />
Tagliare il bordino a misura<br />
L+30mm, siliconare ed installare.<br />
Cut one piece of profile to measure L+30<br />
mm. then put silicon and install.<br />
Ein Stück zurechtschneiden L+ 30 mm. Dann<br />
das Silikon stellen und installieren<br />
Tenere il profilo schiacciato<br />
con del nastro adesivo fino alla<br />
completa essicazione del silicone<br />
Keep the profile crushed with adhesive tape<br />
until silicon has got completely dry<br />
Profil mit Klebeband versehen bis das Silikon<br />
komplett getrocknet ist
1<br />
2<br />
3<br />
Ø 6 mm<br />
Ø 6 mm<br />
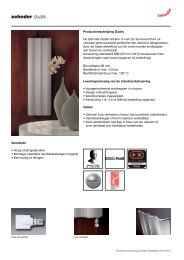
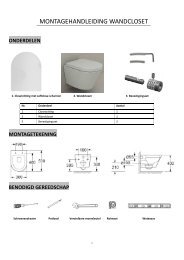
Appoggiare a filo interno ed assicurarsi che le<br />
calamite aderiscano perfettamente<br />
Align with the internal edge and make sure that the<br />
magnets perfectly stick together<br />
Bündig auf die Innenkante setzen und sicherstellen, dass die<br />
Magnete genau aneinanderliegen<br />
1<br />
3<br />
2<br />
4 5 4<br />
6<br />
4<br />
5<br />
5<br />
6<br />
6<br />
Ø 3 mm<br />
Ø 3 mm<br />
4<br />
5<br />
5<br />
4<br />
6<br />
6<br />
7a<br />
7c<br />
7<br />
7<br />
7<br />
8<br />
7b<br />
Ø 6 mm<br />
7d<br />
8<br />
A<br />
A<br />
9<br />
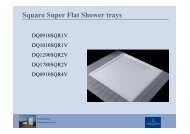
Svitare le viti “A” e “B” e togliere il<br />
braccetto<br />
Unscrew grapevine “A” and “B”, and remove the<br />
arm support<br />
Die Weinreben "A" und "B" lösen und den<br />
Haltestange abnehmen<br />
Riposizionare il braccetto e<br />
riavvitare le viti “A” e “B”<br />
Place again the arm support, and screw<br />
grapevine “A” and “B”<br />
nochmal den Haltestange plazieren und die<br />
Weinreben "A" und "B" schrauben<br />
10<br />
Per il montaggio del profilo salvagoccia,<br />
vedere retro<br />
For the assembling of the drip-saving profile please turn<br />
over<br />
Für die Montage des Tropfschutzprofils siehe Rückseite<br />
24 h<br />
11<br />
Per una migliore tenuta,<br />
siliconare SOLAMENTE le<br />
parti ESTERNE<br />
For a better durability apply<br />
silicone only on external parts<br />
Für einen besseren Halt<br />
Silikon nur auf den äußeren<br />
Teilen auftragen