Istruzioni di montaggio per zanzariera, molla cassone da ... - Bettio
Istruzioni di montaggio per zanzariera, molla cassone da ... - Bettio
Istruzioni di montaggio per zanzariera, molla cassone da ... - Bettio

Create successful ePaper yourself
Turn your PDF publications into a flip-book with our unique Google optimized e-Paper software.
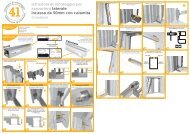
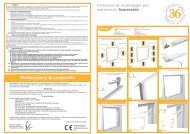
<strong>Istruzioni</strong> <strong>di</strong> <strong>montaggio</strong> <strong>per</strong><br />
<strong>zanzariera</strong>, <strong>molla</strong><br />
<strong>cassone</strong> <strong>da</strong> 35mm.<br />
14<br />
struzioni <strong>di</strong> <strong>montaggio</strong><br />
i<strong>Istruzioni</strong> <strong>di</strong> <strong>montaggio</strong><br />
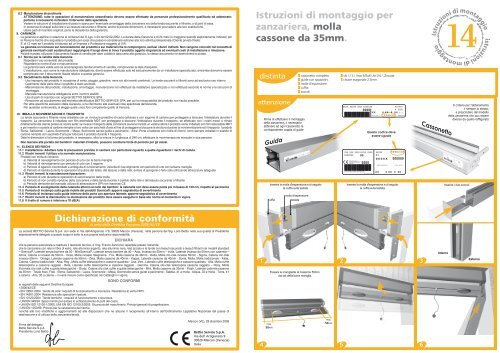
<strong>di</strong>stinta<br />
1 <strong>cassone</strong>tto completo.<br />
2 guide con spazzolini.<br />
2 molle d’espansione.<br />
2 cuffie.<br />
2 zoccoli.<br />
2 viti S.T.E.I. Inox M5x6 UNI 5927, Zincate.<br />
1 chiave esagonale 2,5mm.<br />
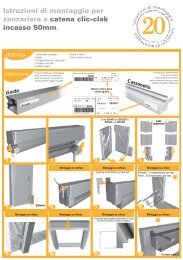
attenzione<br />
Prima <strong>di</strong> effettuare il <strong>montaggio</strong><br />
della <strong>zanzariera</strong>, è necessario<br />
abbinare ad ogni <strong>cassone</strong>tto la<br />
corrispondente coppia <strong>di</strong> guide<br />
Gui<strong>da</strong><br />
Questo co<strong>di</strong>ce deve<br />
essere uguale<br />
Cassonetto<br />
Il criterio <strong>per</strong> l'abbinamento<br />
è sempre lo stesso,<br />
a prescindere <strong>da</strong>l modello<br />
della <strong>zanzariera</strong> che può essere<br />
<strong>di</strong>verso <strong>da</strong> quello raffigurato<br />
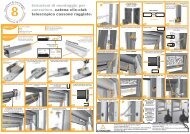
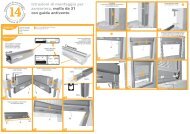
Inserire la <strong>molla</strong> d'espansione e <strong>di</strong> seguito<br />
la cuffia sulla testata<br />
Inserire la <strong>molla</strong> d'espansione e <strong>di</strong> seguito<br />
la cuffia sulla testata<br />
Inserire i due zoccoli<br />
cuffia<br />
<strong>molla</strong> d'espansione<br />
testata<br />
1 2 3<br />
Interno<br />
Esterno<br />
Fissare le manigliette al massimo 50mm<br />
<strong>da</strong>i lati della barra maniglia.<br />
max.<br />
50mm<br />
max.<br />
50mm<br />
4 5 6
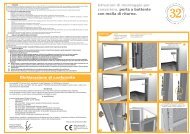
ATTENZIONE:<br />
Le guide devono appoggiare a terra (<strong>da</strong>vanzale)<br />
e <strong>per</strong>pen<strong>di</strong>colari allo stesso<br />
90°<br />
matita<br />
Forare ed inserire i tasselli<br />
(se l’installazione è su muro)<br />
Inserire una vite <strong>per</strong> ogni foro previsto nel telaio.<br />
Fissaggio su muro<br />
Fori con punta <strong>da</strong> Ø6mm.<br />
Tasselli EURO6 in nylon.<br />
Viti a testa cilindrica con impronta a croce 4x40, impronta PZ2, Zincate.<br />
Fissaggio su legno<br />
Viti a testa cilindrica con impronta a croce 4x20, impronta PZ2, Zincate.<br />
Fissaggio su strutture metalliche<br />
Fori con punta <strong>da</strong> Ø2mm.<br />
Viti autofilettanti a testa bombata con impronta a croce 3,5x19, impronta PZ2,<br />
Zincate (UNI 6594 - DIN 7981)<br />
7 8 9<br />
In caso <strong>di</strong> fuori squadra nel lato su<strong>per</strong>iore del vano<br />
si consiglia <strong>di</strong> agganciare il <strong>cassone</strong>tto alle guide<br />
usando il grano in dotazione (ve<strong>di</strong> figura 13)<br />
0mm<br />
xmm<br />
10 11 12<br />
Optional<br />
110302 Mod.14<br />
13 14 15<br />
L'azien<strong>da</strong> si riserva <strong>di</strong> apportare mo<strong>di</strong>fiche senza preavviso