manuale di uso e manutenzione use and maintenance manual - Suex
manuale di uso e manutenzione use and maintenance manual - Suex
manuale di uso e manutenzione use and maintenance manual - Suex

Create successful ePaper yourself
Turn your PDF publications into a flip-book with our unique Google optimized e-Paper software.
70097-70099-70100<br />
Z E U X O<br />
20-33-42<br />
MANUALE DI<br />
USO E MANUTENZIONE<br />
USE AND MAINTENANCE<br />
MANUAL<br />
09-2012<br />
SUEX S.r.l. con l’intento <strong>di</strong> migliorare, si riserva la facoltà <strong>di</strong> variare senza preavviso quanto descritto nel presente <strong><strong>manual</strong>e</strong>.<br />
CONSULTARE IL SITO WWW.SUEX.IT PER LA VERSIONE PIU’ RECENTE DEL PRESENTE MANUALE<br />
SUEX S.r.l. due to constant technological advancement, may mo<strong>di</strong>fy the content of this <strong>manual</strong> without prior notice.<br />
TO ENSURE YOUR USER INFORMATION IS UP TO DATE PLEASE DOWNLOAD THE LATEST VERSION OF THIS MANUAL
70097-70099-70100<br />
SOMMARIO<br />
1 Descrizione e principio <strong>di</strong> funzionamento ............................................................................................................. 3<br />
2 Dati tecnici ............................................................................................................................................................... 5<br />
3 Operazioni preliminari ............................................................................................................................................. 6<br />
3.1 Apertura dell’involucro ...................................................................................................................................... 6<br />
3.2 Accesso alla batteria ........................................................................................................................................ 7<br />
3.3 Inserimento della batteria ................................................................................................................................. 9<br />
3.4 Chiusura dell’involucro ..................................................................................................................................... 9<br />
4 Regolazione assetto .............................................................................................................................................. 10<br />
5 Materiale in dotazione ........................................................................................................................................... 10<br />
6 Ricambi ................................................................................................................................................................... 10<br />
7 Identificazione ........................................................................................................................................................ 13<br />
8 Norme generali <strong>di</strong> sicurezza e <strong>di</strong> prevenzione infortuni ..................................................................................... 13<br />
8.1 Targhetta <strong>di</strong> segnalazione .............................................................................................................................. 14<br />
9 Uso previsto ........................................................................................................................................................... 15<br />
10 Garanzia ............................................................................................................................................................. 15<br />
11 Garanzia sulla batteria ...................................................................................................................................... 15<br />
12 Informazioni per la sicurezza ........................................................................................................................... 16<br />
12.1 Addestramento .......................................................................................................................................... 16<br />
12.2 Configurazione ed assetto <strong>di</strong> manovra ...................................................................................................... 16<br />
12.3 Zona pericolosa e rischi residui ................................................................................................................. 17<br />
12.4 Dispositivo <strong>di</strong> sicurezza ............................................................................................................................. 17<br />
13 Movimentazione ................................................................................................................................................ 18<br />
14 Uso del veicolo subacqueo ADV. .................................................................................................................... 18<br />
15 Autonomia ......................................................................................................................................................... 19<br />
16 Velocità .............................................................................................................................................................. 19<br />
17 Profon<strong>di</strong>tà e ambienti <strong>di</strong> utilizzo ...................................................................................................................... 19<br />
18 Allagamento del veicolo subacqueo, affondamento. .................................................................................... 20<br />
19 Precauzioni d’<strong>uso</strong> ............................................................................................................................................. 20<br />
20 Pulizia e rimessaggio ....................................................................................................................................... 21<br />
21 Problemi, ca<strong>use</strong> e rime<strong>di</strong> .................................................................................................................................. 21<br />
22 Manutenzione .................................................................................................................................................... 22<br />
23 Smaltimento e rottamazione ............................................................................................................................ 22<br />
24 Ricarica della batteria (norme generali) .......................................................................................................... 23<br />
25 Come ricaricare la batteria ............................................................................................................................... 23<br />
26 Informazioni sulla batteria Pb gel .................................................................................................................... 24<br />
27 Con<strong>di</strong>zioni ideali per la ricarica della batteria ................................................................................................ 24<br />
28 Con<strong>di</strong>zioni ideali per la scarica della batteria................................................................................................. 25<br />
28.1 Nota importante sull’esaurimento della batteria! ........................................................................................ 25<br />
29 Dispositivo <strong>di</strong> allarme acustico batteria scarica ............................................................................................ 25<br />
30 Sistema <strong>di</strong> protezione batteria “CUT OFF” principio <strong>di</strong> funzionamento e istruzioni per l’<strong>uso</strong> ................... 26<br />
30.1 Modalità da seguire in caso <strong>di</strong> intervento del cut off .................................................................................. 26<br />
31 Batteria Pb gel, dom<strong>and</strong>e frequenti: ............................................................................................................... 26<br />
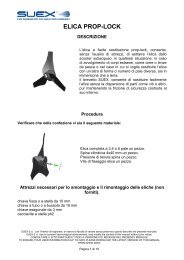
32 Accessori (opzionali) ELICA PROP LOCK. ..................................................................................................... 28<br />
32.1 Descrizione. ............................................................................................................................................... 28<br />
32.2 Come estrarre l’elica prop lock. ................................................................................................................. 31<br />
32.3 Come inserire l’elica prop lock. .................................................................................................................. 31<br />
32.4 Manutenzione elica prop lock. ................................................................................................................... 31<br />
32.5 Problemi, ca<strong>use</strong> e rime<strong>di</strong> elica prop lock. .................................................................................................. 32<br />
33 Accessori (opzionali) COMANDO N-HANDLE. ............................................................................................... 32<br />
33.1 Descrizione. ............................................................................................................................................... 32<br />
33.2 Utilizzo del <strong>di</strong>spositivo N-HANDLE. ........................................................................................................... 34<br />
33.3 Problemi, ca<strong>use</strong> e rime<strong>di</strong> <strong>di</strong>spositivo N-HANDLE. ..................................................................................... 35<br />
34 Accessori (opzionali) LED VERIFICA CARICA BATTERIA. ........................................................................... 36<br />
34.1 Descrizione. ............................................................................................................................................... 36<br />
34.2 Funzionamento. ......................................................................................................................................... 36<br />
35 Accessori (opzionali) DISPOSITIVO BY PASS. .............................................................................................. 37<br />
35.1 Funzionamento .......................................................................................................................................... 37<br />
36 Modularità .......................................................................................................................................................... 38<br />
36.1 Descrizione delle parti ............................................................................................................................... 38<br />
36.2 Sostituzione delle parti .............................................................................................................................. 39<br />
37 ENGLISH VERSION ........................................................................................................................................... 40<br />
38 Description <strong>and</strong> operating principles .............................................................................................................. 40<br />
1
70097-70099-70100<br />
39 Technical specifications .................................................................................................................................. 42<br />
40 Preliminary operations ..................................................................................................................................... 43<br />
40.1 Opening the hull ........................................................................................................................................ 43<br />
40.2 Accessing the battery ................................................................................................................................ 44<br />
40.3 Inserting the battery ................................................................................................................................... 46<br />
40.4 Closing the hull .......................................................................................................................................... 46<br />
41 Buoyancy adjustment ....................................................................................................................................... 46<br />
42 Components ...................................................................................................................................................... 47<br />
43 Spare parts ........................................................................................................................................................ 47<br />
44 Product identification ....................................................................................................................................... 50<br />
45 General safety <strong>and</strong> accident prevention regulations ..................................................................................... 50<br />
45.1 In<strong>di</strong>cator label ............................................................................................................................................ 51<br />
46 Using the vehicle .............................................................................................................................................. 52<br />
47 Warranty ............................................................................................................................................................ 52<br />
48 Battery warranty ................................................................................................................................................ 52<br />
49 Safety instructions ............................................................................................................................................ 53<br />
49.1 Training ..................................................................................................................................................... 53<br />
49.2 Equipment configuration <strong>and</strong> ri<strong>di</strong>ng position .............................................................................................. 53<br />
49.3 Danger zone <strong>and</strong> residual hazards ............................................................................................................ 54<br />
49.4 Safety device ............................................................................................................................................. 54<br />
50 H<strong>and</strong>ling ............................................................................................................................................................ 54<br />
51 Using the ADV <strong>di</strong>ving vehicle. ......................................................................................................................... 55<br />
52 Running time ..................................................................................................................................................... 55<br />
53 Speed ................................................................................................................................................................. 56<br />
54 Depth <strong>and</strong> operating environments ................................................................................................................. 56<br />
55 Floo<strong>di</strong>ng of the <strong>di</strong>ving vehicle, sinking. .......................................................................................................... 57<br />
56 Precautions for <strong>use</strong> .......................................................................................................................................... 57<br />
57 Cleaning <strong>and</strong> overhaul ..................................................................................................................................... 57<br />
58 Troubleshooting ................................................................................................................................................ 58<br />
59 Maintenance ...................................................................................................................................................... 59<br />
60 Disposal <strong>and</strong> scrapping ................................................................................................................................... 59<br />
61 Battery charge (general rules) ......................................................................................................................... 60<br />
62 How to charge the battery ................................................................................................................................ 60<br />
63 Pb gel battery information................................................................................................................................ 61<br />
64 Ideal battery charging con<strong>di</strong>tions .................................................................................................................... 62<br />
65 Ideal battery depletion con<strong>di</strong>tions ................................................................................................................... 62<br />
65.1 Important note on battery depletion! .......................................................................................................... 62<br />
66 Battery depleted alarm siren device ................................................................................................................ 62<br />
67 “CUT OFF” battery protection system, operating principle <strong>and</strong> instructions for <strong>use</strong> ................................ 62<br />
67.1 Procedure to follow in the event the cut off device is triggered.................................................................. 63<br />
68 Pb gel battery, frequently asked questions: ................................................................................................... 63<br />
69 Accessories (optional) PROP LOCK PROPELLER ........................................................................................ 64<br />
69.1 Description. ............................................................................................................................................... 64<br />
69.2 How to remove the prop lock propeller. ..................................................................................................... 67<br />
69.3 How to insert the prop lock propeller. ........................................................................................................ 67<br />
69.4 Prop lock propeller <strong>maintenance</strong>. .............................................................................................................. 67<br />
69.5 Prop lock propeller troubleshooting ........................................................................................................... 68<br />
70 Accessories (optional) N-HANDLE CONTROL ............................................................................................... 68<br />
70.1 Description. ............................................................................................................................................... 68<br />
70.2 N-HANDLE device <strong>use</strong>. ............................................................................................................................. 70<br />
70.3 N-HANDLE device troubleshooting. .......................................................................................................... 71<br />
71 Accessories (optional) BATTERY CHARGE LEVEL LED............................................................................... 71<br />
71.1 Description. ............................................................................................................................................... 71<br />
71.2 Operations. ................................................................................................................................................ 71<br />
72 Accessories (optional) BY PASS DEVICE....................................................................................................... 72<br />
72.1 Operations ................................................................................................................................................. 72<br />
73 Modularity .......................................................................................................................................................... 73<br />
73.1 Part descriptions ........................................................................................................................................ 73<br />
73.2 Part replacement ....................................................................................................................................... 74<br />
74 After-sales service ............................................................................................................................................ 74<br />
2
70097-70099-70100<br />
1 Descrizione e principio <strong>di</strong> funzionamento<br />
L’ADV è costituito da un corpo cavo perfettamente ermetico, dalla forma idro<strong>di</strong>namica,<br />
all’interno del quale sono alloggiati il motore elettrico, le batterie ricaricabili ed il riduttore <strong>di</strong><br />
velocità. All’esterno, posteriormente, sono presenti due maniglie <strong>di</strong> manovra (1), in una<br />
delle quali è integrato il grilletto (2) che, com<strong>and</strong><strong>and</strong>o un pistoncino magnetico (3),<br />
permette il controllo della rotazione dell’elica. A prua, una maniglia in tessuto sintetico (4)<br />
viene utilizzata per la presa ed il sollevamento. All’estremità posteriore è situata l’elica che<br />
gir<strong>and</strong>o genera la spinta propulsiva, quest’ultima è protetta da una fascia circolare ra<strong>di</strong>ale<br />
che costituisce il condotto <strong>di</strong> flusso (5). Sempre posteriormente sono presenti l’interruttore<br />
generale (6) che seziona l’alimentazione elettrica e la manopola <strong>di</strong> regolazione della<br />
velocità (7).<br />
L’involucro esterno è costituito dalla calotta <strong>di</strong> prua (8), sulla quale è inserito il volantino <strong>di</strong><br />
chiusura (9), ed il tubo (10). La calotta è inserita nel tubo e trattenuta da un anello interno.<br />
La tenuta è assicurata da delle guarnizioni <strong>di</strong> tipo O ring.<br />
3
70097-70099-70100<br />
1<br />
2 4<br />
8<br />
5 10<br />
3<br />
2<br />
9<br />
7<br />
6<br />
4
70097-70099-70100<br />
2 Dati tecnici<br />
ADV 20<br />
Dimensioni: Lungh. x Largh. x Alt. mm. 779x460x364<br />
Peso: Kg. 36.2<br />
Velocità max.: m/min. 60<br />
Autonomia me<strong>di</strong>a* min. 60<br />
Voltaggio V.DC 24<br />
Tempo ricarica batterie h 8<br />
Profon<strong>di</strong>tà max. operativa m 120<br />
ADV 33<br />
Dimensioni: Lungh. x Largh. x Alt. mm. 1079x460x364<br />
Peso: Kg. 50.9<br />
Velocità max.: m/min. 60<br />
Autonomia me<strong>di</strong>a* min. 60<br />
Voltaggio V.DC 24<br />
Tempo ricarica batterie h 10<br />
Profon<strong>di</strong>tà max. operativa m 120<br />
ADV 42<br />
Dimensioni: Lungh. x Largh. x Alt. mm. 1219x460x364<br />
Peso: Kg. 59<br />
Velocità max.: m/min. 60<br />
Autonomia me<strong>di</strong>a* min. 60<br />
Voltaggio V.DC 24<br />
Tempo ricarica batterie h 12<br />
Profon<strong>di</strong>tà max. operativa m 120<br />
*Calcolata con accumulatori nuovi, sfruttati per 80% della loro capacità, in esercizio<br />
normale non continuo, in assetto con bi-bombola e GAV.<br />
5
70097-70099-70100<br />
3 Operazioni preliminari<br />
Controllare l’integrità dell’imballo e dei materiali in dotazione (ve<strong>di</strong> cap.5).<br />
3.1 Apertura dell’involucro<br />
Posizionare l’ADV in posizione verticale con la prua verso l’alto appoggiato su una<br />
superficie piana.<br />
Ruotare in senso antiorario il volantino (Fig. 3.1) e continuare nella rotazione fino a<br />
qu<strong>and</strong>o l’involucro non si sia staccato dal gruppo propulsore (Fig. 3.2).<br />
Afferrare la fascia <strong>di</strong> prua. Estrarre l’involucro sollev<strong>and</strong>olo verso l’alto, se necessario<br />
trattenere al suolo il gruppo propulsore appoggi<strong>and</strong>o un piede sulla protezione dell’elica.<br />
Appoggiare l’involucro estratto, evit<strong>and</strong>o che si insinui all’interno polvere o sabbia, in modo<br />
particolare curare la pulizia della sede della guarnizione OR.<br />
Fig. 3.1<br />
Deve essere aperto<br />
Fig. 3.2<br />
6
70097-70099-70100<br />
3.2 Accesso alla batteria<br />
Nei modelli ADV 18 e 28 si estrae un unico pacco batterie composto da due batterie da<br />
12V collegate in serie, mentre nei modelli ADV 33 e 42 si estraggono le batterie da 12V<br />
singolarmente a causa del loro peso, in quest’ultimo caso è necessario scollegare il cavo<br />
impiegato per comporre il collegamento in serie. Il pacco batterie va ricaricato sempre<br />
ricolleg<strong>and</strong>o le batterie in serie.<br />
ATTENZIONE! Ricollegare i cavi, accoppi<strong>and</strong>o sempre i connettori <strong>di</strong> colore uguale.<br />
Staccare i connettori con decisione e senza strappare i cavi, slacciare la fascia <strong>di</strong> velcro<br />
anteriore, estrarre la batteria.<br />
ATTENZIONE! Il peso della batteria è minimo <strong>di</strong> 10 Kg, usare tutte le precauzioni del caso<br />
per non farla cadere o per non generare infortuni.<br />
Zeuxo 20<br />
1<br />
2 3<br />
4<br />
5<br />
7
70097-70099-70100<br />
Zeuxo 42<br />
Zeuxo 33<br />
1<br />
3<br />
4<br />
1 - Fascia in velcro<br />
2 - Zavorra<br />
3 - Pacco batterie<br />
4 - Boccola filettata<br />
5 - Zavorra per acqua salata<br />
8
70097-70099-70100<br />
3.3 Inserimento della batteria<br />
Prima dell’utilizzo dello scooter, la batteria deve essere riposizionata nel proprio<br />
alloggiamento.<br />
Verificare che la fascia <strong>di</strong> velcro posteriore sia chiusa.<br />
Inserire la batteria tra le boccole, nel caso <strong>di</strong> due batterie separate, inserire prima quella<br />
inferiore.<br />
Chiudere la fascia <strong>di</strong> velcro anteriore.<br />
Connettere i cavi, posizion<strong>and</strong>oli come da immagini precedenti.<br />
Verificare che la batteria sia opportunamente bloccata al supporto, eventualmente agire<br />
sulle boccole o sulle fascie <strong>di</strong> velcro.<br />
3.4 Chiusura dell’involucro<br />
Appoggiare lo scooter su un piano in verticale con l’elica verso il basso. Controllare<br />
attentamente che la guarnizione OR <strong>di</strong> chiusura, sia inserita nella propria sede, pulita ed<br />
adeguatamente lubrificata con olio siliconico. Verificare la pulizia anche della bocca<br />
dell’involucro, eventualmente utilizzate un pennello asciutto per eliminare polvere o<br />
sabbia. Inserire l’involucro dall’alto, afferr<strong>and</strong>olo per la fascia <strong>di</strong> prua e orient<strong>and</strong>olo in<br />
modo tale che la fascia si venga a trovare nella posizione corretta. Accompagnare<br />
l’involucro per tutta la <strong>di</strong>scesa fino a farlo combaciare con il blocco motore. Ruotare in<br />
senso orario il volantino fino a chiusura completa senza stringere troppo. Con la sola forza<br />
<strong>di</strong> due <strong>di</strong>ta. (<strong>di</strong>spositivo brevettato)<br />
Accertarsi che, durante l’inserimento dell’involucro, non<br />
fuoriescano i cavi o i connettori, potrebbero danneggiarsi.<br />
Trattenere sempre l’involucro durante l’inserimento, non lasciarlo<br />
cadere, potrebbe danneggiarsi.<br />
9
70097-70099-70100<br />
4 Regolazione assetto<br />
L’assetto dell’ADV deve essere NEUTRO, ovvero ne negativo (affondare) ne positivo<br />
(galleggiare), ma deve rimanere stabile alla quota desiderata, eventualmente leggermente<br />
positivo. Il mezzo viene fornito con assetto neutro in acqua dolce; per compensare la<br />
<strong>di</strong>fferenza tra impiego in acqua dolce ed impiego in acqua salata viene fornita in dotazione<br />
una zavorra, consistente in blocchetti da posizionare e fissare su due lati, sul <strong>di</strong>sco che<br />
separa il vano motore dal vano batterie .<br />
Se necessario, regolare il trim, (tendenza a puntare verso il fondo con la parte anteriore o<br />
posteriore) spost<strong>and</strong>o verso prua, o verso poppa, la batteria; avvit<strong>and</strong>o o svit<strong>and</strong>o le<br />
boccole filettate impiegate per il suo sostegno e bloccaggio, in modo che infine assuma<br />
una posizione orizzontale. Un assetto eccessivamente POSITIVO, NEGATIVO o<br />
decisamente inclinato è potenzialmente PERICOLOSO !!<br />
5 Materiale in dotazione<br />
L’ADV viene fornito con i seguenti materiali in dotazione:<br />
Manuale <strong>di</strong> <strong>uso</strong> e <strong>manutenzione</strong><br />
Carica batterie completo <strong>di</strong> <strong><strong>manual</strong>e</strong> <strong>di</strong> <strong>uso</strong> e <strong>manutenzione</strong><br />
Zavorra per assetto in acqua salata<br />
A seconda dei modelli:<br />
ADV 20 - Batteria al piombo 20Ah<br />
ADV 33 - Batteria al piombo 33Ah<br />
ADV 42 - Batteria al piombo 42Ah<br />
6 Ricambi<br />
Nella seguente tabella sono elencati i materiali considerati <strong>di</strong> normale usura:<br />
CODICE<br />
DESCRIZIONE<br />
70197 Kit guarnizioni elica<br />
70202 Maniglia a fascia<br />
70306 Pacco batterie 20 Ah<br />
70104 Pacco batterie 33 Ah<br />
70105 Pacco batterie 42 Ah<br />
70093 Carica batteria per ADV 20<br />
70036 Carica batteria per ADV 33-42<br />
70204 Kit completo guarnizioni 274<br />
Qualsiasi altro componente è <strong>di</strong>sponibile su richiesta.<br />
10
AVVISO DI PERICOLO !<br />
LEGGERE QUANTO SEGUE<br />
70097-70099-70100<br />
LEGGERE ATTENTAMENTE IL MANUALE DI USO E MANUTENZIONE IN<br />
OGNI SUA PARTE COMPRESA LA SEZIONE 6 “INFORMAZIONI PER LA<br />
SICUREZZA” E LA SEZIONE 8 “USO”.<br />
SUEX srl<br />
• consegna all’acquirente il veicolo subacqueo <strong>di</strong> seguito denominato “ADV” in<br />
perfetto stato <strong>di</strong> <strong>manutenzione</strong> completo <strong>di</strong> <strong><strong>manual</strong>e</strong> <strong>di</strong> <strong>uso</strong> e <strong>manutenzione</strong>;<br />
• assume che chi si appresta ad utilizzare il veicolo subacqueo abbia seguito uno<br />
specifico addestramento per la conduzione <strong>di</strong> veicoli subacquei del genere e <strong>di</strong> aver<br />
conseguito la necessaria certificazione da parte <strong>di</strong> un’agenzia qualificata;<br />
• assume che chi si appresta ad utilizzare il veicolo subacqueo abbia letto questo il<br />
<strong><strong>manual</strong>e</strong> <strong>di</strong> <strong>uso</strong> e <strong>manutenzione</strong> fornito in dotazione nel quale vengono specificati,<br />
in particolare:<br />
- le modalità <strong>di</strong> utilizzo del veicolo subacqueo, con la specificazione della<br />
configurazione corretta dell’attrezzatura utilizzata dal subacqueo, della<br />
posizione che deve assumere il subacqueo durante l’utilizzo stesso, nonché<br />
dell’assetto che il veicolo subacqueo deve mantenere durante l’immersione,<br />
che detto veicolo non deve in alcun modo essere unito in modo non<br />
facilmente svincolabile al suo utilizzatore.<br />
- gli ambienti in cui l’utilizzo del veicolo subacqueo risulta particolarmente<br />
pericoloso, quali nell’immersione profonda, negli ambienti ostruiti, melmosi o<br />
soggetti a sospensione; le specifiche precauzioni da adottare nel caso <strong>di</strong><br />
immersioni in tali ambienti e la necessità <strong>di</strong> aver seguito adeguati corsi <strong>di</strong><br />
addestramento tenuti da qualificate agenzie;<br />
- i comportamenti da evitare in quanto pericolosi, quali, a mero titolo <strong>di</strong><br />
esempio, l’utilizzo del veicolo subacqueo per incrementare la velocità <strong>di</strong><br />
<strong>di</strong>scesa o <strong>di</strong> risalita;<br />
• assume, quin<strong>di</strong>, che l’utilizzatore abbia ricevuto compiuta informazione sulla<br />
<strong>manutenzione</strong>, sul corretto <strong>uso</strong> e sulle caratteristiche del prodotto alle quali lo<br />
stesso si dovrà attenere scrupolosamente.<br />
• Pertanto, qualsiasi danno a persone o cose, conseguente a <strong>di</strong>fetti <strong>di</strong> <strong>manutenzione</strong><br />
del veicolo subacqueo o ad un suo utilizzo con modalità <strong>di</strong>verse da quelle in<strong>di</strong>cate<br />
nel presente <strong><strong>manual</strong>e</strong> o senza le precauzioni ivi descritte, non potrà essere<br />
casualmente ricondotto a <strong>di</strong>fetti del prodotto.<br />
La <strong>Suex</strong> Srl declina ogni responsabilità per per<strong>di</strong>te o danni subiti da terze persone<br />
derivanti dall’utilizzo <strong>di</strong> questo veicolo subacqueo.<br />
L’ADV non è un giocattolo, né un mezzo idoneo al salvataggio. La sua funzione è<br />
esclusivamente quella <strong>di</strong> ausilio al sub esperto nelle sue immersioni, al quale consente <strong>di</strong><br />
coprire una <strong>di</strong>stanza maggiore rispetto a quella percorribile col solo <strong>uso</strong> delle pinne. L’ADV<br />
11
70097-70099-70100<br />
ed i suoi componenti, nel caso specifico la batteria ed il caricabatteria sono destinati ad<br />
un utilizzatore adulto ed esperto, che abbia letto attentamente le istruzioni per l’<strong>uso</strong>.<br />
Al fine <strong>di</strong> evitare ogni rischio a cose o persone, l’utilizzatore delle batterie e del carica<br />
batterie in dotazione con i nostri veicoli subacquei deve prima aver letto il <strong><strong>manual</strong>e</strong> <strong>di</strong> <strong>uso</strong><br />
e <strong>manutenzione</strong> e dovrà attenersi scrupolosamente alle in<strong>di</strong>cazioni sul corretto <strong>uso</strong> e sulle<br />
caratteristiche del prodotto, evit<strong>and</strong>o che persone inesperte o minori possano<br />
maneggiare, anche inavvertitamente, l’ADV e gli strumenti in dotazione.<br />
Il nostri ADV a seconda del tipo <strong>di</strong> batteria utilizzata sono dotati <strong>di</strong> un <strong>di</strong>spositivo <strong>di</strong> “cut<br />
off”, che ha lo scopo <strong>di</strong> tutelare i componenti interni dello stesso, impedendone il<br />
funzionamento qu<strong>and</strong>o la tensione è troppo bassa. Qu<strong>and</strong>o interviene tale <strong>di</strong>spositivo<br />
l’ADV, inevitabilmente, smette <strong>di</strong> funzionare.<br />
Questa caratteristica deve essere sempre tenuta presente al fine <strong>di</strong> non creare, in alcun<br />
modo, pericolo per il subacqueo, il quale, nel programmare l’attività <strong>di</strong> immersione, terrà<br />
conto <strong>di</strong> un tempo sufficiente per risalire in superficie anche in assenza della forza<br />
propulsiva dell’ADV stesso qualora la carica della batteria, a causa del tempo trascorso<br />
in acqua, stia per esaurirsi.<br />
SUEX S.r.l. declina ogni responsabilità per qualsiasi danno a persone e/o cose, derivante<br />
da un <strong>uso</strong> con modalità <strong>di</strong>verse da quelle in<strong>di</strong>cate nel presente <strong><strong>manual</strong>e</strong> e senza aver<br />
adottato le precauzioni ivi descritte.<br />
A causa del costante sviluppo tecnologico i veicoli subacquei suex potranno essere<br />
mo<strong>di</strong>ficati in ogni momento senza preavviso.<br />
Il presente <strong><strong>manual</strong>e</strong> non è un <strong><strong>manual</strong>e</strong> sostitutivo <strong>di</strong> un adeguato corso tenuto da<br />
agenzie certificate circa il corretto utilizzo dell’ADV durante l’immersione.<br />
12
70097-70099-70100<br />
Premessa<br />
Questo <strong><strong>manual</strong>e</strong> contiene le istruzioni e le avvertenze importanti riguardantidei i veicoli<br />
subacquei (ADV) prodotti da SUEX S.r.l.<br />
L’osservanza delle istruzioni contenute nel presente <strong><strong>manual</strong>e</strong>, consente<br />
<strong>di</strong> operare durante le fasi <strong>di</strong> <strong>uso</strong> e <strong>manutenzione</strong> in con<strong>di</strong>zioni <strong>di</strong><br />
sicurezza garantendo nel contempo il regolare funzionamento e<br />
l’economia del mezzo. <strong>Suex</strong> s.r.l. declina ogni responsabilità per danni<br />
conseguenti a negligenza o alla mancata osservanza <strong>di</strong> queste<br />
istruzioni.<br />
7 Identificazione<br />
Sulla macchina è stato apposto un numero <strong>di</strong> matricola impresso generalmente all’interno<br />
del corpo, sulla batteria e sul corpo motore. In caso <strong>di</strong> necessità, per richiesta <strong>di</strong> intervento<br />
<strong>di</strong> assistenza o per la fornitura <strong>di</strong> ricambi deve essere citato il numero riportato.<br />
8 Norme generali <strong>di</strong> sicurezza e <strong>di</strong> prevenzione<br />
infortuni<br />
Prestare particolare attenzione ai segnali <strong>di</strong> pericolo riportati in questo <strong><strong>manual</strong>e</strong>. I segnali<br />
<strong>di</strong> pericolo sono <strong>di</strong> 3 livelli :<br />
Questo segnale avverte che, se le operazioni descritte non sono<br />
correttamente eseguite, l’utente è sottoposto a rischi che potrebbero<br />
recare danni o lesioni con conseguenze anche gravi per la sua salute.<br />
Questo segnale avverte che, se le operazioni descritte non vengono<br />
correttamente eseguite, l’utente è soggetto a possibili rischi che però<br />
non comportano danni o lesioni.<br />
Questo segnale avverte che, se le operazioni descritte non vengono<br />
correttamente eseguite, può conseguirne un danno al mezzo.<br />
Prima <strong>di</strong> utilizzare il mezzo leggere attentamente le istruzioni riportate sul presente<br />
<strong><strong>manual</strong>e</strong><br />
La presente pubblicazione e’ <strong>di</strong> esclusiva proprietà <strong>di</strong> SUEX s.r.l che ne vieta la<br />
riproduzione anche parziale senza precisa autorizzazione scritta.<br />
NOTA IMPORTANTE!<br />
Nonostante fare un immersione con l’ausilio dell’ADV subacqueo sia molto <strong>di</strong>vertente e vi<br />
sollevi da grosse fatiche, non <strong>di</strong>menticate mai che è un mezzo meccanico e…<br />
PUO’ ROMPERSI!<br />
Non considerate mai l’ADV come un aiuto in situazioni <strong>di</strong> pericolo.<br />
NON E’ UN MEZZO DI SALVATAGGIO!<br />
Ricordatevi sempre che potete contare SOLO sulle vostre forze.<br />
13
70097-70099-70100<br />
8.1 Targhetta <strong>di</strong> segnalazione<br />
Sul mezzo è incollata la seguente etichetta, essa non vede essere rimossa ed in caso <strong>di</strong><br />
illeggibiltà va sostituita con una nuova da richiedere alla nostra assistenza. La rimozione <strong>di</strong><br />
questa etichetta, comporta la non responsabilità <strong>di</strong> SUEX S.r.l. per incidenti occorsi in<br />
seguito a comportamenti tenuti in contrad<strong>di</strong>zione alle in<strong>di</strong>cazioni in essa riportate.<br />
14
70097-70099-70100<br />
9 Uso previsto<br />
Il veicolo subacqueo prodotto da SUEX s.r.l. è un mezzo progettato e costruito per lo<br />
spostamento in immersione. Qualsiasi intervento eseguito sul prodotto, da parte del cliente<br />
o terze parti, che mo<strong>di</strong>fichi sostanzialmente la destinazione d’<strong>uso</strong> è vietato.<br />
Il veicolo è stato progettato, <strong>di</strong>mensionato e costruito unicamente per<br />
l’<strong>uso</strong> precedentemente descritto. Qualsiasi altro <strong>uso</strong> o qualsiasi<br />
operazione non conforme o non corrispondente a quanto in<strong>di</strong>cato nel<br />
presente <strong><strong>manual</strong>e</strong>, può comportarne il suo danneggiamento<br />
precludendo così il rispetto delle con<strong>di</strong>zioni per cui è stato progettato e<br />
costruito, con conseguente possibile compromissione delle caratteristiche tecniche e <strong>di</strong><br />
sicurezza. Il costruttore non risponde per danni a persone e/o cose derivanti da <strong>uso</strong> non<br />
conforme.<br />
10 Garanzia<br />
Il prodotto è garantito contro i <strong>di</strong>fetti <strong>di</strong> costruzione per il periodo determinato dalla<br />
normativa vigente. La garanzia decade per un <strong>uso</strong> non conforme o <strong>di</strong>verso da quello<br />
previsto o illustrato nel presente <strong><strong>manual</strong>e</strong>. Cattivo <strong>uso</strong>, negligenza, tentativi <strong>di</strong> riparazione<br />
o mo<strong>di</strong>fica da parte <strong>di</strong> personale non autorizzato, fanno decadere le con<strong>di</strong>zioni <strong>di</strong> garanzia.<br />
(ve<strong>di</strong> le speciali con<strong>di</strong>zioni <strong>di</strong> garanzia della batteria)<br />
11 Garanzia sulla batteria<br />
Le batterie in dotazione ai nostri ADV, sono garantite a termine <strong>di</strong> legge, ad esclusione <strong>di</strong>:<br />
Difetti dovuti a danneggiamenti, errato utilizzo, incidenti, manomissione, negligenza o<br />
incuria e in caso <strong>di</strong> alterazioni o riparazioni effettuate da persone non autorizzate.<br />
Difetti o danni risultanti da un utilizzo del prodotto in con<strong>di</strong>zioni <strong>di</strong>verse da quelle abituali.<br />
Difetti o danni derivanti da errati controlli, operazioni, <strong>manutenzione</strong>, installazione,<br />
adattamenti, applicazioni non autorizzate, o da qualsiasi altra alterazione o mo<strong>di</strong>fica <strong>di</strong><br />
qualsiasi genere.<br />
Rottura o danni a cavi o connessioni se non dovute <strong>di</strong>rettamente a <strong>di</strong>fetti <strong>di</strong> materiali o<br />
lavorazione.<br />
Prodotti smontati o riparati, da altri <strong>di</strong>versi da SUEX S.r.l., in maniera tale da menomare la<br />
corretta funzionalità o impe<strong>di</strong>re un'adeguata verifica e collaudo al fine <strong>di</strong> sod<strong>di</strong>sfare la<br />
richiesta <strong>di</strong> intervento in garanzia.<br />
Difetti o danni dovuti ad umi<strong>di</strong>tà, liqui<strong>di</strong>, o corpi estranei immessi all’interno del pacco<br />
batterie.<br />
Cavi che siano allungati o abbiano l’isolamento rovinato o mancante.<br />
Graffi o danni ad ogni superficie <strong>di</strong> plastica e ad ogni altra parte esterna dell'apparecchio,<br />
dovuti al normale utilizzo del prodotto da parte del consumatore.<br />
Prodotti affittati su base temporanea.<br />
Manutenzione perio<strong>di</strong>ca e riparazione o sostituzione <strong>di</strong> parti dovute ad un normale<br />
logoramento o deterioramento.<br />
15
12 Informazioni per la sicurezza<br />
70097-70099-70100<br />
12.1 Addestramento<br />
L’ADV può essere utilizzato in<strong>di</strong>fferentemente da un subacqueo ricreativo o da un<br />
subacqueo tecnico, in entrambe i casi si dà per scontato che chi si appresta ad immergersi<br />
abbia conseguito la necessaria certificazione da qualificate agenzie; in ogni caso l'utilizzo<br />
dell’ADV presuppone uno specifico addestramento che permetta <strong>di</strong> utilizzarlo in piena<br />
sicurezza e <strong>di</strong> apprezzarne appieno le potenzialità. Non <strong>di</strong>mentichiamo che il pericolo<br />
maggiore è dovuto principalmente dall’ambiente subacqueo <strong>di</strong> utilizzo.<br />
12.2 Configurazione ed assetto <strong>di</strong> manovra<br />
I veicoli subacquei SUEX sono del tipo TOW BEHIND (si <strong>di</strong>fferenzia dai così detti “ride on<br />
top” che devono essere cavalcati) e quin<strong>di</strong> l'utilizzo ideale richiede che il subacqueo si<br />
faccia trainare rest<strong>and</strong>o in posizione arretrata rispetto all’ADV.<br />
Attenzione, è assolutamente vietato vincolare l’ADV al subacqueo in<br />
modo improprio. In ogni momento dovrebbe essere possibile<br />
abb<strong>and</strong>onare l’ADV con estrema facilità. Nel caso si voglia impiegare un<br />
<strong>di</strong>spositivo <strong>di</strong> traino, deve essere utilizzato l’accessorio cod. 70089<br />
provvisto <strong>di</strong> sgancio rapido.<br />
Ve<strong>di</strong> immagine pagina seguente:<br />
fig. 1 <strong>di</strong>spositivo agganciato<br />
fig 2 <strong>di</strong>spositivo sganciato<br />
Figura 1<br />
Figura 2<br />
La configurazione corretta dell'attrezzatura è un fattore <strong>di</strong> cruciale importanza per la<br />
sicurezza in immersione e <strong>di</strong>venta essenziale qu<strong>and</strong>o ci si immerge con l’ADV. In linea <strong>di</strong><br />
principio il tipo ed il posizionamento dell'attrezzatura deve garantire una perfetta<br />
idro<strong>di</strong>namicità e non presentare elementi sporgenti o penzolanti.<br />
16
70097-70099-70100<br />
La posizione del subacqueo in immersione dovrà essere tendenzialmente orizzontale<br />
(assetto e galleggiamento che derivano sempre da una corretta configurazione<br />
dell'attrezzatura e da un adeguato addestramento) ai fini della sicurezza, dell'autonomia,<br />
della velocità e del comfort in navigazione.<br />
Prestare la massima attenzione nel <strong>di</strong>sporre l'attrezzatura con particolare<br />
cura riguardo a: fruste, erogatori, bombole al fianco, manometri,<br />
consolle, avvisatori acustici, lampade e relativi cavi, reel , evit<strong>and</strong>o che<br />
penzolino e quin<strong>di</strong> possano venire a contatto con l'elica o impigliarsi<br />
inavvertitamente sul fondale o sul compagno cre<strong>and</strong>o situazioni <strong>di</strong><br />
pericolo anche grave.<br />
12.3 Zona pericolosa e rischi residui<br />
L’elica è protetta me<strong>di</strong>ante una fascia circolare esterna ra<strong>di</strong>ale, è però esposta sia dal lato<br />
aspirazione che dal lato espulsione. In corrispondenza <strong>di</strong> tali zone non sono state poste<br />
ulteriori protezioni perché ridurrebbero notevolmente il passaggio del fluido nel condotto,<br />
riducendo drasticamente il ren<strong>di</strong>mento del sistema propulsivo.<br />
Rischio <strong>di</strong> impigliamento e taglio<br />
Non introdurre alcun oggetto o parte del corpo all’interno del condotto <strong>di</strong><br />
flusso a contatto con le pale dell’elica in rotazione, durante l’<strong>uso</strong> deve<br />
essere mantenuta, a parte la mano sul grilletto, una <strong>di</strong>stanza <strong>di</strong><br />
sicurezza <strong>di</strong> almeno 40 cm dall’apparato propulsore.<br />
Rischio <strong>di</strong> lesioni dorso-lombari<br />
In superficie, usare cautela se il sollevamento del mezzo avviene<br />
<strong>manual</strong>mente senza l’ausilio <strong>di</strong> attrezzi idonei. È consigliabile farsi<br />
aiutare da una seconda persona.<br />
Rischio <strong>di</strong> schiacciamento<br />
Durante la fase <strong>di</strong> chiusura del tubo o della calotta fare attenzione a non<br />
interporre le <strong>di</strong>ta.<br />
12.4 Dispositivo <strong>di</strong> sicurezza<br />
Tra l’apparato motore e l’elica, vi è un <strong>di</strong>spositivo limitatore <strong>di</strong> coppia, qu<strong>and</strong>o la resistenza<br />
applicata all’elica supera un determinato momento torcente, esso scatta impedendo<br />
all’elica <strong>di</strong> continuare a girare.<br />
Il <strong>di</strong>spositivo produrrà un rumore ritmico che avvertirà imme<strong>di</strong>atamente<br />
della sua inserzione. Non appena si dovesse presentare questa<br />
situazione, rilasciare imme<strong>di</strong>atamente il grilletto, togliere tensione<br />
tramite l’interruttore sezionatore e liberare l’elica dal corpo estraneo.<br />
non mantenere in funzione continua, oltre i 10 secon<strong>di</strong>, il limitatore <strong>di</strong><br />
coppia, è concepito per l’<strong>uso</strong> in emergenza ed una inserzione protratta nel tempo ne<br />
potrebbe causare il danneggiamento.<br />
Se le con<strong>di</strong>zioni <strong>di</strong> utilizzo vi permettono <strong>di</strong> estrarre il corpo estraneo dall’elica durante<br />
l’immersione in tutta sicurezza fatelo, altrimenti abb<strong>and</strong>onate l’ADV per poi eventualmente<br />
recuperarlo in un secondo momento.<br />
17
70097-70099-70100<br />
13 Movimentazione<br />
In qualsiasi situazione <strong>di</strong> trasporto, l’ADV deve essere sempre chi<strong>uso</strong>.<br />
Il veicolo è stato pensato per essere utilizzato in ambiente acquatico, qu<strong>and</strong>o lo dovete<br />
trasportare o caricare in auto, data la sua forma ed il suo peso, dovete osservare alcune<br />
precauzioni.<br />
Sollevatelo impugn<strong>and</strong>o un supporto del condotto <strong>di</strong> flusso e la maniglia <strong>di</strong> prua.<br />
Durante il trasporto in auto o in barca bloccatelo in modo che non si muova.<br />
Si consiglia l’<strong>uso</strong> del supporto cod. 70068 (ve<strong>di</strong> accessori <strong>Suex</strong>).<br />
In barca o gommone, non metterlo mai a prua o comunque in posizione tale che possa<br />
essere sottoposto a forti scossoni, le parti interne potrebbero danneggiarsi. Qu<strong>and</strong>o si<br />
appoggia l’ADV al suolo, fatelo sempre con delicatezza e qu<strong>and</strong>o viene posizionato<br />
verticalmente, appoggiatelo sulla protezione dell’elica, curate che sia appoggiato su un<br />
piano e che nulla vada a contatto con l’ogiva dell’elica.<br />
Se preferite impugnare l’ADV per le maniglie <strong>di</strong> manovra, fatelo pure, ma cercate <strong>di</strong> non<br />
sollecitarle troppo, non sono state realizzate per sopportare carichi eccessivi. Non<br />
sostenere il peso dell’ADV solo con una maniglia.<br />
PRIMA DI IMBARCARE L’ADV A BORDO DI VELIVOLI O MEZZI PUBBLICI<br />
INFORMATEVI SULLE NORME PER IL TRASPORTO DELLE BATTERIE!<br />
14 Uso del veicolo subacqueo ADV.<br />
L’immersione subacquea è un’attività potenzialmente pericolosa, l’utilizzo scorretto<br />
dell’ADV in tale ambiente aumenta il rischio dell’immersione stessa.<br />
Prima dell’<strong>uso</strong> accertarsi che la batteria sia stata ricaricata, che i connettori siano collegati<br />
e che non vi siano parti elettriche ossidate, controllare la chiusura della calotta <strong>di</strong> prua,<br />
l’integrità del corpo principale soprattutto a seguito <strong>di</strong> urti o incisioni accidentali, il<br />
funzionamento del grilletto e dell’interruttore generale. A questo punto il mezzo è pronto<br />
per l’utilizzo. Dopo essere entrati in acqua, è necessario ruotare l’interruttore generale in<br />
senso orario in posizione <strong>di</strong> marcia con la sola forza delle <strong>di</strong>ta, non è un interruttore a<br />
scatto, ma il suo comportamento è simile ad un rubinetto dell’acqua, cioè è necessario più<br />
<strong>di</strong> un giro completo per chiudere od aprire il contatto.<br />
Non forzare a fine corsa l’interruttore, potrebbe danneggiarsi<br />
L’interruttore generale deve essere ruotato in senso orario in posizione <strong>di</strong><br />
marcia solamente qu<strong>and</strong>o si è in acqua; far girare l’elica in aria può<br />
essere pericoloso e danneggia la tenuta idraulica dell’albero motore.<br />
Una volta immersi, per azionare l’elica è necessario tirare verso <strong>di</strong> sè il grilletto integrato<br />
nella maniglia, rilasci<strong>and</strong>o il grilletto l’elica si arresta.<br />
La velocità, può essere regolata dallo 0 al 100% della velocità massima tramite la<br />
manopola <strong>di</strong> regolazione velocità; ruot<strong>and</strong>ola in senso orario la velocità <strong>di</strong>minuisce, in<br />
senso antiorario la velocità aumenta.<br />
Non forzare a fine corsa la manopola del regolatore <strong>di</strong> velocità, il<br />
potenziometro all’interno potrebbe danneggiarsi.<br />
18
70097-70099-70100<br />
15 Autonomia<br />
I dati <strong>di</strong> autonomia forniti sono in<strong>di</strong>cativi e comunque si riferiscono ad un utilizzo :<br />
- con mezzo in perfetta efficienza<br />
- in ambienti temperati<br />
- in assenza <strong>di</strong> correnti<br />
- a me<strong>di</strong>o carico (subacqueo con monobombola o bibombola 12+12 lt)<br />
- in perfetto assetto idro<strong>di</strong>namico<br />
In linea <strong>di</strong> principio va calcolato il tempo per coprire il percorso <strong>di</strong> <strong>and</strong>ata, e ritorno, deve<br />
venire inoltre stabilita una RISERVA <strong>di</strong> autonomia che varierà a seconda del tipo <strong>di</strong><br />
immersione.<br />
In ogni caso si DEVE programmare l'immersione tenendo<br />
conto <strong>di</strong> poter tornare al punto <strong>di</strong> emersione senza l'ausilio<br />
dell’ADV<br />
16 Velocità<br />
Come per l'autonomia, anche la velocità <strong>di</strong>pende dagli stessi fattori. Si dovrà considerare<br />
la velocità compatibile al tipo <strong>di</strong> immersione ed adegu<strong>and</strong>ola a quella dei compagni.<br />
Velocità <strong>di</strong> <strong>di</strong>scesa<br />
L’ADV permette una velocità <strong>di</strong> <strong>di</strong>scesa elevata. EVITARE il suo utilizzo per incrementarla<br />
in quanto aumentano i problemi legati alla compensazione ed all'ambientamento psicofisico.<br />
Velocità <strong>di</strong> risalita<br />
L’ADV “NON DEVE ESSERE UTILIZZATO PER LA RISALITA VERTICALE”, infatti il<br />
suo utilizzo in tal senso può indurre una risalita troppo veloce e quin<strong>di</strong><br />
POTENZIALMENTE PERICOLOSA ; pertanto è opportuno posizionarlo ove non crei<br />
intralcio DOPO AVERLO DISATTIVATO RUOTANDO L’INTERRUTTORE GENERALE<br />
IN POSIZIONE OFF ed effettuare la risalita normalmente.<br />
17 Profon<strong>di</strong>tà e ambienti <strong>di</strong> utilizzo<br />
NON ECCEDERE LA MASSIMA PROFONDITA’ OPERATIVA!!!<br />
In ogni caso l’immersione, in particolare a quella profon<strong>di</strong>tà è un’attività MOLTO<br />
PERICOLOSA, L’UTILIZZO SCORRETTO DELL’ADV IN TALI AMBIENTI, AUMENTA IL<br />
RISCHIO DELL’IMMERSIONE.<br />
E’ importante ricordare che la massima profon<strong>di</strong>tà operativa del veicolo subacqueo si<br />
riferisce all’ADV in perfetta efficienza, urti, rigature o deformazioni riducono sensibilmente<br />
questo limite.<br />
Ambienti ostruiti<br />
L'immersione in tali ambienti è <strong>di</strong> per sé E' MOLTO PERICOLOSA.<br />
L’UTILIZZO SCORRETTO DELL’ADV IN TALI AMBIENTI, AUMENTA IL RISCHIO<br />
DELL’IMMERSIONE. A titolo <strong>di</strong> esempio: un urto delle rubinetterie mentre si procede in<br />
velocità ne potrebbe provocare la rottura con le relative conseguenze. L'IMMERSIONE IN<br />
TALI AMBIENTI PREVEDE ADEGUATI CORSI DI ADDESTRAMENTO TENUTI DA<br />
QUALIFICATE AGENZIE. Si vuol sottolineare che va pianificata la gestione sia<br />
dell’autonomia dell’ADV che quella del gas in modo che ogni componente della squadra<br />
<strong>di</strong>sponga del DOPPIO delle risorse necessarie; è inoltre obbligatorio equipaggiarsi <strong>di</strong> altri<br />
ADV <strong>di</strong> scorta.<br />
19
70097-70099-70100<br />
Ambienti melmosi o soggetti a sospensione<br />
Sono ambienti, ostruiti e non, nei quali la visibilità può azzerarsi repentinamente a causa<br />
della sospensione che si crea qu<strong>and</strong>o viene smosso il se<strong>di</strong>mento. L'immersione in questi<br />
ambienti <strong>di</strong> per sé E' MOLTO PERICOLOSA. IL NON CORRETTO UTIILIZZO DELL’ADV<br />
IN TALI AMBIENTI POTREBBE AUMENTARE IL RISCHIO DELL'IMMERSIONE.<br />
L'IMMERSIONE IN TALI AMBIENTI PREVEDE ADEGUATI CORSI DI<br />
ADDESTRAMENTO TENUTI DA QUALIFICATE AGENZIE<br />
A titolo <strong>di</strong> esempio: l'elica in movimento orientata verso il fondo può sollevare una notevole<br />
quantità <strong>di</strong> sospensione.<br />
L’avviamento accidentale <strong>di</strong> un ADV <strong>di</strong> riserva che si sta train<strong>and</strong>o può creare situazioni <strong>di</strong><br />
serio pericolo.<br />
18 Allagamento del veicolo subacqueo, affondamento.<br />
E’ un’ipotesi che potrebbe verificarsi soprattutto a seguito <strong>di</strong> un <strong>uso</strong> improprio, <strong>di</strong> un forte<br />
urto subacqueo, <strong>di</strong> una non corretta chiusura, <strong>di</strong> una inefficiente <strong>manutenzione</strong>.<br />
In caso <strong>di</strong> allagamento il mezzo comincerà ad assumere un assetto<br />
negativo e quin<strong>di</strong> ad affondare.<br />
In caso <strong>di</strong> allagamento totale la situazione può <strong>di</strong>ventare<br />
POTENZIALMENTE PERICOLOSA in quanto l’ADV assumerà un<br />
FORTE assetto negativo da circa 12 a 40 kg a seconda del<br />
modello TRASCINANDOVI VERSO IL FONDO) e pertanto DOVRA’ ESSERE<br />
IMMEDIATAMENTE ABBANDONATO.<br />
19 Precauzioni d’<strong>uso</strong><br />
- Non tenere l’ADV esposto alla ra<strong>di</strong>azione solare, chi<strong>uso</strong> in auto al sole o esposto<br />
al calore eccessivo, (max 50°C), si potrebbe surriscaldare deform<strong>and</strong>osi e gli<br />
accoppiamenti non potrebbero più garantire l’ermeticità.<br />
- Evitare urti durante l’immersione.<br />
- Non usarlo come sgabello.<br />
- Non salirci sopra con i pie<strong>di</strong>.<br />
- Non farlo usare a minorenni o inesperti.<br />
- Non trasportarlo smontato o aperto.<br />
- Non ricaricare le batterie con un caricabatterie <strong>di</strong>verso da quello in dotazione.<br />
- Non tentare <strong>di</strong> fermare l’elica con le mani.<br />
- Non bloccare il grilletto <strong>di</strong> avvio con marcia inserita.<br />
- Non lanciarlo dalla barca o dalla riva.<br />
- Non smontarlo.<br />
- Non farlo funzionare a secco in superficie.<br />
- Non bagnare i connettori elettrici.<br />
- Non cortocircuitare la batteria.<br />
- Non staccare i cavi dal connettore od invertirne la polarità.<br />
Verificare spesso il fissaggio della fascia <strong>di</strong> tessuto a prua e che non sia<br />
danneggiata, una sua improvvisa rottura potrebbe essere causa <strong>di</strong><br />
incidenti.<br />
Non bagnare le parti interne dell’ADV e le batterie.<br />
20
70097-70099-70100<br />
20 Pulizia e rimessaggio<br />
Dopo l’<strong>uso</strong> l’ADV deve essere sciacquato con acqua dolce, per lo sporco più resistente<br />
può essere usato anche del detergente neutro; prima <strong>di</strong> aprirlo è importante eliminare ogni<br />
residuo <strong>di</strong> salse<strong>di</strong>ne e sabbia In particolar modo deve essere pulito e liberato da residui il<br />
pistoncino <strong>di</strong> com<strong>and</strong>o collegato al grilletto.<br />
Non usare solventi od idrocarburi<br />
Deve essere riposto possibilmente in luogo fresco pulito ed areato, in<br />
posizione verticale con la prua verso l’alto, la batteria deve essere tolta,<br />
ricaricata e conservata anch’essa al riparo dal gelo e dall’eccessivo<br />
calore. Attenzione che l’accidentale contatto con oggetti metallici<br />
all’interno del connettore non la cortocircuitino. Il volantino <strong>di</strong> apertura<br />
dell’involucro deve essere allentato.<br />
Nota importante: togliere sempre le batterie dopo l’<strong>uso</strong>.<br />
21 Problemi, ca<strong>use</strong> e rime<strong>di</strong><br />
PROBLEMA<br />
L’ADV non funziona, allo spostamento del grilletto<br />
l’elica non gira.<br />
Nonostante le batterie siano state caricate ed i<br />
connettori siano inseriti l’ADV non funziona.<br />
La regolazione della velocità non funziona<br />
L’autonomia dell’ADV è vistosamente <strong>di</strong>minuita.<br />
Alla chiusura dell’interruttore generale, l’ADV<br />
funziona sempre, non c’è modo <strong>di</strong> fermarlo.<br />
Il motore è rumoroso.<br />
Si avvertono delle vibrazioni al girare dell’elica.<br />
L’ADV si allaga molto lentamente.<br />
Il grilletto <strong>di</strong> com<strong>and</strong>o si incastra e l’ADV rimane<br />
acceso<br />
CAUSA - RIMEDIO<br />
Aprire l’ADV, controllare che le batterie siano cariche<br />
e che i connettori siano inseriti e non danneggiati,<br />
poi riprovare.<br />
Il sistema <strong>di</strong> controllo potrebbe essere danneggiato,<br />
va verificato.*<br />
Il motore elettrico potrebbe essere fuori <strong>uso</strong>, va<br />
sostituito.*<br />
La batteria potrebbe essere danneggiata, va<br />
sostituita.<br />
Il sistema <strong>di</strong> controllo potrebbe essere danneggiato,<br />
va sostituito.*<br />
Le batterie sono da sostituire.<br />
Il caricabatterie è rotto o non funziona correttamente,<br />
va sostituito.<br />
Il sistema <strong>di</strong> controllo si è danneggiato, va sostituito.*<br />
L’ADV va revisionato.*<br />
L’elica è stata danneggiata, sostituirla.<br />
Il sistema <strong>di</strong> trasmissione è danneggiato, va<br />
revisionato.*<br />
Sostituire tutte le guarnizioni <strong>di</strong> tenuta e guardare<br />
attentamente che le se<strong>di</strong> interne del tubo non siano<br />
rigate. Ve<strong>di</strong> ricambi cap.18<br />
Spegnere l’ADV, provare a far scorrere il pistoncino<br />
<strong>di</strong> avviamento com<strong>and</strong>ato dal grilletto per far uscire<br />
eventuali corpi estranei, riprovare ad accendere. Se<br />
l’ADV continua a funzionare va verificato il sistema <strong>di</strong><br />
avviamento, probabilmente ha subito un urto con<br />
conseguenti danni.<br />
*operazioni da eseguire in centro <strong>di</strong> assistenza autorizzata SUEX.<br />
21
70097-70099-70100<br />
22 Manutenzione<br />
Manutenzione OR tenuta<br />
Aprire l’ADV, togliere con delicatezza l’O-ring <strong>di</strong> tenuta facendo molta attenzione a non<br />
rigare le superfici <strong>di</strong> appoggio dell’O-ring stesso, pulire accuratamente la sede (solo ed<br />
esclusivamente con un pennello o straccio morbido puliti) non usare alcun tipo <strong>di</strong> solvente<br />
o alcool, rimettere al suo posto la guarnizione lubrificata <strong>di</strong> olio siliconico (non usare altro<br />
tipo <strong>di</strong> olio!!!) è consigliato quello in bomboletta spray usato abitualmente per le<br />
attrezzature subacquee. Saltuariamente, lubrificare con normale grasso minerale, la vite<br />
del pomolo <strong>di</strong> chiusura. Non lubrificare mai il movimento del grilletto od il pistoncino<br />
magnetico, si riempirebbero <strong>di</strong> sabbia e sporcizia. Non lubrificare i contatti elettrici!<br />
Manutenzione straor<strong>di</strong>naria<br />
Ogni cento ore <strong>di</strong> utilizzo o almeno ogni due anni è consiglata la revisione dell’ADV, con la<br />
verifica delle tenute idrauliche e dei circuiti elettrici.<br />
SUEX S.r.l. provvede alla completa revisione del vostro ADV con spe<strong>di</strong>zione in tutto il<br />
mondo.<br />
NOTA: Utilizz<strong>and</strong>o i lubrificanti spray, arieggiare abbondantemente<br />
l’interno dell’involucro, in modo tale che non vi ristagnino gas propellenti,<br />
sono quasi sempre infiammabili!!!!!<br />
23 Smaltimento e rottamazione<br />
Questo apparecchio è costruito parzialmente con materiali riciclabili.<br />
Qu<strong>and</strong>o le con<strong>di</strong>zioni <strong>di</strong> utilizzo non sono più sod<strong>di</strong>sfacenti sotto il punto <strong>di</strong> vista della<br />
sicurezza, o l’assistenza ritiene che non possa più essere utilizzato, l’ADV deve essere<br />
demolito.<br />
Deve essere smontato e separato nelle sue parti, le parti in plastica vanno depositate in<br />
appositi contenitori per la raccolta del materiale plastico, le parti metalliche portate presso<br />
un centro <strong>di</strong> raccolta materiali metallici.<br />
Particolare cura va posta nello smaltimento degli accumulatori, essi<br />
sono altamente inquinanti per l’ambiente, vanno obbligatoriamente per<br />
legge, portati in un centro <strong>di</strong> raccolta accumulatori usati.<br />
NON DISPERDERE NELL’AMBIENTE ALCUNA PARTE DEL MEZZO, IN PARTICOLAR<br />
MODO GLI ACCUMULATORI!<br />
22
70097-70099-70100<br />
24 Ricarica della batteria (norme generali)<br />
• LEGGERE ATTENTAMENTE IL MANUALE DI ISTRUZIONI DEL<br />
CARICABATTERIA.<br />
• La batteria va ricaricata solo tramite l’apposito carica batteria in dotazione.<br />
• La ricarica deve avvenire in luogo coperto ed aerato, lontano da oggetti o<br />
liqui<strong>di</strong> infiammabili, in locali non frequentati da persone e tantomeno dentro il<br />
luogo <strong>di</strong> abitazione.<br />
• La batteria deve essere collegata al caricabatteria per mezzo dell’apposito<br />
connettore.<br />
• Prima <strong>di</strong> effettuare la ricarica è ASSOLUTAMENTE NECESSARIO estrarre la<br />
batteria dall’ADV e attendere almeno due ore prima <strong>di</strong> iniziare il processo <strong>di</strong><br />
ricarica.<br />
• Durante il processo <strong>di</strong> ricarica, alla batteria non deve essere connesso alcun<br />
<strong>di</strong>spositivo.<br />
• La batteria va conservata fuori dall’ADV ed inserita e collegata al motore solo<br />
imme<strong>di</strong>atamente prima dell’utilizzo: va <strong>di</strong>sconnessa ed estratta<br />
imme<strong>di</strong>atamente dopo l’utilizzo.<br />
25 Come ricaricare la batteria<br />
• Estrarre la batteria dall’ADV.<br />
• Posizionarla in un luogo protetto, aerato e lontano da cose infiammabili o persone.<br />
• PRIMA collegare il caricabatteria al connettore <strong>di</strong> ricarica batteria (<strong>di</strong>verso a<br />
seconda del modello) posto sulla batteria.<br />
• DOPO collegare il caricabatteria alla rete elettrica.<br />
• Attendere la completa ricarica (ve<strong>di</strong> istruzioni caricabatteria)<br />
• Riposizionare la batteria all’interno dell’ADV prima dell’utilizzo.<br />
In alcuni modelli è fisicamente possibile caricare la batteria anche<br />
senza estrarla dall’ADV (sconsigliato!) in quel caso si raccom<strong>and</strong>a <strong>di</strong><br />
posizionare il mezzo in un luogo protetto, aerato e lontano da cose<br />
infiammabili o persone ed assicurarsi sempre che l’interruttore<br />
principale dell’ADV sia in posizione OFF.<br />
NON TENTARE DI RICARICARE BATTERIE DANNEGGIATE O<br />
CHE PRESENTINO PERDITE DI LIQUIDO, OSSIDAZIONI O ALTRI<br />
DANNI.<br />
SUEX S.r.l. E’ A DISPOSIZIONE PER L’ASSISTENZA TECNICA<br />
NECESSARIA.<br />
23
70097-70099-70100<br />
26 Informazioni sulla batteria Pb gel<br />
La batteria è generalmente costituita da due singole batterie da 12 volt, collegate in serie per raggiungere la<br />
tensione <strong>di</strong> 24 volt. Esse sono assemblate in fabbrica, cablate con il cavo <strong>di</strong> alimentazione e con il<br />
connettore per il collegamento.<br />
Se durante l’utilizzo dell’ADV si nota un sensibile calo <strong>di</strong> potenza erogata, sospenderne l’<strong>uso</strong> spegnendolo<br />
tramite l’interruttore.<br />
Non lasciare MAI la batteria connessa all’ADV se non utilizzata.<br />
Ricaricare la batteria almeno una volta al mese.<br />
Ricaricare la batteria prima <strong>di</strong> ogni utilizzo, avendo cura <strong>di</strong> lasciar raffreddare (se si dovesse essere<br />
intiepi<strong>di</strong>ta) la batteria prima <strong>di</strong> inserirla nell’ADV; durante questa fase la batteria potrebbe rilasciare idrogeno<br />
il quale <strong>and</strong>rebbe inevitabilmente ad accumularsi all’interno dell’ADV che è ermetico.<br />
Un accumulo <strong>di</strong> idrogeno (in particolari con<strong>di</strong>zioni) potrebbe essere causa <strong>di</strong> incidenti, con conseguenti danni<br />
a cose e persone.<br />
Sostituire la batteria che ha terminato i suoi cicli <strong>di</strong> carica e scarica (sulle nostre macchine la batteria al<br />
piombo è verosimile che possa operare un numero variabile da 150 a 300 cicli, <strong>di</strong>pende molto dal tipo <strong>di</strong><br />
utilizzo fatto); una batteria esausta, oltre a non avere più capacità <strong>di</strong> immagazzinamento <strong>di</strong> energia, produce<br />
inevitabilmente gas idrogeno.<br />
Utilizzare solo batterie approvate da <strong>Suex</strong> S.r.l., ricaric<strong>and</strong>ole us<strong>and</strong>o esclusivamente i caricabatteria<br />
approvati dalla stessa. Qu<strong>and</strong>o il caricabatteria non viene usato, scollegarlo dalla presa <strong>di</strong> rete.<br />
Se non utilizzata, una batteria anche completamente carica si scarica lentamente per effetto del fenomeno <strong>di</strong><br />
autoscarica; è comunque consigliato ricaricare le batterie nelle 24 ore precedenti l’utilizzo.<br />
Temperature estreme incidono sensibilmente sulla capacità <strong>di</strong> carica della batteria.<br />
Lasciare la batteria in ambienti cal<strong>di</strong> o fred<strong>di</strong>, come ad esempio in un’auto completamente chiusa in piena<br />
estate o pieno inverno, ridurrà la capacità e la durata della batteria stessa. Cercare sempre <strong>di</strong> tenere le<br />
batterie ad una temperatura compresa tra 15°C e 25°C. Il ren<strong>di</strong>mento delle batterie è notevolmente ridotto a<br />
temperature inferiori a 0°C.<br />
NON GETTARE LE BATTERIE SUL FUOCO, ESPLODONO!<br />
Non utilizzare la batteria per scopi <strong>di</strong>versi da quelli prescritti.<br />
Non utilizzare mai caricabatteria o batterie che risultino danneggiati.<br />
La custo<strong>di</strong>a degli accumulatori deve avvenire all’esterno dell’ADV, in luogo asciutto,<br />
(umi<strong>di</strong>tà relativa 65% +-5%) e temperatura compresa tra i 5°C ed i 25°C, con i<br />
connettori elettrici lontani da oggetti metallici che possano cortocircuitare i due poli<br />
della batteria, con grave pericolo <strong>di</strong> incen<strong>di</strong>o, danni a cose e persone.<br />
Non bagnare i contatti elettrici.<br />
Disfarsi delle batterie applic<strong>and</strong>o le regolamentazioni locali, ad esempio ricicl<strong>and</strong>ole. Non gettarle tra i rifiuti<br />
domestici.<br />
Piombo (Pb)<br />
27 Con<strong>di</strong>zioni ideali per la ricarica della batteria<br />
Temperatura ambiente ammessa da 10°C a 35°C (ideale 20°C)<br />
Opzione <strong>di</strong> carica lenta (qu<strong>and</strong>o il caricabatteria lo consente).<br />
Temperatura della batteria all’inizio della ricarica 20°C.<br />
Con<strong>di</strong>zioni <strong>di</strong>verse da quelle sopra descritte possono influenzare sensibilmente la ricarica<br />
nonché il numero <strong>di</strong> ricariche possibili con una resa accettabile.<br />
24
70097-70099-70100<br />
28 Con<strong>di</strong>zioni ideali per la scarica della batteria<br />
Raccoman<strong>di</strong>amo <strong>di</strong> utilizzare la batteria ad una temperatura ambiente compresa tra 5°C e<br />
35°C.<br />
Per evitarne il deterioramento in tempi brevi e la possibile inversione <strong>di</strong> polarità delle celle,<br />
la batteria non deve essere, in nessun caso, mai scaricata del tutto.<br />
Qu<strong>and</strong>o, durante l’<strong>uso</strong> dell’ADV si notasse un sensibile calo <strong>di</strong> potenza all’elica, non<br />
insistere con il com<strong>and</strong>o <strong>di</strong> avvio, in quelle con<strong>di</strong>zioni <strong>di</strong> scarica della<br />
batteria E’ VIVAMENTE SCONSIGLIATO UTILIZZARE<br />
ULTERIORMENTE VEICOLO SUBACQUEO: la batteria si sta<br />
avvi<strong>and</strong>o ad una sovrascarica.<br />
Durante l’utilizzo dell’ADV è buona norma non procedere<br />
costantemente alla massima velocità, ma utilizzare il variatore <strong>di</strong> giri, magari sospendendo<br />
l’avvio frequentemente, facendo delle brevi pa<strong>use</strong>, in questo modo <strong>di</strong> dà il tempo alla<br />
batteria <strong>di</strong> attuare meglio la reazione chimica necessaria alla generazione della corrente,<br />
evit<strong>and</strong>o bruschi riscaldamenti delle celle.<br />
28.1 Nota importante sull’esaurimento della batteria!<br />
Dopo l’utilizzo dell’ADV, ricordarsi <strong>di</strong> interrompere sempre l’alimentazione al motore,<br />
tramite l’utilizzo dell’interruttore.<br />
Questo perché il controllo elettronico dell’ADV, anche se il motore non è in funzione, ha un<br />
piccolissimo consumo energetico, che a lungo porta alla scarica della batteria. L’intervento<br />
del <strong>di</strong>spositivo <strong>di</strong> cut off elimina la possibilità che la batteria si sovrascarichi, ma se per<br />
qualche motivo esso non dovesse funzionare, il risultato sarebbe quello della completa<br />
scarica della batteria con possibile inversione <strong>di</strong> polarità <strong>di</strong> qualche cella.<br />
29 Dispositivo <strong>di</strong> allarme acustico batteria scarica<br />
Gli ADV <strong>Suex</strong> sono dotati <strong>di</strong> un sistema <strong>di</strong> allarme acustico (sibilo continuo), facilmente<br />
u<strong>di</strong>bile sia in immersione sia in emersione, il quale entra in azione automaticamente al<br />
raggiungimento <strong>di</strong> una tensione impostata, valore considerato minimo per l’utilizzo<br />
dell’ADV, senza sfruttare ulteriormente ed in modo non appropriato la batteria.<br />
Tale avviso interviene sempre, sia che si stia utilizz<strong>and</strong>o l’ADV o nel caso che esso possa<br />
essere stato <strong>di</strong>menticato con il sezionatore in posizione “ON”.<br />
Con il segnalatore acustico in funzione l’ADV potrà rimanere attivo ancora per qualche<br />
minuto. Questo tempo può variare molto e <strong>di</strong>pende da vari fattori, come la potenza<br />
utilizzata e lo stato <strong>di</strong> usura delle batterie.<br />
QUANDO INTERVIENE QUESTO DISPOSITIVO E’ VIVAMENTE RACCOMANDATO DI<br />
NON SFRUTTARE ULTERIORMENTE LA BATTERIA E DI SPEGNERE<br />
IMMEDIATAMENTE L’ADV.<br />
25
70097-70099-70100<br />
30 Sistema <strong>di</strong> protezione batteria “CUT OFF” principio<br />
<strong>di</strong> funzionamento e istruzioni per l’<strong>uso</strong><br />
Il sistema elettronico <strong>di</strong> protezione della batteria dalla scarica totale accidentale è collocato<br />
all’interno della batteria e collegato in serie tra la batteria e il motore dell’ADV.<br />
La funzione è quella <strong>di</strong> impe<strong>di</strong>re la scarica eccessiva delle celle con possibile pericolo <strong>di</strong><br />
inversione della polarità <strong>di</strong> una o più celle, con conseguente possibile <strong>di</strong>struzione del<br />
pacco batterie con potenzialità <strong>di</strong> creare danni anche gravissimi a cose e/o a persone.<br />
Durante la scarica degli accumulatori, la tensione si abbassa fino a raggiungere un valore<br />
limite a quel punto il cut off impe<strong>di</strong>sce, interrompendo l’erogazione della corrente, che la<br />
batteria possa essere scaricata ulteriormente.<br />
Qu<strong>and</strong>o il cut off interviene la batteria non eroga più tensione al connettore.<br />
Per ripristinare la situazione <strong>di</strong> utilizzo della batteria è necessario ricaricarla<br />
esclusivamente per mezzo dell’apposito caricabatteria (ve<strong>di</strong> <strong><strong>manual</strong>e</strong> utilizzo del<br />
caricabatteria) e ristabilire il circuito.<br />
L’intervento del cut off è da ritenersi eccezionale e tale evento non dovrebbe verificarsi<br />
durante il normale utilizzo della batteria, in quanto il corretto <strong>uso</strong> del mezzo non prevede la<br />
scarica eccessiva della stessa.<br />
30.1 Modalità da seguire in caso <strong>di</strong> intervento del cut off<br />
In caso <strong>di</strong> intervento del sistema cut off, E’ IMPORTANTE procedere come <strong>di</strong> seguito:<br />
1. Sconnettere il connettore <strong>di</strong> alimentazione del motore della batteria.<br />
2. Estrarre la batteria dall’ADV.<br />
3. Lasciare la batteria a riposo almeno per 2 ore. E’ il tempo minimo necessario, in<br />
questo caso, per permettere alla batteria <strong>di</strong> raffreddarsi e riportarsi allo stato <strong>di</strong><br />
attesa ricarica.<br />
4. Collegare il connettore per la ricarica della batteria al caricabatteria.<br />
5. Procedere con la ricarica, come da <strong><strong>manual</strong>e</strong> istruzioni del caricabatteria.<br />
NOTA IMPORTANTE!<br />
Si ricorda ulteriormente che qu<strong>and</strong>o interviene il <strong>di</strong>spositivo <strong>di</strong><br />
cut off, l’ADV inevitabilmente smette <strong>di</strong> funzionare. Questo<br />
evento non deve in alcun modo essere origine <strong>di</strong> pericolo per il<br />
subacqueo, il quale avrà programmato l’attività <strong>di</strong> immersione,<br />
tenendo conto che l’utilizzo dell’ADV non può essere considerato come sistema<br />
per salvaguardare la propria vita o per togliersi da situazioni <strong>di</strong> <strong>di</strong>fficoltà.<br />
SUEX S.r.l. declina ogni responsabilità in seguito all’intervento del sistema cut<br />
off, in qualsiasi situazione, in situazioni pericolose o in immersioni dove il<br />
subacqueo abbia (a suo completo rischio) affidato il suo ritorno in superficie al<br />
mezzo subacqueo da noi costruito.<br />
Si ricorda che l’ADV deve essere considerato come ausilio all’immersione e non<br />
come mezzo <strong>di</strong> salvataggio.<br />
31 Batteria Pb gel, dom<strong>and</strong>e frequenti:<br />
Utilizzo l’ADV molto spesso, 2 volte alla settimana o tutti i giorni, ma non scarico mai la batteria al massimo della sua scarica<br />
perché faccio immersioni brevi, devo estrarre ogni volta la batteria e ricaricarla?<br />
La batteria al piombo non ha nessun effetto memoria, è meglio ricaricarla sempre, si allunga la vita degli accumulatori e si ha la<br />
sicurezza <strong>di</strong> avere la massima autonomia.<br />
La batteria va conservata fuori dall’ADV ed inserita e collegata al motore solo imme<strong>di</strong>atamente prima dell’utilizzo, e va <strong>di</strong>sconnessa ed<br />
estratta imme<strong>di</strong>atamente dopo l’utilizzo.<br />
Posso lasciare la batteria collegata al caricabatteria per lungo tempo?<br />
I nostri caricabatteria a fine ricarica entrano in mantenimento, possono essere lasciati attaccati alla batteria per quanto tempo si<br />
desideri, essi effettuano la ricarica solo se necessaria, è comunque meglio staccarli non appena terminata la ricarica.<br />
26
70097-70099-70100<br />
Mi è caduta la batteria al suolo, essa presenta uno spigolo ammaccato, posso utilizzare ancora la batteria?<br />
Ovviamente <strong>di</strong>pende dalle con<strong>di</strong>zioni dell’ammaccatura, le batterie al piombo gel <strong>di</strong> solito sono robuste, tuttavia esse vanno<br />
assolutamente sostituite se l’involucro dovesse presentare dei danni tali da far uscire l’elettrolita. In ogni caso una batteria caduta al<br />
suolo potrebbe avere subito dei danni interni alle connessioni tra le celle, si consiglia <strong>di</strong> sostituirla.<br />
E’ normale un riscaldamento della batteria durante la ricarica?<br />
Premesso che la batteria va sempre caricata ad una temperatura ambiente che va da 15°C a 25°C, durante la ricarica ci può essere un<br />
lieve innalzamento della temperatura della batteria. Qualora si verificasse un surriscaldamento della batteria o <strong>di</strong> una parte della stessa,<br />
interrompere imme<strong>di</strong>atamente il processo <strong>di</strong> ricarica e sostituirla.<br />
E’ normale un riscaldamento della batteria durante la scarica?<br />
Come per la ricarica, anche durante la scarica la batteria subisce un lieve innalzamento della temperatura e valgono le stesse<br />
considerazioni fatte sopra.<br />
Quanto tempo dura in buona efficienza una batteria al piombo se non utilizzata?<br />
Dipende da molti fattori, soprattutto dalla qualità della batteria. Di solito una batteria ricaricata almeno ogni tre mesi e non scaricata dura<br />
anche cinque anni.<br />
Quanto tempo dura una batteria utilizzata sui vostri ADV?<br />
Con un utilizzo sportivo dell’ADV, ovvero una cinquantina <strong>di</strong> immersioni all’anno, usualmente una batteria dura in buone con<strong>di</strong>zioni per<br />
un periodo <strong>di</strong> circa tre anni per un totale <strong>di</strong> circa 150 ricariche. Se utilizzata più spesso, può arrivare anche a circa trecento utilizzi.<br />
Qu<strong>and</strong>o la batteria è esaurita, cosa devo farne?<br />
La batteria va smaltita in un apposito centro <strong>di</strong> recupero batterie al piombo esauste, in tutte le città vi sono degli appositi centri <strong>di</strong><br />
raccolta.<br />
Ho lasciato la batteria in barca e gli agenti marini hanno ossidato i contatti argentati del connettore, cosa devo fare?<br />
Tutti i contatti elettrici che sono all’interno del vano batterie dell’ADV non devono assolutamente generare scariche elettriche o scintillii,<br />
proprio per la possibile presenza <strong>di</strong> idrogeno.Il connettore va imme<strong>di</strong>atamente sostituito. (assistenza suex).<br />
Ho erroneamente tirato i cavi della batteria e si è danneggiato l’isolamento, posso sostituirli o basta che provveda ad isolarli<br />
nuovamente con del nastro adesivo?<br />
I cavi danneggiati vanno assolutamente sostituiti, un corto circuito tra <strong>di</strong> essi potrebbe anche far esplodere la batteria, con conseguenze<br />
gravi per cose e persone. (assistenza suex).<br />
Ho visto che la batteria è costituita da due elementi commerciali da 12 volt cadauno, incollati e collegati in serie per ottenere<br />
24 volt, la mia batteria è danneggiata, posso assemblarmi in casa una nuova batteria utilizz<strong>and</strong>o il connettore ed i cavi della<br />
vecchia?<br />
La SUEX S.r.l. non autorizza e non consiglia <strong>di</strong> assemblare in casa le batterie, questo per <strong>di</strong>versi motivi, tra i quali l’utilizzo <strong>di</strong> batterie <strong>di</strong><br />
primaria marca e capacità. Tuttavia, nel caso l’utente esperto volesse cimentarsi in questo tentativo, si raccom<strong>and</strong>a <strong>di</strong> utilizzare sempre<br />
batterie nuove e della stessa marca, mai assemblare batterie <strong>di</strong> marca o usura <strong>di</strong>versa. La SUEX S.r.l., in ogni caso, non si assume<br />
nessuna responsabilità sul funzionamento dell’ADV o <strong>di</strong> eventuali incidenti o danni, dovuti a batteria assemblate dal cliente.<br />
Voglio aumentare la velocità dell’ADV, posso aggiungere una terza batteria, magari anche più piccola per incrementare la<br />
tensione e far girare il motore elettrico più veloce?<br />
No. La batteria presente sullo scooter è quella adatta allo scopo. Ogni manomissione o mo<strong>di</strong>fica è a totale responsabilità <strong>di</strong> chi la<br />
effettua.<br />
Posso utilizzare batterie <strong>di</strong>verse da quelle date in dotazione, per esempio al posto <strong>di</strong> una batteria al piombo, due batterie al<br />
NiMH collegate in parallelo?<br />
No. Le batterie non vanno MAI collegate in parallelo, la più carica <strong>and</strong>rebbe a caricare la più scarica, e il fenomeno avviene senza<br />
regolazione <strong>di</strong> corrente, con tutta quella <strong>di</strong>sponibile, scaten<strong>and</strong>o effetti che potrebbero essere devastanti. NON COLLEGARE LE<br />
BATTERIE IN PARALLELO!<br />
Devo scaricare saltuariamente la batteria fino al massimo della scarica?<br />
No. Le batterie al piombo non hanno effetto memoria, ogni scarica è un ciclo <strong>di</strong> vita in meno e basta.<br />
Come faccio a conoscere l’efficienza della batteria? Se devo programmare un’immersione, come posso avere la certezza che<br />
la batteria carica mi <strong>di</strong>a una determinata autonomia?<br />
Per questo scopo esiste uno strumento completamente automatico che simula l’assorbimento elettrico dell’ADV durante il<br />
funzionamento e scarica la batteria fino alla tensione residua programmata. Al termine, su un <strong>di</strong>splay, compare la durata in minuti della<br />
scarica. In base a quel dato è possibile conoscere lo stato <strong>di</strong> “salute” della batteria e programmarne il corretto utilizzo. (ve<strong>di</strong> accessori<br />
“burn tester”)<br />
Non utilizzare altri sistemi <strong>di</strong> scarica.<br />
27
32 Accessori (opzionali) ELICA PROP LOCK.<br />
70097-70099-70100<br />
32.1 Descrizione.<br />
interno.<br />
L’elica a facile sostituzione prop-lock, consente, senza<br />
l’ausilio <strong>di</strong> attrezzi, <strong>di</strong> estrarre l’elica dallo scooter<br />
subacqueo, in qualsiasi situazione; in caso <strong>di</strong><br />
avvolgimento <strong>di</strong> corpi estranei, come cime o lenze da<br />
pesca o nel caso in cui si voglia sostituire l’elica con<br />
un’altra <strong>di</strong> forma o numero <strong>di</strong> pale <strong>di</strong>versa, sia in<br />
immersione che a terra.<br />
Il brevetto SUEX, consente <strong>di</strong> sostituire facilmente<br />
l’elica senza la <strong>di</strong>spersione <strong>di</strong> parti come viti o altro,<br />
pur mantenendo la frizione <strong>di</strong> sicurezza costruita al suo<br />
Come sostituire l’elica st<strong>and</strong>ard con la Prop Lock<br />
Verificare che nella confezione vi sia il seguente materiale:<br />
Elica completa a 3, 4 o 5 pale un pezzo.<br />
Spina cilindrica 4x40 mm un pezzo.<br />
Gommino <strong>di</strong> tenuta spina un pezzo.<br />
Vite <strong>di</strong> fissaggio elica un pezzo.<br />
Attrezzi necessari per lo smontaggio e il rimontaggio delle eliche (non forniti).<br />
chiave fissa o a stella da 10 mm<br />
chiave a tubo o a bussola da 10 mm<br />
chiave esagonale da 3 mm<br />
cacciavite a stella ph2<br />
Smontaggio dell’elica st<strong>and</strong>ard<br />
1<br />
1<br />
Svitare ed estrarre completamente il dado (1)<br />
Estrarre l’elica, tir<strong>and</strong>ola verso l’esterno. Se si<br />
oppone una certa resistenza, non usare il martello<br />
ma prendere l’elica con due mani e tirare<br />
ulteriormente.<br />
28
70097-70099-70100<br />
Smontaggio del perno filettato st<strong>and</strong>ard.<br />
Svitare ed estrarre completamente il perno filettato<br />
st<strong>and</strong>ard (2).<br />
2<br />
Montaggio del perno filettato prop lock.<br />
3<br />
Inserire ed avvitare completamente il perno filettato prop lock<br />
(3), avendo cura <strong>di</strong> inserire nell’albero la parte filettata PIU’<br />
CORTA.<br />
Nota: per facilitare l’operazione <strong>di</strong> avvitatura e svitatura del<br />
perno filettato è consigliato utilizzare l’apposito utensile<br />
cod.70319.<br />
3<br />
All’interno dell’albero tra la spina <strong>di</strong> trazione e il perno<br />
filettato ci deve essere una molla in gomma verde.<br />
Questa serve ad impe<strong>di</strong>re che la spina <strong>di</strong> trazione possa<br />
accidentalmente uscire dall’albero.<br />
IMPORTANTE: LA SPINA DI TRAZIONE DEVE<br />
SPORGERE DALL’ALBERO UGUALMENTE DA AMBO<br />
I LATI.<br />
29
70097-70099-70100<br />
5<br />
Prendere l’elica prop lock e verificare che la vite (5) sia svitata, se non lo fosse svitarla<br />
come da figura a fianco, deve sporgere <strong>di</strong> circa 3 mm dal pomello bianco.<br />
Inserire l’elica nell’albero dell’ADV subacqueo, controll<strong>and</strong>o che la spina (4) sia<br />
inserita nella propria sede sul lato interno dell’elica, se non lo fosse,<br />
ruotare l’elica CON LE MANI fino a qu<strong>and</strong>o non avverrà l’inserimento.<br />
SPINA NELLA SEDE MONTAGGIO CORRETTO<br />
4<br />
A<br />
Avvitare il pomello bianco fino a qu<strong>and</strong>o le due<br />
superfici A e B coincidono.<br />
A questo punto tenendo fermo il pomello bianco<br />
avvitare la vite (5) fino in fondo, a raggiungere il<br />
fermo (non forzare).<br />
B<br />
30
70097-70099-70100<br />
NOTA IMPORTANTE!<br />
Non azionare lo scooter con la spina dell’elica non correttamente<br />
inserita nella sede, si azionerebbe il <strong>di</strong>spositivo <strong>di</strong> sicurezza della<br />
frizione, cosa che deve avvenire solo in caso <strong>di</strong> emergenza.<br />
L’utilizzo improprio della frizione <strong>di</strong> emergenza, porta al<br />
danneggiamento della stessa, con esclusione dalla garanzia.<br />
32.2 Come estrarre l’elica prop lock.<br />
Svitare il pomello bianco, (senso ANTIORARIO) fino alla completa estrazione dell’elica.<br />
32.3 Come inserire l’elica prop lock.<br />
Infilare l’elica nell’albero motore dell’ADV, girare l’elica (in senso ORARIO) fino a qu<strong>and</strong>o<br />
la spina si porta nella corretta posizione <strong>di</strong> aggancio, proseguire ruot<strong>and</strong>o (in senso<br />
ORARIO) il pomello bianco.<br />
Stringere il pomello CON LA SOLA FORZA DELLE DITA, SENZA FORZARE.<br />
32.4 Manutenzione elica prop lock.<br />
L’elica prop lock non necessita <strong>di</strong> <strong>manutenzione</strong>, unica accortezza sarà quella <strong>di</strong> verificare<br />
prima dell’inserimento nell’albero dell’ADV che la sede sull’alica sia pulita e priva <strong>di</strong> corpi<br />
estranei.<br />
NOTA IMPORTANTE:<br />
L’ELICA PROP LOCK IMMERSA IN ACQUA AFFONDA!<br />
DURANTE L’OPERAZIONE DI ESTRAZIONE E RICOLLOCAMENTO DELL’ELICA IN<br />
IMMERSIONE, FARE LA MASSIMA ATTENZIONE ESISTE IL POTENZIALE RISCHIO<br />
DI PERDERLA CON LA CONSEGUENZA DI NON POTER UTILIZZARE LO SCOOTER<br />
SUBACQUEO.<br />
GARANZIA SULL’ELICA PROP LOCK<br />
<strong>Suex</strong> garantisce a vita l’elica, contro <strong>di</strong>fetti <strong>di</strong> fabbricazione, ad esclusione <strong>di</strong> errato<br />
montaggio, errato utilizzo, usura e in tutti i casi in cui la rottura dell’elica sia dovuta a<br />
negligenza o cattivo utilizzo da parte dell’utilizzatore.<br />
Nota: la raffigurazione in questo <strong><strong>manual</strong>e</strong> dell’albero motore dell’ADV, è puramente in<strong>di</strong>cativa, raffigura una parte <strong>di</strong> esso per puro<br />
scopo esplicativo.<br />
31
32.5 Problemi, ca<strong>use</strong> e rime<strong>di</strong> elica prop lock.<br />
70097-70099-70100<br />
PROBLEMA<br />
E’ necessario un gr<strong>and</strong>e sforzo per ruotare il pomello<br />
bianco<br />
Anche se la spina dell’albero è nella corretta<br />
posizione nella sede dell’elica, la frizione saltella e lo<br />
scooter non avanza.<br />
Stringendo il pomello bianco gira a vuoto e non ferma<br />
l’elica.<br />
Stringendo la vite sul pomello gira a vuoto<br />
CAUSA - RIMEDIO<br />
Il pomello è stato danneggiato, va sostituito*<br />
La spina <strong>di</strong> trazione è stata danneggiata (piegata) e<br />
va sostituita.<br />
Il mozzo dell’elica è stato danneggiato va sostituito.*<br />
E’ stata impiegata troppa forza nello stringere il<br />
pomello e si è danneggiato, va sostituito.*<br />
Il pomello è stato danneggiato, va sostituito*<br />
*operazioni da eseguire in centro <strong>di</strong> assistenza autorizzata SUEX.<br />
Nota:<br />
Utilizz<strong>and</strong>o l’elica prop lock, si monta un tipo <strong>di</strong> elica che è <strong>di</strong> ingombro maggiore rispetto a<br />
quella st<strong>and</strong>ard, (il pomello bianco sporge in più).<br />
Questo significa che qu<strong>and</strong>o appoggiamo lo scooter sul convogliatore,in posizione<br />
verticale, dobbiamo fare maggior attenzione a come lo posizioniamo. Eventuali colpi<br />
all’elica (più sporgente) potrebbero danneggiare sia l’elica prop lock che lo scooter stesso.<br />
33 Accessori (opzionali) COMANDO N-HANDLE.<br />
33.1 Descrizione.<br />
Verificare che nella confezione vi sia il seguente materiale:<br />
Impugnatura: un pezzo<br />
Viti per fissaggio maniglia e pomolo sinistro: 4 pezzi<br />
Viti per fissaggio impugnatura: 4 pezzi<br />
Maniglia destra completa <strong>di</strong> grilletto: un pezzo<br />
Supporto accessori: un pezzo<br />
Pomello sinistro: un pezzo<br />
Il <strong>di</strong>spositivo <strong>di</strong> com<strong>and</strong>o N-H<strong>and</strong>le è stato<br />
realizzato per facilitare il governo dell’ADV in<br />
determinate con<strong>di</strong>zioni <strong>di</strong> utilizzo.<br />
L’impugnatura corrugata può essere montata in<br />
tre posizioni <strong>di</strong>verse a seconda della gr<strong>and</strong>ezza<br />
della mano.<br />
Il pomello “cruise” permette <strong>di</strong> bloccare il grilletto<br />
nella velocità desiderata.<br />
Il blocchetto accessori, permette <strong>di</strong> applicare allo<br />
scooter supporti strumenti o video.<br />
32
70097-70099-70100<br />
4<br />
5<br />
6<br />
8<br />
3<br />
2<br />
1<br />
7<br />
1. Impugnatura<br />
2. Maniglia<br />
3. Grilletto<br />
4. Pomello cruise<br />
5. Supporto accessori<br />
6. Cava per supporto accessori<br />
7. Fermo prima velocità<br />
8. Blocco supporto accessori<br />
Attrezzi necessari per l’applicazione della maniglia (non forniti).<br />
chiave fissa o a stella da 7 mm<br />
chiave fissa o a stella da 8 mm<br />
chiave esagonale da 3 mm<br />
chiave esagonale da 4 mm<br />
cacciavite a croce Ph2<br />
VEDI VIDEO SU WWW.SUEX.IT PER MONTAGGIO E REGOLAZIONE GRILLETTO.<br />
NOTA SULLA SICUREZZA:<br />
Fare molta attenzione all’elica in rotazione, pericolo <strong>di</strong> contusioni.<br />
NOTA IMPORTANTE!<br />
Non insistete con il funzionamento dell’ADV, all’asciutto le tenute<br />
dell’albero potrebbero danneggiarsi, agire solo per piccoli perio<strong>di</strong>,<br />
3 o 5 secon<strong>di</strong>, giusto il tempo per capire se le regolazioni sono<br />
state effettuate regolarmente.<br />
33
70097-70099-70100<br />
NOTA SULLA SICUREZZA:<br />
Il pomello <strong>di</strong> blocco grilletto (cruise), deve essere utilizzato solo<br />
sotto il massimo controllo della situazione da parte del subacqueo. Deve essere<br />
possibile in qualunque momento intervenire sul pomello stesso, sul grilletto o<br />
sull’interruttore <strong>di</strong> accensione dell’ADV, al fine <strong>di</strong> evitare qualsiasi tipo <strong>di</strong> rischio <strong>di</strong><br />
collisione o <strong>di</strong> trascinamento del subacqueo in zone pericolose.<br />
Il pomello va utilizzato unicamente per il blocco della prima velocità, regolata al<br />
massimo al 50% della potenza <strong>di</strong>sponibile. Bloccare l’avvio dell’ADV alla massima<br />
potenza è potenzialmente pericoloso.<br />
Durante il normale utilizzo dell’ADV il pomello deve essere ruotato completamente<br />
in senso antiorario e così bloccato, in modo tale che non vada in alcun modo a<br />
fermare il normale ritorno del grilletto.<br />
Agire sul pomello, unicamente con la forza <strong>di</strong> due <strong>di</strong>ta.<br />
IN OGNI CASO, PRESTARE LA MASSIMA ATTENZIONE DURANTE L’UTILIZZO DEL<br />
POMELLO DI BLOCCO GRILLETTO, IN QUANTO QUESTA OPERAZIONE E’ SEMPRE<br />
PERICOLOSA!<br />
33.2 Utilizzo del <strong>di</strong>spositivo N-HANDLE.<br />
• Immergere lo scooter.<br />
• Accendere lo scooter tramite l’interruttore principale.<br />
• Impugnare il <strong>di</strong>spositivo.<br />
• Infilare due <strong>di</strong>ta, il <strong>di</strong>to in<strong>di</strong>ce e il <strong>di</strong>to me<strong>di</strong>o nella sede del grilletto.<br />
• Tirare il grilletto con il <strong>di</strong>to me<strong>di</strong>o esso si fermerà sul fermo prima velocità,<br />
permettendo <strong>di</strong> governare lo scooter alla velocità impostata (regolabile tramite<br />
apposito pomello).<br />
• Tirare il grilletto a fondo utilizz<strong>and</strong>o il <strong>di</strong>to in<strong>di</strong>ce e lo scooter funzionerà alla<br />
massima potenza.<br />
• Rilasciare il grilletto in qualsiasi momento per fermare lo scooter.<br />
Supporto accessori<br />
Il supporto accessori, serve per poter applicare alla maniglia qualsivoglia oggetto che<br />
possa essere utile durante l’immersione. A tal scopo esistono alcuni supporti che SUEX a<br />
realizzato con l’intento <strong>di</strong> poter utilizzare i normali strumenti da polso o da consolle.<br />
Utilizzo del supporto.<br />
Allentare la vite <strong>di</strong> blocco e inserire il supporto.<br />
Serrare la vite <strong>di</strong> blocco, con la sola forza <strong>di</strong> due <strong>di</strong>ta.<br />
Mantenere sempre avvitata a fondo la vite, qu<strong>and</strong>o non si utilizza il supporto.<br />
NOTA: non forzare la vite <strong>di</strong> blocco.<br />
Manutenzione<br />
La maniglia N-HANDLE non necessita <strong>di</strong> particolari manutenzioni, seguire le norme<br />
generali <strong>di</strong> <strong>manutenzione</strong> dell’ADV.<br />
34
33.3 Problemi, ca<strong>use</strong> e rime<strong>di</strong> <strong>di</strong>spositivo N-HANDLE.<br />
70097-70099-70100<br />
PROBLEMA<br />
Il pomello cruise si è bloccato, non gira.<br />
Premendo a fondo il grilletto lo scooter non funziona<br />
o funziona a intermittenza.<br />
Stringendo la vite <strong>di</strong> blocco gira a vuoto<br />
CAUSA - RIMEDIO<br />
Lubrificare la vite del pomello e riprovare.<br />
Bisogna regolare la corretta posizione del pistoncino<br />
magnetico.<br />
La filettatura è stata danneggiata va sostituita*<br />
Sul sito web www.suex.it potete trovare alcuni accessori da utilizzare con il <strong>di</strong>spositivo N-<br />
HANDLE.<br />
35
70097-70099-70100<br />
34 Accessori (opzionali) LED VERIFICA CARICA<br />
BATTERIA.<br />
34.1 Descrizione.<br />
Sul corpo motore dell’ADV, è posizionato un<br />
segnalatore luminoso che in<strong>di</strong>ca lo stato <strong>di</strong> carica<br />
della batteria.<br />
L’accensione dei tre led blu, è completamente<br />
automatica e viene gestita da un <strong>di</strong>spositivo<br />
elettronico posto all’interno del vano motore, che<br />
misura la tensione della batteria.<br />
34.2 Funzionamento.<br />
Premesso che il tempo trascorso tra le accensioni dei led può variare sensibilmente dal<br />
tipo <strong>di</strong> batteria e dalle con<strong>di</strong>zioni <strong>di</strong> usura della stessa, questo <strong>di</strong>spositivo vuole essere<br />
solo ed unicamente <strong>di</strong> ausilio al subacqueo, solo un ulteriore aiuto.<br />
E’ assolutamente vietato e sconsigliato programmare l’immersione tenendo conto<br />
della illuminazione dei led dell’in<strong>di</strong>catore. La vera e sicura durata della batteria va<br />
verificata tramite lo strumento <strong>di</strong> burn test (accessorio cod. 70037) il quale ci in<strong>di</strong>ca<br />
esattamente quanta energia abbiamo a <strong>di</strong>sposizione nella bateria esaminata.<br />
Batteria completamente carica<br />
Batteria a circa mezza carica<br />
Batteria in esaurimento<br />
3 led accesi<br />
2 led accesi<br />
1 led acceso<br />
All’accensione dell’ADV, specialmente con batterie Pb e NiMH, ache se le batterie non<br />
sono completamente cariche molto probabilmente tutti e tre i led si accenderanno, questo<br />
perchè la tensione della batteria a riposo tende a rimanere o superare la tensione<br />
nominale. La vera tensione della batteria la potremmo leggere solo durante l’utilizzo, con<br />
lo scooter acceso e dopo qualche decina <strong>di</strong> secon<strong>di</strong> <strong>di</strong> funzionamento.<br />
Ogni utilizzatore deve “imparare” a conoscere il segnale luminoso del <strong>di</strong>spositivo, in<br />
quanto è impossibile determinare una tabella <strong>di</strong> durata tra l’accensione <strong>di</strong> un led o l’altro,<br />
essa <strong>di</strong>pende dal modo <strong>di</strong> utilizzo dell’ADV (velocità impostata). Sicuramente però<br />
l’accensione <strong>di</strong> un solo led deve mettere in avviso il subacqueo che la batteria sta<br />
esaurendo la carica e che è consigliabile non utilizzare ulteriormente lo scooter.<br />
Il segnalatore luminoso è molto utile anche perchè in<strong>di</strong>ca che l’ADV è acceso e pronto per<br />
l’utilizzo.<br />
36
35 Accessori (opzionali) DISPOSITIVO BY PASS.<br />
70097-70099-70100<br />
Il <strong>di</strong>spositivo denominato “BY PASS” è un accessorio montato su alcuni modelli a richiesta<br />
del cliente. Tale <strong>di</strong>spositivo, riconoscibile come um pomello bianco posto sul lato sinistro<br />
del gruppo motore, esattamente opposto all’interruttore generale, connette elettricamente<br />
in modo <strong>di</strong>retto, la batteria al motore elettrico, escludendo qualsiasi altro <strong>di</strong>spositivo<br />
normalmente utilizzato per il funzionamento elettrico dell’ADV: grilletto, regolazione della<br />
velocità, controllo elettronico. L’utilizzo <strong>di</strong> questo <strong>di</strong>spositivo è potenzialmente pericoloso in<br />
quanto una volta azionato, avvia il motore in modo continuo alla massima potenza e<br />
l’unico controllo che possiamo effettuare e quello dello spegnimento tramite l’interruttore<br />
generale o tramite il pomello del by pass.<br />
35.1 Funzionamento<br />
SI RICORDA ULTERIORMENTE CHE L’ADV DEVE POTER ESSERE<br />
ABBANDONATO IN QUALSIASI MOMENTO. NON UTILIZZARE<br />
SISTEMI DI TRAINO NON FACILMENTE SVINCOLABILI DAL<br />
SUBACQUEO.<br />
Ruotare il pomello dell’interruttore generale in senso antiorario ed acceratrsi che l’ADV<br />
non si avvii.<br />
Ruotare il pomello del By Pass in senso orario, a fondo, senza forzare.<br />
Ruotare il pomello dell’interruttore generale in senso orario, l’ADV si avvia in modo<br />
continuo.<br />
Ruotare il pomello dell’interruttore generale in senso antiorario per arrestare l’ADV.<br />
Nelle normali con<strong>di</strong>zioni <strong>di</strong> utilizzo il pomello del <strong>di</strong>spositivo <strong>di</strong> By Pass deve essere ruotato<br />
SEMPRE E COMPLETAMENTE in senso antiorario fino in fondo.<br />
Nota: questo <strong>di</strong>spositivo è da utilizzare solo ed unicamente in reale<br />
caso <strong>di</strong> emergenza, ovvero solo in caso <strong>di</strong> guasto alla parte elettronica<br />
e nel caso in cui azion<strong>and</strong>o il grilletto l’ADV non si avvia.<br />
Si ricorda che l’ADV NON E’ UN MEZZO DI SALVATAGGIO.<br />
37
70097-70099-70100<br />
36 Modularità<br />
Molti modelli <strong>di</strong> ADV della nostra produzione hanno la possibilità <strong>di</strong> essere facilmente<br />
trasformati anche dal cliente in modelli con <strong>di</strong>mensioni caratteristiche ed autonomie<br />
<strong>di</strong>verse.<br />
Il sistema adottato per ottenere tale possibilità è quello <strong>di</strong> <strong>di</strong>videre concettualmente l’ADV<br />
in due parti principali, la parte propulsiva, motore elettrico ed elica e la parte <strong>di</strong><br />
alimentazione ovvero la batteria con i rispettivo supporto.<br />
Le due parti sono contenute in due contenitori che una volta assemblati assieme,<br />
costituiscono l’ADV nella sua integrità, rendendo l’insieme ermetico.<br />
36.1 Descrizione delle parti<br />
Il gruppo propulsore (A) (ve<strong>di</strong> fig. 3 e 4) è collegato al supporto delle batterie (B) tramite 4<br />
da<strong>di</strong> autobloccanti (Y) facilmente svitabili con una chiave fissa da 10 mm.<br />
In alcuni modelli, viene utilizzato l’anello adattatore (D) fissato con 6 viti (X) al propulsore<br />
(A), per compensare i <strong>di</strong>versi <strong>di</strong>ametri del corpo (C) e collegare in modo ermetico il gruppo<br />
propulsore (A) con il corpo (C).<br />
Figura 3<br />
Figura 4<br />
38
70097-70099-70100<br />
Nella figure 3 e 4, si porta come esempio il modello ZEUXO 20, ma il principio <strong>di</strong><br />
assemblaggio dei vari componenti è esattamente lo stesso.<br />
36.2 Sostituzione delle parti<br />
Per effettuare la separazione delle parti principali dell’ADV, posizionare l’ADV appoggiato<br />
sul convogliatore dell’elica su <strong>di</strong> una superficie piana in modo che sia in posizione verticale<br />
con la batteria verso l’alto. Dopo aver tolto l’involucro (C), estrarre e mettere da parte la<br />
batteria , svitare i 4 da<strong>di</strong> (Y) e togliere il supporto batteria (B).<br />
Se il nuovo involucro (C) ha <strong>di</strong>mensioni <strong>di</strong>verse, svitare con un cacciavite a croce PH2<br />
anche le 6 viti (X) e sfilare l’anello adattatore (D). (ve<strong>di</strong> fig.4)<br />
Per riassemblare l’ADV procedere in modo esattamente inverso sostituendo le parti<br />
necessarie alla trasformazione.<br />
ATTENZIONE! Le viti autofilettanti (X) vanno riavvitate con cautela, non<br />
stringere eccessivamente, potrebbero danneggiare il corpo motore che<br />
è in materiale plastico.<br />
I 4 da<strong>di</strong> (Y) vanno stretti adeguatamente, essi garantiscono, oltre<br />
all’assemblaggio delle parti, anche la tenuta ermetica del corpo motore,<br />
rispetto al vano batterie, controllatene bene l’effettiva avvitatura.<br />
Fare anche attenzione alle guarnizioni <strong>di</strong> tenuta, mantenerle sempre pulite e lubrificate<br />
insieme con le rispettive se<strong>di</strong> <strong>di</strong> alloggiamento.<br />
39
37 ENGLISH VERSION<br />
70097-70099-70100<br />
38 Description <strong>and</strong> operating principles<br />
The ADV consists of a perfectly watertight, streamlined, hollow body, inside which the<br />
electric motor, rechargeable batteries <strong>and</strong> speed-reduction gear are ho<strong>use</strong>d. On the<br />
outside, two manoeuvring h<strong>and</strong>les (1) are found at the rear, one of which has an<br />
integrated trigger (2) to control propeller rotation by means of a magnetic reed switch (3).<br />
At the front, a h<strong>and</strong>le in synthetic material (4) is <strong>use</strong>d for gripping <strong>and</strong> carrying the vehicle.<br />
The propeller is located at the rear end <strong>and</strong> is protected by a surroun<strong>di</strong>ng circular strip (5)<br />
which constitutes the flow duct. Rotation of the propeller generates the propulsive thrust.<br />
The main switch (6) for turning the power on <strong>and</strong> off <strong>and</strong> the speed regulator knob (7) are<br />
also found at the rear.<br />
The hull consists of a fore shell (8), in which the locking wheel (9) is inserted, <strong>and</strong> the main<br />
housing (10). The shell is inserted in the tube <strong>and</strong> held by any internal ring. Seal is<br />
ensured by O-ring type gaskets.<br />
40
70097-70099-70100<br />
1<br />
2 4<br />
8<br />
5 10<br />
3<br />
2<br />
9<br />
7<br />
6<br />
41
70097-70099-70100<br />
39 Technical specifications<br />
ADV 20<br />
Size: Length x breadth x height mm. 779x460x364<br />
Weight: Kg. 36.2<br />
Max. speed: m/min. 60<br />
Running time * min. 60<br />
Voltage V.DC 24<br />
Charging time h 8<br />
Maximum operating depth m 120<br />
ADV 33<br />
Size: Length x breadth x height mm. 1079x460x364<br />
Weight: Kg. 50.9<br />
Max. speed: m/min. 60<br />
Running time * min. 60<br />
Voltage V.DC 24<br />
Charging time h 10<br />
Maximum operating depth m 120<br />
ADV 42<br />
Size: Length x breadth x height mm. 1219x460x364<br />
Weight: Kg. 59<br />
Max. speed: m/min. 60<br />
Running time * min. 60<br />
Voltage V.DC 24<br />
Charging time h 12<br />
Maximum operating depth m 120<br />
*Calculated using new batteries, using 80% of their capacity, in normal, non-continuous<br />
working con<strong>di</strong>tions with dual tank <strong>and</strong> GAV settings.<br />
42
70097-70099-70100<br />
40 Preliminary operations<br />
Check the integrity of the shipping carton <strong>and</strong> that of the components supplied (refer to<br />
section 5).<br />
40.1 Opening the hull<br />
St<strong>and</strong> the ADV vertically on a level surface with the front at the top.<br />
Rotate the h<strong>and</strong> wheel counter-clockwise (Fig. 3.1) <strong>and</strong> continue rotating until the hull<br />
detaches from the propulsion unit (Fig. 3.2).<br />
Hold the front part. Extract the hull lifting it upwards. If necessary, hold the propulsion unit<br />
on the ground by placing a foot on the propeller guard. Rest the hull on the ground,<br />
preventing dust or s<strong>and</strong> from entering, <strong>and</strong> clean the OR gasket housing.<br />
Fig. 3.1<br />
Must be open<br />
Fig. 3.2<br />
43
70097-70099-70100<br />
40.2 Accessing the battery<br />
In ADV models 18 <strong>and</strong> 28, the single battery pack made up of two 12V batteries connected<br />
in series is removed while, in ADV models 33 <strong>and</strong> 42, the 12V batteries are removed<br />
singularly due to their weight. In the latter case, <strong>di</strong>sconnect the wire <strong>use</strong>d to connect the<br />
batteries in series. The battery pack should always be charged reconnecting the batteries<br />
in series.<br />
WARNING! Reconnect the wires, always pairing the same colour connectors.<br />
Firmly <strong>di</strong>sconnect connectors without pulling on the wires, unfasten the front Velcro strap<br />
<strong>and</strong> extract the battery.<br />
WARNING! Battery weight is minimum 10 kg. Use all precautions to avoid it from falling or<br />
causing accidents.<br />
Zeuxo 20<br />
1<br />
2<br />
3<br />
4<br />
5<br />
44
70097-70099-70100<br />
Zeuxo 42<br />
Zeuxo 33<br />
1<br />
3<br />
4<br />
1 – Velcro strap<br />
2 – Ballast<br />
3 – Battery pack<br />
4 – Threaded bushing<br />
5 – Ballast for salt water<br />
45
70097-70099-70100<br />
40.3 Inserting the battery<br />
Before using the scooter, the battery must be replaced in its housing.<br />
Make sure the rear Velcro strap is closed.<br />
Insert the battery between the bushings. For two separate batteries, first insert the bottom<br />
one.<br />
Close the front Velcro strap.<br />
Connect wires, positioning them as previously illustrated.<br />
Make sure the battery is suitably locked to the support. Use the bushings or Velcro straps<br />
for assistance.<br />
40.4 Closing the hull<br />
Place the scooter on a vertical surface with the propeller at the bottom. Carefully check<br />
that the closing OR gasket is inserted in its housing, clean <strong>and</strong> adequately lubricated with<br />
silicon oil. Check hull mouth cleaning. Use a dry brush to eliminate dust or s<strong>and</strong>. Insert the<br />
hull from the top, hol<strong>di</strong>ng the front strap <strong>and</strong> <strong>di</strong>recting it so that the strap fits into the correct<br />
position. Accompany the hull downwards until it fits the motor unit. Rotate the h<strong>and</strong> wheel<br />
clockwise until fully closed without over-tightening. Only <strong>use</strong> your h<strong>and</strong>s. (Patented device)<br />
Make sure that wires <strong>and</strong> connectors do not protrude when<br />
inserting the hull. They could be damaged.<br />
Always hold the hull during assembly, never let it fall. It could be<br />
damaged.<br />
41 Buoyancy adjustment<br />
The ADV should have NEUTRAL buoyancy, i.e. it should neither be negative (sinking) nor<br />
positive (floating), but should remain stable at the desired depth, or slightly floating. The<br />
scooter is supplied with fresh water neutral settings; to compensate the <strong>di</strong>fference between<br />
fresh <strong>and</strong> salt water <strong>use</strong> a ballast with blocks to be positioned <strong>and</strong> fastened on the two<br />
sides <strong>and</strong> on the <strong>di</strong>sk that separates the motor compartment from the battery compartment<br />
is supplied.<br />
If necessary, adjust trim (tendency for the front or rear to point down) moving the battery<br />
towards the front or rear, tightening or loosening the threaded bushings <strong>use</strong>d to support<br />
<strong>and</strong> lock it, to assume a horizontal position. An excessively POSITIVE, NEGATIVE or<br />
decisively tilted position is potentially HAZARDOUS!!<br />
46
70097-70099-70100<br />
42 Components<br />
The ADV is delivered complete with the following components:<br />
Use <strong>and</strong> <strong>maintenance</strong> <strong>manual</strong><br />
Battery charger complete with <strong>use</strong> <strong>and</strong> <strong>maintenance</strong> <strong>manual</strong><br />
Weights for buoyancy adjustment in seawater<br />
Accor<strong>di</strong>ng to models:<br />
ZEUXO 20 – 20 Ah lead battery<br />
ZEUXO 33 – 33 Ah lead battery<br />
ZEUXO 42 – 42 Ah lead battery<br />
43 Spare parts<br />
The following table lists those components most likely to wear:<br />
PART NO.<br />
DESCRIPTION<br />
70197 Propeller gasket kit<br />
70202 Forward h<strong>and</strong>le<br />
70012 20 Ah battery pack<br />
70104 33 Ah battery pack<br />
70105 42 Ah battery pack<br />
70093 Battery charger for ADV 20<br />
70036 Battery charger for ADV 33-42<br />
70203 Clutch spring Kit<br />
70204 274 complete gasket Kit<br />
Any other part is available on request.<br />
47
WARNING!<br />
PLEASE READ THE FOLLOWING<br />
70097-70099-70100<br />
CAREFULLY READ THE USE AND MAINTENANCE MANUAL IN ITS<br />
ENTIRETY, INCLUDING SECTION 6 “SAFETY INSTRUCTIONS” AND<br />
SECTION 8 “USING THE ADV”.<br />
The manufacturer, SUEX s.r.l., declares that:<br />
• the ZEUXO Mod. Tech Advanced <strong>di</strong>ving vehicle (henceforth called “ADV”) shall be<br />
delivered to the buyer in perfect working con<strong>di</strong>tion, complete with its <strong>use</strong> <strong>and</strong><br />
<strong>maintenance</strong> <strong>manual</strong>;<br />
• any person attempting to <strong>use</strong> the <strong>di</strong>ving vehicle shall be deemed to have undergone<br />
specific training in the <strong>use</strong> of similar <strong>di</strong>ving vehicles <strong>and</strong> to have obtained the<br />
necessary certification issued by a qualified agency;<br />
• any person attempting to <strong>use</strong> the <strong>di</strong>ving vehicle shall be deemed to have read the<br />
<strong>use</strong> <strong>and</strong> <strong>maintenance</strong> <strong>manual</strong> provided, <strong>and</strong> hence the instructions contained<br />
within, in particular:<br />
- how to <strong>use</strong> the <strong>di</strong>ving vehicle, with details regar<strong>di</strong>ng the <strong>di</strong>ver’s correct<br />
equipment configuration, the <strong>di</strong>ver’s posture during <strong>use</strong>, the position that<br />
must be maintained by the <strong>di</strong>ving vehicle during the <strong>di</strong>ve, <strong>and</strong> that the vehicle<br />
must not be bound with systems hard to release to its <strong>use</strong>r in any way<br />
whatsoever.<br />
- the environmental con<strong>di</strong>tions where <strong>use</strong> of the <strong>di</strong>ving vehicle is especially<br />
dangerous, such as deep-water <strong>di</strong>ves, obstructed environments, muddy or<br />
suspension-filled environments; the special precautions to be adopted when<br />
<strong>di</strong>ves are effected in such environments <strong>and</strong> the need of having undergone<br />
suitable training held by qualified agencies;<br />
- dangerous behaviour that is to be avoided such as, for example, <strong>use</strong> of the<br />
<strong>di</strong>ving vehicle to accelerate the descent or ascent rate;<br />
• it is therefore assumed that the <strong>use</strong>r has been fully informed on how to <strong>use</strong> <strong>and</strong><br />
maintain the product as well as of its technical characteristics, <strong>and</strong> that he shall<br />
scrupulously abide by these rules.<br />
• It hence follows that any damage to persons or objects, deriving from incorrect<br />
<strong>maintenance</strong> of the <strong>di</strong>ving vehicle or from its <strong>use</strong> other than as stipulated by this<br />
<strong>manual</strong> or without the precautions described within, cannot be attributed to defects<br />
of the product.<br />
The company <strong>Suex</strong> S.r.l. is not liable for losses or damages suffered by third persons<br />
consequent to the <strong>use</strong> of this <strong>di</strong>ving vehicle.<br />
The ADV is not a toy, nor a suitable rescue means. It’s exclusive function is to help<br />
expert <strong>di</strong>vers in immersions to cover greater <strong>di</strong>stances than could be normally covered<br />
with fins only. The ADV <strong>and</strong> its components, specifically the battery <strong>and</strong> battery charger,<br />
are intended for adult <strong>and</strong> expert <strong>use</strong> after carefully rea<strong>di</strong>ng these instructions.<br />
48
70097-70099-70100<br />
In order to prevent any harm to things or in<strong>di</strong>viduals, the <strong>use</strong>r of the battery <strong>and</strong> battery<br />
charger supplied with our <strong>di</strong>ving vehicles must first read the <strong>use</strong> <strong>and</strong> <strong>maintenance</strong> <strong>manual</strong><br />
<strong>and</strong> strictly observe the in<strong>di</strong>cations on correct <strong>use</strong> <strong>and</strong> product features, preventing<br />
inexpert personnel or minors from h<strong>and</strong>ling, even inadvertently, the ADV <strong>and</strong><br />
supplied instruments.<br />
Accor<strong>di</strong>ng to the battery <strong>use</strong>d, our ADV are equipped with a “cut off” device that protects<br />
internal components, impe<strong>di</strong>ng operations when voltage is too low. When this device is<br />
triggered, it inevitably, shuts off.<br />
This feature must always be kept in mind to avoid any hazards for the <strong>di</strong>ver who, when<br />
planning a <strong>di</strong>ve, will leave sufficient time to surface even without ADV power should the<br />
battery, due to the amount of time under water, <strong>di</strong>e.<br />
SUEX S.r.l. is not liable for any damages to persons <strong>and</strong>/or property ca<strong>use</strong>d by <strong>use</strong> other<br />
than that described in this <strong>manual</strong> <strong>and</strong> in neglect of the precautions described herein.<br />
Due to constant technological developments, <strong>Suex</strong> <strong>di</strong>ving vehicles may be mo<strong>di</strong>fied at any<br />
time without prior notice.<br />
This <strong>manual</strong> is not a substitute <strong>manual</strong> for an adequate course held by certified<br />
agencies on the correct <strong>use</strong> of ADV on <strong>di</strong>ves.<br />
49
70097-70099-70100<br />
Introduction<br />
This <strong>manual</strong> contains the instructions <strong>and</strong> important warnings concerning the <strong>di</strong>ving<br />
vehicles (ADV) manufactured by SUEX S.r.l.<br />
WARNING<br />
Observance of the instructions contained in this <strong>manual</strong> will allow you<br />
to carry out <strong>use</strong> <strong>and</strong> <strong>maintenance</strong> operations safely, while guaranteeing<br />
optimal vehicle operation <strong>and</strong> reduced running costs. The company<br />
<strong>Suex</strong> s.r.l. is not liable for damage resulting from negligence on behalf<br />
of the <strong>use</strong>r or from failure to observe these instructions.<br />
44 Product identification<br />
The machine has been marked with a hot-pressed serial number generally located in the<br />
body, on the battery <strong>and</strong> engine body. This number is to be quoted whenever technical<br />
assistance or spare parts are required.<br />
45 General safety <strong>and</strong> accident prevention regulations<br />
Pay special attention to the hazard signs in this <strong>manual</strong>. There are 3 levels of hazard<br />
signs:<br />
This sign is a warning that failure of the <strong>use</strong>r to adhere to the described<br />
operations will expose him to health hazards that may lead to serious<br />
or permanent harm.<br />
WARNING<br />
This sign is a warning that failure of the <strong>use</strong>r to adhere to the<br />
described operations will expose him to possible health hazards that<br />
shall not, however, lead to serious or permanent harm.<br />
CAUTION<br />
This sign is a warning that failure of the <strong>use</strong>r to adhere to the<br />
described operations may lead to damage of the vehicle.<br />
Please read the instructions in this <strong>manual</strong> carefully, before using the vehicle.<br />
Copyrights for this <strong>manual</strong> belong exclusively to the company SUEX s.r.l. Reproduction of<br />
this document, in part or in whole, is forbidden unless prior consent is obtained in writing.<br />
IMPORTANT NOTE!<br />
Although <strong>di</strong>ving with the ADV is great fun <strong>and</strong> relieves you of substantial effort, do not ever<br />
forget that it is a machine <strong>and</strong> …<br />
IT CAN BREAK!<br />
Never consider the ADV to be an aid in dangerous situations.<br />
IT IS NOT A LIFE-SAVING DEVICE!<br />
Always remember that you can ONLY COUNT ON YOUR OWN STRENGTH.<br />
50
70097-70099-70100<br />
45.1 In<strong>di</strong>cator label<br />
The following in<strong>di</strong>cator label is found on the vehicle. It should not be removed, tampered<br />
with or destroyed. The <strong>use</strong>r of the vehicle shall be responsible for replacing any worn out<br />
or illegible label with a new one, it must be requested to our after-sales service.<br />
SUEX S.r.l. will not be liable for damages <strong>and</strong> accidents happened in consequence of<br />
behaviors in contra<strong>di</strong>ction to the in<strong>di</strong>cations in it reported.<br />
51
70097-70099-70100<br />
46 Using the vehicle<br />
The <strong>di</strong>ving vehicle manufactured by SUEX s.r.l. is a vehicle that has been designed <strong>and</strong><br />
constructed for <strong>di</strong>ve transportation purposes. Customers <strong>and</strong> third parties are forbidden<br />
from carrying out any alterations that may substantially mo<strong>di</strong>fy its intended purpose.<br />
The vehicle has been designed, sized <strong>and</strong> constructed for the sole<br />
purpose described above. Any other <strong>use</strong> or operation that does not<br />
comply or agree with the instructions contained in this <strong>manual</strong>, may<br />
result in damage to the vehicle. This would prevent the con<strong>di</strong>tions for<br />
which it has been designed <strong>and</strong> built from being achieved, <strong>and</strong> may<br />
compromise its technical <strong>and</strong> safety characteristics. The manufacturer<br />
shall not be liable for damage to persons <strong>and</strong>/or objects deriving from inappropriate <strong>use</strong> of<br />
the vehicle.<br />
47 Warranty<br />
The product is covered against all manufacturing defects for the period determined by the<br />
law in force. The warranty shall cease to be effective if <strong>use</strong> of the vehicle does not comply<br />
or agree with that envisaged <strong>and</strong> described by this <strong>manual</strong>. Improper <strong>use</strong>, negligence, <strong>and</strong><br />
attempts by unauthorized persons to repair or mo<strong>di</strong>fy the vehicle, shall void the warranty.<br />
(see special battery warranty con<strong>di</strong>tions)<br />
48 Battery warranty<br />
The batteries, both Pb <strong>and</strong> NiMH, supplied with our ADV, are guaranteed by law,<br />
exclu<strong>di</strong>ng:<br />
Defects due to damages, incorrect <strong>use</strong>, accident, tampering, negligence or neglect <strong>and</strong> in<br />
the event of mo<strong>di</strong>fications or repairs made by unauthorized personnel.<br />
Defects or damages due to product <strong>use</strong> in con<strong>di</strong>tions other than those customary.<br />
Defects or damages due to incorrect controls, operations, <strong>maintenance</strong>, installation,<br />
adjustments, unauthorized applications or any other alteration or mo<strong>di</strong>fication of any form.<br />
Broken or damaged wires or connections unless <strong>di</strong>rectly due to material or factory defects.<br />
Parts removed or repaired by parties other than SUEX S.r.l., that deteriorate correct<br />
operations or prevent adequate inspections for warranty service purposes.<br />
Defects or damages due to humi<strong>di</strong>ty, liquids or foreign objects introduced within the battery<br />
pack.<br />
Extended wires or with ruined or missing insulation.<br />
Scratches or damages to any plastic surface <strong>and</strong> any other external device part due to<br />
normal product <strong>use</strong> by the consumer.<br />
Temporarily rented products.<br />
Perio<strong>di</strong>c <strong>maintenance</strong> <strong>and</strong> repairs or part replacement due to normal wear or deterioration.<br />
52
49 Safety instructions<br />
70097-70099-70100<br />
49.1 Training<br />
The ADV may be <strong>use</strong>d by technical or recreational <strong>di</strong>vers alike. In either case it is<br />
assumed that whoever is effecting the <strong>di</strong>ve has obtained the necessary certification issued<br />
by qualified certification agencies. At any rate, <strong>use</strong> of the ADV implies that the <strong>use</strong>r has<br />
undergone specific training that permits him to <strong>use</strong> the vehicle safely <strong>and</strong> to fully<br />
appreciate its potential. Do not forget that the greatest danger is constituted by the<br />
underwater environment being explored.<br />
49.2 Equipment configuration <strong>and</strong> ri<strong>di</strong>ng position<br />
SUEX <strong>di</strong>ving vehicles are TOW BEHIND type (as opposed to a “ride-on-top” which must<br />
be straddled) <strong>and</strong> ideally the <strong>di</strong>ver should be towed behind the ADV.<br />
Attention. The ADV should not be improperly bound to the <strong>di</strong>ver. The<br />
<strong>use</strong>r should be able to ab<strong>and</strong>on the ADV at all times <strong>and</strong> with extreme<br />
ease. If you want to <strong>use</strong> a towing device, the fast release fitting cod.<br />
WARNING<br />
70089 must be <strong>use</strong>d.<br />
See images on the following page:<br />
Fig. 1 hooked device<br />
Fig. 2 unhooked device<br />
Figure 5<br />
Figure 6<br />
Correct equipment configuration is a crucial factor for safe <strong>di</strong>ving in general <strong>and</strong><br />
becomes vital when <strong>di</strong>ving with the ADV. As a rule, the type <strong>and</strong> position of the <strong>di</strong>ving<br />
equipment should guarantee perfect streamlining <strong>and</strong> no elements should protrude or be<br />
left dangling.<br />
The <strong>di</strong>ver’s position during the <strong>di</strong>ve must be more or less horizontal (posture <strong>and</strong><br />
buoyancy always derive from correct equipment configuration <strong>and</strong> adequate training). This<br />
ensures safety, longer running times, speed <strong>and</strong> ri<strong>di</strong>ng comfort.<br />
53
DANGER!<br />
70097-70099-70100<br />
Be especially careful when setting out your equipment especially as<br />
regards: hoses, regulators, pony bottles, pressure gauges, au<strong>di</strong>ble<br />
alarms, flashlights <strong>and</strong> pertinent cables, reels, etc., making sure they<br />
do not dangle <strong>and</strong> that they cannot come into contact with the propeller<br />
or entangle themselves on the bottom or on your buddy, creating<br />
possibly serious hazard situations.<br />
49.3 Danger zone <strong>and</strong> residual hazards<br />
The propeller is protected by a surroun<strong>di</strong>ng strip but is exposed at both the intake <strong>and</strong><br />
outflow ends. No ad<strong>di</strong>tional guards have been installed at these points since these would<br />
reduce fluid flow considerably, drastically reducing the efficiency of motor thrust.<br />
DANGER!<br />
DANGER!<br />
DANGER!<br />
Entanglement <strong>and</strong> cut hazards<br />
Do not insert any object or body part inside the flow duct, that could<br />
obstruct the rotating propeller blades. When in <strong>use</strong>, besides the h<strong>and</strong><br />
on the trigger, a safety <strong>di</strong>stance of at least 40 cm must be maintained<br />
between the <strong>di</strong>ver’s body <strong>and</strong> the propeller assembly.<br />
Back injury hazard<br />
When out of the water, be careful if lifting the vehicle without any lifting<br />
aids. Another person’s help is recommended.<br />
Crushing hazard<br />
During the closing operation of the main body or of the head cap be<br />
careful don’t put the fingers.<br />
49.4 Safety device<br />
A torque-limiting device is installed between the motor <strong>and</strong> the propeller. When the<br />
resistance felt by the propeller exceeds a certain torque, this device intervenes, preventing<br />
the propeller from rotating.<br />
The device will generate a rhythmic sound signalling its insertion. If this<br />
situation occurs, release the trigger imme<strong>di</strong>ately, switch off the power<br />
by means of the main switch <strong>and</strong> free the propeller of the foreign body.<br />
CAUTION<br />
Do not leave the torque-limiting device inserted for more than 10<br />
seconds. It has been conceived for emergency purposes <strong>and</strong> may be<br />
damaged by prolonged <strong>use</strong>.<br />
If con<strong>di</strong>tions allow you to remove the foreign body safely during the <strong>di</strong>ve, then do so.<br />
Otherwise let go of the ADV <strong>and</strong> pick it up later.<br />
50 H<strong>and</strong>ling<br />
In every transport con<strong>di</strong>tion, the ADV must be always closed.<br />
The vehicle has been conceived for <strong>use</strong> in water environments. When transporting it or<br />
loa<strong>di</strong>ng it onto a car, some precautions need to be taken due to its shape <strong>and</strong> weight.<br />
Lift it hol<strong>di</strong>ng a flow conduit support <strong>and</strong> front h<strong>and</strong>le.<br />
Whilst transporting it by car or by boat, make sure it is blocked in a secure position.<br />
The <strong>use</strong> of the support cod. 70068 is advised (see <strong>Suex</strong> accessories).<br />
54
70097-70099-70100<br />
Do not position the ADV at the front of boats or <strong>di</strong>nghies or in positions where it would be<br />
subjected to harsh jolting the inner parts may be damaged. When the ADV is laid on the<br />
ground, always do so gently, <strong>and</strong> when it is placed in the upright position, rest it on the<br />
propeller guard. Always make sure that the surface is flat <strong>and</strong> that nothing comes into<br />
contact with the propeller hub.<br />
If you prefer to grip the ADV from the maneuvering h<strong>and</strong>les, do so, but do not overstress<br />
them - they were not designed to bear excessive loads. Do not carry the entire weight of<br />
the ADV on only one h<strong>and</strong>le.<br />
BEFORE EMBARKING THE ADV ON AIRPLANES OR PUBLIC TRANSPORTATION<br />
VEHICLES, PLEASE READ THE REGULATIONS ON BATTERY TRANSPORT!<br />
51 Using the ADV <strong>di</strong>ving vehicle.<br />
Underwater <strong>di</strong>ving is a potentially dangerous activity <strong>and</strong> incorrect <strong>use</strong> of the ADV further<br />
increases the hazards of the <strong>di</strong>ve itself.<br />
Before <strong>use</strong>, make sure the battery is charged, that connectors are connected <strong>and</strong> that no<br />
electrical parts are rusted. Check that the head cap is closed properly, check its con<strong>di</strong>tion,<br />
especially following accidental bumps, or accidental scratches, <strong>and</strong> make sure that the<br />
trigger <strong>and</strong> main switch are functioning correctly. At this point the ADV is ready for <strong>use</strong>.<br />
After entering the water <strong>and</strong> grasping hold of the ADV by means of the tow harness, the<br />
main switch must be switched on by rotating it clockwise with the fingers only. The switch<br />
is not a snap switch, but behaves just like a water tap, i.e. more than one complete turn is<br />
necessary to open or close the contact.<br />
CAUTION<br />
Do not force the switch when the end of travel is reached, otherwise it<br />
could be damaged.<br />
DANGER!<br />
The main switch must be turned clockwise to running mode only when<br />
the ADV is in water. Rotating the propeller out of the water may be<br />
dangerous <strong>and</strong> damage the seal of the motor shaft.<br />
Once in the water, the propeller is activated by pulling the trigger<br />
incorporated on the right manoeuvring h<strong>and</strong>le towards you. Releasing<br />
the trigger will stop propeller rotation.<br />
CAUTION<br />
Speed can be regulated from 0 to 100% of the maximum speed using<br />
the speed regulator knob; turning it clockwise the speed decreases, turning it counterclockwise<br />
the speed increases.<br />
Do not force the regulator knob when the end of travel is reached, otherwise it could be<br />
damaged.<br />
52 Running time<br />
Running time data is in<strong>di</strong>cative <strong>and</strong> is nevertheless referred to <strong>use</strong><br />
- with a vehicle in perfect running order<br />
- in moderate environments<br />
- in the absence of currents<br />
- with an average load (<strong>di</strong>ver with a single tank or doubles 12+12 lt)<br />
55
70097-70099-70100<br />
- in perfect buoyancy con<strong>di</strong>tions<br />
As a rule, the running time should be calculated to cover the descent <strong>and</strong> ascent. An<br />
EMERGENCY running time, which will vary accor<strong>di</strong>ng to the type of <strong>di</strong>ve, must also be<br />
established.<br />
In any case, when planning a <strong>di</strong>ve you MUST consider the<br />
event of returning to the exit point without the ADV.<br />
53 Speed<br />
Speed depends on the same factors as running time. The speed chosen should be<br />
compatible with the type of <strong>di</strong>ve <strong>and</strong> be adjusted to match that of your bud<strong>di</strong>es.<br />
Descent rate<br />
The ADV allows you to accomplish a fast descent rate. AVOID using it to accelerate your<br />
descent since problems related to equalising <strong>and</strong> psychological/physical adjustment are<br />
increased.<br />
Ascent rate<br />
The ADV MUST NEVER BE USED FOR VERTICAL ASCENTS. In fact, using it in such a<br />
manner may result in an excessively rapid ascent WHICH IS POTENTIALLY<br />
DANGEROUS. Hence it is better to DEACTIVATE IT BY TURNING THE MAIN SWITCH<br />
TO THE OFF POSITION, position it out of the way, <strong>and</strong> ascend normally.<br />
54 Depth <strong>and</strong> operating environments<br />
DO NOT EXCEED THE MAXIMUM OPERATING DEPTH!!!<br />
The <strong>di</strong>ve is already VERY DANGEROUS at that depth. INCORRECT USE OF THE ADV<br />
IN SUCH ENVIRONMENTS INCREASE DIVING HAZARDS.<br />
It is important to remember that maximum <strong>di</strong>ving vehicle operating depth refers to the ADV<br />
in prime con<strong>di</strong>tions. Collisions, scratches or deformations significantly reduce this limit.<br />
Obstructed environments<br />
Dives in such environments are already VERY DANGEROUS.<br />
INCORRECT USE OF THE ADV IN SUCH ENVIRONMENTS INCREASES THE DIVING<br />
HAZARDS. For example: if the control valves are hit accidentally whilst travelling at high<br />
speeds, these may break, with obvious consequences. DIVING IN SUCH<br />
ENVIRONMENTS REQUIRES ADEQUATE TRAINING BY QUALIFIED AGENCIES. It is<br />
hereby emphasized that the running time of both the ADV <strong>and</strong> the breathing gas must be<br />
planned in such a manner that every team member has TWICE the necessary resources<br />
available. It is also obligatory to carry another extra ADV.<br />
Muddy or suspension-filled environments<br />
These include those environments, obstructed or otherwise, in which visibility may<br />
suddenly fall to zero due to the suspension that is created by moving the bed se<strong>di</strong>ment.<br />
Dives in these environments are already VERY DANGEROUS. INCORRECT USE OF<br />
THE ADV IN SUCH ENVIRONMENTS INCREASES THE DIVING HAZARDS.<br />
DIVING IN SUCH ENVIRONMENTS REQUIRES ADEQUATE TRAINING BY QUALIFIED<br />
AGENCIES.<br />
For example: the rotating propeller that faces downwards can lift a considerable amount of<br />
suspension.<br />
Accidental activation of an emergency ADV in tow may create highly critical<br />
situations.<br />
56
70097-70099-70100<br />
55 Floo<strong>di</strong>ng of the <strong>di</strong>ving vehicle, sinking.<br />
This is a situation that could occur if the ADV is <strong>use</strong>d incorrectly, has suffered a strong<br />
collision, is not closed properly or is not serviced as it should be.<br />
In the event of floo<strong>di</strong>ng, the vehicle will start to show negative buoyancy<br />
<strong>and</strong> will start to sink.<br />
If total floo<strong>di</strong>ng occurs, the situation can become POTENTIALLY<br />
DANGEROUS since the ADV will become HIGHLY negative from<br />
about 12 to 40 kg depen<strong>di</strong>ng on the model type PULLING YOU<br />
DOWNWARDS, <strong>and</strong> MUST THEREFORE BE ABANDONED IMMEDIATELY.<br />
56 Precautions for <strong>use</strong><br />
- Do not expose the ADV to solar ra<strong>di</strong>ations, closed into the car under the sun, or<br />
exposed to excessive heat (max 50°C). Overheating <strong>and</strong> successive deformation<br />
may occur, to the preju<strong>di</strong>ce of the water tightness of mating surfaces.<br />
- Avoid bumps during the <strong>di</strong>ve<br />
- Do not <strong>use</strong> it as a stool<br />
- Do not st<strong>and</strong> up on it<br />
- Do not let it be <strong>use</strong>d by young or inexpert persons<br />
- Do not charge the batteries with chargers other than those supplied<br />
- Do not try to stop the propeller <strong>manual</strong>ly<br />
- Do not block the trigger mechanism whilst the ADV is in running mode<br />
- Do not hurl it from the boat or, worse, from the shore<br />
- Do not <strong>di</strong>sassemble it<br />
- Do not let it run in a “dry” environment.<br />
- Do not wet electrical contacts.<br />
- Do not short-circuit the batter<br />
- Do not remove the connectors from their leads <strong>and</strong> do not invert the polarity of the<br />
battery connections.<br />
CAUTION<br />
Check frequently that the forward h<strong>and</strong>le (in fabric) is secure <strong>and</strong><br />
sound. Its sudden rupture could lead to serious accidents.<br />
Do not wet the inside of the ADV <strong>and</strong> the battery.<br />
57 Cleaning <strong>and</strong> overhaul<br />
After <strong>use</strong>, the ADV must be rinsed thoroughly with fresh water. A neutral detergent may be<br />
<strong>use</strong>d for more stubborn <strong>di</strong>rt. Before opening the ADV, it is important to remove all traces of<br />
salt. In particular, the magnetic reed connected to the trigger must be cleaned thoroughly<br />
<strong>and</strong> all grit <strong>and</strong> s<strong>and</strong> particles removed.<br />
Do not <strong>use</strong> any solvents or petroleum-based products.<br />
The ADV must be stored in a cool, clean, <strong>and</strong> ventilated place, in an<br />
upright position with the nose facing upwards. The battery must be<br />
removed, charged <strong>and</strong> stored away from frosty con<strong>di</strong>tions or excessive<br />
heat. Make sure that the connectors do not come into contact with metal<br />
CAUTION<br />
objects inside the ADV or the battery will be shorted. The wheel for<br />
opening the head cap must be loosened such that the gasket is in view.<br />
57
Important note: always remove the battery after the <strong>use</strong>.<br />
70097-70099-70100<br />
58 Troubleshooting<br />
PROBLEM<br />
The ADV does not run. When the trigger is activated<br />
the propeller does not turn.<br />
Although the battery pack has been charged <strong>and</strong> the<br />
connectors are inserted the ADV does not run.<br />
The speed regulation doesn’t work.<br />
The ADV’s running time is visibly <strong>di</strong>minished.<br />
When the main switch is on, the ADV runs<br />
continuously with no chance of stopping it.<br />
The motor is noisy.<br />
Vibrations are felt when the propeller rotates.<br />
The ADV floods very slowly.<br />
The control trigger sticks <strong>and</strong> the ADV remains<br />
running.<br />
POSSIBLE CAUSE - TREATMENT<br />
Open the ADV, check that the batteries are charged<br />
<strong>and</strong> that the connectors are inserted <strong>and</strong><br />
undamaged, then try again.<br />
The control system may be damaged - must be<br />
checked.*<br />
The motor may be damaged - must be replaced.*<br />
The battery pack may be damaged - must be<br />
replaced.<br />
The control system may be damaged - must be<br />
replaced.*<br />
The batteries need to be replaced.<br />
The battery charger is broken or does not work well -<br />
must be replaced.<br />
The control card is damaged - must be replaced.*<br />
The ADV needs to be serviced.*<br />
The propeller is damaged - must be replaced.<br />
The drive system is damaged - needs to be<br />
serviced.*<br />
Replace all the O-rings <strong>and</strong> carefully check that the<br />
seating surfaces are not damaged. See section 18 -<br />
Spare Parts<br />
Shut off the ADV, try to slide the starting piston,<br />
driven by the trigger, to get out any foreign bo<strong>di</strong>es,<br />
try to start again. If the ADV continues to work, the<br />
starting system must be verified, probably it was<br />
damaged by a shock.<br />
*operations to be carried out by SUEX authorised service centres.<br />
58
70097-70099-70100<br />
59 Maintenance<br />
Lubrication of head cap O-ring<br />
Open the ADV, gently remove the lock O-ring being careful not to scratch the O-ring<br />
support surfaces, <strong>and</strong> clean the seating thoroughly (only by means of a clean brush or soft<br />
cloth). Do not <strong>use</strong> any type of solvent or alcohol. Apply silicone oil to the O-ring <strong>and</strong> return<br />
it to its place. Do not <strong>use</strong> any other type of oil!!! We recommend the aerosol spray type<br />
which is usually <strong>use</strong>d for <strong>di</strong>ving equipment. Occasionally, lubricate the lock knob screw<br />
with normal mineral grease. Never lubricate trigger or magnetic piston movement. They<br />
would fill of s<strong>and</strong> <strong>and</strong> <strong>di</strong>rt. Do not lubricate electrical contacts!<br />
Supplementary <strong>maintenance</strong><br />
Every hundred hours of <strong>use</strong> or at least every two years, we recommend you overhaul the<br />
ADV checking hydraulic seals <strong>and</strong> electrical circuits.<br />
SUEX S.r.l. fully overhauls your ADV with shipping throughout the world.<br />
WARNING<br />
NOTE: using spray lubricants, it is important to air the inside of the<br />
ADV. In this way the propelling gas go away, for the most part are<br />
inflammable!!!!!<br />
60 Disposal <strong>and</strong> scrapping<br />
This apparatus is partly constructed with recyclable materials.<br />
When the ADV can no longer be <strong>use</strong>d safely or when the service centre deems it no<br />
longer suitable for <strong>use</strong>, the ADV must be scrapped.<br />
The ADV must be <strong>di</strong>sassembled <strong>and</strong> <strong>di</strong>vided into <strong>di</strong>stinct parts. Plastic parts must be<br />
deposited in the relative plastic waste containers <strong>and</strong> metal parts must be taken to a<br />
collection centre for metal waste.<br />
WARNING<br />
Special care must be taken when <strong>di</strong>sposing of battery packs since<br />
these contain LEAD, which is highly polluting to the environment.<br />
Batteries must be taken to a collection centre for spent batteries.<br />
PLEASE SAFEGUARD YOUR SURROUNDINGS!! ALL VEHICLE PARTS AND THE<br />
BATTERY PACKS IN PARTICULAR SHOULD BE DISPOSED OF ACCORDING TO<br />
LOCAL DISPOSAL REGULATIONS!<br />
59
70097-70099-70100<br />
61 Battery charge (general rules)<br />
• CAREFULLY READ THE BATTERY CHARGER INSTRUCTIONS MANUAL.<br />
• The battery should only be charged with the specifically supplied battery<br />
charger.<br />
• Charge the battery in a well-ventilated, covered area, away from flammable<br />
objects or liquids, away from crowded rooms <strong>and</strong> in no way in the home.<br />
• The battery must be connected to the charger using the specific connector.<br />
• REMOVE THE BATTERY from the ADV <strong>and</strong> wait at least two hours before<br />
charging.<br />
• Do not connect any device to the battery when charging.<br />
• The battery should be kept off the ADV <strong>and</strong> only inserted <strong>and</strong> connected to<br />
the engine imme<strong>di</strong>ately before <strong>use</strong>: it should be <strong>di</strong>sconnected <strong>and</strong> removed<br />
imme<strong>di</strong>ately after <strong>use</strong><br />
62 How to charge the battery<br />
• Remove the battery from the ADV.<br />
• Place it in a protected, well-ventilated area away from people <strong>and</strong> flammable<br />
materials.<br />
• FIRST connect the battery charger to the battery charge connector (varies<br />
accor<strong>di</strong>ng to the model) on the battery.<br />
• NEXT connect the battery charger to the mains.<br />
• Wait until fully charged (see battery charger instructions)<br />
• Replace the battery in the ADV before <strong>use</strong>.<br />
Some models let you physically charge the battery without removing<br />
it from the ADV (<strong>di</strong>scouraged!). In this case, we recommend<br />
positioning the vehicle in a dry, well-ventilated place away from<br />
people <strong>and</strong> flammable materials <strong>and</strong> make sure the ADV main switch<br />
is always OFF.<br />
DO NOT ATTEMPT TO CHARGE DAMAGED, LEAKING, RUSTED<br />
OR OTHERWISE DAMAGED BATTERIES.<br />
SUEX S.r.l. IS AVAILABLE FOR ANY NECESSARY TECHNICAL<br />
ASSISTANCE.<br />
60
70097-70099-70100<br />
63 Pb gel battery information<br />
The battery is generally made up of two single 12 volt batteries, connected in sequence to achieve 24 volt<br />
voltage. Factory assembled, they are wired with a power cord <strong>and</strong> connector for hook-up.<br />
If a perceptible drop in <strong>di</strong>stributed power is noticed during ADV <strong>use</strong>, imme<strong>di</strong>ately stop <strong>use</strong> <strong>and</strong> turn off using<br />
the switch.<br />
NEVER leave the battery connected to the ADV when not in <strong>use</strong>.<br />
Charge the battery at least once a month.<br />
Charge the battery before each <strong>use</strong>, letting the battery cool (if heated) before inserting it in the ADV; during<br />
this phase the battery could release hydrogen which would inevitably accumulate inside the ADV which is air<br />
tight.<br />
Hydrogen accumulation (in special con<strong>di</strong>tions) could ca<strong>use</strong> accidents, with consequent damages to people<br />
<strong>and</strong> property.<br />
Replace battery at the end of its charge cycles (on our machines, the lead battery could operate for 150 to<br />
300 cycles, depen<strong>di</strong>ng on <strong>use</strong>); a dead battery, in ad<strong>di</strong>tion to having lost its capacity to store energy,<br />
inevitably produces hydrogen gas.<br />
Only <strong>use</strong> <strong>Suex</strong> srl approved batteries, exclusively charging them with their approved battery chargers. When<br />
the battery charger is not in <strong>use</strong>, <strong>di</strong>sconnect it from the power socket.<br />
Even when not in <strong>use</strong>, a fully charged battery slowly <strong>di</strong>es due to the self-<strong>di</strong>scharge phenomenon; charging<br />
the batteries within 24 hours of <strong>use</strong> is recommended.<br />
Extreme temperatures significantly affect battery charge capacity.<br />
Leaving the battery in hot or cold climates such as, for example, a closed car in mid-summer or mid-winter,<br />
reduces battery capacity <strong>and</strong> life. Always try to keep batteries at a temperature between 15°C <strong>and</strong> 25°C.<br />
Battery performance is significantly reduced at temperatures lower than 0°C.<br />
DO NOT THROW BATTERIES IN FIRES, THEY EXPLODE!<br />
Do not <strong>use</strong> the battery for purposes other than those prescribed.<br />
Never <strong>use</strong> damaged battery chargers or batteries.<br />
Accumulators must be kept outside the ADV, in dry locations, (relative humi<strong>di</strong>ty<br />
65% +-5%) <strong>and</strong> at a temperature between 5°C <strong>and</strong> 25°C, with the electric<br />
connectors away from metallic objects that can short circuit the two battery<br />
poles, with serious fire hazard, damages to people <strong>and</strong> property.<br />
Do not wet electrical contacts.<br />
Dispose of batteries observing local regulations such as, for example, recycling them. Do not <strong>di</strong>spose of<br />
batteries with domestic waste.<br />
Piombo (Pb)<br />
61
70097-70099-70100<br />
64 Ideal battery charging con<strong>di</strong>tions<br />
Admitted room temperature from 10°C to 35°C (ideal 20°C)<br />
Slow charge option (when permitted by the charger).<br />
Battery temperature at charge start 20°C.<br />
Con<strong>di</strong>tions other than those described above may significantly influence charging as well<br />
as the number of possible charges with acceptable yield.<br />
65 Ideal battery depletion con<strong>di</strong>tions<br />
We recommend using <strong>di</strong>scharging batteries at a room temperature between 5°C <strong>and</strong> 35°C.<br />
To avoid short-term deterioration <strong>and</strong> potential cell polarity inversion, the battery should<br />
never, in any case, fully deplete.<br />
When, during ADV <strong>use</strong>, a significant propeller power drop is noted,<br />
do not insist on using the ignition, in these battery depletion<br />
con<strong>di</strong>tions CONTINUING DIVING VEHICLE USE IS HIGHLY<br />
DISCOURAGED: the battery is about to short.<br />
During ADV <strong>use</strong>, it is best not to constantly drive at maximum speed<br />
but to <strong>use</strong> the rpm regulator, suspen<strong>di</strong>ng frequent starts, making<br />
brief pa<strong>use</strong>s, to give the battery time to better conduct the chemical<br />
reaction required to generate power, avoi<strong>di</strong>ng abrupt cell heating.<br />
65.1 Important note on battery depletion!<br />
After ADV <strong>use</strong>, always remember to cut off motor power using the switch.<br />
This is beca<strong>use</strong> the ADV electronic control, even if the motor is not running, consumes a<br />
small amount of energy which, in the long term, depletes the battery. The cut off device<br />
prevents the battery from overheating, but if, for any reason, it malfunctions, the battery<br />
would <strong>di</strong>e <strong>and</strong> the polarity of some cells may invert.<br />
66 Battery depleted alarm siren device<br />
<strong>Suex</strong> ADVs are equipped with an alarm siren system (continuous siren), easy to hear in<br />
both immersion <strong>and</strong> emersion, which automatically sounds when a set voltage, considered<br />
the minimum for ADV <strong>use</strong>, is reached, without further or inappropriately using the battery.<br />
This alarm is always triggered, whether the ADV is in <strong>use</strong> or accidentally left “ON”.<br />
When the siren sounds, the ADV may continue to run for several minutes. This amount of<br />
time varies <strong>and</strong> depends on several factors such as the power <strong>use</strong>d <strong>and</strong> battery wear<br />
con<strong>di</strong>tions.<br />
WHEN THIS DEVICE IS TRIGGERED, WE HIGHLY RECOMMEND YOU TURN THE<br />
ADV OFF IMMEDIATELY SO AS NOT TO FURTHER EXPLOIT THE BATTERY.<br />
67 “CUT OFF” battery protection system, operating<br />
principle <strong>and</strong> instructions for <strong>use</strong><br />
The electronic battery protection system from total accidental depletion is located inside<br />
the battery <strong>and</strong> connected in sequence between the battery <strong>and</strong> ADV engine.<br />
62
70097-70099-70100<br />
Its purpose is to prevent excessive cell depletion that could lead to the polarity inversion of<br />
one or more cells, with consequent potential battery destruction <strong>and</strong> possible damages,<br />
even serious, to property <strong>and</strong>/or people.<br />
When accumulators deplete, voltage lowers until it reaches a limit value. When this value<br />
is reached, cut off prevents the battery from further depleting by interrupting power<br />
<strong>di</strong>stribution.<br />
When the cut off is triggered, the battery no longer outputs voltage to the connector.<br />
To continue battery <strong>use</strong>, it must only be charged with the specific battery charger (see<br />
battery charger instruction <strong>manual</strong>) <strong>and</strong> restore the circuit.<br />
The cut off device should only trigger in exceptional cases <strong>and</strong> this event should not occur<br />
during normal battery <strong>use</strong> since correct <strong>use</strong> does not include excessive depletion.<br />
67.1 Procedure to follow in the event the cut off device is<br />
triggered<br />
In the event the cut off system triggers, IT IS IMPORTANT you proceed as follows:<br />
6. Disconnect the engine battery power connector.<br />
7. Remove the battery from the ADV.<br />
8. Let the battery rest for at least 2 hours. This is the minimum time required, in this<br />
case, for the battery to cool <strong>and</strong> return to awaiting charge con<strong>di</strong>tions.<br />
9. Connect the battery charge connector to the battery charger.<br />
10. Charge following the instructions in the battery charger <strong>manual</strong>.<br />
IMPORTANT NOTE!<br />
Also remember that the ADV inevitably stops running when<br />
the cut off device is triggered. This event is not hazardous<br />
to the <strong>di</strong>ver in any way since the <strong>di</strong>ve was planned taking<br />
into account that ADV <strong>use</strong> is not considered a safety device<br />
or rescue means.<br />
SUEX S.r.l. is not liable after the cut off system triggers, in any situation, in<br />
hazardous situations or immersions where the driver (at his full risk) confided on<br />
surfacing by using our manufactured under water vehicle.<br />
Please remember that the ADV must be considered as an immersion aid <strong>and</strong> not<br />
as a rescue vehicle.<br />
68 Pb gel battery, frequently asked questions:<br />
I often <strong>use</strong> the ADV, twice a week or every day, but I never fully deplete the battery since I make short <strong>di</strong>ves. Should I remove<br />
the battery after every <strong>use</strong> <strong>and</strong> charge it?<br />
A lead battery has no memory effect, it is always best to charge it, prolonging accumulator life <strong>and</strong> ensuring maximum autonomy.<br />
The battery should be kept off the ADV <strong>and</strong> inserted <strong>and</strong> connected to the engine only imme<strong>di</strong>ately prior to <strong>use</strong>. It should be<br />
<strong>di</strong>sconnected <strong>and</strong> removed imme<strong>di</strong>ately after <strong>use</strong>.<br />
Can I leave the battery connected to the battery charger for a long period of time?<br />
After charging, our battery chargers enter idle mode <strong>and</strong> can be left attached to the battery as long as you like. They only charge if<br />
necessary. However, it is always best to <strong>di</strong>sconnect them as soon as charging is finished.<br />
I dropped the battery <strong>and</strong> it has a dented corner. Can I still <strong>use</strong> it?<br />
Obviously, this depends on the extent of the dent. Lead gel batteries are usually durable, however, they must be replaced if the case is<br />
so damaged that electrolyte leaks. In any case, a dropped battery may have internal damages to cell connections <strong>and</strong> replacement is<br />
recommended.<br />
Is battery heating normal when charging?<br />
Given that a battery should always be charged at room temperature between 15°C <strong>and</strong> 25°C, the battery's temperature may slightly rise<br />
during charge. Should the battery or a part of it overheat during charge, stop charging imme<strong>di</strong>ately <strong>and</strong> replace.<br />
Is battery heating normal when outputting?<br />
As with charging, battery output slightly raises battery temperature, therefore, the same con<strong>di</strong>tions apply as above.<br />
How long does good lead battery efficiency last if not <strong>use</strong>d?<br />
This depends on many factors, especially the quality of the battery. Usually, a battery charged at least every three months <strong>and</strong> never<br />
depleted can last up to five years.<br />
How long does a battery <strong>use</strong>d on your ADV last?<br />
63
70097-70099-70100<br />
With sporting ADV <strong>use</strong>, or about fifty <strong>di</strong>ves a year, a battery usually lasts in good con<strong>di</strong>tion for about three years <strong>and</strong> a total of about 150<br />
charges. If <strong>use</strong>d more often, it can even be <strong>use</strong>d about three hundred times.<br />
When the battery is dead, what should I do with it?<br />
The battery should be <strong>di</strong>sposed of in a specific depleted lead battery recycling center. There are specific collection centers in every city.<br />
I left the battery on the boat <strong>and</strong> sea elements rusted the silver-plated connector contacts. What should I do?<br />
All electrical contacts inside the ADV battery case should never generate electrical shocks or sparks due to the presence of hydrogen.<br />
The connector should be replaced imme<strong>di</strong>ately. (<strong>Suex</strong> customer service).<br />
I pulled the battery wires by mistake <strong>and</strong> damaged the insulation. Do I have to replace them or can I insulate them with tape?<br />
Damaged wires must be replaced. A wiring short circuit could even make the battery explode creating serious hazards to people <strong>and</strong><br />
property. (<strong>Suex</strong> customer service).<br />
I noticed that the battery is made up of two 12-volt retail elements, glued <strong>and</strong> connected in sequence for 24 volt. My battery is<br />
damaged. Can I assemble a new one using the connectors <strong>and</strong> wires from the old one?<br />
<strong>Suex</strong> S.r.l. does not authorize or recommend do-it-yourself battery assembly for various reasons inclu<strong>di</strong>ng the <strong>use</strong> of lea<strong>di</strong>ng br<strong>and</strong> <strong>and</strong><br />
capacity batteries. However, if an expert <strong>use</strong>r insists on this attempt, always using new batteries of the same br<strong>and</strong> <strong>and</strong> never<br />
combining <strong>di</strong>fferent br<strong>and</strong>ed or worn batteries is recommended. SUEX S.r.l., in any case, is not liable for ADV operations or any<br />
accidents or damages due to customer assembled batteries.<br />
I want to increase ADV speed. Can I add a third battery, even a smaller one, to increase voltage <strong>and</strong> increase engine rpm?<br />
No. The battery is the best for scooter purposes. Whoever tampers with or mo<strong>di</strong>fies the battery is fully liable.<br />
Can I <strong>use</strong> batteries other than those supplied like, for example, two NiMH connected in parallel instead of a lead battery?<br />
No. Batteries should NEVER be connected in parallel. A greater input would create a greater output <strong>and</strong> this would occur without any<br />
voltage regulation, with all that available, triggering effects that could be devastating. NEVER CONNECT BATTERIES IN PARALLEL!<br />
Should I usually fully deplete batteries?<br />
No. Lead batteries have no memory effect. Each depletion is one less life cycle.<br />
How can I tell what the battery efficiency is? If I have to plan a <strong>di</strong>ve, how can I be sure that the battery charge provides a<br />
certain autonomy?<br />
For this reason, there is a completely automatic tool that simulates electrical ADV absorption during operations <strong>and</strong> depletes the battery<br />
to a set residual voltage. When finished, the length of output in minutes is <strong>di</strong>splayed. This data gives you an idea on battery "health"<br />
letting you plan correct <strong>use</strong>. (see “burn tester” accessories)<br />
Never <strong>use</strong> other <strong>di</strong>scharge systems.<br />
69 Accessories (optional) PROP LOCK PROPELLER<br />
69.1 Description.<br />
The easy to replace prop-lock propeller can be<br />
removed from the underwater scooter without the<br />
<strong>use</strong> of tools in any situation such as in the event the<br />
propeller is wound by foreign objects like fishing<br />
lines or hooks or if the <strong>di</strong>ver wants to replace the<br />
propeller with one shaped <strong>di</strong>fferently or with a<br />
<strong>di</strong>fferent number of blades, both underwater <strong>and</strong> on<br />
l<strong>and</strong>.<br />
The SUEX patent permits the propeller to be easily<br />
replaced without losing parts like screws or others,<br />
still maintaining the safety friction built within.<br />
How to replace the st<strong>and</strong>ard propeller with a<br />
Prop Lock propeller<br />
Make sure the following material is found in the<br />
package:<br />
Complete 3, 4 or 5 blade propeller, one piece.<br />
4x40 mm cylindrical plug, one piece.<br />
64
70097-70099-70100<br />
Rubber plug seal, one piece.<br />
Propeller fastening screw, one piece.<br />
Equipment needed to <strong>di</strong>smantle <strong>and</strong> assemble propellers (not supplied).<br />
10 mm wrench or spanner<br />
10 mm tube or sleeve wrench<br />
3 mm Allen key<br />
Ph2 Phillips screwdriver<br />
St<strong>and</strong>ard propeller removal<br />
1<br />
1<br />
Unscrew <strong>and</strong> completely remove the nut (1)<br />
Remove the propeller, pulling it outwards. If <strong>di</strong>fficult<br />
to remove, do not <strong>use</strong> a hammer but grasp the<br />
propeller with two h<strong>and</strong>s <strong>and</strong> pull harder.<br />
Removing the st<strong>and</strong>ard threaded pin.<br />
Unscrew <strong>and</strong> completely remove the st<strong>and</strong>ard threaded<br />
pin (2).<br />
2<br />
Prop-lock threaded pin assembly.<br />
Insert <strong>and</strong> fully screw in the threaded prop lock pin (3) being<br />
careful to insert the SHORTER threaded part in the shaft.<br />
3<br />
65
70097-70099-70100<br />
Note: to make screwing <strong>and</strong> unscrewing the threaded pin<br />
easier, we recommend using the specific tool code 70319.<br />
3<br />
A green rubber spring should be found in the shaft between the<br />
traction pin <strong>and</strong> threaded pin. Its purpose is to prevent the<br />
traction pin from accidentally exiting the shaft.<br />
IMPORTANT: THE TRACTION PIN SHOULD EQUALLY<br />
PROTRUDE FROM BOTH SIDES OF THE SHAFT.<br />
5<br />
Grasp the prop lock propeller <strong>and</strong> make sure the screw (5)<br />
is loose. If not, loosen it as illustrated. It should protrude<br />
about 3 mm from the white knob.<br />
Insert the propeller in the underwater ADV shaft, make sure the plug (4)<br />
is inserted in its housing on the internal side of the propeller. If this is<br />
not the case, rotate the propeller WITH YOUR HANDS until inserted.<br />
PLUG IN THE ASSEMBLY HOUSING, CORRECT<br />
4<br />
66
70097-70099-70100<br />
A<br />
Screw in the white knob until the two surfaces, A<br />
<strong>and</strong> B, are aligned.<br />
At this point, hold the white knob still <strong>and</strong> fully screw<br />
in the screw (5) until it hits the stop (do not force).<br />
B<br />
IMPORTANT NOTE!<br />
CAUTION<br />
Do not start the scooter with the propeller plug incorrectly<br />
inserted in the housing. This would trigger the friction safety<br />
device which should only occur in the event of emergency.<br />
Improper emergency friction <strong>use</strong> damages the friction <strong>and</strong> voids<br />
the warranty.<br />
69.2 How to remove the prop lock propeller.<br />
Unscrew the white knob (COUNTER-CLOCKWISE) until the propeller is fully removed.<br />
69.3 How to insert the prop lock propeller.<br />
Insert the propeller on the ADV engine shaft. Turn the propeller (CLOCKWISE) until the<br />
plug is in the correct fastening position. Continue rotating the white knob (CLOCKWISE).<br />
Tighten the knob WITH YOUR FINGERS ONLY, WITHOUT FORCING.<br />
69.4 Prop lock propeller <strong>maintenance</strong>.<br />
The prop lock propeller does not require <strong>maintenance</strong>. However, make sure the propeller<br />
housing is clean <strong>and</strong> free of foreign objects before inserting it on the ADV shaft.<br />
IMPORTANT NOTE:<br />
THE PROP LOCK PROPELLER SINKS WHEN SUBMERGED IN WATER!<br />
WHEN REMOVING AND REPLACING THE PROPELLER UNDERWATER, BE<br />
CAREFUL SINCE YOU COULD RISK LOSING IT AND, CONSEQUENTLY, LOSE USE<br />
OF YOUR UNDERWATER SCOOTER.<br />
PROP LOCK PROPELLER WARRANTY<br />
<strong>Suex</strong> guarantees the propeller for life against factory defects except for incorrect<br />
assembly, incorrect <strong>use</strong>, wear <strong>and</strong> all cases in which propeller faults are due to negligence<br />
or poor <strong>use</strong>.<br />
Note: The illustration of the ADV motor shaft in this <strong>manual</strong> is purely in<strong>di</strong>cative. It illustrates a part of it for pure explanatory purposes.<br />
67
69.5 Prop lock propeller troubleshooting<br />
70097-70099-70100<br />
PROBLEM<br />
Rotating the white knob requires excessive strain<br />
Even if the shaft pin is in the correct position in the<br />
propeller housing, the friction jerks <strong>and</strong> the scooter<br />
does not move forward.<br />
The white knob turns freely <strong>and</strong> does not stop the<br />
propeller.<br />
The screw on the knob turns freely<br />
CAUSE - SOLUTION<br />
The knob was damaged <strong>and</strong> should be replaced*<br />
The traction pin was damaged (bent) <strong>and</strong> should be<br />
replaced.<br />
The propeller hub was damaged <strong>and</strong> should be<br />
replaced*<br />
Too much force was <strong>use</strong>d to tighten the knob <strong>and</strong> it<br />
was damaged. It should be replaced.*<br />
The knob was damaged <strong>and</strong> should be replaced*<br />
*operations to be conducted at a authorized SUEX service centre.<br />
Note:<br />
The prop lock propeller is larger than a st<strong>and</strong>ard propeller (the white knob protrudes<br />
further).<br />
This means that the <strong>use</strong> must pay closer attention when stan<strong>di</strong>ng the scooter on the flow<br />
conveyor in the vertical position. Any collisions with the propeller (larger) could damage<br />
both the prop lock propeller <strong>and</strong> scooter.<br />
70 Accessories (optional) N-HANDLE CONTROL<br />
70.1 Description.<br />
The N-H<strong>and</strong>le control device was created for<br />
better ADV manageability in certain con<strong>di</strong>tions.<br />
The corrugated h<strong>and</strong>le can be installed in three<br />
<strong>di</strong>fferent positions accor<strong>di</strong>ng to h<strong>and</strong> span.<br />
The “cruise” knob lets you block the trigger at the<br />
desired speed.<br />
The accessory kit lets you attach tool or video<br />
supports to your scooter.<br />
Make sure the following material is found in the package:<br />
H<strong>and</strong>le, one piece.<br />
H<strong>and</strong>le <strong>and</strong> left knob fastening screws: 4 pieces<br />
Grip fastening screws: 4 pieces<br />
Right h<strong>and</strong>le complete with trigger: one piece<br />
Accessory support: one piece<br />
Left knob: one piece<br />
68
70097-70099-70100<br />
4<br />
5<br />
6<br />
8<br />
3<br />
2<br />
1<br />
7<br />
9. Grip<br />
10. H<strong>and</strong>le<br />
11. Trigger<br />
12. Cruise knob<br />
13. Accessory support<br />
14. Accessory support groove<br />
15. First speed stop<br />
16. Accessory support lock<br />
Equipment needed to assemble the h<strong>and</strong>le (not supplied).<br />
7 mm wrench or spanner<br />
8 mm wrench or spanner<br />
3 mm Allen key<br />
4 mm Allen key<br />
PH2 Phillips screwdriver<br />
WATCH THE VIDEO AT WWW.SUEX.IT FOR TRIGGER ASSEMBLY AND<br />
REGULATION.<br />
SAFETY NOTE:<br />
Pay careful attention to the rotating propeller, trauma risk.<br />
IMPORTANT NOTE!<br />
CAUTION<br />
Do not insist with ADV operations, on l<strong>and</strong>, shaft seals may be<br />
damaged (see instruction <strong>manual</strong>). Only operate for short<br />
periods, 3 or 5 seconds in order to underst<strong>and</strong> whether<br />
regulations are correct.<br />
69
SAFETY NOTE:<br />
70097-70099-70100<br />
The trigger lock knob (cruise) must only be <strong>use</strong>d under the<br />
<strong>di</strong>ver’s maximum control. The knob, trigger or ADV ignition<br />
switch must be usable at all times to avoid any type of<br />
collision or driver dragging risks in hazardous areas.<br />
The knob must only be <strong>use</strong>d to lock first speed, adjusted to 50% of available power<br />
at best. Locking ADV ignition at maximum power is potentially hazardous.<br />
During normal ADV <strong>use</strong> the knob must be fully rotated counter-clockwise <strong>and</strong><br />
locked in place so that it does not stop normal trigger return in any way.<br />
Only <strong>use</strong> the knob with two fingers.<br />
IN ANY CASE, PAY THE UTMOST ATTENTION DURING TRIGGER LOCK KNOB USE<br />
SINCE THIS OPERATION IS ALWAYS HAZARDOUS!<br />
70.2 N-HANDLE device <strong>use</strong>.<br />
• Submerge the scooter.<br />
• Turn on the scooter using the main switch.<br />
• Grasp the device.<br />
• Insert two fingers, your index <strong>and</strong> middle fingers, around the trigger.<br />
• Pull the trigger with your middle finger. It will stop at the first speed to let you drive<br />
the scooter at the set speed (adjustable using the knob)<br />
• Pull the trigger fully back using your index finger <strong>and</strong> the scooter will run at<br />
maximum power.<br />
• Release the trigger at any time to stop the scooter.<br />
Accessory support<br />
The purpose of the accessory support is to be able to attach any object that may be <strong>use</strong>ful<br />
during <strong>di</strong>ves on the h<strong>and</strong>le. For this reason, SUEX has created some supports to be <strong>use</strong>d<br />
with normal wrist or console tools.<br />
Support <strong>use</strong>.<br />
Loosen the lock screw <strong>and</strong> insert the support.<br />
Tighten the lock screw only using two fingers.<br />
Always make sure the screw is fully screwed in when the support is not <strong>use</strong>d.<br />
NOTE: do not force the lock screw.<br />
Maintenance<br />
The N-HANDLE does not require special <strong>maintenance</strong>. Follow the ADV’s general<br />
<strong>maintenance</strong> instructions.<br />
70
70.3 N-HANDLE device troubleshooting.<br />
70097-70099-70100<br />
PROBLEM<br />
The cruise knob is blocked <strong>and</strong> will not turn.<br />
The scooter does not operate or jerks when the<br />
trigger is pulled fully back.<br />
The lock screw turns freely<br />
CAUSE - SOLUTION<br />
Lubricate the knob screw <strong>and</strong> try again.<br />
Adjust the magnetic piston to the correct position.<br />
The thread was damaged <strong>and</strong> requires<br />
replacement.*<br />
Accessories available for the N-HANDLE device can be found at www.suex.it.<br />
71 Accessories (optional) BATTERY CHARGE LEVEL<br />
LED<br />
71.1 Description.<br />
A lighted signal that in<strong>di</strong>cates the battery charge<br />
level is located on the ADV motor body.<br />
The three blue leds turn on automatically <strong>and</strong> are<br />
managed by an electronic device in the motor<br />
compartment that measures battery voltage.<br />
71.2 Operations.<br />
Since the time between one led lighting <strong>and</strong> the next may vary accor<strong>di</strong>ng to the type of<br />
battery <strong>and</strong> its con<strong>di</strong>tions of <strong>use</strong>, this device is only to be considered an ad<strong>di</strong>tional<br />
assistance to the <strong>di</strong>ver, just an ad<strong>di</strong>tional aid.<br />
Programming a <strong>di</strong>ve accor<strong>di</strong>ng to in<strong>di</strong>cator leds is strictly prohibited <strong>and</strong><br />
<strong>di</strong>scouraged. True <strong>and</strong> secure battery duration should be tested by a burn test<br />
instrument (accessory code 70037) which precisely in<strong>di</strong>cates how much energy is<br />
left in the battery.<br />
Battery fully charged<br />
Battery at half charge<br />
Battery low<br />
3 leds on<br />
2 leds on<br />
1 led on<br />
Even if batteries are not fully charge, all three leds will most probably turn on when the<br />
ADV is turned on, especially with Pb <strong>and</strong> NiMH batteries. This is beca<strong>use</strong> idle battery<br />
voltage tends to remain or exceed nominal voltage. True battery voltage can only be read<br />
during <strong>use</strong>, with the scooter on <strong>and</strong> after several dozen seconds of operations.<br />
Each <strong>use</strong>r should “learn” to know the lighted device signal since the time between on led<br />
turning on <strong>and</strong> the next cannot be exactly calculated. It depends on how the ADV is <strong>use</strong>d<br />
71
70097-70099-70100<br />
(set speed). However, only one led on should warn the <strong>di</strong>ver that the battery is low <strong>and</strong><br />
that the scooter should no longer be <strong>use</strong>d.<br />
The lighted signal is extremely helpful beca<strong>use</strong> it in<strong>di</strong>cates that the ADV is on <strong>and</strong> ready<br />
for <strong>use</strong>.<br />
72 Accessories (optional) BY PASS DEVICE.<br />
The BY PASS device is an accessory installed on some models upon customer request.<br />
This device, recognizable as a white knob located on the left side of the motor unit, exactly<br />
opposite the main switch, creates a <strong>di</strong>rect electrical connection between the battery <strong>and</strong><br />
electrical motor, by passing any other device usually <strong>use</strong>d for electrical ADV <strong>use</strong>: trigger,<br />
speed regulator, electronic control. Use of this device is potentially hazardous since once<br />
activated, it starts the motor continuously at maximum power <strong>and</strong> the only control we have<br />
is to turn the ADV off using the min switch or by pass knob.<br />
ALSO REMEMBER THAT YOU MUST BE ABLE TO ABANDON<br />
THE ADV AT ANY TIME. DO NOT USE TOW SYSTEMS THAT ARE<br />
DIFFICULT TO RELEASE.<br />
72.1 Operations<br />
Rotate the main switch counter-clockwise <strong>and</strong> make sure the ADV does not start.<br />
Fully rotate the By Pass knob clockwise without forcing.<br />
Rotate the main switch clockwise. The ADV starts in continuous mode.<br />
Rotate the main switch counter-clockwise to stop the ADV.<br />
In normal operating con<strong>di</strong>tions, the By Pass device knob should be ALWAYS FULLY<br />
rotated counter-clockwise.<br />
Note: This device should only be <strong>use</strong>d in the event of real emergency<br />
meaning if electronics malfunction <strong>and</strong> the ADV cannot be started with<br />
the trigger.<br />
Do not forget that THE ADV IS NOT A LIFE SAVING VEHICLE.<br />
72
70097-70099-70100<br />
73 Modularity<br />
Many of our ADVs can be easily transformed by our customers into models with <strong>di</strong>fferent<br />
characteristics <strong>and</strong> autonomy.<br />
The system adopted to achieve this possibility is that of conceptually <strong>di</strong>vi<strong>di</strong>ng the ADV in<br />
two main parts, the propulsion part, electrical motor <strong>and</strong> propeller, <strong>and</strong> the power part<br />
meaning the battery with its relevant support.<br />
The two parts are contained in two containers which, once assembled, create the entire<br />
ADV, making it watertight.<br />
73.1 Part descriptions<br />
The propulsion unit (A) (see figures 3 <strong>and</strong> 4) is connected to the battery support (B) by 4<br />
self-locking nuts (Y), easily removable with a 10 mm spanner.<br />
In some models an adapter ring (D) is <strong>use</strong>d <strong>and</strong> secured with 6 screws (X) to the<br />
propulsion (A) to compensate for the varying body <strong>di</strong>ameters (C) <strong>and</strong> create a watertight<br />
connection between the propulsion unit (A) <strong>and</strong> body (C).<br />
Figure 3<br />
Figure 4<br />
73
70097-70099-70100<br />
Figures 3 <strong>and</strong> 4 illustrate the ZEUZO 20 model but the assembly criteria for the various<br />
components is exactly the same.<br />
73.2 Part replacement<br />
To separate main ADV parts, rest the ADV on the propeller flow conveyor on a flat surface<br />
so that it is stan<strong>di</strong>ng with the battery towards the top. After removing the shell (C), remove<br />
<strong>and</strong> put away the battery, unscrew the 4 nuts (Y) <strong>and</strong> remove the battery support (B).<br />
If the new shell (C) is of a <strong>di</strong>fferent size, <strong>use</strong> a PH2 Phillips screw to unscrew the 6 screws<br />
(X) <strong>and</strong> remove the adapter ring (D). (see fig. 4)<br />
To reassemble the ADV, perform the above operations in reverse order replacing the parts<br />
required for the transformation.<br />
WARNING! Screw in the self-threa<strong>di</strong>ng screws (X) with care, do not<br />
excessively tighten since they could damage the motor body made<br />
of plastic.<br />
The 4 nuts (Y) should be adequately tightened. In ad<strong>di</strong>tion to part<br />
assembly, they guarantee that the motor body is watertight <strong>and</strong><br />
separate from the battery compartment. Ensure that they are<br />
correctly tightened.<br />
Also pay attention to seal gaskets. Always keep them clean <strong>and</strong> lubricated with their<br />
relevant housings.<br />
74 After-sales service<br />
The company’s after-sales service is at your <strong>di</strong>sposal at all times. Any requests may be<br />
addressed to:<br />
SUEX srl - Submarine Exploration<br />
Via Roma, 261/35<br />
31020 VILLORBA – TV – ITALY<br />
Telephone: 0422-444800<br />
Fax: 0422-620684<br />
www.suex.it<br />
E-mail: info@suex.it<br />
This <strong>use</strong> <strong>and</strong> <strong>maintenance</strong> <strong>manual</strong> is the exclusive property of SUEX S.r.l. Any unauthorized reproduction,<br />
even partial, is prohibited.<br />
For that not foreseen by this <strong>manual</strong>, please refer, for affinity, to civil code regulations, while any <strong>di</strong>sputes<br />
shall be submitted to the Court of Treviso.<br />
74
CE conformity<br />
70097-70099-70100<br />
SUEX S.r.l.<br />
Via Roma, 261/35<br />
31020 Villorba (TV)Italy<br />
International Phone: +39 0422 444849<br />
FAX: +39 0422 620604<br />
Contact Email: info@suex.it<br />
www.suex.it www.suex.eu<br />
DECLARATION OF CONFORMITY<br />
SUEX S.r.l.<br />
Declare, under our sole responsibility as<br />
Distributor, that the product :<br />
Underwater Scooter model: Zeuxo 20 / 33 / 42<br />
Complies with regulations :<br />
Machinery Directive 2006/95/CE<br />
Electromagnetic Compatibility EMC 2004/108/CE<br />
<strong>and</strong> declares that the following rules are applied :<br />
UNI EN ISO 14151-1:2007<br />
UNI EN ISO 12100-1:2009<br />
UNI EN ISO 61000-6-4<br />
UNI EN ISO 61000-6-1<br />
CEI EN 60034-1<br />
CEI EN 60335-1<br />
Villorba, january 01th, 2009<br />
The administrator<br />
Gi<strong>use</strong>ppe Fenu<br />
75