Leggi - DI.BI. Porte Blindate
Leggi - DI.BI. Porte Blindate
Leggi - DI.BI. Porte Blindate

You also want an ePaper? Increase the reach of your titles
YUMPU automatically turns print PDFs into web optimized ePapers that Google loves.
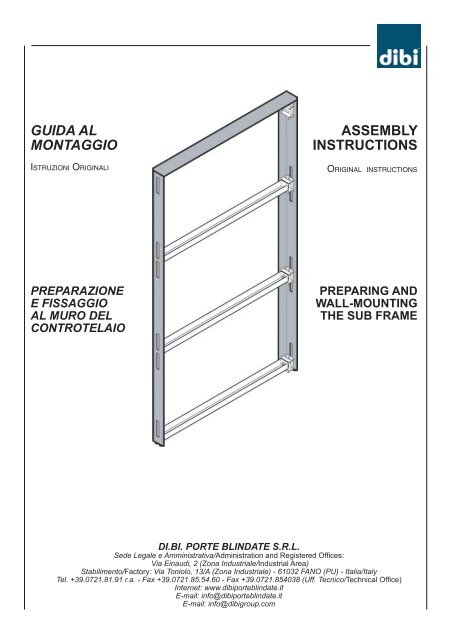
GUIDA AL<br />
MONTAGGIO<br />
<br />
ASSEMBLY<br />
INSTRUCTIONS<br />
<br />
PREPARAZIONE<br />
E FISSAGGIO<br />
AL MURO DEL<br />
CONTROTELAIO<br />
PREPARING AND<br />
WALL-MOUNTING<br />
THE SUB FRAME<br />
<strong>DI</strong>.<strong>BI</strong>. PORTE BLINDATE S.R.L.<br />
Sede Legale e Amministrativa/Administration and Registered Offices:<br />
Via Einaudi, 2 (Zona Industriale/Industrial Area)<br />
Stabilimento/Factory: Via Toniolo, 13/A (Zona Industriale) - 61032 FANO (PU) - Italia/Italy<br />
Tel. +39.0721.81.91 r.a. - Fax +39.0721.85.54.60 - Fax +39.0721.854038 (Uff. Tecnico/Technical Office)<br />
Internet: www.dibiporteblindate.it<br />
E-mail: info@dibiporteblindate.it<br />
E-mail: info@dibigroup.com
NOTA!<br />
I disegni e qualsiasi altro<br />
documento consegnato<br />
insieme alla porta, sono<br />
di proprietà della <strong>DI</strong>.<strong>BI</strong>. che<br />
se ne riserva tutti i diritti<br />
e ricorda che non possono<br />
essere messi a disposizione<br />
di terzi senza la sua<br />
approvazione scritta.<br />
ATTENTION!<br />
The drawings and any other<br />
document that is delivered<br />
with the door are the property<br />
of <strong>DI</strong>.<strong>BI</strong>., which reserves<br />
all rights and reminds the<br />
user that these documents<br />
cannot be distributed to<br />
third parties without written<br />
approval.<br />
E’ quindi rigorosamente<br />
vietata qualsiasi riproduzione<br />
anche parziale del testo<br />
o delle illustrazioni.<br />
Any reproduction, even<br />
partial, of the texts and<br />
illustrations is therefore<br />
strictly prohibited.<br />
Grazie per aver scelto <strong>DI</strong>.<strong>BI</strong>.<br />
Thank you for choosing <strong>DI</strong>.<strong>BI</strong><br />
IN<strong>DI</strong>CE<br />
CAPITOLO<br />
CHAPTER<br />
PAGINA<br />
PAGE<br />
INDEX<br />
INFORMAZIONI<br />
INTRODUTTIVE<br />
1<br />
4<br />
INTRODUCTION<br />
PRESCRIZIONI<br />
<strong>DI</strong> SICUREZZA<br />
2<br />
6<br />
SAFETY<br />
INSTRUCTIONS<br />
MOVIMENTAZIONE<br />
E COMPOSIZIONE<br />
IMBALLI<br />
3<br />
8<br />
MOVING AND PACKAGE<br />
COMPOSITION<br />
PREPARAZIONE<br />
E FISSAGGIO AL MURO<br />
DEL CONTROTELAIO<br />
4<br />
9<br />
PREPARING<br />
AND WALL-MOUNTING<br />
THE SUB FRAME<br />
TABELLA REVISIONI<br />
DEL MANUALE<br />
5 23 CHART OF THE MANUAL<br />
REVISIONS<br />
3
CAPITOLO 1<br />
INFORMAZIONI<br />
INTRODUTTIVE<br />
CHAPTER 1<br />
INTRODUCTION<br />
1.1<br />
NOTA!<br />
Alcuni Controtelai<br />
- su richiesta - verranno<br />
inviati da montare (A)<br />
altri montati (AA).<br />
A seconda della richiesta,<br />
tutte le procedure descritte<br />
nella presente GUIDA AL<br />
MONTAGGIO, mostrano<br />
come fare.<br />
OMETTERE LE OPERA-<br />
ZIONI GIÁ EFFETTUATE.<br />
1.1<br />
ATTENTION!<br />
Some Sub Frames - on<br />
demand - will be sent<br />
disassembled (A) while<br />
some others will be sent<br />
already assembled (AA).<br />
According to the requests,<br />
all the instructions included<br />
in this document, explain<br />
how to do.<br />
OMIT ANY OPERATIONS<br />
THAT HAVE ALREADY<br />
BEEN PERFORMED.<br />
Al ricevimento controllare<br />
che non ci siano deterioramenti<br />
e/o che il cartone<br />
non sia umido;<br />
osservare che l’etichetta<br />
prodotto e l’imballo<br />
siano INTEGRI.<br />
When you receive the<br />
boxes, make sure that they<br />
are not damaged and that<br />
the cardboard is not wet;<br />
check the product label,<br />
the label indicating which<br />
side is up, and that the<br />
packaging is WHOLE and<br />
UNTAMPERED WITH.<br />
Controllare che la bolla<br />
di accompagnamento<br />
corrisponda con l’etichetta<br />
prodotto posta al lato del<br />
cartone.<br />
Check that the packing slip<br />
matches with the product<br />
label on the side of the<br />
package.<br />
4
- Se non corrisponde,<br />
telefonare immediata<br />
mente al Costruttore.<br />
- Se la bolla di accompagnamento<br />
corrisponde<br />
all’etichetta, operare<br />
secondo quanto descritto<br />
al CAPITOLO 3 -”MOVI-<br />
MENTAZIONE E COM-<br />
POSIZIONE IMBALLO”.<br />
Eventualmente, aprire<br />
l’imballo e procedere<br />
al controllo dei loro contenuti<br />
prima d’iniziare il<br />
montaggio.<br />
- If it does not match,<br />
call the Manufacturer<br />
immediately.<br />
- If the packing slip<br />
matches the label as described<br />
in CHAPTER 3 -<br />
“MOVING AND PACKA-<br />
GE COMPOSITION”.<br />
In case, open the packages<br />
and control the<br />
contents before beginning<br />
with the installation.<br />
Per qualsiasi contatto con<br />
il Costruttore o con i suoi<br />
Centri di Assistenza, citare<br />
sempre il numero di ordine.<br />
Whenever contacting<br />
the Manufacturer<br />
or the Service Centers,<br />
always have the order<br />
number on hand.<br />
Trascriverlo in qualche<br />
posto così che in caso di<br />
smarrimento o per qualsiasi<br />
necessità, possiate farne<br />
riferimento.<br />
Make a note of the order<br />
number so that you may<br />
have it as a reference in<br />
case the packing slip is lost,<br />
or in case of other unforeseen<br />
circumstances.<br />
NOTA!<br />
La garanzia NON VIENE<br />
accordata in presenza di<br />
operazioni CONTRARIE<br />
a quanto indicato nelle<br />
“Guide al Montaggio”<br />
dei prodotti <strong>DI</strong><strong>BI</strong>.<br />
ATTENTION!<br />
The guarantee does not<br />
cover malfunctions caused<br />
by operations carried out not<br />
in accordance with the<br />
directions given in the<br />
“Guide to Installation” of<br />
<strong>DI</strong>.<strong>BI</strong>. products.<br />
5
CAPITOLO 2<br />
PRESCRIZIONE<br />
<strong>DI</strong> SICUREZZA<br />
CHAPTER 2<br />
SAFETY<br />
INSTRUCTIONS<br />
2.1<br />
ATTENZIONE<br />
PERICOLO GENERICO!<br />
Indossare sempre guanti<br />
da lavoro e scarponi antinfortunistici.<br />
2.1<br />
CAUTION,<br />
GENERIC DANGER!<br />
Always wear work gloves<br />
and safety boots.<br />
2.2<br />
ATTENZIONE PERICOLO<br />
<strong>DI</strong> SCHIACCIAMENTO!<br />
Quando si movimenta<br />
il Controtelaio e quando<br />
si disimballa prestare<br />
la massima attenzione.<br />
2.2<br />
CAUTION,<br />
DANGER OF CRUSHING!<br />
Be careful when moving<br />
the sub frame and during<br />
unpacking.<br />
2.3<br />
ATTENZIONE PERICOLO<br />
<strong>DI</strong> TAGLIO!<br />
Quando si rompono<br />
le microgiunture delle<br />
zanche del controtelaio, fare<br />
attenzione ai tagli.<br />
INDOSSARE SEMPRE<br />
I GUANTI DA LAVORO.<br />
2.3<br />
CAUTION,<br />
DANGER OF CUTS!<br />
When the small joints<br />
of the sub frame’s anchoring<br />
hooks are broken, take care<br />
to guard against cuts.<br />
ALWAYS WEAR WORK<br />
GLOVES.<br />
2.4<br />
ATTENZIONE<br />
PERICOLO GENERICO!<br />
Durante il montaggio,<br />
l’addetto al montaggio<br />
deve allontanare qualsiasi<br />
persona esposta che<br />
si trovi nell’area di lavoro.<br />
CI POSSONO ESSERE<br />
PIU’ PERICOLI.<br />
In ogni caso il controtelaio,<br />
il telaio e la porta non devono<br />
essere movimentati a<br />
scatti, ma con attenzione.<br />
6<br />
2.4<br />
CAUTION,<br />
GENERIC DANGER!<br />
During installation, the person<br />
responsible for installing<br />
the door should make sure<br />
that any third party is not in<br />
harm’s way and inside the<br />
work area.<br />
THERE COULD BE MORE<br />
DANGER.<br />
Also, the sub frame, the<br />
frame, and the door should<br />
not be moved in spurts.<br />
Rather move them using<br />
caution.
2.5<br />
ATTENZIONE PERICOLO<br />
<strong>DI</strong> SCIVOLAMENTO<br />
E CADUTA!<br />
Durante il montaggio,<br />
mantenere la zona<br />
di lavoro ben pulita<br />
e priva di oggetti<br />
sul pavimento.<br />
2.5<br />
CAUTION, DANGER OF<br />
SLIPPING AND FALLING!<br />
During installation,<br />
keep the work area clean<br />
and free of stray objects<br />
on the floor.<br />
2.6<br />
ATTENZIONE PERICOLO<br />
D’INQUINAMENTO!<br />
Non disperdere<br />
l’imballo nell’ambiente,<br />
ma rivolgersi alle agenzie di<br />
smaltimento.<br />
2.6<br />
CAUTION,<br />
DANGER OF POLLUTION!<br />
When disposing of the<br />
packaging, do not dump<br />
it but contact specialised<br />
waste disposal agencies.<br />
7
CAPITOLO 3<br />
MOVIMENTAZIONE<br />
E COMPOSIZIONE<br />
IMBALLI<br />
CHAPTER 3<br />
MOVING<br />
AND PACKAGE<br />
COMPOSITION<br />
3.1<br />
ATTENZIONE PERICOLO<br />
<strong>DI</strong> NATURA MECCANICA!<br />
Gli addetti alla movimentazione<br />
del Controtelaio e delle<br />
sue parti devono indossare<br />
GUANTI e SCARPONI <strong>DI</strong><br />
SICUREZZA.<br />
Inoltre leggere le<br />
PRESCRIZIONI <strong>DI</strong><br />
SICUREZZA al Capitolo 2.<br />
3.1<br />
CAUTION, MECHANICAL<br />
DANGER!<br />
Those persons responsible<br />
for moving components<br />
of thepackaged or<br />
unpackaged door must<br />
WEAR WORK GLOVES<br />
AND SAFETY BOOTS.<br />
Plus, read the SAFETY<br />
INSTRUCTIONS in<br />
Chapter 2.<br />
3.2<br />
Movimentare l’imballo<br />
CONTROTELAIO<br />
in due persone.<br />
3.2<br />
Handle the package of the<br />
SUB FRAME with 2 people.<br />
AA<br />
A<br />
3.3<br />
Portarlo in prossimità<br />
del luogo d’installazione.<br />
3.4<br />
Se necessario, con una<br />
forbice o cutter tagliare<br />
lo scotch dell’imballo.<br />
3.3<br />
Bring it in proximity<br />
of the location where<br />
it should be installed.<br />
3.4<br />
If necessary, cut the scotch<br />
tape of the packaging using<br />
a pair of scissors or a cutter.<br />
8
CAPITOLO 4<br />
PREPARAZIONE<br />
E FISSAGGIO<br />
A MURO DEL<br />
CONTROTELAIO<br />
CHAPTER 4<br />
PREPARING AND<br />
WALL-MOUNTING<br />
THE SUB RAME<br />
Se necessario,<br />
aprire l’imballo del<br />
CONTROTELAIO (A)<br />
e controllare il contenuto.<br />
If necessary, open the<br />
package of the SUB<br />
FRAME (A) and check<br />
the contents.<br />
COMPOSIZIONE IMBALLO<br />
POSIZIONE<br />
POSITION<br />
QUANTITÁ<br />
PIECES<br />
PACKAGE CONTENTS<br />
MONTANTE SINISTRO<br />
TRAVERSA SUPERIORE<br />
MONTANTE DESTRO<br />
<strong>DI</strong>STANZIATORI<br />
VITI DEI <strong>DI</strong>STANZIATORI<br />
TCEI M8x16<br />
CHIAVE BRUGOLA DA 6<br />
RINFORZI ANGOLARI<br />
VITI DEI RINFORZI<br />
ANGOLARI TCEI M6x12<br />
CHIAVE BRUGOLA DA 5<br />
CAVALLOTTI<br />
PIASTRINE <strong>DI</strong> FISSAGGIO<br />
A1<br />
A2<br />
A3<br />
A4<br />
A5<br />
A6<br />
A7<br />
A8<br />
A9<br />
A10<br />
A11<br />
1<br />
1<br />
1<br />
3<br />
6<br />
1<br />
2<br />
4<br />
1<br />
8<br />
8<br />
LEFT JAMB<br />
UPPER HEAD<br />
RIGHT JAMB<br />
SPACERS<br />
TCEI M8X16 SPACERS<br />
SCREWS<br />
6” ALLEN WRENCH<br />
ANGLE STIFFENERS<br />
TCEI M6x12 ANGLE<br />
STIFFENER SCREWS<br />
5” ALLEN WRENCH<br />
U-BOLTS<br />
FIXING PLATES<br />
9
4.1<br />
Una volta disimballato<br />
il Collo A del Controtelaio<br />
- secondo la procedura<br />
quì sotto descritta -<br />
assemblare il Controtelaio.<br />
ALTO<br />
UP<br />
4.1<br />
Once the Sub Frame package<br />
A has been opened, start<br />
the Sub Frame assembly<br />
by following the instructions<br />
here below.<br />
4.2<br />
Fare attenzione<br />
all’orientamento<br />
dei MONTANTI.<br />
- Il lato SOGLIA, dista 50<br />
millimetri dal primo foro<br />
del cavallotto.<br />
BASSO<br />
DOWN<br />
50<br />
4.2<br />
Pay attention to how<br />
the JAMBS are<br />
positioned.<br />
- The THRESHOLD side<br />
should be 50 millimeter<br />
from the first hole of the u-bolt.<br />
50<br />
4.3<br />
Disporre a terra<br />
i 2 MONTANTI (A1 e A3).<br />
A3<br />
A1<br />
50<br />
4.3<br />
Lay the two JAMBS (A1<br />
and A3) on the floor.<br />
4.4<br />
Appoggiare i Cavallotti<br />
(A10) ai montanti.<br />
A10<br />
4.4<br />
Lean the u-bolt (A10)<br />
on the jambs.<br />
4.5<br />
Infilare le Piastrine<br />
di Fissaggio (A11) - con<br />
la curvatura rivolta verso<br />
il montante - nei Cavallotti<br />
(A10).<br />
A10<br />
A11<br />
4.5<br />
Insert the fixing plates (A11)<br />
- with the bent side turned<br />
towards the jamb - in the<br />
u-bolts (A10).<br />
10
4.6<br />
Non montare <strong>DI</strong>STANZIA-<br />
TORI (A4) piegati per non<br />
compromettere la larghezza<br />
del Controtelaio.<br />
Assicurandosi che i tre<br />
<strong>DI</strong>STANZIATORI (A4) siano<br />
ben appoggiati alla sede<br />
con l’incasso come da figura,<br />
fissarli con le sei Viti TCEI<br />
M8x16 (A5) ai MONTANTI<br />
(A1 e A3) e serrarli con la<br />
Chiave brugola (A6).<br />
4.6<br />
Do not use ruined SPACERS<br />
(A4), otherwise the subframe<br />
width could be modified.<br />
Fit the 3 SPACERS (A4)<br />
firmly into the housing as<br />
shown by the figure and fix<br />
with the 6 TCEI M8x16 (A5)<br />
SCREWS to the JAMBS<br />
(A1 e A3) and tighten with<br />
the ALLEN WRENCH (A6).<br />
OK<br />
A3<br />
A6<br />
A4<br />
A5<br />
A1<br />
4.7<br />
Inserire la Traversa<br />
Superiore (A2)<br />
sui Montanti (A1 e A3).<br />
A3<br />
4.7<br />
Insert the Upper Head (A2)<br />
on the Jambs (A1 and A3).<br />
4.8<br />
Qualora la Traversa Superiore<br />
(A2) non s’inserisca<br />
facilmente nel suo incasso,<br />
vuol dire che i Distanziatori<br />
(A4) sono di misura<br />
non corretta o il montaggio<br />
è sbagliato.<br />
Prima di procedere, controllare<br />
i Distanziatori (A4)<br />
come descritto nel punto<br />
4.6.<br />
A2<br />
A3<br />
A1<br />
4.8<br />
Should the Upper Head<br />
(A2) not fit into place,<br />
either the Spacers (A4)<br />
are the incorrect size or<br />
they have been assembled<br />
incorrectly.<br />
Before proceeding,<br />
control the Spacers (A4)<br />
as described in step 4.6.<br />
4.9<br />
Con un martello, piegare<br />
le alette del Montanti (A1 e<br />
A3) in modo contrapposto.<br />
A1<br />
4.9<br />
Fold the little wings<br />
of the Jambs (A1 and A3)<br />
into opposite directions with<br />
a hammer.<br />
11
4.10<br />
Ricordandosi di serrare<br />
a fondo solo le viti sui MON-<br />
TANTI (A1 e A3),<br />
montare i 2 RINFORZI AN-<br />
GOLARI (A7) e mantenere<br />
le 2 VITI (A8), sulla TRA-<br />
VERSA SUPERIORE (A2),<br />
solo leggermente avvitate.<br />
A3<br />
A2<br />
A1<br />
4.10<br />
Remember to tighten only<br />
the screws on the JAMBS<br />
(A1 and A3), and assemble<br />
the two ANGLE STIFF-<br />
ENERS (A7). Insert the<br />
2 SCREWS (A8) on the<br />
UPPER HEAD (A2) and<br />
loosely screw in.<br />
4.11<br />
ATTENZIONE!<br />
La procedura corretta<br />
per montare il Controtelaio<br />
è quella di murarlo.<br />
Può succedere che,<br />
in alcuni casi, ciò non sia<br />
possibile per motivi<br />
non noti al Costruttore.<br />
In questo caso l’installatore<br />
dovrà decidere quale soluzione<br />
adottare in modo che<br />
il Controtelaio sia altrettanto<br />
sicuro.<br />
Il Produttore a questo proposito<br />
ha predisposto alla<br />
base delle zanche ed<br />
in prossimità dei cavallotti<br />
dei Montanti (A1 e A3),<br />
sei + sei fori Ø 15 millimetri<br />
per l’ancoraggio scelto<br />
dall’istallatore.<br />
Ø 15 mm<br />
4.11<br />
CAUTION!<br />
The correct procedure to<br />
assemble the Sub Frame<br />
requires it to be mounted<br />
into a wall.<br />
There could be situations<br />
where this is not possible<br />
for reasons unknown<br />
to the Manufacturer.<br />
In this case, the person<br />
responsible for installing the<br />
door will have to decide on<br />
how to make sure that the<br />
sub frame is safe nonetheless.<br />
The Manufacturer has predisposed,<br />
for this purpose,<br />
6 + 6 holes 15 millimeters<br />
in diameter onto the base of<br />
the anchoring hooks and near<br />
the u-bolts of the Jambs<br />
(A1 and A3) in order to help<br />
the installer anchor the sub<br />
frame.<br />
4.12<br />
- Se si è deciso di non<br />
murare il Controtelaio,<br />
passare al paragrafo 4.14.<br />
Ricordare che in questo<br />
caso le zanche NON DE-<br />
VONO ESSERE APERTE.<br />
4.12<br />
- If the decision is not to<br />
mount the Sub Frame<br />
into the wall, go to paragraph<br />
4.14.<br />
Remember that the anchoring<br />
hooks DO NOT<br />
NEED TO BE OPENED.<br />
12
- Se si è deciso di murare<br />
il Controtelaio, con un<br />
martello rompere le microgiunture<br />
delle dodici (12)<br />
zanche e con l’utilizzo di<br />
una pinza, - NON A MANI<br />
NUDE - piegarle verso<br />
l’esterno come mostrato<br />
nel disegno a lato.<br />
- If the decision is to mount<br />
the sub frame into the<br />
wall, break the small joints<br />
of the twelve (12) anchoring<br />
hooks with a hammer<br />
and fold them with a pair<br />
of pliers - NOT WITH<br />
BARE HANDS - toward the<br />
exterior, as shown in the<br />
illustration on the side.<br />
4.13<br />
NOTA!<br />
Ricordare che al momento<br />
della muratura, le zanche<br />
devono essere piegate<br />
in modo irregolare.<br />
30°<br />
~<br />
4.13<br />
ATTENTION!<br />
Remember that when<br />
mounting into the wall,<br />
the anchoring hooks have<br />
to be folded irregularly.<br />
30°<br />
~<br />
4.14<br />
ATTENZIONE PERICOLO<br />
<strong>DI</strong> TAGLIO O ABRAZIONE<br />
DOVUTE ALLE ZANCHE!<br />
Indossare guanti da<br />
lavoro e fare attenzione<br />
alla presenza di persone<br />
esposte nella zona<br />
limitrofa alla movimentazione<br />
del Controtelaio.<br />
13<br />
4.14<br />
CAUTION, DANGER<br />
OF CUTS OR ABRASION<br />
BECAUSE OF THE<br />
ANCHORING HOOKS!<br />
Wear work gloves and<br />
take care to request that<br />
third parties leave the<br />
area where the Sub Frame<br />
is moved around.
4.15<br />
Con un triplo metro,<br />
accertarsi che le due diagonali<br />
siano di eguale misura<br />
e...<br />
che le misure del prodotto<br />
siano corrispondenti a:<br />
± 2mm<br />
4.15<br />
Using a triple meter, check<br />
that the 2 diagonal elements<br />
are of the same size<br />
and...<br />
that the product measures<br />
do corresond to:<br />
A<br />
B<br />
Tipo di controtelaio Misura A (millimetri) Misura B (millimetri)<br />
Type of subframe Measure A (mm) Measure B (mm)<br />
800 x 2000<br />
850 x 2000<br />
900 x 2000<br />
800 x 2100<br />
850 x 2100<br />
900 x 2100<br />
915<br />
965<br />
1015<br />
915<br />
965<br />
1015<br />
2057,5<br />
2057,5<br />
2057,5<br />
2157,5<br />
2157,5<br />
2157,5<br />
14
4.16<br />
Solamente quando si<br />
è certi delle diagonali, serrare<br />
le VITI (A8) sulla TRA-<br />
VERSA SUPERIORE (A2).<br />
4.16<br />
After checking the diagonal<br />
elements, tighten the<br />
SCREWS (A8) on the UP-<br />
PER HEAD (A2).<br />
4.17<br />
Ricontrollare le diagonali,<br />
e se è il caso ripetere<br />
le operazioni 4.15 e 4.16.<br />
A2<br />
A8<br />
4.17<br />
Check the diagonal elements<br />
again, and if necessary<br />
repeat the steps described<br />
by 4.15 and 4.16.<br />
± 2mm<br />
± 2mm<br />
4.18<br />
Solamente quando si<br />
è certi che il Controtelaio<br />
è ben squadrato e tutte<br />
le viti ben serrate a fondo,<br />
procedere con le<br />
operazioni seguenti.<br />
4.18<br />
Continue with the successive<br />
steps only when you<br />
are certain that the Sub<br />
Frame is perfectly squared<br />
and all the screws are<br />
thoroughly tightened.<br />
15
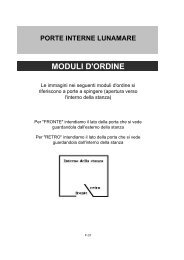
NOTA!<br />
I disegni che seguono,<br />
mostrano come deve<br />
essere montata una porta<br />
spingere destra e una<br />
sinistra.<br />
Osservarli, e comportarsi<br />
di conseguenza nelle<br />
azioni che seguono.<br />
ATTENTION!<br />
The following drawings illustrate<br />
the procedure to follow<br />
to assemble a right-hand<br />
and a left-hand push door.<br />
Carefully follow the steps<br />
indicated.<br />
INTERNO CASA<br />
INSIDE THE HOME<br />
DX<br />
RH<br />
PORTA A SPINGERE<br />
PUSH DOOR<br />
SX<br />
LH<br />
ESTERNO CASA<br />
OUTSIDE THE HOME<br />
4.19<br />
Sollevare il Controtelaio<br />
ed appoggiarlo al vano<br />
della porta.<br />
4.19<br />
Lift the Sub frame and lean<br />
it up against the door<br />
opening.<br />
16
NOTA!<br />
Se si è deciso di NON<br />
MURARE il controtelaio ma<br />
di fissarlo con tasselli,<br />
procedere come descritto in<br />
4.25 senza praticare i fori<br />
per alloggiare le zanche.<br />
4.20<br />
Sostenendo il Controtelaio<br />
con una mano, segnare sul<br />
muro, in corrispondenza<br />
delle zanche la zona d’ancorare.<br />
ATTENTION!<br />
If you have decided NOT<br />
TO WALL- MOUNT the<br />
Sub frame, rather to dowel<br />
it, proceed as described in<br />
4.25 but omit the sections<br />
where the anchoring<br />
hooks are mentioned.<br />
4.20<br />
While holding the Sub frame<br />
with one hand, make a mark<br />
on the wall where it should<br />
be anchored into place<br />
according to where the<br />
anchoring hooks are.<br />
4.21<br />
Togliere il Controtelaio.<br />
4.21<br />
Remove the Sub frame.<br />
4.22<br />
Proteggere in qualche modo<br />
il pavimento dai calcinacci.<br />
4.22<br />
Place a piece of protective<br />
material on the floor to<br />
protect against scraps<br />
and debris.<br />
4.23<br />
Praticare i fori quanto basta<br />
per alloggiare le zanche.<br />
4.23<br />
Make holes big enough<br />
for the anchoring hooks.<br />
4.24<br />
In base ai fori praticati<br />
(vedi 4.23), piegare le<br />
zanche in modo irregolare<br />
e secondo necessità,<br />
ricordando che in ogni caso<br />
le punte delle zanche<br />
devono essere piegate<br />
in modo contrapposto.<br />
OK<br />
17<br />
4.24<br />
According to the holes that<br />
have been made (see step<br />
4.23), fold the anchoring<br />
hooks irregularly, as needed.<br />
Remember that the ends of<br />
the anchoring hooks have<br />
to be folded in opposite<br />
directions.
4.25<br />
Posizionare il Controtelaio<br />
ed assicurarsi che sia<br />
appoggiato al pavimento<br />
finito e che non ci siano<br />
macerie e sporcizie.<br />
4.25<br />
Position the Sub frame and<br />
be sure that it is leaning on<br />
the finished pavement and<br />
that there is no debris or dirt<br />
particles in the area.<br />
OK<br />
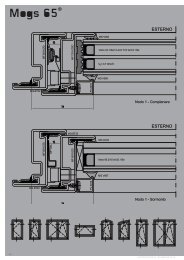
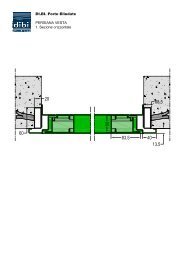
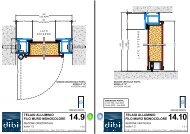
Inoltre assicurarsi<br />
che il FISSAGGIO sia, o<br />
- A FILO INTONACO<br />
INTERNO (1)<br />
o,<br />
- A MAZZETTA (2)<br />
Furthermore, be sure that<br />
the Sub frame is FIXED<br />
either<br />
- FLUSH TO THE INNER<br />
PLASTER LAYER (1) or<br />
- IN THE REVEAL (2)<br />
1<br />
2<br />
20 mm<br />
18
4.26<br />
Con morsetti, cugni o altri<br />
spessori, quì l’esperienza<br />
è regina in merito, prefissare<br />
il Controtelaio<br />
al vano.<br />
4.27<br />
Riferendosi ai cavallotti<br />
dei Montanti (A1 e A3)<br />
e non alla lamiera,<br />
METTERE A PIOMBO<br />
l’intero Controtelaio<br />
e verificare tutti i lati.<br />
A1<br />
A3<br />
4.26<br />
Pre-mount the Sub frame<br />
into the opening by using<br />
spacers, clamp joints,<br />
or clips. This is up to the<br />
experience of the installer.<br />
4.27<br />
Check that the Sub frame<br />
is LEVEL and verify each<br />
side looking at the u-bolts<br />
on the Jambs (A1 and A3)<br />
and not at the sheet metal<br />
of the Jambs.<br />
4.28<br />
Solo quando si è sicuri che<br />
il Controtelaio è a piombo<br />
ed appoggia correttamente<br />
sul pavimento finito,<br />
passare all’operazione<br />
seguente.<br />
4.28<br />
When you are sure that<br />
the Sub frame is level and<br />
sitting squarely on the<br />
finished pavement, proceed<br />
with the following step.<br />
4.29<br />
- Se sono state aperte le<br />
zanche, passare al punto<br />
4.30.<br />
4.29<br />
- If you’ve already opened<br />
the anchoring hooks, go to<br />
step 4.30.<br />
- Se invece il Controtelaio<br />
deve essere fissato in altro<br />
modo (perni a saldare,<br />
tappi ad espansione ecc.)<br />
bisogna comportarsi<br />
come descritto quì di<br />
seguito.<br />
30°<br />
~<br />
- If the Sub frame has to<br />
be mounted in other ways<br />
(pins that have to be<br />
soldered, expansion caps,<br />
etc.) you must follow<br />
these next instructions.<br />
4.29.a<br />
Con resina o altri prodotti,<br />
a discrezione dell’installatore,<br />
in corrispondenza ai fori di<br />
fissaggio, riempire il vuoto<br />
tra il Controtelaio e muro.<br />
A - Controtelaio<br />
B - Resina<br />
C - Muro<br />
.<br />
.<br />
.<br />
A<br />
B<br />
C<br />
4.29.a<br />
Fill in the extra space<br />
between the Sub frame<br />
and the wall, near the holes,<br />
by using a resin or other<br />
material (at the discretion<br />
of the person installing the<br />
product).<br />
A - Sub Frame<br />
B - Resin<br />
C - Wall<br />
19
4.29.b<br />
Attendere la solidificazione<br />
del prodotto utilizzato (vedi<br />
istruzioni del prodotto).<br />
4.29.b<br />
Wait for the product to<br />
solidify (follow the instructions<br />
on the product).<br />
4.29.c<br />
Solamente quando il<br />
materiale si è solidificato,<br />
procedere alla foratura per<br />
l’ancoraggio scelto.<br />
(Per ottenere più resistenza<br />
è bene forare con<br />
orientamenti diversi, e verso<br />
l’interno del muro).<br />
4.29.c<br />
When the material has solidified,<br />
proceed with making<br />
a hole for the<br />
type of anchoring you will<br />
perform.<br />
(To obtain a stronger hold<br />
we recommend that you<br />
make holes in different<br />
directions and toward<br />
the interior of the wall).<br />
4.29.d<br />
Fissare il Controtelaio<br />
al muro secondo il metodo<br />
scelto, dopodiché passare<br />
al punto 4.33.<br />
OK<br />
OK<br />
4.29.d<br />
Mount the Sub frame to the<br />
wall by following the desired<br />
method. Afterward, go to<br />
step 4.33.<br />
4.30<br />
CONSIGLIO!<br />
Il Costruttore invita<br />
gl’Istallatori a fissare<br />
il controtelaio con cemento<br />
o malte premiscelate<br />
a presa normale e non<br />
a presa rapida perché creano<br />
tensioni e crepe.<br />
Qualora sia imperativo utilizzare<br />
un cemento a presa<br />
rapida, ricordare che con<br />
il tempo appariranno delle<br />
crepe sull’intonaco.<br />
20<br />
4.30<br />
RECOMMENDED!<br />
The Manufacturer recommends<br />
that the persons<br />
installing the unit should fix<br />
the Sub frame with cement<br />
or pre-mixed malts that are<br />
normal drying and not quick<br />
drying, to avoid cracks or<br />
breaks.<br />
If it is impossible not<br />
to use quick drying cement,<br />
remember that cracks<br />
in the paint will appear<br />
through time.
4.31<br />
Provvedere alla cementazione<br />
delle zanche.<br />
4.31<br />
Apply the cement around<br />
the anchoring hooks.<br />
4.32<br />
Attendere l’asciugatura<br />
del cemento.<br />
4.32<br />
Wait for the cement<br />
to dry thoroughly.<br />
4.33<br />
Togliere i <strong>DI</strong>STANZIATORI<br />
(A4) ed i RINFORZI ANGO-<br />
LARI (A7).<br />
A7<br />
A4<br />
4.33<br />
Take out the SPACERS<br />
(A4) and the ANGLE STIF-<br />
FENERS (A7).<br />
4.34<br />
Pulire tutta l’area di lavoro<br />
prima di aprire l’imballo<br />
del Telaio e della Porta.<br />
4.34<br />
Clean the entire work area<br />
before opening the Frame<br />
and the Door packages.<br />
4.35<br />
I Cavallotti (A10) e le<br />
Piastrine di fissaggio (A11),<br />
devono rimanere nel<br />
controtelaio per il fissaggio<br />
del telaio.<br />
A10<br />
A11<br />
4.35<br />
The u-bolt (A10) and the<br />
fixing plates (A11) must<br />
remain in the subframe to<br />
fix the frame.<br />
21
4.36<br />
ATTENZIONE PERICOLO<br />
D’INQUINAMENTO!<br />
Non disperdere i Distanziatori<br />
(A4) ed i Rinforzi<br />
Angolari (A7) nell’ambiente,<br />
ma rivolgersi ad<br />
Agenzie di smaltimento<br />
materiali ferrosi.<br />
4.36<br />
CAUTION, DANGER<br />
OF POLLUTION!<br />
Do not dispose of the Spacers<br />
(A4) and the Angle<br />
Stiffeners (A7) improperly,<br />
rather contact the public<br />
agencies responsible<br />
for recuperating metal<br />
materials.<br />
4.37<br />
La PREPARAZIONE E<br />
FISSAGGIO AL MURO DEL<br />
CONTROTELAIO, è finito.<br />
4.37<br />
The PREPARING AND<br />
WALL-MOUNTING THE<br />
SUB FRAME section<br />
is complete.<br />
22
PARTE 5<br />
TABELLA REVISIONI<br />
DEL MANUALE<br />
Descrizione<br />
Edizione 01<br />
Dicembre 2005:<br />
Emissione<br />
Edizione 02<br />
Marzo 2008<br />
Edizione 03<br />
Marzo 2008<br />
Edizione 04<br />
Marzo 2011<br />
N°<br />
revisione<br />
0<br />
1<br />
2<br />
3<br />
Data<br />
1-12-2005<br />
1-03-2008<br />
15-06-2008<br />
30-03-2011
PORTE BLINDATE S.R.L.<br />
Sede Legale e Amministrativa/Administration and Registered Offices:<br />
Via Einaudi, 2 (Zona Industriale/Industrial Area)<br />
Stabilimento/Factory: Via Toniolo, 13/A (Zona Industriale) - 61032 FANO (PU) - Italia/Italy<br />
Tel. +39.0721.81.91 r.a. - Fax +39.0721.85.54.60 - Fax +39.0721.854038 (Uff. Tecnico/Technical Office)<br />
Internet: www.dibiporteblindate.it<br />
E-mail: info@dibiporteblindate.it<br />
E-mail: info@dibigroup.com