
You also want an ePaper? Increase the reach of your titles
YUMPU automatically turns print PDFs into web optimized ePapers that Google loves.
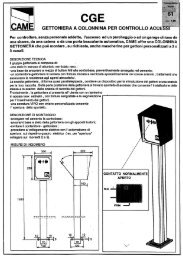
CANCELLI AU TO MA TI CI<br />
SERIE R | R SERIES | SÉRIE R | BAUREIHE R | SERIE R | SERIE R<br />
LETTORE OTTICO<br />
OPTICAL READER<br />
LECTEUR OPTIQUE<br />
<strong>B4336</strong><br />
OPTISCHES LESERGERÄT<br />
LECTOR ÓPTICO<br />
OPTISCHE LEZER<br />
Documentazione<br />
Tecnica<br />
S21<br />
rev. 2.1<br />
10/2004<br />
© CAME<br />
CANCELLI<br />
AUTOMATICI<br />
119RS21<br />
I<br />
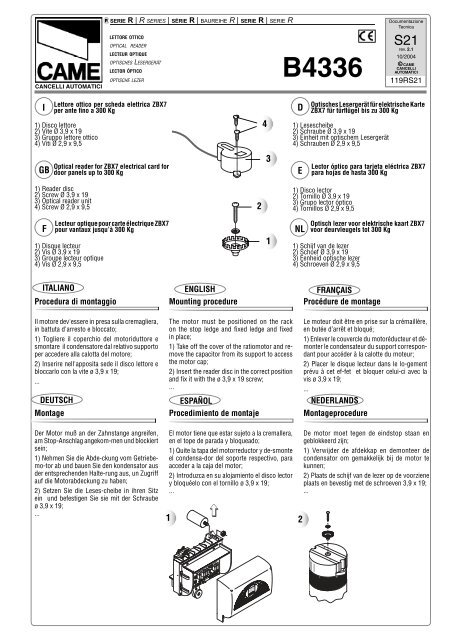
Lettore ottico per scheda elettrica ZBX7<br />
per ante fi no a 300 Kg<br />
1) Disco lettore<br />
2) Vite Ø 3,9 x 19<br />
3) Gruppo lettore ottico<br />
4) Viti Ø 2,9 x 9,5<br />
GB<br />
Optical reader for ZBX7 electrical card for<br />
door panels up to 300 Kg<br />
4<br />
3<br />
D<br />
Optisches Lesergerät für elektrische Karte<br />
ZBX7 für türfl ügel bis zu 300 Kg<br />
1) Lesescheibe<br />
2) Schraube Ø 3,9 x 19<br />
3) Einheit mit optischem Lesergerät<br />
4) Schrauben Ø 2,9 x 9,5<br />
E<br />
Lector óptico para tarjeta eléctrica ZBX7<br />
para hojas de hasta 300 Kg<br />
1) Reader disc<br />
2) Screw Ø 3,9 x 19<br />
3) Optical reader unit<br />
4) Screw Ø 2,9 x 9,5<br />
2<br />
1) Disco lector<br />
2) Tornillo Ø 3,9 x 19<br />
3) Grupo lector óptico<br />
4) Tornillos Ø 2,9 x 9,5<br />
F<br />
Lecteur optique pour carte électrique ZBX7<br />
pour vantaux jusqu’à 300 Kg<br />
1) Disque lecteur<br />
2) Vis Ø 3,9 x 19<br />
3) Groupe lecteur optique<br />
4) Vis Ø 2,9 x 9,5<br />
1<br />
NL<br />
Optisch lezer voor elektrische kaart ZBX7<br />
voor deurvleugels tot 300 Kg<br />
1) Schijf van de lezer<br />
2) Schoef Ø 3,9 x 19<br />
3) Eenheid optische lezer<br />
4) Schroeven Ø 2,9 x 9,5<br />
ITALIANO<br />
Procedura di montaggio<br />
ENGLISH<br />
Mounting procedure<br />
FRANÇAIS<br />
Procédure de montage<br />
Il motore de v'es se re in presa sulla cremagliera,<br />
in bat tu ta d'ar re sto e bloc ca to;<br />
1) Togliere il co per chio del motoriduttore e<br />
smontare il condensatore dal relativo supporto<br />
per ac ce de re alla ca lot ta del mo to re;<br />
2) Inserire nell'apposita sede il disco let to re e<br />
bloc car lo con la vite ø 3,9 x 19;<br />
...<br />
The motor must be positioned on the rack<br />
on the stop ledge and fi xed ledge and fi xed<br />
in place;<br />
1) Take off the cover of the ratiomotor and remove<br />
the capacitor from its support to access<br />
the motor cap;<br />
2) Insert the reader disc in the correct position<br />
and fi x it with the ø 3,9 x 19 screw;<br />
...<br />
Le moteur doit être en prise sur la crémaillère,<br />
en butée d’arrêt et bloqué;<br />
1) Enlever le couvercle du motoréducteur et démonter<br />
le condensateur du support correspondant<br />
pour accéder à la calotte du moteur;<br />
2) Placer le disque lecteur dans le lo-gement<br />
prévu à cet ef-fet et bloquer celui-ci avec la<br />
vis ø 3,9 x 19;<br />
...<br />
DEUTSCH ESPAÑOL NEDERLANDS<br />
Montage<br />
Procedimiento de montaje<br />
Montageprocedure<br />
Der Motor muß an der Zahnstange angreifen,<br />
am Stop-Anschlag angekom-men und blockiert<br />
sein;<br />
1) Nehmen Sie die Abde-ckung vom Getriebemo-tor<br />
ab und bauen Sie den kondensator aus<br />
der entsprechenden Halte-rung aus, un Zugriff<br />
auf die Motorabdeckung zu haben;<br />
2) Setzen Sie die Leses-cheibe in ihren Sitz<br />
ein und befestigen Sie sie mit der Schraube<br />
ø 3,9 x 19;<br />
...<br />
El motor tiene que estar sujeto a la cremallera,<br />
en el tope de parada y bloqueado;<br />
1) Quite la tapa del motorreductor y de-smonte<br />
el con den sa-dor del soporte respectivo, para<br />
ac ce der a la caja del motor;<br />
2) Introduzca en su alojamiento el di sco lector<br />
y bloquéelo con el tornillo ø 3,9 x 19;<br />
...<br />
1<br />
2<br />
De motor moet tegen de eindstop staan en<br />
geblokkeerd zijn;<br />
1) Verwijder de afdekkap en demonteer de<br />
condensator om gemakkelijk bij de motor te<br />
kunnen;<br />
2) Plaats de schijf van de lezer op de voorziene<br />
plaats en bevestig met de schroeven 3,9 x 19;<br />
...
I<br />
GB<br />
F<br />
3) Inserire con attenzione il gruppo lettore ottico<br />
e fi s sar lo con le due viti 2,9 x 9,5;<br />
4) Inserire la morsettiera del grup po lettore<br />
ot ti co nella ri spet ti va sede (+; E; D) della<br />
sche da ZBX7;<br />
5) Abilitare il lettore ottico po si zio nan do il DIP<br />
3 in OFF;<br />
Nota: rimontare il con den sa to re e chiu de re il<br />
motoriduttore.<br />
3) Carefully insert the optical reader unit and<br />
fi x with the two 2,9 x 9,5 screws;<br />
4) Insert the terminal board of the optical reader<br />
unit in the respective position (+, E, D) of the<br />
ZBX7 board;<br />
5) Enable the optical reader by setting DIP 3 to<br />
the position OFF;<br />
Note: re-mount the capacitor and close the<br />
ratiomor.<br />
3) Placer avec précaution le groupe lecteur<br />
optique et le fi xer avec les deux vis 2,9 x 9,5;<br />
4) Placer la plaque à bornes du groupe lecteur<br />
optique dans le logement correspon-dant (+, E,<br />
D) de la carte ZBX7;<br />
5) Activer le lecteur optique en mettant le<br />
commutateur à bascule 3 sur OFF;<br />
Remarque: remonter le condensateur et refermer<br />
le motoréducteur.<br />
D E NL<br />
3) Setzen Sie vorsichtig die Einheit mit dem<br />
optischen Lesegerät ein und befestigen Sie sie<br />
mit den beiden Schrauben 2,9 x 9,5;<br />
4) Stecken Sie das Klemmbrett derEinheit mit<br />
dem optischen Lesegerät in den ent spre chen den<br />
Sitz (+, E, D) auf der Karte ZBX7;<br />
5) Aktivieren Sie das optische Lesegerät. Schalten<br />
Sie dazu den DIP-Schalter<br />
3 auf OFF;<br />
Hinweis: Bauen Sie den Kondensator wieder ein<br />
und schließen Sie den Getriebemotor.<br />
3) Introduzca con cuidado el grupo lector óptico<br />
y fíjelo con los dos tornillos 2,9 x 9,5;<br />
4) Introduzca el tablero de bornes del lector<br />
óptico en su aloja-miento (+, E, D) en la tarjeta<br />
ZBX7;<br />
5) Active el lector óptico colocando el DIP 3<br />
en OFF;<br />
Nota: vuelva a monter el condensator y cierre<br />
el motorreductor.<br />
3) Plaats voorzichtig de optische lezer en<br />
bevestig met de twee schroeven 2,9 x 9,5;<br />
4) Plaats de aansluitklemmen van de optische<br />
lezer in de voorziene behuizing (+, E, D) van<br />
de print ZBX7;<br />
5) Activeer de optische lezer door dipswitch 3<br />
op OFF te zetten;<br />
Opmerking: Plaats de condensator terug en<br />
sluit de afdekkap.<br />
3<br />
4<br />
L1 L2 U V W E1 10 11 1 2 3P 7 C1C3 E D FA FC F B1 B2<br />
+ =<br />
E<br />
D<br />
D = rosso<br />
red<br />
rouge<br />
rot<br />
rojo<br />
rood<br />
5<br />
E = nero<br />
black<br />
noir<br />
schwarz<br />
negro<br />
zwart<br />
FUS. ACCESSORI 1A<br />
1 2 4<br />
1 2 3 4 5 6 7 8 9 10<br />
AF<br />
3<br />
ON<br />
OFF<br />
QUADRO COMANDO<br />
ZBX7<br />
Tut ti i dati sono sta ti con trol la ti con<br />
la mas si ma cura. Non ci as su mia mo<br />
co mun que al cu na re spon sa bi li tà per<br />
even tua li errori od omissioni.<br />
All data checked with the maximum care.<br />
However, no liability is accepted for any<br />
error or omission.<br />
Toutes les données ont été contrôlées<br />
très soigneusement. Nous n’assumons<br />
de toute façon aucune responsabilité<br />
pour les erreurs ou omissions<br />
éventuelles.<br />
Die Daten wurden mit höchster Sorgfalt<br />
geprüft. Für eventuelle Fehler oder<br />
Auslassungen übernehmen wir keine<br />
Haftung.<br />
Todos los datos se han controlado con<br />
la máxima atención. No obstante no<br />
nos responsabilizamos de los posibles<br />
errores u omisiones.<br />
De gegevensin deze handleiding<br />
werden zorgvulding gecontroleerd. Wijn<br />
niet verantwoordelijk voor eventuele<br />
drukfouten.<br />
CANCELLI AU TO MA TI CI<br />
ASSISTENZA TECNICA<br />
NUMERO VERDE<br />
800 295830<br />
WEB<br />
www.came.it<br />
E-MAIL<br />
info@came.it<br />
SISTEMA QUALITÀ<br />
CERTIFICATO<br />
CAME CANCELLI AUTOMATICI S.P.A.<br />
DOSSON DI CASIER (TREVISO)<br />
(+39) 0422 4940 (+39) 0422 4941<br />
CAME LOMBARDIA S.R.L._____COLOGNO M. (MI)<br />
(+39) 02 26708293 (+39) 02 25490288<br />
CAME SUD S.R.L. ___________________NAPOLI<br />
(+39) 081 7524455 (+39) 081 7529109<br />
CAME (AMERICA) L.L.C.________MIAMI (FL)<br />
(+1) 305 5938798 (+1) 305 5939823<br />
CAME AUTOMATISMOS S.A__________MADRID<br />
(+34) 091 5285009 (+34) 091 4685442<br />
CAME BELGIUM__________________LESSINES<br />
(+32) 068 333014 (+32) 068 338019<br />
CAME FRANCE S.A.____NANTERRE CEDEX (PARIS)<br />
(+33) 01 46130505 (+33) 01 46130500<br />
CAME GMBH________KORNTAL BEI (STUTTGART)<br />
(+49) 07 15037830 (+49) 07 150378383<br />
CAME GMBH ____________SEEFELD BEI (BERLIN)<br />
(+49) 03 33988390 (+49) 03 339885508<br />
CAME PL SP.ZO.O______________WARSZAWA<br />
(+48) 022 8365076 (+48) 022 8369920<br />
CAME UNITED KINGDOM LTD___NOTTINGHAM<br />
(+44) 0115 9210430 (+44) 0115 9210431