Sostituzione cane (C51273) con cane scheletrato ... - Beretta USA
Sostituzione cane (C51273) con cane scheletrato ... - Beretta USA
Sostituzione cane (C51273) con cane scheletrato ... - Beretta USA

You also want an ePaper? Increase the reach of your titles
YUMPU automatically turns print PDFs into web optimized ePapers that Google loves.
1<br />
2<br />
3<br />
4<br />
5<br />
6<br />
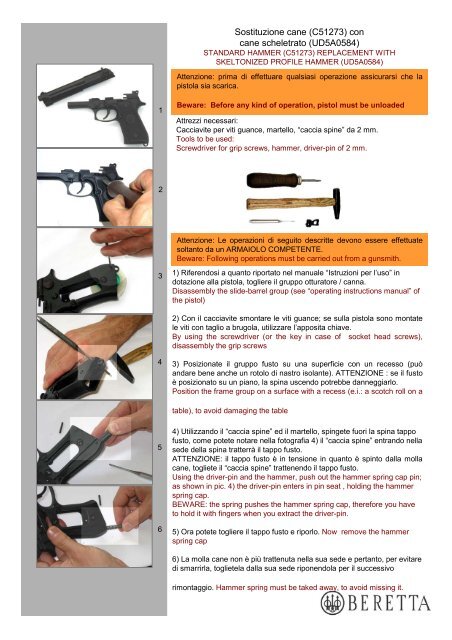
<strong>Sostituzione</strong> <strong>cane</strong> (<strong>C51273</strong>) <strong>con</strong><br />
<strong>cane</strong> <strong>scheletrato</strong> (UD5A0584)<br />
STANDARD HAMMER (<strong>C51273</strong>) REPLACEMENT WITH<br />
SKELTONIZED PROFILE HAMMER (UD5A0584)<br />
Attenzione: prima di effettuare qualsiasi operazione assicurarsi che la<br />
pistola sia scarica.<br />
Beware: Before any kind of operation, pistol must be unloaded<br />
Attrezzi necessari:<br />
Cacciavite per viti guance, martello, “caccia spine” da 2 mm.<br />
Tools to be used:<br />
Screwdriver for grip screws, hammer, driver-pin of 2 mm.<br />
Attenzione: Le operazioni di seguito descritte devono essere effettuate<br />
soltanto da un ARMAIOLO COMPETENTE.<br />
Beware: Following operations must be carried out from a gunsmith.<br />
1) Riferendosi a quanto riportato nel manuale “Istruzioni per l’uso” in<br />
dotazione alla pistola, togliere il gruppo otturatore / canna.<br />
Disassembly the slide-barrel group (see “operating instructions manual” of<br />
the pistol)<br />
2) Con il cacciavite smontare le viti guance; se sulla pistola sono montate<br />
le viti <strong>con</strong> taglio a brugola, utilizzare l’apposita chiave.<br />
By using the screwdriver (or the key in case of socket head screws),<br />
disassembly the grip screws<br />
3) Posizionate il gruppo fusto su una superficie <strong>con</strong> un recesso (può<br />
andare bene anche un rotolo di nastro isolante). ATTENZIONE : se il fusto<br />
è posizionato su un piano, la spina uscendo potrebbe danneggiarlo.<br />
Position the frame group on a surface with a recess (e.i.: a scotch roll on a<br />
table), to avoid damaging the table<br />
4) Utilizzando il “caccia spine” ed il martello, spingete fuori la spina tappo<br />
fusto, come potete notare nella fotografia 4) il “caccia spine” entrando nella<br />
sede della spina tratterrà il tappo fusto.<br />
ATTENZIONE: il tappo fusto è in tensione in quanto è spinto dalla molla<br />
<strong>cane</strong>, togliete il “caccia spine” trattenendo il tappo fusto.<br />
Using the driver-pin and the hammer, push out the hammer spring cap pin;<br />
as shown in pic. 4) the driver-pin enters in pin seat , holding the hammer<br />
spring cap.<br />
BEWARE: the spring pushes the hammer spring cap, therefore you have<br />
to hold it with fingers when you extract the driver-pin.<br />
5) Ora potete togliere il tappo fusto e riporlo. Now remove the hammer<br />
spring cap<br />
6) La molla <strong>cane</strong> non è più trattenuta nella sua sede e pertanto, per evitare<br />
di smarrirla, toglietela dalla sua sede riponendola per il successivo<br />
rimontaggio. Hammer spring must be taked away, to avoid missing it.
7<br />
8<br />
9<br />
10<br />
11<br />
12<br />
7) Togliete il perno del <strong>cane</strong>, prendendola dal lato della testa.<br />
Take away the hammer pin, by the side of the head.<br />
8) Ora potete togliere il <strong>cane</strong> semplicemente afferrandolo <strong>con</strong> le dita.<br />
Now you can take away the hammer, just holding it with fingers.<br />
9) Per sostituire il <strong>cane</strong> non è necessario smontare il portamolla <strong>cane</strong>. Se<br />
inavvertitamente dovesse uscire dal fusto, riposizionatelo come indicato<br />
nella figura 9).<br />
To change hammer, it is not necessary to disassembly hammer spring<br />
guide. If hammer spring guide comes out of the frame, place it as in pic. 9.<br />
10) Inserite il <strong>cane</strong> <strong>scheletrato</strong> in sede nel fusto avendo cura di far<br />
allineare i fori per inserire il perno <strong>cane</strong>.<br />
Insert skeltonized hammer in seat into the frame, paying attention to the<br />
alignement of the holes for the assembly of hammer pin.<br />
11) Inserire il perno <strong>cane</strong>.<br />
Insert hammer pin.<br />
12) Ora potete infilare la molla <strong>cane</strong>, avendo cura di posizionarla sul<br />
portamolla <strong>cane</strong>; prendete il tappo fusto e inseritelo nel fusto.<br />
ATTENZIONE: dovete spingere il tappo fusto fino ad allineare il foro <strong>con</strong> il<br />
corrispondente foro nel fusto (fotografia 12); la molla offre una discreta<br />
resistenza - fate attenzione. Non appena allineati i fori inserite il caccia<br />
spine come mostrato nella fotografia 4). Controllate che il <strong>cane</strong> ed il<br />
<strong>con</strong>gegno di scatto funzionino correttamente, avendo cura di<br />
accompagnare il <strong>cane</strong> senza farlo scattare a vuoto.<br />
Battete <strong>con</strong> il martello sulla spina facendo uscire il “caccia spine” e<br />
<strong>con</strong>tinuate a battere <strong>con</strong> il martello fino ad allineare la spina nella sua<br />
sede. La spina non deve sporgere altrimenti non sarà possibile montare la<br />
guancetta. Procedete al montaggio delle guance ed all’assemblaggio del<br />
gruppo otturatore.<br />
Now you can insert hammer spring after driving it on hammer spring<br />
guide; take hammer spring cap and insert it into the frame. BEWARE: You<br />
must push the hammer spring cap until the alignement of the two holes<br />
(see pic. 12); the spring makes some resistance. When holes are aligned,<br />
insert the driver-pin as shown in pic. 4. Check that the hammer and the<br />
sear operate correctly. Do not release hammer loadless. Beat with<br />
hammer on pin, push out the driver-pin until the pin is aligned on its seat.<br />
The pin must not protrude, to allow the assembly of the grip. Assemble<br />
grips and slide.