

Brother PQ-1500/1500S - Manuale di istruzioni per PQ-1500S
Brother PQ-1500/1500S - Manuale di istruzioni per PQ-1500S
Brother PQ-1500/1500S - Manuale di istruzioni per PQ-1500S

You also want an ePaper? Increase the reach of your titles
YUMPU automatically turns print PDFs into web optimized ePapers that Google loves.
Basic Sewing (3)<br />
Note<br />
• Make sure power is off before changing feet.<br />
• When attaching zip<strong>per</strong>s to stretch fabrics, use the pin feed method<br />
and adjust foot pressure accor<strong>di</strong>ngly.<br />
• The zip<strong>per</strong> foot can also be used as a guide when attaching piping to<br />
fabric.<br />
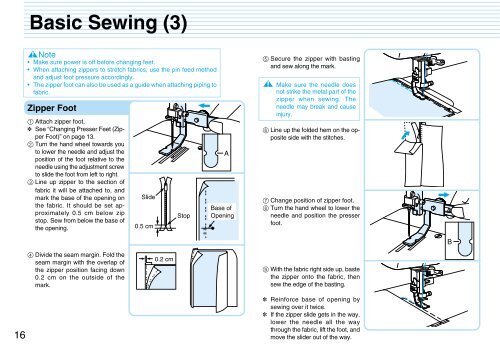
Zip<strong>per</strong> Foot<br />
1 Attach zip<strong>per</strong> foot.<br />
✽ See “Changing Presser Feet (Zip<strong>per</strong><br />
Foot)” on page 13.<br />
2 Turn the hand wheel towards you<br />
to lower the needle and adjust the<br />
position of the foot relative to the<br />
needle using the adjustment screw<br />
to slide the foot from left to right.<br />
3 Line up zip<strong>per</strong> to the section of<br />
fabric it will be attached to, and<br />
mark the base of the opening on<br />
the fabric. It should be set approximately<br />
0.5 cm below zip<br />
stop. Sew from below the base of<br />
the opening.<br />
Slide<br />
0.5 cm<br />
Stop<br />
<br />
Base of<br />
Opening<br />
5 Secure the zip<strong>per</strong> with basting<br />
and sew along the mark.<br />
Make sure the needle does<br />
not strike the metal part of the<br />
zip<strong>per</strong> when sewing. The<br />
needle may break and cause<br />
injury.<br />
6 Line up the folded hem on the opposite<br />
side with the stitches.<br />
7 Change position of zip<strong>per</strong> foot.<br />
8 Turn the hand wheel to lower the<br />
needle and position the presser<br />
foot.<br />
B<br />
4 Divide the seam margin. Fold the<br />
seam margin with the overlap of<br />
the zip<strong>per</strong> position facing down<br />
0.2 cm on the outside of the<br />
mark.<br />
0.2 cm<br />
9 With the fabric right side up, baste<br />
the zip<strong>per</strong> onto the fabric, then<br />
sew the edge of the basting.<br />
16<br />
✽ Reinforce base of opening by<br />
sewing over it twice.<br />
✽ If the zip<strong>per</strong> slide gets in the way,<br />
lower the needle all the way<br />
through the fabric, lift the foot, and<br />
move the slider out of the way.


