

BlackandDecker Sega A Scure- Cs355 - Type 1 - Instruction Manual (Inglese)
BlackandDecker Sega A Scure- Cs355 - Type 1 - Instruction Manual (Inglese)
BlackandDecker Sega A Scure- Cs355 - Type 1 - Instruction Manual (Inglese)

Create successful ePaper yourself
Turn your PDF publications into a flip-book with our unique Google optimized e-Paper software.
ENGLISH<br />
(Original instructions)<br />
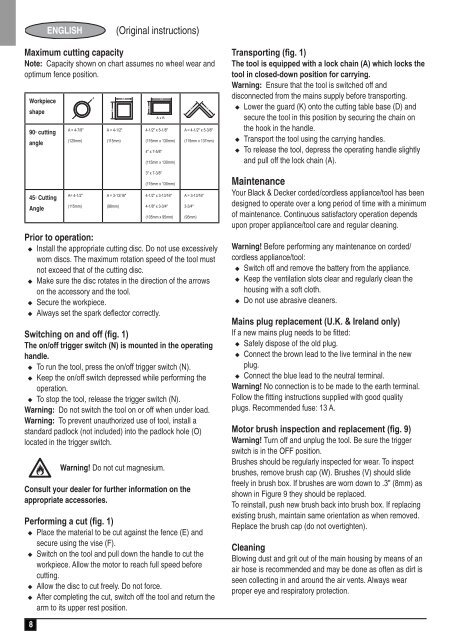
Maximum cutting capacity<br />
Note: Capacity shown on chart assumes no wheel wear and<br />
optimum fence position.<br />
Workpiece<br />
shape<br />
90 cutting<br />
O<br />
angle<br />
45 Cutting<br />
O<br />
Angle<br />
8<br />
A = 4-7/8"<br />
(125mm)<br />
A= 4-1/2"<br />
(115mm)<br />
A = 4-1/2"<br />
(115mm)<br />
A = 3-13/16"<br />
(98mm)<br />
4-1/2" x 5-1/8"<br />
(115mm x 130mm)<br />
4" x 7-5/8"<br />
(115mm x 130mm)<br />
3" x 7-3/8"<br />
(115mm x 130mm)<br />
4-1/2" x 3-13/16"<br />
4-1/8" x 3-3/4"<br />
(105mm x 95mm)<br />
A = 4-1/2" x 5-3/8"<br />
(115mm x 137mm)<br />
A = 3-13/16"<br />
3-3/4"<br />
(95mm)<br />
Prior to operation:<br />
u Install the appropriate cutting disc. Do not use excessively<br />
worn discs. The maximum rotation speed of the tool must<br />
not exceed that of the cutting disc.<br />
u Make sure the disc rotates in the direction of the arrows<br />
on the accessory and the tool.<br />
u Secure the workpiece.<br />
u Always set the spark deflector correctly.<br />
Switching on and off (fig. 1)<br />
The on/off trigger switch (N) is mounted in the operating<br />
handle.<br />
u To run the tool, press the on/off trigger switch (N).<br />
u Keep the on/off switch depressed while performing the<br />
operation.<br />
u To stop the tool, release the trigger switch (N).<br />
Warning: Do not switch the tool on or off when under load.<br />
Warning: To prevent unauthorized use of tool, install a<br />
standard padlock (not included) into the padlock hole (O)<br />
located in the trigger switch.<br />
&<br />
Warning! Do not cut magnesium.<br />
Consult your dealer for further information on the<br />
appropriate accessories.<br />
Performing a cut (fig. 1)<br />
u Place the material to be cut against the fence (E) and<br />
secure using the vise (F).<br />
u Switch on the tool and pull down the handle to cut the<br />
workpiece. Allow the motor to reach full speed before<br />
cutting.<br />
u Allow the disc to cut freely. Do not force.<br />
u After completing the cut, switch off the tool and return the<br />
arm to its upper rest position.<br />
Transporting (fig. 1)<br />
The tool is equipped with a lock chain (A) which locks the<br />
tool in closed-down position for carrying.<br />
Warning: Ensure that the tool is switched off and<br />
disconnected from the mains supply before transporting.<br />
u Lower the guard (K) onto the cutting table base (D) and<br />
secure the tool in this position by securing the chain on<br />
the hook in the handle.<br />
u Transport the tool using the carrying handles.<br />
u To release the tool, depress the operating handle slightly<br />
and pull off the lock chain (A).<br />
Maintenance<br />
Your Black & Decker corded/cordless appliance/tool has been<br />
designed to operate over a long period of time with a minimum<br />
of maintenance. Continuous satisfactory operation depends<br />
upon proper appliance/tool care and regular cleaning.<br />
Warning! Before performing any maintenance on corded/<br />
cordless appliance/tool:<br />
u Switch off and remove the battery from the appliance.<br />
u Keep the ventilation slots clear and regularly clean the<br />
housing with a soft cloth.<br />
u Do not use abrasive cleaners.<br />
Mains plug replacement (U.K. & Ireland only)<br />
If a new mains plug needs to be fitted:<br />
u Safely dispose of the old plug.<br />
u Connect the brown lead to the live terminal in the new<br />
plug.<br />
u Connect the blue lead to the neutral terminal.<br />
Warning! No connection is to be made to the earth terminal.<br />
Follow the fitting instructions supplied with good quality<br />
plugs. Recommended fuse: 13 A.<br />
Motor brush inspection and replacement (fig. 9)<br />
Warning! Turn off and unplug the tool. Be sure the trigger<br />
switch is in the OFF position.<br />
Brushes should be regularly inspected for wear. To inspect<br />
brushes, remove brush cap (W). Brushes (V) should slide<br />
freely in brush box. If brushes are worn down to .3" (8mm) as<br />
shown in Figure 9 they should be replaced.<br />
To reinstall, push new brush back into brush box. If replacing<br />
existing brush, maintain same orientation as when removed.<br />
Replace the brush cap (do not overtighten).<br />
Cleaning<br />
Blowing dust and grit out of the main housing by means of an<br />
air hose is recommended and may be done as often as dirt is<br />
seen collecting in and around the air vents. Always wear<br />
proper eye and respiratory protection.


