

KitchenAid T 16 A1 D/HA - Fridge/freezer combination - T 16 A1 D/HA - Fridge/freezer combination EN (853903401500) Istruzioni per l'Uso
KitchenAid T 16 A1 D/HA - Fridge/freezer combination - T 16 A1 D/HA - Fridge/freezer combination EN (853903401500) Istruzioni per l'Uso
KitchenAid T 16 A1 D/HA - Fridge/freezer combination - T 16 A1 D/HA - Fridge/freezer combination EN (853903401500) Istruzioni per l'Uso

You also want an ePaper? Increase the reach of your titles
YUMPU automatically turns print PDFs into web optimized ePapers that Google loves.
STOP FROST SYSTEM (depending on the model)<br />
The STOP FROST SYSTEM (available depending on the model) facilitates the defrost procedure<br />
for the <strong>freezer</strong> compartment. The STOP FROST accessory (figure 1) is designed to collect some<br />
of the frost that forms in the <strong>freezer</strong> compartment and it is easy to remove and clean, therefore<br />
reducing the time needed to defrost the inside of the <strong>freezer</strong> compartment.<br />
To remove the frost on the STOP FROST accessory follow the cleaning procedure demonstrated<br />
below.<br />
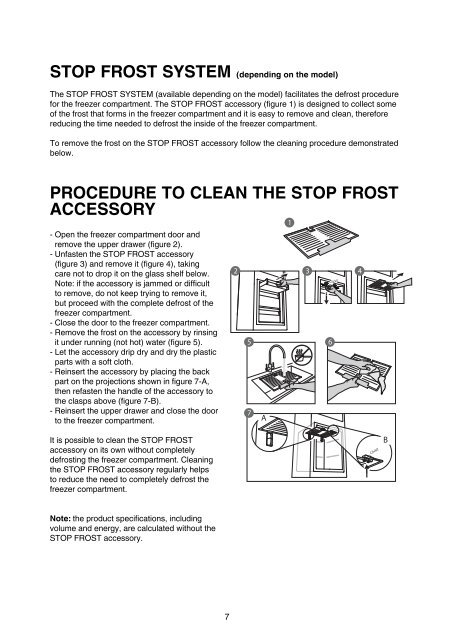
PROCEDURE TO CLEAN THE STOP FROST<br />
ACCESSORY<br />
- Open the <strong>freezer</strong> compartment door and<br />
remove the up<strong>per</strong> drawer (figure 2).<br />
- Unfasten the STOP FROST accessory<br />
(figure 3) and remove it (figure 4), taking<br />
care not to drop it on the glass shelf below.<br />
Note: if the accessory is jammed or difficult<br />
to remove, do not keep trying to remove it,<br />
but proceed with the complete defrost of the<br />
<strong>freezer</strong> compartment.<br />
- Close the door to the <strong>freezer</strong> compartment.<br />
- Remove the frost on the accessory by rinsing<br />
it under running (not hot) water (figure 5).<br />
- Let the accessory drip dry and dry the plastic<br />
parts with a soft cloth.<br />
- Reinsert the accessory by placing the back<br />
part on the projections shown in figure 7-A,<br />
then refasten the handle of the accessory to<br />
the clasps above (figure 7-B).<br />
- Reinsert the up<strong>per</strong> drawer and close the door<br />
to the <strong>freezer</strong> compartment.<br />
2<br />
5<br />
7<br />
A<br />
1<br />
3 4<br />
Click!!<br />
6<br />
It is possible to clean the STOP FROST<br />
accessory on its own without completely<br />
defrosting the <strong>freezer</strong> compartment. Cleaning<br />
the STOP FROST accessory regularly helps<br />
to reduce the need to completely defrost the<br />
<strong>freezer</strong> compartment.<br />
Click!!<br />
B<br />
Note: the product specifications, including<br />
volume and energy, are calculated without the<br />
STOP FROST accessory.<br />
7


