VENTA9LUFTWÄSCHER - Venta Luftwäscher GmbH
VENTA9LUFTWÄSCHER - Venta Luftwäscher GmbH
VENTA9LUFTWÄSCHER - Venta Luftwäscher GmbH

Create successful ePaper yourself
Turn your PDF publications into a flip-book with our unique Google optimized e-Paper software.
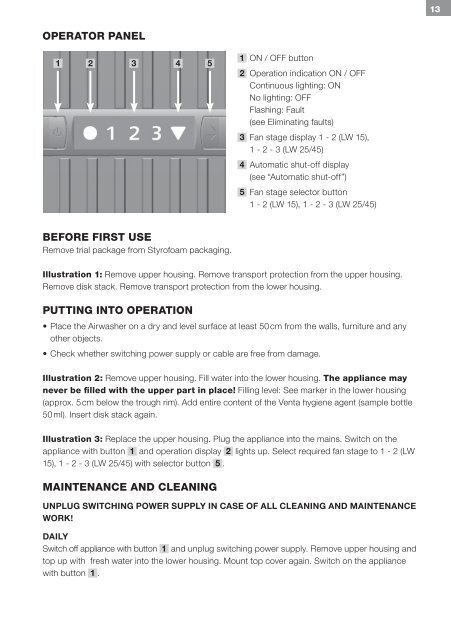
operator paneL<br />
1 2 3 4 5<br />
beFore FirSt uSe<br />
Remove trial package from Styrofoam packaging.<br />
1 ON / OFF button<br />
2 Operation indication ON / OFF<br />
Continuous lighting: ON<br />
No lighting: OFF<br />
Flashing: Fault<br />
(see Eliminating faults)<br />
3 Fan stage display 1 - 2 (LW 15),<br />
1 - 2 - 3 (LW 25/45)<br />
4 Automatic shut-off display<br />
(see “Automatic shut-off”)<br />
5 Fan stage selector button<br />
1 - 2 (LW 15), 1 - 2 - 3 (LW 25/45)<br />
illustration 1: Remove upper housing. Remove transport protection from the upper housing.<br />
Remove disk stack. Remove transport protection from the lower housing.<br />
putting into operation<br />
• Place the Airwasher on a dry and level surface at least 50cm from the walls, furniture and any<br />
other objects.<br />
• Check whether switching power supply or cable are free from damage.<br />
illustration 2: Remove upper housing. Fill water into the lower housing. the appliance may<br />
never be filled with the upper part in place! Filling level: See marker in the lower housing<br />
(approx. 5cm below the trough rim). Add entire content of the <strong>Venta</strong> hygiene agent (sample bottle<br />
50ml). Insert disk stack again.<br />
illustration 3: Replace the upper housing. Plug the appliance into the mains. Switch on the<br />
appliance with button 1 and operation display 2 lights up. Select required fan stage to 1 - 2 (LW<br />
15), 1 - 2 - 3 (LW 25/45) with selector button 5 .<br />
maintenance and cLeaning<br />
unPlug sWitching PoWer suPPly in case of all cleaning and maintenance<br />
Work!<br />
daily<br />
Switch off appliance with button 1 and unplug switching power supply. Remove upper housing and<br />
top up with fresh water into the lower housing. Mount top cover again. Switch on the appliance<br />
with button 1 .<br />
13