

KitchenAid PDP 819/P - PDP 819/P EN (858042149600) Istruzioni per l'Uso
KitchenAid PDP 819/P - PDP 819/P EN (858042149600) Istruzioni per l'Uso
KitchenAid PDP 819/P - PDP 819/P EN (858042149600) Istruzioni per l'Uso

Create successful ePaper yourself
Turn your PDF publications into a flip-book with our unique Google optimized e-Paper software.
3gb20020.fm Page 18 Tuesday, February 24, 2004 4:07 PM<br />
INSTALLATION<br />
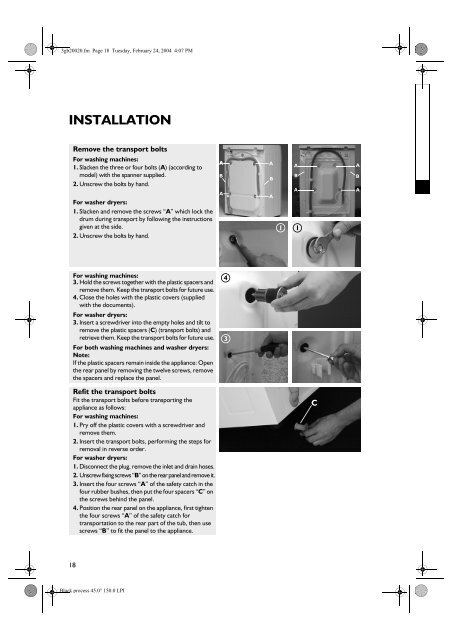
Remove the transport bolts<br />
For washing machines:<br />
1. Slacken the three or four bolts (A) (according to<br />
model) with the spanner supplied.<br />
2. Unscrew the bolts by hand.<br />
For washer dryers:<br />
1. Slacken and remove the screws “A” which lock the<br />
drum during transport by following the instructions<br />
given at the side.<br />
2. Unscrew the bolts by hand.<br />
A<br />
B<br />
A<br />
A<br />
B<br />
A<br />
1<br />
A<br />
B<br />
A<br />
1<br />
A<br />
B<br />
A<br />
For washing machines:<br />
3. Hold the screws together with the plastic spacers and<br />
remove them. Keep the transport bolts for future use.<br />
4. Close the holes with the plastic covers (supplied<br />
with the documents).<br />
For washer dryers:<br />
3. Insert a screwdriver into the empty holes and tilt to<br />
remove the plastic spacers (C) (transport bolts) and<br />
retrieve them. Keep the transport bolts for future use.<br />
For both washing machines and washer dryers:<br />
Note:<br />
If the plastic spacers remain inside the appliance: Open<br />
the rear panel by removing the twelve screws, remove<br />
the spacers and replace the panel.<br />
4<br />
3<br />
Refit the transport bolts<br />
Fit the transport bolts before transporting the<br />
appliance as follows:<br />
For washing machines:<br />
1. Pry off the plastic covers with a screwdriver and<br />
remove them.<br />
2. Insert the transport bolts, <strong>per</strong>forming the steps for<br />
removal in reverse order.<br />
For washer dryers:<br />
1. Disconnect the plug, remove the inlet and drain hoses.<br />
2. Unscrew fixing screws “B” on the rear panel and remove it.<br />
3. Insert the four screws “A” of the safety catch in the<br />
four rubber bushes, then put the four spacers “C” on<br />
the screws behind the panel.<br />
4. Position the rear panel on the appliance, first tighten<br />
the four screws “A” of the safety catch for<br />
transportation to the rear part of the tub, then use<br />
screws “B” to fit the panel to the appliance.<br />
C<br />
18<br />
Black process 45.0° 150.0 LPI


