

KitchenAid PDP 819/P - PDP 819/P EN (858042149600) Istruzioni per l'Uso
KitchenAid PDP 819/P - PDP 819/P EN (858042149600) Istruzioni per l'Uso
KitchenAid PDP 819/P - PDP 819/P EN (858042149600) Istruzioni per l'Uso

Create successful ePaper yourself
Turn your PDF publications into a flip-book with our unique Google optimized e-Paper software.
3gb20020.fm Page 19 Tuesday, February 24, 2004 4:07 PM<br />
Adjust the feet<br />
If the floor is uneven, adjust the levelling feet as required (do<br />
not insert pieces of wood, cardboard etc. under the feet):<br />
1. Loosen the locknut using the wrench provided.<br />
2. Adjust the height of the foot, turning it by hand.<br />
3. Tighten the locknut anticlockwise towards the appliance.<br />
If the appliance is to be installed on a wooden floor, distribute the<br />
weight by placing it on a 60 x 60 (or 40) cm sheet of plywood at<br />
least 3 cm in thickness.<br />
Secure the plywood sheet to the floor.<br />
Worktop for built-under models.<br />
The appliance must only be installed beneath a continuous fitted kitchen worktop.<br />
1. Unplug the appliance.<br />
2. Unscrew the worktop fixing screws from the rear of the appliance.<br />
3. Lift the worktop slightly to free it from the housing of the top, then slide it forward to disengage it from<br />
the control panel, and remove. Install the cover panel following the relative instructions.<br />
4. Refit the fixing screws and tighten them.<br />
5. Plug the appliance back in.<br />
Connect the water inlet hose<br />
For models with straight hose:<br />
1. Insert the dirt strainer (included in the accessories) into<br />
the threaded tap coupling and the coupling between the<br />
hose and the appliance.<br />
2. Carefully screw the hose connection onto the tap,<br />
preferably by hand.<br />
3. Make sure there are no kinks in the hose.<br />
4. Carefully screw the hose connection to the appliance<br />
inlet, preferably by hand.<br />
5. Turn the tap on fully and check that the joints at the<br />
appliance and the tap are watertight.<br />
If the hose is too short, replace it with a suitable length of pressure<br />
resistant hose (1000 kPa min, <strong>EN</strong> 50084 approved type).<br />
Check the hose regularly for brittleness and cracks and<br />
replace if necessary.<br />
The appliance can be connected without a non-return valve.<br />
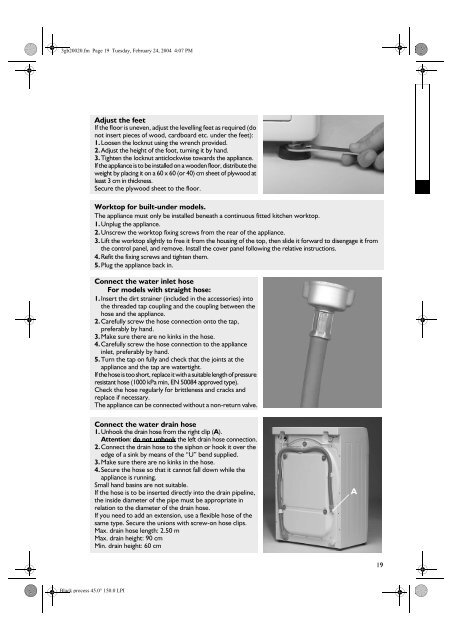
Connect the water drain hose<br />
1. Unhook the drain hose from the right clip (A).<br />
Attention: do not unhook the left drain hose connection.<br />
2. Connect the drain hose to the siphon or hook it over the<br />
edge of a sink by means of the “U” bend supplied.<br />
3. Make sure there are no kinks in the hose.<br />
4. Secure the hose so that it cannot fall down while the<br />
appliance is running.<br />
Small hand basins are not suitable.<br />
If the hose is to be inserted directly into the drain pipeline,<br />
the inside diameter of the pipe must be appropriate in<br />
relation to the diameter of the drain hose.<br />
If you need to add an extension, use a flexible hose of the<br />
same type. Secure the unions with screw-on hose clips.<br />
Max. drain hose length: 2.50 m<br />
Max. drain height: 90 cm<br />
Min. drain height: 60 cm<br />
A<br />
19<br />
Black process 45.0° 150.0 LPI


