

KitchenAid KOBLENZ 2480 - KOBLENZ 2480 EN (858365720100) Istruzioni per l'Uso
KitchenAid KOBLENZ 2480 - KOBLENZ 2480 EN (858365720100) Istruzioni per l'Uso
KitchenAid KOBLENZ 2480 - KOBLENZ 2480 EN (858365720100) Istruzioni per l'Uso

You also want an ePaper? Increase the reach of your titles
YUMPU automatically turns print PDFs into web optimized ePapers that Google loves.
CARE AND MAINT<strong>EN</strong>ANCE<br />
Appliance exterior and control panel<br />
• Wash down with a soft, damp cloth. Dry with<br />
a soft cloth.<br />
Appliance interior<br />
• After each washing, leave the door open for some<br />
time to allow the inside of the appliance to dry.<br />
• If you never or seldom wash your laundry at<br />
95 °C, we recommend to occasionally run a<br />
95 °C programme without laundry, adding a<br />
small amount of detergent, to keep the interior<br />
of the appliance clean.<br />
Door seal<br />
• Dry the door seal after each washing with an<br />
absorbent cotton cloth; make sure that the<br />
door seal is completely dry before closing the<br />
door of the empty washing machine.<br />
• Check the condition of the door seal<br />
<strong>per</strong>iodically.<br />
Filter<br />
• Check and clean the filter regularly, at least two<br />
or three times a year (see “Draining Residual<br />
Water/Cleaning The Filter”).<br />
Do not use detergents containing solvents, scouring powder, glass or general purpose<br />
cleaners, and flammable fluids. They may harm the plastic surfaces or other parts.<br />
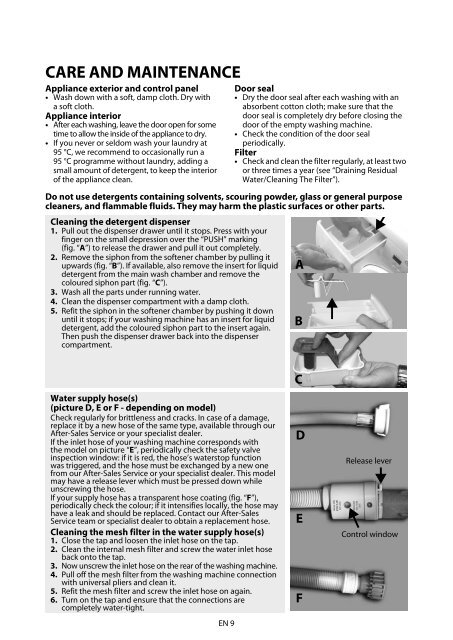
Cleaning the detergent dispenser<br />
1. Pull out the dispenser drawer until it stops. Press with your<br />
finger on the small depression over the “PUSH” marking<br />
(fig. “A”) to release the drawer and pull it out completely.<br />
2. Remove the siphon from the softener chamber by pulling it<br />
upwards (fig. “B”). If available, also remove the insert for liquid<br />
detergent from the main wash chamber and remove the<br />
coloured siphon part (fig. “C”).<br />
3. Wash all the parts under running water.<br />
4. Clean the dispenser compartment with a damp cloth.<br />
5. Refit the siphon in the softener chamber by pushing it down<br />
until it stops; if your washing machine has an insert for liquid<br />
detergent, add the coloured siphon part to the insert again.<br />
Then push the dispenser drawer back into the dispenser<br />
compartment.<br />
A<br />
B<br />
Water supply hose(s)<br />
(picture D, E or F - depending on model)<br />
Check regularly for brittleness and cracks. In case of a damage,<br />
replace it by a new hose of the same type, available through our<br />
After-Sales Service or your specialist dealer.<br />
If the inlet hose of your washing machine corresponds with<br />
the model on picture “E”, <strong>per</strong>iodically check the safety valve<br />
inspection window: if it is red, the hose’s waterstop function<br />
was triggered, and the hose must be exchanged by a new one<br />
from our After-Sales Service or your specialist dealer. This model<br />
may have a release lever which must be pressed down while<br />
unscrewing the hose.<br />
If your supply hose has a transparent hose coating (fig. “F”),<br />
<strong>per</strong>iodically check the colour; if it intensifies locally, the hose may<br />
have a leak and should be replaced. Contact our After-Sales<br />
Service team or specialist dealer to obtain a replacement hose.<br />
Cleaning the mesh filter in the water supply hose(s)<br />
1. Close the tap and loosen the inlet hose on the tap.<br />
2. Clean the internal mesh filter and screw the water inlet hose<br />
back onto the tap.<br />
3. Now unscrew the inlet hose on the rear of the washing machine.<br />
4. Pull off the mesh filter from the washing machine connection<br />
with universal pliers and clean it.<br />
5. Refit the mesh filter and screw the inlet hose on again.<br />
6. Turn on the tap and ensure that the connections are<br />
completely water-tight.<br />
<strong>EN</strong> 9<br />
C<br />
D<br />
E<br />
F<br />
Release lever<br />
Control window


