15 - Gruppi autonomi di raffreddamento Serie SILENT EVO 3

Create successful ePaper yourself
Turn your PDF publications into a flip-book with our unique Google optimized e-Paper software.
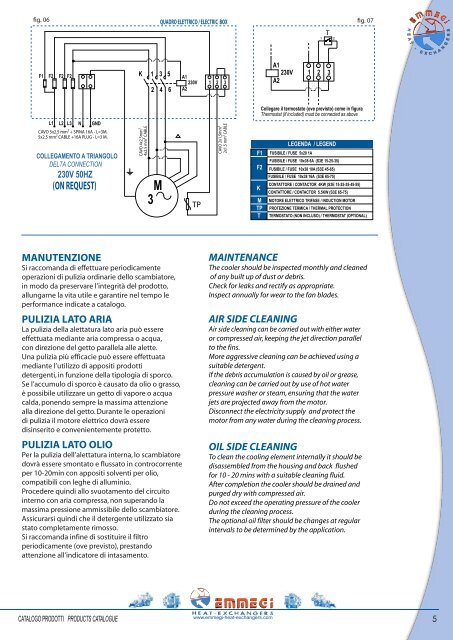
fig. 06 QUADRO ELETTRICO / ELECTRIC BOX<br />
fig. 07<br />
T<br />
1 2<br />
F1<br />
F2 F2 F2 K 1<br />
2<br />
3<br />
4 6<br />
5<br />
A1<br />
230V<br />
A2<br />
1 2 3<br />
A1<br />
230V 1 2 3<br />
A2<br />
Collegare il termostato (ove previsto) come in figura<br />
Thermostat (if included) must be connected as above<br />
L1 L2 L3 N GND<br />
CAVO 5x2.5 mm² + SPINA 16A - L=3M.<br />
5x2.5 mm² CABLE +16A PLUG - L=3 M.<br />
COLLEGAMENTO A TRIANGOLO<br />
DELTA CONNECTION<br />
230V 50HZ<br />
(ON REQUEST)<br />
CAVO 4x2.5mm²<br />
4x2.5 mm² CABLE<br />
M<br />
3<br />
TP<br />
CAVO 2x1.5mm²<br />
2x1.5 mm² CABLE<br />
F1<br />
F2<br />
K<br />
M<br />
TP<br />
T<br />
LEGENDA / LEGEND<br />
FUSIBILE / FUSE 5x20 1A<br />
FUSIBILE / FUSE 10x38 6A (S3E <strong>15</strong>-25-35)<br />
FUSIBILE / FUSE 10x38 10A (S3E 45-65)<br />
FUSIBILE / FUSE 10x38 16A (S3E 65-75)<br />
CONTATTORE / CONTACTOR 4KW (S3E <strong>15</strong>-25-35-45-55)<br />
CONTATTORE / CONTACTOR 5.5KW (S3E 65-75)<br />
MOTORE ELETTRICO TRIFASE / INDUCTION MOTOR<br />
PROTEZIONE TERMICA / THERMAL PROTECTION<br />
TERMOSTATO (NON INCLUSO) / THERMOSTAT (OPTIONAL)<br />
MANUTENZIONE<br />
Si raccomanda <strong>di</strong> effettuare perio<strong>di</strong>camente<br />
operazioni <strong>di</strong> pulizia or<strong>di</strong>narie dello scambiatore,<br />
in modo da preservare l’integrità del prodotto,<br />
allungarne la vita utile e garantire nel tempo le<br />
performance in<strong>di</strong>cate a catalogo.<br />
PULIZIA LATO ARIA<br />
La pulizia della alettatura lato aria può essere<br />
effettuata me<strong>di</strong>ante aria compressa o acqua,<br />
con <strong>di</strong>rezione del getto parallela alle alette.<br />
Una pulizia più efficacie può essere effettuata<br />
me<strong>di</strong>ante l’utilizzo <strong>di</strong> appositi prodotti<br />
detergenti, in funzione della tipologia <strong>di</strong> sporco.<br />
Se l’accumulo <strong>di</strong> sporco è causato da olio o grasso,<br />
è possibile utilizzare un getto <strong>di</strong> vapore o acqua<br />
calda, ponendo sempre la massima attenzione<br />
alla <strong>di</strong>rezione del getto. Durante le operazioni<br />
<strong>di</strong> pulizia il motore elettrico dovrà essere<br />
<strong>di</strong>sinserito e convenientemente protetto.<br />
PULIZIA LATO OLIO<br />
Per la pulizia dell’alettatura interna, lo scambiatore<br />
dovrà essere smontato e flussato in controcorrente<br />
per 10-20min con appositi solventi per olio,<br />
compatibili con leghe <strong>di</strong> alluminio.<br />
Procedere quin<strong>di</strong> allo svuotamento del circuito<br />
interno con aria compressa, non superando la<br />
massima pressione ammissibile dello scambiatore.<br />
Assicurarsi quin<strong>di</strong> che il detergente utilizzato sia<br />
stato completamente rimosso.<br />
Si raccomanda infine <strong>di</strong> sostituire il filtro<br />
perio<strong>di</strong>camente (ove previsto), prestando<br />
attenzione all’in<strong>di</strong>catore <strong>di</strong> intasamento.<br />
MAINTENANCE<br />
The cooler should be inspected monthly and cleaned<br />
of any built up of dust or debris.<br />
Check for leaks and rectify as appropriate.<br />
Inspect annually for wear to the fan blades.<br />
AIR SIDE CLEANING<br />
Air side cleaning can be carried out with either water<br />
or compressed air, keeping the jet <strong>di</strong>rection parallel<br />
to the fins.<br />
More aggressive cleaning can be achieved using a<br />
suitable detergent.<br />
If the debris accumulation is caused by oil or grease,<br />
cleaning can be carried out by use of hot water<br />
pressure washer or steam, ensuring that the water<br />
jets are projected away from the motor.<br />
Disconnect the electricity supply and protect the<br />
motor from any water during the cleaning process.<br />
OIL SIDE CLEANING<br />
To clean the cooling element internally it should be<br />
<strong>di</strong>sassembled from the housing and back flushed<br />
for 10 - 20 mins with a suitable cleaning fluid.<br />
After completion the cooler should be drained and<br />
purged dry with compressed air.<br />
Do not exceed the operating pressure of the cooler<br />
during the cleaning process.<br />
The optional oil filter should be changes at regular<br />
intervals to be determined by the application.<br />
CATALOGO PRODOTTI PRODUCTS CATALOGUE<br />
www.emmegi-heat-exchangers.com<br />
5