a b c d e f c - Dohse Aquaristik KG
a b c d e f c - Dohse Aquaristik KG
a b c d e f c - Dohse Aquaristik KG

Create successful ePaper yourself
Turn your PDF publications into a flip-book with our unique Google optimized e-Paper software.
Dupla CO2 Duurtest<br />
Bijzondere kenmerken:<br />
eenvoudige bediening<br />
gepatenteerd (Nr. 2854 447)<br />
makkelijk af te lezen<br />
drie kleuren voor drie pH-trajecten<br />
Belangrijk!<br />
Het mengsel van testvloeistof + aquariumwater (het indicatormengsel) in de test dient<br />
dezelfde karbonaathardheid (KH waarde) te hebben als het aquariumwater. Na iedere<br />
wisseling van water en tenminste 1x per maand moet dit mengsel ververst worden. Indien<br />
de vloeistof, gezien tegen het witte refl ector-vlakje, twee kleurnuancen vertoont,<br />
dan is de CO2 waarde aan het veranderen. (Bijv. boven blauw, onderaan groen.) De<br />
test geeft het pH-bereik na +/- 10 min. aan. De O-ringen moeten af en toe licht met<br />
siliconenvet worden ingesmeerd. Vermijdten verwijder algengroel.<br />
Let op!<br />
Onder een KH waarde van 4° dH is de aanwijzing van de test niet nauwkeurig. In dit<br />
geval kan met Dupla KH+ de KH-waarde boven de 4° dH gebracht worden.<br />
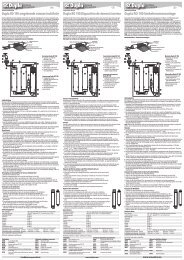
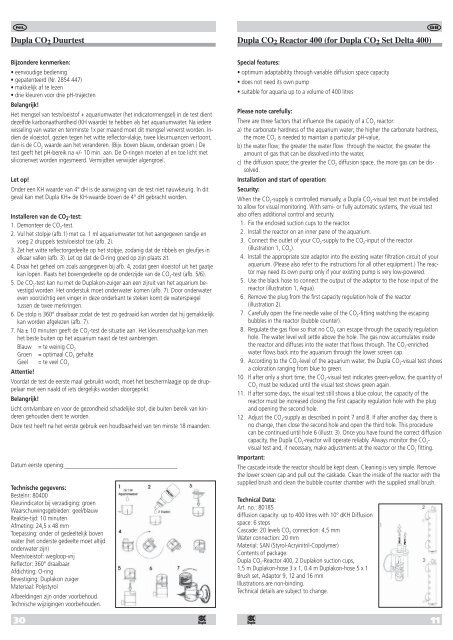
Installeren van de CO2-test: 1. Demonteer de CO2-test. 2. Vul het stolpje (afb.1) met ca. 1 ml aquariumwater tot het aangegeven randje en<br />
voeg 2 druppels testvloeistof toe (afb. 2).<br />
3. Zet het witte refl ectorgedeelte op het stolpje, zodanig dat de ribbels en gleufjes in<br />
elkaar vallen (afb. 3). Let op dat de O-ring goed op zijn plaats zit.<br />
4. Draai het geheel om zoals aangegeven bij afb. 4, zodat geen vloeistof uit het gaatje<br />
kan lopen. Plaats het bovengedeelte op de onderzijde van de CO2-test (afb. 5/6).<br />
5. De CO2-test kan nu met de Duplakon-zuiger aan een zijruit van het aquarium bevestigd<br />
worden. Het onderstuk moet onderwater komen (afb. 7). Door onderwater<br />
even voorzichtig een vinger in deze onderkant te steken komt de waterspiegel<br />
tussen de twee merkringen.<br />
6. De stolp is 360° draaibaar zodat de test zo gedraaid kan worden dat hij gemakkelijk<br />
kan worden afgelezen (afb. 7).<br />
7. Na ± 10 minuten geeft de CO2-test de situatie aan. Het kleurenschaaltje kan men<br />
het beste buiten op het aquarium naast de test aanbrengen.<br />
Blauw = te weinig CO2 Groen = optimaal CO2 gehalte<br />
Geel = te veel CO2 Attentie!<br />
Voordat de test de eerste maal gebruikt wordt, moet het beschermlaagje op de druppelaar<br />
met een naald of iets dergelijks worden doorgeprikt.<br />
Belangrijk!<br />
Licht ontvlambare en voor de gezondheid schadelijke stof, die buiten bereik van kinderen<br />
gehouden dient te worden.<br />
Deze test heeft na het eerste gebruik een houdbaarheid van ten minste 18 maanden.<br />
Datum eerste opening: –––––––––––––––––––––––––––––––––––––––––<br />
Technische gegevens:<br />
Bestelnr: 80400<br />
Kleurindicator bij verzadiging: groen<br />
Waarschuwingsgebieden: geel/blauw<br />
Reaktie-tijd: 10 minuten<br />
Afmeting: 24,5 x 48 mm<br />
Toepassing: onder of gedeeltelijk boven<br />
water (het onderste gedeelte moet altijd<br />
onderwater zijn)<br />
Meetvloeistof: wegloop-vrij<br />
Refl ector: 360° draaibaar<br />
Afdichting: O-ring<br />
Bevestiging: Duplakon zuiger<br />
Materiaal: Polystyrol<br />
Afbeeldingen zijn onder voorbehoud.<br />
Technische wijzigingen voorbehouden.<br />
130<br />
Dupla CO2 Reactor 400 (for Dupla CO2 Set Delta 400)<br />
Special features:<br />
optimum adaptabitity through variable diffusion space capacity<br />
does not need its own pump<br />
suitable for aquaria up to a volume of 400 litres<br />
Please note carefully:<br />
There are three factors that infl uence the capacity of a CO2 reactor:<br />
a) the carbonate hardness of the aquarium water; the higher the carbonate hardness,<br />
the more CO2 is needed to maintain a particular pH-value,<br />
b) the water fl ow; the greater the water fl ow through the reactor, the greater the<br />
amount of gas that can be dissolved into the water,<br />
c) the diffusion space; the greater the CO2 diffusion space, the more gas can be dissolved.<br />
Installation and start of operation:<br />
Security:<br />
When the CO2-supply is controlled manually, a Dupla CO2-visual test must be installed<br />
to allow for visual monitoring. With semi- or fully automatic systems, the visual test<br />
also offers additional control and security.<br />
1. Fix the enclosed suction cups to the reactor.<br />
2. Install the reactor on an inner pane of the aquarium.<br />
3. Connect the outlet of your CO2-supply to the CO2-input of the reactor<br />
(illustration 1, CO2). 4. Install the appropriate size adaptor into the existing water fi ltration circuit of your<br />
aquarium. (PIease also refer to the instructions for all other equipment.) The reactor<br />
may need its own pump only if your existing pump is very low-powered.<br />
5. Use the black hose to connect the output of the adaptor to the hose input of the<br />
reactor (illustration 1, Aqua).<br />
6. Remove the plug from the fi rst capacity regulation hole of the reactor<br />
(illustration 2).<br />
7. Carefully open the fi ne needle valve of the CO2-fi tting watching the escaping<br />
bubbles in the reactor (bubble counter).<br />
8. Regulate the gas fl ow so that no CO2 can escape through the capacity regulation<br />
hole. The water level will settle above the hole. The gas now accumulates inside<br />
the reactor and diffuses into the water that fl ows through. The CO2-enriched water fl ows back into the aquarium through the lower screen cap.<br />
9. According to the CO2-level of the aquarium water, the Dupla CO2-visual test shows<br />
a coloration ranging from blue to green.<br />
10. If after only a short time, the CO2-visual test indicates green-yellow, the quantity of<br />
CO2 must be reduced until the visual test shows green again.<br />
11. If after some days, the visual test still shows a blue colour, the capacity of the<br />
reactor must be increased closing the fi rst capacity regulation hole with the plug<br />
and opening the second hole.<br />
12. Adjust the CO2-supply as described in point 7 and 8. If after another day, there is<br />
no change, then close the second hole and open the third hole. This procedure<br />
can be continued until hole 6 (illustr. 3). Once you have found the correct diffusion<br />
capacity, the Dupla CO2-reactor will operate reliably. Always monitor the CO2 visual test and, if necessary, make adjustments at the reactor or the CO2 fi tting.<br />
Important:<br />
The cascade inside the reactor should be kept clean. Cleaning is very simple. Remove<br />
the lower screen cap and pull out the caskade. Clean the inside of the reactor with the<br />
supplied brush and clean the bubble counter chamber with the supplied small brush.<br />
Technical Data:<br />
Art. no.: 80185<br />
diffusion capacity: up to 400 litres with 10° dKH Diffusion<br />
space: 6 steps<br />
Cascade: 20 levels CO 2 connection: 4,5 mm<br />
Water connection: 20 mm<br />
Material: SAN (Styrol-Acryinitril-Copolymer)<br />
Contents of package:<br />
Dupla CO 2-Reactor 400, 2 Duplakon suction cups,<br />
1,5 m Duplakon-hose 3 x 1, 0.4 m Duplakon-hose 5 x 1<br />
Brush set, Adaptor 9, 12 and 16 mm<br />
Illustrations are non-binding.<br />
Technical details are subject to change.<br />
11