Instruction Manual Manuel D'instructions Manual de ... - Tasco
Instruction Manual Manuel D'instructions Manual de ... - Tasco
Instruction Manual Manuel D'instructions Manual de ... - Tasco

Create successful ePaper yourself
Turn your PDF publications into a flip-book with our unique Google optimized e-Paper software.
MOUNTING YOUR RED DOT SCOPE<br />
1. The base or bases should be manufactured specifically for your pistol, rifle or shotgun and should create a uniform<br />
horizontal and vertical mounting platform. Be sure they are properly installed and securely fastened according to the<br />
manufacturer’s instructions for your safety. There is no set eye relief for this sight, therefore, you should provi<strong>de</strong> at<br />
least three inches of clearance between the eyebell and your eye when in the shooting position.<br />
2. Set the clamps onto the base or bases so that they align with the crosscut grooves. Work each clampscrew into the base<br />
until the crossbolt seats into the groove. Securely tighten each locking nut with a coin or screwdriver. For additional<br />
holding power, add a drop of thread-locking compound to the center of each locking nut.<br />
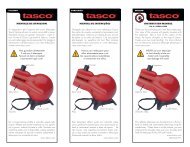
INSTAllING BATTERIES<br />
Your new <strong>Tasco</strong> Red Dot is powered by one 3V “coin-style” lithium battery, Type 2032. Should your reticle<br />
grow dim or not light at all, you will need to replace the batteries. To install new batteries, unscrew the battery<br />
compartment and insert “+” si<strong>de</strong> up. Replace battery cover.<br />
ZEROING YOUR RED DOT SIGhT<br />
CAUTION! BE SURE GUN IS NOT lOADED.<br />
USE SAFE GUN hANDlING PROCEDURES AT All TIMES.<br />
NOTE: THE FOLLOWING SHOULD BE DONE AT AN APPROVED RANGE OR OTHER SAFE AREA. EYE AND<br />
EAR PROTECTION IS RECOMMENDED.<br />
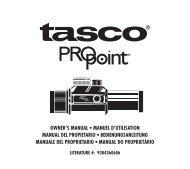
1. Activate the illuminated reticle by turning the rheostat knob clockwise to brighten and counterclockwise to dim. The<br />
“1” represents the dimmest and the “11” the brightest illuminations.<br />
2. Remove the windage and elevation adjustment caps.<br />
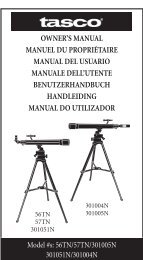
3. With the scope mounted, rest the gun on a solid support. Sight along the barrel and aim at a target 50 to 100 yards<br />
away. Sight through your Red Dot and use the windage and elevation adjustments to align the lighted reticle with the<br />
target as seen along the barrel. Each click of adjustment moves the point of impact by 1/2” at 100 yards, 1/4” at 50<br />
yards, and 1/8” at 25 yards.<br />
RED DOT 6LIM-swapped adjustment 5 5 8/22/07 10:58:28 PM<br />
3