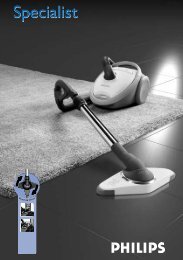
HI838, 835 Azur Excel Plus 'Aquazur' - Philips
HI838, 835 Azur Excel Plus 'Aquazur' - Philips
HI838, 835 Azur Excel Plus 'Aquazur' - Philips

You also want an ePaper? Increase the reach of your titles
YUMPU automatically turns print PDFs into web optimized ePapers that Google loves.
polyester and 40% cotton” should be ironed at<br />
the temperature indicated for polyester (1) and<br />
without steam.)<br />
If you do not know what kind(s) of fabric(s) the<br />
article has been made of, find a spot which will<br />
be invisible when wearing or using the article.<br />
Try out the ironing temperature which is most<br />
suitable there. (Start at a relatively low<br />
temperature.)<br />
• Pure woollen fabrics (100% wool) may be<br />
pressed with the iron set to a steam position.<br />
Preferably set the steam control to maximum<br />
position and use a dry pressing cloth.<br />
When steam-ironing woollen fabrics, shining of<br />
the fabric may occur. This can be prevented by<br />
turning the article inside out and ironing the<br />
reverse side.<br />
• Velvet and other textures which rapidly acquire<br />
shiny spots should be ironed in one direction<br />
only (with the nap) applying light pressure.<br />
Always keep the iron moving.<br />
• Iron the reverse side of synthetic materials and<br />
silk to prevent shining spots. Do not use the<br />
spray button to prevent stains.<br />
Setting the temperature<br />
- Stand the iron on its<br />
rubber mat on the 14<br />
watertank.<br />
- Set the temperature<br />
control (A) to the<br />
correct ironing<br />
temperature as<br />
indicated in the ironing<br />
instructions or in the<br />
table (fig. 14).<br />
- Insert the mains plug<br />
into the wall socket.<br />
- After the amber temperature pilot light (H) first<br />
has gone out and has come on again, you may<br />
start ironing.<br />
• The amber pilot light will come on from time to<br />
time during ironing.<br />
• If you set the temperature control to a lower<br />
setting after ironing at a high temperature, do<br />
not begin again before the amber pilot light has<br />
come on and gone out again.<br />
7<br />
Spraying T<br />
15<br />
• You can spray at any temperature by pushing<br />
on the spray button T (D) (fig. 15).<br />
• An electrical pump in the iron stand supplies the<br />
small internal reservoir (P) with spraywater.<br />
• Ensure that there is enough water in the<br />
watertank.<br />
• When the internal reservoir (P) is empty, after<br />
intensive spraying, pull the steam trigger (C) for<br />
about one minute to refill it. Refilling is complete<br />
when you see/hear steam coming out from the<br />
steam vents on the iron sole.<br />
• Filling and refilling of the internal reservoir must<br />
be executed at a temperature setting between<br />
2 and MAX. It’s not possible to fill the<br />
reservoir at a temperature setting below 2<br />
(fig. 16).<br />
Steam-ironing<br />
16<br />
• As indicated on the temperature control (A) and<br />
the table, steam-ironing is only possible at<br />
higher ironing temperatures:<br />
2 for moderate steam<br />
3 for maximum steam.<br />
• With conventional steam irons, water may leak<br />
from the soleplate if a too low temperature has<br />
been selected. This will cause stains.<br />
However,the <strong>Philips</strong> Aquazur <strong>HI838</strong>, <strong>835</strong><br />
features "Drip Stop" Steam Shut-off: the iron<br />
will automatically stop steaming at too low<br />
temperatures, to avoid the forming of drops,<br />
which could leave stains on textile.<br />
When Drip Stop is activated, you can hear<br />
"Click". Set the temperature control (A) to the<br />
advised position. Steaming will recommence as<br />
soon as the appropriate temperature has been<br />
reached.<br />
• Ensure that there is enough water in the<br />
watertank.<br />
- Put the iron on its rubber mat on the watertank.<br />
- Set the temperature control (A) at the required<br />
position within the “steam area” (11 to MAX).<br />
- Insert the mains plug into the wall socket.<br />
- After the amber temperature pilot light (H) first<br />
has gone out and has come on again, you can<br />
start ironing.


![03_[DE] - Philips](https://img.yumpu.com/25100096/1/184x260/03-de-philips.jpg?quality=85)