freya - Graco Europe
freya - Graco Europe
freya - Graco Europe

You also want an ePaper? Increase the reach of your titles
YUMPU automatically turns print PDFs into web optimized ePapers that Google loves.
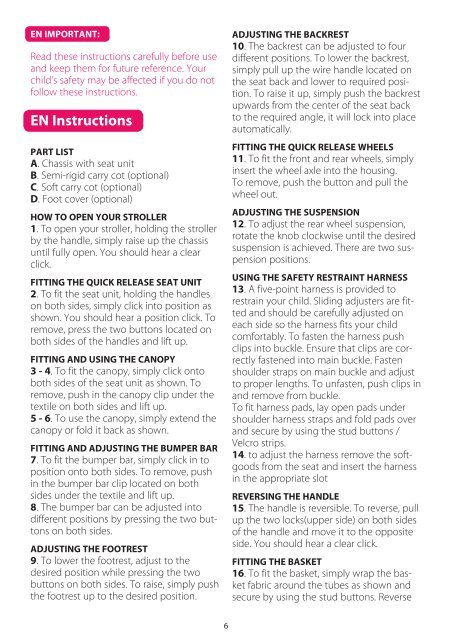
EN IMPORTANT:<br />
Read these instructions carefully before use<br />
and keep them for future reference. Your<br />
child’s safety may be affected if you do not<br />
follow these instructions.<br />
EN Instructions<br />
PART LIST<br />
A. Chassis with seat unit<br />
B. Semi-rigid carry cot (optional)<br />
C. Soft carry cot (optional)<br />
D. Foot cover (optional)<br />
HOW TO OPEN YOUR STROLLER<br />
1. To open your stroller, holding the stroller<br />
by the handle, simply raise up the chassis<br />
until fully open. You should hear a clear<br />
click.<br />
FITTING THE QUICK RELEASE SEAT UNIT<br />
2. To fit the seat unit, holding the handles<br />
on both sides, simply click into position as<br />
shown. You should hear a position click. To<br />
remove, press the two buttons located on<br />
both sides of the handles and lift up.<br />
FITTING AND USING THE CANOPY<br />
3 - 4. To fit the canopy, simply click onto<br />
both sides of the seat unit as shown. To<br />
remove, push in the canopy clip under the<br />
textile on both sides and lift up.<br />
5 - 6. To use the canopy, simply extend the<br />
canopy or fold it back as shown.<br />
FITTING AND ADJUSTING THE BUMPER BAR<br />
7. To fit the bumper bar, simply click in to<br />
position onto both sides. To remove, push<br />
in the bumper bar clip located on both<br />
sides under the textile and lift up.<br />
8. The bumper bar can be adjusted into<br />
different positions by pressing the two buttons<br />
on both sides.<br />
ADJUSTING THE FOOTREST<br />
9. To lower the footrest, adjust to the<br />
desired position while pressing the two<br />
buttons on both sides. To raise, simply push<br />
the footrest up to the desired position.<br />
6<br />
ADJUSTING THE BACKREST<br />
10. The backrest can be adjusted to four<br />
different positions. To lower the backrest,<br />
simply pull up the wire handle located on<br />
the seat back and lower to required position.<br />
To raise it up, simply push the backrest<br />
upwards from the center of the seat back<br />
to the required angle, it will lock into place<br />
automatically.<br />
FITTING THE QUICK RELEASE WHEELS<br />
11. To fit the front and rear wheels, simply<br />
insert the wheel axle into the housing.<br />
To remove, push the button and pull the<br />
wheel out.<br />
ADJUSTING THE SUSPENSION<br />
12. To adjust the rear wheel suspension,<br />
rotate the knob clockwise until the desired<br />
suspension is achieved. There are two suspension<br />
positions.<br />
USING THE SAFETY RESTRAINT HARNESS<br />
13. A five-point harness is provided to<br />
restrain your child. Sliding adjusters are fitted<br />
and should be carefully adjusted on<br />
each side so the harness fits your child<br />
comfortably. To fasten the harness push<br />
clips into buckle. Ensure that clips are correctly<br />
fastened into main buckle. Fasten<br />
shoulder straps on main buckle and adjust<br />
to proper lengths. To unfasten, push clips in<br />
and remove from buckle.<br />
To fit harness pads, lay open pads under<br />
shoulder harness straps and fold pads over<br />
and secure by using the stud buttons /<br />
Velcro strips.<br />
14. to adjust the harness remove the softgoods<br />
from the seat and insert the harness<br />
in the appropriate slot<br />
REVERSING THE HANDLE<br />
15. The handle is reversible. To reverse, pull<br />
up the two locks(upper side) on both sides<br />
of the handle and move it to the opposite<br />
side. You should hear a clear click.<br />
FITTING THE BASKET<br />
16. To fit the basket, simply wrap the basket<br />
fabric around the tubes as shown and<br />
secure by using the stud buttons. Reverse<br />
20080382_IM_Freya_ALL.indd 6 16-01-2009 10:58:59